Ultimate Guide to Downspout Repair & Installation
Last updated: Feb 28, 2026
Introduction to Downspout Repair and Installation
Downspouts are the quiet workhorses of your roof system, carrying rainwater from the gutters away from your home. When they're working well, you never notice them; when they're not, you'll see staining, damp walls, or even foundation issues. This page keeps things practical and real, with straightforward guidance on repairing common problems, choosing the right materials, and installing new or replacement downspouts with confidence.
What downspouts do for your home
- Direct water away from siding and windows to prevent leaks and rot.
- Channel rain to landscaping or drainage systems, reducing basement and crawlspace moisture.
- Support a healthy foundation by controlling soil erosion around the base of the house.
- Help prevent ice damming in cold climates by keeping runoff away from roof edges.
When to repair vs replace
- Minor leaks at joints or seams can often be repaired with sealant or mastic.
- Loose or bent sections are usually fixable with clamps or new fittings.
- Corrosion, extensive rust, or multiple failed joints often mean replacing sections or the entire downspout.
- If a downspout is crushed, crushed elbows are cracked, or it doesn't drain properly after fixes, consider replacement for long-term reliability.
Materials and sizes
- Common materials: aluminum (lightweight and affordable), vinyl (budget-friendly, corrosion-resistant), copper (aesthetics and longevity), galvanized steel (durable but heavier).
- Typical size: 2x3 inch downspouts with 2x3 or 3x4 inch elbows; downspout extensions or splash blocks are sized to match the system.
- Match fittings to your gutters and exterior finish for a seamless look and reliable performance.
Quick repair guide
1. Inspect the system to locate leaks, rust, or loose fasteners.
2. Clean the joints and surrounding area so sealants can adhere properly.
3. Re-secure loose sections with the appropriate hangers or straps.
4. Seal seams with manufacturer-approved sealant or mastics; replace damaged sections if needed.
5. Test by running water through the system to confirm proper drainage and no leaks.
Installation essentials (new or replacement)
1. Plan a layout that directs water at least 4–6 feet from the foundation and away from walkways.
2. Gather matching materials (downspout, elbows, brackets, sealant, and connectors).
3. Cut to length, squarely and cleanly, with proper hand or power tools.
4. Connect sections securely, using the right fasteners and compatible adapters.
5. Seal joints and supports, then mount with level, spaced hangers to prevent sagging.
6. Test drainage by simulating rainfall and ensuring water exits away from critical areas.
Maintenance and tips
- Clear debris from gutters and downspouts at least twice a year.
- Check for loose hangers and tighten or replace as needed.
- Ensure the outlet at the bottom directs water away from the foundation; consider splash blocks or a buried drain line if necessary.
- Avoid directing water toward windows, doors, or vent openings.
- Inspect after severe storms or heavy snow to catch displacement or damage early.
Quick homeowner checklist
- Leaks or corrosion at joints? Repair or replace.
- Are hangers secure and evenly spaced? Re-secure if loose.
- Is water draining away from the foundation? Adjust routing if needed.
- Do downspouts connect cleanly to elbows and extensions? Correct any misfits.
- Are gutters free of debris so water enters downspouts smoothly? Clean regularly.
Downspout Repair and Installation: A Practical Guide
Comprehensive definition
A downspout is the vertical pipe that carries water from your gutters down to the ground or drainage system. It's part of the overall rainwater management system that protects your roof, fascia, foundation, and landscaping from water damage. Downspouts connect to gutters with elbows, tees, and adapters, and they discharge water away from the home via splash blocks, extension pipes, or underground drains. Common materials include aluminum, PVC/vinyl, galvanized steel, and copper. Proper sizing, routing, and secure mounting are essential to prevent leaks, rust, sagging, or detachment during heavy rain or freezing conditions.
When it's typically needed
- Installing gutters and downspouts on a new or renovated roof.
- Replacing corroded, cracked, or bent downspouts after weather damage.
- Adding extra downspouts or rerouting flow to improve drainage around foundations.
- Repairing leaks at joints, seams, or where sections have separated.
- Addressing sagging sections or unstable hangers that allow water to back up or overflow.
- Correcting improper slope or insufficient capacity for large or multi-story roofs.
Signs you should address downspouts now
- Visible leaks at joints or along seams.
- Loose or missing hangers causing wobble or sagging.
- Water pooling near the foundation after a rain.
- Rust, corrosion, dents, or crushed sections.
- Sections disconnecting from elbows or gaskets.
- Dirt, plant growth, or dirtiness around the base indicating poor drainage.
Repair options (quick fixes and durable improvements)
- Reseal joints with silicone, gutter sealant, or duct-rated sealant; reattach with new screws.
- Replace a damaged elbow, T-connector, or short run of downspout.
- Reattach or replace loose hangers; ensure each section is supported every 4–6 feet.
- Patch small holes or dents with metal epoxy or a vinyl-compatible patch.
- Straighten bent sections and tighten fasteners; replace severely dented pieces.
- Treat rusted galvanized steel or copper with rust inhibitors, and consider replacing with aluminum or PVC if corrosion is extensive.
- Install a splash block or surface extension to ensure discharge ends are directing water away from the foundation.
Step-by-step: Repair a leaking joint
1. Gather supplies: gutter sealant, replacement gasket or elbow, screws, cleaning brush, rag.
2. Clean the area around the joint; remove dirt, debris, and old sealant.
3. If the joint is loose, reseat the connection and resecure with screws or clamps.
4. Apply a bead of sealant along both the inside and outside seams; smooth with a finger or putty knife.
5. Reattach any loose hangers and ensure the downspout is plumb.
6. Run water from a hose to test; inspect for drips and adjust as needed.
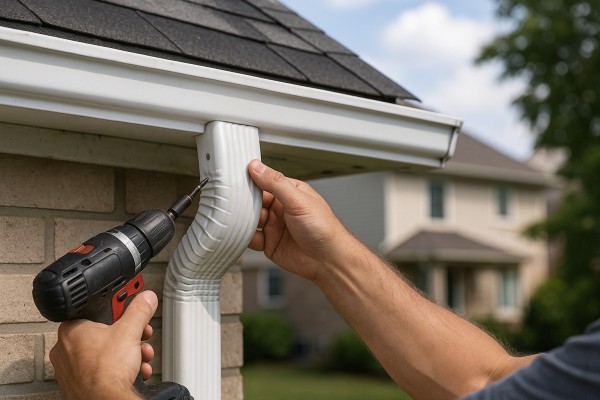
Step-by-step: Install a new downspout
1. Plan layout: determine where water will discharge; avoid planting beds or walkways; aim to extend 3–4 feet from the foundation.
2. Measure and cut: cut downspout sections to fit between gutters and ground, using approved metal or plastic snips.
3. Attach hangers: install wall brackets every 4 feet (and at corners); make sure they are level and secure to solid structure.
4. Connect sections: assemble elbows, straight runs, and extensions; seal joints with compatible gasket or sealant.
5. External routing: use an elbow at the bottom to direct water toward a splash block or drainage line.
6. Test and adjust: run water through the gutter system; check for leaks, misalignment, or improper discharge, and fix as needed.
- Downspout sections (PVC or metal)
- Elbows, tees, and extension pipes
- Hangers/brackets and screws
- Sealant/gasket or gutter-specific sealant
- Metal snips or plastic cutter
- Ladder, level, measuring tape
- Safety gloves and eye protection
Maintenance and safety tips
- Clean gutters and downspouts at least twice a year; remove leaves and debris to prevent flooding.
- Inspect after major storms for loose connections, cracks, or misalignment.
- Ensure discharge is directed away from the foundation by at least 3–4 feet.
- Use proper ladder safety: stable footing, two hands, and a spotter if possible.
- Consider splash blocks or a buried drainage line for areas with heavy rainfall or slope challenges.
When You Need Downspout Repair and Installation
Signs this service is needed
- Downspouts are sagging, loose, or detached from the wall or gutter.
- You see dents, holes, rust, or crumbling sections in metal or plastic downspouts.
- Water pours out of joints or along the length instead of flowing smoothly through the downspout.
- Water pools or puddles at the foundation after a rain, or soil around the foundation is eroding.
- Gutters overflow even when debris is minimal, indicating a blocked or misdirected downspout.
- Splash blocks or drainage paths are missing, misdirected, or not extending water away from the house.
- Elbows or connection points are cracked or separating, letting water leak into fascia or siding.
Ways you can confirm yourself as a homeowner
1) Do a visual walk-around: look for any loose hangers, warped sections, or sections that move when you touch them.
2) Check alignment and connections: ensure the downspout sits straight against the wall and is firmly connected to the gutter elbow.
3) Run a simple flow test: spray water into the gutter with a hose and watch how it exits the downspout. note any leaks, backflow, or water stopping mid-length.
4) Inspect the ground and foundation area: after a rain, look for damp spots, mud, or erosion right at the foundation that points to improper drainage.
5) Verify discharge distance: confirm the water exits at least 3–4 feet away from the foundation and that extensions or splash blocks are in place to direct flow away from the home.
6) Listen for clues indoors: near basements or crawl spaces, unusual dampness or musty odors can signal hidden downspout issues or leaks.
When to get a professional assessment
- If you find large holes, deep rust, or sections that crumble under light pressure, replacement is usually safer than repair.
- If multiple sections are loose, bent, or detached and the system is visibly misaligned, a fix may require rehang, re-seating, or full replacement.
- If damage involves the fascia, soffit, or roofline, or if you need access from the roof, a professional should handle the work.
- If water still leaks indoors or near the foundation after cleaning out clogs and re-sealing joints, there may be unseen damage or improper system design that needs expert evaluation.
- If you're uncomfortable with height, ladder use, or working around electricity and shingles, it's best to call in a pro to assess and carry out repair or installation safely.
- If you're considering a larger upgrade (extending the downspout run, adding additional outlets, or reconfiguring drainage to better protect the foundation), a professional assessment will help plan a durable, code-compliant solution.
What's Included with Downspout Repair & Installation
What is typically included
- On-site assessment and precise measurements to determine run length, slope, and any redirects needed for proper drainage.
- Materials: new downspouts (standard sizes), elbows, brackets, straps, and all fasteners; splash blocks or dispersion accessories; seals, gaskets, and weatherproof caulk; color-matched finishes available.
- Labor: removal of old downspouts (if present) or securing loose sections, alignment, and secure fastening to fascia or wall mounting.
- Fabrication and fit: any required custom bends, extensions, or adjustments to match your eave line and gutter system.
- Protection and prep: use of drop cloths, ladder safety, and protection for siding, shingles, and landscaping.
- Drainage setup: ensuring the downspout path directs water away from the foundation; tie-in to existing gutters where applicable and adjust for proper flow.
- Sealing and weatherproofing: joints sealed with exterior-grade sealants; corrosion protection for metal components.
- Testing: a water-flow or hose test to confirm proper discharge and check for leaks or backflow.
- Finish and warranty: workmanship warranty on the repair/installation; manufacturer warranties on components; color-matching options and finish guarantees where offered.
- Cleanup: thorough removal of debris, old fasteners, and any temporary protective mats; the site left neat and safe.
- Documentation and guidance: basic maintenance tips and a summary of warranties provided.
How the process works
1. On-site assessment and measurements to confirm scope and fit.
2. Material selection and ordering, including color and finish choices.
3. Preparation and installation, including removal of old downspouts if present.
4. Drainage testing and final adjustments for proper slope and clearance.
5. Clean-up and final inspection with you to verify satisfaction.
What is not typically included
- Major gutter replacement beyond downspouts or fascia repair when fascia or roof edges are damaged.
- Repair of damaged fascia boards, roof decking, or underlying structure.
- Downspout relocation or significant rerouting that requires landscape work or new trenching.
- Custom fabrication beyond standard fittings (e.g., copper downspouts or rare finishes) unless quoted as an upgrade.
- Permit fees, inspections, or engineering reports (these are usually handled by the homeowner or coordinated separately as needed).
- Interior repairs for water intrusion or damage that becomes evident after installation.
- Landscaping, grading adjustments, or drainage system work outside the downspout discharge path.
Roofing Materials Commonly Used in Downspout Repair and Installation
Aluminum is by far the most common choice for residential downspouts thanks to its light weight, ease of handling, and good corrosion resistance. It pairs well with most gutter systems and fascia finishes, and it accepts many finishes to blend with trim. When we repair or install with aluminum, we typically keep all components aluminum or use compatible alloys to minimize galvanic corrosion.
- Pros: lightweight, affordable, easy to cut and fit; resists rust.
- Cons: dents more easily than steel; can be damaged by heavy impact.
- Service considerations:
- Use stainless steel or coated fasteners to prevent rust.
- Seal joints with exterior-grade silicone or gasket sealant.
- Avoid mixing aluminum with copper or untreated steel unless a dielectric barrier is used.
- Installation steps:
1) Measure run length and match gauge for strength.
2) Dry-fit elbows and downspout sections, then secure with aluminum brackets.
3) Seal all joints, then fasten with corrosion-resistant screws.
4) Run water test to confirm no leaks and proper drainage.

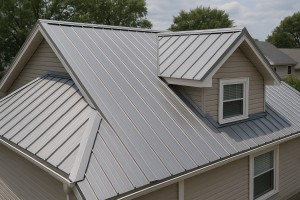
Galvanized steel offers superb strength and is a traditional choice for longer runs or areas with harsher weather. It holds up well under load, but the protective coating can be damaged, exposing steel to rust. For downspouts, galvanized steel is usually paired with similarly treated gutters and steel fascia components.
- Pros: highly durable, strong against impact, cost-efficient over time.
- Cons: coating can wear away; rust risk on cut edges or damaged sections.
- Service considerations:
- Inspect edges for any coating damage; touch up with rust-inhibiting primer if needed.
- Use zinc-coated fasteners and compatible sealants to prevent corrosion at joints.
- Avoid direct contact with dissimilar metals unless barriers are used.
- Installation steps:
1) Inspect for corrosion; replace compromised sections.
2) Cut clean, square ends and deburr edges.
3) Attach with galvanized brackets and corrosion-resistant screws.
4) Seal joints and test drainage for leaks.
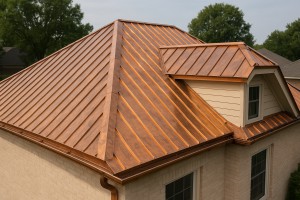
Copper downspouts are favored when a home has copper roofing, copper fascia, or a premium aesthetic. Copper ages gracefully to a distinctive patina and offers excellent durability. However, it requires careful joining and should not be paired with aluminum or untreated steel without a dielectric barrier to prevent galvanic corrosion.
- Pros: long-lasting, attractive patina, excellent corrosion resistance.
- Cons: high upfront cost; patina change may be undesirable for some.
- Service considerations:
- Joints are often soldered or riveted; use lead-free flux and appropriate copper solder.
- Dielectric unions or barriers are recommended when connecting copper to other metals.
- Avoid mixing copper directly with aluminum in wet conditions.
- Installation steps:
1) Dry-fit copper segments and plan all joints.
2) Solder or rivet joints; clean and flux properly.
3) Attach with copper-specific brackets and corrosion-resistant hardware.
4) Verify joints with a thorough water test and inspect for leaks.
Vinyl (PVC)
Vinyl downspouts are a budget-friendly and DIY-friendly option. They're lightweight, easy to cut, and resistant to corrosion. Vinyl performs well in many climates but can be less forgiving in extreme cold or UV-heavy environments, and it's important to use compatible fittings for a secure seal.
- Pros: inexpensive, quick to install, corrosion-proof.
- Cons: can become brittle in severe cold; UV exposure over time may degrade color.
- Service considerations:
- Use PVC-compatible elbows, couplings, and sealants; avoid solvent lines not rated for exterior use.
- Ensure proper expansion gaps to prevent warping in heat.
- Do not mix PVC with metal directly without appropriate adapters.
- Installation steps:
1) Cut to length with a PVC-compatible saw.
2) Dry-fit fittings, then cement joints per product directions.
3) Secure with vinyl brackets; avoid over-tightening.
4) Run water test and inspect for leaks.
Stainless Steel
Stainless steel downspouts are a premium choice for coastal or highly corrosive environments. They resist rust exceptionally well and maintain a clean, modern look. They do come with higher material costs and heavier handling requirements.
- Pros: excellent corrosion resistance, long lifespan, low maintenance.
- Cons: higher price; heavier to maneuver.
- Service considerations:
- Use stainless fasteners to match the material and prevent rust transfer.
- Ensure compatible seals and gaskets; check for galvanic pairing when joining to other metals.
- Installation steps:
1) Plan routing to minimize sharp bends.
2) Install with stainless brackets and sealed joints.
3) Carefully join sections with corrosion-resistant methods.
4) Test flow and inspect for leaks after first rainfall.
Cost of Downspout Repair & Installation
Typical costs for Downspout Repair & Installation
- Minor repair (seam leaks, small patches, reseal): $100–$250
- Moderate repair (replacing a short section, loose mounting, re-sealing joints): $150–$350
- Replace a single downspout (labor + materials): $200–$600
- Replace multiple downspouts or a full system on a standard home: $600–$1,800
- New installation on a larger or multi-story home (per downspout): $200–$350 for basic material, $350–$600+ if you add elbows, brackets, or runs longer than 8 ft
Material options and installed costs
- Aluminum or vinyl downspouts: typically $200–$350 per downspout installed
- Steel downspouts: typically $250–$450 per downspout installed
- Copper or premium alloys: typically $600–$1,000+ per downspout installed
Notes:
- Real-world pricing depends on length, number of bends, accessibility, and whether you're tying into an existing system or starting fresh.
- Copper and other premium materials look nicer and resist corrosion longer, but cost significantly more upfront.
Cost by project scope
- Patch or repair only: usually under $250
- Replace one downspout and add a couple of elbows: around $300–$500
- Replace several downspouts or a full four-downspout system on a typical house: $800–$1,800
- Entire system overhaul on a large home or with specialty materials: $2,000+ (depends on house size, roof pitch, and drainage needs)
Cost-saving considerations that may reduce the price
- Focus on repairing instead of full replacement when damage is localized
- Reuse existing fittings and fascia if in good shape
- Choose standard materials (aluminum or vinyl) rather than copper or steel
- Do smaller jobs in the off-peak season if possible
- Get multiple quotes and look for bundled pricing if you're upgrading more than one section
- DIY-safe minor repairs if you have the right tools and understand safety risks (note: DIY may affect warranties)
Cost-driving considerations that can increase the price
- Copper, decorative finishes, or custom bends
- Long runs, multiple 90-degree turns, or difficult access (over tall fascia, over decks, or multi-story setups)
- Replacing or repairing fascia damage, rotted mounting brackets, or gutter alignment as part of the job
- Drainage upgrades (adding splash blocks, regrading soil, or tying into a new drainage line)
- Weather or debris-related conditions that complicate work or require additional cleanup
- Permits or HOA requirements (rare for downspouts, but possible in some jurisdictions)
Quick planning steps (step-by-step)
1. Count and map each downspout location you want repaired or installed.
2. Decide on material: aluminum/vinyl for economy, steel for strength, copper for premium look.
3. Measure each run length and note any necessary elbows or brackets.
4. Obtain 3 quotes and compare both price and warranty terms.
How the Downspout Repair and Installation Process Works
Step 1: Initial Assessment and Measurement
A clear plan starts with a careful look at the existing system and your home's layout.
- We walk the perimeter to spot problem areas: leaks, loose brackets, rust, crumbling fascia, and clogged outlets.
- We measure: downspout run length from the roof edge to the discharge area, elbow counts, and where extensions or splash blocks are needed.
- We evaluate drainage: direction away from the foundation, any pooling spots, and the best path to a safe discharge point.
- We note compatibility: fascia material, gutter type, and surrounding siding to choose the right fasteners and brackets.
Step 2: Material Selection and Planning
Choosing the right materials saves time and headaches later.
- Material options: aluminum (lightweight and affordable), copper (durable and high-end), or vinyl (budget-friendly). Most homes use aluminum for repair or replacement.
- Profile and fit: K-style vs round downspouts, wall thickness (gauge), and color matching to your gutters and home.
- System size: we verify downspout diameter and whether a single large section or multiple shorter pieces work best for your run.
- Accessories: elbows, adapters, splash blocks, extensions, and additional brackets to ensure a clean, secure install.
Step 3: Preparation and Safety
A safe, organized prep sets the stage for a solid fix.
- We mobilize gear: ladders, harnesses if needed, level, ruler, markers, and sealant.
- Surface prep: we check fascia and gutters for rot or corrosion and address any weak spots before work begins.
- Personal safety: we wear gloves, eye protection, and use proper ladder setup with stable footing and secure footing zones.
Step 4: Removal or Preparation of Old System
If you're repairing, we don't force a full replacement unless necessary.
- Old hardware: we loosen and remove loose brackets, roto or corroded screws, and any damaged downspout sections.
- Cleaning: we clear debris from gutters and downspouts to ensure smooth operation of the new or repaired system.
- Repairing damage: if fascia or gutter seams show rot, we may perform targeted repairs before installing new pieces.
Step 5: Installation or Repair Process
This is the core of the work, tailored to your situation.
- For repairs: we reseal joints with exterior-grade sealant, replace damaged elbows, re-secure hangers, and fix any grated or bent sections.
- For installations: we pre-cut and assemble sections on the ground, then carefully hoist into position.
- Fastening: we use corrosion-resistant brackets and screws rated for exterior use, ensuring every connection is tight but not over-tightened.
- Alignment: we verify vertical alignment and slope to keep water moving toward the discharge point; we adjust as needed for a clean, functional run.
Step 6: Drainage Connection and Downspout Routing
Proper drainage is the goal, not just a pipe on the wall.
- Slope check: we confirm a slight downward pitch toward the discharge area to prevent standing water.
- Routing: we position downspouts to clear walkways, windows, and doors, avoiding splash onto siding or foundations.
- Extensions and splash blocks: we install as needed to direct water at least 3-4 feet away from the home foundation.
Step 7: Finish Work and Cleanup
A tidy finish helps the system perform and look right.
- Sealing: we apply exterior sealant to joints where required and ensure we don't trap moisture behind brackets.
- Color and texture: we match or touch up paint or coatings to blend with gutters and siding.
- Final sweep: we remove debris, check all fasteners again, and confirm smooth water flow after a light water test.
Step 8: Inspection and Maintenance Tips
A quick post-install check keeps the system reliable.
- Test run: we run water through the system to confirm there are no leaks and that water exits cleanly.
- Regular checks: inspect brackets and joints after heavy winds or storms; remove debris from the gutters and downspouts every 6 months.
- Seasonal care: reseal joints if you notice cracking, and re-secure any loose components promptly.
Residential vs. Commercial Considerations for Downspout Repair and Installation
Residential vs Commercial Considerations of Downspout Repair & Installation
- Residential downspouts are typically built for lighter rain loads and simpler layouts. Commercial projects face higher water volumes, larger roof areas, and stricter requirements. Understanding the differences helps you plan for performance, safety, and cost.
- Capacity and Sizing
- Residential: Smaller cross-sections are common (for example, 2x3 inch rectangular or equivalent round sizes). Often one or two downspouts handle a modest roof area.
- Commercial: Bigger roofs demand more capacity. Expect larger downspouts (3x4, 4x5, or larger rectangular sizes, and 4-inch round options). Multiple downspouts or a combination of sizes are common on commercial buildings.
- Attachment and Structure
- Residential: Downspouts attach to the gutter system or fascia with lightweight hangers. The goal is ease of installation and cost efficiency.
- Commercial: Downspout systems anchor into masonry, concrete, or steel framing with heavy-duty hangers and bracing. Some installations use through-wall brackets or roof-level drains to handle higher wind and seismic loads.
- Drainage Design and Discharge
- Residential: The aim is to move water away from the foundation with proper slope, splash blocks, and yard drainage. Grading is typically straightforward.
- Commercial: Drainage often ties into the site's stormwater system. You may need drainage trenches, scuppers, or connections to storm drains, plus considerations for grading around large paved areas and landscaping.
- Codes, Permits, and Inspections
- Residential: Local codes cover basic repairs, with fewer structural reviews. Permits are common for major repairs but vary by jurisdiction.
- Commercial: Permits and plans are more common and may require civil or structural review, wind-load calculations, and adherence to accessibility and fire-safety standards. Expect inspections and documented approvals.
- Maintenance and Accessibility
- Residential: Routine cleaning and inspection—a couple of times a year—is typical. Ladders and basic tools usually suffice.
- Commercial: Regular, documented maintenance is standard. Access often uses lifts or scaffolding, and a safety plan is common for crews working at height.
- Aesthetics and Integration
- Residential: Downspouts are visible and often color-matched to the home or used as decorative elements.
- Commercial: Integration with the building envelope matters. Downspouts may be concealed behind cladding or coordinated with architectural metal panels; color and finish choices must stand up to harsher exposure.
- Cost and Timeline
- Residential: Lower overall cost and shorter timelines due to smaller scale and simpler requirements.
- Commercial: Higher costs due to larger materials, higher loads, and longer installation times. Coordination with site schedules and other trades is typical.
- Quick-start Planning (for homeowners who want a practical roadmap)
1. Assess roof size and rainfall expectations for your property.
2. Decide on sizing: do you need larger downspouts or multiple lines?
3. Map discharge paths: where will water go after it leaves the downspouts?
4. Check local codes and permit needs for your project.
5. Choose material and finish that suits climate, budget, and aesthetics.
6. Hire a qualified contractor familiar with your property type and local requirements.
7. Schedule regular maintenance and establish a service interval.
- Practical decision tips
- If you're between sizes, opt for a larger downspout on a high-volume roof or in areas with heavy rainfall.
- Prioritize proper anchorage if you have strong winds or seismic considerations.
- Plan for accessibility in high-traffic or commercial settings—maintenance should be feasible without disrupting operations.
- Common pitfalls to avoid
- Undersizing for the roof area, which leads to overflow and potential foundation issues.
- Skipping permits or code review on commercial projects, risking penalties or failed inspections.
- Neglecting to design discharge paths that address site grading and landscaping, which can cause erosion or pooling.
How Downspout Repair and Installation Vary by Location
Regional climate and rainfall patterns
Local weather drives how you size, place, and maintain downspouts. Regions with heavy rainfall or frequent snowfall push you toward more robust drainage solutions, while drier areas can get by with fewer outlets.
- In high-rainfall areas: consider additional downspouts, tighter routing to redirect water away from the foundation, and splash blocks or discreet drainage outlets.
- In cold climates: plan for snow and ice consideration. Ensure outlets discharge away from walkways and heat-related devices aren't exposed to freezing conditions.
- In moderate climates: standard 2x3 inch or 3x4 inch downspouts with regular maintenance usually suffice, but stay mindful of seasonal debris.
1) Assess typical rainfall on your home.
2) Decide how many downspouts and where they'll terminate.
3) Time your maintenance to seasons with the most debris or freezing risk.
Building codes and permits by region
Codes and permitting practices can change by state, county, or city, and some homeowners associations have their own rules. Always check before starting.
- Permits: some jurisdictions require a simple permit for new or relocated downspouts; others don't.
- Inspections: certain areas may require a drainage plan review or confirmation that water won't cause runoff issues on neighboring properties.
- HOA rules: fencing around underground lines, color matching, or specific attachment methods may apply.
Steps to stay compliant:
1) Contact your local building department or code enforcement office.
2) Review HOA guidelines if applicable.
3) Secure any needed permits and keep records of workmanship and materials.
Materials available and regional preferences
Material choice isn't just about looks—it's about durability in your climate and proximity to salt air or pollutants.
- Aluminum: light, affordable, resists corrosion; popular in many regions.
- Copper: long-lasting and attractive, often used in coastal or high-end homes but carries higher cost.
- Galvanized steel: strong, but can corrode faster in salty or acidic environments.
- Stainless steel: highly resistant to corrosion, a good choice in harsh coastal or industrial areas.
Tip: match fasteners and flashings to the same material family to avoid galvanic corrosion.
Local drainage and grading practices
The way your property is graded and how nearby structures drain will influence downspout placement and discharge.
- Slope: ensure a gentle slope away from the foundation; avoid directing water toward walkways, crawl spaces, or basements.
- Discharge options: splash blocks, pop-up emitters, or buried drainage lines should align with your yard layout and local regulations.
- Landscaping: planting beds and hardscapes can guide water flow, reducing erosion and pooling.
1) Inspect the ground grading around the foundation.
2) Choose discharge points that channel water away at a safe distance.
3) Verify that drainage outlets won't cause soil erosion or foundation problems during heavy storms.
How this service varies in different regions in the United States
Regional realities shape what a standard downspout job looks like, from materials to installation details.
- Northeast and Midwest (cold winters): prioritize sealed joints, robust hangers, and outlets that minimize ice dams. Consider extra downspouts or rerouting to clear walkways and entry points.
- Southeast and Gulf Coast (high humidity, storms, salt air): emphasize corrosion-resistant materials (stainless, copper, or coated aluminum) and secure connections to withstand high winds and rain-driven debris.
- West Coast (heavy rain in wetter seasons, earthquakes): focus on ensuring flexible, secure connections and drainage paths that avoid water pooling near the foundation; account for ground movement with properly seated fasteners.
- Coastal regions (salt air): prefer metals with strong corrosion resistance and avoid bare steel; inspect flashings and joints regularly for salt-related wear.
- Desert or arid regions: wind-blown debris and limited rainfall can still cause clogging; choose easy-to-clean screens or guards and ensure outlets are shielded from blowing dust.
Notes for homeowners:
- Always tailor downspout repair and installation to local conditions, not just the roof line.
- When in doubt, hire a local roofer who understands regional quirks and code expectations.