Ultimate Guide to Roof Leaking
Last updated: Feb 28, 2026
Introduction to Roof Leaks
Roof leaks can feel alarming, especially when you see water dripping onto floors, staining ceilings, or hear rain where it shouldn't be. The good news: a surprising number of leaks are repairable, and catching them early saves you time, money, and heartache. Whether it's a sudden shower during a storm or a long‑standing damp spot that's appeared after seasons of weather, you're not alone in dealing with it.
Is it urgent or common?
- Leaks can range from urgent to routine maintenance. Active dripping into living spaces is urgent and should be addressed promptly to minimize interior damage and mold risk.
- Minor signs, like a small stain or a damp patch after heavy rain, are fairly common and often indicate an area worth inspecting before it worsens.
- Roofs age over time, and most homeowners will experience at least one leak or seepage over the life of their roof. Knowing what to look for helps you respond calmly and effectively.
Common causes at a glance
- Damaged, missing, or curled shingles that let water in during wind or rain
- Flashing failures around chimneys, vents, skylights, and valleys
- Gaps where roof penetrations meet the deck or where sealants have degraded
- Ice dams in colder climates that push water under shingles
- Condensation or poor attic ventilation that leads to moisture buildup
- Worn or aging underlayment and seams from previous repairs
How leaks typically present themselves
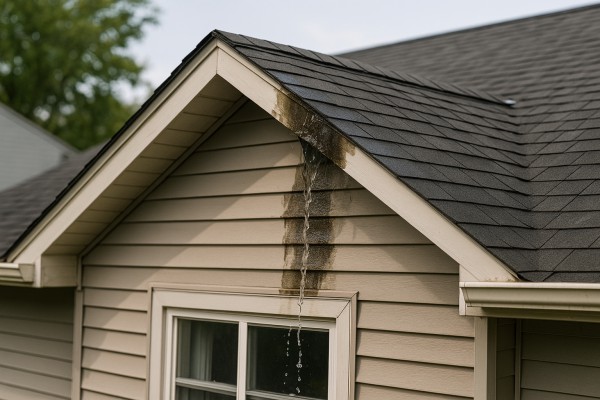
- Water stains on ceilings or walls, often following the roofline
- Drips or active streams of water inside the attic or living spaces
- Warped drywall, bubbling paint, or peeling wallpaper
- A musty odor or visible mold in converted spaces like attics or closets
- Soft or spongy decking when you access the attic after a rain
Quick safety checks
- If water is actively dripping, prioritize safety: avoid contact with electrical fixtures and switch off breakers in the affected area if advised by a pro.
- If inside, place a bucket or container under the drip and protect valuables from water damage.
- Do not attempt risky roof work during a storm or on a slippery roof; this is typically a job for a licensed roofer.
- Keep family members and pets away from the leak zone to prevent injury or exposure to mold.
High-level next steps
1. Confirm the source safely: inspect from the inside in the attic (if accessible) to trace dampness back toward the likely roof area, and note the location of any stains.
2. Mitigate damage: contain the intrusion with containers, towels, or tarps, and move belongings away from damp areas.
3. Document the issue: take clear photos of stains, drips, and any visible roof signs from inside and outside, along with dates of rainfall or incidents.
4. Plan a professional assessment: a licensed roofer will inspect exterior roofing, flashing, underlayment, and ventilation to identify the exact cause and outline a repair plan with a rough timeline.
Is a Roof Leak an Emergency?
Quick triage
- Call a roofer immediately if
- Water is actively dripping into living spaces, the ceiling is sagging, or you can see daylight through the roof in the attic.
- The leak began during a storm with strong winds or heavy rain, and the roof appears structurally compromised (missing shingles, exposed underlayment) with interior damage spreading quickly.
- Wet outlets, switches, appliances, or visible electrical hazards are involved, or you smell burning electrical components near the leak.
- Monitor if
- The leak is small and localized to one room, with no ceiling sagging or standing water on floors, and weather is calm.
- Water drips intermittently rather than continuously, and you can observe for a short period while you arrange service within the next day or two.
- There is some interior staining but no active dripping, and you can schedule a repair soon without heat or storm danger escalating.
- Can wait if
- The roof has minor cosmetic damage and there is no active leak; planning a repair during normal business hours within a few days is reasonable.
- The attic and interior show no signs of water intrusion after the storm has passed, and you're confident you can protect the area while you arrange a visit.
What to do right now
1) Protect belongings and find a safe area
- Move furniture and valuables away from the affected zone.
- Place containers, buckets, or towels under drips to minimize water damage.
- If possible, use plastic sheeting to cover furniture or flooring directly beneath the leak.
2) Prioritize safety
- Do not go onto a wet or damaged roof—slipping and falling is a real risk.
- If water contact with electrical systems is possible, shut off power to the affected area at the main breaker, but only if you can do so safely without stepping through water.
3) Document and communicate
- Take clear photos or short videos of the interior, ceiling stains, and attic, plus any structural concerns you notice.
- Note the time and what weather conditions were present when the leak started.
4) Manage the interior while you arrange help
- Keep doors open to improve airflow and help moisture dry out once the source is addressed.
- If you can do so safely, place a temporary plastic barrier or tarp on the interior side of the leak to slow water coming through—do not attempt a roof patch yourself.
5) Plan for professional help
- Have your roofing contractor inspect both the interior damage and the roof condition.
- Ask about emergency tarping options if a major storm is still ongoing or imminent.
Quick checks you can rely on when deciding urgency
- If the leak is actively dripping and growing, treat it as an emergency.
- If you notice ceiling movement or you smell electrical hazards, treat it as an emergency.
- If you're unsure about the severity, err on the side of caution and contact a roofer for guidance and a rapid assessment.
Common Causes of Roof Leaks
Damaged or Missing Shingles
- Wind uplift, hail strikes, and aging can crack, lift, or tear shingles.
- Curling, buckling, or blistering shingles create gaps where water can seep underneath.
- Granule loss exposes the asphalt or membrane, accelerating wear and letting moisture reach the underlayment.
- Even a single compromised shingle can become an entry point, especially on steep roofs where water runs quickly toward eaves.
Damaged or Faulty Flashing
- Flashing around chimneys, roof vents, skylights, and along transitions to walls is designed to seal joints. If it cracks, lifts, or corrode, leaks follow the gaps.
- Step flashing at wall intersections and base flashing at penetrations can fail from age, improper installation, or cement-like sealant that dries out.
- Deteriorated or improperly seated flashing often shows a shiny metal edge, loose corners, or gaps that water can exploit.
- Inspection tip: look for rust, lifted seams, gaps at joints, and old or cracked sealant. Replacements or resealing are common fixes when caught early.
Pipe Boots, Vents, and Skylights
- Rubber or plastic pipe boots degrade from heat, UV exposure, and climate cycles. Cracking or splitting lets water wick in around the vent stack.
- Vents and skylights with worn seals or flashing that's pinched or loose are common leak points.
- Improper caulking or aging sealant around penetrating fixtures creates a path for moisture during rain and snowmelt.
Valleys and Roof Transitions
- Roof valleys collect water from multiple slopes; metal valleys can corrode or become deformed over time.
- If valley flashing is damaged, blocked, or improperly installed, water can back up and leak into the attic.
- Snow and ice magnify stress on valley seams, making leaks more likely in cold climates.
Gutters, Downspouts, and Drainage
- Clogged or sagging gutters cause water to spill over and soak the roof edge, flashing, or fascia.
- Poor downspout routing can push water toward the fascia or walls, seeping behind joints.
- Leaf debris, standing water, and ice build-up increase the chance of water finding weak spots.
- Quick checks: ensure gutters are clear, securely fastened, and slope toward the downspouts; inspect seals at joints and where gutters meet the roofing edge.
Ice Dams and Snow Load
- Freeze-thaw cycles push water under shingles at the eaves, then it backfeeds underlayment and into the attic.
- Ice dams form when attic insulation is poor or ventilation is restricted, allowing heat to melt snow near the roof crest while the eave remains cold.
- Dammed water can travel laterally under shingles and into soffits or ceilings.
- Indicators: icicles along eaves, damp spots on exterior walls, and stains on ceilings near exterior walls after winter storms.
Aging Roof Components
- Shingles, underlayment, and flashing degrade with time. Life expectancy varies by material, climate, and exposure.
- Worn components lose their ability to shed water effectively, especially after multiple freeze-thaw cycles.
- Typical signs: curling shingles, granule buildup in gutters, brittle flashing, and widespread discoloration.
Poor Installation or Design
- Inadequate flashing detail, improper nail placement, or incorrect shingle type for local weather can create chronic leaks.
- Roofs designed without adequate ventilation or insulation invite heat and moisture buildup in the attic, accelerating damage and leaks.
- Design flaws: insufficient eave protection in heavy rain regions, or mismatched flashing across roof penetrations.
How Roof Materials Affect Roof Leaks
Roof leaks behave differently depending on the roof material. The way water travels, where it tends to infiltrate, and how long it takes for a leak to become visible inside your home all hinge on the material and the way it's installed. Understanding these patterns helps you spot trouble earlier and talk with a pro more confidently.
How leaks interact with different roof materials
- Water pathways are shaped by the surface and underlayment. Some materials shed water quickly, while others rely more on a continuous waterproof layer beneath.
- Fasteners, flashing, and penetrations are common weak points. If those details fail, leaks appear even when the surface looks intact.
- Age and maintenance matter. Deterioration accumulates differently on each material (granules on shingles, seam wear on metal, cracked tiles, or membrane wear on flat roofs).
- Seasonal changes amplify issues. Freeze–thaw cycles, heat expansion, and wind-driven rain interact with your specific roof type to produce leaks in predictable spots.
Common materials and how leaks manifest
- Asphalt shingles

- Leaks often start at valleys, around flashing, or at penetrations (vents, skylights, chimneys). Missing or damaged shingles, curled edges, or granule loss can hide water entry until damage is substantial.
- Why it leaks: the shingle surface shields underlayment, but once granules are lost or shingles fail, water can reach the underlayment and plywood.
- Quick tip: look for loose granules in gutters after a heavy rain and check attic for dark staining near rafter tails.
- Metal roofs (steel, aluminum)

- Leaks tend to occur along seams, panel overlaps, rivets or screws, and around flashings. Hail and surface corrosion can also create hidden punctures.
- Why it leaks: sheet seams and fastener penetrations are common failure points; coatings degrade over time, and edge details matter.
- Quick tip: inspect panel seams and fasteners from ground level after storms; listen for a rain-like sound inside the attic if a panel is compromised.
- Clay or concrete tile

- Cracked, broken, or slipped tiles create water entry above the underlayment. Valleys and flashing around hips, chimneys, and vents are prone to leaks if tiles shift.
- Why it leaks: tiles sit on a waterproof underlayment, and damaged tiles expose gaps where water can reach the roof deck.
- Quick tip: walk the roof carefully (or have a pro do it) to spot cracked tiles, and check gutters for broken shards after storms.
- Wood shingles/shakes

- Rot, cupping, splitting, or insect damage leads to water wicking and deck swelling. Gaps around chimneys, vents, and trim are common leak routes.
- Why it leaks: wood's porous surface absorbs moisture; untreated sections deteriorate faster, especially where ventilation is poor.
- Quick tip: look for dark staining and soft spots in the attic and along eave edges where timber is most exposed.
- Slate

- Slate is durable but brittle. Cracked, slipped, or missing slates allow water to reach underlayment quickly, especially where fasteners or flashing are involved.
- Why it leaks: individual slate pieces act as tiles; a single broken piece can create a channel for water.
- Quick tip: check for loose or misaligned slates from a safe vantage point after storms; listen for changes in attic moisture patterns.
- Built-Up Roofing (BUR) and Modified Bitumen
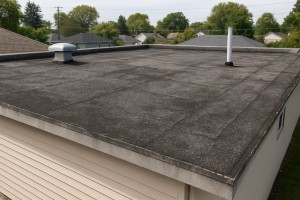
- Leaks show up at seams, blisters, or punctures. Ponding water on flat sections can accelerate membrane wear and edge seepage.
- Why it leaks: multiple plies rely on properly bonded seams; deterioration or poor drainage reveals itself as moisture intrusion.
- Quick tip: inspect for ridges, blisters, and areas where tar or gravel is displaced; note any soft spots in the deck.
- Flat roof membranes (EPDM, TPO, PVC)

- Leaks often occur at seam overlaps, flashing, or around penetrations and edges. Punctures from foot traffic or hail are common culprits.
- Why it leaks: seam adhesive and edge flashing are critical; membrane shrinkage or punctures expose the underlying layers.
- Quick tip: check seam lines and perimeter flashing after windstorms; look for soft or bubbled areas that might indicate membrane failure.
- Synthetic/composite roofing

- Similar to shingles and shakes, but failures can cluster around fasteners, seams, and exposed edges. UV degradation shortens life and can create leakage pathways over time.
- Why it leaks: non-traditional materials age differently; some expand and contract more than asphalt, stressing fasteners and joints.
- Quick tip: review installation specs for maintenance intervals and check for early signs of edge lifting.
Quick checks by material (step-by-step)
1) Inspect attic after a rainfall for staining, damp insulation, or musty odors.
2) Visually review the roof surface for missing, cracked, or worn components (shingles, tiles, seams, flashings).
3) Check around penetrations (vents, chimneys) and along eaves for damage or loose fasteners.
4) For flat roofs, test drainage and look for ponding water or blisters that may indicate membrane wear.
The Risks of Ignoring a Roof Leak
Structural damage
Water seeping into the roof deck, rafters, and attic framing weakens the very bones of your home. Over time you may notice sagging ceilings, softened decking, or warped trim. Small leaks left unchecked can lead to sudden, more extensive failures that require major reconstruction.
- Warped or softened roofing sheathing
- Rotting attic framing that reduces load-bearing strength
- Ceiling dips, cracked plaster, or peeling paint
Mold and mildew growth
Moisture creates a hospitable environment for mold and mildew. Hidden moisture behind walls, under insulation, or in the attic can spread, even if the visible leak seems minor.
- Health risks from mold spores (allergies, asthma flare-ups)
- Hidden growth behind drywall, insulation, and insulation batts
- Unpleasant musty odors that signal unseen contamination
Electrical hazards
Water and electrical systems don't mix. A leak near wiring, outlets, or fixtures can cause short circuits, corrosion, or fire risk.
- Damaged insulation and exposed conductors
- Tripped breakers, intermittent power disruptions
- Increased risk of electrical fires in damp spaces
Health risks for occupants
Damp homes affect indoor air quality and comfort, with short- and long-term consequences.
- Respiratory irritation, headaches, and fatigue
- Exacerbation of asthma or chronic lung conditions
- Greater risk for children, seniors, and immune-compromised household members
Increased energy costs and interior damage
Moisture can compromise insulation and create cold spots or air leaks around the leak site.
- Higher heating and cooling bills due to poor insulation performance
- Deterioration of attic insulation leading to heat loss in winter and heat gain in summer
- Ice dams in cold climates that bring more water intrusion
Pest activity and wood decay
Damp wood invites wood-destroying insects and creates new nesting sites for other pests.
- Termites, carpenter ants, and wood-boring beetles
- Pests moving from the attic into living spaces
- Accelerated decay of structural members behind walls
Insurance implications and repair costs
A small leak today can balloon into a costly claim tomorrow if damage is not mitigated promptly.
- Possible denial of coverage for delayed mitigation
- Hidden damage increases repair scope and expense
- Long-term costs from replacing multiple systems (roof deck, drywall, HVAC)
Timeline of damage: how quickly things can escalate
Ignoring a drip can look harmless for a while, but water travels and spreads.
1. Days: stains appear, damp insulation shows up in the attic
2. Weeks: mold begins to form, wood may start to swell
3. Months: framing damage grows, ceilings sag, drywall softens
4. Months to years: extensive reconstruction becomes necessary, including possible HVAC or electrical system work
How Roof Leaks Are Diagnosed
Exterior signs and surface condition
- Look for damaged shingles: curling, cracking, missing pieces, or granules washed into gutters.
- Check flashing around chimneys, vents, skylights, and where roof planes meet walls; lift edges, corrosion, or gaps signal trouble.
- Inspect valleys and metal flashing for rust, wear, or loose corners.
- Examine gutters and downspouts: standing water, overfull troughs, or broken connections can mask a roof leak or cause water to back up under shingles.
- Note any sagging, buckling, or unusual softness in the roof deck from a safe distance; soft spots often mean moisture intrusion or structural issues.
- Watch for vegetation or moss growth that traps moisture and accelerates deterioration.
Interior clues and attic checks
- In the attic, look for water stains on the underside of the sheathing, rafters, or insulation; staining may travel some distance from the actual entry point.
- Check for damp or compressed insulation, moldy or musty smells, and dark, damp patches that don't dry quickly after rain.
- Observe ventilation and insulation condition: poor ventilation can amplify condensation and conceal leaks.
- Trace drips or damp streaks along rafter lines; remember water often travels before it shows up as a stain far from the entry point.
- Inspect attic penetrations (vent pipes, exhausts, chimneys) for bridging gaps or compromised sealant.
- Basic tools: flashlight, ladder, camera or phone for photos, a notepad to map findings.
- Safety first: never venturing onto a roof in wet or windy conditions; have a helper and secure footing.
- Ground-level checks: use binoculars to spot missing granules, damaged shingles, or lifted flashing from the lawn or driveway.
- Attic checks: have a partner watch the interior while you inspect the roof deck from the attic side; use a mirror or flashlight to inspect hard-to-see seams.
- Documentation: take clear photos of suspect areas, note dates and weather conditions, and sketch a simple roof map showing the approximate leak path.
Step-by-step diagnostic process (homeowner-friendly)
1. Prepare and plan
- Ensure you have a sturdy ladder, proper footwear, and a partner for safety.
- Gather photos, notes, and a tape measure to document dimensions of suspect areas.
2. Do a thorough exterior sweep
- From ground level, inspect all exposed roofing surfaces, flashings, and drainage components.
- Focus on transitions (walls to roof, chimney, vent stacks) and shaded, wetter areas.
3. Move to the attic and trace the path
- Look for fresh water streaks, damp insulation, or staining along rafters and sheathing.
- Note where water first enters and how it travels to other locations.
4. Narrow down with a controlled water test (if safe and feasible)
- Pick a small, accessible area and spray with a gentle, steady stream; pause to check for interior leaks.
- If no leak appears, move to adjacent sections and repeat.
- Never attempt a full-roof water test alone or on a roof with compromised footing.
5. Map and compare findings
- Create a simple map showing suspected source areas and the interior symptoms they correspond to.
- Cross-check with material condition (shingles, flashing, seals) to prioritize likely causes.
6. Decide the next step
- If a clear source is found and you're comfortable with DIY repairs (e.g., resealing a vent, replacing a damaged shingle, tightening flashing), you can plan a targeted fix.
- If the source remains elusive, or the roof is aged, or you discover structural concerns, it's wise to bring in a licensed roofer for a full diagnostic and professional repair plan.
Common leak patterns to watch for
- Shingle-level leaks that show up as ceiling stains below a single shingle area.
- Flashing-related leaks around chimneys or vents, often showing up after wind-driven rain.
- Valley leaks where two roof planes meet, especially in sagging or deteriorated metal.
- Gutter-driven leaks where clogged or misaligned gutters cause water to back up under the edge.
Important notes for accuracy
- Water travels; the entry point and the visible stain or drip may be separated by feet of roof or attic surface.
- Seasonal changes, wind direction, and recent repairs can shift how and where leaks appear.
- Not every stain means a new leak; some stains are old and just showing up after a heavy rain.
Repair Options for a Leaking Roof
Temporary fixes
- Quick containment: Cover the leak with a heavy-duty tarp or waterproof plastic. Secure edges with roofing nails or staples and weight at the corners to prevent wind from lifting it. Keep the tarp flat and avoid creating gaps that funnel water under it.
- Local seal for small penetrations: For tiny cracks or pinholes, apply a bead of roof-grade sealant or roofing cement. Press a patch or piece of metal flashing over the patch if you have it, then seal the edges.
- Protect the interior: Place a large bucket under the drip and lay down drop cloths or towels to catch drips. If the ceiling or attic wiring is near water, consider turning off power to that area until a permanent fix is in place.
- Attic staging: If you can access the attic safely, place a temporary drain path or catch tray under the leak and clear any obstructing insulation away from the area to help air dry and locate the source.
- Plan ahead: Schedule a proper repair as soon as possible. Temporary fixes reduce damage but are not a substitute for a proper roof repair.
Minor repairs
- When the leak is localized, small repairs can often stop the water intrusion without a full roof teardown.
- Identify the source: Look for a damaged shingle, loose nail, or flashing issue around vents, chimneys, or roof penetrations.
- Shingle replacement:
1) Remove the damaged shingle by lifting the shingle above it and prying up the surrounding nails.
2) Install a new shingle that matches size and color. Nail with corrosion-resistant nails, placing the nails just below the sealant line of the new shingle.
3) Seal the edges with a thin line of roofing cement under the tab and along the edges to prevent water seep.
- Flashing and seals: Inspect step flashing along chimneys, vents, and valleys. Re-secure with nails and apply roofing cement or sealant to seal gaps. If flashing is corroded or pulled away, replace or reseal the flashing to restore the water barrier.
- Vent seams and penetrations: Recaulk around vent pipes using roof-grade sealant. Ensure a tight seal where the pipe meets the shingle line.
- Deck check: Lightly press on the area around the repair to ensure there's no soft or rotten wood. If deck damage is found, a larger repair will be needed.
- Aftercare: Clean the area, monitor for new drips after a rain, and document the repair for future reference.
Partial replacement
- When several adjacent shingles or a small section of the roof is compromised, replacing that portion can be cost-effective and time-efficient.
- Assess extent: Look for multiple damaged shingles, worn underlayment, or signs of rot in the decking within a defined area.
- Remove and replace:
1) Remove the damaged section down to the underlayment and, if needed, replace any rotten decking.
2) Install new underlayment over the repaired area, ensuring proper overlap with surrounding sheets.
3) Apply a new starter course and re-shingle the area, aligning with the existing rows for a smooth transition.
4) Flashing around the repaired section should be checked and resealed as needed to prevent future leaks.
- Integration: Nailing pattern and shingle type should closely match the rest of the roof. Ensure valleys and intersections are properly flashed to avoid future leaks.
- Final check: Inspect from the attic during a rain test or with a careful water test to confirm the repair holds.
Full roof replacement
- When the roof is aging, widely damaged, or leaks persist across multiple areas, a full replacement may be the most durable long-term solution.
- When to consider it: Age over 20–25 years, widespread rot, extensive shingle loss, or multiple failed repairs. Consider climate, energy efficiency, and long-term warranty options.
- Process outline:
1) Material selection: Choose shingles or other roofing material, color, warranty, and expected lifespan. Match architectural style and local climate needs.
2) Permits and bidding: Hire a licensed contractor, collect multiple bids, and confirm permit requirements and disposal plans.
3) Preparation: Clear the area, protect sensitive landscaping, and coordinate attic ventilation and insulation considerations.
4) Tear-off vs. overlay: Decide between removing the old roof completely or installing a new layer over existing shingles (note that many jurisdictions restrict overlays).
5) Installation sequence: Install ice-and-water shield where required, lay underlayment, install starter strips, and apply the new shingles with proper nailing patterns. Ensure flashing, vents, and chimneys are integrated with the new system.
6) Final steps: Clean up debris, perform a final inspection, and verify warranty coverage and documentation with the installer.
Typical Cost to Fix a Leaking Roof
Minor repair: description and cost
A minor leak usually comes from a single damaged shingle, loose edge, or a small flash line around a vent or chimney. It's often fixable with quick sealing and a few replacement shingles, without major disassembly.
- Typical tasks:
- Seal around flashing with waterproof caulk and reseal joints
- Replace 1-3 damaged shingles and reseat loose ones
- Tidy and seal vent boots or other small penetrations
- Estimated cost:
- Typical range: $150-$450
- Easy access and asphalt shingle roofs on a small section may land toward the lower end; complex flashing or harder-to-reach spots can push toward the higher end
- Quick repair steps:
1. Inspect attic to locate the exact source
2. Dry the area and clean away debris
3. Apply sealant and patch as needed
4. Reinspect after a rain test
Moderate repair: description and cost
Moderate leaks involve more extensive shingles, larger flashing sections, or minor decking damage near the leak. The fix requires more material and time but often avoids a full roof replacement.
- Typical tasks:
- Replace several shingles and repair/flash around vents or chimneys
- Reflash valleys or step-flashing where corrosion or gap occurred
- Inspect or patch small deck areas if the plywood shows signs of moisture
- Estimated cost:
- Typical range: $500-$1,800
- Costs skew higher for steep pitches, larger roof areas, or difficult access
- Steps to complete:
1. Assess extent of damage from attic and roof surface
2. Remove damaged shingles, repair or replace flashing
3. Install new shingles and seal joints
4. Test for leaks and tidy the site
Major repair: description and cost
Major repairs are called for when water has penetrated deeply, affecting decking, underlayment, or structural elements. In many cases this signals replacement of a substantial roof section or all of the affected area.
- Typical tasks:
- Replace large sections of decking/underlayment, reflash, repair or replace valleys
- Repair rotted framing or insulation, reinstall protective underlayment
- In some cases, partial roof replacement is more economical than extensive patching
- Estimated cost:
- Typical range: $2,000-$8,000+
- Very large or complex roofs, or areas with extensive rot, can exceed this range
- Notes:
- If sheathing or framing is rotten, costs rise quickly
- A full roof replacement may be considered if the damage is widespread and the remaining life is limited
What factors affect cost
- Roof size
- Access
- Material type
- Extent of damage
- Local labor rates
Here are a few grammatically correct section heading options:
- How Long Can You Wait Before Addressing a Roof Leak?
- How Long Can You Wait Before Fixing a Roof Leak?
- How Long Can You Wait Before a Roof Leak Gets Worse?
- Safety first: avoid walking on a wet, slippery roof. If you must go up, wear non-slip footwear and use a sturdy ladder with a helper nearby.
- Protect interiors: place a bucket or container under the drip, lay down towels, and move valuables away from the leak.
- Cover the area if you can do so safely: a tarp or plastic sheeting held down with weights can reduce incoming water and limit further damage.
- Document the damage: take clear photos from inside and outside to help with insurance or a pro assessment.
- Check for electrical hazards: if water is near outlets or electrical panels, keep people away and turn off the power at the breaker if it's safe to do so. When in doubt, call a licensed electrician.
- Call a roofing professional: get a same-day or next-day inspection scheduled. A pro can confirm the source and recommend a plan.
24 hours to fix: what happens if you wait
- Interior damage accelerates: drywall staining, ceiling sag, and insulation saturation become more probable.
- Mold risk increases: even short delays can start mold growth in damp, dark spaces.
- Deck and framing potential exposure: prolonged dampness can weaken roof decking and rafter connections.
- Cost begins to rise: labor and material costs climb as the problem grows, especially if puddling or ice damming occurs in colder months.
- Hidden leaks become visible: you may notice new drips in different parts of the ceiling as the system shifts under pressure.
- Temporary fixes still assist: tarps, weighted covers, and careful drying can buy you time, but they are not replacements for proper repairs.
3–7 days: longer wait consequences
- Water intrusion spreads: more insulation and ceiling materials absorb moisture, reducing R-value and creating odor and mildew concerns.
- Structural risks grow: prolonged moisture can rot roof sheathing and weaken supports, potentially altering roof geometry.
- Electrical and HVAC impact: dampness in ceilings and walls can affect outlets, switches, and HVAC ducts, increasing risk of shorts or odor issues.
- Insurance implications: delayed repairs can complicate claims or coverage limits, and proof of timely mitigation may be required.
- Escalated repair scope: what started as a localized leak often becomes a larger repair project, potentially involving decking replacement or multiple roof penetrations.
- Interior finishes suffer: paint, wallpaper, and plaster may require removal and reapplication after the roof is repaired.
1–2 weeks or more: escalating damage
- Mold and mildew become entrenched: remediation can be costly and time-consuming, with potential health considerations.
- Significant insulation loss: wet insulation loses effectiveness and may need replacement, increasing energy costs.
- Structural and framing concerns: unchecked moisture can lead to wood rot and pest attraction, threatening attic integrity.
- Higher repair bill: multiple trades might be needed (roofing, drywall, paint, insulation), extending timelines and budgets.
- Warranty and code issues: delayed fixes can affect manufacturer warranties and local building code compliance, complicating the project scope.
What happens if you wait to address the problem in several timeframes
- Immediate to 24 hours: water intrusion can cause rapid interior damage, mold beginnings, and electrical hazards; quick temporary measures help but do not replace a proper repair.
- 24 hours to 7 days: damage extends to insulation, decking, and framing; interior finishes suffer, and repair costs rise as the scope broadens.
- 1–2 weeks or more: moisture becomes a long-term problem—mold, rot, higher energy losses, and more invasive reconstruction; delays can affect warranties and increase overall project time.
How This Problem Varies by Location and Climate
Quick factors that shift leaks by climate
- Freeze-thaw cycles: Water that seeps in freezes, expanding and stressing shingles, flashing, and sealants.
- Precipitation type: Snow and ice create ice dams and hidden leaks; heavy rain tests flashings and gutters.
- Wind and exposure: Wind-driven rain reaches vulnerable seams and penetrates around vents, skylights, and chimneys.
- Sun and heat: Prolonged sun exposure dries and ages shingles, loosening granules and seals.
- Humidity and shade: Damp, shaded roofs foster moss, algae, and rot that trap moisture.
- Roof age and material: Aging roofs in any climate are more prone to leaks; some materials tolerate heat better, others tolerate cold better.
How This Problem Varies by Region & Climate within the United States
Northeast
- Common leak themes: Ice dams at eaves and along roof-to-wall joints; leaks near valleys, skylights, and chimneys after thaws.
- Weather drivers: Heavy snow, quick freeze-thaw cycles, winter wind gusts.
- Prevention tips:
- Improve attic insulation and ensure continuous ventilation to reduce meltwater.
- Keep gutters and downspouts clear; install heated cables where permitted.
- Inspect flashing around vents and chimneys after major thaws.
Midwest
- Common leak themes: Snow buildup and ice damming similar to the Northeast, plus wind-driven rain from squalls.
- Weather drivers: Cold winters with frequent freezes and thaws; big temperature swings.
- Prevention tips:
- Seal attic penetrations and bolster underlayment under flashing.
- Regularly remove snow from the roof edge with a roof rake; check for wind-blown gaps after storms.
- Schedule professional roof and flashing inspections every season.
South & Southeast
- Common leak themes: Seams and penetrations leak during intense thunderstorms; fast deterioration from heat and humidity; hail damage in some seasons.
- Weather drivers: Heavy rain bursts, tropical systems, high heat.
- Prevention tips:
- Use impact-resistant shingles where possible; verify flashing around skylights and vents.
- Trim trees away from the roof to prevent limb damage during storms.
- Ensure attic ventilation is balanced to mitigate heat buildup.
West (including California and the desert Southwest)
- Common leak themes: Shingle granule loss and cracking in high-UV areas; moss and debris where shade exists; pooling after monsoon storms.
- Weather drivers: Long dry spells followed by intense rain; high winds near coastal and desert transitions.
- Prevention tips:
- Choose UV-rated shingles and maintain underlayment condition.
- Clean debris and check vents/flashing after heavy rain events.
- Watch for wind uplift around edges and replace peeling or curling shingles promptly.
Gulf Coast & Southeast Central Plains
- Common leak themes: Severe thunderstorms, hail, and hurricane-era wind-driven rain. Flashings and roof penetrations are frequent failure points.
- Weather drivers: High humidity, salt exposure near coastlines, powerful storm systems.
- Prevention tips:
- Inspect and replace damaged flashing after storms; maintain sealant around vents.
- Consider upgraded underlayment and corrosion-resistant metal components in coastal zones.
- Have a plan for rapid debris removal from the roof after storms.
Pacific Northwest
- Common leak themes: Persistent roof leakage from persistent rain, moss, and algae growth that hold moisture against the roof; leaks around chimneys and skylights with aging flashing.
- Weather drivers: Heavy, frequent rainfall; damp, cool conditions; forested surroundings.
- Prevention tips:
- Regular moss and algae control; ensure proper drainage and roof slope adequacy.
- Keep flashing tight around valleys, chimneys, and vents; address any discoloration that signals moisture intrusion.
- Schedule semiannual inspections to catch slow leaks early.
Seasonal maintenance in your region
1. Pre-winter check: insulation, ventilation, and flashing integrity.
2. Spring after storms: inspect for hail, wind damage, or missing granules.
3. Post-storm quick checks: look for damp ceilings, water stains, and tucked gutters.
4. Annual professional inspection: confirm sealants, flashing, and underlayment are sound.