Ultimate Guide to Wind Damage Roof Repair
Last updated: Feb 28, 2026
Introduction to Wind-Damage Roof Repair
What wind damage is and why it happens
Wind—whether from a fast storm, a passing gust, or sustained high winds—can lift, peel, or loosen roofing materials. It can also push water into gaps created by damaged flashing, missing shingles, or breached underlayment. Wind damage often starts small but can grow quickly after a storm if left unaddressed. Understanding how wind harms a roof helps you catch problems early and prevent bigger, costlier repairs later.
Signs wind damage shows up on your roof
- Missing, curled, or buckled shingles
- Lifting at the edges of shingles or tabs
- Exposed underlayment or flashing along the rake, hips, or valleys
- Loose or damaged roof-to-wall flashing
- Granules gathered in gutters or on the ground near the fascia
- Dented metal components (vents, flashing, kickouts)
- Water stains or staining in the attic after rain
- Soft or spongy decking that suggests moisture intrusion
1. Stay off the roof. Do not walk on damaged areas or in high-wind conditions unless you have proper safety gear and training.
2. Inspect from the ground with binoculars or a camera, focusing on shingles, flashing, and vents.
3. Clear the area below of fragile items and keep children and pets away from the roof line.
4. If you can do so safely, cover exposed areas with a tarp to reduce water intrusion until repairs begin. Secure the tarp with appropriate fasteners or weights so it won't blow away.
5. Document damage with photos and notes for your records and insurance claim.
How wind damage is repaired
- Temporary protection: tarping or boarding to stop leaks while you arrange a repair plan
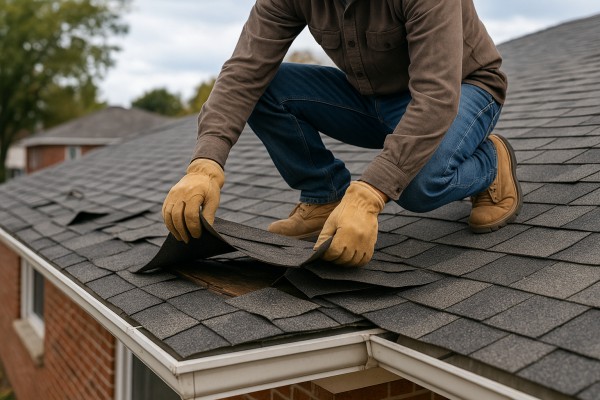
- Shingle replacement: re-seating or replacing damaged shingles, with matched materials when possible
- Flashing Repair or Replacement: sealing or replacing deteriorated metal flashings around vents, chimneys, and valleys
- Underlayment and deck repairs: addressing any compromised underlayment or decking to restore a solid, dry surface
- Ventilation and attic seal checks: ensuring attic space isn't a secondary source of moisture due to wind-related gaps
- Fascia and siding considerations: repairing any wind-driven damage that could affect the roof edge and exterior walls
DIY or professional repair
- You can handle minor upkeep or cosmetic resealing on a calm day with the right safety gear, but major wind damage usually requires a pro.
- When to call a professional:
- Visible structural movement or sagging decking
- Damaged or loose flashing near the chimney or valleys
- Large sections of shingles missing or creased
- Damaged gutters or fascia that affect roof edge protection
- Pros know how to match materials, follow local codes, and coordinate with insurers.
What to expect in costs and timelines
- Typical repair costs vary with material type, extent of damage, and local labor rates.
- Minor wind damage repairs may be completed in a few hours to a day.
- More extensive fixes—especially those involving decking, flashing, or multiple roof areas—can take several days and require temporary protections during weather gaps.
- Preservation of warranty: work should match manufacturer specifications to avoid affecting warranties.
Insurance and documentation
- Photograph the damage before starting repairs and keep a dated log of communication.
- Gather your policy number, insurer, and a list of affected areas.
- File a claim promptly and work with a licensed contractor to provide estimates and scope of work.
- Retain receipts, contracts, and photos for future reference and potential adjuster review.
Wind-Damage Roof Repair: Assessing Damage and Repair Options
Comprehensive definition
Wind-damage roof repair is the set of measures taken to restore a roof that has been compromised by wind storms, gusts, or high-velocity air. It covers the assessment of missing, lifted, or torn shingles; damaged flashing around chimneys, vents, and hips; underlayment exposure; deck damage;以及 compromised fascia, soffits, gutters, and vent boots. The goal is to stop further moisture intrusion, restore the roof's protective layer, and, when necessary, plan for more extensive repairs or replacement. It typically involves temporary stabilization and permanent repairs that address the specific components affected by wind.
When it's typically needed
- After a severe wind event or thunderstorm with gusts above 40–50 mph
- Visible shingle cupping, curling, or missing tabs
- Torn or lifted flashing, vents, or vent boots
- Granule loss in gutters and downspouts or on the ground
- Water spots on ceilings or interior walls following rainfall
- Debris on the roof or around the eaves indicating wind disturbance
- Sagging or soft decking reported by a professional inspection
Common wind damage sources and signs
- Lifted or torn shingles and exposed underlayment
- Damaged or displaced flashing around chimneys and vents
- Ripped fascia, soffit damage, and gutter separation
- Exposed or damaged roof decking and edging
- Misaligned or broken roof vents and pipe collars
- Stay off the roof during or right after a storm; wind can cause slips or further damage.
- If safe, walk the property perimeter to note missing shingles or visible damage; avoid power lines.
- Cover exposed areas with a temporary tarp or waterproofing material only if you can do so safely from the ground.
- Photograph and document damage for insurance and contractor records.
How to assess damage (from ground and up, if safe)
1. Ground-level inspection: look for shingles scattered around the yard, displaced flashing, or obvious gaps along eaves and ridges.
2. Roof-level inspection (by a pro): request a thorough roof inspection to verify decking integrity, underlayment exposure, and hidden damage.
3. Interior check: inspect ceilings and walls for moisture intrusion after rainfall.
4. Documentation: compile photos, note dates, and capture affected areas for claims and repair planning.
Repair options
- Temporary stabilization: tarps or plastic sheeting to block moisture while waiting for a contractor.
- Shingle replacement: individual damaged shingles or sections, plus resealing with appropriate sealant or new adhesive tabs.
- Flashing and boot repair: reseal or replace damaged flashing around chimneys, vents, and stack penetrations.
- Decking repair: replace or patch damaged plywood or OSB to restore the roof deck's integrity.
- Fascia, gutters, and soffit work: realign, secure, or replace damaged edges and drainage components.
- Ventilation and sealing: replace vent boots and reseal penetrations to prevent leaks.
- Full repair vs. replacement: small, localized damage may be repaired; widespread, structural decking or framing damage often necessitates roof replacement.
Repair process: step-by-step
1) Secure access and safety: confirm weather conditions are suitable; use fall protection as needed.
2) Damage assessment: perform a targeted inspection to identify severely damaged components.
3) Temporary protection: place tarps or boards over exposed areas to prevent moisture.
4) Component replacement: replace damaged shingles, flashing, boots, and any compromised decking.
5) Seal and waterproof: reseal fasteners, sealants, and flashing joints; ensure proper underlayment coverage.
6) Final inspection: verify the roof is watertight and confirm downstream components (vents, gutters) are functioning.
Materials, costs, and contractor considerations
- Materials: matching shingles, flashing, underlayment, decking, sealants, vent boots, fascia materials.
- Costs: depend on extent; minor repairs may be a few hundred dollars, while decking or numerous penetrations can rise substantially.
- Contractor considerations: choose licensed, insured roofers with wind-damage experience and clear warranty terms.
Prevention and maintenance for wind resilience
- Regular inspections after storms; focus on flashings, vents, and edge fastenings.
- Secure loose debris and keep gutters clear to reduce uplift risk.
- Trim trees near the roof to minimize branch damage during high winds.
- Consider impact-resistant or wind-rated shingles and well-sealed flashing as long-term upgrades.
When You Need Wind-Damage Roof Repair
Signs this service is needed
- Missing or significantly damaged shingles after a wind event.
- Shingles that are curled, lifted, or creased along edges and ridges.
- Granule loss in gutters, downspouts, or along the eaves—you'll notice a gritty, sand-like pile.
- Exposed underlayment or dark, damp patches on the roof deck visible from the attic or through gaps in soffits.
- Damaged or detached flashing around vents, chimneys, skylights, or along the roof perimeter.
- Visible gaps, gaps in the attic, or daylight shining through the roof boards when you're in the attic.
- Sagging or soft spots in the roof deck, or obvious bowing near ridges or hips.
- Water stains, staining on ceilings or walls, or signs of leaking after windy weather.
- Debris from the storm embedded in the roof or around the eaves indicating wind-driven damage.
- Any unusual draft or persistent moisture in the attic after windy days.
- Wind damage isn't always obvious from the ground. If you notice any of the above after a storm, plan for closer evaluation.
Ways you can confirm yourself as a homeowner
1) Do a cautious exterior check from the ground
- Use binoculars to scan easily reachable areas: shingles with curling, lifting, or missing pieces; flashing around vents and chimneys; and the overall integrity of the roof line.
- Look for loose granules in gutters and at the base of downspouts.
2) Inspect the attic with care
- Look for daylight seeping through the roof boards, which suggests compromised underlayment.
- Check for damp insulation or new stains on ceiling boards that align with exterior wind events.
- Note any musty smell or unusual moisture that wasn't there before.
3) Assess the interior impact
- Check for new or spreading water stains on ceilings after wind-heavy days, especially after rain.
- Look for signs of drafts or warm spots that might indicate roof gaps.
4) Photograph and document
- Take clear photos of any damaged shingles, flashing, or interior stains.
- Keep a dated record to share with a roofer or insurer.
5) Consider safety and access
- Do not climb onto a damaged or wet roof yourself. If you're unsure, treat it as potentially dangerous and seek professional eyes.
6) Decide if temporary measures are warranted
- If you detect active leaks, plan for temporary protection (tarps) only if it's safe to do so and you can do it without stepping on damaged areas.
- Document any findings and prepare a concise summary to share with a pro, including the storm date, observed damage, and areas most affected.
When to get a professional assessment
- If you see any of the signs above, especially missing shingles, lifted edges, flashing damage, or daylight in the attic, schedule a professional roof assessment as soon as feasible.
- After a significant wind storm, aim for a professional inspection within 24–72 hours, weather permitting, to catch hidden damage before it leads to leaks or structural concerns.
- If you notice leaks or ongoing interior staining, call a roofer promptly—do not delay, as wind damage can progress quickly during rain.
- In an ongoing claim or insurance scenario, a professional assessment provides documentation the insurer will rely on for coverage decisions.
- Emergency steps: if there is active leaking or a risk of further collapse, contact a pro for immediate stabilization options and guidance on tarping and safely protecting the home.
What's Included in Wind-Damage Roof Repair
What is typically included
- Comprehensive wind-damage assessment
- On-roof and exterior inspection to identify damaged shingles, lifted or broken flashing, damaged vents, soffits, fascia, and signs of assisted leaks.
- Documentation of findings to share with your insurer.
- Temporary protection and stabilization
- Tarping, boarding, or other measures to keep water out while the full scope is planned.
- Safe containment of loose debris to protect your family and driveway or landscaping.
- Roof surface repairs
- Replacement of visibly damaged shingles to match the existing roof type and color where feasible.
- Sealant and cement applications to create a watertight seal around penetrations.
- Flashing and penetrations
- Repair or replacement of metal flashing around chimneys, vents, skylights, and pipe boots.
- Re-sealing around penetrations to prevent future leaks.
- Underlayment and decking considerations
- inspection of underlayment and immediate repairs or resealing as needed to restore a dry roof surface.
- Localized decking assessment and minor repairs required to stop leaks; major decking replacement is typically outside the scope unless specifically authorized.
- Structural and weathering checks
- Assessments for signs of wind-related damage to roof edges, ridge lines, and fasteners.
- Recommendations for additional work if hidden or progressive damage is discovered.
- Debris removal and site cleanup
- Complete cleanup of nails, shingle scraps, and other debris from the roof and surrounding areas.
- Final sweep of the yard and driveway to prevent punctures or injuries.
- Insurance claim support
- Detailed photo log, scope of work documentation, and an itemized repair estimate to support your claim.
- Clear explanations of what was repaired, why it was needed, and any remaining concerns that may require future work.
- Scheduling and coordination
- Coordination with weather windows and timelines to minimize disruption.
- Basic coordination with any required inspections or review meetings associated with the repair.
- Quality control and short-term warranty
- A workmanship check after repairs are completed to ensure proper sealing and performance.
- A limited warranty on the repaired area for a defined period, subject to terms.
Step-by-step flow you can expect
1) Schedule and on-site inspection
2) Documentation and scope agreement
3) Temporary protection and debris control
4) Patch, replace damaged materials, and reseal
5) Final inspection and handoff with warranty details
What is not typically included
- Interior water damage repairs
- Drywall repair, plaster replacement, insulation replacement, mold remediation, or ceiling repainting caused by leaks are not part of wind-damage roof repair unless specifically added to the scope.
- Major decking or structural repairs
- Large-scale roof deck replacement, structural framing, or foundational roof support work beyond localized patches is generally not included.
- Non-wind-related damage
- Repairs required for issues unrelated to wind, such as extensive hail damage, termite damage, or long-term moisture intrusion that predates the wind event.
- Chimney and masonry work beyond flashing
- Repointing brickwork, chimney rebuilding, or extensive masonry work is not covered unless it directly ties to wind-related leakage at flashing points and is included in a broader scope.
- Gutter, fascia, or soffit work beyond the immediate repair area
- Full gutter systems, fascia replacement beyond the affected zones, or soffit replacement not tied to the roof leak repair is typically separate.
- Non-essentials or cosmetic upgrades
- Decorative vent covers, color upgrades, or cosmetic replacements not required to restore function or prevent leaks are not included.
- Permits, engineering, and code upgrades (unless specified)
- Permit fees, engineering reports, or code-upgrades required by local jurisdiction are usually billed separately unless your contract explicitly includes them.
Common Roofing Materials for Wind-Damage Roof Repairs

Wind damage most often shows up on asphalt shingles, so repairs typically center on replacing missing or torn shingles and resealing edges. Here's how this service relates to asphalt shingles:
- Replacement and matching: Remove damaged shingles carefully, then install new ones that match the existing color, profile (3-tab or architectural/dimensional), and exposure. Mismatched shingles are noticeable and can affect curb appeal and future wind resistance.
- Fastening and alignment: Use the correct nail type and placement (usually in the shingle's nail line, not the exposed area) and seal tabs to prevent lift. Upgrading to wind-rated asphalt shingles (higher wind-resistance) is common if wind damage is frequent.
- Underlayment and flashing: Check underlayment for damage and replace as needed. Restore or replace valley flashing and rake/hip roof metal flashing to prevent leaks where wind often forces water under shingles.
- Protective upgrades: Consider adding an ice and water shield at eaves and valleys in windy climates, plus better attic ventilation, to lessen future issues.
- Inspection steps: Inspect the deck for exposed nails, rot, or damaged sheathing behind repaired areas; address any deck problems before finishing the repair.

Metal roofs respond differently to wind, and repairs focus on seams, fasteners, and panel integrity.
- Seam and panel assessment: Inspect seams for separation or denting and check panels for oil canning or bending. Damaged seams are the usual wind-leak point.
- Replacement or patching: If a panel is compromised, either replace the affected panel or patch the seam with approved sealants and seam fasteners. Standing-seam systems often allow targeted panel replacement.
- Fasteners and clips: Wind can loosen clips or screws; re-fastening with correct corrosion-resistant fasteners restores wind resistance. Use gasketed screws where recommended.
- Flashing and edge details: Inspect and repair edge flashing, parapets, and transitions (chimneys, vents). Proper sealing at these interfaces is critical in windy weather.
- Coatings and corrosion protection: If the roof is metal, verify coating integrity and recoat as needed to prevent rust and preserve performance after a wind event.

Tile roofs are brittle and can crack or blow off with high winds, making repairs more meticulous.
- Tile replacement: Breakage is common; replace cracked or missing tiles with matching clay or concrete profiles and colors. Tiles should seat firmly without rocking to maintain wind resistance.
- Deck and underlayment: Wind can expose deck damage; inspect underlayment and wood battens for moisture or rot and repair before re-tile.
- Fastening and installation: Use appropriate clip or nail methods for your tile type. Proper fastening helps prevent future wind uplift.
- Matching and weight considerations: Clay and concrete tiles are heavy; ensure the structure supports the weight of replacement tiles and assess potential reinforcements if multiple tiles were lost.
- Safety and staging: Handle tiles carefully to avoid micro-cracks that can propagate after installation.

Wood shakes and shingles require careful handling after wind events due to moisture and edge lifting.
- Visual and hidden damage: Inspect for lift, cupping, and rot beneath the surface. Damaged shakes should be replaced with new, properly cut pieces.
- Fastening and spacing: Refasten or replace fasteners with corrosion-resistant nails and ensure correct spacing to prevent future warping.
- Preservation steps: Treat exposed timber and consider a protective sealant if the deck shows signs of moisture staining after wind exposure.
- Compatibility: If large sections were damaged, you may want to retrofit with more wind-rated shakes or switch to a different material if ongoing wind exposure is a concern.
- Maintenance focus: After repair, routine inspections help catch early signs of deterioration from wind-driven debris.

Slate repairs are more specialized and often require skilled masons or roofers due to brittleness and weight.
- Tile replacement: Replace broken or delaminated slate with matching thickness and texture. Proper bedding and mortar or rivoting methods matter for long-term wind resistance.
- Deck check: Wind damage may expose deck or substrate issues; inspect for cracked sheathing and moisture intrusion.
- Fastening method: Slate uses hidden or semi-hidden fasteners; ensure secure attachment to minimize future losses from wind gusts.
- Long-term considerations: Given cost and fragility, many homeowners consider partial or full slate restoration rather than piecemeal repairs after repeated wind events.

Engineered shingles mimic common materials but can have different performance in wind.
- Replacement options: Use identical or compatible engineered shingles to restore wind resistance and appearance. Check for warranty compatibility with existing materials.
- Installation nuances: Follow manufacturer wind-rated guidelines, including nail patterns and underlayment requirements.
- Durability notes: Some engineered products have higher impact resistance and may carry extended warranties; discuss options with your roofer if wind damage is a recurring issue.
- Matching and layering: Ensure color and texture match closely; verify that the substrate and flashing are sound to prevent recurrent leaks.
Flat Roofs (EPDM, TPO, Built-Up)
Wind damage on flat roofs usually shows up in seams, edges, and flashing.
- Seam repair: Patch or replace damaged seams and ensure solvent-based or adhesive patches cure fully. For EPDM and TPO, use manufacturer-approved patches and seam tapes.
- Patching vs replacement: Isolated patches can suffice if the membrane is intact elsewhere, but widespread damage may require partial membrane replacement.
- Edge flashing: Repair exposed edges and parapets; wind-driven rain often intrudes at the perimeters.
- Drainage and insulation: Check drainage paths and insulation boards behind the membrane for moisture damage; replace as needed to restore performance.
- Compatibility: Use compatible membranes and adhesives to avoid delamination and ensure a uniform wind barrier across repaired areas.
The Cost of Wind-Damaged Roof Repair
Typical average costs
- Minor repairs (a few blown-off shingles, small flashing fixes, or tarping): around $150–$600.
- Moderate repairs (missing shingles over a larger area, several leaks, flashing and edge-work): roughly $600–$1,800.
- Severe repairs (extensive shingle loss, decking/underlayment damage, multiple areas needing repair): typically $1,800–$5,000+.
Costs vary by roof type, pitch, and local labor rates. If the damage is isolated to one section, you'll usually see the lower end of the range; widespread damage or high-end materials push costs toward the upper end.
What affects price
- Roof size and slope: larger roofs and steeper pitches require more time, equipment, and material.
- Material type: asphalt shingles are generally cheaper to repair than architectural shingles, metal, slate, or tile.
- Extent of damage: if decking, underlayment, or flashing is compromised, costs rise quickly.
- Accessibility and safety: steep or difficult-to-access roofs add labor and risk, increasing prices.
- Weather and urgency: urgent repairs, after-hours calls, or storms with widespread outages can raise rates.
- Local labor markets: some regions have higher or lower pricing for roofing labor.
- Insurance implications: if you're filing a claim, the contractor's documentation quality and scope can affect the claim outcome.
Less expensive scenarios
- Damage limited to a small area of shingles with an intact deck.
- Quick fixes like resealing flashing or replacing a few shingles rather than wholesale patchwork.
- Early discovery before leaks cause decking damage.
- Using a contractor with good availability and competitive pricing.
- Summer or shoulder-season work when demand is lower.
More expensive scenarios
- Visible leaks penetrating underlayment or decking, or soft, warped decking that needs replacement.
- Structural damage or compromised rafters requiring inspection or repair.
- Multiple roof planes or a very large roof with extensive shingle failure.
- High-end or specialty materials (metal with custom flashing, clay or concrete tiles).
- Difficult access (very steep pitches, limited workspace) or need for scaffolding, safety gear, or temporary tarps for extended periods.
- Storm aftermath with high demand, which can drive up labor and material costs.
Quick cost guide by repair type
- Shingle replacement (isolated): typically $100–$350 per patch, plus material.
- Flashing repair or replacement: $200–$600 depending on extent and roof area.
- Patch and tarping services: $150–$500, often bundled with a temporary solution until permanent repair.
- Decking/underlayment repair: $400–$2,000+ depending on square footage and access.
Steps to estimate and plan
1. Inspect and document damage safely (note missing shingles, leaks, and any visible decking issues).
2. Schedule a professional roof inspection for an in-person assessment.
3. Obtain 3 quotes that itemize materials, labor, and any decking or flashing work.
4. Check if tarping or short-term protection is included in the quote.
5. Validate warranty and workmanship coverage; ask about debris disposal and cleanup.
6. Discuss insurance: have the contractor provide a written estimate and detailed damage report to accompany your claim.
When to expect insurance involvement
- If you're submitting a claim, your insurer will want documentation of wind damage, photos, and a written repair estimate.
- Some policies cover temporary measures (tarps) and permanent repairs; coverage varies by plan and details of wind event.
- A thorough, line-item estimate helps with claim adequacy and faster settlement.
Practical tips to keep costs reasonable
- Get multiple detailed estimates and compare scope, not just price.
- Prioritize permanent repairs over temporary fixes when possible; avoid repeated call-outs.
- Schedule after weather windows to minimize emergency repairs and avoid escalating costs from second storms.
- Ask about material warranties and workmanship guarantees to protect your investment.
How the Wind Damage Roof Repair Process Works
- We respond quickly after wind damage is reported or spotted. Expect a practical, no-surprises timeline based on your roof's condition and weather.
- During the call, we gather basic details: address, when the wind event occurred, photos if available, and a sense of how severe the damage looks from ground level.
- We schedule an on-site inspection at a convenient time and confirm access, safety considerations, and any pets or obstacles.
Step 2: On-site Safety Check and Comprehensive Inspection
- Our technician arrives with safety gear and a plan to protect you and your home. We inspect from ground level and, when safe, the roof surface, including shingles, flashing, vents, and chimney areas.
- We look for common wind damage indicators: lifted or missing shingles, loose or damaged flashing, torn underlayment, and exposed fasteners.
- We also assess attic signs of wind-related leaks (stains, moisture, or mold) and check gutters and downspouts for debris that could channel water toward the fascia or soffits.
Step 3: Documentation and Damage Assessment Report
- We create a clear, itemized damage report with photos and measurements.
- You'll receive a written scope of work that spells out the repairs needed, the materials to be used, and an estimated timeline.
- The report is ready to share with your insurer or adjuster, ensuring everyone is on the same page about what's required.
Step 4: Temporary Protection and Water Mitigation
- If leaks or active exposure are present, we install temporary protection to minimize water intrusion.
- This may include tarps, leak barrier patches, or plywood covers over exposed sections until permanent repairs can begin.
- We remove loose debris from the affected area and secure materials to prevent further wind damage.
Step 5: Insurance Claim Coordination and Support
- We assist with the insurance process by providing the damage report and a detailed repair estimate.
- Our team can communicate with your adjuster, answer questions, and help you understand what's recoverable under your policy.
- If needed, we prepare a supplemental claim to cover any unseen or newly discovered wind damage.
Step 6: Repair Planning, Materials, and Permits
- We finalize the repair plan with your input, selecting materials that match your roof and meet local code requirements.
- We order or source the appropriate shingles, underlayment, flashing, and vent components.
- If a permit is required, we handle the permitting process and coordinate inspections to keep the project moving.
Step 7: Repair Execution and Quality Assurance
- The actual repair sequence typically follows these steps:
1) Remove and replace any damaged shingles and underlayment with care to maintain proper overlap and waterproofing.
2) Re-secure or replace flashing around chimneys, vents, and perimeters to seal against wind uplift.
3) Reinstall matching shingles with correct nailing patterns and sealant where needed.
4) Restore proper ventilation and ensure attic insulation is dry and intact.
5) Clean the area, remove debris, and perform a final leak check.
- Throughout, we follow industry best practices and local code requirements to ensure lasting performance.
Step 8: Final Walkthrough and Warranty
- We conduct a thorough final walkthrough with you, verifying the repair quality and checking for any signs of residual leaks.
- We provide maintenance tips to prolong roof life after wind events and explain the warranty coverage that accompanies the repair.
- Any questions you have about care, future wind resistance, or next steps are addressed during this walkthrough.
Residential vs. Commercial Considerations for Wind-Damage Roof Repair
Residential vs Commercial Considerations of Wind Damage Roof Repair
- Wind damage affects residential and commercial roofs differently because of scale, construction, and usage. Knowing the key differences helps you plan a practical, trustworthy repair path.
Scale, Access, and Safety
- Residential roofs: smaller footprint, steeper pitches, and often tighter yards. Access is usually via ladders and handheld tools; fall protection is important but typically simpler.
- Commercial roofs: large, flat or low-slope surfaces. Expect scaffolding, roof hatches, and lift equipment. Fall protection, vehicle access, and site safety plans are critical for crews and occupants.
Roof System Differences and Material Behavior
- Residential systems: asphalt shingles, metal, clay or concrete tiles. Wind uplift depends on product type, installation, and flashing around vents, chimneys, and skylights. Repairs often focus on resealing flashing, reseating shingles, and replacing damaged sections.
- Commercial systems: TPO, EPDM, built-up membranes, metal decks, or concrete roofs. Wind uplift is a primary design consideration; seams, flashings, and ballast (where applicable) drive repair strategy. Repairs may require membrane patches, insulation checks, and deck-level fixes.
Structural and Attachment Considerations
- Residential: roof decks are typically plywood/OSB over wood framing. Repairs look at damaged decking, sheathing gaps, and rafter or truss integrity after wind events.
- Commercial: decks can be steel, concrete, or composite. Roof-vent and parapet interactions with wind loads are common failure points. Structural checks may involve engineers to confirm connections and load paths.
Code, Permits, and Inspections
- Residential: permits are common for re-roofing or significant repairs; inspections verify weather-tightness and code compliance for flashing, ventilation, and eave details.
- Commercial: permitting can be more complex, with plan reviews, life-safety considerations, and potential engineer stamps. Coordination with the building owner or property manager, and adherence to more stringent retrofit standards, is typical.
Insurance, Warranties, and Claims
- Residential: homeowner insurance handles weather-related damage; product warranties and workmanship warranties vary by brand and contractor. Documentation and a clear scope help with claims.
- Commercial: claims often involve property management, tenants, and multiple stakeholders. Warranties may differ by system (membrane, ballast, or metal). Timelines and repairs may be coordinated around occupancy and tenant use.
Process, Timeline, and Coordination
- Residential: faster, more predictable scheduling; fewer trades to coordinate; typical repair windows are short.
- Commercial: longer timelines due to size and complexity; coordination with tenants, utility shutoffs, and other trades is common; access windows may be limited to non-peak hours to minimize disruption.
Quick Reference: Practical Considerations for Both Scenarios
1. Evaluate safety and access early to avoid delays.
2. Identify damaged materials, flashing, vents, and edge details that commonly fail in wind events.
3. Confirm required permits, inspections, and any engineer or code approvals.
4. Plan for moisture, interior checks, and a clear, documented scope of work.
What to Ask Your Roofing Pro
- Do you specialize in both residential and commercial wind-damage repairs, and how does your approach differ by system?
- Can you provide a written scope with material specifications, uplift ratings, and flashing details?
- What permits, inspections, and potential engineering reviews will be needed, and who coordinates them?
- How do you protect occupants during repair, and what temporary measures might be required to maintain weather-tightness?
How Wind-Damage Roof Repairs Vary by Location
Regional climate differences
Wind damage occurs differently depending on where you live. Local weather patterns, storm frequency, and environmental factors change which parts of a roof fail first and how repairs are planned.
- How this service varies in different regions in the United States:
- Coastal hurricane zones (Gulf and Atlantic coasts, parts of the Southeast): frequent high-wind events, heavy uplift at eaves and along rakes; expect reinforced fasteners, hurricane straps, impact-resistant shingles, and salt exposure considerations for corrosion resistance.
- Northeast and upper Midwest: freeze-thaw cycles and ice damming complicate repairs; edge flashing and ice shields may be prioritized, and contractors may address water intrusion from ice dams before structural work.
- West Coast and Pacific Northwest: strong, gusty storms and coastal salt spray; rust-resistant metal components or corrosion-rated fasteners, plus attention to coastal moisture and ventilation in humid microclimates.
- Southwest and inland deserts: extremely hot days speed up aging of asphalt and sealants; emphasis on UV protection, heat-resistant underlayment, and proper attic ventilation to prevent rapid expansion and contraction damage.
- Great Plains and open plains: broad wind gusts and debris from storms; evaluation of ridge lines, underlayment quality, and edge protection is critical.
Building codes and permitting
- Local codes dictate required fastener patterns, roof deck attachment, and flashing standards; some regions require post-storm inspections or permits for temporary repairs.
Insurance considerations by state
- Wind or hail deductibles, coverage limits, and claim timelines vary; in some states, wind-damage claims follow different rules than standard property claims.
Wind exposure and roof design by region
- Terrain matters: open fields vs. urban canyons vs. hillside coverage changes uplift risk; exposure category (Exposed, Partially Exposed, Fully Exposed) informs fastener schedules and material choices.
- Roof geometry: steeper pitches may shed wind differently; steeper roofs might need more robust attachment.
Material choices by region
- Material performance differs with climate:
- Asphalt shingles: cost-effective, but lifespan varies with heat and sun exposure.
- Metal roofs: high wind resistance but installation details matter for coastlines and desert heat.
- Tile and clay: heavier, suitable in some regions with structural support; wind uplift ratings matter.
- Underlayment and flashings: climate-specific choices (ice shields, moisture barriers, vapor retarders).
Practical repair approach by region (step-by-step)
1. Safety first: assess after storms; avoid hazards like downed power lines.
2. Document damage for your insurer and contractor.
3. Temporary protection: tarps or plywood over open areas, especially in rain-prone regions.
4. Prioritize repairs: address leaks and structural concerns before cosmetic fixes.
5. Schedule region-appropriate work: ensure fasteners, underlayment, and flashing meet local standards.
6. Follow up inspections: verify repairs hold up in seasonal weather patterns.