Ultimate Guide to Roof Ventilation Services
Last updated: Feb 28, 2026
Introduction to Roof Ventilation Services
Good attic ventilation is a quiet, steady ally for a durable roof and a comfortable home. This section introduces practical, trustworthy guidance on how ventilation works, what configurations common homes use, and how to evaluate your current setup. You'll find straightforward tips you can apply now, plus clear steps for when you might want a pro's eye on things.
Why proper attic ventilation matters
- Controls moisture: Proper airflow removes humid air that can cause mold, mildew, and wood rot.
- Improves energy efficiency: Well-ventilated attics stay closer to outdoor temperatures, reducing cooling and heating loads.
- Prevents ice dams and condensation: Adequate ventilation helps manage heat and moisture that otherwise work through your roof in winter.
- Extends roof life: Less heat and moisture buildup means fewer shingles curling, warping, or blistering.
- Supports insulation performance: Ventilation works with insulation to keep attic spaces dry and effective.
How ventilation works
Attic ventilation relies on a simple exchange: cool outdoor air enters through intake vents (often near the soffits) and warm attic air rises and exits through exhaust vents (like ridge, roof, or gable vents). The natural stack effect, plus wind, creates a continuous flow that keeps the attic cooler and drier.
- Intake for fresh air: Soffit vents, under-eave openings, or dedicated intake grills.
- Exhaust for warm air: Ridge vents, roof vents, turret vents, or powered exhaust fans.
- Balanced approach: Aim for roughly equal intake and exhaust in total vent area to avoid pressurizing the attic.
Common venting configurations
- Soffit intake + ridge exhaust: The classic, efficient setup for many homes.
- Soffit intake + roof vents: A practical alternative when ridge lines aren't ideal.
- Gable vents or turbine vents: Can supplement other systems, especially where roof design limits other options.
- Powered attic fans: Used where natural ventilation is insufficient, or for climates with high moisture or heat, but they should be sized and controlled properly to avoid depressurizing living spaces.
- Hybrid systems: A mix of passive vents with selective powered exhaust for specific conditions or seasons.
Assessing your current setup
Start by getting a quick read on your attic's airflow. Use these steps:
1. Measure attic floor area (in square feet).
2. Inventory all vents: count intake sources and exhaust outlets, and note any blockages (dust, insulation, or debris).
3. Look for signs of trouble: excess humidity, condensation on windows, frost at roof edges in winter, peeling paint or mold in the attic.
4. Check for insulation placement: Ensure insulation isn't covering soffit vents or blocking airflow near exhaust points.
5. Examine for air leaks: Gaps around attic access, duct runs, or penetrations can undermine ventilation.
- Typical guideline (broad rule of thumb): aim for about 1 square foot of net free vent area per 150 square feet of attic floor space, with an even split between intake and exhaust where possible. Local codes may vary, so treat this as a starting point.
Planning the right approach
When the current setup isn't doing enough, consider these decisions:
- Climate and season: Hot, humid summers vs. cold, snowy winters change the ideal balance.
- Roof design and space: Ridge lines, dormers, or hip configurations influence vent placement.
- Aesthetics and noise: Choose vent types that fit the look of your home and minimize noise generation.
- Maintenance needs: Some vents stay clear longer; others require regular cleaning or re-sealing.
1) Confirm vent area Targets for your attic size.
2) Map suggested intake and exhaust locations based on your roof geometry.
3) Schedule a professional evaluation to verify airflow, seal leaks, and propose adjustments.
Maintenance and care
- Inspect annually: Look for blockages, cracked vent caps, or displaced insulation.
- Keep intakes clear: Leaf litter, dust, and debris reduce air entry.
- Clean exhaust outlets: Remove any obstructions and ensure caps are intact.
- Seal leaks: Weather-stripping or caulking around attic gaps helps maintain airflow where it's intended.
What Roof Ventilation Services Include
Comprehensive definition
Roof ventilation services cover the assessment, design, installation, balancing, and maintenance of an attic ventilation system. The aim is to move air through the attic to manage heat, moisture, and air pressure so shingles, insulation, and living spaces stay protected and energy use stays efficient. A well-functioning system reduces moisture buildup that can lead to mold, wood rot, and insulation degradation, helps prevent ice dams in cold climates, and lowers cooling costs in hot weather. In practice, a project often starts with a careful diagnosis of current airflow, temperature, and humidity, followed by a tailored plan that balances intake and exhaust openings.
- Assessment: evaluate attic size, roof layout, climate, insulation, and current venting.
- Design: choose a balanced mix of intake and exhaust types to deliver steady airflow.
- Installation: add or upgrade vents, fans, and related components.
- Balancing and testing: verify airflow, seal gaps, and adjust to achieve target air exchange.
- Maintenance: periodic inspections, cleaning, and sensor or fan replacements as needed.
Typical components and approaches
- Passive vents (intake and exhaust): soffit, continuous ridge, gable, and wind-driven options that work without electricity.
- Active vents: powered attic exhaust fans or attic fans with thermostats or humidity sensors.
- Airflow balance: baffles or vent chutes to prevent insulation from obstructing intake and to create a clear path for air.
- Sealing and insulation: sealing air leaks between the attic and living spaces and ensuring insulation does not block vents.
- Moisture control: vapor barriers in appropriate spots and moisture-sensitive controls to prevent condensation.
- Climate-aware design: different configurations for cold, hot, humid, or windy environments to maximize effectiveness.
Steps in a typical project
1. Initial assessment: homeowner interview, visual inspection, and basic measurements.
2. Diagnostic tests: humidity, temperature, and sometimes smoke or vane tests to locate leaks and stagnation.
3. Plan and recommendation: a written ventilation plan with vent types, locations, and estimated airflow targets.
4. Installation or upgrade: mounting soffit, ridge, or gable vents; installing attic fans or replacing aging components.
5. Balancing and testing: confirm intake-to-exhaust balance, adjust vents, and verify comfort and moisture levels.
6. Follow-up: periodic check-ins to ensure performance and address any changes in attic conditions.
When you typically need roof ventilation services
- New construction or major remodel: to install a designed ventilation system from the start.
- Persistent attic humidity or condensation: signs include damp insulation, sweating ducts, or musty smells.
- Heat buildup in summer: attic temperatures significantly higher than living spaces.
- Ice dam risk in winter: insufficient ventilation can exacerbate heat loss and melt/refreeze cycles at the eaves.
- Mold, mildew, or wood rot in the attic: moisture indicators require airflow improvements and sealing.
- Elevated energy bills: poor ventilation can increase cooling and heating load.
- Shingle wear or premature aging: excessive heat and moisture can shorten roof lifespan.
Quick homeowner checks (simple, non-invasive)
- Ensure soffit vents are unobstructed by insulation or storage.
- Look for blocked ridge or gable vents and signs of vent sagging.
- Check attic insulation thickness and coverage near vents.
- Schedule a professional inspection every few years, or sooner if you notice moisture, odors, or temperature swings.
When You Need Roof Ventilation Services
Signs this service is needed
- Attic feels hot and stuffy in warm weather, with little air movement observed near ceiling outlets.
- Condensation, damp insulation, or visible mold/mildew in the attic or around HVAC ducts.
- Ice damming or lingering frost on the roof during winter, signaling moisture buildup and poor attic ventilation.
- Higher-than-normal energy bills in summer due to the attic acting as a heat trap for the living space.
- Warped or buckled roof decking, stained sheathing, or musty odors coming from the attic.
- Soffit, ridge, or gable vents appear blocked by insulation, debris, or bird nests, reducing intake and exhaust airflow.
- Constant running of the attic fan or roof vents without noticeable cooling effect.
Ways you can confirm yourself as a homeowner
1) Do a simple attic check
- With a flashlight, scan for moisture stains, dark mold patches, or damp insulation.
- Look for crushed or compressed insulation near vents, which can block airflow.
2) Inspect the venting layout
- Ensure soffit vents are clear and not buried under insulation.
- Confirm ridge or roof vents run the length of the peak and aren't clogged with debris.
- Check gable vents (if you have them) for obstruction or signs of damage.
3) Compare attic to outdoor temperatures on a sunny day
- Open the attic hatch for a few minutes to feel air movement.
- If the attic air is significantly hotter than outdoor air and there's little breeze, ventilation may be insufficient.
4) Check humidity and moisture levels
- In the living space near the attic, monitor humidity levels. Consistently high indoor humidity (above about 50%) can point to ventilation issues.
- In the attic, look for persistent moisture or condensation on nails, joists, or metal components.
5) Look for seasonal warning signs
- Winter: ongoing frost or ice dams despite proper insulation elsewhere.
- Summer: rooms near the attic feel warmer than the rest of the house, or you notice a stagnant odor in the attic.
When to get a professional assessment
- You notice mold growth, persistent moisture, or structural damage in the attic or surrounding ceilings.
- Symptoms persist after you've cleared debris from vents, added insulation, and sealed obvious leaks.
- You're unsure which ventilation approach your home needs (soffit-to-ridge, powered exhaust, whole-house ventilation, or a combination) or how to size and balance the system.
- There's been recent roof work, new insulation, or changes to attic layout that could have altered airflow, and you want a plan that meets building codes and warranties.
- You want a formal, written assessment with recommendations, airflow measurements, and a corrective plan to improve energy efficiency and prevent future issues.
Quick steps a pro will typically take
- Measure attic temperature and humidity, and perform a blower test to locate air leaks.
- Inspect all intake and exhaust vents, confirm proper balancing, and identify blockages.
- Evaluate insulation levels and the air barrier between living spaces and the attic.
- Provide a tailored ventilation plan, which may include vent upgrades, baffles, ridge or soffit enhancements, or a whole-house ventilation strategy.
What's Included with Roof Ventilation Services
What is typically included
- Attic ventilation assessment to determine current balance and identify hot spots, moisture risk, and insulation issues.
- Diagnostic airflow and moisture testing to guide design decisions (smoke tests, anemometer readings, and visual inspection).
- Custom ventilation plan that balances intake and exhaust for your attic size, climate, and roof type.
- Product recommendations tailored to your home: soffit and/or gable intake options; ridge, static, or turbine exhaust options; and optional powered attic fan if appropriate.
- Materials and components installation: intake vents, exhaust vents, attic baffles to keep airflow above insulation, weatherproof seals, screens, and bug guards.
- Air sealing and insulation guidance: seal penetrations around vents and attic hatches; ensure insulation isn't blocking vents.
- Roof protection during installation: protective tarps or boards, careful walking paths, and thorough site cleanup.
- Installation of intake and exhaust systems according to plan: soffit, gable, ridge or roof vents, with proper spacing and coverage.
- Optional powered attic fan installation (if selected): wiring and controller setup by a licensed electrician, with code-compliant electrical work.
- System commissioning and verification: airflow checks, temperature and humidity readings, and confirmation that the system meets the design targets.
- Post-installation client education: simple tips for monitoring attic ventilation and signs of inadequate venting.
- Documentation and warranty information: written notes on installed components, care instructions, and any manufacturer or workmanship warranties.
How the installation works
1. Pre-installation assessment and plan finalization.
2. Material preparation and site protection to keep your home and landscape safe.
3. Vent installation and sealing, including placing baffles and weatherproof seals.
4. System commissioning and adjustments reviewed with you to ensure proper airflow.
5. Cleanup and a quick walk-through to confirm everything is finished to standard.
What is not typically included
- Major roof repairs or re-roofing beyond the ventilation installation.
- Structural repairs to attic framing or roof deck not directly related to venting.
- Insulation upgrades or replacement beyond ensuring proper airflow (insulation work is addressed separately).
- Electrical work beyond basic control wiring for a powered vent; any new circuit, panel upgrade, or more extensive wiring requires a licensed electrician.
- Permits, site inspections, or local code compliance tasks (these may be handled as an add-on or by you, depending on local requirements).
- Mold remediation, water damage repair, or roof leak repair not caused by the ventilation work.
- Removal or disposal of asbestos or other hazardous materials; specialized remediation is not included.
- Ventilation integration with solar or other energy systems requiring additional permits.
Roofing Materials Commonly Used With Roof Ventilation Services

Asphalt shingles are the workhorse of residential roofing, and they pair well with standard attic ventilation to control heat and moisture. A well-ventilated attic keeps the roof deck cooler, reduces shingle aging, and helps prevent mold growth in the attic.
- Ventilation setup: Soffit intake vents combined with ridge or continuous exhaust vents create a steady airflow under the deck. Use baffles to keep airflow unobstructed from soffit to ridge.
- Temperature and humidity: Heat buildup under asphalt shingles can soften the adhesive strip and accelerate curling. Adequate venting lowers attic temperatures and helps preserve shingle life.
- Moisture management: In humid climates, proper venting reduces condensation on the underside of the deck and in insulation, protecting against mildew.
- Maintenance reminders: Keep soffits free of debris, ensure ridge vents aren't covered by insulation, and inspect vent openings for blockages after storms.
- Quick steps:
1) Assess attic airflow balance.
2) Install or verify soffit and ridge vents with unobstructed paths.
3) Schedule periodic checks for insulation cover and vent cleanliness.

Metal roofs are durable and energy-efficient, but they still benefit from good attic ventilation to manage moisture and condensation in the attic space beneath the panels.
- Venting approach: Use ridge or exhaust vents that align with the metal roof design, and consider eave-to-ridge ventilation to maintain air movement under the deck.
- Condensation control: Vapor barriers and proper insulation help prevent condensation from forming on the underside of metal panels, which can lead to corrosion or mold in the attic.
- Fastening and flashing: When vents penetrate metal panels, use manufacturer-approved details and flashing to prevent leaks and maintain vent performance.
- Snow and wind considerations: Ensure vent openings stay clear of snow buildup and are not blown closed by gusts; proper placement is key with metal seams.
- Maintenance reminders: Inspect vents for corrosion, gaps around penetrations, and debris that can block airflow.
- Quick steps:
1) Confirm vent locations work with metal panel seams.
2) Install vapor barriers and ensure air can reach the ridge.
3) Regularly inspect for leaks and vent blockages.

Tile roofs rely on a ventilated attic to control moisture, but tiles themselves don't provide the airflow. A sound ventilation plan protects the underlayment and roof structure.
- Venting integration: Use continuous soffit vents and vented ridge caps or tiles with built-in vents to maintain an effective air channel beneath the tile layer.
- Underlayment choice: Breathable or semi-permeable underlayment helps manage moisture without trapping it beneath the tiles.
- Flashing and penetrations: Proper flashing around chimneys, vents, and hips is crucial to prevent leaks where ventilation paths intersect tile work.
- Weight and structure: Tile roofs are heavy; ensure the attic and roof structure can support the chosen venting approach without compromising tile alignment.
- Maintenance reminders: Check for cracked tiles near vent areas and keep vent openings free from debris.
- Quick steps:
1) Verify vented ridge or tile-vent systems are compatible with the tile type.
2) Ensure underlayment and flashing are in good condition.
3) Inspect regularly for cracked tiles and debris in vent areas.

Wood roofs are naturally porous but need controlled ventilation to prevent moisture retention, warping, and rot.
- Ventilation importance: Adequate airflow helps wood shingles dry out after rain and stay dry in humid months, extending their life and reducing mildew risk.
- Venting options: Soffit vents with attic or roofline ventilation, sometimes enhanced with turbine or powered vents, provide consistent airflow without trapping moisture.
- Safety and maintenance: Wood is more susceptible to fire risk, so pairing ventilation with proper spacing and clearance is important. Treat exposed wood with protective finishes and keep ignition sources away from vent areas.
- Maintenance reminders: Inspect for moisture staining, shrinkage, or dry rot near vent openings; keep vent paths clear of debris.
- Quick steps:
1) Check that soffit and vent paths are unobstructed.
2) Use moisture-tolerant finishes and proper clearance near vents.
3) Schedule seasonal inspections for signs of moisture damage.

Slate roofs are durable but heavy and require careful ventilation planning to maintain attic moisture control without compromising the slate's integrity.
- Ventilation strategy: Implement continuous soffit vents with ridge or vented cap systems designed for slate, ensuring proper flashing around vents.
- Underlayment: A high-quality, vapor-permeable underlayment helps manage moisture without trapping it under the slate.
- Structural fit: Confirm the roof structure can support the attic ventilation approach and the weight considerations of slate and vent hardware.
- Maintenance reminders: Inspect flashing around vents and check for loose or cracked slate near vent areas.
- Quick steps:
1) Verify compatible venting details for slate installations.
2) Ensure underlayment choices support moisture control.
3) Inspect slate and flashing around vents annually.

Synthetic or composite shingles mimic traditional asphalt but often offer improved durability and performance.
- Ventilation relevance: They behave similarly to asphalt in terms of heat and moisture management, so balanced attic ventilation remains important.
- Expansion considerations: Some synthetics respond to temperature changes differently; ensure vent openings and seals accommodate movement.
- Warranty considerations: Follow manufacturer guidelines for ventilation to preserve any material-specific warranties.
- Maintenance reminders: Keep vents clean and check for edge swell or seam issues near vent penetrations.
- Quick steps:
1) Align venting with the manufacturer's guidance for composites.
2) Confirm seals and movement allowances around vents.
3) Regularly inspect vent areas for debris and wear.
Flat Roofing Membranes (EPDM/TPO)
Flat or low-slope roofs with membranes still benefit from proper ventilation when there is an accessible attic, crawlspace, or moisture-prone interior below.
- Ventilation focus: In homes with attic or cavity spaces above a flat roof, ensure adequate air exchange to prevent condensation from affecting insulation and deck material.
- Rooftop penetrations: Manage exhausts, HVAC curbs, and other penetrations with proper flashing and sealed detailing to preserve membrane integrity.
- Condensation control: Use vapor barriers and ensure any insulation above the deck is breathable where practical to avoid moisture buildup.
- Maintenance reminders: Inspect seams and flashing around penetrations; ensure parapet edges allow adequate air flow and avoid pooling water near vents.
- Quick steps:
1) Confirm ventilation pathways between attic/crawlspace and roof deck.
2) Seal penetrations and install proper vent curbs.
3) Periodically inspect membrane seams and edge details for moisture ingress.
How Much Do Roof Ventilation Services Cost?
Typical average costs
Costs vary with roof size, vent type, attic layout, and local labor rates. Here's a practical snapshot to help you plan.
- Basic vent installation (soffit, gable, or turbine vents)
- Typical installed range: $150–$350 per vent, including materials. For a small handful of vents, total costs commonly land in the $500–$1,200 range.
- Ridge vent installation
- Typical total installed cost for an average home: $1,000–$2,500. This includes materials and labor for the ridge line, plus any needed sealing at ends. On longer or more complex roofs, expect toward the higher end.
- Per linear foot (ballpark): roughly $2–$6 installed for the vent material plus labor. Real-world totals reflect roof length, overlaps, and accessibility.
- Attic electric vent fan installation
- Typical installed cost: $500–$1,500. This covers the fan unit, wiring, a switch or thermostat, and basic mounting.
- Whole-house attic fan (powered, centralized)
- Typical installed cost: $600–$1,800. This includes the unit and electrical connection, plus any ducting or vent relocation if needed.
- Solar-powered attic fan
- Typical installed cost: $700–$2,000. A solar option eliminates electrical hookup but may depend on sun exposure and local incentives.
- Vent repair or resealing
- Typical repair range: $100–$400, depending on damage, accessibility, and whether fittings or flashing need replacement.
- Permits, inspections, and code-related work
- Typical cost range: $50–$300 in many jurisdictions. Some complex projects or neighborhoods with stricter rules may be higher.
- Optional upgrades or add-ons
- Smart controllers, humidity sensors, or remote monitoring: $150–$500 extra.
Factors that can reduce cost
- Reusing existing openings and components
- If you already have compatible vents or a ridge line, you may save on materials.
- Bundling tasks into one visit
- Scheduling a combined vent upgrade, insulation check, and moisture/temperature assessment can reduce mobilization fees.
- Simpler vent types
- Standard, off-the-shelf vents are cheaper than custom or decorative options.
- Off-season scheduling and quotes
- Some contractors offer lower rates during slower times of year or when they can bundle several projects together.
- Energy‑saving focus
- If a contractor identifies that you only need basic ventilation improvement (instead of a full system upgrade), you'll likely pay less.
- Local rebates or incentives
- Solar attic fans or energy-efficiency upgrades may qualify for incentives that reduce net cost.
Factors that can raise cost
- Roof complexity and pitch
- Steep or multi‑story roofs increase safety measures, time, and equipment needs, driving up labor.
- Long ridge lines or large attic footprints
- More materials and labor for ridge vent or extensive venting systems adds to the price.
- Poor access or structural issues
- Limited entry or attic obstacles require extra labor, safety gear, or equipment.
- Old or damaged roofing components
- If sheathing, flashing, or insulation needs replacement to install vents properly, expect higher costs.
- Electrical work with new wiring or breakers
- Electric attic fans require wiring, switches, and sometimes permit work; complexity raises price.
- Permits, inspections, and code updates
- In jurisdictions with stringent permitting, approval can add to the total.
- High‑end or specialty vents
- Designer, color-matched, or high‑performance vents carry premium prices.
- Weather and scheduling disruptions
- Bad weather or urgent repair needs can add to on-site time and costs.
How Our Roof Ventilation Process Works
Step 1: Initial assessment and measurements
- We start with a thorough on-site visit to understand your attic layout, roof design, and existing venting.
- We measure attic dimensions, intake and exhaust locations, and calculate the target vent area based on house size and climate.
- We look for red flags: condensation, musty odors, ice dam risk, insulation gaps, or signs of improper existing venting.
- Short paragraph: This first step helps us map out the scope and tailor a solution that fits your home and budget.
Step 2: Diagnostic testing
- We perform a diagnostic sweep to confirm airflow balance between intake (soffits, eaves) and exhaust (ridge, roof vents, gable vents).
- Tools we use include moisture readings, infrared checks for temperature differences, and anemometers to measure actual air movement.
- We film or document any air leaks into living spaces and note insulation quality in the attic.
- Short paragraph: Diagnostics ensure we don't guess about problems—we verify them with practical tests.
Step 3: Custom ventilation plan
- We calculate Net Free Area (NFA) and select vent types that fit your roof and attic geometry.
- The plan covers the number, size, and placement of vents (ridge, soffit, gable, turbine, or powered options).
- We consider climate, energy efficiency, and noise expectations, then map a clear, code-compliant design.
- Short paragraph: You'll see a concrete, written plan with recommended products and installation steps.
Step 4: Site prep and safety
- We prepare the work area with roof protection, ladder safety, and fall-arrest precautions.
- If permits or inspections are required, we coordinate them on your behalf.
- We protect interior spaces and seal off attic access to prevent dust or debris.
- Short paragraph: Safety and organization keep the project smooth and predictable.
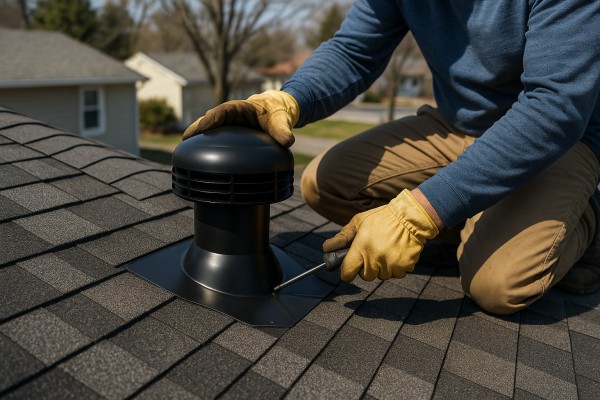
Step 5: Installation or upgrade
- Install or upgrade venting components: ridge vents, soffit intake vents, gable or roof-mounted vents, and attic fans if included.
- We place baffles at soffits to maintain clear intake paths and prevent insulation from blocking airflow.
- All penetrations are sealed, flashing is checked, and connections are weatherproofed to prevent leaks.
- Short paragraph: Our aim is balanced, continuous airflow with durable, long-lasting hardware.
Step 6: Sealing, insulation adjustments, and moisture control
- We seal air gaps around vents, penetrations, and attic hatches to minimize unintended air leakage.
- Insulation is adjusted to avoid blocking vents, and any compression or settling is accounted for.
- We install or adjust vapor barriers where needed to reduce condensation risk.
- Short paragraph: Proper sealing and insulation work together to keep your attic dry and comfortable.
Step 7: Verification and quality check
- We re-test airflow to confirm balanced intake and exhaust across the attic.
- We perform a smoke test or infrared scan to visualize airflow patterns and identify hotspots.
- All fasteners, flashing, and weatherproofing are inspected, and vent covers are secured.
- Short paragraph: Verification confirms the system performs as designed before we finish.
Step 8: Post-install guidance and maintenance
- We provide simple maintenance steps: periodic vent cleaning, checking for blockages, and seasonal inspections.
- We share a basic troubleshooting checklist for common issues like frost buildup or unusual noises.
- You'll receive a written summary of what was installed, how to monitor performance, and when to call us for follow-up.
- Short paragraph: This final step leaves you with clear, practical guidance to keep your roof ventilation working efficiently year after year.
Residential vs. Commercial Considerations for Roof Ventilation
Residential vs Commercial Considerations of Roof Ventilation Services
Homes and commercial buildings share the same core goal—move moisture out and keep your interior comfortable. But the scale, building design, safety rules, and maintenance needs differ enough that what works on a house may not fit a warehouse or office tower. Here's how to think about residential versus commercial roof ventilation services from a practical, homeowner-friendly perspective.
Roof Type and Layout
- Residential roofs: typically pitched with an attic space. Ventilation paths usually rely on intake vents along the eaves or soffits and exhaust vents at the peak (ridge or roof vents). Flashings are simpler, and access is generally easier.
- Commercial roofs: often flat or low-slope with large roof areas. Ventilation involves rooftop exhausts, mechanical penthouses, curbs for rooftop equipment, and dedicated "greenure" or plenary ventilation zones. Flashings and penetration details are more complex, and access for service is more restricted.
Ventilation Goals and Code Framework
- Residential goals: prevent attic condensation, reduce heat buildup, and improve overall home comfort. Vent sizes and placement are guided by residential codes and climate-based recommendations.
- Commercial goals: meet stricter indoor air quality and energy-performance requirements. Codes and standards—such as IBC/IMC references, NFPA 90A for systems, and ASHRAE guidance—often drive ventilation rates, exhaust capacity, and equipment staging. Ventilation may also support specialized spaces (data rooms, kitchens, laboratories) with dedicated exhaust and make-up air.
- Practical tip: for homes, focus on balanced attic ventilation and preventing hot surfaces. For commercial spaces, plan for zoning, make-up air, and integration with HVAC systems.
Installation Realities
- Accessibility and safety: residential work is usually ground-accessible with standard ladders and fall protection. Commercial jobs may require roof access via lifts, larger safety programs, and more stringent OSHA-compliant practices due to height and equipment mass.
- Equipment and materials: homes commonly use ridge vents, soffit intake, box vents, or turbine vents. Commercial projects use roof curbs, large-diameter ducts, rooftop fans, economizers, and specialized flashings around curbs and penthouses.
- Weather and downtime: a single-family project can often be scheduled around a homeowner's timeline. Commercial work may demand phased installations, temporary shutdowns, or after-hours work to minimize disruption.
Maintenance and Longevity
- Home maintenance: periodic inspections (seasonally or annually) to ensure vents aren't blocked by debris, snow, or insulation; check flashing and sealant around vents.
- Commercial maintenance: more frequent, system-wide checks due to larger equipment, continuous operation, and critical indoor air quality needs. Regular cleaning of exhaust ducts, curb seals, and rooftop fans helps prevent corrosion and efficiency loss.
- Warranty and service life: residential components are typically rated for many years in typical climates. Commercial systems often carry warranties tied to heavy-use cycles and higher-grade equipment; expect more scheduled service visits and inspection reports.
Planning, Budget, and Timeline
- Budget considerations: residential projects are usually smaller in scale and budget, with quicker turnarounds. Commercial projects require larger budgets, longer lead times for equipment, and coordination with property management or tenants.
- Coordination needs: homes can move through planning with a single homeowner and contractor. Commercial work often requires site access coordination, building permits, and cross-department approvals.
- Think ahead: for either type, a well-written plan outlines roof layout, vent types, required clearances, safety measures, and a maintenance calendar.
1. Identify building type and roof layout (pitched vs flat/low-slope).
2. Define ventilation goals, make-up air needs, and any space-specific requirements.
3. Select appropriate venting strategies and equipment compatible with the roof and codes.
4. Schedule installation with safety and access considerations in mind.
5. Establish a maintenance and inspection cadence to protect performance and longevity.
How Roof Ventilation Services Vary by Location
Climate and Weather Patterns
- Hot, dry climates (Southwest, parts of the West): prioritize a strong intake/exhaust balance to remove hot air, plus radiant barriers and good attic insulation to reduce heat transfer.
- Humid subtropical and tropical zones (Southeast, Gulf Coast): focus on moisture control, continuous ventilation to move damp air out, and materials rated for high humidity to prevent mold growth.
- Cold, snowy regions (Northeast, Midwest): design to minimize ice dam risk while still allowing attic air to circulate; ensure vents stay functional under snow loads and that insulation and air sealing reduce warm-air leakage into the attic.
- Temperate coastal areas (Pacific Northwest): balance cooling needs with rain protection; emphasize vent durability against moisture and corrosion from salt air where applicable.
Local Building Codes and Permits
- Codes vary by city, county, and state. Some places specify required vent area per attic square footage and a recommended intake-to-exhaust balance.
- Permits and inspections are common in many jurisdictions. A licensed installer will document vent sizing, placement, and weatherproofing to satisfy local rules.
- Always verify which vent types are permitted in your area (ridge, soffit, gable, or powered attic ventilation) and whether any energy-efficiency standards apply.
Roofing Style and Roof Pitch
- Shingle roofs: standard soffit intake paired with ridge or turbine exhaust works well in many climates, with easy access for inspection.
- Tile and metal roofs: venting may need to be integrated into the roof design; some configurations require special vents or additional framing considerations.
- Steep pitches vs. low-slope roofs: steeper roofs can promote better natural air flow, but installation must ensure vents remain above snow lines and that airflow isn't hindered by overhanging eaves.
Humidity and Moisture Control
- Coastal and high-humidity regions: select vents and underlayment rated for moisture resistance; consider vapor-permeable barriers and drainage to prevent condensation.
- Regions with wide seasonal swings: combine proper insulation with venting strategies that can adapt to both summer heat and winter moisture changes.
- Mold-prone areas: prioritize airtight sealing of penetrations, high-quality vapor barriers, and continuous ventilation paths to minimize condensation.
How this service varies in different regions in the United States
- Northeast and Mid-Atlantic
- Ice dam risk drives emphasis on keeping attic air moving without letting warm air melt snow at the eaves.
- Seal attic air leaks aggressively and pair with insulation upgrades to maintain stable attic temperatures.
- Southeast
- Humidity dominates, so venting designs focus on removing moist air efficiently and reducing attic humidity to prevent mold and wood rot.
- Materials selected for salt or humidity exposure if you're near the coast.
- Midwest
- Cold winters plus snow require vents that resist blockage and still allow airflow; balance is key between keeping heat out and preventing moisture buildup.
- Ensure consistent vent performance across temperature swings and consider backup cooling strategies for attic spaces.
- Southwest
- Extreme heat means prioritizing radiant barriers, reflective coatings, and ample exhaust paths to keep attic temperatures down.
- Dust and wind can affect vent openings; choose durable, easy-to-clean vents with secure mounting.
- Pacific Northwest
- High rainfall and humidity call for weatherproof vent assemblies and corrosion-resistant hardware.
- Roofs may see frequent damp conditions, so venting systems should support continuous air movement while protecting interior spaces from moisture intrusion.
- Practical step-by-step considerations
1) Assess climate-specific risks (ice damming, humidity, heat) with a local pro.
2) Check local codes for vent sizing and placement requirements.
3) Match vent type to roof style and pitch while ensuring snow/rain protection.
4) Plan insulation and air sealing in tandem with ventilation to optimize performance.
5) Select materials rated for your climate (moisture resistance, corrosion resistance, UV stability).
6) Schedule regional maintenance checks to prevent blockage or deterioration over time.