Ultimate Guide to Roof Mold
Last updated: Feb 28, 2026
Introduction to Roof Mold
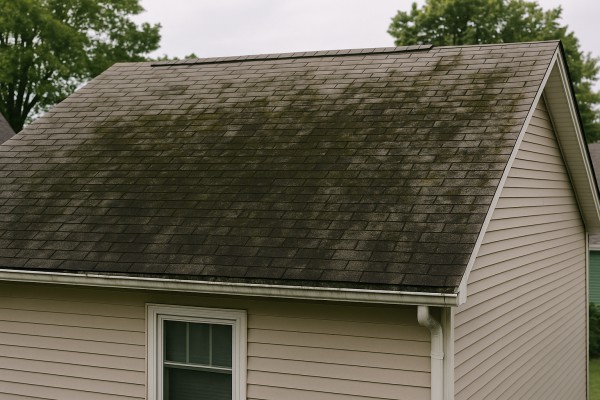
Mold growth on a roof surface or in the attic can be a sign of moisture and ventilation issues. It's a problem homeowners notice as dark spots, staining, or a musty smell that lingers in the attic or upper corners of the house. This page provides practical guidance to identify, assess, and address roof mold without unnecessary alarm.
What roof mold is and isn't
- Mold refers to fungi that thrive in damp, shaded spaces.
- It differs from simple algae or staining; mold can indicate hidden moisture.
- Visible growth on shingles, flashing, or sheathing warrants closer look.
- Moisture intrusion from leaks, condensation, or poor attic ventilation.
- Shaded areas, persistent humidity, and organic debris like leaves or pine needles.
- Aging materials, damaged flashing, and minor roof gaps that trap moisture.
Is roof mold urgent or common?
- Common: many homes have some mold or mold-like staining at some point.
- Urgent when:
- There is active water intrusion or standing moisture in the attic.
- The odor is strong, or you notice rapid growth after a rain.
- Health concerns exist (for sensitive individuals) or mold is spreading.
- For many homeowners, addressing moisture sources and cleaning affected surfaces is doable, but a professional assessment is wise if you're unsure.
Signs you may have roof mold
- Dark spots or streaks on shingles, flashing, or under the eaves.
- A musty or sour smell in the attic or upper rooms.
- Visible moisture damage, peeling paint, or warped wood in the attic.
- Elevated humidity readings or condensation on windows.
High-level next steps
- Step 1: Confirm moisture source
1. Inspect the attic for active leaks from the roof deck or flashing.
2. Look for pooling water near skylights, chimneys, or dormers after rain.
- Step 2: Improve ventilation and dry the space
1. Ensure soffit vents are clear and attic fans run when needed.
2. Use a dehumidifier or controlled ventilation to reduce humidity in the attic.
- Step 3: Clean carefully and assess materials
1. Light surface mold on nonporous surfaces can be cleaned with a mold-safe cleaner.
2. Porous materials (wood sheathing, insulation) may require replacement if mold penetrates.
- Step 4: Address the underlying issue
1. Seal leaks, replace damaged flashing, repair shingles, and improve roof drainage.
2. Consider professional mold remediation if growth is extensive or spreading.
- Water intrusion with active leaking.
- Mold growth spanning multiple roof areas or attic sections.
- Health concerns or persistent odors after mitigation.
What a professional roofer will check
- Roof integrity: shingles, flashing, ventilation, and attic insulation.
- Water pathways and potential hidden leaks.
- Moisture levels in wood and insulation and mold remediation options.
Is Roof Mold an Emergency? How to Determine Severity and Take Action
Quick severity check
Mold on the roof or in the attic is not always a crisis, but some signs demand immediate attention. Start with a simple assessment: is moisture actively entering your home, or is the mold confined to a dry area with no dampness? The distinction matters for safety, health, and cost.
Emergency indicators you should not ignore
- Visible leaks or water dripping from the roof into the attic or living space.
- Large patches of mold accompanied by staining, warped wood, or sagging roof sheathing.
- Strong musty odor that persists after running ventilation or that intensifies with rain.
- Electrical components in the attic or near damp areas show signs of moisture or short-circuit risk.
- Rapid spread of mold across multiple patches or areas after rain or heavy humidity.
If you notice any of these, treat it as an emergency and act quickly to prevent structural damage and health risks.
Urgency language for homeowners
- Call a roofer immediately if
- you have active leaks, dripping water, or mold growth that appears to be spreading after rainfall, or you see visible mold on roof sheathing or attic rafters.
- Monitor if
- the issue seems localized to a small patch, the attic area is dry, there's no strong musty odor, and there's no water intrusion observed.
- Can wait if
- there are no leaks or dampness, mold growth is minimal and contained to non-porous surfaces, and you have a plan to address it within a few days.
1. Protect contents and people
- Move valuables away from the affected area and cover items with plastic sheeting to prevent further moisture exposure.
2. Reduce further moisture
- If safe, reduce humidity in the attic by running a dehumidifier or increasing ventilation (box fans pointed outward, vents open). Avoid creating condensation by cooling or heating rapidly.
3. Minimize electrical risk
- If you notice moisture near electrical outlets or wiring, keep clear of the area and switch off power to the affected circuits from the main panel if you can do so safely.
4. Document the problem
- Take clear photos of leaks, stains, and mold patches with dates for your records and for any contractor you contact.
5. Call a pro promptly
- Even if you're unsure, a roofer or mold remediation specialist can evaluate moisture sources, confirm mold extent, and recommend a plan to stop moisture ingress.
What to expect from a professional assessment
- Identification of moisture sources: roof penetrations, attic ventilation issues, or insulation problems.
- Determination of mold type and scope: hidden growth behind walls or under sheathing, plus air-quality considerations.
- Recommended remediation plan: containment, mold removal, moisture source repair, and ventilation improvements.
- Timeline and cost estimates: whether temporary fixes suffice or full roof/attic work is needed.
Quick containment ideas (if you must pass time before help arrives)
- Seal off access to the attic temporarily to limit exposure.
- Increase airflow with fans pointing outward from the attic to reduce humidity.
- Keep doors and windows in living spaces open where safe to improve cross-ventilation, weather permitting.
Monitoring guidance for non-urgent cases
- Track humidity and temperature in the attic: aim to keep relative humidity below 60% and avoid prolonged damp conditions.
- Watch for new mold growth after rain or high humidity and note any new leaks or stains.
- Plan a professional inspection within a few days to confirm whether the issue can be managed with routine maintenance or requires structural repair.
Common Causes of Roof Mold
Inadequate attic ventilation
When attic air is allowed to stagnate, humidity climbs and mold finds a cozy spot on wood, insulation, and the underside of the roof deck.
- Warm, moist air from living spaces rises into the attic and has nowhere to escape.
- Vents are undersized, blocked, or the baffles are misplaced, restricting airflow.
- Attic fans or passive vents aren't used or aren't functioning properly.
A poorly ventilated attic creates a damp microclimate that mold loves. Regularly check that soffit vents, ridge vents, and any attic fans are clear and capable of moving air.
Roof leaks and water intrusion
Even a small, lingering leak can keep a spot damp long enough for mold to take hold.
- Damaged or missing shingles allow rain to seep in.
- Faulty flashing around chimneys, vents, and dormers provides a steady moisture source.
- Ice dams in colder climates push water up under shingles and along the roof deck.
Spotting stains on the ceiling, dark lines along rafters, or damp insulation in the attic can point to a hidden leak that needs attention.
Condensation from living spaces
Warm, humid air from inside the home can meet a cold roof deck and condense, creating wet conditions ideal for mold growth.
- Bathroom or kitchen exhaust fans vent into the attic rather than outside.
- Poor insulation or air sealing around ducts, pipes, or attic access doors allows moist air to escape upward.
- Gaps in insulation let warm air reach the roof deck.
Improper ventilation and insulation interplay is a common mold trigger in many homes.
Blocked gutters and downspouts
Clogged gutters hold water at the edge of the roof, allowing it to seep under shingles and saturate the roof deck.
- Debris like leaves and pine needles trap moisture.
- Sagging or overflowing gutters keep water in contact with roof edges.
- Downspouts drain toward the roof edge or foundational areas where water can back up.
Clean, straight gutters and properly directed downspouts reduce moisture contact with the roof line.
Debris and organic material on roof
Leaves, needles, moss, and other organic matter retain moisture against the shingles and provide a feeding ground for mold.
- Moss or algae colonies create moisture-holding blankets on the roof.
- Fallen leaves accumulate in valleys and along the eaves, staying damp longer.
Regular roof cleaning and moss control help prevent mold-friendly surfaces from forming.
Poor insulation and air sealing
Insufficient or uneven insulation and gaps around penetrations allow warm attic air to reach the cold roof deck.
- Thin or uneven attic insulation leaves cold spots that condense moisture.
- Gaps around attic hatches, pipes, vents, and ductwork create leakage paths for moist air.
- Older homes with drafty envelopes are especially prone.
Addressing insulation and sealing reduces the moisture load reaching the roof deck.
Quick inspection steps
1) Look for musty odors and damp spots in the attic and along the roof deck.
2) Check that attic vents are clear, functional, and balanced (intake vs. exhaust).
3) Inspect for staining, mold growth, or damp insulation around penetrations and along the eave line.
How Roof Materials Affect Roof Mold

Asphalt shingles are made with a fiberglass or organic mat bound in asphalt. The mat contains organic material that can feed mold when moisture sticks around. Shingle surfaces can hold tiny amounts of water in micro-crevices, especially in shaded valleys, near vents, or where leaves linger. Mold and mildew often show up as dark staining on the surface and can migrate into the underlayment if dampness persists. Shingle color and climate also influence growth—the wetter and cooler the conditions, the faster mold can appear.
- Susceptibility: higher in shaded, humid, poorly ventilated spots; valleys and around penetrations are common trouble zones.
- How mold forms here: organic mat plus moisture retention creates a food source for mold spores.
- Maintenance tips: keep gutters clear, trim overhanging branches, ensure attic ventilation is adequate, avoid high-pressure washing which can lift granules, and treat stubborn stains with a mild, roof-safe cleaner.

Metal roofs are inorganic, which means the roof surface itself isn't a food source for mold. Mold growth is more often on organic debris, dirt, or algae that accumulate on the panels or in the underlayment where moisture is trapped. Condensation can occur on the underside of metal roofs in cold climates if insulation and ventilation aren't balanced, potentially growing mold on the deck or through the roof cavity.
- Susceptibility: low on the exposed metal surface, higher where debris collects and underlayment is damp.
- How mold forms here: dirt, leaves, and organic matter create a welcome mat for mold in sheltered spots; condensation on the underside can promote mold in the attic if moisture isn't controlled.
- Maintenance tips: rinse off organic buildup, inspect flashing and seals, keep vents clear, and ensure the underlayment and attic are dry.

Wood is inherently organic, so it provides a ready-made food source for mold. Wood shakes and shingles absorb moisture from rain and humidity and dry slowly, creating a constant moisture cycle. Warmer, shaded areas compound the problem. Rot and fungal decay can follow mold if moisture remains in the wood.
- Susceptibility: high, especially in damp climates, near eaves, and around dormers or chimneys.
- How mold forms here: mold spores feed on wood fibers; water infiltration accelerates spread.
- Maintenance tips: keep wood sealed or treated, install with proper spacing for ventilation, remove debris from between courses, and perform regular inspections for signs of rot or splitting.

Clay and concrete tiles themselves are inorganic and resist mold growth more than organic materials. However, mold can grow on organic debris, algae, and dirt that accumulate in tile joints, ridges, or underlayment. The spaces between tiles can trap moisture if drainage is poor or the roof is tilted incorrectly.
- Susceptibility: moderate, mainly where debris collects or where underlayment remains damp.
- How mold forms here: organic matter in joints and on the underside can support mold colonization; poor drainage increases risk.
- Maintenance tips: clean vegetation and debris from valleys and joints, inspect for cracked tiles that trap moisture, ensure proper slope and drainage, and check underlayment condition.

Slate is dense and naturally resistant to mold on the surface, but mold can still take hold in damp, shaded spots and in the underlayment or substrate if moisture is allowed to persist. For slate roofs, the underlayment and flashing determine how much mold risk reaches into the attic.
- Susceptibility: generally low on the surface; higher if the deck or underlayment stays damp.
- How mold forms here: organic debris that sits against the slate and moisture trapped behind worn flashing can foster mold.
- Maintenance tips: keep the roof free of leaves and moss, inspect flashing and valleys, and ensure the underlayment remains dry and intact.

Flat roofs can trap more moisture due to limited slope and drainage. Membranes themselves are inorganic, but dirt, algae, and organic debris can accumulate, providing a food source for mold. If drainage isn't adequate, standing water creates long-term dampness that promotes mold growth on the surface and near seams.
- Susceptibility: moderate to high in wet climates or poorly drained flat roofs.
- How mold forms here: algae and mold thrive where water stands or slowly drains; seams and penetrations are common hotspots.
- Maintenance tips: ensure good drainage, keep drains clear, and clean debris from the surface with non-abrasive methods; inspect seams and flashings for moisture intrusion.
Quick maintenance steps (by material)
1. Improve attic ventilation and insulation to reduce condensation for all materials.
2. Fix leaks promptly and seal penetrations to stop moisture ingress.
3. Keep gutters and downspouts clear and ensure proper drainage away from the roof.
4. Trim overhanging branches and remove debris that can shelter mold.
5. Schedule annual professional inspections, paying special attention to valleys, flashings, and underlayment.
The Risks of Ignoring Roof Mold
Health risks
Mold spores don't stay put once mold starts growing in a roof space. If attic leaks or damp insulation send spores into living areas, your family can notice symptoms sooner or later. Spores can travel through gaps in ductwork, vents, and fixtures, especially in older homes with imperfect sealing.
- Allergic reactions: sneezing, runny nose, itchy eyes, and congestion.
- Respiratory triggers: coughing, throat irritation, and aggravated asthma.
- Infections or sinus issues: more frequent sinus infections or bronchitis in sensitive individuals.
- Skin and eye irritation: rashes or red, itchy eyes after exposure.
- Vulnerable groups: children, the elderly, and anyone with compromised immunity may react more strongly.
Structural and interior risks
Mold grows where moisture persists, which often means hidden damage inside your roof system and walls. Left unchecked, that damage can progress and weaken the structure over time.
- Wood rot and framing decay: attic joists, rafters, and wood decking can deteriorate, reducing load-bearing capacity.
- Sheathing and insulation degradation: damp sheathing loosens, warps, or delaminates; insulation loses R-value when wet.
- Hidden pathways for mold: mold can spread into wall cavities and ceilings, creating unseen problems that are costly to remediate.
- Interior finish damage: staining, warped ceilings, and peeling paint or wallpaper can signal ongoing moisture and mold activity.
Moisture, energy costs, and indoor air quality
Mold needs a moisture source to survive, so addressing humidity and leaks helps protect comfort and efficiency.
- Moisture sources: roof leaks, condensation, and high attic humidity sustain mold growth.
- Energy penalties: wet insulation and damp air reduce insulation effectiveness, driving up heating and cooling costs.
- Air quality decline: poorly sealed attics can allow mold spores to migrate into living spaces, lowering IAQ (indoor air quality).
- Hidden expense cycle: moisture invites more cycling changes (drying, heating, dehumidifying) that keep your utility bills higher.
Steps to break the cycle:
1) Identify and fix the moisture source (roof leak, flashing gaps, or plumbing vent issues).
2) Dry out affected materials promptly and completely.
3) Improve attic ventilation and airflow to reduce humidity.
4) Use a dehumidifier in damp spaces and monitor humidity levels (target around 30–50%).
Fire risk and insurance implications
While mold itself isn't a fire hazard, moisture-related issues can create dangerous conditions that affect safety and coverage.
- Electrical risk: damp areas can corrode wiring connections or create short-term electrical hazards.
- Insurance and claims: undisclosed or long-standing mold problems can complicate claims or coverage eligibility.
- Code and inspection issues: persistent moisture may trigger code violations or require updates during inspections or renovations.
Long-term financial impact and resale value
Ignoring roof mold tends to compound the damage and drive up repair costs later.
- Escalating remediation: early mold growth is cheaper to treat; unchecked spread forces larger, more invasive repairs.
- Structural repair bills: once framing or decking is compromised, costs rise quickly.
- Sale implications: mold issues must be disclosed; unresolved problems can deter buyers or lower offers.
- Warranty and manufacturer concerns: untreated moisture can void certain warranties on roof components or coatings.
Practical takeaway
- Mold in a roof space is not just a cosmetic issue; it signals ongoing moisture and can impact health, structure, and bills.
- Early identification, accurate source control, and targeted remediation save time, money, and stress.
How Roof Mold Is Diagnosed: A Step-by-Step Guide
Step 1: Do a careful visual survey
- Look for visible mold growth on roof decking, sheathing, attic joists, and underlayment where leaks or moisture linger.
- Notice stains, discoloration, or warped wood that signal moisture problems.
- Pay attention to musty smells in the attic or near vents, dormers, or stair penetrations.
- Record locations and extent with notes or photos to guide repairs.
Step 2: Identify likely moisture sources
- Leaking or damaged flashing around chimneys, skylights, or roof penetrations.
- Damaged shingles, curling edges, or missing granules that invite water intrusion.
- Clogged or overflowing gutters and downspouts that cause roof water to back up.
- Poor attic ventilation or condensation from HVAC ducts that can keep areas damp.
Step 3: Inspect the attic and interior spaces
- Check roof sheathing, insulation, and vapor barriers for dampness or water staining.
- Look for mold colonies growing on joists, on the underside of the roof deck, or inside wall cavities reachable from the attic.
- Note any damp insulation or sagging materials, which indicate sustained moisture.
- If you see mold growth behind attic access panels or around penetrations, mark those spots for further evaluation.
- Moisture meter: test wood and insulation to identify elevated moisture levels (typical dry wood runs in the single digits; persistently higher readings suggest moisture intrusion).
- Infrared (thermal) camera or moisture reader: spots temperature and moisture anomalies that aren't visible to the eye.
- Borescope or inspection camera: peek behind roof sheathing or around tight cavities without removing large areas.
- Protective gear: wear gloves, a dust mask or respirator, and eye protection; ladder safety and fall protection are essential.
Step 5: Consider professional testing options
- When visible growth is extensive, or you're unsure if unseen areas are affected, a professional mold assessment adds accuracy.
- Common testing methods:
- Air sampling (spore trap) collected by a certified lab to compare indoor vs. outdoor spore levels.
- Surface or bulk sampling (swabs or small material samples) sent to a lab for mold species identification.
- Bulk samples from suspected mold sources for laboratory analysis.
- Limitations to know:
- Test results reflect a moment in time and don't pinpoint moisture sources.
- Lab results require careful interpretation in the context of building conditions and sample location.
- Testing without addressing obvious moisture problems can lead to repeat issues.
Step 6: Interpret results and decide on action
- If moisture issues are confirmed, prioritize fixing leaks, venting properly, and removing damp materials before remediation.
- If mold levels are localized and moisture is controlled, remediation may be straightforward—isolating the area, removing affected materials, and cleaning with proper methods.
- If health concerns exist or growth is extensive, hire a licensed mold remediator who follows established containment and cleanup protocols.
Step 7: Document findings and plan for repair
- Compile a simple report: locations, observed moisture problems, photos, and test results.
- Create a remediation plan outlining containment steps, removal of affected materials, cleaning methods, and a timeline.
- Implement preventive measures to stop recurrence: seal leaks, repair flashing, improve attic ventilation, and maintain gutters and downspouts.
- Schedule a follow-up evaluation after repairs to verify moisture levels are back to normal and mold has not reappeared.
Repair Options for Roof Mold
Temporary fixes
- Stop water entry first: if you have an active leak, temporarily protect the spot with a contractor-grade tarp secured well from the outside, while a professional arrives. Do not climb on a wet roof if you're unsure of safety.
- Reduce attic moisture: run a dehumidifier or box fan in the attic to lower humidity, and ensure soffit vents and any existing ridge vents are clear of obstructions.
- Contain spores: keep interior doors closed and use plastic sheeting or drop cloths in adjoining spaces if attic work is underway, to limit dust and spores from spreading.
- Gentle cleanup basics: for non-porous surfaces or exterior mold grows on metal or cement, you can wipe with a mild detergent solution or white vinegar. Avoid aggressive scrubbing on porous wood; this is a temporary measure, not a cure.
- Record and photograph: note locations of mold, moisture sources, and any rot you see. This helps a roofer or mold remediation pro plan a proper repair.
Minor repairs
- Fix the moisture source: seal obvious roof penetrations (vent pipes, chimney flashing, skylights) with properly matched, weather-rated sealant or flashing upgrades. Replacing or resealing flashing is often enough to stop recurring leaks in small areas.
- Replace damaged shingles and underlayment: remove a limited row or two of shingles from the affected area, inspect the underlayment, and lay new underlayment and shingles. Re-nail everything to manufacturer specs and seal any fasteners that penetrate the mold-affected zone.
- Treat the area after drying: once the roof and attic are dry, apply an approved mold-inhibiting treatment or fungicidal wash designed for roof materials. Follow label directions and safety guidelines.
- Improve attic ventilation long-term: add or upgrade baffles, soffit/vent channels, or an exhaust fan if possible. Better airflow reduces moisture buildup that feeds mold.
- Monitor and recheck: after minor repairs, keep an eye on the repaired zone through a few wet seasons. If mold returns or moisture persists, escalate to a larger repair option.
Partial replacement
- When damage is localized: assess the extent with a professional to determine how much decking, underlayment, and shingles are compromised. If the wood decking shows rot beyond a small patch, you'll need more than a simple fix.
- Decking and underlayment: remove damaged shingles, flashing, and a section of decking as needed. Replace with new decking that matches structural requirements and install fresh underlayment.
- Shingle matching and flashing: install new shingles that closely match color and profile, and reseal or replace surrounding flashing. Pay attention to edge cut lines for a seamless look.
- Flashing and penetrations: reflash all penetrations (vent pipes, chimneys, skylights) to prevent future leaks. Ensure step flashing and counter-flashing are properly integrated.
- Drying and mold prevention: after replacement work, run a thorough drying cycle in the attic and treat surrounding surfaces with a mold-inhibiting product if recommended by your roofer. Confirm there's adequate ventilation to prevent recurrence.
- Documentation and follow-up: keep records of the repair scope, materials, and photos. Schedule a follow-up inspection after a few wet seasons to verify the fix holds and moisture levels stay low.
Full roof replacement
- When mold is widespread or there's significant wood rot: if mold has penetrated many sections of sheathing, or the roof is approaching the end of its life (typically 20–25+ years, depending on material), a full replacement may be the most cost-effective long-term option.
- Planning and permits: work with a licensed roofer to plan decking replacement, underlayment choice, ventilation upgrades, and proper disposal of mold-affected material. Check local permits and code requirements.
- Complete teardown: remove all old shingles, underlayment, flashing, and deck sheathing in affected areas. Inspect roof framing for rot and replace damaged framing as needed.
- New assembly: install fresh roof decking, underlayment, new flashing, and the chosen shingles. Ensure proper nailing patterns and secure flashing at all penetrations.
- Ventilation and insulation: upgrade attic ventilation and consider insulation improvements to minimize future moisture problems.
- Final checks: perform a thorough leak test, inspect for gaps, and confirm there's no persistent moisture that could reintroduce mold. Have a post-installation inspection to verify adherence to local building codes.
Safety note: mold remediation and structural repairs can involve risks. If mold covers a large area, if you notice wood rot, or if moisture problems persist despite repairs, hire a licensed contractor or mold remediation specialist to assess and perform the work.
Typical Costs to Fix Roof Mold
Minor repair
Small mold spots are usually surface-level and limited to a small area, with no signs of ongoing moisture intrusion. Most homeowners can manage these with basic cleaning and preventive steps.
- What it includes: surface cleaning, mold inhibitor application, minimal sealing, and recommendations for ventilation improvements.
- Typical cost range: $150–$500.
- Quick overview of steps:
1) Inspect the area and confirm there are no active leaks.
2) Isolate the spot and protect surrounding materials.
3) Clean with a mild mold cleaner (such as a 3% hydrogen peroxide solution) and scrub gently.
4) Apply a mold-inhibiting sealant or coating.
5) Reassess after a few weeks and monitor humidity and HVAC/ventilation.
Moderate repair
When mold covers a larger patch or has penetrated into attic insulation or plywood, more extensive cleaning and some material replacement are needed. This is a sign to address moisture sources more robustly.
- What it includes: thorough cleaning of the affected area, removal and replacement of damp insulation if necessary, treating wood framing, and resealing or reattaching attic components. If a moisture source persists, further investigation is recommended.
- Typical cost range: $500–$2,000.
- Quick overview of steps:
1) Identify and fix any active roof leaks or attic moisture source.
2) Remove visibly affected insulation and damaged framing as needed.
3) Clean and treat wood with a mold inhibitor; allow to dry completely.
4) Install new insulation and sealants; reseal penetrations.
5) Re-check for hidden mold in adjacent areas.
6) Improve venting: add or adjust vents, dehumidifier, or a moisture-control plan.
Major repair
Extensive mold growth that affects structural materials—such as roof decking, sheathing, or framing—often requires substantial remediation. This can involve removing compromised decking, replacing sections of roof underlayment, and potentially reroofing over the affected area.
- What it includes: removal and replacement of severely damaged roof decking or sheathing, insulation replacement, drywall/ceiling repair if mold reached living spaces, and comprehensive moisture management.
- Typical cost range: $2,000–$7,000+, with higher-end projects for extensive structural work or additional roof area replacement.
- Quick overview of steps:
1) Conduct a thorough moisture assessment and determine scope of damage.
2) Remove mold-infested materials safely, following local codes for containment.
3) Replace damaged decking, insulation, and any compromised framing.
4) Treat framing with mold inhibitors and ensure a dry, ventilated space.
5) Reinstall roofing materials and underlayment; seal penetrations.
6) Refinish interior spaces if affected (drywall, paint) and reestablish humidity controls.
What factors affect cost
- Roof size
- More area means more materials and labor, increasing both minor and major repair costs.
- Access
- Hard-to-reach roofs, steep pitches, or limited attic access raise labor time and safety considerations.
- Material type
- Wood framing, plywood/OSB, insulation type, and the extent of underlayment replacement influence price.
- Extent of damage
- Surface-only mold vs. structural contamination drives whether you need cleaning, replacement, or full reroofing.
- Local labor rates
- Neighborhood demand and regional wage differences affect the overall price.
How Long Can You Wait Before Addressing Roof Mold?
Mold growth is driven by moisture, not time. The longer you wait, the more spores can spread, moisture can intensify, and repairs can escalate from cosmetic to structural. Here's how waiting plays out across common timeframes, plus practical steps you can take while you work to fix the problem.
0-24 hours: What happens and what you notice
- Spores can land on nearby surfaces and begin to take hold, especially on damp wood or insulation.
- Humidity and moisture remain the main drivers of growth; a small leak or condensation can already trigger early colonies.
- You may notice a musty smell or visible staining near the attic or roof sheathing.
What to do in this window:
- Fix active leaks as a top priority. Even a small drip can fuel growth.
- Keep the attic area as dry as possible: run a dehumidifier if you have one, and increase ventilation where safe.
2-7 days: What happens
- Fungus can become more noticeable on wood, plywood, or insulation, with edges of colonies expanding.
- Odor intensifies; damp areas may feel colder or clammy.
- Moisture can begin to degrade structural materials over time if left unchecked.
What to do in this window:
- Document visible mold with photos and notes for your records and any contractor discussions.
- If you must enter the attic, wear a mask and avoid disturbing the spores; minimize movement that could spread spores to other rooms.
- Begin scheduling a professional inspection; early assessment can save downstream costs.
1-4 weeks: What happens
- Mold colonies grow larger, and wood or drywall behind roof sheathing can start to rot or warp.
- Insulation can lose its effectiveness, trapping more moisture and making problems harder to detect from inside the house.
- Health symptoms may appear or worsen for sensitive occupants (irritation, allergies, asthmaflare-ups).
What to do in this window:
- Avoid DIY remediation on porous materials; disturbing mold on insulation or wood can release more spores.
- Keep interiors ventilated and maintain moisture control (dehumidification, proper ventilation in the attic where safe).
1-3 months: What happens
- Structural risk rises as wood rot deepens; roof deck or sheathing may require repair or replacement.
- Hidden mold behind walls or under attic materials becomes more likely, complicating repairs.
- Costs typically increase as more material is affected and access becomes harder.
What to do in this window:
- Engage a licensed roofing or mold remediation professional for a full assessment.
- Prepare for possible more extensive repairs if moisture has penetrated structural components.
3+ months: What happens
- Major structural repairs and potential roof deck replacement may be necessary.
- Hidden mold can spread into living spaces, raising indoor air quality concerns.
- Long-term cost impact is higher, and delaying further can extend downtime and disruption.
What to do in this window:
- Prioritize professional evaluation to determine extent and safe remediation plan.
- Consider moisture-control upgrades (ventilation, vapor barriers, improved attic insulation) to prevent recurrence.
Practical steps you can take while you wait
- Stop the source: repair leaks, fix flashing, and address any standing moisture on the roof or in the attic.
- Contain and minimize spread: keep doors closed to the attic, avoid unnecessary disturbance of moldy areas, and limit HVAC circulation into living spaces if safe to do so.
- Protect occupants: especially children, elderly, or those with allergies or asthma; remove them from exposure when mold is visible and visible growth is suspected.
- Document and plan: take dated photos, track any changes in moisture or odor, and create a timeline for when to bring in a professional.
When to call a professional
- Visible mold larger than 10 square feet or growing rapidly.
- You notice recurring leaks or moisture despite quick fixes.
- There's noticeable musty odor and health symptoms in occupants.
- You're unsure how to access ductwork, insulation, or behind-wall mold safely.
- Structural concerns or rot become evident, heat or cold losses increase, or you're facing expensive repairs down the line.
How Roof Mold Varies by Location and Climate
Core climate drivers
Moisture, temperature, and airflow are the three big levers. Where you live determines how much moisture the roof deck is exposed to, how often it dries out, and how aggressively mold can take hold.
- Humidity levels drive mold growth; higher humidity means more moisture available for mold on the deck and under shingles when ventilation is poor.
- Rainfall and storm patterns matter; frequent rain or coastal drizzle keeps surfaces wetter longer.
- Freeze-thaw cycles create points where moisture can seep under flashing and into the attic.
- Temperature extremes influence growth rate; warm summers accelerate mold, while cold snaps can trap moisture indoors if ventilation suffers.
- Ventilation and attic design matter; poor soffit/ridge venting, leaky attic hatches, or damp insulation raise mold risk.
How This Problem Varies by Region & Climate within the United States
- How This Problem Varies by Region & Climate within the United States
- Northeast: Cold winters with snow melt and high shoulder-season humidity create moisture pockets in attics and near eaves; mold spots often show up where warm indoor air meets the cold roof.
- Southeast: Persistent humidity and frequent summer rain feed mold on shaded roof planes; gutters and downspouts help, but attic ventilation and dehumidification are key.
- Midwest: Large seasonal swings and periodic ice dams raise moisture risk; ensure continuous ventilation from soffits to ridge and address insulating gaps to limit warm attic air.
- Southwest: Intense heat and arid days punctuated by monsoon moisture; mold tends to appear in shaded, moisture-retentive pockets such as under overhangs or in damp roof valleys.
- Pacific Northwest (West Coast): Year-round damp conditions promote moss and mold on roofs with limited sun exposure; careful guttering, ventilation, and periodic cleaning are important.
- California (diverse microclimates): Coastal fog zones stay damp; inland deserts stay dry but can still harbor mold in shaded, cool spots; prioritize drying potential and ventilation where moisture lingers.
- Alaska: Long, frigid winters and occasional thaws create condensation and ice-dam risks; balancing insulation with ventilation helps keep roof surfaces drier.
- Hawaii: Tropical humidity and frequent rain create constant mold pressure on shaded roofs; regular cleaning and ensuring drainage and ventilation are essential.