Ultimate Guide to Ice Dam Prevention Services
Last updated: Feb 28, 2026
Introduction to Ice Dam Prevention Services
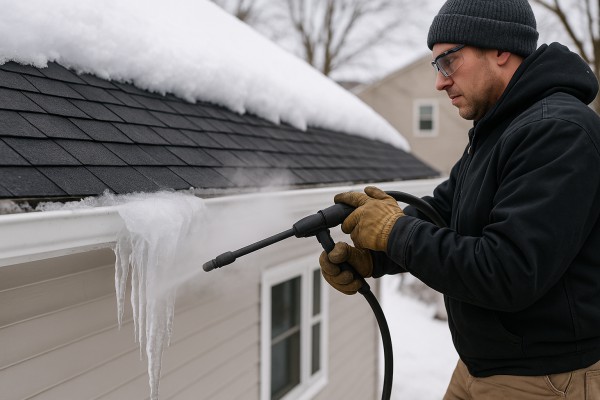
Ice dams are more than a nuisance—they can lead to interior leaks, damaged roof edges, and costly repairs if left unchecked. Our Ice Dam Prevention Services zero in on the root causes, so you get long-lasting protection rather than quick fixes. We start with a clear, practical plan tailored to your home, climate, and budget, then guide you through every step with honest, trustworthy recommendations.
What causes ice dams?
- Heat loss from the home into the attic, warming the roof deck and melting snow near the ridge.
- Poor attic insulation and ventilation that allow warm air to circulate under the roof.
- Clogged or inefficient gutters and downspouts that prevent proper drainage, causing melted water to back up at the eaves.
- Insulation upgrades and air-sealing to reduce heat escaping into the attic.
- Ventilation improvements (soffit, ridge, or newer intake/exhaust solutions) to keep the roof cold and snow intact.
- Gutter maintenance and protection to ensure smooth water flow off the roof.
- Roof edge detailing and flashing checks to prevent leaks where ice dams form.
- Optional heat-management options, discussed openly, including when and where they are appropriate for your home.
Step-by-step: How we approach a prevention project
1) Start with a thorough evaluation of attic insulation, air leaks, ventilation pathways, and gutter condition.
2) Identify the primary sources of heat gain and ice dam risk for your specific roof design.
3) Create a prioritized plan that blends insulation upgrades, vent improvements, and drainage tweaks.
4) Implement insulation and air-sealing work to minimize warm attic air reaching the roof.
5) Improve roof-edge ventilation and ensure gutters and downspouts are clear and functioning.
6) Verify performance in conditions similar to peak winter months and adjust as needed.
Safety, quality, and transparency you can count on
- Clear explanations of what needs to be done and why, with no jargon.
- Realistic timelines, costs, and potential trade-offs, so you can make informed choices.
- Licensed, insured workmanship with a focus on long-term roof health and dry interiors.
- Thorough clean-up and a final walkthrough to show you where and how the prevention measures are working.
Quick homeowner tips to reduce risk between visits
- Keep gutters clear of debris to maintain consistent drainage.
- Think about attic access and insulation gaps around penetrations (pipes, wires) and seal as needed.
- Regularly remove heavy snow from the roof edge with a roof rake from the ground, taking care not to damage shingles.
- Monitor for icicles forming along the eaves and address any unusual moisture stains or sheen on interior ceilings promptly.
Ice Dam Prevention Services
Comprehensive definition
Ice dam prevention is a proactive, system-wide approach to stopping ice dam formation before it starts. It combines building science—reducing heat transfer from living spaces into the attic, improving attic ventilation, and managing snowfall—with roofing practices that keep water moving freely off your roof. The goal is to keep warm attic surfaces from melting snow near the eaves while allowing proper drainage at the roof peak, so melted water flows into gutters and downspouts rather than backing up under shingles and into ceilings. Key components include insulation upgrades, air sealing, venting improvements, weatherization of attic hatches, vapor barriers, roof-edge protection with ice and water shield, and targeted de-icing strategies installed by a licensed professional when appropriate. Ice dam prevention is not the same as removing an ice dam; it is about eliminating the conditions that create it.
When it's typically needed
- In climates with regular freeze-thaw cycles and heavy snowfall
- If your attic is under-insulated or drafts around attic access
- If you see icicles forming, moisture in ceilings, stained walls or ceilings in upper floors, or melting on interior surfaces
- If your roof has experienced prior ice dam events
Common prevention methods
- Air sealing and insulation upgrades to reduce heat escape into the attic
- Attic ventilation improvements (soffit vents, ridge vents, baffles) to keep the attic cold and dry
- Ice and water shield installation along eaves, gutters, and low-slope sections
- Vapor barriers in the attic or ceiling assembly to limit moisture migration
- Roof edge protection and proper drainage planning to minimize meltwater backing up
- Snow management strategies (roof rake practices and proper snow removal)
- Targeted, code-compliant de-icing systems in areas prone to dam formation
- Regular roof and attic inspections to catch potential issues early
Step-by-step approach
1. Assessment and measurements: evaluate insulation levels, air leaks, attic ventilation, and roof edge conditions
2. Diagnosis: identify heat sources, moisture paths, and high-risk zones
3. Customized plan: prioritize high-impact upgrades (insulation, sealing, ventilation, edge protection)
4. Implementation: perform upgrades, install shields, and set up any approved de-icing measures
5. Verification: re-check insulation tightness, ventilation balance, and moisture control; use thermal imaging if needed
6. Maintenance planning: outline ongoing checks and seasonal adjustments
Homeowner-facing tips (practical maintenance)
- Keep attic hatch and doors properly sealed to prevent warm air leakage
- If safe, clear light amounts of snow from the roof edge with a roof rake from ground level
- Monitor for new icicles or damp spots on ceilings after storms; note changes in attic temperature
- Schedule annual or biennial inspections to ensure insulation, sealing, and ventilation stay effective
What to expect from our team
- A licensed, insured crew following safety protocols at all times
- Transparent assessment, clear prioritization, and written estimates
- Professional installation of insulation, air sealing, ventilation upgrades, and edge protection
- Minimal disruption to your living space with thorough cleanup
- A maintenance plan and follow-up checks to ensure lasting prevention
When You Need Ice-Dam Prevention Services
Signs this service is needed
- Icicles and a pronounced ice dam forming along the lower roof edge after a snowfall.
- Water stains, staining, or dripping from ceilings or upper walls, especially after thawing periods.
- Damp or musty smells in the attic, or visible damp spots on attic decking and insulation.
- Warmth or heat escaping into the attic, making insulation feel "uneven" or unevenly warm to the touch.
- Gutter damage, sagging fascia, or gutters that are clogged with ice and heavy ice buildup.
- Recurrent ice dam problems year after year, even with basic maintenance.
- Higher winter heating bills that coincide with ice dam activity or attic warmth.
- Frost patterns on attic sheathing or unusual ice buildup near vents that indicates heat leakage into the roof space.
Ways you can confirm yourself as a homeowner
1) Check attic insulation and air leaks
- Take a look in the attic (with proper lighting and safety) and assess insulation depth and coverage. Look for gaps around the hatch, around pipes and wires, and along recessed lights. Uneven or thin insulation often means heat can escape to the roof, increasing dam risk.
- Feel along the attic floor for cold spots or drafts near the ceiling lines in living spaces below.
2) Inspect attic ventilation
- Confirm there are clear soffit vents and a continuous path to a ridge or exhaust vent. Blocked vents or insulation covering vent openings can trap heat and moisture, creating warm roof areas that contribute to dam formation.
3) Examine the roof and gutters from ground level
- Clear, well-functioning gutters and downspouts help direct water away from the roof edge. If gutters are clogged or frozen, water can back up and form dams. Note any places where ice dams repeatedly form along the eave.
4) Look for interior signs of leaks
- Ceiling stains, bubbling paint, or drywall seams near exterior walls can indicate that ice dam water is intruding. Even small leaks should be documented, as they signal ongoing risk.
5) Assess whether you've had persistent winter issues
- If you've seen damming for multiple seasons or after minor snowfall events, it's a red flag that the roof's heat loss or ventilation balance needs professional review.
When to get a professional assessment
- You notice active ice dams with ongoing water intrusion into the home, or you see repeated damming across several winters.
- You cannot locate the source of heat loss or you've tried DIY fixes without lasting improvement.
- Attic conditions feel warm, or you see obvious insulation gaps, air leaks around penetrations, or blocked ventilation that DIY fixes haven't resolved.
- You want a comprehensive, prioritized plan that addresses insulation, air sealing, and ventilation to prevent future dams.
What a professional assessment typically includes
- Roof surface inspection for dam indicators, gutter condition, and drainage issues.
- Attic inspection focusing on insulation depth, coverage, and air leakage pathways.
- Ventilation evaluation to confirm a balanced, continuous airflow from soffits to ridge or exhaust areas.
- Optional infrared or moisture scanning to pinpoint heat loss and moisture pockets without destructive probing.
- A prioritized mitigation plan with cost estimates and a timeline, plus guidance on immediate weather-safe precautions.
If you're unsure after your quick checks, a pro assessment gives you a clear path forward to reduce ice dam risk, protect interior spaces, and extend roof life.
What Ice Dam Prevention Services Include
What is typically included
We tailor prevention to your home's needs. Here's what you can generally expect as part of standard ice dam prevention work:
- Thorough roof and attic assessment
- Identify risk factors such as insufficient insulation, air leaks, and ventilation issues that contribute to ice dam formation.
- Air sealing and insulation improvements
- Seal penetrations around fixtures, vents, pipes, chimneys, and knee walls to stop warm attic air from migrating into the attic.
- Upgrade insulation to meet climate-specific recommendations (often R-value targets), using blown-in or batt insulation as appropriate.
- Attic ventilation optimization
- Verify and improve ventilation balance between soffit intake and ridge or exhaust vents to promote cooler roof temps and reduce moisture buildup.
- Eave and roof-edge protection
- Install or upgrade ice and water shield in vulnerable areas, reinforce roof flashing where needed, and ensure proper drip edge details to direct meltwater away from the home.
- De-icing and anti-icing options (where allowed)
- In select cases, and with code compliance in mind, discuss approved de-icing solutions such as heated cables or mats in problem spots. Provide guidance on energy use, safety, and warranty implications.
- Snow management planning and safety guidance
- Provide a homeowner-facing plan for winter maintenance, safety tips, and best practices for minimizing ice dam risk during heavy snow events.
- Written findings and a prioritized plan
- Deliver a clear report with photos, up-to-date diagnostics, recommended improvements, and a phased work plan with rough cost ranges.
- Optional seasonal maintenance alignment
- Offer a maintenance checklist and seasonal checks to help you stay ahead of ice dam risk year after year.
Step-by-step approach we follow
1) Schedule the diagnostic visit
- We coordinate a convenient time to assess the roof and attic without disrupting your schedule.
2) On-site diagnostics
- We inspect insulation levels, air leaks, ventilation paths, flashing, and edge details; we document issues with notes and photos.
3) Custom prevention plan
- You receive a written plan outlining prioritized improvements, expected outcomes, and a cost estimate tailored to your home.
4) Implement improvements
- We install or upgrade insulation and air sealing, optimize ventilation, and adjust roof-edge protection as outlined. Any de-icing solutions are installed only when appropriate and permitted.
5) Final review and winter readiness
- We perform a follow-up check to confirm all measures are functioning and provide a practical maintenance checklist for you.
6) Optional ongoing maintenance
- If you want ongoing protection, we can arrange seasonal inspections and preventive tune-ups.
What is not typically included
- Major roof replacement or structural repairs beyond prevention-related improvements.
- Interior water damage remediation or extensive mold treatment (these are handled by specialists separately).
- Full gutter replacement or extensive drainage system work beyond regulation-prescribed protection at the eaves.
- Extensive chimney repairs or re-flashing beyond what's necessary to prevent ice dam formation.
- Emergency snow or ice removal from the rooftop (snow removal services are separate offerings and not part of standard prevention work).
- Permit fees or code upgrades not directly tied to the prevention measures being implemented.
- Large-scale exterior remodeling or material replacements outside of the prevention plan scope.
- Work beyond the agreed service area or outside the project's defined timeline without a formal change order.
Roofing Materials Commonly Used for Ice Dam Prevention Services

Asphalt shingles are the most common residential roofing material, and ice dam prevention on this roof type centers on keeping the eave and roof edge properly protected and vented.
- How the service relates:
- Install ice-and-water shield along the eave line to create a waterproof barrier.
- Add or upgrade attic insulation and ensure balanced ventilation to reduce heat loss that contributes to dam formation.
- Use drip edges and clean gutters to maintain clear water runoff.
- Material-specific notes:
- Heat cables can be used with asphalt but must be installed per manufacturer guidelines to avoid overheating or damaging the shingle surface.
- Fasteners and clips should not penetrate through the shingle surface in ways that could lead to leaks.
- Practical considerations:
- Inspect for damaged or curling shingles during service and plan for replacement if needed.
- Ensure proper clearance around vents, chimneys, and attic penetrations to prevent heat bleed into the roof deck.

Standing-seam metal roofs are excellent at shedding snow, but ice dams can still form if the attic is warm or if heat leaks around roof edges.
- How the service relates:
- Ice dam prevention on metal roofs often combines top-edge insulation/ventilation with targeted eave protection.
- When needed, heat cables are installed with care to avoid contact with seams and to prevent thermal hotspots.
- Material-specific notes:
- Metal surfaces require non-penetrating installation methods and special clips to avoid denting or puncturing panels.
- Heat cables should be rated for metal roofs and positioned to run along the eave and downspouts without crossing seams.
- Practical considerations:
- Snow guards or snow retention systems can be coordinated with prevention work to manage sliding snow safely.
- Inspect flashing at details (valleys, pitches) since ice can back up at transitions even on metal.
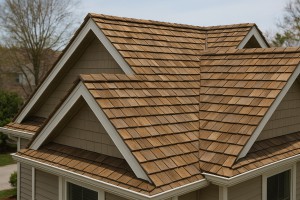
Cedar adds natural beauty but is more vulnerable to moisture intrusion if ice dams form and water backs up under shingles.
- How the service relates:
- Proper underlayment and ice/water shield at the eaves protect the wood from back-water while the attic is insulated and vented.
- Techniques focus on avoiding direct heat exposure to cedar surfaces, which can cause warping or scorching.
- Material-specific notes:
- Cedar is prone to shrinkage and gaps; flashing and step-flashing must be precise to seal edges where ice dams form.
- If heated cables are used, they should be cedar-friendly and kept away from exposed wood surfaces to prevent damage.
- Practical considerations:
- Consider upgrading to cedar-rated flashing and ensuring the roof deck is sound before adding any electrical de-icing elements.

Tile roofs are durable but heavy and require careful handling during ice dam prevention work.
- How the service relates:
- Eave protection with ice/water shield and a robust underlayment is essential to prevent water infiltration at tile eaves.
- When heat cables are used, the installation must avoid cracking or loosening tiles and must respect tile manufacturer guidelines.
- Material-specific notes:
- Tiles can crack if cables press against them or if heat is concentrated; use low-profile, tile-rated heat cables and secure them without stressing the tiles.
- Re-seating or replacing damaged tiles may be part of the service plan after de-icing work.
- Practical considerations:
- Ensure proper tile clearance and venting to allow warm air to escape from the attic, reducing dam risk at the eaves.

Slate roofs demand precision and care due to their brittleness and cost.
- How the service relates:
- Use of high-quality underlayment and ice/water shield is critical at the eaves to block meltwater from penetrating beneath slate.
- Any heating elements must be installed by experienced pros to avoid cracking or loosening slate.
- Material-specific notes:
- Slate requires professional handling for flashing details and for any cable routing near fasteners or joints.
- Replacement slate pieces should be considered if damage is anticipated during insulation or de-icing work.
- Practical considerations:
- Periodic inspections after winter help catch loosening slates or degraded underlayment early.

These offer similar performance to asphalt with some added durability and flexibility.
- How the service relates:
- They accept standard ice-dam prevention practices (shielding, insulation, ventilation) with the potential for easier heat-cable integration in some systems.
- Do not overlook gutter and drip-edge protection to keep meltwater moving away from the roof edge.
- Material-specific notes:
- Synthetic products often tolerate heat cables better than natural materials, but follow manufacturer guidelines to avoid warranty issues.
- Inspect fasteners and edge flashing to ensure a secure seal around penetrations.
- Practical considerations:
- Regular maintenance and timely replacement of damaged sections extend dam-prevention effectiveness.
- Coordination with existing roof vents and attic insulation remains important for long-term success.
The Cost of Ice Dam Prevention Services
Typical average costs for Ice Dam Prevention Services
- Diagnostic inspection: $75–$150
- Heat cable installation along the roof edge: $1,200–$2,800 (typical 1–2 story homes)
- Attic insulation upgrade to reduce heat loss: $1,000–$3,500
- Ventilation improvements (soffit/ridge vents, fans): $300–$1,200
- Sealing around penetrations (chimneys, pipes, vents): $100–$400 per opening; $600–$1,500 for multiple
- Roof edge flashing adjustments or drip edge work: $150–$600
- Full prevention package (inspection + prevention upgrades): $2,500–$6,000
- Typical total for a standard 1,800–2,000 sq ft home: $2,000–$5,500
Cost considerations that may reduce costs
- Smaller or simpler roof geometry (fewer dormers, shorter roof edge)
- Scheduling in the off-season or during promotions
- Pre-existing favorable conditions (already good ventilation, some insulation in place)
- Homeowner prep that reduces labor (clearing snow, removing debris, organizing access)
- Bundled services or package deals combining inspection, insulation, and ventilation
- No emergency/after-hours service; work during normal business hours
Cost considerations that may increase costs
- Large, complex roofs (multi-story, steep pitches, many dormers)
- History of ice dam damage requiring roof or deck repairs
- Water intrusion or hidden damage discovered during prevention work
- Old or incompatible equipment needing replacement or relocation
- Limited access or difficult working conditions (tight or obstructed attic spaces)
- Remote locations with higher travel time and logistics
- After-hours, weekend, or emergency service requests
- Permits, code updates, or additional safety measures
- Price volatility for materials (heat cables, high-R insulation)
What to expect in a typical service visit (steps)
1. Schedule assessment and gather basic home information
2. On-site roof and attic evaluation to identify heat loss sources
3. Customized prevention plan outlining scope, materials, and timeline
4. Itemized quote with labor, materials, and any potential contingencies
5. Pre-install prep guidance and safety briefing
6. Post-install inspection, testing of systems, and warranty discussion
How Our Ice Dam Prevention Process Works
Step 1: Scheduling and Initial Assessment
We begin with a quick call to understand your concerns and set expectations. Then we schedule a thorough on-site visit at a time that fits your calendar. During the visit, we look for:
- Signs of past ice dams and trouble spots on the roof
- Gutter and downspout condition
- Attic access, insulation gaps, and potential air leaks
- Roof ventilation layout and overall attic temperature balance
We explain what we'll look for in plain terms and answer any questions you have before we begin.
Step 2: Diagnostics and Mapping
Next, we map out why ice dams form on your home. This includes identifying heat sources in the attic, insulation shortfalls, and airflow patterns that may be warming the roof deck unevenly. We document problem zones so every upgrade targets the root cause, not just the symptom.
- Create a heat map of attic temperatures in key zones
- Verify insulation R-values in the attic and around penetrations
- Check for gaps around chimneys, vent pipes, and fixtures
Step 3: Customized Prevention Plan
With data in hand, we craft a homeowner-friendly plan tailored to your roof, climate, and budget. You'll receive:
- Clear goals and milestones
- A prioritized list of improvements
- An estimated timeline and warranty notes
The plan outlines short-term measures for immediate impact and longer-term fixes for lasting protection.
Step 4: Air Sealing and Insulation Improvements
Air leaks and thin insulation are the leading causes of warm roof decks. Our approach focuses on stopping heat from traveling into the attic and sealing pathways for moisture.
- Seal attic hatches, electrical penetrations, and vent openings
- Add or upgrade attic insulation where gaps exist
- Install or adjust air barriers around kneewalls and skylight bays
- Use baffles or vent channels to ensure proper attic ventilation
Step 5: Ventilation Upgrades and Climate Control
A well-ventilated attic helps keep the roof deck cold in winter. We optimize airflow without sacrificing living space comfort.
- Reconfigure soffit and ridge vents for balanced ventilation
- Add or reposition intake vents where needed
- Verify attic fan operation only if recommended for your setup
- Ensure insulation is not blocking vents
Step 6: Snow and Ice Management Protocol
In some cases, a controlled approach to snow and ice is part of preventing damage while work is underway.
- Establish safe, site-friendly snow removal practices if necessary
- Create a plan for monitoring ice dam risk during heavy snows
- Coordinate with you to minimize disruption to daily routines
Step 7: Optional Ice Dam Prevention Technologies
We discuss tech options only when they fit your home and climate. We emphasize enduring improvements over temporary fixes.
- Exterior roof venting enhancements
- Supplemental attic thermal barriers where needed
- Heated cable systems considered only after insulation and ventilation fixes are in place
- Roof ice guards and water channels installed where appropriate
Step 8: Implementation, Safety, and Quality Check
When the plan is approved, we proceed with careful, clean workmanship and a strong safety protocol.
- Schedule work in logical phases to avoid rework
- Protect landscaping, siding, and interior spaces
- Perform a mid-project check to confirm alignment with plan
- Complete a final walkthrough with you and document all changes
Step 9: Final Review and Maintenance Plan
We wrap up with a comprehensive post-installation review and clear guidance for long-term protection.
- Review of all upgrades and why they prevent ice dams
- Tips for ongoing attic maintenance and seasonal checks
- A written maintenance plan and warranty details
- Follow-up visit option to verify performance after a full freeze-thaw cycle
Residential vs. Commercial Considerations for Ice Dam Prevention
Residential Considerations
Homes typically have steeper roofs, attic spaces, and lighter structural loads. Ice dam risk here often stems from heat escaping through the attic, uneven insulation, and blocked gutters. A practical plan keeps things simple, affordable, and effective for a single-family home.
- What matters on a house
- Roof type: pitched, asphalt shingles, and compact eaves where warm air can melt snow near the edge.
- Attic conditions: insulation thickness, air leaks, and venting ability.
- Access and safety: ladder-safe work zones and fall protection for technicians.
- Key prevention actions
- Improve attic insulation and air sealing to create a uniform roof temperature.
- Ensure soffit and ridge vents are clear and functional to promote continuous airflow.
- Keep gutters clean and functioning; install ice guards if appropriate for the eave line.
- Use heat cables selectively, only where melt-back is persistent and approved by code.
- Step-by-step approach you can expect
1. In-home assessment of attic insulation, air leaks, and venting.
2. Customized plan to reduce heat loss and improve drainage.
3. Implementation: air sealing, insulation upgrades, and venting adjustments.
4. Gutter and edge treatments to improve melt and runoff.
5. Follow-up check to confirm effectiveness and address any new concerns.
Commercial Considerations
Commercial buildings bring different scales, systems, and safety obligations. Roofs are often flat or low-slope, with more complex drainage, multiple occupants, and stricter code and permit requirements. Planning focuses on reliability, long-term maintenance, and coordinated operations.
- What matters on a commercial property
- Roof geometry: flat or low-slope roofs with large eaves and multiple levels.
- Drainage control: scuppers, parapets, downspouts, and edge detailing to prevent ponding.
- Tenant coordination: schedules, access, and minimizing disruption during maintenance.
- Safety and compliance: fall protection, PPE, scaffold or equipment use, and permits.
- Key prevention actions
- Tighten thermal envelope at perimeter edges to reduce heat transfer to the roof.
- Optimize insulation and vapor barriers for consistent roof temperatures across large areas.
- Install or upgrade edge heating where ice dams are a recurring issue.
- Strengthen drainage: proper snow removal plans, cleared gutters, and functional drainage paths.
- Step-by-step approach you can expect
1. Roof survey of all accessible areas, often with drone assistance for large footprints.
2. Design of a perimeter heating plan, insulation upgrades, and drainage improvements.
3. Implementation across zones, with attention to safety protocols and building access.
4. Establish a long-term maintenance program (inspections, snow management, and edge care).
5. Documentation for code compliance, warranties, and tenant communication.
Residential vs Commercial Considerations of Ice Dam Prevention Services
- Scope and complexity
- Residential: targeted to a single structure with fewer systems to coordinate.
- Commercial: multi-zone, multi-tenant, and often multiple roof types requiring phased planning.
- Temperature management
- Residential: focus on attic heat loss and eave protection tailored to typical homes.
- Commercial: broader strategy to maintain uniform roof temperatures across large areas.
- Safety, permits, and codes
- Residential: standard precautions, simpler permitting in many neighborhoods.
- Commercial: formal safety plans, OSHA considerations, and stricter permitting and inspections.
- Scheduling and disruption
- Residential: flexible scheduling around the homeowner's routine.
- Commercial: coordinated outages and work windows to minimize tenant impact.
- Long-term value
- Residential: improvements that reduce ice dam risk and potential interior damage.
- Commercial: ongoing maintenance contracts that address seasonal cycles, snow events, and asset protection.
How Ice-Dam Prevention Services Vary by Location
Regional Climate Considerations
Winter conditions drive how we plan and execute ice-dam prevention.
- Freeze-thaw cycles, snowfall totals, and sun exposure shape dam risk at the eaves.
- Regions with long, cold spells plus rapid melts require different strategies than consistently mild climates.
- Roof orientation and shading affect when meltwater refreezes on the roof edge.
In practice, this means tailoring insulation, attic ventilation, and heat-management approaches to how heat moves from the living space to the roof and how often and how rapidly meltwater occurs.
Roof Construction and Materials Variations
The roof itself dictates the best prevention approach.
- Asphalt shingles dominate many regions, but clay tiles, metal, or slate change how ice dam barriers are installed and how heat is applied or resisted.
- Roof pitch and overhang length influence dam formation: long overhangs can trap meltwater; steeper pitches shed snow faster but require edge protection.
- Gutter design and spacing matter: some areas rely on heated gutters or supplemental eaves protection, others use snow guards and roof-edge materials that shed snow more predictably.
Local Codes, Permits, and Contractor Licensing
Regulatory context guides what we can install and when.
- Permits and licensed HVAC/roof professionals are required in some states, while others have fewer formalities.
- Building codes may specify ice barriers along eaves or within the first 12–24 inches of the roof plane in snow-prone zones.
- Insurance and lien rules vary; reputable teams document scope, materials, and warranty details for regional compliance.
Equipment and Techniques Vary by Region
Techniques adapt to what the climate and roof demand.
- Heat cables, ice barriers, and their configuration are chosen based on typical winter patterns (self-regulating vs. constant wattage types).
- Snow removal tools (roof rakes) and snow guards are deployed according to regional snow behavior.
- Ventilation and insulation strategies are tuned to local energy codes and attic conditions; some areas emphasize air sealing more than others.
How this service varies in different regions in the United States
- Northeast (New England, Mid-Atlantic): Heavy snow and repeated freeze-thaw cycles. Expect robust eave protection, continuous ice-and-water shield, and proactive snow-management plans before major storms.
- Midwest: Wide swings in temperature and wind-driven snow. Emphasis on balanced attic ventilation, moisture control, and strategies to reduce dam formation on long eave lines.
- South: Less frequent, but sometimes intense freezes. Focus on sealing air leaks, upgrading insulation, and targeted heat management for problem spots.
- West (Mountain states, Pacific Northwest): Mountain regions face persistent snow and cold nights; coastal-inland areas vary. Priorities include proper attic ventilation, moisture control, and selective use of heat barriers in zones prone to dam build-up.
Steps to tailor ice-dam prevention by region
1. Assess local climate patterns and typical roof designs for your area.
2. Review applicable local codes and permit requirements with a licensed pro.
3. Choose heat-management, insulation, and ventilation tactics suited to your region.
4. Schedule maintenance and preventive measures to align with your area's winter window.
Timing and Seasonal Availability
- Local winters dictate when we start assessments and install preventative measures.
- Some regions benefit from pre-season work in autumn; others can have shorter windows for installation depending on weather.
Maintenance and Upkeep Differences
- Areas with repeated freeze-thaw cycles require more frequent inspections of attic seals, gutters, and edge barriers.
- Humid or coastal regions emphasize moisture monitoring and deck/roof-structure rot prevention alongside dam-prevention work.