Ultimate Guide to Ice Dams Caused by Heat Loss
Last updated: Feb 28, 2026
Introduction to Ice Dams Caused by Heat Loss
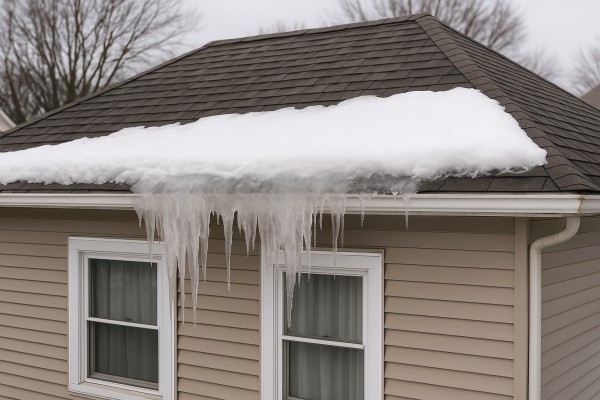
Ice dams form when warm air escaping from your living spaces heats the roof near the attic, melting snow that refreezes at the eaves to create a dam. Water can back up behind that dam, seeping under shingles, leaking into walls or ceilings, and staining or rotting wood. While not every home experiences them every year, ice dams are a common winter challenge in colder climates and for houses with heat loss in the attic.
What causes ice dams from heat loss
When the attic isn't properly insulated or air-sealed, warm air from the living space rises and warms the roof from the inside. The snow on the roof melts in the warmed area and then refreezes at the colder eaves, forming a dam. As meltwater backs up, it can seep under shingles and into the roof deck or attic, leading to leaks, staining, and potential mold.
How common and how urgent is this problem
- This is a widespread issue in regions with cold winters and significant snowfall.
- Homes with older insulation, gaps around ducts or plumbing, or poorly vented attics are especially prone.
- Urgency depends on signs:
- Active leaks, dripping water, or ceilings showing water stains demand immediate attention.
- If there are no leaks but you see ice dams forming or icicles growing along the eaves, plan preventive measures before winter storms intensify.
High-level next steps (overview)
- Step 1: Assess insulation and air sealing in the attic.
- Step 2: Improve attic ventilation to keep roof sheathing closer to outdoor temperatures.
- Step 3: Manage snow on the roof safely when conditions allow.
- Step 4: Identify and seal problem air leaks around lights, vents, chimneys, and ductwork.
- Step 5: Consider longer-term upgrades if ice dams recur year after year.
Quick checks you can do safely
- Look for warm spots on the attic floor or unusual frost patterns on the underside of roof decking (if you have access safely).
- Check for gaps around ceiling penetrations, electrical boxes, or attic hatches and seal them.
- Clear exterior gutters and downspouts of debris so meltwater can shed away from the roof edge.
What a roofer will assess in a heat-loss-driven ice dam
- Attic insulation R-value and overall coverage, including around penetrations.
- Air leaks between living space and attic (ducts, recessed lights, fan housings, plumbing).
- Attic ventilation balance, including soffit, ridge, and gable vents.
- Roof edge and shingle condition for signs of damage from repeated freezing and thawing.
- Potential moisture damage in the attic or ceiling cavities and any signs of mold or wood rot.
High-level fixes to prevent recurrence
- Increase insulation to stop warm attic air from reaching the roof deck.
- Plug air leaks around penetrations and seal gaps at the attic hatch.
- Improve ventilation by balancing intake (soffit) and exhaust (ridge) vents.
- Regularly remove snow from the roof with a safe roof rake when safe conditions permit.
- Schedule a professional assessment for persistent or severe damming to design a tailored upgrade plan.
Is an Ice Dam Caused by Heat Loss an Emergency?
- Water is actively dripping through ceilings or walls into living spaces, especially during thaw cycles. This means leaks are progressing and can quickly worsen without intervention.
- Ceilings or drywall are bulging, cracking, or there is pooling water in the attic or on interior surfaces. A bulge or spreading damp spot signals a mounting risk to structure and insulation.
- Large ice dams are forming or failing in ways that push water under shingles or into the attic, threatening insulation, decking, and interior finishes.
- There are signs of electrical hazards near leaks (moist outlets, switches, or fixtures, buzzing sounds, or a burning smell). Water and electricity together are a serious safety issue.
- The dam is causing visible damage to the roof edge (shingles lifting, significant ice buildup near eaves) or you notice daylight through the roof around the dam. That can indicate structural compromise that needs prompt attention.
Monitor if
- There is minor water intrusion that has not progressed in 24–48 hours and does not yet threaten living spaces. You're watching for any changes but no active drip inside.
- Frost or cold air shows on the attic underside of the roof deck, indicating heat loss, but there are no interior leaks yet. This is a warning sign you'll want to address soon.
- The ice dam is small and stable, and the home remains dry at present. You're keeping an eye on it while planning a proactive fix with a roofer.
Can wait if
- There is no water entering the home and the damage appears limited to the roof edge without interior leakage. In this case, you can schedule a professional assessment for a clearer fix.
- The dam is isolated, there are no drips or moisture in living spaces, and weather conditions suggest it won't thaw rapidly in the next day or two.
- The attic has robust insulation and proper ventilation, so heat loss is limited and the risk of rapid escalation is low. You can plan for repairs without an urgent, on-the-spot intervention.
1. Do not walk on the roof or attempt to chip or melt the ice dam yourself. Mechanical manipulation can damage shingles and create more leaks.
2. Keep people and pets away from the affected area; close doors to isolate the problem zone and reduce heat transfer into the attic.
3. Place towels or a bucket under drips; use plastic sheeting to protect furniture and valuables if feasible.
4. If you can safely do so, document damage with photos for insurance purposes; note where leaks occur and how quickly they spread.
5. Call a roofer for an on-site assessment and temporary containment options (they may install tarping or other measures to prevent further leaks). If you see exposed wiring or other electrical concerns, turn off power to the affected area at the main breaker to reduce risk until professionals arrive.
Common Causes of Ice Dams Caused by Heat Loss
Inadequate attic insulation and thermal bridging
Heat rising from living spaces into the attic is a primary driver of warm roof decks. When insulation is missing, thin, compressed, or poorly installed, heat can travel through the attic floor and melt snow on the roof. The melt runs to the colder eave area and refreezes, forming an ice dam.
- Common issues: low overall insulation, compressed batt insulation, gaps around joists, and poor coverage around vents and wiring.
- Thermal bridging: studs, rafters, and corners conduct heat from the interior to the roof deck even where insulation is present.
What to look for:
- Uneven insulation depth, exposed joists, or noticeably warmer attic spots.
- Gaps where insulation meets the attic hatch, ductwork, or roof framing.
Air leaks from living spaces into the attic
Tiny cracks and penetrations let warm indoor air flood into the attic, warming the roof deck.
- Attic access doors and pull-down stairs that don't seal well.
- Gaps around plumbing stacks, wiring penetrations, and vent openings.
- Leaky duct penetrations or disconnected ducts allowing warm air into the attic.
What to fix:
- Seal gaps with appropriate sealant or foam; add weatherstripping to access doors.
- Properly seal around plumbing and electrical penetrations; use draft-stopping materials.
Poor attic ventilation and air circulation
Even with insulation, if attic air isn't circulating, heat builds up near the roof, promoting snow melt at the eaves.
- Blocked or insufficient soffit intake vents.
- Inadequate ridge or exhausting ventilation.
- Missing or improperly installed baffles that channel air from soffits to the roof ridge.
What to fix:
- Clear or upgrade soffit vents; install or repair ridge venting.
- Add or correct baffles to maintain a clear airflow path from soffits to the ridge.
Ducts, fans, and other heat sources in the attic
Warm air from heating or other equipment vented into an attic warms the roof deck.
- Leaky or poorly insulated ducts running through the attic.
- Exhaust fans venting into the attic instead of outdoors.
- Electrical equipment, light fixtures, or heating devices in the attic.
Fixes:
- Seal duct seams with mastic; wrap ducts in insulation.
- Route exhausts to outdoors; use airtight, IC-rated fixtures where needed.
Cathedral ceilings, skylights, and other high-heat roof areas
Vaulted spaces and skylights can concentrate heat near the roof line if not properly insulated and vented.
- Insulation gaps around vaulted sections allow heat to reach the roof.
- Skylights without adequate insulation or shading collect solar heat.
What helps:
- Increase insulation around vaulted areas; use radiant barriers where appropriate.
- Ensure attic ventilation remains effective behind skylights so heat doesn't build up.
Attic bypasses and penetrations
Every place heat can escape into the attic strengthens the heat-loss path.
- Attic hatch framing or pull-down stairs that aren't tight.
- Recessed lighting installed without proper sealing.
- Plumbing, electrical, and vent penetrations that aren't sealed.
Ways to address:
- Air-seal penetrations with low-expansion foam; seal around hatch frames.
- Use sealed, IC-rated fixtures; ensure penetrations are well insulated.
Quick checks to identify heat-loss causes
1) Inspect insulation depth and condition in the attic; look for compression, gaps, or sagging areas.
2) Feel for warm spots around attic access, ductwork, and penetrations; seal as needed.
3) Assess ventilation: are soffit vents clear? Is there a functional ridge vent? Are baffles in place?
4) Inspect ducts and fans routed through the attic; seal leaks and improve insulation where possible.
How Roof Materials Affect Ice Dams Caused by Heat Loss
The core idea: heat transfer and roof material
Inside heat that leaks into the attic can melt snow on the roof. The material and color of your roof influence how quickly that heat moves through the roof structure and where water refreezes at the eaves. That pattern helps determine where ice dams form and how severe they become.

- Moderate heat transfer: Shingles themselves aren't the strongest barrier to heat coming from the attic, so melted water often rides down the roof and refreezes at the eaves.
- Dam hotspots: Dams tend to form near roof edges where meltwater reaches colder, shaded areas.
- Durability notes: Freeze–thaw cycles can loosen shingles near ice dams if water gets under them; ensure flashing and underlayment are in good shape.
- What helps: Good attic insulation and a well-sealed attic air barrier reduce heat loss through shingle surfaces.

- High conductivity: Metal transfers heat from the attic to the roof surface quickly, which can cause rapid snow melt on upper roof sections.
- Dam dynamics: If insulation or ventilation is poor, meltwater can still flow toward the eave and refreeze, creating ice dams just like on other roof types.
- Snow management: Metal roofs shed snow more readily, but that can push water toward downstream eaves and gutters, concentrating dam risk where water meets colder edges.
- What helps: Pair metal with strong attic insulation, proper underlayment, and, if practical, snow guards to control sliding water and reduce dam formation at the edges.

- Porous surfaces: Wood can absorb and hold moisture, which complicates how quickly water moves off the roof.
- Warping and gaps: Repeated freeze–thaw cycles near ice dams can cause shakes to warp or lift, creating pathways for water behind the roofing layer.
- Dam patterns: Irregularities in wood surfaces may cause uneven melting, with potential local dams where water collects.
- What helps: A continuous, well-sealed underlayment and solid roof deck help keep meltwater moving safely to the eaves.

- Dense but heavy: Tiles themselves don't conduct heat as rapidly as metal, but heat loss from the attic still melts snow on the upper portions.
- Water paths: If tiles are poorly vented or have broken underlayment, melted water can become trapped and refreeze at the eaves.
- Tile edge risks: The spaces at tile edges and along penetrations are common weak points for dam-related leaks.
- What helps: Ensure proper ventilation, intact flashing, and a reliable underlayment beneath tile to channel water away from the eaves.

- Durable, low porosity: Slate resists water intrusion well, which can lessen damage from small dams, but heat loss can still create dam buildup at the eaves.
- Edge concerns: Ice dams may form where meltwater encounters cold perimeter sections.
- What helps: A good underlayment and attention to flashing around roof penetrations minimize water entry behind slate.

- Weather-mimicking but variable: Performance depends on the exact composition; many behave like asphalt with similar heat transfer characteristics.
- Dam risk: If attic heat drives snow melt, dams tend to form at eave lines similarly to asphalt shingles.
- What helps: Treat like asphalt—well-sealed attic, proper underlayment, and edge detailing reduce dam risk.

- Wide surface, different drainage: On flat or low-slope roofs, melted water doesn't always drain quickly, which can create pooling that behaves differently from pitched roofs.
- Ice dam analogs: Dams aren't always the driving issue, but interior heat loss can still melt upper layers and lead to water backing up toward roof edges or penetrations.
- What helps: Ensure edge detailing, proper perimeter flashing, and unobstructed drainage pathways to prevent water backing up at the edges.
Practical steps to reduce ice dams by material
1) Improve attic insulation and air sealing across all roof types to minimize heat reaching the deck.
2) Ensure adequate attic ventilation (so soffit and ridge vents work together) to keep the roof cold even in winter.
3) Use roof color and reflectivity considerations to reduce solar gain on sunny days, especially with darker materials.
4) Install snow guards or guards along eaves on metal or tile roofs to manage snow movement and reduce concentrated dam formation.
5) Inspect flashing, chimney/chase penetrations, and vents regularly; damaged seals worsen dam risks regardless of material.
6) For high-risk climates, consider professional assessment of underlayment choices tailored to your roof type and climate.
7) If using heat cables as a last resort, place them along eaves only and follow manufacturer guidelines to avoid damaging roof edges or triggering fire hazards.
The Risks of Ignoring Ice Dams Caused by Heat Loss
Hidden Structural Damage
- Ice dams are a symptom of heat escaping into the attic; that heat drives meltwater up under shingles and toward the eaves. When water sits there, it can seep into roofing materials and the roof deck, accelerating rot and deterioration.
- Repeated freeze–thaw cycles push water behind layers that aren't designed to shed it, which can loosen fasteners, lift shingles, and damage underlayment.
- Over time, hidden moisture weakens support members in the attic (rafters, joists) and can compromise the roof's long-term structural integrity.
Water Intrusion and Interior Damage
- Water trapped behind an ice dam can migrate through gaps and leak into attic spaces, ceiling junctions, and walls.
- You may notice ceiling stains, bubbling paint, warped drywall, or peeling wallpaper long before you see the dam itself.
- Damp insulation loses its R-value, making the attic and upper living spaces colder and more prone to further heat loss.
Mold, Mildew, and Health Risks
- Persistent moisture in insulation and framing creates ideal conditions for mold and mildew growth.
- Mold spores can affect air quality, triggering allergies, asthma, or respiratory irritation—especially for children, seniors, and anyone with sensitivities.
- In kitchens, bathrooms, or living areas below the attic, damp patches and odors can indicate deeper mold problems.
Electrical and Fire Hazards
- Water in proximity to wiring, fixtures, or electrical boxes increases the risk of short circuits or arcing.
- Saturated insulation around electrical components raises fire risk and can complicate repairs if moisture persists.
- Damaged gutters or flashing that leak onto electrical pathways adds another potential hazard.
Increased Energy Bills and Wasted Heat
- Heat loss that forms ice dams means the home is wasting energy to compensate, so the furnace runs longer and harder.
- Even small, unseen leaks add up over a winter, leading to noticeably higher heating bills and an uncomfortable indoor climate.
Financial and Insurance Implications
- Interior damage from leaks translates into repair costs for drywall, ceilings, floors, and personal belongings.
- Prolonged moisture exposure can necessitate attic insulation replacement or roof deck work, which is far more expensive than early-stage fixes.
- Some insurance policies scrutinize moisture-related claims; neglect or chronic leaks can influence coverage decisions or premium considerations.
Escalation and Repair Complexity
- Early-stage issues are generally cheaper and faster to fix; delaying allows damage to spread to structural components and living spaces.
- Once mold penetrates framing or rot takes hold in sheathing, you may face structural framing repairs, full roof deck replacement, or extensive interior remediation.
Warning Signs You Shouldn't Ignore
- Visible ice along eaves combined with damp patches on ceilings or attic walls.
- Stains or discoloration on ceilings, especially after winter thaw cycles.
- Musty attic odors, warped insulation, or peeling paint near ceiling lines.
How Ice Dams Caused by Heat Loss Are Diagnosed
What the diagnosis evaluates
When ice dams form because heat leaks from living spaces into the attic, the diagnosis focuses on three things: 1) are there warm spots on the roof deck during cold weather, 2) are attic insulation and ventilation allowing that heat to reach the roof, and 3) is there evidence of heat leaks at the attic level (gaps, penetrations, or unsealed fixtures) that feed those warm spots. The goal is to confirm heat movement from the living space into the roof structure and identify where to fix it.
Visual and interior signs to look for
- Ceiling stains or slight sagging near interior attic access or in rooms directly above the attic.
- Icicles forming at the eaves with irregular melted patches higher on the roof, suggesting heat-driven melting near the roof edge.
- Frost or condensation on attic rafters, sheathing, or insulation surfaces during cold, calm weather—especially near penetrations like light cans, vent pipes, and chimneys.
- Warmer-looking interior attic corners or areas visible through attic vents when you're up there on a cold day.
Step-by-step diagnostic process
1) Gather the basics
- Note where leaks occur, what time of year, and how long heat has been escaping. Ask about recent remodeling, new insulation, or openings in the attic.
2) Inspect insulation depth and coverage
- Check insulation thickness across the attic floor and around kneewalls, penetrations, and hatch openings.
- Look for gaps, compressed blanket, or settled insulation that leaves portions of the roof deck exposed.
3) Assess attic ventilation
- Verify soffit intake vents aren't blocked and are continuous to ridge or other exhaust vents.
- Look for blocked vents, loose baffles, or inadequate vent area that would trap heat under the roof deck.
4) Identify heat sources near the attic
- Locate recessed lighting, bathroom vents, kitchen ducts, or plumbing lines that lack proper airtight sealing or insulation.
- Check attic access doors, fans, and chimneys for poor seals or gaps.
5) Map temperature patterns
- Use an infrared camera or a high-quality infrared thermometer to identify warm spots on the underside of the roof sheathing.
- Compare warm areas to insulation gaps to see if heat is escaping where it shouldn't.
6) Test for air leaks
- Perform a smoke pencil or incense test around attic hatches, electrical boxes, light fixtures, and around plumbing and duct penetrations.
- If available, consider a blower door test for a more thorough assessment of overall attic air leakage.
7) Check moisture and condensate indicators
- Use a moisture meter on wood framing and insulation near warm spots to see if moisture buildup is present.
- Look for any signs of condensation on attic surfaces that would indicate persistent warm air transfer.
8) Distinguish heat loss from other causes
- If warm roof spots align with leak signs inside and around electrical or lighting fixtures, heat loss is a strong driver.
- If the roof deck is consistently cold underneath melted areas, the dam may be driven more by external snow melt or ventilation issues rather than leaks—note these patterns for the fix plan.
Tools and techniques you'll see in a professional assessment
- Infrared camera or infrared thermometer for temperature mapping.
- Smoke pencil, incense sticks, or a similar tracer for spotting air leaks.
- Moisture meter for wood and insulation.
- Visual attic inspection and a review of insulation R-values and vent performance.
How findings are documented
- A labeled map of warm roof areas, insulation gaps, and vent blockages.
- Photos or screenshots from infrared scans showing temperature differences.
- A checklist of leaks, penetrations, and ventilation deficiencies to address.
How the diagnosis guides the next steps
- Prioritize air sealing around penetrations and fixtures with evident leaks.
- Improve attic insulation to restore a uniform cold roof deck during winter.
- Upgrade or repair attic ventilation to move heat and moisture out efficiently.
- Recheck after repairs with a follow-up inspection to confirm the dam-causing heat loss has been resolved.
Repair Options for Ice Dams Caused by Heat Loss
Temporary fixes
- Remove snow from the eaves with a roof rake from ground level. Do this carefully and in short, controlled passes to avoid damaging shingles or injuring yourself.
- Wear gloves and keep a safe distance from the edge.
- Work gradually, clearing only a foot or two at a time to prevent dislodging ice.
- Use calcium chloride ice melt in a sock or pantyhose laid along the dam. This helps create a channel for meltwater to flow off.
- Do not pour liquid directly onto shingles or metal flashing.
- Replace the sock as it becomes saturated and melt progresses.
- Keep gutters and downspouts clear of debris so meltwater can drain away from the roof edge.
- Use a roof ladder or hand-held scoop from the ground to remove clogs if safe to do so.
- Temporarily reduce attic heat to slow new meltwater.
- Lower the thermostat a few degrees for a short period.
- Close or minimize use of attic exhaust fans and seal obvious air leaks around attic hatches or penetrations with temporary caulk or foam until a proper fix can be done.
- If a leak is actively visible inside, place a tarp or plastic sheeting under the attic opening temporarily to divert water away from important areas, only if you can do it safely without stepping on the roof.
Minor repairs
- Re-seat and secure loose shingles around the dam line.
- Lift the shingle edge slightly, apply a bead of asphalt roofing cement, and re-nail with corrosion-resistant nails a bit lower than the original nail line.
- Fix damaged or missing flashing along eaves, valleys, or around vent pipes.
- Reattach with approved flashing nails and seal with high-quality roofing sealant.
- Seal small air leaks at the attic level that contribute to heat loss.
- Use low-expansion spray foam or backer rod and sealant at gaps around plumbing stacks, recessed lights, and attic accesses.
- Clean and repair gutters if you notice seepage or sagging.
- Re-secure hangers, re-align misaligned gutters, and ensure proper slope for drainage.
- Upgrade or rejuvenate ice/water shield in the vulnerable area.
- Add or replace the ice/water barrier along the eaves where damage is evident, extending up the roof several feet as needed.
Partial replacement
- Localized replacement of damaged shingles and underlying decking near the dam.
- Remove the damaged section down to solid, undamaged sheathing.
- Inspect and replace any rotted decking, then install new underlayment and ice/water shield.
- Re-shingle with matching material, ensuring proper alignment and nailing pattern.
- Rebuild or repair affected flashing and drip edge in the damaged zone.
- Clean, reseal, and reattach to ensure a watertight transition from roof to gutter.
- Reinstall or upgrade attic air barriers in the affected area.
- Add insulation and seal penetrations to reduce future heat loss in that zone.
Full roof replacement
- When ice dams are recurrent and the roof is old or extensively damaged, a full replacement may be justified.
- Comprehensive inspection to assess decking, ventilation, and structural integrity.
- Remove all shingles, underlayment, and damaged decking as needed.
- Install high-quality underlayment, proper ventilation, and ice/water shield at eaves.
- Reinstall new drip edge, fascia, and upgraded flashing where needed.
- Install new shingles with proper nailing and alignment; ensure color and style match for a cohesive look.
- Reconnect gutters and verify water flow away from the home; address any drainage issues on the yard or street side.
- Key considerations during full replacement.
- Ensure adequate attic insulation and a balanced ventilation strategy to reduce future heat loss.
- Confirm proper attic hatch sealing and air sealing around penetrations.
- Plan for weather windows and set realistic timelines with your roofer.
Typical Costs to Fix Ice Dams Caused by Heat Loss
Minor repair: Description and cost
This is the smallest fix that tackles heat loss with minimal disruption. It's appropriate when only a few leaks are obvious or when a light insulation boost will slow the dam's growth.
- What's included:
- Air sealing around accessible penetrations (chimney chase, plumbing stacks, wiring holes)
- Weatherstripping and sealing the attic hatch or access point
- Targeted insulation boost in the most problem spots (roughly 1–2 inches or a focused area)
- Typical cost range: $200–$800
- Timeframe: 1–2 days, depending on access and weather
- Steps to complete:
1. Inspect the attic to locate obvious air leaks.
2. Seal gaps with caulk or spray foam and install weatherstripping.
3. Add insulation to the identified hot spots and recheck for leaks.
Moderate repair: Description and cost
This level covers more comprehensive air sealing and a fuller insulation upgrade, plus basic ventilation improvements to address heat loss across a larger area.
- What's included:
- Thorough air sealing of the entire attic space (around ductwork, vents, and penetrations)
- Insulation upgrade to roughly R-38 to R-49 in the attic (climate dependent)
- Ventilation improvements as needed (adding or adjusting soffit vents, ridge or gable vents)
- Minor roof/decking or flashing repairs if moisture intrusion is detected
- Typical cost range: $1,000–$4,000
- Timeframe: 2–4 days
- Steps to complete:
1. Run a detailed attic audit to determine insulation and sealing needs.
2. Seal leaks around penetrations and ductwork with appropriate materials.
3. Install or top up insulation to the recommended level.
4. Improve ventilation and address small flashing or deck issues as needed.
Major repair: Description and cost
This category tackles substantial heat loss, significant ice dam formation, and any resulting roof or interior damage. It often involves a full retrofit and possible roof repairs.
- What's included:
- Full attic air sealing and a substantial insulation upgrade (often to R-38–R-60, depending on climate)
- Replacement of damaged roof decking or underlayment and any affected shingles
- Interior damage mitigation (drywall repair, insulation replacement, mold prevention if present)
- Enhanced eave protection and, if necessary, additional heat-loss mitigation measures
- Typical cost range: $5,000–$15,000+ (larger or more complex projects can cost more)
- Timeframe: 1–2 weeks
- Steps to complete:
1. Define a detailed scope with a roofer and insulation contractor.
2. Remove and replace damaged decking/underlayment and restore roof integrity.
3. Implement a comprehensive air sealing and insulation upgrade, then verify cold spots are eliminated.
4. Restore interior finishes and address any water damage.
What factors affect cost
- Roof size
- Larger attic areas require more materials and labor for sealing and insulation.
- Access
- Hard-to-reach spaces, steep or multi-story roofs, and finished attic interiors add time and complexity.
- Material type
- Fiberglass, cellulose, and spray foam have different costs and performance; premium air sealing products also vary.
- Extent of damage
- Hidden moisture, rot, or damaged decking/shingles increase material and labor needs.
- Local labor rates
- Regional price variations, contractor availability, and seasonal demand can swing prices noticeably.
- Additional considerations
- Codes and climate zone can influence required insulation levels.
- Comprehensive repairs may include warranty considerations and potential long-term energy savings.
How Long Should You Wait Before Addressing Ice Dams Caused by Heat Loss?
Ice dams start as a quiet problem, but they won't stay quiet forever. Even if you don't have a steady drip yet, heat loss in the attic can push meltwater back up under shingles and into the roof deck. If you notice interior leaks, bulging ceilings, or moisture around the dam, act now. Your goal is to slow or stop the water from moving inward while you plan a longer-term fix.
- Stay safe first: don't climb on the icy roof or stand on a slick surface.
- Use a long-handled roof rake from the ground to carefully remove snow from the bottom edge of the roof.
- Keep kids and pets away from the affected area and protect valuables beneath the dam.
- If you see active dripping, place buckets under the leaks and loosen jams protecting ceiling lines to prevent further damage.
24–48 hours: assess and mitigate
Once you've removed immediate snow buildup and reduced the driving force of meltwater, focus on short-term stabilization and information gathering.
- Check inside for leaks and note where water is coming in and how fast it's spreading.
- Inspect attic insulation and vents from a safe vantage point to confirm that warm air is not escaping into the attic.
- If you can do so safely, reduce heat in the attic area (without creating other moisture issues) and seal obvious air leaks around penetrations (pipes, chimneys, electrical boxes) with appropriate sealant.
- Consider temporary protections (plastic sheeting or tarps) over exposed ceiling junctions to limit further water intrusion.
3–7 days: plan repairs and temporary fixes
With safety and stabilization underway, shift to formalizing a repair plan that addresses both the immediate dam and the longer-term causes.
- Schedule a roof ice dam removal or removal-assisted service to clear the dam without damaging shingles.
- Verify attic ventilation and insulation improvements to minimize heat transfer next winter (aim to meet or exceed recommended venting and insulation levels for your climate).
- Address air leaks comprehensively: seal around attic access doors, plumbing penetrations, and any gaps that let warm air escape into the attic.
- If you notice widespread water damage, document affected areas for insurance and warranty purposes and consider temporary containment to protect living spaces.
Longer than a week: risks escalate
Waiting longer than a week begins to compound the damage. The longer meltwater sits on or behind roof components, the greater the odds of costly repairs.
- Water intrusion can penetrate through ceilings, walls, and insulation, increasing mold risk.
- Repeated freeze–thaw cycles can worsen roof deck damage and loosen roof fasteners, reducing roof longevity.
- Insulation efficiency declines as damp materials lose effectiveness, driving higher energy costs and comfort problems.
- Delays can complicate insurance claims and extend repair timelines, as the scope expands from a simple dam removal to full roof, attic, or structural work.
What happens if you wait? in several timeframes
- 24 hours: early interior moisture, potential ceiling spots, minor staining; risk of mold remains low but rising.
- 3–7 days: more widespread interior leaks, damp insulation behind ceilings, increased mold risk, and greater damage to ceiling materials.
- 2–4 weeks: significant water intrusion, widespread mold and wood rot potential, structural concerns in attic framing, and a much larger repair bill.
- Beyond a month: long-standing moisture can cause substantial roof deck deterioration, require extensive dry-out and remediation, and necessitate major system replacements (insulation, drywall, and possibly entire roof sections).
How Ice Dams Vary by Location and Climate
How This Problem Varies by Region & Climate within the United States
Ice dam risk shifts with where you live, how much snow you get, and how often temperatures swing above and below freezing. Here's how region and climate shape the problem:
- Northern cold regions (Northeast, Upper Midwest, Mountain States): long winters, heavy snowfall, and frequent freeze-thaw cycles. High potential for heat escaping into the attic and melting snow at the roof surface. Key focus: airtight attic, high or continuous insulation, and proper ridge/soffit ventilation to keep the roof cold at the eave.
- Mixed or fluctuating climates (Great Plains, parts of the Rockies): pronounced temperature swings between day and night. The melt-refreeze cycle can occur even with smaller snowpacks if attic heat leaks. Priorities: seal gaps around penetrations, maintain consistent ventilation, and reduce heat buildup in the attic.
- Mild, humid coastal climates (Pacific Northwest coastal areas, parts of the Southeast): ice dams are less common but still possible during occasional cold snaps. Risk rises when attic heat leaks unchecked into a roof that's otherwise just bare snow. Focus: air sealing around attic access and joints, moisture control, and ensuring vents aren't blocked by insulation.
- Dry, high-elevation regions (Rockies, Great Basin, Southwest high desert): snow is common, but bright sun can rapidly warm roof surfaces. Melted snow can refreeze at the eaves after sunset. Risk increases with insufficient attic insulation and poor radiant heat management. Actions: good insulation, radiant barriers where appropriate, and a vented attic that's still effectively sealed.
Regional Climate Drivers
- Temperature swings: frequent thaw/freeze cycles accelerate dam formation, even with moderate snow.
- Snow depth and solar gain: deeper snow plus sunny roofs can cause more surface melting with cold eaves, creating dam conditions.
- Wind and moisture: windy days can transport snow to the roof edge; wet climates encourage rapid heat transfer through the roof assembly.
- Building envelope: homes with gaps, leaks, or old insulation lose more heat into the attic, aggravating dam formation across regions.
Roof Design, Materials & Exposure
- Roof pitch: lower-slope roofs hold more snow near the eaves; steeper pitches shed snow faster and reduce dam risk.
- Sun exposure: south-facing or exposed roofs absorb more heat, increasing melt at the top of the roof and heightening edge dam potential.
- Material and color: darker roofing materials absorb more heat, while light-colored roofs stay cooler. Metal roofs behave differently than asphalt shingles in how they melt and refreeze snow.
- Ventilation and sealing: blocked soffits or ridge vents trap warm air; ensure continuous, unobstructed ventilation while eliminating attic leaks.
Quick Regional Checklists
1) Northeast and Upper Midwest
- Inspect attic insulation (aim for a high continuous layer) and seal gaps around penetrations.
- Verify soffit-to-ridge ventilation is open and unobstructed.
- Look for warm-spot leaks around attic hatch and plumbing stacks; seal as needed.
2) Pacific Northwest and nearby Coast
- Check attic moisture control; ensure vapor barriers are in place where appropriate.
- Confirm attic access isn't a heat leak; seal penetrations around cables and pipes.
- Maintain a balanced venting strategy to prevent localized heat buildup on the roof.
3) Southeast and Gulf Coast
- Prioritize airtightness around attic seams and hatch openings.
- Add insulation where needed and consider radiant barriers to limit heat gain on sunny days.
- Monitor any unusual ice buildup after rare cold snaps and address leaks quickly.
4) Southwest and High Desert
- Improve attic insulation and consider radiant barriers to reduce heat transfer.
- Ensure the attic is vented while still being sealed against air leakage into living spaces.
- Watch for rapid snowmelt after sunny days and validate eave temperatures stay cold enough to deter refreezing.