Ultimate Guide to Active Water Dripping from Ceiling
Last updated: Feb 28, 2026
Introduction: Active Water Dripping from the Ceiling
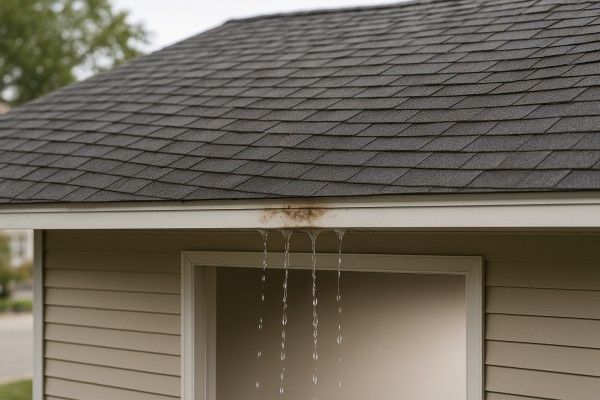
Discovering water dripping from your ceiling can be jarring. It signals moisture intrusion and potential damage to insulation, wood, and electrical components. The sight is understandably unsettling, but with calm, practical steps you can often stabilize the situation and protect your home.
What this signal can mean
- Roof-related leaks from damaged shingles, flashing, or worn seals that allow rain to seep in.
- Plumbing leaks above the ceiling, such as a burst or dripping pipe, a broken joint, or a fixture issue.
- Condensation or humid air from heating, cooling, or a damp space (often worse in bathrooms or kitchens).
- Ice dams or meltwater during cold weather that travels along roof edges and into the attic or interior.
- Penetrations around skylights, vents, or chimneys that have degraded seals.
Is it urgent?
- In most cases, yes, it's a problem that needs prompt attention. Water intrusion can quickly cause structural damage, mold growth, and electrical hazards.
- It's particularly urgent if you see active streaming water, dripping near electrical fixtures, or the ceiling showing sagging and active dripping.
- A slow, small damp spot behind a wall or under a fixture is less dramatic but should be addressed soon to prevent bigger issues.
What to do right now
- Safety first
- If water is near electrical outlets or switches, turn off power to that area at the main breaker or circuit to reduce shock risk.
- If you notice exposed wiring or burning smells, evacuate and call emergency services.
- Protect belongings
- Move valuables away from the affected area and place a bucket or basin under the drip.
- Lay plastic sheeting or towels to catch drips and prevent floor damage.
- Manage the flow without making it worse
- Do not climb on a wet roof during a storm. Avoid using heat lamps or attempting improvised fixes that could cause more harm.
- If you can access the source safely (attic hatch, ceiling access), you can inspect from a distance and note the location, but avoid touching actively leaking pipes or wiring.
- Document for the record
- Take clear photos or short videos of the drip location, ceiling damage, and any nearby fixtures or pipes. This helps with insurance and contractor discussions.
- Quick notes
- Record the date, time, and weather conditions when the leak was noticed. This helps determine whether the leak correlates with rain events or indoor activity.
High-level next steps
1. Identify the source
- Trace whether the water is coming from the roof, a plumbing line, or HVAC/condensation. If you can't confidently locate the source, document the drip and proceed to professional help.
2. Apply a temporary containment if safe
- Use a bucket and towels, and consider a temporary roof tarp or sealant only if you have safe, direct access and the weather allows. Do not perform risky roof work in a storm.
3. Call in the pros
- Reach out to a local roofer for potential roof leaks or flashing failures, and a licensed plumber if a plumbing leak is suspected. If both could be involved, coordinate a joint assessment to prevent misdiagnosis.
4. Plan repairs
- Expect a professional assessment that covers source identification, repair scope, and a timeline. Typical fixes may include resealing flashing, replacing damaged shingles, shutting off or repairing a plumbing line, or addressing HVAC condensation.
5. Prevention and monitoring
- After repairs, implement prevention measures: routine roof maintenance, gutter cleaning, attic insulation and ventilation improvements, and addressing ice dam risk where relevant. Monitor the area for several days to ensure the leak is fully resolved.
Short paragraphs and practical steps like these help you move from shock to action with clarity, keeping your home safer while you arrange the right fixes.
Is Active Water Dripping from the Ceiling an Emergency?
1) Move people and pets away from the dripping area to avoid slips and electrical hazards.
2) If water is near electrical outlets, switches, appliances, or wiring, shut off power to the affected area at the breaker box. Do not touch wet surfaces or plugs with bare hands. If you can't reach the panel safely, leave the area and call a professional.
3) Place a bucket, bin, or towels under the drip to catch water and protect flooring, furniture, and valuables.
4) If you can access the attic safely, locate the source from above without stepping on a wet roof or unstable surfaces. Do not climb onto a wet roof or use damaged ladders.
5) Avoid running heat or electrical devices near the leak. Do not try to seal the leak with tape or caulk from inside the home.
- The drip is heavy or the ceiling is actively leaking water in a way that seems to be increasing. A fast flow means rapid risk to structure and belongings.
- The ceiling shows bulging, cracking, sagging, or signs of active structural compromise. Water pressure can weaken joists and cause a collapse.
- Water is near electrical components (outlets, switches, lighting fixtures) or you must shut off power to a larger area to control the risk. Electrical and water together is a high‑risk combination.
- There are multiple leaks from different spots on the roof or around a skylight, indicating widespread damage that likely needs immediate assessment.
- The leak began or worsened during a storm and continues afterward, and you cannot identify a safe, stable source to stop it.
- You notice mold growth, persistent damp insulation, or lingering strong odors after a leak. Delays can escalate damage to walls, ceilings, and framing.
- You're unable to safely access the source from the attic due to damage, height, or poor footing, or if the roof is exposed to ongoing rain.
Monitor if
- The drip is slow, intermittent, or only occurs during rainfall, and there is no visible pooling on the floor or sagging ceiling.
- The area around the leak remains dry between rain events and you can observe carefully for 24–48 hours.
- You can safely observe the ceiling from a distance, without stepping into potentially dangerous zones, and you plan to contact a roofer soon to pinpoint the source.
- You have temporarily contained the area with a bucket or tray and you're keeping valuables away from the leak, while you await a professional assessment.
Can wait if
- The drip is minor and inactive most of the time, with no ceiling deformation or water on the floor.
- You can schedule a roof inspection within the next 1–2 days and there's a dry spell or light rain only.
- You've limited exposure and risk, you're able to protect belongings, and you're prepared for a scheduled repair without expedited service.
- The home is not currently occupied or the affected room is not critical for daily use, and you're coordinating a planned repair window that minimizes disruption.
Common Causes of Active Water Dripping from the Ceiling
A leak from above the ceiling often points to the roof or attic area. Weather, age, and poor maintenance all play a role. Common culprits to inspect first:
- Ice dams and thaw cycles: In cold climates, melting snow can refreeze at the eaves, pushing water under shingles and into the attic.
- Damaged or missing shingles: Wind, hail, or aging shingles leave gaps for water to penetrate.
- Faulty flashing around penetrations: Chimneys, vents, and skylights rely on metal flashing that can corrode or lift over time.
- Leaks at roof intersections: Valleys, dormers, and transitions where two roof planes meet are prone to seepage if seams widen.
- Condensation on cold surfaces: A poorly ventilated attic can cause warm, moist air to condense on cold sheathing and drip into living spaces.
Plumbing leaks above the ceiling
Water supply lines, fixtures, and appliances upstairs can drip through the ceiling if a connection fails or a line bursts. Typical plumbing-related causes include:
- Leaking supply lines in the attic: Copper, PEX, or CPVC lines feeding sinks, toilets, or the laundry area can corrode or loosen joints.
- Hidden pipe damage: Small punctures from nails or shifting framing can leak slowly, showing up as damp spots and dripping.
- Fixture or appliance leaks above the ceiling: A bathtub, bathroom vent, or water heater that backs up water into the ceiling space can manifest as steady drips below.
- Condensate from water-using devices: Draining issues on humidifiers or dehumidifiers can overflow into the ceiling cavity if routed improperly.
HVAC and condensation sources
Heating, cooling, and ventilation equipment can produce moisture that finds its way into living spaces when lines or pans fail.
- Condensate line leaks: Air conditioners and furnaces with condensate lines can overflow or leak near the ceiling if the line is blocked or disconnected.
- Leaky attic ductwork: Poorly sealed ducts can sweat in hot weather, dripping moisture onto insulation and into the ceiling.
- Frozen or thawing coils: An ice buildup on an evaporator coil in the attic can melt rapidly, sending water down through joints or gaps.
Attic moisture, insulation, and ventilation issues
Even without a visible roof leak, moisture control problems in the attic can cause dripping into the ceiling.
- High humidity in a poorly ventilated attic: Warm, moist air meets cold surfaces and condenses, dripping onto the ceiling below.
- Insulation gaps around penetrations: Missing or compressed insulation around vents, pipes, or cables can trap moisture and create drip paths.
- Ventilation problems: Inadequate intake or exhaust for the attic space can force condensation to find a way into living areas.
What to look for as you investigate
- Streaks and staining patterns: Water often travels along joists, so stains may not be directly above the drip.
- Wet insulation or visible moisture: Check the attic or crawlspace for damp insulation, pooling water, or musty smells.
- Fastener or flashing signs: Look for lifted shingles, rusted flashing, or rust-colored water marks around penetrations.
- Temperature cues: Warmer attic spots with dripping can indicate condensation rather than a roof leak.
Immediate steps to take if you have active dripping
1) Safety first: if water near electrical fixtures or outlets is suspected, shut off power to the affected area at the main panel.
2) Contain the water: place a bucket or basin under the drip; protect flooring and furniture with towels or plastic.
3) Identify the source from a safe spot: if you can safely access the attic, trace the drip path to a likely source (shingle line, flashing, a pipe, or a duct).
4) Call a qualified roofer or plumber: active leaks require professional assessment to stop the source and prevent further damage.
How Roof Materials Affect Active Water Dripping From the Ceiling

- How active dripping is affected: The shingles themselves shed water well, but the underlayment and flashing around vents, chimneys, and roof-to-wall transitions carry the load. If the underlayment is compromised, or if ice dams form at eaves, water can travel inward and drip from the ceiling.
- In the attic: Expect narrow, linear staining along attic joists under the areas with flashing or near eaves.
- What to inspect: Look for lifted, curling, or missing shingles; damaged flashing; granule loss on the roof surface; ice dam buildup at gutters.

- How active dripping is affected: Metal roofs are durable, but leaks show up mainly at seams, panel overlaps, fasteners, and around penetrations (like vents or skylights). Water can travel quickly along a seam and find a small opening to dripping points.
- In the attic: You may notice straight, narrow streaks of staining or a sudden drip near a seam line.
- What to inspect: Check panel seams, loose or missing fasteners, and step-flashings at walls; examine around penetrations for sealant gaps.

- How active dripping is affected: Tiles protect underlayment, but a cracked, broken, or displaced tile lets water reach the underlayment quickly. Water then follows the deck lines and can drip inside through the attic.
- In the attic: Drips or damp spots often align with tile courses or valley lines.
- What to inspect: Look for cracked tiles, loose ridges, collapsed or shifted tiles, and damaged ridge/valley flashing.
Wood Shingles and Shakes
- How active dripping is affected: Wood absorbs water and expands; gaps can open at seams and nail heads. Wet wood can warp or delaminate, creating routes for water to pass into the attic.
- In the attic: Stains may appear near roof edges where wood bows or gaps form.
- What to inspect: Check for cupping, splitting, or soft spots in shingles; ensure nails aren't backing out; inspect around roof-to-wall flashings for gaps.

- How active dripping is affected: Slate is very durable, but leaks usually come from failures in flashings or cracked/slipped slates and issues at penetrations. Water tends to follow the slate's natural joints to the deck.
- In the attic: Look for localized moisture under valleys or near vent penetrations.
- What to inspect: Examine for cracked or displaced slate, loose fasteners, and faulty flashings at chimneys and vents.
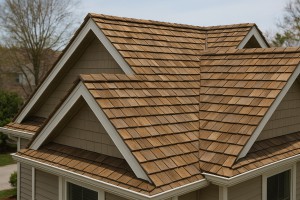
- How active dripping is affected: Similar to wood, cedar shakes can warp, cup, or delaminate when wet, creating gaps that channel water inward.
- In the attic: Expect drip lines near ridge lines or where shakes have decayed.
- What to inspect: Look for missing shakes, excessive cracking, and signs of rot or moss growth that traps moisture.

- How active dripping is affected: These mimic asphalt but can use different fasteners and sealants. Seams and flashings remain common leak points; improper installation or aging sealant can allow dripping.
- In the attic: Drips often trace to flashing or seam areas rather than large surface areas.
- What to inspect: Check seam integrity, flashing around vents, and the condition of edge caps and ridge pieces.
Flat Roofs (EPDM, TPO, Built-Up/BUR)
- How active dripping is affected: On flat or low-slope roofs, leaks show up at seams, penetrations, and flashing details. Ponding water can exacerbate slow leaks until a drip is visible inside.
- In the attic: Look for water stains directly under seams, penetrations, and perimeter edges.
- What to inspect: Inspect edge details, seam integrity, boot flashings around penetrations, and drainage points; ensure proper ballast or insulation as applicable.
Quick-start assessment by material
1) Identify your roof material type (or combination).
2) In the attic, map drips to possible roof areas: eaves, valleys, penetrations, or walls.
3) Inspect the corresponding surface on the roof: shingles/tiles intact, flashing solid, seams sealed.
4) If you can't pinpoint or see obvious damage, note the material and seek help for a targeted inspection.
The Risks of Ignoring Active Water Dripping From the Ceiling
Structural Integrity at Risk
Active dripping means water is actively saturating roof materials, insulation, and framing. Over time, this weakens plywood sheathing, roof decking, and ceiling joists. As the wood absorbs moisture, it loses stiffness and can sag, warp, or suddenly fail. The longer the leak goes unchecked, the higher the chance of a partial or full ceiling collapse.
Indicators to watch for:
- Soft, spongy spots in the ceiling or attic floor
- Visible sagging or bowing near the leak
- Warped drywall seams, peeling paint, or bubbling plaster
Electrical Hazards
Water and electricity are a dangerous combination. If dripping is near outlets, switches, lighting fixtures, or electrical wiring, you face real shock and fire risks. Water can travel along wiring or junction boxes, potentially causing shorts, dimming lights, or arcing.
What to screen for:
- Flickering or dim lights in the area
- Outlets or switches that feel warm or show discoloration
- A consistent drip landing near electrical components
Mold, Mildew, and Indoor Air Quality
Moist environments invite mold and mildew. These fungi can grow within 24–48 hours of moisture exposure, especially in warm, dark spaces like attics and ceilings. Persistent mold exposure worsens allergies, asthma, and respiratory issues, and it can produce musty odors that linger even after the leak stops.
Common signs:
- Musty smell in the room or attic
- Black, green, or white patches on ceilings or insulation
- Persistent coughing, throat irritation, or eye redness after occupying the space
Higher Repair Costs and Hidden Damage
Ignoring a leak typically leads to escalating costs. Early-stage damage may involve only a small area, but prolonged moisture invites wider rot, degraded insulation, and secondary damage to walls and flooring. By the time you notice the bill, you may be looking at replacing multiple layers of roof decking, insulation, drywall, and even parts of the attic or ceiling structure.
Potential cost growth includes:
- Wet insulation losing R-value and needing replacement
- Damaged roof decking and rafters
- Water-damaged drywall and paint that must be redone
Insurance and Responsibility
Insurance claims hinge on timely mitigation and documentation. Some policies require you to take reasonable steps to stop the damage; delaying repairs can complicate or delay coverage. Keeping thorough records—photos, notes, dates—helps when discussing claims with your insurer and contractor.
What to keep in mind:
- Most policies expect you to limit further damage promptly
- Documentation speeds claim review and contractor scheduling
- You may need a licensed professional to assess and confirm the source of the leak
1) Prioritize safety: Do not step into areas with active dripping if you suspect electrical hazards; if you see exposed wiring or outlets near moisture, turn off power to the affected zone at the main breaker if you can do so safely. If in doubt, evacuate the area and call a professional.
2) Contain the leak: Place a sturdy bucket, large recipient, or plastic trough under the drip. Lay down towels or a tarp to protect flooring and furniture from ongoing water.
3) Reduce further damage: Move valuables away from the area and open windows or use a fan to improve ventilation, but avoid directing air toward wet electrical components. Do not attempt to patch or seal the roof from inside.
4) Document and plan: Take clear photos from multiple angles, note dates and times, and keep a simple damage timeline. Contact a licensed roofing contractor or water intrusion specialist to assess the leak and recommend next steps.
5) Assess the attic and insulation (if safely accessible): Check for soaked insulation or damp framing. If you can access the attic, avoid walking on wet or soft surfaces and do not disturb mold growth. Call a pro to evaluate attic moisture, mold remediation needs, and ventilation improvements.
How Active Water Dripping from the Ceiling Is Diagnosed
What counts as active dripping
- Drips or streams that appear during rain or after a roof breach, not just dampness.
- Visible flow or fresh droplets on the ceiling that indicate ongoing water entry.
- Drips that worsen with outdoor rainfall and ease when the rain stops.
Safety basics before you start
- Turn off power to the affected area at the breaker if water could reach outlets or fixtures.
- Use a sturdy ladder, have a helper, and wear non-slip footwear and gloves.
- If you smell natural gas, hear a hiss, see exposed wiring, or feel unsafe, step back and call a professional.
What you can observe inside the room
- Note the drip location on the ceiling and any nearby stains.
- Check if stains are new or old, and whether the water looks clear, dirty, or mineral-streaked.
- Record how the dripping correlates with rain: when it starts, how long it lasts, and whether it changes with storm intensity.
Looking in the attic
- If you have attic access, you can often see the leak path more clearly.
- Look for damp insulation, pooling water, or dark streaks on the underside of roof decking.
- Trace toward common leakage points: around vents, plumbing stacks, chimneys, skylights, and the roof perimeter.
- Note any gaps in flashing, loose nails, or deteriorated sealant along penetrations.
Distinguishing leaks from condensation
- Condensation tends to form on cold surfaces and is tied to humidity and temperature, not necessarily rain.
- Leaks usually show a clearer path from a single source and may create new stains or active drips when it rains.
- A sustained drip with a visible water line indicates active flow beneath the surface.
A practical diagnostic plan (step-by-step)
1. Compile observations from the room and attic, including rainfall details and timing.
2. If safe, go to the attic during rain or use a controlled water test (gentle hose spray) on suspected roof areas while someone watches the interior ceiling.
3. Inspect likely leak points: flashing around chimneys, vent boots, skylights, and around any roof penetrations; look for cracks, gaps, rust, or loose sealant.
4. Check gutters and downspouts for overflow, clogs, or misdirection that could back-pour water onto the roof edge.
5. Inspect attic insulation and decking for dampness or compression near the suspected path.
6. If you can identify a plausible source, document it and plan a professional evaluation to confirm the leak and discuss repair options.
What to document for a pro
- Clear photos of the ceiling drip, stains, attic damage, and roof penetrations.
- A concise rain history: when it began, storm intensity, and proximity of the leak to rainfall.
- Any temporary fixes you've tried and what effect they had (if any).
Repair Options for Active Water Drips from the Ceiling
Temporary fixes
- Safety first: If water is actively dripping, avoid standing directly under the leak. If the drip is near electrical outlets or fixtures, turn off power to that area at the breaker to reduce shock risk. Move furniture and valuables out of the way.
- Catch and contain: Place a sturdy bucket or container under the drip. Use towels or a chamois to soak up obvious drips and prevent staining while you assess.
- Shield interior damage: If you can access the attic, lay a sheet of plastic or a tarp over the leaking area to reduce further water intrusion. Tape the edges to keep the sheet in place, but don't climb on a wet roof to install it.
- Quick exterior patch (if you're comfortable): From the attic side, you can apply a thin bead of roofing cement over a small, clearly visible gap or nail hole around flashing or penetrations as a temporary seal. This is only to slow the flow until a proper repair can be made.
- Document the leak: Take clear photos of the affected ceiling, attic area, and any obvious penetrations. This helps a roofer diagnose the cause quickly.
- Plan for a proper fix: Temporary measures are not a substitute for a lasting repair. Schedule professional help as soon as possible, especially if multiple areas are leaking or the roof is aging.
Minor repairs
- Identify the source: Look in the attic for signs around pipe penetrations, vent collars, chimney flashing, or step flashing. Water may travel before it drips, so inspect along flashing lines and along the roof deck edges.
- Tighten or reseat shingles: If you find loose or cupped shingles, re-nail them with corrosion-resistant roofing nails and seal the nail heads with lightweight roofing cement. Do not over-nail or crack the shingles.
- Seal small gaps: Use a high-quality, flexible roofing sealant (silicone or polyurethane) along flashing seams, around vent pipes, and in small gaps where water is seeping. Smooth the sealant for a tight, watertight finish.
- Re-secure flashing: If flashing around a vent, chimney, or wall intersection is loose or lifted, carefully bend it back into place and reseal with roofing cement or flashing tape in addition to sealant.
- Address minor decking issues: If you spot slight water staining or soft spots in the attic decking, you can temporarily reinforce with a small patch of exterior-grade plywood or a patching compound. This is a short-term fix; plan to replace rotted decking as part of a larger repair.
- Monitor after fixes: After performing minor repairs, keep an eye on the area during rain. If the leak persists, escalate to a partial replacement assessment.
Partial replacement
- When it's appropriate: Localized damage from a failed flashing, damaged shingles, or a small section of rotted decking often fits a partial replacement approach.
- Assess scope: Measure the damaged area and inspect the underlying decking for rot. If decking shows significant rot, that portion will need replacement rather than patching.
- Remove and replace:
1) Remove the damaged shingles, underlayment, and any compromised flashing or decking.
2) Install new underlayment and, if needed, new flashing around penetrations.
3) Install replacement shingles that match the existing roof color and profile.
- Flashing and seals: Re-flash edges and joints where water entered. Seal all seams with a compatible sealant or roofing cement as instructed by the material manufacturer.
- Final checks: Ensure proper venting of the roof and confirm clean, secure installations around skylights, chimneys, and vents. Check for wind uplift and sealant integrity after a rain.
- Duration and expectations: Partial replacement can restore a leaky area without a full roof job, but it's a stepping-stone solution that works best on targeted, localized damage rather than widespread wear.
Full roof replacement
- When to consider it: If leaks are frequent across multiple areas, the roof age exceeds the manufacturer's expected lifespan, decking is extensively rotted, or multiple partial repairs fail to stop the water intrusion.
- Planning: Get 2–3 solid roof estimates, confirm warranties, and verify ventilation and insulation goals. Prepare for debris removal, dumpster access, and potential temporary power adjustments in the attic.
- Removal and deck inspection:
1) Remove all existing shingles and underlayment.
2) Inspect the roof deck fully; replace any rotted or damaged boards.
- Installation sequence: Install new underlayment, drip edge, flashing, and venting components, then lay the new shingles in the chosen pattern. Ensure proper nailing patterns and wind uplift ratings.
- Finishing touches: Install new flashings around chimneys, skylights, and walls; reseal roof penetrations; install ridge vent or aftermarket ventilation as needed.
- Cleanup and inspection: Remove nails and debris, inspect for gaps or misaligned shingles, and perform a final leak check after a rain. Ensure warranties, maintenance recommendations, and inspection intervals are documented.
Typical Costs to Fix Active Water Dripping from the Ceiling
Minor repair
A minor repair targets a small, localized source of dripping, such as a loose shingle, a small gap where flashing or sealant has failed, or a tiny crack around a vent boot. Often the interior water shows in one spot and the attic has minimal intrusion, with little or no roof decking damage. Typical cost range: $150–$450.
- What you're likely paying for: quick sealant touch-up, shingle re-securement, or a small section of flashing replaced.
- When it's appropriate: the leak is isolated, the roof surface is otherwise sound, and there's no widespread water staining inside the ceiling.
- Steps to address:
1) Place a bucket under the drip and protect nearby areas.
2) Schedule a professional inspection to confirm the source and perform a targeted fix.
3) Have the roofer reseal the flashing, replace a few shingles, or apply a new sealant around the vent boot.
Moderate repair
A moderate repair involves a more involved fix where the leak has extended beyond a single shingle or seam. This may include repairing or replacing damaged flashing, replacing several shingles, addressing compromised underlayment, and sometimes a small area of decking damage. Typical cost range: $500–$2,000.
- What you're likely paying for: multiple components addressed in one patch, potential underlayment replacement, and a more thorough check of surrounding roof areas.
- When it's appropriate: you notice recurring dripping from a moderate area, or there's visible water staining on the ceiling with evidence of multiple penetrations nearby.
- Steps to address:
1) Temporarily shield the room from ongoing drips with tarps or plastic.
2) Have the roofer inspect for underlayment or flashing issues and assess decking for minor damage.
3) Complete the repair, which may include replacing flashing, resealing seams, and replacing several shingles.
Major repair
A major repair is needed when there's extensive water intrusion, significant flashing failure, large sections of damaged shingles, or compromised roof decking and structural components. It often includes interior water damage mitigation (drywall, insulation, painting), potential mold remediation, and a sizable roof repair or full replacement of a roof section. Typical cost range: $2,000–$10,000+, depending on scope and materials.
- What you're likely paying for: extensive surface work plus interior repairs; possible decking replacement; potential need for temporary containment and extensive cleanup.
- When it's appropriate: there's widespread ceiling staining, active drips from multiple roof areas, or visible rot/mold in attic decking or framing.
- Steps to address:
1) Contain and dry the interior to prevent further damage.
2) The roofer may replace damaged decking, reinstall new flashing and underlayment, and reseal penetrations.
3) If interior damage is present, coordinate drywall, insulation, and mold remediation as needed; then finish with painting and insulation replacement.
What factors affect cost
- Roof size
- Access
- Material type
- Extent of damage
- Local labor rates
How Long Should You Wait Before Addressing a Dripping Ceiling?
Immediate safety and containment (0–6 hours)
- What happens if you wait: The leak continues depositing water and moisture into the ceiling, increasing the chance of staining, sagging, or electrical hazards if wiring is involved.
- Do this now:
- If you can do so safely, kill power to the room at the breaker to reduce the risk of shocks or short circuits.
- Place a bucket under the drip and lay towels or a shower curtain across the affected area to catch water and protect belongings.
- If you know the source is a roof leak and it's safe to access the attic, place a temporary tarp or plastic sheeting to divert water away from the ceiling, but don't climb on a wet roof during rain.
- Photograph the leak and any staining or sagging to document the condition for repairs and insurance later.
- Keep kids and pets away from the area and avoid disturbing the saturated drywall.
First day window (6–24 hours)
- What happens if you wait: Moisture continues to saturate materials. Drywall can begin to swell, insulation loses R-value, and there's a higher risk of mold starting to form behind walls.
- Steps to take:
- Recheck for signs of active water: new drips, ceiling bulges, or drips that increase with rain or plumbing use.
- If you can determine a plumbing source and it's safe, shut off the affected supply valve to slow the leak; otherwise call a plumber.
- Keep the area well-ventilated if possible — use a fan in a dry, safe way to reduce humidity, but avoid running electrical appliances near pooled water.
- Move valuables out of reach and keep a log of when the leak is most active.
1–3 days (24–72 hours)
- What happens if you wait: The problem compounds. Saturated insulation and damaged drywall can lead to more extensive ceiling collapse risk and the onset of visible mold growth.
- Actions to consider:
- Have a roofer or plumber inspect the source. If it's a roof leak, you'll need a roofer; if a plumbing leak, a licensed plumber.
- Check attic or crawlspace above the ceiling for damp insulation or rotten framing; note any musty odors or damp air.
- If water has reached electrical fixtures in the ceiling or near outlets, stop using those circuits and call a licensed electrician.
- Avoid cosmetic fixes (like patching or repainting) until the source is repaired and the area is dry.
4–7 days (4–7 days)
- What happens if you wait: Extended moisture can cause wood framing to warp, mold colonies to mature, and drywall to crumble. Electrical safety remains a concern if wiring has been compromised.
- Considerations:
- A professional assessment is critical. Delays can turn a manageable repair into a full ceiling replacement and major mold remediation.
- Expect discovery of additional damage behind the ceiling and in the attic or walls; budget and schedule for more extensive repairs.
Week or more: extended damage and higher costs
- What happens if you wait: Structural elements may weaken, insulation becomes unusable, and mold remediation becomes necessary. Insurance claims are often more complicated when problems aren't addressed promptly.
- What to plan for:
- Full ceiling replacement, drywall removal, and potential replacement of damaged insulation and ceiling joists.
- Mold remediation if any growth is present or suspected.
- Electrical system repairs or rewiring if wiring has been compromised.
- Longer downtime for living spaces and a higher repair bill.
- Final note on timing:
- The sooner you identify and address the source with a licensed professional, the lower the risk of cascading damage, higher repair costs, and longer disruption to your home.
How This Problem Varies by Location and Climate
How This Problem Varies by Region & Climate within the United States
- Northeast (New England, Mid-Atlantic): heavy winter snow and repeated freeze-thaw cycles make ice dams a common culprit. Water can back up under shingles and meltwater finds its way into ceilings, especially near eaves, valleys, and roof-to-wall intersections.
- What to watch: attic temperature differences, insulation gaps, and edge ventilation.
- Practical focus: add or upgrade attic insulation, seal air leaks into living spaces, and ensure proper venting at the roof edge.
- Midwest: cold snaps with big temperature swings and substantial snowfall drive ice dam risk and moisture migration. Leaks often show up around skylights, dormers, and roof penetrations.
- What to watch: underlayment integrity, flashing connections, and ventilation in colder months.
- Practical focus: install ice/water shield at eaves and along roof edges, maintain gutters, and keep attic air balanced with adequate ventilation.
- Southeast: hot, humid summers and frequent heavy thunderstorms raise issues with wind-driven rain and failing flashing. Condensation in attics can become visible as moisture during humid periods.
- What to watch: flashing around penetrations and proper attic moisture control.
- Practical focus: improve attic ventilation, use durable sealants and flashing materials, and inspect after storms.
- Southwest: extreme sun and heat plus occasional intense monsoon storms. Roofs can experience membrane wear, and poor ventilation can lead to condensation in the attic.
- What to watch: aging roofing membranes, seal failures at solar penetrations, and ventilation shortfalls.
- Practical focus: consider reflective or cool roofing, ensure vapor barriers are in place, and keep vents clear.
- Pacific Northwest: one of the wettest regions, with persistent dampness and moss growth that can hide roof problems until leaks appear.
- What to watch: moss, clogged gutters, and deteriorating flashing that's hard to see under vegetation.
- Practical focus: regular roof cleaning, moss control, and robust flashing around all penetrations.
- Alaska: long, freezing winters with potential ice dam buildup and hidden leaks behind thick ice.
- What to watch: extreme cold stress on membranes, insulation gaps, and ventilation under heavy snow.
- Practical focus: maximize insulation, provide continuous ventilation, and address ice dam risks with heat management strategies.
- Hawaii: tropical rain patterns and occasional heavy downpours can overwhelm seals around skylights and vents, especially after storms.
- What to watch: deteriorated seals and flashing in exposed areas.
- Practical focus: high-quality, corrosion-resistant flashing and proactive inspection after heavy rains.
Seasonal and Weather Pattern Impacts on Dripping
- Winter: ice dams, thaw/freeze cycles, and attic heat loss that drives meltwater toward edges.
- Spring: heavier rains and wind can force leaks through weakened flashings or worn seals.
- Summer: high humidity can cause condensation in poorly ventilated attics, especially when cool indoor air meets hot attic air.
- Fall: preparing for of season storms means checking seals, gutters, and penetrations before the first heavy rains.
Climate-Sensitive Fixes You Can Plan For
- Cold climates (Northeast, Midwest, Alaska):
- Improve attic insulation to minimize heat transfer into the roof assembly.
- Install ice/water shield along eaves and valleys.
- Ensure continuous attic ventilation and seal gaps between the living space and attic.
- Hot, humid climates (Southeast, parts of Gulf Coast):
- Balance attic ventilation (soffit and ridge vents) to reduce condensation.
- Use a vapor barrier on the warm side of ceilings where practical.
- Inspect for and repair flashing around penetrations after storms.
- Rainy/coastal climates (Pacific Northwest, Atlantic coast):
- Keep flashing around chimneys, skylights, and vent pipes in good condition.
- Regularly clean gutters and downspouts to prevent water backup.
- Check underlayment and sealing after moss removal or roof work.
- Wind-prone or hurricane-prone areas:
- Reinforce roof-to-wall connections and use hurricane-rated flashing.
- Inspect after major storms for displaced shingles or damaged seals.
- Consider impact-resistant roof penetrations and proper sealants.
Quick Triage for Active Drips
1) Catch and contain: place a bucket and towels to minimize interior damage.
2) Identify the likely source: attic, ceiling seam, or a plumbing/condensation issue.
3) If you suspect a plumbing leak, shut off the main water supply to minimize damage.
4) If the roof is the culprit, avoid stepping on the roof; call a roofer to inspect flashing, shingles, and underlayment.
5) Document damage with photos and schedule repairs at the earliest safe opportunity.