Ultimate Guide to Moss Growth on Roof
Last updated: Feb 28, 2026
Introduction to Moss Growth on Roofs
What moss growth on roofs means
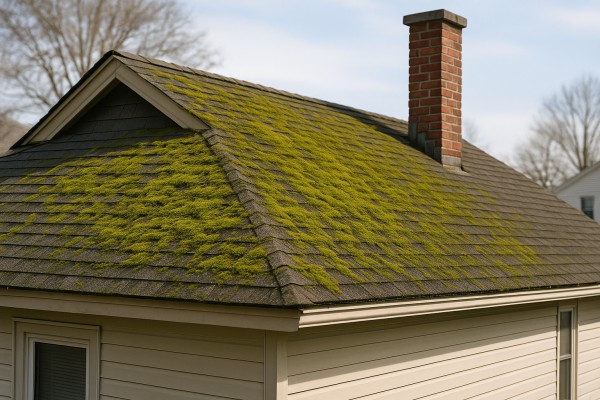
Moss on a roof is a common, natural occurrence in many climates. It thrives in shaded, damp areas and can gradually build up into patches. Moss itself doesn't roar in like a leak, but it can trap moisture against shingles, hide underlying damage, and, over time, contribute to wear, lifting, and deterioration if left unchecked. Early, gentle intervention can keep roof life intact and avoid bigger problems.
Is it urgent or common?
- Common in shaded, humid regions and in homes with lot of trees nearby.
- Not usually an immediate emergency, but untreated moss can accelerate wear and create water-siting issues that lead to leaks.
- The sooner you address noticeable patches, the easier it is to preserve roof integrity and extend its lifespan.
How moss grows and why it matters
- Moss loves damp, cool, shady spots. It spreads slowly across roof planes where moisture lingers.
- Once established, it holds moisture against shingles, which can accelerate granule wear, lift edges, and loosen the roof surface.
- The rhizoids (tiny root-like filaments) can loosen granules and soften the protective layer over time.
- In winter, moss can contribute to ice damming by slowing down water flow and creating stubborn patches of ice.
High-level next steps
- Step 1: Safety first. Wear sturdy shoes with good traction, use a stable ladder, and consider fall protection. Don't work on a wet roof or alone.
- Step 2: Do a ground-level check. Look for visible moss mats, dark stains, and clogged gutters where moisture collects.
- Step 3: Identify your roof material. Asphalt shingles, wood, tile, and metal each respond differently to cleaning and care.
- Step 4: Select a cleaning approach:
- Light, manual removal with a soft brush or plastic scraper from a stable stance; avoid high-pressure washing that can damage shingles.
- Gentle, manufacturer-approved roof cleaners or naturally derived moss controls; avoid harsh chemicals near landscaping.
- For large patches or delicate roofs, consider professional assistance to minimize risk.
- Step 5: Prevention after cleaning:
- Trim overhangs to improve airflow and reduce shade on roof surfaces.
- Install zinc or copper strips along the ridge as directed by product guidelines to deter future moss growth.
- Keep gutters clear so roof drainage isn't impeded.
- Schedule regular inspections after wet seasons to catch new growth early.
Quick homeowner checklist
- Signs to watch for:
- Clearly visible moss patches or green mats on shingles
- Raised, curled, or lifting edges on shingles
- Dark staining or unusual grit in gutters and downspouts
- Persistent damp feeling in shaded roof zones
- Maintenance cadence:
- Inspect at least twice a year, with extra checks after heavy rains or snow
- Reassess shading and tree trimming needs annually to reduce ongoing moisture retention
Is Moss Growth on the Roof an Emergency?
- Water is actively leaking into the home after rain, or you see dripping from the ceiling or attic.
- Shingles are visibly damaged: missing, cracked, curling, or there is exposed underlayment or flashing.
- The roof decking or structure feels soft, spongy, or shows signs of sagging when you inspect the attic or ceiling.
- Large clumps of moss or debris weighing on the roof after a storm, and you cannot confirm the roof is structurally sound from the ground.
- There is a persistent damp smell, visible mold, or moisture is repeatedly showing up in the attic.
- Ice dams are forming in winter and water is backing up into the eaves, indicating drainage or insulation issues that require prompt attention.
Monitor if
- The attic remains dry after rain and interior surfaces show no moisture.
- Moss is present but there are no obvious signs of shingle or decking damage yet.
- There are no leaks after storms, and you can observe moss growth to track progression without urgent repair needs.
- The roof clears a routine inspection window and you can schedule a professional assessment soon.
Can wait if
- Moss is confined to shaded, non-critical areas away from vents, skylights, and gutters, and shingles look intact.
- There are no current leaks, damp spots, or soft decking; interior spaces stay dry.
- You have time to schedule a cleaning and inspection within a few weeks, and weather conditions aren't pushing you toward urgent action.
Quick safety checks (do these before scheduling service)
1. Do not climb onto a wet or mossy roof. It's slippery and can cause a fall or roof damage.
2. If you must assess from the ground, use binoculars and inspect edges, vents, and gutters. Never lean or lean over a railing to look at the roof.
3. Protect interior by placing towels or containers under any suspected leaks; keep valuables away from water damage.
4. Avoid high-pressure washing, aggressive scrubbing, or harsh chemicals on moss. These can damage shingles and underlayment; rely on a professional method.
5. Document what you see with photos from the ground and a safe distance, then share them with your roofer to aid a fast, accurate assessment.
Common Causes of Moss Growth on Roofs
Shading and Limited Sunlight
Moss thrives in damp, shady spots. When parts of your roof stay in shadow, moisture sticks around longer and dries slowly, giving moss a favorable foothold.
- Overhanging trees cast continuous shade and drop leaves that trap moisture.
- North-facing or deeply shaded sections receive little sun, nurturing damp conditions.
- Cool, humid mornings with minimal afternoon sun create dew that lingers on shingles.
How to check:
1. Observe sun patterns on a typical day and note the heavily shaded roof areas.
2. Inspect tree canopies for branches that rest on or overhang the roof.
3. Track shade duration across the day and across seasons.
Moisture and Poor Drainage
Persistent surface moisture is a moss magnet. When water isn't shed quickly, moss can establish and spread.
- Clogged gutters and downspouts keep water against the roof surface.
- Valleys, intersections, and penetrations trap moisture and debris.
- Ice dams in winter back up water onto shingles, promoting moss growth.
How to check:
1. Look for water pooling along edges after rain or during thaw cycles.
2. Inspect gutters seasonally for debris buildup and sagging.
3. Tap the roof surface near valleys for softness or dampness indicating trapped moisture.
Roofing Surface and Material
Some roof materials and surface textures are more moss-friendly than others.
- Cedar shakes and other porous materials absorb and hold moisture longer than smooth asphalt.
- Rough or weathered surfaces give moss rhizoids a sturdy grip.
- Damaged flashing or lifted shingles create damp pockets that moss can colonize.
How to check:
1. Scan for lifted edges, curling shingles, or exposed nails.
2. Note if you have cedar or other highly porous materials.
3. Inspect for granule loss on asphalt shingles, which signals wear and moisture exposure.
Organic Debris and Dirt Accumulation
Leaves, needles, and organic matter act like mulch on your roof, retaining moisture and feeding moss.
- Fallen leaves and needles collect in valleys and along the eaves.
- Pollen, seeds, and bird droppings alter surface pH and moisture balance.
How to check:
1. Inspect roof valleys, gutters, and around chimneys for debris buildup.
2. Check regularly after storms or windy days when debris accumulates quickly.
3. Clear debris to see how quickly moss reappears in shaded, damp spots.
Roof Age, Wear, and Conditions
Older roofs often lose their ability to shed water effectively.
- Aging shingles can curl, crack, or develop micro-crevices that trap moisture.
- Damaged flashing at vents, chimneys, and intersections creates damp microenvironments.
- Worn granules expose the underlying asphalt, increasing moisture absorption.
How to check:
1. Assess shingle condition for curling, cracking, or missing granules.
2. Examine around vents, chimneys, and roof penetrations for flashing damage.
3. Consider a professional inspection if you notice unusual dampness or moss spread on an aging roof.
Climate and Local Environment
Local weather patterns drive moss growth more than you might expect.
- High rainfall and humidity create consistently damp roof surfaces.
- Coastal or fog-prone areas bring persistent dew and moisture.
- Dense landscaping that keeps areas shaded and damp promotes moss establishment.
How to check:
1. Review local climate data for humidity and rainfall trends.
2. Identify nearby evergreen trees that provide year-round shade and debris.
3. Observe moss growth rate across seasons to spot climate-driven patterns.
How Roof Materials Affect Moss Growth on Roofs
Why material matters
Moss loves shade, moisture, and surfaces it can cling to. The roof material you have affects how water sits on surfaces, how rough or porous the surface is, and how quickly sun dries things out. Smooth, non-porous or quickly heated surfaces tend to dry faster and resist moss a bit more, while rough, porous, or shaded surfaces give moss a foothold. Aging materials can develop micro-roughness that moss needles into, and some materials retain moisture longer than others. Here's how the most common roof types behave in moss-prone climates.

- Moss growth tendency: Moderate to frequent in shaded valleys, along eaves, and near penetrations where moisture collects.
- Why it happens: Weathered asphalt shingles can develop micro-roughness and small gaps between granules that moss roots into. The underlayment and felt can retain moisture in low-vented areas.
- Maintenance notes: Use a plastic or wood-handled brush to gently remove moss; avoid aggressive power washing that can loosen granules. Consider a moss-control product or copper/zinc-based treatment, applied per product directions.

- Moss growth tendency: High, especially in shady, humid spots.
- Why it happens: Wood is porous and holds moisture longer. The natural texture provides abundant anchors for moss, and the organic material can contribute to rot if moss is left long enough.
- Maintenance notes: Regular cleaning and sealing help, but replacement may be needed where rot appears. Keep branches pruned to reduce shade and improve drying, and treat or seal wood surfaces to slow moss establishment.

- Moss growth tendency: Generally low, but not zero in dense shade or near trees.
- Why it happens: Metal surfaces are smooth and dry quickly, but seams, fasteners, and ribbed areas can trap moisture and debris.
- Maintenance notes: Clean debris from seams and valleys; avoid abrasive scrubbing or harsh chemicals that can scratch coatings. If moss forms in shaded pockets, gentle removal and ensuring good ventilation help.

- Moss growth tendency: Moderate to high in shaded, moist areas.
- Why it happens: Porous surfaces and natural texture provide a good grip for moss. Tiles can hold standing water in certain configurations or at joints.
- Maintenance notes: Remove moss with care to avoid cracking tiles; ensure proper slope and drainage. Copper strips or zinc pellets installed along ridges can deter moss long-term.

- Moss growth tendency: Occasional to moderate in shade; slate is dense but can still support moss in damp microclimates.
- Why it happens: Slate is durable but often has natural fissures and rough edges where moisture lingers.
- Maintenance notes: Moss on slate should be removed gently to avoid chipping. If repeated growth occurs, assess shading and consider professional treatment.
Synthetic Roofing Materials
- Moss growth tendency: Varies by product; many synthetics resist moss better than organic materials, but some can still harbor moss in shade.
- Why it happens: Some synthetics have smooth, non-porous surfaces that shed water quickly, while others have textured tops that provide micro-nitches for moss.
- Maintenance notes: Clean with non-abrasive brushes and follow manufacturer guidance. If moss persists, ensure the roof isn't consistently shaded and that ventilation around the roof line is adequate.
Quick-start moss risk checklist by material (one glance guide)
- Asphalt: Moderate risk in shade; brush off moss; consider treatment.
- Wood Shakes: High risk; manage moisture and shade; inspect for rot.
- Metal: Low risk; watch for seams in shade; gentle cleaning only.
- Clay/Concrete Tiles: Moderate to high risk; maintain drainage; consider copper/zinc deterrents.
- Slate: Moderate risk; gentle removal; check for shading issues.
- Synthetic: Variable; follow product guidance; ensure surface isn't repeatedly shaded.
- Tip for all materials: trim overhanging branches to reduce shade, keep gutters clear so water drains away, and address any persistent moisture pockets promptly to minimize moss-friendly conditions.
The Risks of Ignoring Moss Growth on Your Roof
Moss and Shingle Damage
Moss isn't just unsightly—it's a moisture magnet. When it sits on your roof, it traps water against the surface, which can accelerate wear on asphalt shingles. The little root-like structures (rhizoids) can creep under edges and lift shingles, causing misalignment and small gaps. As moss grows, it can push apart tabs and loosen flashing around vents and chimneys. Over time, this combination leads to early granule loss, which reduces UV protection and shortens the roof's lifespan. Dense mats can also create micro-sumps where water pools, increasing wear during rainstorms.
Water Intrusion and Leaks
Moss acts like a sponge for rain. Water pooled in shady, moss-covered areas can seep under shingles and into underlayment, especially at seams, valleys, and around roof penetrations. Persistent moisture behind the roof deck creates a haven for rot and mold in the attic space. In cold weather, trapped moisture can contribute to ice dams, where melted snow refreezes at the eaves and forces water under shingles.
Structural and Deck Deterioration
Prolonged moisture from moss growth can compromise the roof deck itself. After years of damp conditions, plywood or boards beneath the shingles may start to warp or rot. This weakens the roof's structural integrity and can lead to sagging, creaking, or accelerated deterioration of ceiling drywall in the attic. Mold and mildew aren't just cosmetic concerns; they can impact indoor air quality and insulation effectiveness.
Gutter Blockages and Ice Dams
Moss and accompanying debris frequently accumulate in gutters and downspouts. Blocked systems prevent proper drainage, causing water to back up and spill over the fascia. In winter, trapped moisture in clogged gutters feeds ice dam formation, which further pushes water under shingles and into the roof structure. The combined effect is more leaks, damaged gutters, and higher winter maintenance costs.
Safety Risks During Maintenance
To address moss, many homeowners climb onto the roof or use ladders to scrub or treat affected areas. Wet, mossy shingles are extremely slippery, increasing fall risk. Improper cleaning can loosen granules or damage shingles, creating new leaks. If you have tall or steep roofs, the risk isn't just personal injury—it can also lead to accidental damage to vent pipes, flashing, or skylights.
Long-Term Cost Impacts
Ignoring moss growth can transform a manageable maintenance issue into a major repair bill. Benefits of proactive treatment include:
- Extended roof life and preserved granule count
- Lower likelihood of attic leaks and interior water damage
- Fewer gutter replacements due to reduced debris
- Less risk of costly mold remediation in the attic or ceilings
Quick Risk Check for Homeowners
1. Visualize the roof from the ground or a safe vantage point; note any brown/green patches or thick mats.
2. Inspect gutters for moss debris, granule loss, or water backup signs.
3. Look for curling, cracked, or lifted shingles, especially near valleys and flashing.
4. Check the attic after a rain for damp spots, musty odors, or visible condensation.
5. Assess proximity to shade sources (trees, tall structures) that keep the roof damp for longer periods.
Consequences of Delay
- Increased leak frequency after rainfall
- Faster granule loss and more rapid shingle deterioration
- Higher repair and replacement costs
- Greater risk of rot in roof deck and structural framing
Signs It's Time for Professional Help
- Moss covers a large area or is growing into flashing and valleys
- You notice recurrent leaks despite minor surface cleaning
- The roof deck shows signs of sagging, soft spots, or mold growth
- You're uncomfortable working on a pitched roof or lack proper safety equipment
Moss Growth: What Not to Ignore
- Persistent dampness in shaded roof areas
- Regular (seasonal) moss re-growth after cleaning
- Visible lift or damage to shingles and flashing
- Recurrent attic moisture or temperature inconsistencies
How Moss Growth on the Roof Is Diagnosed
Visual clues from the ground
- Moss patches appear as green, gray, or brown plush cushions on shingles, shakes, or tiles. They'll often look like clumps or wispy carpets in shaded patches.
- You may notice dark streaks or staining on the roof surface where moisture sits longer, especially in valleys or under eaves.
- Moss keeps moisture close to the surface, so shingles in those spots can look damp, and granules at the gutter line may begin to shed more quickly.
- Growth is typically denser on north-facing slopes or areas blocked from sun by trees or tall structures.
Safe, up-close checks
1) Prepare for safety
- Use a sturdy ladder, a helper if possible, non-slip shoes, and avoid stepping on mossy, slick areas.
- If your roof has steep pitch or you're unsure, skip close-up inspections and move to professional help.
2) Ground-to-roof inspection
- Use binoculars or a zoom camera to map out exactly where moss is thickest: under overhanging branches, around chimneys or skylights, along valleys, and on the shaded side of the house.
- Photograph the affected areas with dates to track progression over time.
3) Lightly test a few non-critical spots
- If it's safe to approach, gently rake or sweep a small section of leaves and loose debris to see how firmly the moss is attached. Loose patches that come away easily indicate more surface-level growth; deeply rooted moss may be harder to remove and could signal moisture retention underneath.
Signs of moisture and underlying roof issues
- Soft or spongy feel when you press on suspected moss patches can indicate underlying moisture in the shingles or decking.
- Curling or bubbling shingles beneath heavy moss growth suggests deterioration from prolonged dampness.
- Granule loss at the gutters or on the ground near downspouts can mean the roof's protective surface is wearing away in moss-prone areas.
- Attic signs: damp insulation, musty odors, or damp spots on the ceiling after rain point to roof leaks or poor ventilation that often accompany moss growth.
- Moss loves shade, moisture, and poor air flow. Look for clusters in:
- North-facing or heavily shaded sections
- Areas under tree canopies or near overhanging branches
- Roof valleys, near dormers, and corners where water pools
- Note whether the roof has debris buildup (leaves, pine needles) that traps moisture and holds moss in place.
- Consider climate cues: high humidity, frequent rain, or persistent cool spells foster moss habitation.
1) Compare areas
- Mark and compare mossy sections to nearby dry sections. Are the dry areas showing early signs of wear or only cosmetic moss patches?
2) Check for roof surface changes
- Look for softened shingles, exposed nails, or broken granules where moss is thickest. These are red flags for structural risk if moss has been holding moisture for a long time.
3) Look inside the attic
- With permission, peek for damp spots, mold, or stained rafters. Wetness upstairs often mirrors surface moisture outside.
When to call a roofer or moss-damage specialist
- moss covers large swaths of the roof or is concentrated in critical areas like valleys, around dormers, or near the ridge.
- you notice significant shingle curling, cracking, or granule loss corresponding with moss patches.
- you're uncomfortable inspecting or accessing the roof safely.
- there are signs of attic moisture or recurring leaks despite cleaning.
Documentation to share with a pro
- Photos of moss density by area (north face, shaded zones, valleys).
- Notes on roof age, recent weather, and any prior repairs.
- Your attic observations, especially any dampness or staining.
Repair Options for Moss Growth on Roofs
Temporary fixes
These steps slow moss spread and protect the roof while you plan bigger repairs.
- Remove loose moss with a plastic putty knife or soft-bristle brush; avoid metal tools that can scratch shingles.
- Clear debris from roof and gutters; keeping eaves clear helps everything dry faster.
- Skip high-pressure washing. It can lift shingle granules and damage the surface. Use a soft wash or an enzymatic moss cleaner designed for your roofing material, and follow the label.
- Trim back overhanging branches to reduce shade and moisture; more sun and airflow slows moss return.
- Consider temporary deterrents like zinc or copper strips along the ridge if approved for your roof; these release ions that inhibit moss growth on nearby shingles.
Steps:
1) Mark the densest moss areas so you know where to focus later.
2) Gently lift and remove moss clumps from shingles, working from the bottom up.
3) Rinse with a gentle spray from the ground or a safe ladder height; avoid blasting granules loose.
4) Apply the cleaner per label instructions and let it dwell as directed before rinsing or waiting for the next rain.
Minor repairs
If moss has caused localized damage but the roof deck is sound, tackle these fixes.
- Replace damaged or lifted shingles in the affected zone; seal edges with compatible roof cement or sealant.
- Re-nail loose shingles to restore wind resistance; use the correct spacing and fasteners for your roof type.
- Re-secure or reseal flashing around vents, chimneys, and valleys as needed.
- Clean gutters and downspouts to ensure proper drainage and prevent water from sitting near softened areas.
- After cleaning, treat the area with a moss killer safe for your shingles, then monitor for regrowth over the next season.
Partial replacement
Use partial replacement when damage covers a larger but still localized area (for example, a few squares).
- Assess scope to determine how much of the roof needs replacement and whether the underlying decking is sound.
- Remove damaged shingles down to the underlayment; inspect and patch any damaged decking as needed.
- Install new shingles with proper alignment, nailing, and sealing; ensure color and profile match.
- Reflash or replace flashing around penetrations and along valleys as needed to maintain a watertight seal.
- Clean up debris, verify drainage, and consider adding preventive measures (like improved ventilation or moss deterrents) after the repair.
Full roof replacement
Reserve full replacement for widespread moss damage, extensive shingle failure, or when the roof is near the end of its life.
- Inspect the roof deck for rot or mold; replace any damaged sheathing and address attic ventilation before the new roof goes on.
- Choose material, color, thickness, and warranty that balance durability with maintenance needs.
- Prepare the job site: protect landscaping, cover windows, and plan for disposal of old roofing material.
- Schedule with a licensed roofer; coordinate permits, inspections, and safety protocols.
- After installation, arrange a post-installation inspection to verify flashing, ventilation, and underlayment are correctly installed.
Typical Cost to Fix Moss Growth on a Roof
Minor repair: Description and cost
A minor repair covers light moss growth with no underlying roof damage. This is mostly about cleaning and preventative treatment to slow future growth.
- What's included: gentle cleaning (soft brush or low-pressure wash), application of a moss killer or preventative treatment, and a quick gutter sweep to remove debris.
- Typical cost: $150–$400.
- Notes: Usually on a small roof area or single section; no damaged shingles or underlayment involved.
Moderate repair: Description and cost
Moderate repairs happen when moss has started to affect the surface, lifting a few shingles or causing minor granule loss. You'll want a thorough cleaning plus targeted fixes to prevent recurrent problems.
- What's included: comprehensive roof cleaning, moss inhibitor application, minor shingle replacement (a few damaged tabs), resealing around vents and flashings, and basic gutter and surface debris removal.
- Typical cost: $400–$1,200.
- Notes: May involve a couple of days of work depending on roof size and accessibility; often paired with an inspection to catch early signs of water intrusion.
Major repair: Description and cost
Major repairs are needed when moss has caused significant damage—rotted decking, leaks, or widespread shingle loss—potentially requiring partial re-roofing or full replacement in the affected area.
- What's included: full assessment, removal of moss and debris, replacement of damaged shingles and underlayment as needed, flashing and ventilation repairs, decking fixes if soft or rotten, and disposal. In some cases, a larger section or whole roof may need replacement.
- Typical cost: $2,000–$12,000+.
- Notes: Costs scale with roof size, material type, and extent of damage; steep pitches, hard-to-access areas, or high-end materials (tile, slate, cedar) push costs higher.
What factors affect cost
- Roof size: Larger roof area means more labor, materials, and time, driving up the price.
- Access: Hard-to-reach roofs (topped with tall elevations, steep pitches, or tight space) increase labor risk and time, boosting cost.
- Material type: Asphalt shingles are generally the most affordable to repair; tile, slate, and cedar require specialized methods and may need more extensive replacement.
- Extent of damage: If moss has caused underlying rot, damaged underlayment, or decking, expect higher costs for materials and labor.
- Local labor rates: Prices vary by region and contractor demand; urban areas or regions with higher living costs often see higher bids.
- Ventilation and flashing: Damaged flashing or inadequate ventilation increases the complexity and cost of repairs.
- permits and inspections: Some repairs, especially partial roof replacements, may require permits, adding filing fees and inspection costs.
How Long Can You Wait Before Removing Moss From Your Roof?
Short-term realities (0-3 months)
In the earliest stage, moss is mostly a moisture trap and a cosmetic issue. If your roof sits in shade and sees frequent rain, the moss can establish itself quickly and start holding dampness against the shingles.
- Signs to watch (without climbing)
- Dark green patches on shaded sections
- Slight dampness in the attic after rain
- More debris and moss fragments in gutters
- What it means for your roof
- Moss holds moisture against shingles, which can accelerate granule loss and aging of the roof surface over time
- Practical steps you can take now (no heavy lifting required)
1) Keep gutters clear to prevent water backing up under moss patches
2) Trim back overhanging branches to reduce shade and promote drying sun exposure
3) Schedule a professional roof check if you're unsure about the extent or safety of an at-height inspection
Medium-term realities (3-12 months)
If the moss keeps growing, expect thicker mats and more moisture retention, which increases trouble for the roof surface.
- Consequences you may notice
- Edges of shingles begin to lift or curl where moss sits
- Moss mats deepen; valleys and areas around fasteners show wear
- Heightened risk of leaks in shaded spots during wet seasons
- Maintenance tips
- Use roof-safe moss removal methods (soft wash or labeled biocides) rather than aggressive pressure washing
- Confirm there's adequate ventilation in the attic and soffits to help drying and reduce dampness
Long-term realities (1-2+ years)
Prolonged moss presence can lead to more serious damage and higher repair costs.
- Potential outcomes
- Widespread shingle damage, leaks, and potential decking rot
- Accelerated granule loss, leading to faster UV damage and shorter roof life
- Ice damming in colder climates where moss alters heat transfer
- What to plan for
- If damage is extensive, replacement may become more cost-effective than ongoing patchwork
- Address shading, drainage, and ventilation to slow or prevent future moss regrowth
What happens if you wait to address the problem in several timeframes
- 0-3 months: moss persists; moisture remains trapped; minor staining may appear
- 3-6 months: mats thicken; edges start to lift; higher leak risk in sheltered areas
- 6-12 months: more widespread shingle wear; leaks more likely after rain; valleys and flashing vulnerable
- 1-2+ years: significant structural concerns; decking moisture and rot develop; roof replacement becomes a real consideration
How Moss Growth Varies by Location and Climate
Humidity, Shade, and Moisture Availability
Moss needs steady moisture and shade to thrive. In regions with high humidity and frequent drizzle, roofs stay damp longer, especially on permanently shaded spots. Orientation and nearby foliage can create microclimates where moss rips through even on otherwise dry roof faces.
- Pacific Northwest and Gulf Coast climates: moss commonly builds up on north-facing sections and under eaves where shade and moisture linger.
- Northeast and Great Lakes: cool springs and humid summers encourage moss in shaded valleys, dormers, and gutters that stay damp.
- Southwest and parts of the Plains: moss is less common, but persistent shade from trees or irrigation-induced moisture can create pockets.
- North-facing surfaces in the Northern Hemisphere tend to stay moister year-round, making them prime moss zones.
- Overhanging branches and dense canopies dramatically boost moss presence by keeping surfaces shaded.
Temperature, Sun Exposure, and Seasonal Patterns
Temperature plays a big role in how fast moss appears and how long it hangs around. Cool, damp conditions promote moss growth, while direct, intense sun dries surfaces and slows moss establishment.
- In mild, wet regions (Pacific Northwest, parts of the Southeast during humid seasons), moss grows steadily and can persist through multiple seasons.
- Areas with cold winters and freeze-thaw cycles (Northeast, Great Lakes, parts of the Midwest) see moss flourish in sheltered, shaded spots and then slow or pause during peak sun and dryness.
- Very hot, arid areas (deep Southwest) see moss mainly in shaded pockets after rain; drought conditions keep most roofs clear.
- Short days and cloudy seasons can prolong moss life on shaded roofs, even when surrounding areas dry out.
Roof Material, Orientation, and Drainage
Material and roof design affect how quickly moss can establish and how easy it is to remove.
- Asphalt shingles: common to grow moss where moisture lingers; rougher textures and valleys collect debris that hold moisture.
- Metal roofs: heat transfer can dry surfaces faster, making moss less likely, but shaded edges still matter.
- Tile or shake roofs: the texture provides more nooks for moss to anchor; debris-filled valleys traps moisture.
- Steep roofs shed water quickly, limiting moss; low-slope or flat sections stay damp longer and invite moss.
- Valleys, dormers, and areas where debris accumulates stay moist and are moss hot spots.
- Proper drainage matters: clogged gutters or poor downspout flow keeps runoff from drying on the roof, promoting moss growth.
How This Problem Varies by Region & Climate within the United States
- Pacific Northwest (Washington, Oregon, coastal Northern California): Very moss-prone year-round due to frequent rain and persistent shade. Expect moss on north-facing slopes and under overhangs; plan annual inspections and targeted cleanings in the fall.
- Northeast (New England, New York, Pennsylvania) and Great Lakes: Seasonal moss activity tied to damp springs and cool summers. Shaded dormers and eaves are common sites; gutters and valleys warrant regular attention during transitional seasons.
- Southeast (Carolinas, Georgia, Florida panhandle): High humidity and frequent rain sustain moss on shaded roofs, especially under tree cover. Monitor shaded, low-slope areas after heavy rains.
- Midwest (Illinois, Michigan, Ohio, Wisconsin): Variable moisture with snow and melt cycles. Moss tends to appear on north-facing and shaded sections; de-icing and gutter maintenance help reduce recurrence.
- Southwest (Arizona, New Mexico): Arid overall, moss is less common but can appear in sheltered pockets near trees or irrigation zones. Focus on removing moisture-retaining debris and trimming shading vegetation.
- Mountain West (Colorado, Utah, Nevada): Cooler nights and episodic moisture in canyons create moss-prone microclimates around valleys and shaded rooves; address these spots promptly after wet periods.
- Alaska and Hawaii: Alaska's coastal, moist zones see moss more readily on shaded, cooler roofs; Hawaii's tropical microclimates can foster moss in shaded, damp areas despite overall warmth—regular inspection in shaded roof sections helps keep growth in check.
- Quick regional checklists:
1) Identify shaded, north-facing or tucked-away roof areas.
2) Note any persistent moisture—drips, overhanging branches, or blocked gutters.
3) Observe after rain: where does moss reappear first?
4) Plan region-appropriate maintenance intervals (more frequent in moss-prone areas).