Ultimate Guide to Chimney Flashing & Repair
Last updated: Feb 28, 2026
Introduction to Chimney Flashing & Repair
What chimney flashing does and why it matters
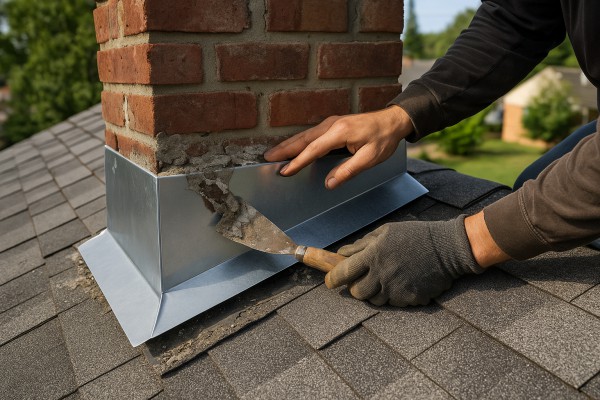
Chimney flashing is the metal barrier that seals the joint where your chimney meets the roof. It directs water away from vulnerable nooks and crannies to keep your attic dry and your siding and framing sound. When flashing is damaged, improperly installed, or overwhelmed by wind, rain, or freeze-thaw cycles, leaks follow the same path—down the chimney, into the attic, and across ceilings. A well-installed flashing system is a quiet, long-term line of defense for the entire roof structure.
Key components of chimney flashing
- Base flashing along the roof line that nests against the chimney butt.
- Step flashing that weaves up the sides of the chimney as shingles lay over it.
- Counter-flashing that overlays the step flashing, locking seams in place.
- A cricket (saddle) or diverted water path behind the chimney to shed runoff.
- Sealant or caulking at corners or gaps, used sparingly to supplement, not replace, metal flashing.
- Proper integration with the chimney crown and chimney cap to keep water from collecting at the top.
Common failure modes
- Missing, lifted, or corroded base flashing at the roof-joint.
- Damaged or poorly installed step flashing that allows water entry at edges.
- Insufficient or improperly installed counter-flashing.
- Ice dam damage in cold climates that compromises the seal.
- Gap openings where shingles meet the chimney, or competitive vent penetrations.
- Decorative brickwork that shifts and disturbs the flashing line.
Signs your chimney flashing needs attention
- Water stains or damp spots on ceilings near the chimney.
- Attic condensation, musty odors, or mold growth around the chimney shaft.
- Visible rust, corrosion, or lifted metal at the flashing.
- Dark bricks, efflorescence, or crumbling mortar near the flash line.
- Icicles forming around the chimney during winter or recurring minor leaks after rain.
How a chimney flashing repair typically unfolds
- A professional inspection to locate the exact leak path and assess surrounding roofing.
- Temporary protection of interiors to keep dust and water out during work.
- Removal of damaged flashing pieces without harming the chimney or shingles.
- Cleaning of surfaces to ensure a solid, long-lasting seal.
- Installation of base flashing, then step flashing up the chimney sides, with precise overlaps.
- Application of counter-flashing and compatible sealant at seams, plus integration with existing shingles.
- Final leak test and a brief walk-through of maintenance tips to prevent future issues.
Step-by-step overview: a typical repair process
1) Inspect and diagnose the source of the leak.
2) Protect interior spaces from debris and water intrusion.
3) Remove faulty flashing sections without damaging brick or roof.
4) Clean and prepare the flashing surfaces for a secure fit.
5) Install base flashing, then step flashing, ensuring proper overlaps and tight seals.
6) Add counter-flashing and seal seams; blend with the roof shingles for a watertight finish.
Maintenance tips to extend flashing life
- Schedule regular roof inspections, especially after severe weather.
- Keep the chimney mouth and surrounding roof area clear of leaves, branches, and debris.
- Inspect for loose shingles or lifted edges near the flashing and address promptly.
- Avoid aggressive cleaning near flashing; use gentle methods if you must clean nearby areas.
- Use high-quality flashing materials designed for your climate and roof type.
When to call a professional
- You notice recurring leaks after storms or freeze-thaw cycles.
- The flashing shows visible damage, corrosion, or significant movement.
- You're unsure how to safely access the chimney area or execute a proper seal.
- A past repair doesn't stop the leaks, or you're planning a chimney rebuild or crown work.
Chimney Flashing and Repair: Preventing Leaks and Protecting Your Home
Comprehensive definition
Chimney flashing is a weatherproof metal interface that seals the joint between a masonry or factory-built chimney and the sloped roof. It directs water away from the vulnerable seam where the chimney intersects the roof deck. A proper flashing system typically includes base flashing along the bottom of the chimney, step flashing that weaves up under shingles, and counter flashing that covers the vertical joints. In some roofs, a chimney cricket (a small saddle-shaped ridge) or a broad back dam may be added to divert heavy runoff away from the base. When done correctly, flashing creates a continuous, watertight barrier that prevents leaks even during driving rain, freeze-thaw cycles, and wind-driven water.
When it's typically needed
- During new roof installations or chimney rebuilds to ensure a fresh, continuous seal.
- After severe weather, storms, or freeze-thaw cycles that can distort or lift flashing.
- If you notice water staining, dampness, or musty smells near the chimney in the attic.
- After remodeling or re-roofing around the chimney location.
- If you see cracked or loose mortar, dented metal, rust, or gaps around the chimney base.
- When a roof replacement is performed and flashing isn't replaced or resealed as part of the project.
Key flashing components and how they work
- Base flashing: Lays flat against the roof decking at the chimney perimeter to shed water away from the joint.
- Step flashing: Individual V-shaped pieces that bend up the roof slope and under each shingle to create a layered barrier.
- Counter flashing: Installed on top of the base/step flashing, typically embedded into the chimney mortar or wall to seal the vertical seam.
- Cricket/saddle: A small peaked mound behind the chimney that diverts water around its base.
Common problems that cause leaks
- Damaged, corroded, or lifted flashing from wind, foot traffic, or shifting roof framing.
- Improper installation where step and counter flashing don't fully overlap or seal.
- Gaps at mortar joints or cracked brick around the chimney.
- Deteriorated roof shingles adjacent to the chimney allowing water entry.
- Sealant failures that dry out, crack, or peel away.
- Vegetation or debris piling up at the chimney base, blocking water flow.
Step-by-step: how flashing repair or replacement is typically done
1. Inspect and locate: Identify active leaks, visible rust, loose pieces, or gaps at the chimney joints.
2. Prepare the area: Protect interior spaces and remove a small section of shingles around the chimney to access flashing.
3. Remove damaged material: Carefully lift and remove old flashing, sealant, and any deteriorated mortar in the immediate area.
4. Clean and inspect substrate: Scrape away old sealant, rinse debris, and check the deck and chimney edge for rot or loose fasteners.
5. Install base flashing: Fit new base flashing along the chimney toe and extend onto the roof decking for a tight fit.
6. Apply step flashing: Install continuous, overlapping step flashing up the sides of the chimney, integrating it with shingles as you go.
7. Install counter flashing: Secure counter flashing over the step flashing and into the chimney joint or mortar, sealing all overlaps with appropriate sealant.
8. Add a cricket or saddle if needed: If the roof shape or runoff warrants it, install a cricket behind the chimney to direct water away.
9. Seal and reseal: Apply high-quality roofing sealant at all joints, corners, and seams; re-bed shingles and protect the edges.
10. Reinstall shingles: Carefully place and fasten shingles back, ensuring courses align and water can shed cleanly.
11. Inspect and test: Check for smooth water flow at the base and perform a careful water test (or wait for rain) to confirm a leak-free seal.
Materials and maintenance tips
- Use corrosion-resistant metals: copper, zinc, or aluminum—matched to your roof type and climate.
- Sealants: Choose roofing-grade sealants designed for perpendicular joints; avoid generic caulk that can tear away.
- Regular checks: Inspect flashing annually and after storms; look for rust, loose pieces, or gaps.
- Cap maintenance: Ensure chimney caps and shrouds are intact to reduce debris and ice buildup near flashing.
- Pro advice: For high or complex roof angles, or damaged masonry, hire a professional with chimney flashing expertise.
Signs you may need professional flashing work
- Persistent wet spots after rain or snowmelt.
- Visible gaps, lifted flashing, or corroded metal around the chimney.
- Cracked mortar joints or erratic chimney movement after heavy winds.
- You're planning a roof replacement and want the flashing integrated correctly.
When You Need Chimney Flashing & Repair
Signs this service is needed
- Water spots or stains on ceilings, walls, or attic insulation near the chimney.
- Damp or musty smells in the attic, especially after rain.
- Visible gaps, cracks, or lifting around the base of the chimney where flashing meets the roof.
- Loose, cracked, or missing shingles directly adjacent to the chimney.
- Rust or corrosion on metal flashing, visible nails showing at the edge, or flashing pulled away from the chimney.
- Cracked mortar joints or spalling brick on the chimney crown or chase.
- Moss, algae, or excessive moisture pooling around the chimney area.
- Ice dams or recurring leaks in winter that trace to the chimney area.
Ways you can confirm yourself as a homeowner
1) Inspect the attic with a flashlight
- Look for staining, damp insulation, or dark streaks along the chimney chase.
- Check the interior side of the flashing where it runs up the chimney; any signs of water intrusion or corrosion are red flags.
2) Do a quick exterior check (from a safe stance)
- Examine the flashing along the chimney base for gaps, lifted sections, or loose fasteners.
- Look at the roof surface near the chimney for blistered, loose, or missing shingles.
- Check mortar joints and the brick around the chimney for cracks or spalling.
3) Inspect the flashing and sealant
- See if old caulk or sealant around the flashing has deteriorated, cracked, or peeled away.
- Notice if there are fresh nail holes or signs that the metal flashing has shifted.
4) Watch for telltale signs after a rain
- If a small drip or damp spot appears in the attic after a storm, it's a strong indicator the flashing is compromised.
5) Photograph findings
- Take clear photos of the flashing, joints, and any damage. They help when you talk to a pro and track changes over time.
When to get a professional assessment
- You have an active roof leak or water is entering the house near the chimney after rain or snowmelt.
- The flashing shows extensive damage: large gaps, significant rust, bent or torn sections, or flashing pulled away from the chimney.
- There are structural concerns: cracks in the brick or mortar, leaning or bowing chimney, or any movement at the chimney base.
- You notice widespread shingle damage or repeated leaks around multiple chimney edges, suggesting a broader roof issue.
- You're not comfortable working on a roof, or your roof is steep, tall, or otherwise unsafe to access.
- After severe weather (hurricanes, hail, heavy freezing/thawing), to verify flashing integrity and prevent future leaks.
- If you're planning to replace flashing or re-seal, and you want a professional assessment to choose the right flashing type (lead, copper, aluminum, or stainless) and proper integration with chimney cap, counter-flashing, and roof shingles.
What to expect from a pro visit
- A careful, on-roof inspection of flashing, counter-flashing, step flashing, and roof-to-chimney intersection.
- Assessment of the masonry around the chimney, including crown integrity and mortar joints.
- Recommendations for repair options: resealing, re-flashing, or full flashing replacement, plus shingle repair if needed.
- A clear explanation of costs, labor time, and any follow-up maintenance to prevent future leaks.
What's Included with Chimney Flashing and Repair
Typical Inclusions
- On-site inspection and leak diagnosis at the chimney-roof intersection to identify the exact water entry points.
- Custom-fabricated flashing materials (copper, stainless steel, or durable lead-free alloys) cut to fit the chimney base and sides.
- Installation of base/apron flashing at the chimney's footprint, integrated with the roof covering.
- Side flashing along the chimney walls, with counter-flashing tuned to masonry joints to channel water away.
- Step flashing where the chimney meets the roof, properly folded into roof seams and shingles.
- Exterior sealants and caulking using high-quality polyurethane or silicone sealants for long-lasting weatherproofing.
- Replacement or repair of damaged shingles in the flashing zone and secure re-nailing where needed.
- Chimney cricket or diverter installation if the design requires improved water diversion around the base.
- Ice and water shield or additional underlayment in vulnerable areas to reduce ice damming and leaks.
- Final leak test, thorough cleanup, and documentation of work performed.
Not Typically Included
- Major masonry repairs beyond the flashing zone (e.g., extensive repointing, brick replacement, or crown restoration).
- Full chimney rebuilds or extensive re-flashing that affects masonry beyond the base area.
- Interior repairs caused by past leaks (drywall, insulation, ceilings, or flooring) unless a separate contract covers interior work.
- Roof deck replacement or structural work beyond the immediate flashing footprint.
- Complete chimney cap or chase cover replacement unless specifically scoped in the project.
- Permitting fees, hauling/ disposal of large quantities of debris, or travel charges that fall outside the local service area (these are typically separate line items).
- Major roof replacement tied to the flashing project when the rest of the roof is near end-of-life, unless bundled in a larger roofing scope.
The Repair Process (What to Expect)
1. Initial assessment and written estimate outlining findings and material choices.
2. Material selection (copper, stainless steel, or other durable options) and precise measurements for a custom fit.
3. Site preparation: protect shingles and clean around the chimney; remove old flashing if necessary.
4. Flashing installation: base/apron first, then side flashing, followed by counter-flashing; all seams sealed.
5. Shingle integration: reseal and re-nail shingles as needed; ensure proper overlap and water flow.
6. Final inspection and leak test; homeowner walk-through and warranty details; job site cleaned.
Roofing Materials Commonly Used With Chimney Flashing & Repair

- How this service relates: Asphalt shingles rely on step flashing that weaves under the shingles and up the chimney flashing to shed water. When flashing fails, leaks travel behind the shingle rows, so attention to flashing installation and sealant is crucial.
- Material-specific notes:
- Use galvanized, stainless, or copper flashing that resists rust with asphalt exposure.
- Counter-flashing should be embedded into the chimney mortar to prevent water from creeping behind it.
- Sealants must be compatible with asphalt and flexible enough to handle seasonal movement.
- Common issues to watch:
- Buckling or loose shingles near the chimney.
- Nail pops that expose the flashing edge.
- Deteriorated sealant at the top edge of the flashing.
- Steps we take:
1) Inspect the chimney chase and surrounding shingles for damage.
2) Remove damaged shingles to expose existing flashing.
3) Install new step flashing and integrate counter-flashing into the chimney.
4) Seal joints with a compatible, flexible sealant.
5) Reinstall shingles, ensuring proper nailing and alignment for water shedding.
- How this service relates: Metal roofs use continuous or segmented flashing at the chimney intersection, and through-fastened panels require precise flashing to prevent leaks at every seam.
- Material-specific notes:
- Standing-seam systems favor continuous flashing with counter-flashing; through-fastened panels need properly seated, watertight fasteners.
- Copper flashing ages beautifully with metal roofs but can be pricier; choose corrosion-resistant alloys for long-term performance.
- Use sealant that remains flexible with metal movement and temperature swings.
- Common issues to watch:
- Corrosion at fasteners or seams.
- Gaps at the chimney base due to panel movement.
- Inadequate counter-flashing behind the chimney cap.
- Steps we take:
1) Remove compromised flashing and inspect panel seams.
2) Fit continuous or segmented flashing designed for metal roofing.
3) Install counter-flashing and seal all joints.
4) Re-seal around the chimney with a compatible sealant.
5) Re-attach any trim and ensure panels shed water away from the chimney.
Cedar Shake or Shingle
- How this service relates: Cedar expands and contracts with moisture and temperature, so chimney flashing must be flexible and properly integrated to avoid cracks and leaks.
- Material-specific notes:
- Use copper or stainless-steel flashing to resist rot and decay near wood.
- Allow for wood movement; avoid rigid, tight corners that can cause cracking.
- Sealant must bond with wood and metal while remaining flexible.
- Common issues to watch:
- Rot at the cedar around the chimney due to persistent moisture.
- Cracked or lifted shingles at the flashing edge.
- Fastener corrosion where flashing contacts wood.
- Steps we take:
1) Inspect for soft cedar, signs of rot, and damaged flashing.
2) Install flexible flashing that accommodates wood movement.
3) Add counter-flashing and sealants compatible with wood and metal.
4) Re-bed and re-nail cedar where needed.
5) Perform a water test to confirm a clean seal.

- How this service relates: Tile roofs require careful removal of a few tiles to install proper flashing and sometimes a cricket or saddle to direct water away from the chimney.
- Material-specific notes:
- Flashing often uses lead, copper, or stainless-steel adaptors integrated with tile underlayment.
- Tiles must be reset with correct spacing and sealant to avoid tile breakage.
- Use underlayment that remains watertight under heavy rainfall and freeze-thaw cycles.
- Common issues to watch:
- Tile cracks around the chimney base.
- Improper tile seating causing water intrusion behind flashing.
- Deteriorated underlayment under tiles.
- Steps we take:
1) Remove the necessary tiles to access the flashing area.
2) Install proper head flashing with a tile-compatible sealant.
3) Re-seat tiles and replace any cracked pieces.
4) Install chimney cricket or saddle if needed, and flash to prevent ponding.
5) Re-check water flow and reseal joints.

- How this service relates: Slate's brittleness demands careful handling; flashing must be compatible with slate's high thermal movement and weight.
- Material-specific notes:
- Copper or stainless-steel flashing is common for slate due to durability.
- Flashing must be integrated without cracking slate pieces; often involves stepping with offset pieces.
- Sealants should be compatible with slate and not stain pale stones.
- Common issues to watch:
- Cracked or loose slate near the chimney.
- Corrosion or wear on edge flashing.
- Water pooling behind flashing if joints aren't fully sealed.
- Steps we take:
1) Carefully remove or lift affected slate around the chimney.
2) Install properly sequenced flashing and counter-flashing.
3) Relace slate pieces with matching fasteners.
4) Seal joints with slate-safe sealant.
5) Confirm watertight performance around the chimney base.
Synthetic or Composite Shingles
- How this service relates: Modern synthetic shingles behave more like traditional shingles but can be more flexible, affecting flashing choice and sealant compatibility.
- Material-specific notes:
- Choose flashing materials and sealants compatible with the synthetic surface.
- Flexibility helps accommodate movement, but flashing must still be watertight at the chimney seam.
- Avoid overly aggressive nails into the synthetic layer that could cause fractures.
- Common issues to watch:
- Separation of flashing from the synthetic edge.
- Silicone or asphalt-based sealants not bonding well with certain synthetics.
- Moisture infiltration through compromised joints.
- Steps we take:
1) Inspect synthetic shingle edge and chimney interface.
2) Install compatible flashing and corrosion-resistant fasteners.
3) Apply a flexible, roofing-grade sealant approved for synthetics.
4) Reinstall or trim shingles for proper overhang and water shedding.
5) Verify seal integrity with a water test.
The Cost of Chimney Flashing & Repair
Typical costs you can expect
- Diagnosis/inspection: $100–$250. A technician will pinpoint whether leaks are due to flashing, mortar joints, crown, or vent boot, and note needed fixes.
- Sealant-only patches for minor leaks: $150–$500. Quick, non-invasive fixes can slow or stop small drips.
- Flashing repair (re-sealing, small patch, or reseating): $250–$900. Works for small gaps, blown-in sealants, or loose flashing without a full teardown.
- Full flashing replacement around the chimney: $500–$1,800 on a standard one-story roof; higher on steep pitches or multi-story homes.
- Counter-flashing installation (or re-flashing behind shingles): $400–$1,400. Adds protection where flashing meets siding or brick.
- Chimney chase cover replacement (when corroded or warped): $400–$1,400. Important to keep water out from the top of the chase.
- Related masonry or deck work (mortar joints, brick repair, crown adjustments): $200–$2,500. If water intrusion has affected surrounding masonry, costs rise accordingly.
- Typical total for a straightforward chimney flashing job on a standard home: $600–$1,400. More complex roofs, premium materials, or extensive damage can push to $2,000+.
What affects the price
- Roof pitch and access: Steeper or taller chimneys require more safety measures, equipment, and time.
- Chimney size and number of flashing penetrations: More perimeter flashing or multiple pockets raise material and labor.
- Material choice: Aluminum is affordable and common; copper or stainless steel lasts longer but costs more upfront.
- Scope of work: Sealant-only fixes are cheaper; full removal and replacement of flashing, with counter-flashing, costs more.
- Additional repairs: Damaged shingles, decking, or mortar joints add to the bill.
- Permits, disposal, and inspections: Local rules or waste haul-off fees can add modest amounts.
Cost-saving considerations
- Opt for sealant/patch approach when leaks are minor and localized.
- Accessible roof and simple chimney layout reduce labor time.
- Choose standard aluminum flashing rather than premium metals.
- Combine chimney work with other roofing tasks to share labor and equipment.
- Schedule repairs in dry seasons to minimize weather delays.
When costs go up
- High wind, freeze–thaw cycles, or extensive mortar decay that requires repointing or masonry repair.
- Premium materials (copper or stainless steel) or custom flashing profiles to match a unique chimney.
- Complex roof geometry, multiple slopes, or two-story height increasing safety and setup time.
- Significant roof deck damage or crown issues that require removal and rebuild.
- Need for permits, specialized safety equipment, or extensive shingle removal around the chimney.
Quick quote-ready checklist
1. Document the leak's symptoms (drips, staining, condensation) and suspected sources (flashing, crown, mortar).
2. Note roof pitch, chimney height, and accessibility for ladders and equipment.
3. Request a line-item estimate covering flashing replacement/repair, counter-flashing, sealant, and any masonry work.
4. Ask about warranties on labor and materials, and whether moisture testing or follow-up visits are included.
How the Chimney Flashing and Repair Process Works.
1. On-site Assessment and Documentation
- 1) Step 1: We perform a thorough roof and chimney inspection from ground level and, if safe, from the roof. We look for loose or corroded flashing, gaps at the chimney base, cracked mortar, damaged shingles, and signs of prior repairs.
- 2) Step 2: We check the attic and interior for water intrusion indicators—staining, musty odors, or mold growth.
- 3) Step 3: We record measurements and take photos to map out the exact scope of work and communicate findings clearly.
2. Plan, Materials, and Timeline
- We present practical options based on your chimney's configuration: traditional base and counter flashing, step flashing for the chimney sides, or a hybrid approach using flexible flashing where needed.
- We outline material choices (aluminum, copper, or reinforced flexible flashing), expected costs, and a realistic timeline.
- We include a warranty and a brief maintenance plan so you know what to watch for after the repair.
3. Preparation and Safety
- 1) We set up fall protection, porch or ladder safety, and protect landscaping, windows, and exterior coatings.
- 2) We cover interior spaces if access is needed from inside the attic, and we place containment for debris.
- 3) We designate the work zone and communicate access needs to keep kids and pets safe.
4. Removal of Old Flashing and Surface Cleaning
- 1) We carefully remove deteriorated flashing, old sealant, and any compromised roofing components around the chimney.
- 2) We clean the roof surface around the chimney to create a dry, sound bonding area for the new flashing.
- 3) We inspect the underlying roof deck for rot or damage and repair or replace as needed before new flashing goes in.
5. Installation of New Flashing
- 1) We install base flashing at the chimney base, securing it to resist wind uplift and weather exposure.
- 2) We lay out and install step flashing up the chimney sides and along the roof plane, overlapping with the shingles for a continuous, watertight seam.
- 3) We seal joints with a high-quality, weather-resistant sealant and verify the fit with a quick functional check.
6. Sealing, Membranes, and Shingle Integration
- 1) We apply a continuous bead of sealant along all seams to prevent moisture entry.
- 2) We use a compatible membrane or overlay as needed to ensure full coverage and compatibility with your existing roof system.
- 3) We re-secure or replace damaged shingles near the chimney, trimming carefully to maintain pattern and proper nail lines for a clean, seamless look.
7. Chimney Crown and Brickwork Repair (If Needed)
- 1) We inspect the chimney crown for cracks and repair any that could channel water inward.
- 2) We repoint or replace damaged mortar joints around the chimney to restore brickwork integrity and long-term durability.
8. Final Inspection, Testing, and Clean-Up
- 1) We perform a final, roof-level and attic-level inspection to verify proper alignment and a leak-free surface.
- 2) If appropriate and safe, we conduct a controlled water test to confirm watertight seams and joints.
- 3) We tidy the work area, remove debris, and leave you with care tips for ongoing chimney flashing health and maintenance.
Residential vs. Commercial Considerations for Chimney Flashing and Repair
Residential vs Commercial Considerations of Chimney Flashing & Repair
- Scope and scale
- Residential keeps to single-family or small multi-family homes. Flashing is usually smaller, simpler, and easier to access.
- Commercial can involve large, multi-story buildings, flat or low-slope roofs, and chimneys tied into HVAC stacks or industrial flues. Flashing work is often bigger and more complex.
- Roof type and access
- Homes: pitched roofs, limited edge exposure, and easier access from ladders or reachable eaves.
- Commercial: flat or low-slope roofs with parapets, curbs, skylights, and multiple roof penetrations. Access may require scaffolding or lifts and coordination with building management.
- Materials and detailing
- Homes: common flashing materials include zinc, aluminum, copper, or stainless steel for chimney heads and counterflashing. Detailing is usually straightforward around a single chase.
- Commercial: metal flashing may be heavier gauge, custom-fabricated, and integrated with curb flashings, masonry copings, and roof-to-wall transitions. Counterflashing often requires precise, field-made cuts and stronger seals.
- Codes, permits, and inspections
- Homes: permits may be simpler or not required for small repairs; inspections focus on typical building and life-safety code basics.
- Commercial: permits, fire codes, and structural codes can be stricter. Projects may require plan review, coordination with a GC, and third-party inspections.
- Maintenance expectations
- Homes: annual or biannual inspections focus on leaks, ice dams, and interior staining around a single chimney.
- Commercial: maintenance cycles are often tied to property management contracts, with planned inspections after storms or seasonal changes and more extensive repairs when multiple penetrations exist.
- Longevity and warranties
- Homes: warranties are typically homeowner-focused and tied to the specific flashing material or install.
- Commercial: warranties may be tied to the building envelope system, with long-term performance targets and service-level agreements.
- What this means for homeowners
- Expect longer lead times and more coordination for commercial work; scheduling around building operations is common.
- Budgeting should anticipate higher labor rates and potential specialty metal fabrications on commercial jobs.
- Even on a home, using the right metals and proper flashing details pays off in durability and moisture protection.
- Key differences in approach
- Residential repairs often target a localized leak with a sealant refresh or a straightforward flashing repair.
- Commercial projects may require re-flashing larger sections, integrating with parapets or curbs, and addressing multiple flashing planes at once.
- Typical decision flow for homeowners
1) Identify signs: water stains, efflorescence on masonry, rusted flashing, or loose counterflashing.
2) Document: take photos from several angles and note weather events around the time of damage.
3) Compare options: repair short-term vs. full flashing replacement; consider copper or stainless for longer life.
4) Gather quotes from qualified roofers with chimney flashing experience.
5) Schedule and plan around weather and occupancy (if applicable).
- Common contractor considerations
- Verify licensing and insurance.
- Check references for chimney flashing and roof penetrations on similar building types.
- Ask about workmanship warranties and material warranties, and about how counterflashing will be integrated with existing masonry or roof elements.
- Practical tips for homeowners
- Prioritize flashing in high-wind or freeze-thaw regions; these conditions stress seals and fasteners.
- If you notice interior water marks after storms, act quickly—delays can increase damage to insulation and framing.
- For commercial buildings, request a written envelope assessment outlining how flashing ties into curbs, parapets, and roof drainage.
How Chimney Flashing and Repair Vary by Location
Regional Climate and Roof Styles
- Climate drives material choice and flashing details. In cold climates with frequent freeze–thaw cycles, flexible, dent-resistant flashings with durable sealants help prevent cracking at the joints.
- In hot, sunny areas, UV exposure and thermal expansion matter. Choose sealants and metals that resist sun damage and stay pliable with temperature swings.
- Roof types vary by region. Tile, shake, metal, and asphalt each demand different flashing approaches (tile roofs often need stepped flashing with proper underlayment; masonry chimneys require compatible flashing that tolerates brick or stone movement).
- Wind exposure influences design. High-wind zones require extra fastening, continuous base flashing, and wind-rated sealants to resist lifting at the top of the chimney.
Local Building Codes and Permits
- Some regions require permits for chimney flashing replacement or large repairs, especially if it involves structural work or changes to venting.
- Codes may specify approved flashing materials (stainless, copper, or certain polymers) and installation methods. Your local code office or a licensed roofer can confirm requirements before work begins.
- Inspections are common after significant flashing work to verify proper drainage and weatherproofing, which varies by jurisdiction.
Material Availability and Costs
- Regional supply affects pricing and lead times. Copper, stainless steel, and alloy flashings are more readily available in some markets than others.
- Transportation costs and tariffs can influence material price in rural or coastal areas.
- Seasonal demand influences scheduling and pricing windows, with busier seasons commonly in spring and fall.
Common Local Issues by Region
- Coastal areas (salt air and humidity): Greater corrosion risk; stainless steel or copper flashing is preferred; ensure joints are sealed to prevent salt penetration.
- Northeast and Great Lakes (freeze–thaw and snow): Repeated freezing can loosen fasteners and joints; prioritize robust counter-flashing and corrosion-resistant nails; plan for annual or biannual inspections.
- Southeast (hurricanes and heavy rain): Wind-driven rain tests flashing integrity; use wind-rated flashing and continuous seals; more attention to overlap and drainage paths.
- Southwest (high heat and arid dust): Heat-friendly sealants that resist cracking; attention to expansion gaps; dust and sand can clog drainage paths, so keep weep holes clear.
- Pacific Northwest (heavy rain and moss): Frequent moisture requires excellent drainage and moss prevention around the chimney area; copper or stainless options help resist long-term moisture damage.
How this service varies in different regions in the United States
- Northeast
- Common chimney materials: brick or stone chimneys accompanying masonry walls.
- Priority: stop leaks from brick joints and mortar; ensure flashing sheds water into proper channels and away from interior ceilings.
- Typical approach: durable base flashing, proper counter-flashing over the masonry, and attention to parapet seams.
- Southeast
- Common issues: strong wind uplift and heavy rain events.
- Priority: continuous, wind-rated flashing; robust sealants at all joints; secure fasteners to framing behind siding.
- Typical approach: seamless transitions at roof-to-chimney intersections and reinforced edges.
- Midwest
- Common issues: freeze–thaw cycles and snow load.
- Priority: resilient sealants that resist cracking; stepping flashing that accommodates masonry movement.
- Typical approach: seasonal inspections and resealing to prevent moisture infiltration during thaws.
- Southwest
- Common issues: extreme heat, sun exposure, and dusty conditions.
- Priority: high-temp sealants, metals with low thermal expansion, and simple drainage paths to avoid drying cracks.
- Typical approach: materials chosen for heat resistance, with careful attention to roof penetrations for long-term performance.
- Pacific Northwest
- Common issues: heavy rainfall and moss growth.
- Priority: moisture management and rot prevention around the chimney base.
- Typical approach: corrosion-resistant flashing, proactive cleaning of surrounding shingles, and proactive maintenance scheduling.
- Practical steps you can expect from a regionally informed repair
1) Inspect: assess flashing integrity, joint seals, and drainage paths.
2) Plan: choose materials suited to your climate and roof type.
3) Seal: apply compatible sealants and secure flashing per local code.
4) Verify: test with a light rain or controlled water flow to confirm direction of runoff.
5) Maintain: schedule region-appropriate inspections after seasonal changes or severe weather.