Ultimate Guide to Missing Shingles
Last updated: Feb 28, 2026
Introduction: What Causes Missing Shingles?
Missing shingles happen when a portion of the roof's protective surface is blown away or deteriorates enough that the underlying deck is exposed. This is a common issue after strong winds, heavy hail, or as shingles age and lose their grip. The problem can feel alarming, but understanding the cause helps you decide what to do next without panic.
Is this urgent?
- Visible daylight or damp spots in the attic means you should address it sooner rather than later.
- A few missing shingles after a wind event is fairly common and often repairable, especially on older roofs.
- Large gaps, many missing shingles, or exposed underlayment near seams and valleys increases the risk of leaks and rot and should be evaluated promptly.
Common causes of missing shingles
- Wind uplift from storms or gusty days, especially along eaves, valleys, and roof edges.
- Aging materials: over time, asphalt shingles can become brittle and detach more easily.
- Improper installation: insufficient nails, wrong nail location, or poor sealing at edges can allow shingles to lift.
- Hail damage: impacts can crack or dislodge shingles, initiating loose edges.
- Thermal stress: repeated heating and cooling cycles can cause curling and edge lifting.
- Foot traffic and maintenance activity: walking on the roof or working near penetrations can loosen fasteners or crack shingles.
- Debris and organic growth: moss or trapped debris can trap moisture and weaken fasteners around the affected area.
Quick checks you can do from the ground
- Scan the roof line for gaps, missing tabs, or entire strips along the eaves and rakes.
- Look for curling, cupping, or cracked edges on individual shingles.
- Note any exposed underlayment (the dark or lighter layer beneath shingles) along seams.
- Inspect gutters and the ground for an accelerated granule drop—if you find a lot of gritty granules, the shingles may be nearing the end of their life.
- Use binoculars to spot high-stress zones around vents, chimneys, and metal flashings that might shed shingles during wind events.
High-level next steps
1) Do a safe exterior scan: avoid climbing on the roof; use binoculars and a helper if you need a closer look.
2) Document the damage: take clear photos of missing shingles and any exposed underlayment or daylight in the attic.
3) Check the attic for clues: look for leaks, damp insulation, or daylight seeping through the roof plane.
4) Assess the scope: determine whether you have a few missing shingles or a larger area that may require more extensive repair or replacement.
5) Plan a professional evaluation: a roofer can confirm the cause, outline a repair plan, and discuss timing, materials, and warranty considerations.
Are Missing Shingles an Emergency? How to Tell and What to Do
Quick indicators of urgency
Missing shingles expose the roof deck and underlayment to the elements. If rain, wind, or snow can reach the attic or interior space, the situation can escalate quickly. A few missing shingles aren't automatically an emergency, but the potential for water intrusion increases with weather and time.
- Water intrusion or dripping from ceilings or walls
- Daylight visible through the roof deck when you're in the attic
- A visibly sagging roof edge, ridge, or vent area
- Loose, cracked, or torn shingles near valleys, chimneys, or vent pipes
- Strong wind gusts that are lifting or rattling shingles
Decision guide
- Call a roofer immediately if
- You have active leaks, pooling water, or wet insulation in the attic
- Daylight is clearly visible through the roof deck from the attic or ceiling
- There is any noticeable sagging or separation at the roof edge, ridge, or around openings like vents and pipes
- Multiple shingles are missing in a concentrated area or wind has created new openings after a storm
- Monitor if
- There are a few loose shingles but no interior leaks yet
- Weather is calm and you can safely observe the roof from inside the attic or a ground view without climbing
- The missing shingles are isolated away from critical areas (valleys, chimneys, and vents) and you can plan for a prompt repair
- Can wait if
- The interior is dry and the weather forecast shows no rain in the near term
- The missing shingles are scattered and not near high-risk features (valleys, transitions, or large overhangs)
- You have a clear, scheduled window for a repair and there's no imminent risk of wind-driven damage
What to do right now (safety-first)
1. Prioritize safety: never climb a wet or windy roof. Use a sturdy ladder, secure it, and wear non-slip shoes. Consider eye protection and a fall-arrest setup if you must inspect.
2. Protect the interior: place buckets under any active leaks, move valuables away from the area, and cover holes in the attic with plastic sheeting if you can do so safely.
3. Document the damage: take clear photos of missing shingles, roof edges, and any signs of water entry. Note the storm date and wind speeds if you know them.
4. Minimize exposure: if you can safely access the exterior from the ground, use a tarp or temporary covering to shield exposed areas, especially around valleys and vents.
5. Plan for a repair window: use the daylight to locate the most critical areas and share the specifics with your roofer so they can quote accurately and arrive prepared.
Practical considerations for timing
- If a storm is approaching, anticipate that temporary coverings may be the best immediate protection and plan a professional visit as soon as weather allows.
- In milder, dry weather, a prompt inspection and repair is often straightforward and cost-effective, especially if the missing shingles are localized.
- Insurance and warranty implications: document damage thoroughly and keep records of any temporary fixes; some policies require timely remediation to cover resulting damage.
Quick safety checklist for homeowners
- Avoid walking on the roof unless necessary and safe
- Keep children and pets away from the work area
- Do not attempt to re-nail or replace shingles yourself on a steep or damaged roof
- If you're unsure about the severity, err on the side of caution and call a professional for an on-site evaluation
Common causes of missing shingles
- High winds and severe storms
- Improper nailing or poor shingle installation
- Aging underlayment or damaged starter courses
- Hail impact or debris damage from nearby trees
Aftercare considerations
- Have the roof inspected after the next harsh weather event
- Ask for a written assessment detailing which shingles are defective and recommended repair steps
- Ensure any temporary cover is secured and checked after wind or rain
What Causes Missing Shingles?
Aging and weathering
- Over time, sun exposure, UV rays, wind, rain, and temperature swings wear down the protective granules and adhesive that keep shingles sealed. This makes shingles brittle, more prone to cracking, curling, and eventually lifting off.
- Asphalt shingles typically last 20–30 years with proper maintenance. After that, they're more susceptible to missing sections, especially in harsh climates.
- Short paragraph: Weathered shingles lose their grip as the protective layer erodes. Once the edges begin to lift or curl, wind can more easily pull them away.
Wind damage
- Strong winds, especially during storms or microbursts, can pry shingles loose from the roofing nails or tear them off entirely.
- Edges, rakes, and corners are common failure points; mismatched or brittle shingles fail sooner in gusty conditions.
- Short paragraph: Even a few shingles missing after a windy day usually point to wind uplift as a primary culprit. Wind exposes underlying layers to moisture and accelerates further damage.
Improper installation
- Incorrect nail placement, insufficient nails per shingle, or fasteners that are too long or too short can compromise a roof's wind resistance.
- Poor alignment or inadequate sealing tabs allow wind to pry shingles upward and create gaps that worsen with weather.
- Short paragraph: A roof that was poorly installed will show missing shingles sooner, sometimes in clusters, especially after storms.
Ice dams and freeze-thaw cycles
- Ice dams cause water to back up under shingles, lifting edges as the dam expands and contracts with temperature changes.
- Repeated freeze-thaw cycles crack or pry up corners, loosening shingles and exposing the underlayment.
- Short paragraph: In colder climates, winter damage often shows up as missing shingles along eaves and roof edges where ice and snow linger.
Roof deck moisture and ventilation
- Excess moisture from leaks or poor attic ventilation can rot roof decking, reducing support for shingles and allowing edges to peel away.
- A moist, rotting deck can undermine fastener hold and accelerate shingle failure.
- Short paragraph: When the deck is soft or damp, even well-sealed shingles may start to fail prematurely.
Tree damage and debris
- Falling branches, hail, or heavy debris can physically tear off shingles or create stress points that rip them away.
- Debris buildup traps moisture, promoting rot and granule loss that weakens adhesion.
- Short paragraph: Regular yard debris and nearby tree maintenance reduce the risk of sudden missing shingles after storms.
Pests and animal activity
- Squirrels, birds, and rodents may lift or gnaw at shingles to access insulation or nesting sites.
- This damage is often concentrated around chimneys, vents, and pipe flashing where animals target for entry.
- Short paragraph: If you notice localized missing shingles near vents or pipes, animal activity could be a factor.
Shingle quality and defects
- Low-quality shingles or manufacturing defects may fail sooner than expected, even with normal weather.
- Warranty coverage may apply if a defect is identified within the warranty period.
- Short paragraph: Always check product warranties and installation dates when assessing missing shingles.
Roof slope and orientation
- Very steep or unusually oriented roofs alter wind exposure and how shingles seal.
- Some shingle products are less forgiving on extreme pitches, increasing the risk of missing pieces.
- Short paragraph: Pitch and roof geometry influence how resilient shingles are to weather and wind.
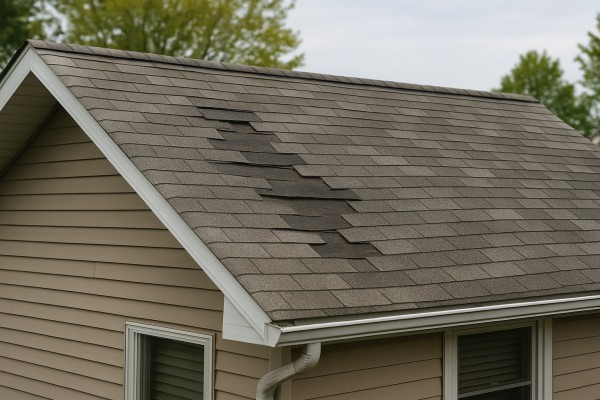
What to look for (quick indicators)
- Curled, cupped, or buckled edges
- Areas with exposed underlayment or flashing
- Visible gaps between shingles or at the rake and eave
- Noticeable granule loss in gutters or downspouts
Quick steps to assess and respond (1-4)
1. Do a visual sweep from ground level with binoculars; note lifted edges or gaps.
2. Check the attic for signs of leaks, staining, or moisture behind missing shingles.
3. Inspect gutters for a gritty residue, which indicates granule loss.
4. If you suspect wind or ice-dam damage, arrange a professional roof inspection to confirm and plan repairs.
How Roof Materials Affect Missing Shingles

- Missing shingles expose the underlayment and the fiberglass mat. Granule loss from missing tabs accelerates aging and reduces UV protection, making the roof more brittle.
- Impact on performance: increased risk of leaks at edges, faster deterioration after wind events, and more rapid curling or cupping of remaining shingles.
- Visual cues: exposed fasteners, visible underlayment, bare asphalt mat, and concentrated gaps near ridges or eaves.
- Steps to address:
1) Safely inspect from ground level or with a partner on a stable ladder.
2) Document missing sections and call in a professional for patching or full replacement as needed.
3) Match shingles in color, granule size, and profile for a seamless repair.
4) Recheck attic insulation and ventilation to prevent future moisture buildup.

- Missing metal panels or torn seams expose fasteners and laps, which are common failure points on metal roofs.
- Impact on performance: higher wind uplift risk, potential water intrusion at laps, and accelerated corrosion around exposed fastener holes.
- Visual cues: visible gaps where panels should overlap, exposed screw heads, and flashing separation.
- Steps to address:
1) Inspect for dents, loose screws, and lifted seams.
2) Replace damaged panel sections and reseal all laps with the correct sealant.
3) Tighten or replace fasteners with weather-resistant screws and proper washer configuration.
4) Have a pro confirm proper panel alignment and flashing integrity.

- Missing wood pieces create direct pathways for water to reach the roof deck; wood is susceptible to rot, mold, and insect damage when exposed.
- Impact on performance: rapid decay in exposed areas, higher fire risk if not treated, and noticeable energy loss from heat gain at bare spots.
- Visual cues: thinning areas, large gaps between shakes, and dark staining around exposed edges.
- Steps to address:
1) Replace missing shakes with matched material and thickness.
2) Treat new wood with appropriate preservative or fire retardant as needed.
3) Inspect surrounding shakes for looseness and reseal with flashing where necessary.
4) Schedule regular maintenance to catch early rot or insect damage.

- Missing tiles leave open pockets for water to seep under the tile bed and into the underlayment.
- Impact on performance: risk of cracked neighboring tiles from weight shifts, potential deck damage if underlayment is compromised, and leaks around parapets and vents.
- Visual cues: shifting tiles, cracked edges, and gaps at hips or ridges.
- Steps to address:
1) Replace missing tile with a matching profile and color.
2) Inspect underlayment and deck for water damage and repair as needed.
3) Check surrounding tiles for cracks; reinforce with proper mortar bed and sealant.
4) Verify proper tile spacing and securement to prevent future gaps created by wind.

- Slate is durable, but missing pieces still expose the roof structure to moisture and debris.
- Impact on performance: leaks near flashing, vents, and ridges; heavy weight means replacement should be handled by specialists to avoid deck damage.
- Visual cues: isolated missing slates, small gaps near fasteners, and hairline cracks around surrounding tiles.
- Steps to address:
1) Replace with matching slate and ensure correct bedding and nail placement.
2) Have a slate specialist re-bed adjacent pieces if needed.
3) Inspect flashing and vent connections for any gaps.
4) Avoid walking on slate tiles unless properly supported.

- Missing pieces expose the substrate and can accelerate deterioration of the synthetic material's protective coating.
- Impact on performance: leaks at irregular edges, UV exposure can fade or warp surrounding pieces, and color mismatch is more noticeable.
- Visual cues: irregular gaps, curled edges, and frayed tabs.
- Steps to address:
1) Replace missing sections with the same material family to maintain warranty terms.
2) Check fasteners and sealants around the repair area.
3) Inspect adjacent shingles for stress cracks and reseal if needed.
4) Schedule regular inspections to monitor wear patterns unique to synthetic products.
EPDM Rubber / Flat Roof Membrane
- Missing patches expose the underlying membrane, risking punctures and seam failures.
- Impact on performance: ponding water in low spots, accelerated UV degradation, and potential edge leaks at flashings.
- Visual cues: blisters, seam separation, and exposed substrate at the surface.
- Steps to address:
1) Patch the exposed area with a compatible EPDM patch kit.
2) Seal seams and inspect edge details where ponds form.
3) Consider a full membrane inspection to confirm overall integrity and drainage.
The Risks of Ignoring Missing Shingles
Water intrusion and interior damage
Missing shingles leave the roof deck and underlayment vulnerable to rain and meltwater. Even a light shower can find its way through gaps, soaking insulation and attic spaces. That moisture can lead to staining on ceilings, warped drywall, and hidden mold growth that isn't always obvious at first glance.
- Leaky spots may show up as brown stains on ceilings or walls.
- Attic insulation can lose its R-value when damp.
- Mold can take hold in tight, poorly ventilated spaces, causing musty odors and potential health concerns.
Structural damage
Over time, moisture that isn't shed properly can compromise the structure of the roof and even the home. Water can wick into plywood or roof sheathing, softening the wood and inviting rot. Repeated cycles of moisture and drying can lead to sagging, weakened roof lines, and the potential for more extensive repairs.
- Soft, spongy patches in attic decking.
- Warped or squeaky roof components.
- Faster deterioration of fascia and soffit boards adjacent to missing shingles.
Energy efficiency and comfort
A roof with missing shingles acts like a hole in a jacket. You lose insulation effectiveness and create temperature swings between indoors and outdoors. That translates to higher energy bills and less consistent comfort in extreme weather.
- Cold drafts near attic access or vents.
- Hot attics that radiate heat into living spaces.
- Increased heating or cooling loads over the season.
Wind uplift and storm risk
Missing shingles are easy prey for wind. A strong gust can lift loose edges, uncover more of the roof, and accelerate damage to surrounding shingles. The more shingles that are missing or loose, the greater the chance of a larger wind-driven failure during storms.
- Shingle fragments scattered in gutters or yard after a storm.
- Expanded leaks as wind drives rain under the roof edge.
- Potential for injury or property damage from falling debris during high winds.
Hidden damage beneath shingles
Not all problems show up right away. Underneath the visible gaps, the underlayment and flashing may already be compromised. Water can infiltrate around nails, vents, and chimneys, creating localized rot or rust on metal components. This often costs more to fix once it's uncovered.
- Corrosion on flashing around vents and chimneys.
- Deterioration of roof felt or synthetic underlayment.
- Hidden mold or mildew in decking that isn't visible from the ground.
Long-term cost implications
Ignoring missing shingles tends to save a little time today but costs more later. Small leaks become bigger leaks; minor decking damage becomes widespread rot. In many cases, a targeted repair is cheaper than a full replacement, but delays can push you into a more expensive, unavoidable replacement.
- Incremental repair bills add up over seasons.
- Increased likelihood of needing full roof replacement sooner than expected.
- Secondary damages to ceilings, insulation, and interior finishes.
Visible signs and risk scenarios
Certain parts of the roof are more prone to problems when shingles are missing. Functionally critical areas require prompt attention to avoid cascading damage.
- Roof edges and eaves where shingles are most likely to lift.
- Valleys where two slopes intersect and water concentrates.
- Around chimneys, vents, and skylights where flashing plays a key role.
What to do if you notice missing shingles
1) Do a quick safety check from ground level; avoid climbs on a damaged roof.
2) Document with photos focusing on edges, gaps, and any surrounding damage.
3) If safe, cover exposed areas with a tarp to minimize ongoing water entry.
4) Schedule a professional roof inspection to assess deck, underlayment, and flashing.
5) Obtain at least two quotes for repair versus replacement, considering roof age and overall condition.
How Missing Shingles Is Diagnosed
Quick signs homeowners may notice
- Large bare patches on the roof where shingles are missing.
- Exposed underlayment, roof felt, or decking visible from the ground or at the edges.
- Shingle tabs that used to be there are completely gone rather than just curled or lifting.
- Interior signs such as ceiling stains, brown spots, or damp spots after rain.
- Wind-driven damage from a recent storm, especially along eaves, ridges, and overhangs.
Ground-level observations and safe checks
- Use binoculars from a stable spot to spot obvious gaps, especially on upper slopes or hard-to-reach areas.
- Note the extent and location of missing shingles (ridge, hip, or along the eave).
- Photograph areas of concern from ground level for later comparison or to share with a roofer.
- Check whether the attic or interior walls show daylight or moisture that aligns with roof gaps.
On-roof inspection steps
1) Safety first: wear non-slip shoes, use a sturdy ladder, and employ fall protection if available. Avoid wet or windy days.
2) Start at the edges: walk slowly along the eaves and edges to identify missing or greatly damaged shingles and any exposed underlayment.
3) Inspect each roof plane: move across each slope, looking for gaps, misaligned shingles, or sections where the tabs are gone.
4) Check around penetrations and flashing: vent pipes, chimneys, skylights, and HVAC vents often show gaps or damaged flashing even if shingles look intact nearby.
5) Document with photos: capture close-ups of missing areas and wide shots to show the scope of the damage.
Attic and interior indicators
- Light shining through attic boards during daylight is a strong sign of missing shingles or decking exposure.
- Increased attic heat or moisture buildup after rain can indicate compromised roofing underlayment.
- Stains or damp spots on ceiling drywall beneath ceiling joists may reveal active or past leaks.
Distinguishing missing shingles from other issues
- Missing shingles vs. curling or buckling: missing means an entire piece or several pieces are gone, not just curled edges.
- Granule loss often accompanies aging or wind damage but doesn't by itself confirm missing shingles; look for edge gaps and exposed decking to confirm loss.
- Damaged flashing around vents or chimneys can mimic missing shingles at the edge; inspect the surrounding area closely.
Documentation and reporting
- Create a simple map: note the slope, location (e.g., north side, near the chimney), and approximate area in feet or number of squares.
- Record the extent: rough estimate of how many shingles or how large an exposed area.
- Keep photos organized by date and location to help a contractor estimate repairs.
When to involve a professional
- If missing shingles cover more than a small area, or if you see exposed decking, felt, or daylight in the attic.
- After severe weather or a known windstorm, especially on older roofs or if multiple sections are affected.
- If you're not comfortable with heights, or your roof has steep pitch, complex flashing, or surrounding hazards.
- When diagnosing whether underlayment or roof decking has been compromised or whether structural support may be affected.
What a diagnosis typically includes
- A clear count or mapped area of missing shingles and exposed underlayment.
- Assessment of flashing condition around penetrations and along hips/ridges.
- Evaluation of attic signs (daylight, moisture, insulation exposure) and potential leaks.
- Recommendations for repair options, replacement thresholds, and timing based on roof age and condition.
Repair Options for Missing Shingles
Temporary fixes
When you first notice missing shingles, think short-term protection to minimize water intrusion while you plan the longer-term fix.
1) Clean debris and dry the area.
2) Cut a patch at least 2 inches larger than the hole on all sides.
3) Peel the backing and press the patch firmly over the exposed area.
4) Run a thin bead of asphalt roof cement around the edges to seal.
1) Locate a matching shingle and a scrap to form a patch.
2) Lift surrounding shingles just enough to slip the patch into place.
3) Align the patch with the existing course and overlap the surrounding tabs.
4) Secure with corrosion-resistant nails and seal the edges with roof cement.
- Temporary tarp cover (in heavy rain forecast)
1) Measure the gap plus a generous margin and cut a tarp accordingly.
2) Position the tarp over the missing area, with at least 12 inches of overhang on all sides.
3) Fasten the tarp to the roof deck or fascia with roofing nails or bungee cords, ensuring it's taut.
4) Check periodically and replace if the wind or rain worsens.
Minor repairs
For a single missing shingle or a small cluster, a minor repair can restore weather resistance until you replace the shingles properly.
- Replacing one missing shingle
1) Identify the exact shingle and the row it sits in.
2) Remove any loose nails from the neighboring shingles and expose the underlayment beneath.
3) Slide a new, matching shingle into place, aligning with the surrounding tabs.
4) Nail the new shingle with corrosion-resistant nails, typically near the ends, following the manufacturer's guidance for wind zones.
5) Seal the edges with a thin line of roof cement if gaps appear between tabs.
- Securing near the ridge or eave
1) Check that the new shingle sits flush with the courses above and below.
2) Use no more nails than necessary to avoid damaging neighboring shingles.
3) Apply a small amount of sealant along the nail heads for extra weatherproofing.
4) Inspect from the ground for proper alignment and edge seal.
Partial replacement
If a run of shingles is missing or damaged, a partial replacement is more economical than a full roof refresh.
- Steps to replace a small section
1) Determine the extent of damage and remove all damaged shingles in the row.
2) Lift the row above to free the replacement shingles without tearing underlayment.
3) Cut replacement shingles to fit the exact width of the missing area.
4) Place and align the new shingles edge-to-edge with the existing rows.
5) Nail the new shingles in the recommended pattern (usually two nails near each end, with additional nails in high-wind areas).
6) Seal exposed edges with roof cement and re-seal any gaps between tabs.
1) Inspect the underlayment beneath the removed shingles.
2) Patch or replace damaged underlayment as needed to restore a solid barrier against moisture.
3) Reinstall with a proper overlap to maintain weather seal.
4) Inspect surrounding shingles for even alignment and consistent wind resistance.
Full roof replacement
Consider a full roof replacement when missing shingles are widespread, the underlayment is compromised, or the roof is near the end of its service life.
- Evaluation and preparation
1) Have a professional assess decking, underlayment, and venting.
2) Obtain necessary permits and confirm warranty implications.
3) Schedule a section-by-section removal plan to minimize interior exposure and weather risk.
1) Remove all existing shingles and lay down a clean, dry deck.
2) Inspect plywood or OSB for rot; replace any compromised sections.
3) Repair or reinforce rafters or decking as needed.
- Underlayment, ventilation, and drip edge
1) Install new roofing underlayment across the entire surface.
2) Ensure proper attic ventilation to extend roof life.
3) Install drip edge along eaves and rakes for drainage control.
- New shingles installation
1) Start with a proper starter strip along the eaves.
2) Lay shingles course by course, matching manufacturer pattern and exposure.
3) Secure with the recommended number of nails per shingle, considering wind zones.
4) Finish with ridge caps and final inspections for alignment and sealant integrity.
Typical Cost to Fix Missing Shingles
Minor repair
This fix covers a small number of missing shingles, a quick re-nail of loose pieces, and a light sealant touch to stop a minor leak. It's the fastest, least invasive option and often the first line of defense after a wind event or aging shingles.
Steps:
1. Inspect the area from ground level and, if possible, from the attic to confirm underlayment isn't compromised.
2. Remove loose or damaged shingles, clean dirt and debris, and install replacement shingles with the proper nail pattern.
3. Apply roofing cement or sealant under the shingle tabs and ensure all fasteners sit flush.
Cost: typically $150–$350, depending on shingle type and local labor rates.
Time: about 1–2 hours in dry weather.
Moderate repair
This covers a larger patch, usually about 8–20 shingles, and may involve a small underlayment patch or minor flashing adjustments around penetrations (vents, chimneys).
Steps:
1. Identify the full patch area and verify whether underlayment or decking shows any moisture damage.
2. Remove damaged shingles, replace with matching material, and re-nail securely.
3. Inspect and reseal around penetrations and re-flash if needed.
Cost: typically $350–$900.
Time: 2–5 hours depending on roof pitch, height, and access.
Major repair
This applies when a large section is missing or damaged, potentially requiring underlayment replacement, plywood patching, and updated flashing or vent work.
Steps:
1. Assess the entire affected area to determine if underlayment or decking needs replacement.
2. Remove the full patch, replace underlayment and any rotted decking, then install new shingles.
3. Replace or reseal flashings, ensure proper edge detail, and install drip edge as needed.
Cost: typically $1,000–$4,000 for a substantial patch; larger areas or decks with extensive rot can push higher.
Time: 1–3 days for complex cases, with weather and access affecting timelines.
What factors affect cost
- --Roof size
- --Access
- --Material type
- --Extent of damage
- --Local labor rates
How Long Can You Wait Before Replacing Missing Shingles?
0-24 hours
A missing shingle is not just an eyesore—it can start a chain of problems the moment rain or wind hits the roof. Small gaps can let water into the roof deck and sheathing, and gusts can loosen more shingles.
- What happens in this window:
- Water can travel under shingles, staining ceilings and insulation.
- Exposed decking is vulnerable to rot, especially if there's existing moisture or previous leaks.
- Wind uplift can peel adjacent shingles, expanding the problem.
1) Do not climb onto the roof. If you're unsure, call a pro.
2) If you can access the attic and see active leaks or damp insulation, note locations and take photos.
3) Consider a temporary weather barrier only if you can do it safely from the ground or inside the attic: place a tarp or heavy-duty plastic over the area and secure with weights—never fasten to shingles from above.
4) Document the damage with photos for your records and insurance.
5) Schedule a quick assessment with a roofing contractor for a temporary protection and a permanent fix.
1-7 days
During the first week, a single missing shingle becomes a doorway for more water and wind damage. The roof and interior may show more obvious signs of trouble.
- What happens in this window:
- Continuous leaks or damp spots appear in ceilings or walls.
- Attic insulation loses its effectiveness, raising heat loss or condensation issues.
- Adjacent shingles are more likely to loosen or curl, increasing repair scope.
1) Arrange a professional roof inspection as soon as possible.
2) If weather permits, add a more secure temporary cover from the ground with professional guidance.
3) Protect interior spaces: place towels or a basin under leaks to catch drips; reduce humidity with exhaust fans if safe.
4) Keep receipts and notes for insurance and warranty purposes.
1-4 weeks
If the gap remains unaddressed for weeks, the risk of structural damage grows dramatically.
- What happens in this window:
- Roof decking may start to rot where water sits, compromising support.
- Mold and mildew can form in damp insulation and framing.
- Ice dams in cold climates worsen leaks and can lift shingles further.
1) Get a written repair or replacement plan from a licensed roofer.
2) Consider a more robust temporary solution (properly installed tarps or coverage) while awaiting replacement.
3) Verify attic ventilation and insulation levels to minimize condensation and heat loss.
1-3 months and beyond
Prolonged exposure leads to cumulative damage.
- What happens in this window:
- Structural material damage, including decking, may require replacement.
- Interior costs rise due to water damage, mold remediation, and energy loss.
- Warranties and insurance claims may be affected if the roof is left in poor condition.
1) Prioritize a full replacement or shingle patching by a licensed contractor.
2) Have ventilation corrected and address moisture sources to prevent recurrence.
3) Revisit shingles' color match and warranty options with your contractor.
Quick checks and reminders
- If you're in a region with heavy rain, hail, or wind, treat any missing shingle as an urgent issue.
- Immediate help is warranted if you notice active leaks, dripping, or large areas of wet decking.
- When in doubt, a licensed roofer can provide a same-day assessment and temporary protection.
How Missing Shingles Vary by Location and Climate
How This Problem Varies by Region & Climate within the United States
Shingles come off for different reasons depending on where you live, the typical weather weathers, and the way homes are built in that area. Here's a practical breakdown so you can spot common signs and plan fixes without overreacting.
- Northeast & Mid-Atlantic states (New England to the mid-Atlantic)
- What drives it: winter wind storms, ice dams, and rapid temperature swings can lift or loosen tabs; heavy snow adds weight and stress on the roof.
- What you'll see: missing tabs after big wind events; granule loss from sun and cold cycles; curled or blistered shingles.
- What to do: ensure your roof uses wind-rated shingles and proper nailing per local code; keep attic insulation and venting balanced to reduce ice dam risk; inspect after storms and at the end of winter for loose or damaged shingles.
- Midwest (Great Lakes region)
- What drives it: freeze-thaw cycles, spring storms, and strong winds from squalls or thunderstorms.
- What you'll see: shingles pulled up along the edges, loose tabs, and occasional shingles lying in gutters after big temp swings.
- What to do: install underlayment with good weather resistance, verify strong nail patterns, and clear eaves and valleys to prevent water backup; do a mid-season check after harsh freezes or heavy thaw days.
- Southeast & Gulf Coast
- What drives it: hurricanes, tropical storms, heavy rain, and salt spray near coastlines; heat accelerates aging of asphalt.
- What you'll see: rapid granule loss in sun-exposed areas; lifted tabs from wind gusts; more frequent need for impact-resistant or higher-grade shingles in exposed spots.
- What to do: consider impact or higher-wind-rated shingles and robust underlayment; reinforce edges and hips in high-wind zones; inspect after major storms for any lifted corners or exposed underlayment.
- Southwest (Arizona, Nevada, southern California inland)
- What drives it: intense sun, high heat, and long dry periods with occasional monsoon rain; UV exposure degrades asphalt faster.
- What you'll see: accelerated granule wear, chalky or faded shingles, and sometimes cupping or curling from heat.
- What to do: choose heat- and sun-resistant shingles with good UV stability; ensure proper ventilation and radiant barrier in the attic; watch for curling after heat waves and schedule timely resealing or replacement.
- Northwest & West Coast (California to Washington)
- What drives it: frequent rain, damp conditions, and coastal winds; moss and algae growth can affect shingle life and sealant connections.
- What you'll see: missing shingles near eaves from wind-driven rain; moss or dark staining that hides minor damage; curled tabs from wetting cycles.
- What to do: prioritize water-tight underlayment and high-quality sealants; keep gutters clear and trim nearby trees to reduce debris; inspect for soft decking or rot in damp locales.
- Mountain States (Colorado, Utah, Wyoming, Idaho)
- What drives it: heavy snow, wind, and strong sun at altitude.
- What you'll see: wind lift on exposed slopes, snow-related stress points, and faster aging on darker shingles due to sun exposure.
- What to do: use wind- and snow-season rated products; maintain clear attic ventilation to equalize temperatures; inspect after heavy snowfall and during spring thaws.
Practical cross-region tips
- Regional codes matter: Wind and hail zones in your area influence allowed shingle weight, nail counts, and underlayment choices. Always follow local code and manufacturer specs.
- Maintenance mindset by climate: Regions with harsh winters benefit from proactive ice/water shields and attic ventilation; hot, sunny regions benefit from UV-resistant shingles and regular granule checks.
- Storm-readiness routine: After any major storm, plan a quick visual check for missing tabs, lifted edges, or exposed underlayment, then address promptly to prevent leaks.
Regional red flags to watch for
- Sudden loss of several shingles after a single storm
- Soft spots or decking that feel damp behind the shingles
- Unusual granule buildup in gutters or downspouts
- Visible curling, cupping, or cracking on multiple tabs
Regional maintenance plan (quick-start)
1) Identify your climate zone and typical storm patterns.
2) Verify that your roof materials and fasteners meet or exceed local wind/hail requirements.
3) Schedule periodic inspections, especially after severe weather seasons.
4) Address any signs of damage promptly with a qualified roofer to prevent leaks.