Ultimate Guide to Gutter Installation Services
Last updated: Feb 28, 2026
- Introduction to Gutter Installation Services
- An Introduction to Gutter Installation Services
- Gutter Installation Services: An Introduction
- Overview of Gutter Installation Services
What a gutter installation covers
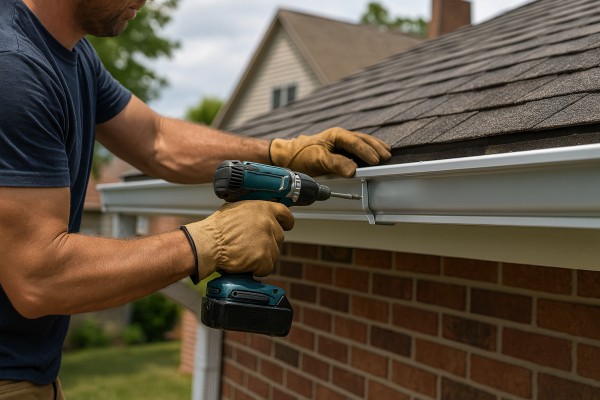
A solid gutter system starts with a clear plan. Homeowners rely on gutters to channel roof runoff away from the foundation, protect plantings, and reduce soil erosion. A typical installation includes evaluation, sizing, material selection, and precise assembly of gutters, downspouts, hangers, and joints. The goal is a leak-free, properly pitched, and durable setup that handles your local weather patterns.
- Site assessment and measurement
- Choosing the right material and shape
- Seamless versus sectional options
- Installation of gutters, downspouts, and brackets
- Sealing, slope adjustments, and final testing
Material options and what to consider
Choosing the right gutter material affects longevity, maintenance, and cost. Here's a quick guide to common options and their trade-offs:
- Aluminum: Lightweight, corrosion resistant, affordable, and easy to work with.
- Steel: Very durable; often powder-coated but heavier and may require maintenance to prevent rust.
- Copper: Premium look and long life; expensive with specialized installation.
- Vinyl: Budget-friendly and easy to install; can warp in heat or extreme sun.
- Shapes (K-Style vs Half-Rround): K-Style is most common for efficient water capacity and decorative versatility; Half-Round can suit traditional homes.
The installation process: a typical sequence
A well-run job follows a predictable flow to ensure efficiency and quality.
1) Confirm length and layout based on the roofline and fascia.
2) Prepare the fascia and secure sturdy brackets and hangers at regular intervals.
3) Cut and join gutter sections, then seal seams to prevent leaks.
4) Install downspouts and outlets, routing discharge points away from the foundation.
5) Check alignment and pitch, adjusting for proper water flow.
6) Do a water test to verify drainage and identify any leaks or misalignments.
Sizing, slope, and drainage: practical guidelines
Getting the basics right makes a big difference in performance and longevity.
- Slope: A slight downward tilt is essential—about 1/16 inch per 10 feet of run—to ensure water exits cleanly.
- Gutter size: Most homes use 5-inch gutters; steeper roofs or heavy rainfall may require 6-inch gutters.
- Downspout frequency: Typically every 40 to 60 feet of gutter length, with extra outlets at corners or transitions to prevent overflow.
Maintenance basics after installation
A well-installed system saves time and protects your home with minimal ongoing effort.
- Clean 2 times per year, or more often in leafier areas.
- Inspect for loose hangers and sagging sections after storms.
- Clear downspouts to prevent clogs and standing water.
- Check seals at corners and joints and re-seal as needed.
Safety and code considerations
Quality gutter work respects safety and local requirements.
- Ladder safety and fall protection during installation.
- Proper clearance from roof edges and maintaining fascia integrity.
- Local building codes and warranty requirements that may affect materials or methods.
A thoughtfully chosen and properly installed gutter system integrates with fascia, roof lines, and drainage plan. With the right material choice, attention to slope, and routine maintenance, your gutters can perform reliably for years.
Gutter Installation Services: What They Include and How They Help
Comprehensive definition
Gutter installation services encompass the planning, sizing, fabrication, and mounting of a complete gutter system around a home's roofline. This includes assessing your property, choosing the right materials and profile, removing any old gutters if present, installing hangers and fascia attachments, routing downspouts, and sealing joints to prevent leaks. A well-installed system directs rainwater away from your foundation, walls, and landscaping, reducing erosion, basement flooding, and moisture-related damage.
What's included in a typical installation
- Site assessment and precise measurements to match your roofline
- Material selection guidance (see options below)
- Removal and disposal of existing gutters if needed
- Fascia preparation or replacement to provide a solid mounting surface
- Installation of securely spaced hangers/brackets with the correct slope
- Seam fabrication, sealing, and leak testing
- Downspouts, elbows, splash blocks, and splash pads
- End caps, miters, and appropriate end-seals for corners
- Gutter guards or leaf protection options (optional)
- Final inspection and thorough cleanup
Material options and considerations
- Aluminum: lightweight, affordable, corrosion-resistant, and easy to work with; a popular all-around choice
- Steel: strong and durable, often with a powder-coated finish; better for harsh weather but heavier and pricier
- Copper: premium look and longevity; high upfront cost but very long-lasting
- Vinyl: inexpensive and easy to install; can become brittle in extreme cold or heat over time
- Profiles: K-style and half-round are common; each has a distinct look and capacity
- Sizing: 5-inch or 6-inch gutters are standard for most homes; larger roofs or heavy rain areas may need bigger sizing
- Extras: leaf guards, seamless vs. sectional construction, corrosion-resistant coatings
Consultation helps balance aesthetics, performance, and budget for your climate and roof.
When gutter installation is typically needed
- After a roof replacement or major roof work to ensure compatible drainage
- Damaged, bent, or leaking gutters that can't be repaired effectively
- Sagging or detached gutters compromising drainage or fascia protection
- Poor drainage, standing water, or erosion around the foundation
- Ice damming or ice buildup along the eaves in colder climates
- Clogged or overflowing gutters during rainstorms
- New landscaping, additions, or renovations that alter water flow or require different downspout routing
- Upgrading from vinyl or older systems to more durable materials
The installation process: step-by-step
1. Initial survey and measurements to determine length, slope, and number of downspouts
2. Material and style selection based on budget, climate, and home aesthetics
3. Removal of existing gutters (if present) and fascia inspection; repair or replacement as needed
4. Prep work: ensuring fascia boards are straight, clean, and secure
5. Mounting primary gutter run using high-quality hangers/brackets with the correct pitch (roughly 1/4 inch per 10 feet)
6. Sealing joints and seams; ensuring watertight connections and proper alignment at corners
7. Installing downspouts, elbows, and splash blocks; routing to drain away from the foundation
8. Optional installation of leaf guards or protection systems; final inspection and water test
9. Cleanup, debris removal, and a walk-through to confirm drainage performance
Care and maintenance tips
- Clean gutters at least twice a year and after heavy storms to prevent blockages
- Check for loose hangers and tighten as needed to restore proper slope
- Inspect joints and seals; re-seal any gaps to prevent leaks
- Ensure downspouts remain clear and direct water at least 3–4 feet away from the foundation
- Consider seasonal checks in fall and spring to address leaves, ice buildup, or debris
- Schedule professional inspections after severe weather or if you notice pooling water or staining on the fascia
Practical checks to know you're getting a quality install
- Proper slope along the entire run and consistent alignment at corners
- Sturdy, corrosion-resistant hangers spaced to support the gutter length
- Leak-free seams with proven sealant or seamless construction
- Downspouts that terminate away from the foundation and have no obstructions
- Matching materials and finishes that complement your home and climate
Common questions homeowners ask
- How long does installation take? Typically a partial day to a couple of days, depending on house size and complexity.
- Can I install gutters myself? DIY is possible for small projects, but professional installation ensures proper sizing, slope, and warranties.
- Do gutters require maintenance plans? A periodic maintenance plan helps extend life and prevent costly damage from leaks or sagging.
When You Need Gutter Installation Services
Signs this service is needed
- Water spills over the sides of gutters during a rainstorm, instead of flowing through the downspouts
- Gutters pull away from the fascia or sag noticeably between hangers
- Sections are loose, rattling in wind, or have visible bowing
- Downspouts are clogged or discharge directly onto the ground or foundation
- Stains, staining, or mildew appear on siding or along the foundation, signaling poor drainage
- Visible rust, holes, or large leaks in the gutters
- Peeling paint or wood rot along eaves and fascia boards
- Ice damming or heavy ice buildup along the roof edge during winter
- Gutters are older than 20 years and show ongoing wear, corrosion, or misshapen runs
- End caps, elbows, or seams are visibly separated or leaking
Ways you can confirm yourself as a homeowner
1) Do a quick external walk-around: look for loose hangers, gaps at joints, or sections that sit unevenly against the fascia.
2) Check the slope and drainage: a properly pitched gutter should fall about 1/4 inch every 10 feet toward the downspout. Use a small level or a simple water test to see if water pools in any section.
3) Test drainage with water: pour a steady stream from a hose into the gutter and watch flow toward the downspout. If water backs up or spills over far from the downspout, you've got a drainage issue.
4) Inspect downspouts and extensions: flush downspouts with water to clear clogs and ensure they discharge at least 3–4 feet away from your foundation. Make sure extensions aren't kinked or blocked.
5) Look for signs of damage behind the gutter: check for fascia wood rot, mold, or paint peeling where the gutter sits. Rotty fascia can weaken the entire system.
6) Note the gutter age and material: if you don't know when they were installed or if you see extensive corrosion, replacements may be more cost-efficient than frequent repairs.
7) Consider debris and maintenance needs: heavy leaf buildup or ongoing clogging means more frequent cleaning or a larger gutter with better drainage capacity.
When to get a professional assessment
- You identify persistent leaks, sagging, or rust that keeps returning after quick fixes
- You see fascia or soffit wood rot or structural deterioration around the gutter line
- The system fails basic self-checks (poor slope, improper downspout drainage, chronic clogs) despite regular cleaning
- The gutters are old (roughly 20+ years) and show widespread wear, corrosion, or frequent leaks
- You have a complex roof or multi-level eaves where safe access is difficult or you're unsure about proper pitch and downspout routing
- You're planning a full replacement and want a precise size, material, and layout plan tailored to your home
What the professional assessment typically covers:
- On-site inspection of roof edge, fascia, soffit, and overall structural condition
- Accurate measurement of gutter run, slope, and downspout placement
- Evaluation of material options (aluminum, steel, copper, vinyl) and fastener quality
- Recommendation for size, style (K-style, half-round), and seamless vs. sectional systems
- Drainage capacity assessment to prevent overflows and foundation splash
- Clear scope, timeline, and cost estimate for installation or replacement
- Safety assessment and ladder/access considerations for your home
If you're unsure after a DIY check, a professional assessment can save time, prevent costly mistakes, and ensure your gutters protect your home effectively.
What's Included in Gutter Installation Services
What's typically included
- On-site assessment of your roof edge and overall drainage needs
- Custom gutter system chosen for your home (material, style, finish)
- Seamless gutter fabrication and installation when possible
- Gutters mounted with appropriate hangers/brackets spaced per manufacturer guidelines
- Downspouts, elbows, outlets, end caps, and corner pieces tailored to your layout
- Proper slope (pitch) adjustment to ensure water flows toward downspouts
- Fascia prep, cleaning, and minor surface refinishing as needed to support installation
- Sealing of joints and seams with correct sealant or soldering for copper systems
- Removal and disposal of old gutters when replacement is part of the project
- Debris removal and site cleanup after the installation
- Basic warranty on workmanship and materials (term varies by contractor and material)
Materials and customization options
- Material choices and color finishes (aluminum, galvalume steel, copper, etc.)
- Style options (K-style, half-round, fascia-mounted, or hidden hangers)
- Downspout configurations (rectangular vs. round, 2x3 vs. 3x4 sizes) and splash blocks
- Optional add-ons (gutter guards, leaf screens, or debris filters) available as packages or add-ons
- Finish matching and touch-up painting for fascia or trim if needed
The installation process (step-by-step)
1. Initial measurement and drainage plan: precise measurements, forestall potential overflow, and plan downspout routing.
2. Material selection and confirmation: review options, confirm color, gauge, and style before fabrication.
3. Old gutters removal (if replacing): safe detachment, disposal, and site protection as needed.
4. Fascia and roof edge prep: clean fascia, address minor damage, and ensure a solid mounting surface.
5. Mounting and leveling: position hangers/brackets, establish consistent slope, and verify alignment at corners.
6. Sealing, connections, and testing: seal joints, secure downspouts, and run a water test to verify flow and leaks.
7. Final cleanup and inspection: remove debris, wipe down fascia, and perform a final walkthrough to confirm satisfaction.
What's not typically included
- Roof repairs or shingle replacement beyond gutter-related work
- Major fascia replacement or structural repairs to the eave (unless part of a bundled service)
- Permitting or final code inspections (some contractors handle this, but it's not guaranteed)
- Electrical work, drainage redesign, or alteration of roofing drainage beyond standard downspout routing
- Extensive painting or refinishing of exterior surfaces unrelated to the gutter system
- Gutter guards or screens installed as a standalone feature unless specified as part of the package
- Specialty or custom metals (such as pure copper gutters) unless you explicitly select them as an option; they incur higher costs and longer lead times
- Post-install maintenance plans beyond basic cleaning and flushing during the initial service visit
Common Roofing Materials Used With Gutter Installation Services

- Asphalt shingles are by far the most common roofing material. Gutter installation here hinges on a solid fascia and proper drip edge at the eaves to funnel water into the gutters.
- How this service relates: we attach hangers to the fascia, seal any gaps, and ensure the gutter run matches the roof line for optimal drainage. Granule shedding from shingles can accumulate in gutters, so proactive cleaning and occasional gutter guards help prevent clogs.
- Material-specific notes:
- Use corrosion-resistant fasteners and factory-approved hangers to avoid leaking points.
- Typical gutters: 5-inch or 6-inch K-style, usually aluminum or galvanized steel.
- Downspouts should align with roof valleys and landscape slopes to avoid pooling near foundations.
- Quick tips:
- Inspect fascia for rot before installation; replace if needed.
- Plan for proper slope (about 1/4 inch per 10 feet) to keep water moving toward downspouts.

- Metal roofs (standing seam, metal panels) shed water efficiently but require gutter_mounting that respects metal movement.
- How this service relates: many metal roofs require specific hanger styles and sometimes hidden brackets to avoid penetrating panels. Copper gutters pair exceptionally well with copper or painted steel roofs for a cohesive look.
- Material-specific notes:
- Temperature expansion and contraction mean you'll want flexible hangers or clips spaced appropriately.
- If your roof is steel or zinc, consider corrosion-resistant gutters and compatible fasteners to minimize galvanic corrosion.
- Standing seam roofs sometimes benefit from k-style or European-style gutters with precise sealants at joints.
- Quick tips:
- Avoid overtightening screws into thin metal; use through-bolts or clips designed for metal roofs.

- Clay and concrete tiles are heavy and fragile at the edges; gutter installation must protect tile integrity.
- How this service relates: we often use brackets that sit under or beside tiles without cracking them, and we may need to remove and reset edge tiles to create a clean gutter line.
- Material-specific notes:
- In areas with heavy rainfall, slopes and downspout placement are critical to prevent water from cascading behind tiles.
- Ensure fascia is robust enough to support brackets and avoid flexing under load.
- Copper or aluminum gutters with tile roofs are common; color and coating choices should resist mineral buildup from tile runoff.
- Quick tips:
- Have a tile retrofit plan for any tile that must be moved or adjusted during installation.

- Slate roofs are very durable but extremely heavy; they demand careful attention during gutter work.
- How this service relates: we anchor to a solid fascia with brackets that distribute load, avoiding direct pressure on slate courses.
- Material-specific notes:
- Slate often pairs with copper gutters for long life and aesthetic harmony.
- If slate edges overhang, you may need custom fascia trim or a drip edge that doesn't interfere with slate alignment.
- Quick tips:
- Use protective padding when working around slate to prevent cracks.
Wood Shingles and Shakes
- Wood shingles/shakes require gentle handling due to rot-prone fascia and potential insect exposure.
- How this service relates: we reinforce or replace damaged fascia as needed and install gutters with clips that minimize contact with wood honeycombing.
- Material-specific notes:
- Fire codes in some areas push for ember-resistant gutter covers or metal closures.
- Regular cleaning is crucial to prevent moss and rot from clogging the system.
- Quick tips:
- Consider gutter guards to reduce leaf and bark debris from decaying wood.

- Composite shingles behave similarly to asphalt but may have different weight considerations.
- How this service relates: standard gutter hangers and drip edges apply, with attention to any extra underlayment or substrate requirements.
- Material-specific notes:
- Verify weight load on fascia, especially if retrofit brackets are used.
- Typical gutters are aluminum or steel; color options often match the roof.
Flat or Low-Slope Roofing (EPDM, TPO)
- Flat or low-slope roofs often drain to edge gutters or internal drains; edge details are crucial.
- How this service relates: we may install edge drip flashing, extend gutter runs to align with drainage paths, and ensure secure mounting on a continuous parapet.
- Material-specific notes:
- Use corrosion-resistant fasteners and weatherproof seals at joints.
- If your system includes downspouts near parapets, plan for overflow relief and splash blocks to protect walls.
- Quick tips:
- Inspect for ponding near corners; adjust slope or add a secondary drain if needed.
Understanding the Cost of Gutter Installation Services
Typical average costs
- Aluminum seamless gutters (most common): roughly $6-$12 per linear foot installed. A standard 150- to 200-foot project typically lands in the $900-$2,400 range, depending on width (5" vs 6"), thickness, and hardware.
- Vinyl gutters: usually $3-$7 per linear foot installed. For the same 150-200 feet, expect about $450-$1,400.
- Galvanized steel gutters: about $6-$12 per linear foot installed. Total for a mid-size home often lands in the $900-$2,400 range.
- Copper gutters: significantly higher, around $15-$30 per linear foot installed. A 150- to 200-foot system can cost $2,250-$6,000 or more, depending on design details and fittings.
- Extra components: downspouts, elbows, endcaps, hangers, and splash blocks can add $2-$6 per linear foot in some cases, or several hundred dollars overall for a multi-story home.
Total project costs vary with home size, roof complexity, and material choice. For example:
- A simple, single-story home with 120-150 ft of aluminum gutters: often $800-$1,800 total.
- A two-story home with complex roof lines and 180-250 ft: typically $2,000-$4,500 for aluminum.
- Copper upgrades or specialty finishes can add $1,000-$3,000 above aluminum, depending on length and fittings.
What drives the price
- Material choice: premium metals (copper, stainless steel) cost substantially more than aluminum or vinyl.
- Linear footage: more feet means more material and more labor, so cost scales with house size.
- Roof complexity: multiple valleys, hips, steep pitches, or many corners require extra fittings and labor.
- Downspout count and placement: additional downspouts and specialized drainage routes add to labor and material costs.
- Access and height: tall or hard-to-reach areas increase ladder time, safety equipment, and potential need for scaffolding.
- Removal of old gutters: disposal fees and additional labor if old gutters are damaged or glued in place.
- Color and finishes: color-matching or specialty paint/coil finishes can raise price slightly.
- Local labor rates: regional wage differences affect overall installation costs.
Ways to save (less expensive options)
- Choose standard aluminum gutters over copper or stainless options.
- Opt for vinyl gutters if you don't require metal strength or extreme climates.
- Keep gutter length simple: fewer corners and obstructions reduce labor time.
- DIY removal and clean-up: some homeowners save by removing old gutters themselves and hiring a pro only for the install.
- Schedule off-peak: in some regions, off-season installations (fall/winter) may price more competitively due to lower demand.
- Combine projects: bundling gutter installation with fascia repair, leaf guard installation, or roof work can reduce mobilization costs per project.
- Pre-fabricated (non-seamless) options can be cheaper than fully seamless systems, though with trade-offs in leakage risk and longevity.
Ways costs can rise (budget busters to watch)
- Steep or multi-story roofs requiring more ladder time and safety gear.
- Complex rooflines with many turns, valleys, or penetrations that require extra connectors and precise measuring.
- Copper or designer finishes and custom color matching.
- Heavy rain, wind, or weather delays that push a project into overtime or scheduling complications.
- Damaged fascia boards or rotted wood that needs replacement before gutters can be installed.
- High disposal fees for removing and hauling away old gutters, especially in regions with stringent waste regulations.
How to estimate your project in 3 steps
1) Measure your approximate linear footage: walk the perimeter and tally the sections that will receive gutters, including corners and downspout locations.
2) Pick a material and gauge: aluminum seamless for durability and value, vinyl for budget, or copper for aesthetics and longevity.
3) Add labor and extras: include installation, downspouts, and any fascia repair or leaf guard additions. Request a few quotes to compare exact numbers and ensure you understand what's included.
Common inclusions you should expect in quotes
- Measurements and material selection
- Delivery and handling of gutters and hardware
- Hangers, endcaps, inside/outside corners, and outlets
- Downspouts and splash blocks
- Removal and disposal of old gutters (if applicable)
- Cleanup of the work site and any necessary attic or roof access adjustments
When to expect variability
- Prices can swing by 20-40% between contractors for similar materials and projects, driven by labor markets and local competition.
- Expect a range in quotes for the same house depending on whether a contractor offers a bundled package (gutters plus guards, for instance) or prices components separately.
How the Gutter Installation Process Works
Step 1: Free initial consultation and property assessment
- We start with a practical chat about your goals, home design, and budget.
- Our team measures the roofline, counts corners and penetrations, and notes current drainage.
- We discuss material options (aluminum, copper, steel), styles (K-style vs half-round), and color choices.
Step 2: Material and style selection
- Choose the core materials and thickness to fit your climate and wear expectations.
- Decide on gutter shape, end caps, joints, and downspout configurations.
- We bring samples, explain maintenance needs, and help you pick colors that complement your home.
Step 3: Accurate measurements and layout planning
- We map full gutter runs along eaves and determine downspout locations for balanced drainage.
- Set the slope: typically 1/8 to 1/4 inch of drop per 10 feet toward downspouts.
- Plan seam locations, hanger spacing (usually every 24-36 inches), and efficient transitions at corners.
Step 4: Pre-install preparation
- We assess site safety and protect landscaping, siding, and walkways.
- If old gutters exist, we remove them carefully and dispose of debris.
- We handle any necessary permits or HOA requirements and confirm scheduling.
Step 5: Installation day: mounting gutters
- Gutters are attached to fascia with sturdy hangers or brackets, aligned level.
- We establish and maintain the proper slope during installation for prompt drainage.
- Seams and connections are reinforced with corrosion-resistant sealant or rivets; end caps and corners are installed cleanly.
Step 6: Downspouts and drainage planning
- Downspouts are anchored securely and positioned for efficient drainage away from the foundation.
- We add elbows, splash blocks, or extensions as needed to direct water where it won't cause damage.
- A quick flow check ensures water moves through each run without pooling or back-siphoning.
Step 7: Sealing, testing, and adjustments
- All joints, end caps, and seam joints receive a thorough seal airtight against leaks.
- We run water along the gutters to test for leaks and verify the slope is correct.
- If a section sags or a joint leaks, we adjust fasteners and reseal as needed; we also review for ice-dam risk in cold climates.
Step 8: Clean up and final walkthrough
- We remove all tools, debris, and protective coverings; the work area is left tidy.
- You receive a walkthrough of the finished system, maintenance tips, and warranty details.
- We note any follow-up inspections or adjustments that might be beneficial over time.
Residential vs. Commercial Considerations in Gutter Installation
Residential Considerations
For homes, gutter work centers on reliable rainwater management, curb appeal, and straightforward maintenance. The system should blend with the house and handle typical local rainfall without frequent cleaning or repairs.
- Gutter size and profile: 5-inch K-style gutters are standard for most residences; 6-inch may be chosen for larger roofs or heavier downpours.
- Materials and finish: aluminum is common for affordability and ease of installation; steel or copper offer longer life or a premium look but cost more.
- Seams and installation: many residential jobs use seamless gutters installed on-site with hidden hangers every 2–3 feet for clean lines and solid support.
- Slope and drainage: aim a slight slope of about 1/16 inch per foot toward the downspout to prevent standing water.
- Downspout layout: typically 2 × 3 inch rectangular downspouts; two to four downspouts are used on larger homes to distribute flow evenly.
- Leaf and debris management: consider optional leaf guards or strainers that are compatible with the chosen gutter system and fascia.
- Access and safety: ladder-based work with basic fall protection is usually sufficient; plan around outdoor landscaping and entry points.
Steps to plan a residential install
1) Measure roof span and estimate drainage area. 2) Map downspout locations for balanced flow. 3) Select material, finish, and gutter profile that match the home's style. 4) Confirm required slope and hangar spacing. 5) Schedule the project with weather-safe windows and access points.
Commercial Considerations
Commercial properties bring higher volumes of water, bigger roof footprints, and stricter expectations for durability, access, and code compliance.
- Size and load requirements: gutters are often 6 to 8 inches wide with heavier gauge metal to handle larger catchment areas and snow loads.
- Materials and finishes: aluminum, galvanized steel, stainless steel, or copper—chosen for longevity, curb appeal (if visible), and cost considerations.
- Fastening and support: more frequent hangers and heavier brackets to resist wind, debris, and ice damming; seamless or long-span sections reduce joints in exposed areas.
- Access, safety, and coordination: crews may use lifts, scaffolding, or cranes; strict adherence to fall protection and site safety is essential.
- Maintenance and obstruction control: higher debris loads require robust screens, debris separators, and a proactive maintenance plan.
- Integration with roof and drainage systems: need careful coordination with parapets, scuppers, and roof drains; ensure seamless water transition from roof to gutter to downspout.
- Codes, permits, and warranties: commercial installations often require permits, inspections, and adherence to local building codes or tenant guidelines.
- Aesthetic and branding considerations: color options and materials may align with building branding or architectural standards.
Best practices for commercial installs
- Conduct a site survey to assess roof pitch, parapet details, and wind exposure.
- Size gutters based on measured water tributary area and local rainfall intensity charts.
- Verify downspout routing to discharge away from foundations, plazas, and entrances.
- Plan for safe access during installation and ongoing maintenance windows with building management.
Residential vs Commercial Considerations of Gutter Installation Services
Key differences at a glance
- Scale and complexity: homes use shorter runs and simpler layouts; commercial projects cover larger footprints and more complex edge conditions.
- Material options: residential tends toward cost-efficient aluminum; commercial may justify steel, stainless, or copper for durability and branding.
- Fastening and support: residential relies on standard hangers; commercial uses heavier supports and longer span designs.
- Safety and coordination: home projects focus on homeowner-friendly access; commercial work requires site safety plans, permits, and coordination with tenants or other trades.
Process highlights
1) Initial survey and measurement for both sectors, with different emphasis on scale. 2) Material and finish selection aligned with budget, climate, and building code requirements. 3) Custom detailing for edge conditions, downspout routing, and any integration with existing roof drainage. 4) Final inspection to verify slope, alignment, and proper discharge. 5) Maintenance recommendations tailored to residential ease-of-care or commercial accessibility.
How Gutter Installation Services Vary by Location
Regional Climate and Weather Patterns
Weather drives how gutters are designed and installed. Regions with heavy snowfall or ice buildup need features to handle ice dams, while coastal areas contend with salty air and wind. In the Northeast and Upper Midwest, you'll often see larger downspouts and deeper overflow paths to move meltwater quickly. On the West Coast, frequent Pacific storms push for durable finishes and better protection against prolonged rain. The Southwest and Southeast demand different UV resistance and heat tolerance for colors and seals. Think through:
- Ice-dam prevention options (drip edges, heated cables where appropriate).
- Downspout placement to route water away from foundations in windy regions.
- Color and coating choices that resist sun exposure and salt spray.
Local Building Codes, Permits, and HOA Rules
Your location governs what you can install and how. Some areas require permits for gutter replacement or re-routing of downspouts. HOAs may specify gutter profiles, materials, and even guard types. Expect variations like:
- Required fall-protection or splash-block standards.
- Downspout discharge distance from sidewalks or driveways.
- Restrictions on copper or certain color schemes in historic districts.
Material Availability and Regional Preferences
Material choice is often regional. Aluminum is common nationwide, but other options show regional flavors:
- Copper or zinc for upscale homes in coastal or historic neighborhoods.
- Stainless steel or thicker aluminum in salt-prone coastal zones.
- Standard thicknesses (0.027"–0.032") vary by contractor and climate demands.
Color finishes and warranty terms can also differ by supplier availability in your area.
Sizing and Design Standards by Region
Gutter size and shape aren't universal. The local rainfall intensity and roof area drive sizing:
- 5-inch gutters are typical in many suburbs; 6-inch gutters may be recommended in heavy-rain regions or large homes.
- K-style gutters are widely used; half-round gutters are more common in certain historic districts.
- Gutter guards or screens are selected based on leaf and debris loads common to your region (pine needles, eucalyptus, maple seeds, etc.).
Snow, Ice, and Freeze-Thaw Considerations
Cold climates demand robust systems:
- Extra slope and outlet capacity to move snowmelt quickly.
- Shielded or reinforced hangers to withstand freeze-thaw cycles.
- Optional heated cables or heat-tape in extreme cases (usually municipal or multi-story properties).
Terrain, Roof Style, and Access
Hilly neighborhoods, tight lots, or multi-story homes change the approach:
- Scaffold or roof-access methods depend on elevation and neighboring structures.
- Downspout routing may differ to avoid walkways, driveways, or landscaping hazards.
- Roof type (asphalt, tile, metal) influences hangers, sealants, and flashing details.
Maintenance Frequency and Debris Load
Local vegetation and weather patterns affect upkeep:
- Heavier leaf loads (oak, maple) mean more frequent cleanouts in fall.
- Regions with year-round pollen or seed production may require mid-season inspections.
- Coastal areas may see more corrosion checks due to salt exposure.
Labor Costs, Availability, and Permitting Time
Prices and timelines shift by market:
- Urban markets often have higher labor rates but faster scheduling.
- Rural areas may require longer lead times or travel fees.
- Permit processing times vary by city or county, potentially delaying installs.
Regional Hazards and Seasonal Considerations
Salt air, humidity, wildfire smoke, and hurricane season can dictate product selection and installation methods:
- Corrosion resistance is crucial near saltwater; coatings and fasteners matter.
- Wind-rated hangers and sealed joints help in hurricane-prone zones.
- Temporary protective measures may be needed during wildfire season debris events.
Quick Guidance for Homeowners
1. Identify your climate zone and typical weather patterns.
2. Check local codes, permits, and any HOA restrictions.
3. Choose materials and sizes that align with regional needs.
4. Plan for maintenance based on local debris loads and foliage.