Ultimate Guide to Ponding Water on Roof
Last updated: Feb 28, 2026
Introduction to Ponding Water on Roof
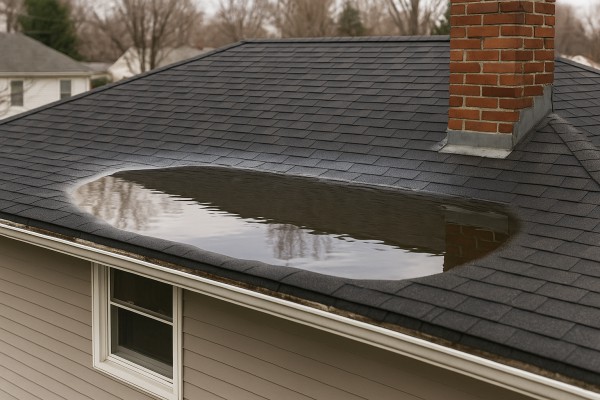
Ponding water on a roof is water that pools in shallow depressions after rain, snowmelt, or heavy winds. It's most common on flat or low-slope roofs, but any roof can experience it if drainage isn't keeping up. Acknowledge that it's a real, visible signal that something about the roof's drainage or structure may need attention.
What is ponding water on a roof?
Ponding isn't just an aesthetic issue. It's water that remains on the roof for an extended period, rather than draining away quickly. Over time, persistent ponding can stress components, shorten membrane life, and increase the likelihood of leaks at seams, penetrations, or deck joints. In simple terms: if water won't drain, it's not behaving like a well-functioning roof system.
Why ponding matters
- It can accelerate wear on roofing membranes and flashings.
- Standing water adds dead load, especially when it's heavy or long-lasting.
- It often signals drainage problems that, if left unchecked, lead to leaks or interior damage.
- It may invite algae, mold, or staining that affects curb appeal and indoor air quality.
Is ponding urgent or common?
- Common on flat or low-slope roofs, especially in regions with heavy rain or snowmelt.
- Not every instance is an emergency, but long-lasting ponding requires attention.
- Immediate concern is warranted if you notice active leaks, water intrusion around penetrations, or soft spots on the roof deck.
Common causes
- Insufficient slope or deflection from aging or improper installation.
- Clogged drains, scuppers, or downspouts.
- Accumulated debris, dirt, or vegetation that blocks flow.
- Roof damage or wear that creates low spots or sags.
- Improperly installed drainage accessories or failed sealants.
Signs you might have ponding
- Visible pools of water more than a day or two after rain.
- Damp or soft patches on the roof surface.
- Streaks, staining, or dark patches around edges, penetrations, or seams.
- Increases in indoor moisture or recurring localized leaks after storms.
High-level next steps
1) Do a quick safety check
- If you're comfortable, inspect from the ground and nearby edges. Look for clogged gutters, downspouts, or obvious debris.
- Avoid walking on a roof unless you're trained and equipped for it. Safety first.
2) Document what you see
- Take clear photos of any ponding areas, nearby penetrations, and drain outlets.
- Note how long water remains after a storm and whether leaks appear inside.
3) Seek a professional assessment
- A roofing professional can verify if ponding is due to drainage, slope, or membrane issues.
- They'll help determine whether drainage improvements, deck repairs, or membrane work is needed.
4) Understand high-level mitigation options
- Improve drainage paths: clear debris, repair or replace clogged drains, and ensure downspouts are positioned to carry water away from the roof.
- Restore proper slope or add targeted drainage features where feasible.
- Repair or replace damaged membrane sections around troubled areas.
- Plan for periodic maintenance to prevent recurrence after heavy rains or snowmelt.
Quick safety reminders
- Do not climb onto a compromised roof without proper equipment, fall protection, and training.
- Temporary patches or quick fixes aren't substitutes for a proper drainage solution or membrane repair.
- If you see active leaks or standing water near electrical components, prioritize safety and contact a professional.
Is Ponding Water on a Roof an Emergency?
Ponding water isn't always an instant collapse situation, but it is a warning sign you don't want to ignore. Standing water on a roof can accelerate wear on seals, flashing, and membrane, invite algae and mold, and, in a worst-case scenario, lead to leaks inside the home or even long-term damage to the roof structure. Flat and low-slope roofs are particularly prone to drainage issues, so it's worth assessing promptly and safely.
- Do not walk on a wet, ponding roof. Wet surfaces are slippery and a fall hazard.
- Keep people, especially children and pets, away from the ponding area.
- If water is leaking inside, place buckets or towels to catch drips and protect valuables. Move furniture away from damp walls and consider using a dehumidifier or fans to reduce interior moisture.
- If water is near electrical components (outlets, lights, breaker panel), avoid touching those areas. If you can do so safely, shut off power at the main breaker to prevent electrical hazards, and call a licensed electrician before you re-enter any wet areas.
- Take photos from the ground or a safe view to document the situation for a roofer. Photos help diagnose drainage patterns and the extent of the issue.
- Ponding water is actively leaking into the interior of the home or is near electrical components or outlets.
- The ponding covers a large area on a flat roof, especially over living spaces or rooms below.
- You notice signs of roof distress near the ponding, such as blistering, loose or torn flashing, or exposed membrane.
- There is any visible sagging or deflection near the ponding zone, which could signal structural or decking concerns.
Monitor if
- The weather forecast shows a short storm window and you can observe whether the water level drops after the rain stops.
- There are no interior leaks yet and the roof has a known drainage plan that should handle typical ponding when conditions are normal.
- The ponding area is small and not actively growing, and you've observed that drainage capacity is reasonable for your roof type.
Can wait if
- The ponding is shallow, not increasing, and there are no signs of interior moisture or leaks.
- You can schedule a roof inspection during a dry spell or in a period with favorable weather, without risking interior damage in the meantime.
- The area has proven drainage for your roof, and this is a temporary storm-aftereffect that should subside with time and dry weather.
Common Causes of Ponding Water on Roofs
Inadequate slope or drainage design
Flat or low-slope roofs depend on a purposeful fall to shed rain quickly. If the surface is too flat or the drainage plan isn't sized for the roof, water will sit long after a storm. Small surface irregularities turn into ponds over time, increasing the risk of leaks and membrane wear.
- Minimum slope: many flat roofs require at least 1/4 inch of fall per foot; more in heavier rainfall areas.
- Drain layout: outlets, gutters, and scuppers should pull water toward the drainage point, not away from it.
- Visual cues: after a rain, look for puddles in the same spots and watch if they persist.
Steps to check:
1) Measure the slope along several spans with a level or laser; note any low areas.
2) Mark where water pools after a storm and compare to drain locations.
3) Consult a roofer about re-slope options or adding drainage outlets.
Over time, framing or deck materials can sag or bow, creating built-in low spots where water collects. This isn't just a cosmetic issue—persistent ponding can damage the waterproofing and shorten roof life.
- Signs to watch: visible dips, bowing edges, warped membrane areas near low spots, and doors or walls that don't sit squarely.
- Causes: improper framing, prolonged moisture exposure, or heavy loads over time.
What to do:
1) Have a structural assessment done if you notice sagging or noticeable deck deformation.
2) If sag is confirmed, address framing or decking problems before re-roofing.
3) After repairs, re-evaluate drainage to prevent new low spots.
Blocked drainage systems
Gutters, downspouts, and roof drains are the final exit for rainwater. Debris, sealant buildup, or ice can clog outlets, leaving water to pond on the surface.
- Common culprits: leaves, pine needles, roof grit, and settled sealant around drains.
- Symptoms: water pours over gutters, drains run slowly, and pools form away from outlets.
Remediation steps:
1) Clean gutters and downspouts; ensure they're free-flowing.
2) Clear roof drains and scuppers; remove debris from drain sumps.
3) Test by running water near outlets to confirm full drainage.
Damaged or improperly installed flashing and penetrations
Flashing around vents, skylights, parapets, and HVAC curbs keeps water out. If flashing lifts, cracks, or was poorly installed, water can wick into seams and pool nearby.
- Look for: lifted edges, gaps, cracked metal, or deteriorating sealant at seams.
- Effects: water can follow seams around penetrations, creating hidden ponding zones.
Remediation steps:
1) Re-seal or replace compromised flashing; ensure it overlaps properly with counter-flashing.
2) Re-flash penetrations using compatible materials.
3) Have a professional verify flashing integrity during a follow-up inspection.
Membrane wear, punctures, and seam failures
Age and exposure take a toll on single-pply and built-up membranes. Cracks, punctures, or loose seams can trap water instead of shedding it.
- Indicators: wrinkling, blisters, punctures, and seam separations, especially near outlets or penetrations.
- Risk: exposed substrate accelerates deterioration and ponding risk.
Remedies:
1) Clean, dry, and inspect the surface to identify all damaged areas.
2) Patch small defects or plan a full membrane replacement if damage is widespread.
3) Check drainage during repair work to prevent renewed ponding.
Debris buildup and seasonal factors
Leaves, needles, and organic matter collect in low spots and along edges, creating a barrier to drainage and promoting puddling. In winter, ice and snow can compound the problem through damming and freeze-thaw cycles.
- Impact: debris adds weight and moisture retention, accelerating membrane wear.
- Seasonal risk: ice dams form at the eaves and can back up water onto the roof.
Remediation steps:
1) Schedule regular roof cleanouts, especially in fall.
2) Keep nearby trees trimmed and clear roof surfaces of loose debris.
3) In winter, manage snow and ice near edges to minimize damming and ponding.
How Roof Materials Affect Ponding Water on Roofs
General effects of ponding on roof materials
- Standing water concentrates load and moisture at low spots, accelerating wear on any roof material if drainage isn't adequate.
- Seams, flashings, and bedding become critical failure points where ponding sits; water pressure can push against sealants and adhesives.
- Ponding increases exposure time to UV and temperature cycling for coatings and membranes, speeding degradation.
- Heavy, continuous moisture promotes moss, algae, and granular loss on certain surfaces, which can worsen drainage and leakage risks.
- Accessibility and inspection are easier when you understand how your material responds to water depth and duration.
Asphalt shingles and ponding
- Vulnerability: Shingles aren't designed to hold water long-term; extended ponding can lead to faster buckling, curling, and granule loss where water sits.
- Attack points: Sealant strips and edge fasteners near low spots are stressed by standing water, increasing the chance of leaks at penetrations.
- Practical signs: Dark convex spots, soft spots under heavy water, and accelerated granule loss near low areas.
- What to do: Ensure proper cross-slope and redirect water with adequate gutters and downspouts; repair or replace damaged shingles and improve flashing around chimneys, vents, and skylights.
- Strengths: Metal sheds water quickly and resists many surface failures; modern standing-seam systems tolerate ponding when properly installed.
- Weaknesses: Long-term standing water at seams or around fasteners can cause corrosion at joints, staining, or accelerated wear on coatings.
- Practical signs: Dimpling or corrosion at low spots, discoloration around fasteners, or loose flashing after many seasons of ponding.
- What to do: Check seam closures and fasteners for tightness; ensure proper drainage paths, and maintain corrosion-resistant coatings in areas prone to standing water.
Clay and concrete tiles and ponding
- Strengths: In well-designed systems, tiles themselves are water-shedding, but ponding tests underlayment, fasteners, and flashing.
- Weaknesses: Water pooling can seep through cracked or displaced tiles and undermine underlayment; heavy water exposure accelerates tile cracking and mortar deterioration.
- Practical signs: Cracked tiles, broken mortar joints, moss growth in low spots, and damp underlayment in skylight or vent neighborhoods.
- What to do: Inspect for cracked or chipped tiles and replace; verify underlayment integrity and flashing; adjust framing or add drainage to reduce low spots.
Wood shingles/shakes and ponding
- Vulnerability: Wood absorbs water; prolonged ponding leads to rot, warping, and mold; supports can deteriorate where water sits.
- Practical signs: Dark staining, soft or spongy areas, and visible cupping in shingles at pooled sections.
- What to do: Keep wood dry with good ventilation and drainage; reseal or repoint vulnerable seams and replace damaged shingles; consider upgrading to a moisture-resistant underlayment in susceptible regions.
- Strengths: Multi-ply bitumen systems tolerate ponding better than some single-layer membranes, but only if the plies and capsheets are intact.
- Weaknesses: Ponding accelerates bitumen softening, potential for blistering, and impaires cap sheet adhesion; delamination risk increases with sustained moisture.
- Practical signs: Blisters, edge splits, or lifted seams near low areas.
- What to do: Inspect for blistering and delamination; ensure ballast or cap sheets remain secure; re-apply or repair ply layers where water pools.
Single-pply membranes (EPDM, TPO, PVC) and ponding
- Strengths: Designed to handle ponding in many installations; seamless or well-sealed seams resist leaks.
- Weaknesses: Poorly prepared substrates, improper seam work, or punctures under ponding can lead to leaks; prolonged water exposure at seams or penetrations is a risk.
- Practical signs: Seam separation, punctures from debris, or edge lifting in low spots.
- What to do: Have a professional inspect seam integrity and flashings; maintain a continuous drainage path; repair punctures and reseal edges promptly.
Quick-reference checklist for common materials
- Asphalt shingles: prioritize drainage improvements; inspect flashings.
- Metal roofs: check seams and fasteners; ensure corrosion protection.
- Tile roofs: monitor underlayment and grout; replace cracked tiles.
- Wood roofs: watch for rot; reseal and improve ventilation.
- BUR: look for blisters and delamination; secure ballast and repairs.
- Single-ply membranes: inspect seams and punctures; verify substrate quality.
Practical steps to address ponding by material
1. Map the ponding zones and measure water depth after a rain.
2. Inspect for visible damage or degradation tied to that material.
3. Improve drainage by re-sloping, adding or enlarging gutters, or installing overflow paths.
4. Schedule a professional assessment to verify underlayment, flashing, and fasteners in low areas.
5. Plan material-specific repairs or replacements to restore proper drainage and long-term performance.
Why Ignoring Ponding Water on a Roof Is Dangerous
Structural stress and sagging
Water adds weight to the roof, and standing water concentrates that load where the roof is weakest. For a rough sense, 1 inch of water across 100 sq ft is already several hundred pounds; 2 inches doubles that. Over days, weeks, or months, the extra weight can push the deck, joists, and fasteners beyond their design limits. The result can be visible sagging, deflection, or, in severe cases, structural failure in the affected area.
- Extra load can loosen seams, pull flashing, and stress connections around vents and skylights.
- Repeated cycles of wetting and drying疲 can reduce the roof's ability to spring back, accelerating permanent deformation.
Deterioration of roofing materials
Most membranes and roof assemblies aren't meant to hold water indefinitely. Ponding accelerates aging and creates failure points.
- Membranes may blister, delaminate, or lift at seams where water sits.
- Adhesives, coatings, and coatings' sealants can break down faster when submerged or repeatedly wetted.
- UV exposure beneath the water can worsen damage once water eventually drains or evaporates.
Water intrusion and leaks
Ponding water finds the path of least resistance, and that path is often around penetrations like pipes, vents, skylights, and flashing corners.
- Water can seep under flashing and creep into the attic, insulation, and ceiling spaces.
- Tiny leaks expand into bigger leaks as water wicks through seams and porous substrates.
- Wet insulation loses R-value, promoting heat loss or gain and higher energy costs.
Wood rot and framing damage
Moisture that penetrates the roof deck and framing invites rot and fungal growth.
- Plywood or oriented strand board (OSB) sheathing can soften, warp, or rot near ponded zones.
- Damaged framing reduces structural stiffness and can necessitate costly repairs.
- Slow leaks may remain hidden behind ceilings until staining or sagging becomes obvious.
In climates that freeze, ponding water can freeze and thaw, expanding and contracting with each cycle.
- Freeze-thaw cycles crack membranes, flashing, and fasteners.
- Ice buildup at edges or around penetrations can lift seals and gutters, worsening leaks.
- Condensation in attic spaces beneath ponding zones can promote mold growth and energy loss.
Mold, mildew, and indoor air quality concerns
Persistent moisture in and around the roof can lead to hidden mold problems in the attic or ceiling bays.
- Mold growth compromises indoor air quality and may require remediation.
- Damp insulation loses effectiveness, increasing energy bills and reducing comfort.
Safety and maintenance implications
Standing water creates a slippery, unsanitary surface that's risky to walk on.
- Roof access becomes hazardous for maintenance or inspection.
- Hidden damages behind ponding can escalate quietly if not spotted early.
Financial risk and insurance considerations
Prolonged ponding often translates to higher repair costs later and potential insurance scrutiny.
- Smaller, early fixes are usually far cheaper than major membrane or structural repairs.
- Some policies may require prompt attention to ponding problems to keep coverage valid.
What to watch for (quick indicators)
- Visible depressions or continuous water pockets after rain.
- Damp attic insulation or stained ceilings below the ponding zone.
- Cracking or loose flashing around penetrations.
- Unusual roof texture changes (soft spots, blisters) in suspected areas.
How ponding accelerates problems (step-by-step)
1) Water sits for days, increasing load and moisture exposure.
2) Membrane and sealants begin to fail at the weakest points.
3) Water intrudes around penetrations, seeping into insulation and framing.
4) Wood rot and mold take hold, weakening structure and air quality.
5) Repairs become larger and more invasive as damage spreads.
How Ponding Water on Roofs Is Diagnosed
Quick signs to note after rain
- Water that lingers in the same spots for hours or days signals a drainage issue.
- Shiny pools or dark patches on the membrane or coating can show where water collects.
- Visible roof features (drains, vents, edges) sagging inward or noticeable deck deflection also point to problem areas.
- Interior clues like ceiling stains or damp insulation in rooms below a flat roof can corroborate on-roof ponding.
Safety-first on-roof observations
- Only go on a roof if you feel confident and have proper safety gear (harness, secured anchor, non-slip shoes). If you're unsure, observe from access points or with binoculars.
- Never stand in the middle of a shallow pond to “see if it drains” unless you're equipped to move around safely.
- Document what you can from ground level first, then decide if a pro inspection is warranted.
Map the low spots and check slope
1) Identify all suspected ponding zones after a rain event. Use chalk or tape to mark the edges of standing water.
2) Check the deck slope by using a straight edge or a laser level from the high side to the low side. The goal is a consistent, gradual slope that directs water toward drains.
3) Measure the depth of water at several marked points with a ruler. Persistent depths greater than a quarter inch for an extended period indicate inadequate drainage.
4) Look for sagging or deflections in the roof deck, which can create new low spots over time. If you see noticeable bend or deflection, a professional assessment is advised.
Drainage system evaluation
- Inspect all outlets: interior drains, scuppers, and any perimeter gutters. Clear any debris, hair, leaves, or sediment that blocks flow.
- Verify that the drains are not separated from the membrane and that seals around penetrations are intact.
- If you have internal drains, pour a little water near each drain and observe whether it flows free to the outlet without backing up or ponding elsewhere.
- Check for backwater damage or signs that water is not escaping as designed during rain events.
Assessing roof structure and membrane condition
- Look for membrane wrinkles, fishmooks, or fishmouths near joints, seams, or penetrations. These can trap water and create persistent ponds.
- At transitions (where roof planes meet walls or curbs), ensure flashings are intact and sealed. Damaged flashings are common ponding culprits.
- Examine penetrations (vents, exhausts, HVAC curbs) for signs of leakage or compromised seals.
- Infrared imaging (IR) can show moisture differences under the surface after a cooling period post-rain. Warmer or cooler bands may indicate trapped moisture and potential leaks related to ponding.
- A handheld moisture meter can check for elevated moisture in decks or insulation near ponding zones, but it's most effective when used with a professional assessment.
- A simple “drain test” (watching water flow during a controlled test) can confirm whether drainage paths are functioning, but do not perform this near fragile areas or without safety measures.
Interpreting what you find
- If ponding is limited to a couple of shallow spots and drains clear quickly, you may be dealing with minor slope irregularities or minor debris buildup.
- If substantial areas pond, drains clog easily, and there is visible deck sag or membrane distortion, it points to a more serious drainage or structural issue that likely needs a roofing professional.
When persistent ponding is confirmed
- Chronic ponding—especially in the same zones after multiple rain events or across seasons—typically signals inadequate slope, deck deformation, or drained system underperforming. A licensed roofer or contractor should evaluate to determine if adjustments, repairs, or re-roofing is required.
Repair Options for Ponding Water on Roofs
Temporary fixes
- Remove standing water safely: use a hand pump or a sturdy scoop to clear the surface. If you must work on the roof, wear non-slip shoes and avoid electrical lines.
- Clear drains and scuppers: remove leaves, dirt, and debris so water can reach the drainage points. Test drains to confirm water moves away from the surface.
- Quick sealant patches: for small, isolated spots, apply a thin layer of roofing cement or elastomeric sealant over a clean, dry area and press in a compatible patch or fabric mesh. This is a stopgap, not a fix you should rely on long-term.
- Temporary covers: in a rainstorm or during a delay before a repair, place a tarp or weighted cover over the ponding area (anchored away from edges) to reduce further water ingress. Do not leave covers on for extended periods.
- Add temporary drainage helpers: if allowed by the system, install a temporary channel or grate extension to direct water toward an available drain. Remove once the roof can be safely repaired.
- Safety first: never crawl on a wet roof for long periods, and avoid stepping near edges or over weak spots. If in doubt, call a pro for temporary water removal and assessment.
Minor repairs
- Create or restore slope toward drains: small low spots can be corrected by adding tapered insulation or a gentle rebuild of the deck to establish a minimum slope (typically 1/4 inch per foot toward the drain).
Steps:
1) Identify the most persistent ponding area and measure its depth.
2) Untack or remove a portion of the existing surface to access the substrate.
3) Add tapered insulation or build-up material, ensuring the new slope directs water to the drain.
4) Re-secure the surface and reseal all joints.
- Reflash and reseal around penetrations: check around vents, drains, and skylights for gaps.
Steps:
1) Clean the flashing edges and remove old sealant.
2) Apply fresh sealant along the flashing seams.
3) If necessary, reseat or replace flashing with compatible materials and re-seal.
Steps:
1) Clean the area and lightly sand for adhesion.
2) Apply an approved patch or cold-applied membrane patch over the crack.
3) Cover with a reinforcing layer and seal edges.
- Maintain and reseal penetrations: ensure end walls, vents, and curbs are watertight after minor surface work.
Steps:
1) Inspect all seals.
2) Reapply sealant or replace damaged flashing.
3) Test with a brief water spray to confirm no pooling near the seam.
Partial replacement
- When localized failure persists: replace only the affected roof section rather than the entire system.
Steps:
1) Mark the boundaries of the defective area by ponding behavior and membrane wear.
2) Remove the compromised membrane, fasteners, and any degraded decking within that zone.
3) Inspect substrate for rot or corrosion; replace as needed.
4) Install new membrane with proper overlaps and seam adhesion, plus any necessary flashing.
5) Install or restore tapered insulation to re-create slope toward a drain, then reseal and test.
- Drain and curb integration: ensure new section integrates cleanly with existing drains, scuppers, and edge details.
Steps:
1) Reattach or upgrade drains to handle current water loads.
2) Seal all transitions between old and new materials.
3) Verify that ponding is minimized under a controlled water test.
Full roof replacement
- System-wide ponding or approaching end of life: replace the entire roof with a properly designed, slope-aware system.
Steps:
1) Assess the structure, insulation, ventilation, and deck condition; address any rot or moisture damage.
2) Choose a roof assembly with adequate slope, drainage channels, and compatible materials.
3) Install new insulation, prioritize tapered sections to promote drainage, and fit new drains and scuppers.
4) Install the roofing membrane, flashing, and edge details according to manufacturer specs.
5) Conduct a water test and inspect all seams, penetrations, and transitions for leaks.
Typical Cost to Fix Ponding Water on a Roof
Minor repair — description and cost
Ponding is limited to a small area or a couple of seams. The fixes are quick, non-invasive, and aimed at stopping the leak and restoring surface drainage.
- Patch a small, localized area of the roof surface to stop a leak; cost: roughly $200–$600
- Re-seal and re-caulk vulnerable seams around penetrations (vents, skylights); cost: $150–$400
- Adjust or replace loose flashing at a simple detail; cost: $100–$300
- Debris removal and surface cleaning to restore drainage; cost: $100–$300
1) Inspect the area during a dry day and map the ponding zone.
2) Clean the surface and apply patch or sealant as needed.
3) Re-test with rain or a hose to confirm the fix.
Moderate repair — description and cost
If ponding covers more area or there's signs of degraded underlayment or deck, more involved work is needed to restore proper drainage.
- Re-slope or install tapered insulation to direct water toward drains; cost: $1,000–$3,500
- Add or upgrade drainage (new drain, cricket, or scupper) to improve flow; cost: $1,500–$4,500
- Repair or replace damaged underlayment or decking in the affected zone; cost: $1,000–$5,000
- Re-seal flashing and membrane seams around penetrations; cost: $600–$1,800
1) Inspect for hidden damage and verify drainage paths.
2) Implement drainage improvements and/or deck repairs.
3) Re-seal and re-test to ensure ponding is eliminated.
Major repair — description and cost
Ponding that signals widespread damage or structural concerns often requires a larger scope, such as a full re-roof or substantial deck work.
- Full roof replacement or large-scale membrane overhaul; cost: $4,000–$12,000+ depending on roof size and materials
- Structural deck repair or reinforcement due to rot or sagging; cost: $3,000–$10,000
- Comprehensive drainage system overhaul (new drains, multiple crickets, parapet work); cost: $5,000–$15,000
1) Develop a repair plan with a contractor, including load, materials, and access.
2) Remove compromised layers and install the new roof assembly and drainage.
3) Perform final testing and inspection for proper drainage.
What factors affect cost
- Roof size
- Access
- Material type
- Extent of damage
- Local labor rates
How Long Should You Wait for Ponding Water on the Roof to Drain?
Immediate drain vs. lingering water (0–24 hours)
- If the ponding disappears within a few hours after a rain, you've likely got a functional drainage path and no urgent repair is needed. Still, keep an eye on rain events to ensure it doesn't reappear.
- If standing water remains after 24 hours, the risk level rises. Water that sits on the surface can start soaking into the roof assembly, especially porous insulation or wood decks beneath the membrane.
Short-term window (2–3 days)
- What happens if you wait 2–3 days with ponding:
- Saturation of insulation and deck materials can reduce their effectiveness and shorten roof life.
- Prolonged moisture increases the chance of leaks around penetrations, seams, and edges.
- Algae, mold, and mildew can begin to grow on the surface, creating slippery conditions and odor.
- During this window, you should:
- Inspect accessible drainage points (drains, scuppers, gutters) for clogs and clear any debris.
- Photograph the ponding level and any stains or damp spots for your records or a contractor.
Medium-term risk (1 week)
- Waiting a week with a pond can lead to:
- Delamination or breakdown of the roof membrane at seams and flashings.
- Damage to lightweight substrates or purlins if exposed to repeated saturation.
- Increased likelihood of interior leaks during subsequent rains, especially with wind-driven spray.
- Actions to take if water persists toward the end of this window:
- Schedule a professional roof evaluation. A contractor can verify drainage paths, inspect flashings, and test for hidden moisture.
Longer-term concerns (2 weeks to 1 month)
- If ponding continues for more than a couple of weeks:
- There's a higher risk of structural concern due to sustained moisture load, especially on flat or low-slope roofs.
- Persistent water can corrode metal components near drains and scuppers.
- Prolonged moisture exposure can accelerate rot in substrates and void warranties if the roof is under one.
- When to act decisively:
- If you notice sagging, persistent damp spots, or new stains inside the home, call a roofer immediately.
- Do not rely on temporary patches for long-term ponding; these are generally not a fix and can trap moisture.
Quick homeowner actions you can take now
1. Safety first: limit roof access, use proper footwear, and avoid slick areas.
2. Clear drainage: remove leaves, debris, and to the extent safe, access obstructions from drains and scuppers.
3. Document and monitor: take date-stamped photos of water level and any interior leaks.
4. Reduce build-up before rain: ensure nearby vegetation or objects aren't blocking drainage paths.
5. Plan a professional assessment: if ponding lasts beyond 48 hours after a rain event, schedule a roof inspection to diagnose drainage paths and membrane integrity.
When to call a professional
- Ponding persists more than 48 hours after rainfall, or returns quickly after cleanouts.
- You notice signs of membrane damage (blistering, tearing, seam separation), cracks at flashings, or interior water intrusion.
- The roof is old, or you've had prior ponding issues that keep returning despite maintenance.
What professionals typically check
- Drainage effectiveness: scuppers, internal drains, and parapet scuppers for blockages or misalignment.
- Membrane condition: seams, penetrations, edge details, and flashing integrity.
- Substrate moisture: tests or moisture meters to determine water saturation in insulation or deck material.
- Structural indicators: signs of wood rot or sagging decking that can affect load-bearing capacity.
Preventive mindset for the future
- Ensure reliable drainage design matches your roof's geometry and climate.
- Regularly clean and inspect drains and gutters, especially after fallen leaves or storms.
- Schedule routine roof inspections every 1–2 years, or sooner if you've experienced ponding issues in the past.
How Ponding Water on Roofs Varies by Location and Climate
How This Problem Varies by Region & Climate within the United States
Ponding risks aren't the same everywhere. The climate you live in shapes how quickly water accumulates, how long it sits, and what kind of damage can follow. Think about temperature swings, rainfall patterns, and snow-mnow melt cycles as the big drivers.
- Temperature and freeze-thaw cycles: In寒 climates, water that ponds can freeze, expand, and then thaw, stressing membranes, flashing, and seams. Coatings can crack, and ice dams can back up water onto the deck.
- Rainfall intensity and seasonality: In regions with heavy, brief downpours, gutters and scuppers need high capacity and clean discharge paths. In drier regions, long dry spells can cause membranes to become brittle and less forgiving when rain finally arrives.
- Snow and ice dynamics: Snow load followed by rapid melt creates a two-step problem—accumulated weight while water sits in low spots, then sudden release that can push water toward edges or penetrations.
- Wind and drainage patterns: Coastal and exposed areas experience wind-driven rain that can overwhelm roof edges and force water toward seams. Local wind patterns also influence how fast water drains.
- Roof type and construction norms: Flat and low-slope roofs are common in some regions (think mid-Atlantic towns and many Southwest homes), while steeper slopes or ridgeline approaches vary by climate and building tradition.
- Building codes and maintenance culture: Regions with strict freeze-thaw design requirements or hurricane/wlooding codes tend to have more robust drainage details and inspection standards.
Regional Climate Profiles and Ponding Risks
- Northeast and Midwest: Frequent freeze-thaw cycles increase ice dam and edge-ponding risk. Rapid thaws after storms can lead to standing water that seeps under flashing if flashing work isn't solid. Expect ice barriers, improved scuppers, and heat tracing in some setups.
- Southeast and Gulf Coast: Heavy convective rains and tropical storms mean sudden, high-volume runoff. Clogged gutters and downspouts are a common pain point; ensure adequate slope and protected drainage paths year-round.
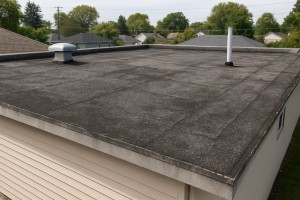
- Pacific Northwest: High rainfall and persistent humidity create moss, debris buildup, and recurrent ponding in poorly drained flat roofs. Roof membranes in these areas should be robust against moisture ingress and algae.
- Southwest and desert-bordering regions: Intense sun and heat can dry roofing components quickly, but monsoon-season downpours can overwhelm drainage systems that aren't properly sized. Check for UV degradation and sealant gaps after hot seasons.
- Mountain West: Wide temperature swings and snowmelt drive episodic ponding as high-altitude moisture runs off. Snow guards, tapered insulation, and well-planned scupper placement help manage meltwater.
Practical Maintenance Considerations by Region
1) Map your roof's drainage plan to your climate. Confirm slope meets your region's needs (typical minimums vary with roof type and local codes).
2) Inspect and clear gutters, scuppers, and internal drains at least twice a year, and after big storms, especially in regions with heavy rain or snowfall.
3) Check flashing and parapets for gaps or deterioration that could trap water and channel it into undesired spots.
4) Consider material and design upgrades suited to your climate (tapered insulation for cold climates to eliminate low spots; robust membranes with UV resistance for sunny, arid areas).
5) Schedule targeted inspections after extreme weather events (or seasonal transitions) to catch minor issues before they become ponding problems.