Ultimate Guide to Roof Overlay Services
Last updated: Feb 28, 2026
Introduction to Roof Overlay Services
Roof overlays are a practical option when your current roof is structurally sound but shows age or surface wear. Instead of tearing off everything, an overlay puts a new layer on top of the existing roof, giving you a refreshed exterior and added protection without a full roof replacement. Here's a homeowner-friendly overview to help you decide if an overlay is right for you, and what to expect during the process.
What is a Roof Overlay?
- A roof overlay involves installing new shingles over the existing roof deck and underlayment, after careful inspection.
- It can save time and reduce waste compared to a complete tear-off.
- Structural readiness and proper underlayment are essential for a lasting result.
Overlay vs. Roof Replacement
- Overlay:
- Faster installation and less debris.
- Typically lower upfront cost.
- Requires a sound existing roof and compatible roof system.
- Roof replacement:
- Thorough inspection of the deck, flashing, and ventilation.
- Often the better long-term solution if the underlying roof is failing.
- Cleaner slate for future repairs and potentially better warranties.
When to Consider an Overlay
- The roof deck is solid with no extensive rot or significant water damage.
- The existing ventilation and attic condition are adequate or can be upgraded.
- You want a quicker project with less mess and reduced disposal costs.
- Local codes and warranties permit overlays for your home and roof type.
- You're planning to stay in the home for several more years and want a renewed look.
The Overlay Process: Step-by-Step
1. Inspect and plan
- A thorough roof inspection to assess decking, flashing, and ventilation.
- Confirm code allowances and warranty implications.
2. Surface prep
- Clean and repair minor deck issues.
- Address any water intrusion or rot before layers go on.
3. Underlayment and ventilation upgrades
- Install appropriate underlayment and, if needed, boost attic ventilation.
4. Overlay installation
- Install the new shingles over a properly prepared surface.
- Align patterns and ensure straight seams for curb appeal.
5. Flashing and edge work
- Replace or reseal flashing around chimneys, vents, and walls.
- Finish with proper drip edge and rake detailing.
6. Final checks
- Inspect for proper nail patterns, gaps, and ventilation.
- Verify warranty paperwork and keep maintenance tips.
Materials, Design, and Compatibility
- Shingle type and profile: architectural vs. 3-tab shingles influence appearance and weight.
- Underlayment options: synthetic membranes, felt, or ice/water shield where needed.
- Ventilation: adequate attic airflow helps longevity and performance.
- Deck and edge conditions: a solid, clean surface supports a durable overlay.
Pros and Cons to Consider
- Pros:
- Faster installation and reduced debris.
- Immediate curb appeal with a fresh surface.
- Lower initial cost compared to full tear-off.
- Cons:
- Not suitable if the deck has hidden damage.
- Potentially limited warranty compared to a new roof.
- Adds weight; structural checks are essential.
Costs, Permits, and Timeline
- Costs vary by roof size, shingle type, and regional labor rates.
- Permits: some jurisdictions require permits and inspections for overlays.
- Timeline: most overlays take days to a couple of weeks, depending on complexity and weather.
Maintenance and Longevity
- Regular inspections after heavy seasons or storms help catch issues early.
- Keep trees trimmed to reduce debris and moisture buildup in gutters.
- Address flashing and vent seals if you notice leaks or drafts.
- A well-installed overlay with proper ventilation can extend roof life and preserve your home's exterior.
Common Questions Homeowners Ask
- How do I know if an overlay is right for my roof?
- When the deck is sound, ventilation is adequate, and code allowances permit it.
- Will my warranty cover an overlay?
- Warranties vary by manufacturer and installer; check specifics for your shingles and local codes.
- Can I choose any shingle style?
- In most cases, you can select from common residential profiles, but compatibility and weight are important.
Practical Next Steps
- Schedule a thorough inspection to review deck condition, ventilation, and flashings.
- Discuss warranty options, maintenance plans, and expected lifespans with your roofer.
- Review design choices, including shingle color and profile, to match your home's aesthetic.
Roof Overlay Services: What They Are and How They Work
Comprehensive definition
A roof overlay is the installation of a new roofing layer directly over an existing roof, without tearing off the old shingles. The new covering—whether asphalt shingles, metal panels, or tiles—sits on top of a prepared underlayment and refreshed flashing system. It's meant to restore weather protection, improve curb appeal, and often save time and labor compared with a full tear-off. But overlays aren't a universal fix: they require careful evaluation of the existing roof deck, attic ventilation, and overall structure. If underlying damage is present, an overlay can trap problems and lead to bigger costs later.
Key characteristics to consider:
- The roof deck (sheathing) must be sound, with no rot, severe sagging, or large gaps.
- The structure must be able to support the added weight of an extra layer.
- Proper ventilation must be maintained to prevent moisture buildup.
- Warranties and manufacturer specs vary; overlays may affect coverage under certain product warranties.
- Local building codes and HOA rules can limit when overlays are allowed.
When it's typically needed
- The existing roof shows wear and aging but the deck remains solid, with no active leaks.
- You want a quicker, lower-cost option or wish to change the appearance or material type without a full tear-off.
- Budget constraints or scheduling pressures make a full roof removal impractical.
- The home's structure and attic space meet ventilation requirements and can accommodate an additional layer.
- Local codes permit up to a limited number of existing layers (often up to two); more layers usually require a tear-off.
How it works in practice
- Assessment: A professional inspection confirms deck condition, ventilation, and suitability for an overlay.
- Planning: We verify code allowances, warranties, and the best material choice for climate and aesthetics.
- Surface prep: Any damaged decking or flashing is addressed; underlayment is installed to provide a fresh, moisture-resistant base.
- Installation: The new roofing material is applied over the existing roof following manufacturer guidelines, with proper fasteners, sealing, and venting.
- Flashings and penetrations: Valleys, chimneys, vents, and edge detailing are updated to ensure a leak-free system.
- Final checks: A leak test and thorough inspection ensure everything is sealed, aligned, and ready for weather exposure.
Planning considerations and practical steps
1) Schedule a professional roof assessment to determine suitability for an overlay.
2) Confirm local code allowances, warranty requirements, and any HOA constraints.
3) Choose compatible materials and color that suit your climate and home style.
4) Ensure the existing deck is repaired or reinforced where needed and ventilation is adequate.
5) Have the overlay installed by trained crews following the manufacturer's specifications.
6) Plan for a post-installation inspection to verify leak protection and alignment.
What to expect during and after installation
- Noise, debris, and some disruption are normal, but a skilled crew minimizes downtime.
- A thicker roof layer means added weight; structural checks ensure safety.
- The new surface typically looks refreshed and may improve energy performance slightly, depending on materials.
- Maintenance remains important: address any flashing issues promptly and schedule routine roof inspections to catch problems early.
When You Need Roof Overlay Services
Signs overlay might be right
- You want to extend the roof's life without a full tear-off and disposal.
- Your roof currently has one or two layers, and the deck shows no widespread rot or sagging.
- Shingles are worn, curled, or losing granules, but there isn't extensive water damage in the attic.
- Leaks are intermittent or localized around valleys, flashing, or edges rather than pervasive across the roof.
- Local codes and a qualified contractor indicate the deck is strong enough for an overlay.
- Budget, schedule, or mess concerns make a full replacement less feasible right now.
Do-it-yourself checks you can do
- Inspect the attic for moisture, staining, or mold. Soft spots on decking or ceiling watermarks suggest deeper issues.
- From the ground, note widespread shingle wear: curling edges, missing granules, streaks or dark patches along valleys.
- Try to confirm how many layers exist (if you're aware of a prior tear-off history or permits). If you already have two layers, overlay options may be restricted in your area.
- Check attic ventilation: adequate soffit and ridge ventilation helps an overlay perform as intended.
- Look for signs of deck problems near vents, chimneys, or skylights; persistent leaks there can limit overlay viability.
When to get a professional assessment
- You're unsure about the deck's condition or how many roof layers remain suitable for overlay.
- You've found moisture, rot, or soft spots in the attic or on the decking.
- You want a clear professional determination on whether an overlay is appropriate, plus the long-term cost and warranty implications.
- You need guidance on code compliance and whether an overlay will affect your current roof warranty.
How a professional assessment unfolds (numbered steps)
1) Reach out for an on-site evaluation and schedule a time that works for you.
2) The inspector checks the number of existing layers and the condition of the roof deck.
3) They examine attic ventilation, insulation, and signs of moisture or mold.
4) They inspect flashing, chimneys, vents, and overall roof geometry (slope/pitch).
5) The reviewer provides a written recommendation, outlining whether an overlay is suitable, plus alternatives, timelines, and cost ranges.
What a professional will check (condensed)
- Exact layer count and condition of each layer
- Deck integrity: soft spots, rot, moisture intrusion
- Ventilation and insulation status
- Flashing around chimneys, vents, walls
- Roof slope and overlay compatibility
- Code rules, warranty considerations, and installation outlook
How to prepare for the assessment
- Gather permit history, prior contractor notes, and any warranty documents you have.
- Make safe access clear for the inspector; note any safety concerns or pets in the area.
What's Included in Roof Overlay Services
What's included in a typical roof overlay project
A roof overlay adds a fresh top layer without ripping off the existing roof. Here's what you should expect to be included when you hire a qualified roofer for an overlay.
- Pre-installation assessment and written scope
- A thorough inspection of the current roof, deck, and attic ventilation, with a clear, written plan for the overlay project.
- Materials package
- New shingles, underlayment (synthetic or felt), ice and water shield in critical areas, starter course, ridge caps or venting accessories, drip edge, and flashing materials as needed.
- Deck inspection and prep
- Evaluation of the roof deck for soft spots, rot, or damage. Minor repairs are handled within scope; major structural work is outside overlay scope.
- Site protection and debris removal
- Protection of landscaping, walls, and gutters; daily cleanup during the job; magnet sweeps to remove nails and scrap after each day's work.
- Ventilation assessment and upgrades (if needed)
- Review of attic and soffit ventilation; adding or adjusting vents to meet code and improve long-term performance.
- Underlayment installation
- Installation of synthetic underlayment (or felt) over the existing deck to provide a secondary moisture barrier.
- Overlay installation
- Laying the new shingle layer over the existing roof, with proper alignment, wind resistance, and secure nailing patterns.
- Detailing and flashing
- Repair or replacement of flashing around chimneys, skylights, and vents; resealing penetrations to prevent leaks.
- Perimeter, drip edge, and trim
- Installation of drip edge and appropriate fascia protection to seal the edges everywhere the new layer meets the deck.
- Fastening, sealing, and quality control
- Attention to nail spacing, wind uplift resistance, and sealant at critical joints to ensure a long-lasting seal.
- Clean-up and final walk-through
- Final site cleanup, removal of leftover materials, and a homeowner walk-through to confirm satisfaction.
- Warranty options and documentation
- Written workmanship warranty details, plus any applicable manufacturer warranties on the new shingles and underlayment, with records provided.
What's not typically included
Some items are outside the overlay scope. If you need them, plan for a separate project or adjust the contract accordingly.
- Major structural deck repairs or replacement
- Any significant rot, sagging, or structural damage to the deck itself is not covered by a standard overlay.
- Full tear-off of existing roofing
- Overlay typically does not include a full removal of all old shingles; a tear-off or selective stripping is a separate service if desired.
- Extensive interior repairs
- Water intrusion that has caused interior damage, mold remediation, or drywall/ceiling repairs are not part of the overlay unless specifically included.
- Significant insulation upgrades
- Major attic insulation improvements or air-sealing beyond basic ventilation checks are outside the typical overlay scope.
- Permit fees and inspections
- Permits and associated inspection fees may be handled separately or as a separate line item in your contract.
- Non-standard or specialty details
- Custom roof shapes, unusual flashing needs, or non-standard ventilation solutions beyond the initial assessment may require additional framing or materials not included in a standard overlay.
- Hazardous materials or extensive cleanup
- Removal of hazardous materials or extensive remediation work is not included unless specifically addressed in the contract.
- Optional add-ons beyond standard scope
- Enhanced warranties, additional venting systems, or eco-friendly underlayment choices may be available as add-ons and priced separately.
Common Roofing Materials Used with Roof Overlay Services

- Why it fits: Asphalt shingles are the most common overlay candidate. A second layer can extend life when the deck is solid and there are no active leaks. Overlaying asphalt atop existing shingles is often a cost saver and a faster way to refresh curb appeal.
- What to watch for: The roof must be structurally sound, dry, and free of rot. Older shingles with significant curl or moisture damage may not support an additional layer well, and some codes limit the number of shingle layers allowed.
- How the service works:
1) Inspect the deck: check for damage, moisture, and ventilation issues; repair as needed.
2) Prepare the surface: clean, remove loose material, and seal any penetrations.
3) Install a primary underlayment (ice/water shield at critical areas) and then add new asphalt shingles over the existing layer, staggering seams and fastening through both layers when permitted.
4) Reflash vents and pipes as needed and verify proper attic ventilation.
- Pros and caveats: Relatively straightforward, faster, and cheaper than full replacement. Weight adds up with a second layer, so verify structural limits and warranty implications.

- Why it fits: Metal panels can sometimes be installed as an overlay when the underlying structure is sound and there's a suitable air gap. A new metal layer can deliver long life, improved weather resistance, and a modern look.
- What to watch for: Corrosion on the existing metal, uneven surfaces, and insufficient ventilation. Many installers use furring strips or battens to create a vented cavity for condensation control and thermal movement.
- How the service works:
1) Inspect for corrosion, loose panels, and flashing integrity.
2) If allowed, prepare a vented substrate with battens to create an air space.
3) Install a high-quality underlayment, then fasten new metal panels over the existing roof with proper clips and sealants.
4) Seal along ridges, hips, and penetrations; confirm all flashings are watertight.
- Pros and caveats: Quick update and improved performance when done right. Weight and thermal expansion must be considered, and not all metal types are suitable for overlay.

- Why it fits: Some homes with cedar or other wood shingles/shakes can benefit from a renewal overlay if the deck is solid and moisture-free.
- What to watch for: Wood is susceptible to rot and insect damage. Overlaying wood requires careful inspection of every panel/shake, plus attention to ventilation and moisture management.
- How the service works:
1) Inspect for rot, insect damage, and fastener corrosion; replace damaged sections.
2) Install a new underlayment to improve moisture protection.
3) Apply a new layer of shingles or shakes over the existing, staggering seams and maintaining proper nailing through both layers if code allows.
4) Revisit flashings and ventilation pathways; ensure attic airflow is adequate.
- Pros and caveats: Can refresh appearance and performance, but adds significant weight and may not be suitable if the existing wood is compromised or if local codes restrict multi-layer wood coverings.

- Why it fits: In rare cases with strong structural support, tile roofs may be overlaid, especially when the goal is to refresh waterproofing and insulation rather than replace tiles.
- What to watch for: Tile roofs are very heavy. Overlay requires a verified structural capacity, proper underlayment, and precise flashing details to prevent leaks.
- How the service works:
1) Structural assessment is essential to ensure the framing can handle added weight.
2) Existing tiles are evaluated and any damaged pieces are addressed.
3) Underlayment and/or battens are installed to accommodate new tile placement.
4) New tiles are installed with careful alignment and proper drainage; all penetrations are flashed.
- Pros and caveats: Can extend service life in some situations, but weight, cost, and code restrictions make overlays on tile roofs less common.

- Why it fits: Slate overlays are uncommon but may be considered if the structure is robust and the slate is in good condition beneath. Most professionals prefer a full evaluation before attempting an overlay.
- What to watch for: Slate is extremely heavy and brittle. Any overlay plan must account for substantial weight gain and potential damage to the slate underneath.
- How the service works:
1) Engage a structural engineer to confirm capacity for an added layer.
2) Inspect slate for cracks and secure fragile pieces; remove or carefully brace as needed.
3) Install appropriate underlayment and a secondary roofing layer designed for slate compatibility.
4) Refasten and seal along all flashing and valley areas; ensure ventilation is not impeded.
- Pros and caveats: Highly situational and not routinely recommended. When attempted, it requires specialized evaluation and workmanship.

- Why it fits: Flat or low-slope roofs are often good candidates for overlays, provided the existing membrane is still sound and drainage is intact.
- What to watch for: Drainage must be maintained, and the existing decking must be solid. Edges, terminations, and penetrations require careful detailing to prevent leaks.
- How the service works:
1) Inspect for ponding, wear, and delamination of the existing membrane.
2) Clean and repair the surface; install a suitable underlayment as needed.
3) Apply a new membrane over the old roof with appropriate adhesive or mechanical fasteners, ensuring seams are securely sealed.
4) Revisit flashing at parapets, curbs, and rooftop penetrations; test drainage and perform a water test.
- Pros and caveats: Overlaying flat roofs can save time and provide a seamless new surface, but must be executed with attention to drainage and edge detailing to avoid future leaks.
Understanding the Cost of Roof Overlay Services
Typical average costs
- Asphalt shingles overlay: often priced at about 4–8 per square foot installed. For a 2,000 sq ft roof (roughly 20 squares), that translates to roughly $8,000–$16,000.
- Premium or architectural shingles: 5–9 per sq ft installed, depending on color, profile, and brand.
- Metal roof overlays: typically 6–12 per sq ft installed, with higher end for heavier gauge panels and integrated systems.
- Tile or slate overlays (where feasible): commonly 10–15+ per sq ft, driven by material complexity and weight constraints.
- By-roof size estimates:
- 1,000 sq ft roof: approximately $4,000–$8,000
- 1,500 sq ft roof: approximately $6,000–$12,000
- 2,000 sq ft roof: approximately $8,000–$16,000
- 2,500 sq ft roof: approximately $10,000–$20,000
Note: these figures cover materials and labor for an overlay over existing shingles. They can vary by region, contractor, and material choice, and do not always include permit fees, disposal, or structural repairs.
Cost breakdown (by stage)
1. Inspection and planning
- Initial roof assessment, measurements, and material decisions.
- Possible minor decking checks; estimate: commonly $100–$500 depending on scope.
2. Materials and accessories
- Shingles or metal/tiles, underlayment, flashing, nails, sealants, and vents.
- Material choices drive a big chunk of the cost variation.
3. Labor and installation
- Core cost driver. Steep pitches, complex geometry, and limited access raise labor time and price.
4. Cleanup, disposal, and site protection
- Clean-up, debris removal, and possible disposal fees if existing layers are hauled away.
5. Contingencies
- If unexpected decking repair or moisture issues are found, costs can rise.
Considerations that may make this less expensive
- One existing layer: Overlay is generally cheaper when you're not removing a full second layer.
- Standard materials: Sticking with conventional asphalt shingles or basic metal options lowers price versus premium colors, profiles, or specialty products.
- Simple roof geometry: Regular, low-pitch roofs with straightforward geometry reduce labor time.
- Quick scheduling: Off-peak or off-season bookings can reduce labor rate pressure.
- No major repairs: Decking, flashing, or structural repairs add substantial costs; avoiding these helps keep the total down.
- Efficient disposal: If waste is minimal and contractors can reuse or recycle components, disposal fees drop.
Considerations that may make this more expensive
- Existing damage: Rotten decking, extensive water intrusion, or compromised structure require repairs before overlay, driving up cost.
- High pitch or difficult access: Steep roofs, tall structures, or limited road access raise safety precautions and labor hours.
- Multiple penetrations: Skylights, chimneys, vent stacks, and complex flashing add labor and materials.
- Premium or specialty materials: Designer shingles, luxury metal systems, or tile bring higher material costs.
- Permits and inspections: Local permit fees and required inspections add to the project price.
- Size and complexity: Nonstandard shapes, large roof areas, or multi-level builds require more setup, time, and equipment.
- Required ventilation or insulation upgrades: If the attic or roof system needs improved ventilation or insulation, expect additional costs.
- Weather constraints: Wet or frozen conditions can delay work and may necessitate protective measures, increasing costs.
Quick reference hints
- Get written quotes from 2–4 contractors to compare material options, scope, and warranties.
- Ask for a transparent line-item breakdown (materials, labor, disposal, permits).
- Confirm whether the quote assumes no decking repairs; if repairs are needed, get a separate escalation estimate.
How the Roof Overlay Process Works
Eligibility and Planning
- We begin with a thorough on-site assessment of the existing roof, deck condition, and ventilation. An overlay is only suitable if the structure and underlayment can support an additional layer and if current shingles aren't causing major leaks.
- We confirm code compliance, permit requirements, and any HOA guidelines. We also review your preferred shingle type, color, and underlayment options.
- You'll receive a clear plan: what will stay, what will be replaced or repaired, the timeline, and a transparent estimate.
Pre-Installation Assessment
- We perform a detailed roof inspection to identify soft decking, water damage, rot, or damaged flashing. Any issue that compromises the roof deck is noted and addressed prior to overlay.
- If repairs are needed, we outline the scope and timing. This is essential to ensure a durable, long-lasting overlay.
Material Selection
- Choose shingles (architectural, 3-tab, color) and underlayment (synthetic or felt) with an ice-and-water shield where required by climate or code.
- We select fasteners and flashing compatible with the new layer to maximize wind resistance and longevity.
- We confirm everything aligns with your budget and warranty expectations.
Preparation and Safety
- The work area is prepared: ladders, edge protection, tarps, and safety protocols are set up.
- Debris from loose shingles is removed, the roof is cleaned, and problem areas are stabilized. Any loose nails or protrusions are addressed to prevent punctures under the overlay.
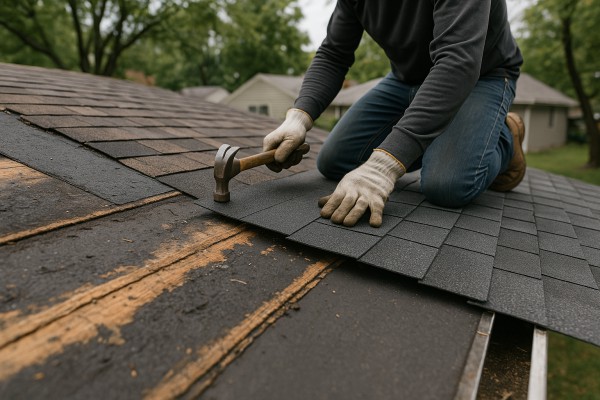
Installation: Step-by-Step Overlay Process
1) Underlayment and moisture barriers
- Install high-quality underlayment over the existing roof surface.
- Apply ice-and-water shield at eaves, valleys, and around penetrations as needed for your climate.
2) Alignment and starter course
- Establish reference lines from the eave up to ensure straight, uniform courses.
- Place the starter strip to anchor the bottom row and prevent wind uplift.
3) Shingle installation
- Install new shingles over the existing roof from bottom to top, staggering seams for strength.
- Fasten per manufacturer guidelines with corrosion-resistant nails at the correct spacing and depth.
4) Flashing, valleys, and roof penetrations
- Reflash around chimneys, vents, skylights, and along valleys with compatible metal flashing.
- Seal penetrations to minimize the risk of leaks under the new layer.
5) Edge fasten and securing the field
- Ensure all rows are properly nailed, aligned, and free of gaps.
- Check for consistent shingle exposure and uniformity across the roof plane.
6) Ridge cap and final sealing
- Install ridge caps to finish the top edge and seal the seams for wind resistance.
- Apply any necessary sealants or edge caulking as specified by the manufacturer.
7) Ventilation review
- Verify attic ventilation remains effective with the added layer; adjust or add vents if needed to prevent heat buildup and moisture issues.
Post-Installation Checks
- We perform a thorough inspection for missing nails, lift points, or gaps, and verify tight flashing details.
- A final water-test or controlled rain test is done in a methodical manner to confirm performance before cleanup.
Cleanup, Protection, and Warranty
- The site is cleaned of all debris, old nails are collected, and surface granules are swept up.
- We review maintenance guidelines and warranty coverage, so you know what to expect in years ahead.
Maintenance and Long-Term Care
- Schedule regular inspections, especially after severe storms or major temperature shifts.
- Keep gutters clear and address any minor issues early to preserve the overlay's performance.
Residential vs. Commercial Considerations
Residential vs Commercial Considerations of Roof Overlay Services
- A roof overlay adds a new top layer over the existing roof. It's typically considered on homes with a solid deck, good drainage, and a pitch that sheds water well. Some commercial roofs can accept overlays too, but conditions are more stringent and the system types differ.
- The big difference you'll notice is how the project is sized, inspected, and coordinated. Residential jobs are smaller, more personalized, and often have tighter budget and disruption controls. Commercial jobs involve larger areas, more penetrations (mechanical curbs, skylights, drains), and stricter scheduling to minimize tenant impact.
Core considerations at a glance
- Roof type and condition: Homes usually use shingle overlays on pitched roofs; commercial roofs are often flat or low-slope, with membrane systems.
- Structural load: An overlay adds weight. A structural analysis confirms the deck, framing, and existing layers can handle an extra load.
- Access and disruption: Home projects affect daily routines; commercial projects must coordinate around tenants, operations, and safety protocols.
- Permits and codes: Local rules differ by sector. Wind uplift, membrane adhesives, and edge detailing have distinct requirements for residential vs commercial.
- Warranties and life expectancy: Overlays may affect warranties from manufacturers and installers. Residential shingle overlays often come with specific shingle warranties; commercial membranes have their own warranty timelines.
- Ventilation and insulation: Good ventilation is essential on homes to prevent moisture buildup and heat trap. Commercial systems require different approaches to insulation, drainage, and weatherproofing.
- Drainage and edge details: Gutters, scuppers, and roof drains must remain functional. Overlays shouldn't create ponding or mismatched edges.
Residential considerations
- When overlays make sense:
- The deck is sound, with no widespread leaks or rot.
- The pitch and drainage prevent water from pooling on any new layer.
- You're aiming for a faster, lower-cost upgrade without tearing off the old roof.
- What to expect:
- Shorter work timelines and less dumpster space.
- A single new layer atop the existing roof, which may limit the ability to address insulation or ventilation improvements.
- Potentially limited warranty options compared with a full roof replacement.
- Practical steps:
1) Have the roof and attic inspected for hidden damage.
2) Confirm slope and drainage meet overlay requirements.
3) Verify the existing deck is dry, clean, and sound.
4) Check with your insurer and manufacturer about overlay warranty options.
5) Plan for ventilation adjustments if needed.
Commercial considerations
- When overlays are appropriate:
- The roof is relatively flat or gently sloped, with accessible edges and clear terminations.
- You need a quicker, weather-tight solution for a large area without a full teardown.
- Tenant operations require careful scheduling and coordination.
- What to expect:
- Large-scale logistics: equipment, staging, and safety barriers for crews.
- More complex flashing, curbs, and penetrations to seal around HVAC units, vents, and skylights.
- Longer-term maintenance planning that accounts for industrial or commercial loads and drainage systems.
- Practical steps:
1) Gather building plans and current roof drawings to map all penetrations.
2) Conduct a comprehensive structural and waterproofing assessment of the deck and substrate.
3) Coordinate with tenants/management for access times and noise considerations.
4) Ensure edge detailing, parapets, and drains are designed for the overlay system.
5) Review warranty terms for the commercial membrane system and any overlay-specific limitations.
Decision guidance
- Key questions to ask your roofer:
- Is the existing deck suitable for an overlay, and what is the maximum number of layers allowed?
- What diagnostic tests are needed (moisture scans, infrared, or core samples)?
- How will ventilation, insulation, and drainage be addressed with the new layer?
- What are the wind uplift and drainage requirements for my building type?
- What is the long-term maintenance plan and expected lifespan of the overlay?
How Roof Overlay Services Vary by Location
Regional Weather and Climate
- In cold northern regions, snow loads, ice dam formation, and freeze–thaw cycles influence overlay decisions. A thicker or reinforced roof deck, proper ice barriers, and enhanced ventilation may be required to prevent moisture buildup beneath the new layer.
- In hot, sun-heavy areas, UV exposure and heat can accelerate shingle aging. Adequate attic ventilation and proper flashing details help maintain roof longevity and energy efficiency.
- Coastal and hurricane-prone zones demand wind-resistant components and corrosion-resistant fasteners. Local climate also affects drip edge, underlayment type, and sealant selection.
Short paragraph: Weather patterns drive choices about underlayment, ventilation, fasteners, and flashing. A location-aware plan keeps the overlay performing well under the next few decades of climate conditions.
Building Codes and Permits
- Building codes vary by state, county, and even city. Some jurisdictions treat an overlay as a reroof and require a permit, inspections, and a structural assessment; others have streamlined processes for reroof overlays.
- Local code adoption can affect venting requirements, ice and water shield placement, and roof deck integrity checks. Always verify permit timelines, inspection steps, and any code-mandated documentation with the local building department.
Short paragraph: Codes are not one-size-fits-all. A compliant overlay hinges on knowing the exact local rules before work begins.
Roof Structure and Material Compatibility
- Overlays add weight. Some homes (especially older structures) may need a structural evaluation to confirm joist/rafter capacity and load path, ensuring the deck can support the new layer.
- Material compatibility matters. Certain roof decks respond better to overlays with specific underlayment and fastener types. In regions with high wind or seismic activity, additional bracing or edge protection may be required.
Bullet list: Expect a local assessment to determine if existing plywood or OSB needs reinforcement, or if a lighter overlay solution is preferable.
Local Labor Practices and Availability
- Availability of skilled roofers and preferred installation methods vary by region. Some markets favor quick-turnaround overlays; others emphasize meticulous flashing details and venting work.
- Seasonal pace shifts can affect scheduling. In areas with heavy rain or snow seasons, you'll see shorter working windows and stricter weather contingencies.
Short paragraph: Local experience matters. A nearby contractor familiar with regional tolerances will navigate material choices and sequencing smoothly.
Insurance and Warranty Considerations
- Insurance underwriting and warranty coverage can differ regionally. Some carriers require a full deck inspection, newer underlayment, or specific shingle types to maintain coverage or warranty terms on an overlay.
- Warranties may specify regional compliance needs (ventilation, flashing, and underlayment requirements) to keep the coverage valid.
Bullet list: Ask for the overlay's warranty terms in writing and verify how regional factors influence coverage.
Color, Aesthetics, and HOA Rules
- Local HOA rules or neighborhood aesthetics can constrain color choices, shingle profiles, and edge details. Some regions have climate-informed color palettes for heat reflectivity or UV resistance.
- In historic districts or high-density neighborhoods, overlay work might require approvals or detailed architectural guidelines.
How this service varies in different regions in the United States
- Northeast: Stricter winterization requirements, higher emphasis on ice barriers and attic ventilation; more frequent permit checks; snow load considerations shape deck reinforcement needs.
- Southeast: Wind and moisture resistance drive fastener choices and sealed flashing; hurricane zones push for impact-rated shingles and robust edge protection.
- Midwest: Freeze–thaw cycles demand careful underlayment selection and deck resilience; moisture control and ventilation are crucial to prevent mold and ice buildup.
- West (including California): Seismic and wildfire considerations can influence attachment methods and fire-rated underlayments in fire-prone zones; drought-tolerant, UV-resistant options and energy-performance factors come into play; local codes may emphasize retrofit sealing and venting.
Steps to Verify Local Requirements
1. Check with the local building department for permit, inspection, and code adoptions applicable to roof overlays.
2. Ask contractors for a written plan that cites regional codes, required underlayment, venting, and flashing details.
3. Obtain at least two local references and confirm project outcomes under similar regional conditions.
4. Confirm structural assessment needs and whether additional reinforcement is required before overlay installation.
Quick checklist for homeowners
- Confirm structural compatibility and any needed reinforcements.
- Verify underlayment, ventilation, and flashing meet regional standards.
- Ensure permits and inspections are scheduled and documented.