Ultimate Guide to Roof Waterproofing Services
Last updated: Feb 28, 2026
An Introduction to Roof Waterproofing Services
Why waterproofing matters
Waterproofing protects the structure beneath your roof from moisture that can cause rot, mold, and costly repairs. A well-executed system reduces the chance of interior leaks and helps preserve insulation, attic spaces, and living areas. Think of it as a shield that works behind the scenes, especially on flat or low-slope roofs where standing water is more likely.
- Signs to watch for: staining on ceilings or walls, musty smells in the attic, blistering paint, or peeling sealants around vents and flashing.
- Hidden issues: subtle leaks often hide under shingles or in the underlayment; waterproofing helps address these before they turn into bigger problems.
- Longevity: properly installed systems shorten future repair cycles and can extend the life of your roof.
Common roof waterproofing methods
There isn't a one-size-fits-all solution. Your roof type, climate, and budget guide the best choice. Here are the main approaches you'll encounter:
- Membranes: Modified bitumen, EPDM, or TPO membranes applied over or integrated with the roof deck to create a continuous waterproof layer.
- Liquid-applied coatings: Silicone, polyurethane, or acrylic coatings that form a seamless film—great for complex shapes or retrofits.
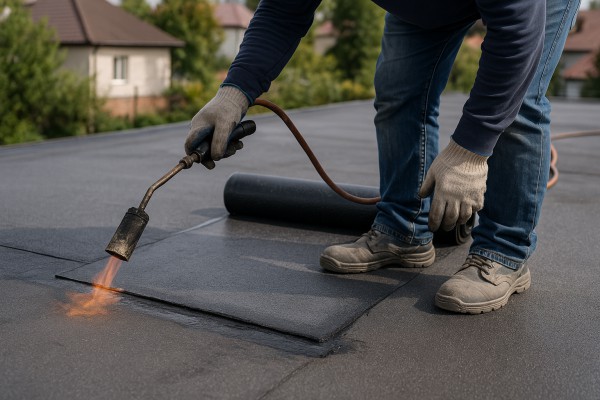
- Asphalt-based and bituminous systems: Torch-down or self-adhering options often used on commercial or flat residential roofs.
- Flashing and sealants: Reinforcing joints around penetrations (vents, skylights, chimneys) to prevent leaks at edges and corners.
- Drainage and ponding solutions: Adjusting slope, installing scuppers, or adding drip edges to reduce standing water stress.
When to consider waterproofing
Timely protection can save you headaches and money later. Consider waterproofing if you're facing any of these situations:
- New flat or low-slope roof installations where full sealing matters from the start.
- Replacing aging underlayment or a compromised roof deck after leaks.
- Post-storm repair needs or after hail and wind damage that exposed vulnerable areas.
- Visible moisture intrusion in the attic or living spaces, even if the exterior roof looks intact.
- Planning a bathroom or kitchen remodel that involves roof penetration or skylight work.
- Seasonal maintenance windows where you can schedule a professional evaluation without disrupting living space.
The waterproofing process: a practical overview
Understanding the flow helps homeowners plan and ask informed questions.
1) Initial inspection and diagnosis: identify active leaks, moisture, and structural concerns.
2) Material selection: choose a waterproofing method that suits roof type, climate, and budget.
3) Surface preparation: clean, dry, and repair the roof deck, flashing, and penetrations.
4) Application: install the chosen system—membrane, coating, or combined approaches—with attention to overlaps and seams.
5) Curing and inspection: allow proper curing time and verify seamless coverage and edge details.
6) Maintenance planning: receive guidance on routine checks and minor touch-ups to extend life.
Maintenance and prevention
Keeping your waterproofing effective requires a simple, ongoing routine.
- Schedule seasonal roof inspections to catch early signs of trouble.
- Keep gutters and downspouts clear to prevent water backing up near the roof edge.
- Check skylights, vents, and flashing for loose seals after severe weather.
- Limit foot traffic on membranes or flat sections to avoid punctures.
- Address small leaks promptly to prevent bigger, harder-to-fix problems.
How to evaluate a contractor
A confident, transparent roofer makes waterproofing easier to manage.
- Verify licenses, insurance, and any material certifications relevant to your region.
- Ask for recent projects with photos and references; request on-site estimates.
- Request written warranties covering workmanship and materials, with clear timelines.
- Ensure the contractor explains each step, including surface prep, material choices, and curing requirements.
- Look for detailed, itemized proposals rather than vague estimates.
Roof Waterproofing Services: What They Include and Why They Matter
Comprehensive definition
Waterproofing a roof means creating a continuous, durable barrier that stops water from penetrating the roof assembly. It blends membranes (sheet or liquid-applied), protective coatings, flashing, sealants, and detailing at all joints, penetrations, and transitions. A complete system considers the roof deck, insulation, substrate, drainage, and ventilation. It's not just about sealing a leak; it's about preventing moisture migration, reducing mold risk, preserving structural elements, and extending roof life. Proper waterproofing also includes surface preparation, reliable bonding to the substrate, and a maintenance plan to catch issues early.
What waterproofing services typically include
- Site assessment and moisture survey
- Surface preparation
- Cleaning, debris removal, and mural repairs
- Patching cracks, blisters, or worn patches
- Ensuring proper slope and drainage
- System selection and design
- Sheet membranes (EPDM, TPO, bituminous/asphalt)
- Liquid-applied membranes (polyurethane, acrylic, silicone)
- Cementitious or spray-applied coatings
- Flashing, detailing, and penetrations around vents, skylights, chimneys
- Installation of waterproofing systems
- Primer and bonding agents
- Membrane installation with seams correctly sealed
- Flashing at edges, parapets, and transitions
- Integral drainage enhancements (clarified gutters, scuppers, scupper detailing)
- Penetration and detail work
- Vents, drain penetrations, HVAC curbs, and roof-mounted equipment
- Seals around penetrations using compatible sealants and fasteners
- Protection and finish
- Protective top coatings or ballast adjustments
- Optional protection under ballast or decking where applicable
- Inspection and warranty
- Final moisture test and defect verification
- Documentation for warranties and future maintenance
Materials and systems
- Fluid-applied membranes: seamless or easily repairable coatings that bridge complex details
- Sheet membranes: continuous, puncture-resistant barriers suitable for large flat areas
- Asphalt or bituminous systems: traditional options with layered protection
- Cementitious coatings: durable, mineral-based protection for concrete or masonry substrates
- Flashings and sealants: critical for corners, edges, and penetrations
- Drainage enhancements: ensuring water exits freely to prevent pooling
When it's typically needed
- Persistent leaks or damp attic spaces after rain or snow
- Roofs with flat or low-slope design where water tends to pond
- Aging roofs showing signs of moisture intrusion, blistering, or delamination
- Cracks, gaps, or open joints around vents, skylights, chimneys, or parapets
- After hail or storm damage that compromises surface integrity
- Before or during new construction or major roof renovations to guarantee a watertight base
- In humid environments where vapor migration and mold risk are concerns
- When upgrading insulation, ventilation, or roof decking to improve performance
The waterproofing process (typical steps)
1. Evaluation and planning
2. Leak and moisture mapping; identify high-risk details
3. Surface prep and substrate repair
4. Selection of waterproofing system based on roof type and climate
5. Membrane installation with proper seam sealing and flashing
6. Drainage checks and penetration sealing
7. Final testing, documentation, and warranty setup
Maintenance and care
- Schedule regular inspections, especially after severe weather
- Keep drains and gutters clear of debris to prevent standing water
- Inspect penetrations and flashing for signs of wear or movement
- Promptly address any new cracks or blisters
- Avoid heavy foot traffic on sensitive membranes unless designed for it
- Clean coating surfaces when necessary and recoat per manufacturer guidelines
Common considerations for homeowners
- Compatibility of materials with existing roof components
- Downtime and impact on interior spaces during installation
- Warranty terms and what they cover (labor vs. materials)
- Long-term maintenance plan and potential retrofit needs
When You Need Roof Waterproofing Services
Signs this service is needed
- Water leaks in living spaces after a rainstorm or when snow melts.
- Visible water stains, dark spots, or bubbling on ceilings and upper walls near the roof line.
- Musty odor or visible mold growth in the attic, crawl space, or upper rooms.
- Peeling paint, bubbling wallpaper, or soft, damp drywall below or around the attic.
- Warped, sagging, or damp-looking ceiling drywall from repeated moisture exposure.
- Damaged, loose, or missing flashing around roof penetrations (chimneys, vents, skylights).
- Ice dams or water back-up on a flat or low-slope roof in winter.
- Damp insulation in the attic or persistent condensation on the underside of the roof deck.
- Granule loss in shingles, curling or cupping shingles, or visible gaps where water can infiltrate.
- Gaps or cracks around roof edges, valleys, or seams that look compromised.
Ways you can confirm yourself as a homeowner
1) Do a daylight attic check: with a flashlight, look for damp spots, dark staining, mold growth, or signs of moisture on the roof deck.
2) Inspect exterior roof components: check for loose, cracked, curling, or missing shingles; brittle or torn flashing; gaps at chimneys, vents, or skylights.
3) Check around penetrations: examine seals around pipes, vents, and chimneys for gaps or deterioration.
4) Monitor after rain: note if fresh leaks appear in the ceiling or walls within 24–48 hours of a heavy rain.
5) Look for insulation dampness: touch insulation in the attic—wet insulation means ongoing moisture intrusion.
6) Use basic moisture cues: a damp, musty attic or attic plywood with a higher moisture tone can indicate a hidden leak.
7) Check drainage and gutters: clogged or sagging gutters can cause water to back up and infiltrate the roof edge or fascia.
8) Assess flat or low-slope areas: standing water that doesn't drain in a reasonable time is a red flag for waterproofing failure.
9) Consider roof age and past repairs: if the roof is older or has had prior waterproofing fixes, new issues are more likely.
When to get a professional assessment
- You cannot safely access the roof or attic due to height, slope, or structural concerns.
- Leaks or moisture signs appear in multiple areas, or leakage persists after basic fixes.
- There is visible mold growth, persistent dampness, or a strong musty odor that won't go away.
- Structural signs accompany moisture, such as sagging ceilings, warped drywall, or crumbling sheathing.
- The roof is older (typically 15–20+ years for many common materials) and waterproofing components haven't been updated recently.
- Recent storm, hail, or wind damage created new or extensive water intrusion.
- You're planning a pre-purchase inspection or preparing to sell and need a professional waterproofing assessment.
- A flat or low-slope roof shows blisters, bubbling, or compromised membrane sections that DIY checks can't safely address.
What's Included in Roof Waterproofing Services
What is typically included
- On-site assessment and moisture diagnosis: a thorough inspection of the roof surface, flashing, penetrations, and drainage, plus a plan for the waterproofing system tailored to your roof type and climate.
- Surface preparation: cleaning away dirt, debris, moss, and algae; addressing dry-out needs and ensuring a clean, dry base before any coating or membrane goes down.
- Minor repairs within scope: sealing small cracks, re-caulking around vents and penetrations, reseating loose flashing, and addressing loose fasteners or nail pops that affect waterproofing performance.
- Flashing, penetrations, and edge detailing: repairing or replacing damaged flashing, pipe collars, vent boots, skylight seals, and edge details to create continuous, watertight seams.
- Waterproofing material application: priming (when required), applying the chosen system (sheet membrane, liquid-applied membrane, or elastomeric coating), and fabric reinforcement at joints or transitions as needed.
- Crack treatment and reinforcement: targeted crack sealing or injection for narrow cracks and reinforced seam areas to prevent future leaks, performed within the project scope.
- Drainage optimization: ensuring proper slope and drainage paths, cleaning and upgrading drains or scuppers, and installing or refreshing drip edges and edge seals to direct water away from the roof.
- Penetration management: sealing around all openings such as vents, HVAC curbs, flues, and satellite dishes with compatible sealants and flashing details to keep penetrations watertight.
- Curing and protection: weather-aware timing for applications, temporary coverings if needed, and clear guidance on when the roof can be unblocked to normal use.
- Final inspection and testing: a post-application check, plus water testing (spray test or controlled water exposure) to verify integrity of seams and details; optional infrared inspection to identify hidden moisture or cold spots.
- Clean-up and site protection: removal of debris, drop sheets, and protective barriers; site left tidy and ready for normal use.
- Documentation and guidance: a written summary of work performed, any warranty terms, and practical maintenance tips to help extend the life of the waterproofing system.
What is not typically included
- Major structural repairs or roof deck replacement: sagging, rot, or extensive decking work fall outside waterproofing and may require separate carpentry or decking contracts.
- Full roof replacement or re-roofing: waterproofing work may extend the life of the roof, but a complete reroof is a separate project.
- Interior remediation for existing leaks: mold abatement, insulation replacement, or drywall repair due to water intrusion is generally handled as a separate service after the exterior waterproofing is secured.
- Siding, exterior trim, or gutter system replacement: while we may clean or adjust gutters during service, full replacement or major restoration is not part of waterproofing.
- Skylight replacement or major penetrations work: resealing and flashing repairs are common, but replacement of skylights or significant fabrication around openings is usually a separate scope.
- Permits and code upgrades: obtaining building permits, blue-print adjustments, or code-required upgrades are not included unless separately quoted or arranged by you.
- Hazardous material remediation: remediation for asbestos, lead paint, or other hazardous materials is outside standard waterproofing scope and requires specialized environmental handling.
- Major structural modifications or framing work: any work that alters roof structure, load paths, or framing is outside the waterproofing scope.
- Long-term maintenance plans or ongoing service contracts: ongoing monitoring or yearly maintenance beyond the initial warranty-related tips is typically quoted separately.
Roofing Materials Commonly Used in Roof Waterproofing Services

- How waterproofing relates: The primary protection comes from a solid underlayment and properly installed flashing, not the shingles alone. Waterproofing services often add or upgrade ice-and-water shield at eaves and penetrations, plus high-quality sealants around vents, chimneys, and skylights to prevent leaks where shingles meet edges.
- Material-specific notes: Asphalt shingles are common and affordable, but their overlaps create joints that require meticulous sealing. The underlayment must be compatible with asphalt; a self-adhering membrane is frequently recommended to reduce lifting in wind-driven rain. If repairs are needed, deck condition and dry-in prior to waterproofing are essential.

- How waterproofing relates: Tile roofs rely on a durable underlayment and properly flashed interfaces to keep water from penetrating at ridges, hips, penetrations, and around flashing. Roofing waterproofing services often install or upgrade underlayment beneath the tile, plus sealants and metal flashings that tolerate tile movement.
- Material-specific notes: Clay and concrete tiles are heavy and fracture-prone if mishandled. The underlayment must be rated for tile systems and temperature changes. Sufficient underlayment, correct fastener penetration, and accurate tile-to-flashing details are critical to prevent leaks between tiles and along valleys.

- How waterproofing relates: Metal roofs rely on precision-sealed seams, flush flashings, and properly terminated edges. Waterproofing services can include seam sealants, gasketed closures at vents, and, where needed, a compatible underlayment to add redundancy for harsh weather.
- Material-specific notes: Standing-seam metal roofs shed water well, but fastener penetrations and penetrations through the field still need sealing. Aluminum or steel can corrode if not properly flashed, so coatings and compatibility with sealants are important. Movement from temperature changes must be accommodated with flexible sealants and expansion gaps.
Wood Shingles and Shakes
- How waterproofing relates: Wood roofs benefit from a robust underlayment and careful flashing around penetrations. Waterproofing services often apply a moisture barrier beneath the wood layer and use durable sealants at joints, plus edge flashings to prevent wind-driven leaks.
- Material-specific notes: Wood is porous and expands/contracts with moisture. Proper ventilation and a breathable yet waterproof barrier are key. Avoid trapping moisture; ensure deck surface is clean and dry before applying waterproofing membranes or overlays that are compatible with wood systems.

- How waterproofing relates: Slate requires dependable flashing, sealed joints, and often copper or lead fittings around chimneys and valleys. Waterproofing services focus on maintaining impermeable interfaces without compromising slate integrity.
- Material-specific notes: Slate is fragile and breaks if overloaded. A compatible underlayment and precise installation of flashings are essential. Non-porous, chemically compatible sealants help keep joints water-tight while preserving slate's appearance.
Composite and Synthetics
- How waterproofing relates: Modern composite shingles and synthetic tiles often pair with advanced underlayments and waterproof membranes engineered for lightweight, flexible performance. Waterproofing services tailor the membrane selection to the material's expansion and contraction cycles.
- Material-specific notes: These products can be more forgiving than natural materials but still require proper adhesion partners and edge detailing. Check for UV resistance, chemical compatibility with sealants, and warranty terms that cover waterproofing layers.

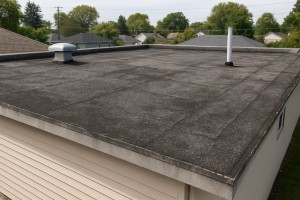
- How waterproofing relates: Flat roofs rely on a continuous, seamless waterproof membrane as the primary defense. Waterproofing services typically install or repair single-ply membranes, ensure proper flashing details, and address drainage to prevent ponding.
- Material-specific notes: Choose a membrane type that matches roof slope, climate, and foot traffic expectations. EPDM and TPO membranes respond to temperature and weathering differently than PVC, so detailing around penetrations and edge terminations is crucial.
- How waterproofing relates: BUR and modified bitumen create multiple interwoven layers of felt or fiberglass with bitumen to form a strong waterproof shield. Waterproofing services may refresh flood coats, reinforce seams, and add granule protection on top layer.
- Material-specific notes: This approach is durable but can be heavy and brittle over time. Regular maintenance, crack repairs, and proper edge detailing keep it performing. Compatibility with coatings and sealants is important to maintain a seamless barrier.
Process snapshot (brief)
1. Inspect and assess roof type, condition, and drainage.
2. Prep surface: clean, dry, and repair deck as needed.
3. Select compatible underlayment or membrane for the material.
4. Install with attention to flashing, penetrations, and edges.
5. Seal joints and test for water-tightness at critical areas.
Understanding the Cost of Roof Waterproofing Services
What a waterproofing job typically includes
A professional waterproofing service usually covers assessment, surface prep, a waterproofing system (coating, membrane, or both), flashing and detail work around penetrations, drainage considerations, and a warranty. The exact scope depends on roof type, existing condition, and local weather demands. Expect a clear plan that outlines materials, labor, and any necessary repairs to decking or underlayment before the waterproofing begins.
Typical average costs
- Minor repairs or spot waterproofing: $300–$800
- Liquid-applied coatings on flat or low-slope roofs: $1.50–$3.50 per sq ft
- Single-ply membrane systems (EPDM, TPO) on flat roofs: $4–$8 per sq ft
- Torch-down or built-up membrane on complex flat sections: $6–$12 per sq ft
- Full roof waterproofing for a standard 1,500–2,000 sq ft home (mix of coatings and/or membranes): $6,000–$12,000
- Add-ons and detail work (additional flashings, penetrations, deck repairs): $400–$2,500
Note: costs can vary by region, roof complexity, and the contractor's approach. A simple, well-sealed area will typically be cheaper than a full-coverage system on a multi-detail roof.
How to estimate for your home
1. Measure roof area (in square feet) and note any flat sections vs. pitched areas.
2. Decide between coating (often cheaper, suitable for flat/low-slope roofs) and full membrane systems (more durable for larger or more exposed roofs).
3. Inspect condition of underlayment, decking, and existing flashings; note any repairs needed.
4. Consider accessibility and safety needs (scaffolding, roof hyst, or removal of obstacles).
5. Obtain at least 3 quotes that clearly break out materials, labor, and any contingencies; compare warranties.
Cost-reduction considerations
- Choose coating systems for flat or low-slope roofs instead of full membrane installations when appropriate.
- Limit scope to essential waterproofing areas first (patch vulnerable joints) rather than a full-coverage overhaul.
- Schedule work in off-peak seasons or during mild weather to reduce labor delays.
- Do some light prep work yourself (clear debris, protect landscaping) to reduce labor time.
- Improve roof access and cleanliness to speed up installation and lower labor costs.
- Bundle waterproofing with other needed roof work (ventilation, flashing, or minor repairs) to save on mobilization costs.
Cost-increasing considerations
- Large or intricate roofs with many penetrations, valleys, or multiple levels.
- Steep pitches or difficult access requiring additional safety measures and equipment.
- Damaged decking, mold, rot, or compromised underlayment needing replacement.
- Old or corroded flashings, flashings around chimneys, skylights, or vents that require replacement.
- Need for permits, temporary power, scaffolding, or specialized equipment.
- Higher-end systems (premium membranes, UV-resistant coatings, or multi-layer assemblies) or extended warranties.
- Tight scheduling or weather delays that push crews to run longer, increasing labor hours.
Quick tips to sanity-check quotes
- Ask for a breakdown: materials per sq ft, labor per sq ft, and any demolition/repair costs.
- Verify warranty length and what it covers (surface vs. labor vs. workmanship).
- Confirm roof area measurements and system type proposed to ensure apples-to-apples comparisons.
- Check contractor references and recent project photos of waterproofing installations.
How Our Roof Waterproofing Process Works
Step 1: Initial Site Visit and Free Assessment
We begin with a thorough on-site review to pinpoint where water is getting in and what's causing it. This visit is no-obligation and helps us tailor the right solution for your roof.
- We look for active leaks, staining in ceilings or attic spaces, and any mold or odors.
- We inspect the roof deck, flashing, penetrations, vents, chimneys, and skylights.
- We evaluate existing coatings, membranes, and fasteners for wear or gaps.
- We check drainage components (gutters, downspouts, scuppers) and confirm proper slope.
- We document attic ventilation and insulation conditions that can affect waterproofing performance.
Step 2: Diagnostic Report and Plan
After the visit, we translate findings into a clear plan with options, materials, and costs.
- We identify the best waterproofing approach for your roof type (membrane, liquid-applied coating, or cementitious systems).
- We outline surface prep requirements, repairs, and any class-C fixes needed to a sound substrate.
- We provide a detailed scope of work, a realistic timeline, and transparent pricing.
- We explain anticipated life span, maintenance needs, and warranty terms.
- You'll receive photos and notes so you know exactly what to expect.
Step 3: Surface Preparation
Prep lays the foundation for durable waterproofing. Skipping this step leads to failures down the line.
- We remove debris, loose coatings, and weathered shingles or tiles as needed.
- We clean and dry the surface, addressing mold, algae, or moisture concerns.
- We repair small cracks, damaged flashings, and compromised joints to a solid substrate.
- We prime porous surfaces and ensure the work area is safe and dry before coating begins.
Step 4: Deck/Surface Repair and Priming
Strengthening the substrate improves adhesion and long-term performance.
- We address structural or decking issues that could compromise waterproofing.
- We seal joints, flashing intersections, and penetrations to prevent future leaks.
- We apply appropriate primer or bonding agents to optimize adhesion for the chosen system.
- We protect areas not being treated and control dust and debris during repairs.
Step 5: Waterproofing Application
This is the core of the process. We tailor the approach to your roof and climate, with options that fit your home.
- If using a sheet membrane:
- We lay down the membrane with clean seams, heat-welding or tape-sealing where required.
- We reinforce critical detail areas (edges, corners, penetrations) for extra durability.
- If applying a liquid or cementitious coating:
- We apply multiple coats or layers, following proper cure times between passes.
- We use reinforcement where joints and transitions occur to bridge movement.
- For all methods:
- We ensure proper ventilation during application and monitor humidity and temperature for optimal cure.
- We conduct a mid-process inspection to catch any issues early and adjust as needed.
Step 6: Curing, Sealing, and Protection
Proper curing ensures the warranty and performance live up to expectations.
- We monitor cure times and avoid foot traffic or exposure to weather during the critical window.
- We seal edges, seams, and flashings once the membrane or coating has properly set.
- We recheck drainage components and reattach gutters or drip edges as necessary.
- We perform a post-application clean-up and protect treated surfaces from debris.
Step 7: Final Inspection, Cleanup, and Warranty
A final walkthrough confirms success and sets expectations for ongoing care.
- We verify all penetrations, joints, and terminations are watertight.
- We document the completed work with photos and a written summary.
- We review maintenance tips to extend the life of the waterproofing system.
- We provide warranty terms that align with the chosen material and installation method.
Quick reference: What you'll typically see across methods
- Surface prep is always thorough: clean, dry, and sound substrate.
- Detailing around penetrations is a focus to prevent leaks at high-risk points.
- Curing and protection steps are critical for long-term performance.
- A clear warranty and maintenance plan accompany every project.
Residential and Commercial Considerations for Roof Waterproofing
Residential Considerations
Homes are usually smaller-scale projects, but that doesn't mean planning should be rushed. Living space below, pets, and daily routines all matter when scheduling and choosing materials.
- Roof type and material compatibility: Asphalt shingles, tile, metal, and flat membranes each respond differently to waterproofing products. Ensure the chosen system is proven for your roof type.
- Roof condition and age: Older roofs may require more prep, deck sealing, or temporary patchwork before a full waterproofing layer is added.
- Access and disruption: Ladders, scaffolding, and equipment placement should minimize tripping hazards and damage to landscaping or siding.
- Interior impact: Attic spaces, ventilation, and humidity levels can change during work. Consider temporary ventilation solutions and sealants with low odor if occupants are sensitive.
- Weather window: Dry, moderate temperatures help sealants cure properly. Plan around rain, heat waves, or freezing conditions.
- Permits and HOA guidelines: Some neighborhoods require permits or adherence to HOA rules, even for small repairs. Check ahead to avoid delays.
- Warranties and longevity: Look for warranties that cover both waterproofing products and workmanship, with clear terms for leaks and defects.
- Budget and scope expectations: Residential projects often have tight budget windows. Ask for a detailed scope with line-item costs and potential contingencies.
- Maintenance plan: Schedule periodic inspections, especially after severe weather, to catch issues early.
Commercial Considerations
Commercial roofs bring different demands: larger areas, complex penetrations, and the need to keep operations running. Coordination with building management and tenants is essential.
- Scale and complexity: Flat and low-slope roofs with HVAC units, skylights, and access points require careful layout and staging.
- Tenant coordination and operations: Work often happens around business hours or in phased sections to minimize disruption.
- Permits, codes, and inspections: Commercial work may trigger stricter permitting, fire codes, and environmental considerations.
- Safety and site management: Higher emphasis on fall protection, PPE, debris control, and visitor management for public-facing properties.
- Access and logistics: Large equipment, crane access, or material storage may require special permissions and clear paths.
- Weather and timing: Longer projects demand contingency planning for seasonal weather and extended shutdown periods.
- Downtime impact and business continuity: Plan for minimal interruption; coordinate with facility managers on outages or temporary relocation of equipment.
- Warranties and service levels: Programs often include long-term maintenance agreements, performance guarantees, and preferred-rate service calls.
- Budgeting and procurement: Precise bids with clear scope are crucial; expect higher upfront costs but potentially lower life-cycle costs with durable systems.
Residential vs Commercial Considerations of Roof Waterproofing Services
- Core goal is the same: create a seamless barrier against water intrusion. The approach diverges because of size, usage, and risk.
- Scope and cost: Residential work is smaller in scale and typically quicker; commercial work leverages bulk materials and may require longer procurement cycles.
- Scheduling impact: Homes benefit from short, predictable windows; commercial sites must coordinate around tenants, business hours, and on-site safety.
- Coordination needs: Homeowners deal directly with a single contractor; commercial projects often involve property managers, facilities teams, and multiple vendors.
- Safety and compliance: Residential work focuses on occupant comfort and basic safety; commercial jobs demand rigorous safety plans, insurance layers, and compliance checks (OSHA-style practices where required).
- Materials and systems: Residential projects prioritize aesthetic compatibility and residential warranty terms; commercial projects prioritize long-term performance under heavy use, drainage design, and compatibility with large HVAC and drainage networks.
- Long-term planning: Both benefit from a maintenance plan, but commercial plans tend to formalize inspections, service contracts, and performance metrics.
1) Assess your roof type, damage, and project goals.
2) Gather bids with a clearly defined scope, materials, and warranty terms.
3) Verify permits, HOA rules, and access requirements.
4) Plan for disruption, safety, and scheduling that fit daily life or operations.
5) Establish a maintenance and inspection cadence to sustain the waterproofing.
How Roof Waterproofing Services Vary by Location
How this service varies in different regions in the United States
- Northeast and Upper Midwest: harsh winters, freeze-thaw cycles, and ice dam risks mean waterproofing emphasizes sturdy flashing, leak-tight penetrations, and moisture barriers both underlayment and above deck. Expect attention to gutter ties, drip edges, and proper attic ventilation to slow condensation.
- Southeast and Gulf Coast: high humidity, heavy rain, and tropical storm exposure push for breathable, moisture-tolerant systems, superior drainage, and mold-resistant detailing around parapets and penetrations. Coastal salt air also informs material choice and fastener corrosion resistance.
- Southwest: intense sun and heat drive UV-stable membranes and reflective coatings to limit expansion, contraction, and heat aging. We prioritize heat-resistant sealants and color choices that reduce attic temps and energy load.
- Pacific Northwest: frequent rain and moss-friendly environments call for drainage-first designs, algae/moss prevention, and breathable yet water-tight assemblies. Sloped transitions and wall-to-roof junctions get extra attention for continuous weathertightness.
- Mountain West: wide temperature swings and occasional heavy snowfall require durable, temperature-tolerant membranes with reliable expansion joints and robust snow-dam safeguards around roof edges.
- Mid-Atlantic and Central Plains: these regions blend cold snaps with heavy rainfall, so waterproofing plans balance wind-driven rain protection with moisture barriers and solid flashing at all roof penetrations.
Climate and weather patterns shape product choices and installation practices
- Cold-weather regions: prefer membranes with strong low-temperature performance, seam welding or tight adhesive bonds, and interior moisture control to prevent condensation.
- Hot, sunny regions: prioritize UV-stable coatings, heat-reflective finishes, and flexible detailing to handle daily thermal cycling.
- Humid climates: emphasize vapor control on the warm side, robust drainage, and materials resistant to mold and mildew growth.
- Rain-dominated areas: focus on continuous edge detailing, high-slope gutter connections, and reliable flashing around chimneys, vents, and skylights.
- Moss-prone zones: incorporate algae/moss-resistant substrates and periodic rinsing plans to maintain long-term effectiveness.
Local codes, permits, and contractor norms
- Licensing and contractor qualifications vary by state and municipality; some areas require a roofing contractor license for waterproofing work, others do not.
- Permit requirements can depend on roof type (flat/low-slope vs. steep) and project scope (replacement vs. surface-only work).
- Warranty terms are often tied to region-specific installation practices and approved products; ensure your pro follows local standards to keep warranties valid.
Roof systems and materials you'll see by region
- Asphalt shingle roofs: common nationwide; waterproofing connects with underlayment and flashing around vents, plumbing stacks, and edges.
- Flat or low-slope roofs: membrane systems ( EPDM, TPO, PVC, or bitumen) are typical; location influences choice based on UV exposure, wind, and rainfall.
- Tile and clay roofs: flashing and sealing details must work with tile profiles and substrate movement; regional wind and seismic concerns matter.
- Metal roofs: require compatible sealants and seam protection tailored to expansion rates and coastal corrosion risks.
- Wood shakes or slate: demand careful flashing detail and substrate protection against moisture ingress, with regional maintenance rhythms.
Practical steps for homeowners by location
1. Identify your climate profile and typical weather events for your area.
2. Ask about product warranties and why a specific membrane or coating suits your region.
3. Confirm local permit requirements and whether the contractor uses regionally preferred materials.
4. Plan work for a window with predictable weather and minimal heat or cold stress on materials.
5. Schedule regular inspections after key seasonal transitions (spring thaw, post-storm, or fall pre-winter) to catch region-specific wear.