Ultimate Guide to Roof Flashing Repair & Installation
Last updated: Feb 28, 2026
Introduction to Roof Flashing Repair & Installation
What roof flashing does
Flashing is the thin metal or flexible material that shields roof joints, valleys, chimney bases, vent pipes, skylights, and edges from water intrusion. It acts as a barrier where shingles meet other surfaces, guiding water away from vulnerable spots and toward the gutter system.
Why flashing matters for your roof's longevity
- Keeps fasteners and decking dry, preventing rot and leaks
- Reduces the chance of ice dam buildup in colder climates
- Extends the life of shingles by preventing water from seeping under edges
- Helps maintain interior comfort and home value
Common flashing problems you may encounter
- Loose, lifted, or damaged pieces at chimneys, vents, or valleys
- Corrosion, rust, or punctures in metal flashing
- Improper installation or gaps sealed with old, failed caulk
- Damaged step flashing around roof-to-wall transitions
- Roof movement creating bending or cracking in the flashing
Signs you need flashing repair or installation
- Water spots or staining on ceilings near walls or chimneys
- Damp or musty odors after rain, especially in upper levels
- Visible gaps, peeling sealant, or rust on flashing surfaces
- Shingle edges wrinkling or lifting at corners and transitions
- Ice dams forming at eaves or along gutters in winter
Materials and styles (choices for homeowners)
- Metals: aluminum (lightweight, corrosion-resistant), galvanized steel (strong, affordable), copper (long-lasting, premium)
- Flexible flashing products for special angles or around irregular features
- Color and profile options to match your roof and home style
- Compatibility with your roof type (asphalt, tile, metal, or flat roofing)
DIY or hire a pro? Quick guide
- DIY could be feasible for simple, visible patches on easy-to-access roofs with solid ladder setup
- Hire a pro for chimneys, skylights, valleys, or steep pitches, where improper flashing can cause widespread leaks
- Always weigh safety, attic access, and roof complexity before attempting repairs
The repair or installation process (what to expect)
1. Assess and protect: Inspect the area from ground level and overhead, set up safe access, and remove debris.
2. Remove and clean: Detach damaged flashing and clean the substrate to ensure a solid seal.
3. Fit new flashing: Pan or bend the flashing to match the surface, ensuring proper overlap and direction of water flow.
4. Seal joints: Apply compatible sealant or mastic only where specified, with attention to paintable, flexible products for long life.
5. Flash and fasten: Secure the flashing with appropriate nails or fasteners, sealing penetrations and ensuring a tight fit at all transitions.
6. Inspect and finish: Check for wrinkles, gaps, or loose edges; re-seal as needed and clean the area for gutters and drainage.
Maintenance tips to extend flashing life
- Schedule annual roof inspections, focusing on edges, valleys, and around protrusions
- After severe storms, re-check for loose pieces or lifted edges
- Keep nearby trees trimmed to reduce debris and damage from branches
- Reapply sealant only when compatible with the flashing material and climate
What to expect from a professional job (quality indicators)
- Clear assessment of flashings' condition and surrounding roof structure
- Proper overlap, step/flashing details at transitions, and integrated sealant where appropriate
- Durable fasteners, corrosion-resistant materials, and a clean, weather-tight finish
- A written warranty or workmanship guarantee and a documented maintenance plan
Roof Flashing Repairs and Installations
Comprehensive definition
Roof flashing is the thin metal (or other durable material) around joints and penetrations where the roof surface meets walls, chimneys, vents, skylights, and valleys. Its job is to create a watertight seal and direct water away from vulnerable seams so leaks don't follow along the roofline. Flashing can be made from aluminum, galvanized steel, copper, lead, or durable plastics, and it often works in concert with roof cement or sealant. Proper flashing prevents water intrusion at transitions, while shingles or tiles provide the primary weather barrier. Installed correctly, flashing blends with the roof design and stays secure even in wind and freeze-thaw cycles.
When it's typically needed
- During or after a roof replacement or addition, especially around penetrations and at valleys.
- After severe weather (high winds, hail) that can lift or bend flashing.
- When a roof is aging and flashing shows wear, rust, or cracks.
- During remodeling that alters vents, skylights, chimneys, or roof-to-wall connections.
- When changing from one roofing material to another (new flashing may be required to suit the material).
- If you notice signs of leakage around penetrations, along seams, or at the base of a chimney.
Types of roof flashing
- Step flashing: interlocks with shingles along vertical joints where the roof meets a wall.
- Continuous (base) flashing: a long strip installed at the eaves or around parapets and chimneys.
- Counter flashing: installed over base flashing at wall penetrations for additional protection.
- Valley flashing: lines the valley where two roof planes meet.
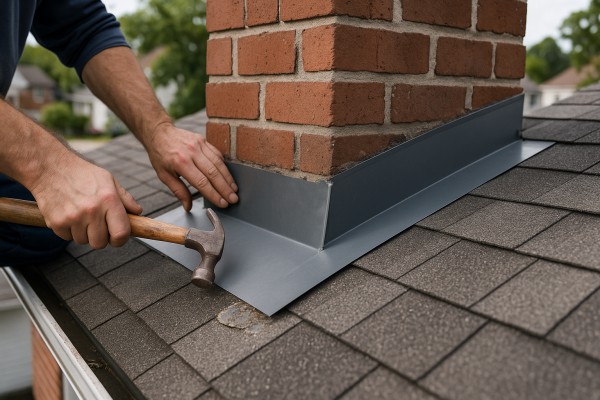
- Chimney and vent flashing: custom pieces that wrap around or seal around protrusions.
- Cricket or saddle flashing: used behind chimneys or islets to divert water.
- Booted vs. non-booted: rubber or plastic boots around vents vs. integrated flashing around the shaft.
Common problems and signs
- Lifting, cracking, or corrosion of flashing material.
- Gaps, gaps under shingles, or misaligned edges.
- Rusted or crushed metal allowing water to seep underneath.
- Improperly sealed terminations at walls, chimneys, or vents.
- Water stains in the attic or along interior ceiling spots.
- Ice dams forming at eaves due to inadequate flashing.
Installation steps (for homeowners to understand)
1. Assess the area: identify all flashing details around penetrations, valleys, and joints.
2. Safety check: use a stable ladder, harness if needed, and weather-free conditions.
3. Remove damaged flashing: carefully lift shingles near the flashing and pry away deteriorated metal.
4. Clean and dry: remove debris, old sealant, and dirt; ensure surfaces are dry.
5. Measure and cut: tailor new flashing to fit around penetrations and along joints.
6. Fit and secure: slide step flashings into place with appropriate fasteners; ensure they interlock with adjacent shingles.
7. Seal and sealant: apply a compatible roofing sealant or caulk to seal joints, then press flashing tightly to create a watertight seal.
8. Reinstall shingles: carefully re-nail or re-lay shingles over the flashing, staggering joints as needed to prevent leaks.
9. Inspect after installation: check all edges for tight fit and re-check around penetrations for any gaps.
10. Optional finalize: apply a bead of sealant at vulnerable seams for extra protection, but avoid excessive sealant that can trap moisture.
Maintenance and care
- Inspect flashing twice a year and after major storms.
- Clean debris from around flashings to prevent moisture buildup.
- Look for loose fasteners, corrosion, or bent sections and address promptly.
- Maintain proper ventilation to minimize ice dam risk and reduce stress on flashing.
- If repainting or refinishing, ensure flashing coating remains intact and compatible with roofing materials.
- Tape measure, utility knife, tin snips, hammer, roofing nails or screws.
- Metal snips or crimping tool for precise bends.
- Roofing sealant compatible with existing roof material.
- Flashing material matching metal type (aluminum, steel, copper).
- Pry bar, chisel, and putty knife for removal and sealing.
Safety considerations
- Use sturdy ladders and fall protection; never work on a wet or icy roof.
- Avoid stepping on fragile shingles near flashings; distribute weight carefully.
- If you're unsure about flashing layout or structural conditions, hire a pro to assess and install.
When You Need Roof Flashing Repair and Installation
Signs this service is needed
- Visible gaps, lifting, or gaps where flashing meets the chimney, vent pipes, skylights, dormers, or the rake edges.
- Corrosion, rust, cracks, or other damage to metal flashing.
- Water intrusion signs: ceiling or wall stains, damp insulation, or musty attic smell after rain.
- Shingles or sealant around penetrations are curling, bubbling, or pulling away.
- Loose nails or fasteners around flashing, or caulk that has failed and is splitting away.
- Ice dam buildup or damp spots along the eaves and near penetrations in cold climates.
- After a severe windstorm or hail event, even if the rest of the roof looks fine, flashing can be displaced.
Ways you can confirm yourself as a homeowner
- Ground-level check: look for any dark streaks, gaps, or lifted edges near the chimney, vents, skylights, or dormers. Use binoculars if you need a closer look from the yard.
- Attic check: safely go into the attic and look for light shining through gaps, wet insulation, or moldy spots around penetrations.
- Inspect penetrations up close: at the chimney, vent pipes, and skylights, look for loose flashing, torn sealant, or gaps where water could penetrate.
- Look for moisture patterns: stains on ceiling drywall, warped plywood, or persistent damp spots along walls beneath roof penetrations suggest flashing issues.
- Assess the surrounding shingles: torn tabs, missing granules, or shingles that butt up awkwardly against flashing can indicate flashing problems.
- Track recent weather: after heavy rain, wind, or freeze-thaw cycles, re-check areas around penetrations for new signs of leakage.
When to get a professional assessment
- You spot leaks or active water intrusion near penetrations that don't stop after a quick patch.
- You're uncomfortable climbing on the roof or working in the attic, or you notice widespread flashing damage that isn't easy to pinpoint.
- The flashing shows rust, corrosion, or extensive cracking, especially around the chimney or vent stacks.
- There are multiple penetrations with signs of failure, or the roof is older and has likely seen the lifespan of its flashing system.
- You're planning a roof replacement or a major remodel and want a professional to coordinate flashing with underlayment and new shingles.
What a professional assessment typically covers
- A thorough exterior inspection of chimney flashing, step flashing along hips and valleys, counter-flashing, and rake flashing.
- Evaluation of underlayment and roof deck around penetrations to determine if replacement is needed.
- Identification of required fixes: resealing, re-flashing, adding counter-flashing, or full replacement of flashing sections.
- Clear, itemized recommendations and an upfront estimate for materials and labor.
- Safety considerations and a projected timeline that minimizes ongoing leaks during work.
How to prepare for a professional visit
- Note areas that have leaked or stained recently and any weather events that may have affected the roof.
- Gather any prior warranties, repair receipts, and photos of problem spots.
- Clear access routes and ensure attic and exterior access points are easy to reach for inspection.
Common outcomes after a professional assessment
- Small, targeted repairs (re-sealing, resealing joints, or re-nailing flashing).
- Partial flashing replacement around a penetrations cluster.
- Full flashing replacement when corrosion or age is extensive to ensure long-term protection.
- Coordination with underlayment and roof shingle work to ensure a water-tight seal.
What Is Included with Roof Flashing Repair and Installation
What is typically included
A standard flashing project focuses on the seals and transitions that keep water out where the roof meets vents, chimneys, skylights, and edges. Here's what you can generally expect to be included in a typical scope.
- On-site assessment and scope confirmation
- Thorough inspection of all flashing areas: step flashing, counter-flashing, chimney and vent flashing, valley flashing, and boot/flange connections.
- Material selection and procurement
- Appropriate flashing metals (aluminum, galvalume/galvanized steel, copper or other color-matched options) chosen to suit your roof and climate; color and finish approved before installation.
- Site protection and preparation
- Roof and exterior area protection, tarps or ladders as needed, and a clean, dry work surface prepared for precise flashing installation.
- Removal and disposal of damaged flashing
- Safe removal of deteriorated flashing, including fasteners and sealants, with proper disposal.
- Flashing repair and replacement
- Replacement or repair of step flashing, counter-flashing, valley flashing, chimney flashing, vent boot flashing, and any related penetrations.
- Integration with roof decking and underlayment as required by the project.
- Sealing and waterproofing
- Use of high-quality sealants, mastics, butyl tape, or other approved closures to create watertight seams at all flashing joints.
- Fasteners and corrosion resistance
- Stainless steel or hot-dipped galvanized nails/screws with proper sealing to prevent corrosion and leaks.
- Underlayment and membrane considerations
- Assessment of adjacent underlayment; patching or replacement in flashing zones if needed to ensure a continuous barrier.
- Ice and water shield installation in critical areas (e.g., eaves, rake, and transitions) when specified by code or contract.
- Roof surface preparation
- Surface cleaning, drying, and alignment checks to ensure flashing sits flat and true.
- Leak testing and final inspection
- In-field testing (where feasible) or rain simulation after installation, plus a final inspection to verify seal integrity.
- Warranties and documentation
- Supplying information on workmanship warranty and any manufacturer warranties applicable to the installed flashing.
- Cleanup and site protection
- Debris removal, attic and landscaping protection, and a tidy work area after completion.
- Post-installation guidance
- Maintenance tips, documentation on what to monitor after heavy rain, and recommended inspection intervals.
What is not typically included
Certain tasks fall outside the standard flashing scope. Here's what you should not expect to be included unless stated otherwise or agreed to in writing.
- Full roof replacement or re-shingling
- Projects that extend beyond flashing into broader roof replacement are not included by default.
- Structural repairs or decking replacement
- Joists, rafters, or roof deck repairs are not part of flashing work.
- Major underlayment replacement beyond flashing zone
- Extensive underlayment work outside the immediate flashing area is typically not included.
- Rebuilding or major repair of chimneys, vents, or masonry
- Structural rebuilds or re-flashing of large masonry features beyond standard flashing detail may be separate projects.
- Interior water damage remediation
- Repairs to ceilings, walls, or insulation caused by preexisting issues not attributable to the flashing scope are not included.
- Exterior remodeling or siding work
- Siding replacement or brickwork tied to flashing is usually outside the scope.
- Permits and fees (unless specified)
- Permit costs are not automatically included; some contractors handle permits as a separate item, or the homeowner arranges them.
- Non-covered damage or conditions
- Damage from hail, storm events, or conditions not observed or caused by flashing itself may be excluded.
- Emergency tarping or temporary stabilization
- Temporary fixes beyond standard scope or expedited emergency services may be offered as add-ons, not included by default.
- Ongoing maintenance plans
- Routine maintenance contracts or long-term service plans are typically optional add-ons rather than included work.
Roofing Materials Commonly Used in Roof Flashing Repair and Installation

- How flashing relates: Asphalt shingle roofs rely on proper flashing at valleys, around chimneys, vent pipes, and where dormers meet the roof plane. Flashing must be fully integrated with the shingle layout to prevent leaks where two surfaces meet.
- What to use and why: Aluminum or galvanized-steel flashings are common. Flexible flashing around penetrations and step flashings along the sides of dormers help seal irregular edges.
- Material-specific tips: When replacing shingles, re-nail and reseal the flashing to maintain a watertight edge. Apply an ice-and-water shield at eaves and valleys if your climate sees freezing temps. Avoid gaps between flashing and shingles; seal gaps with compatible roof sealant only where appropriate.
- Maintenance notes: Inspect around chimneys and vents for loose or lifted flashing and reseal promptly after wind events.

- How flashing relates: Metal roofs rely on continuous or integrated flashings that follow panel seams and terminations. Proper counterflashing and sealant help prevent water from entering at seams, hips, and ridges.
- What to use and why: Seam caps, endwall flashings, and inter-seam flashings are typically made of the same metal as the roof (or a compatible contrasting metal) to avoid galvanic corrosion.
- Material-specific tips: For standing-seam roofs, use factory-cut flashing that conforms to the panel profile. Fastener placement matters—too close to a flashing edge can create leaks. If repainting, pick a sealant compatible with metal finishes.
- Maintenance notes: Check for loose fasteners, paint blisters, and any migration of sealant. Clean debris from underlaps to avoid water pooling near flashings.

- How flashing relates: Tile roofs require flashings that respect tile geometry—headlaps, side laps, and valleys must be flashed with minimal tile breakage and proper drainage.
- What to use and why: Copper or corrosion-resistant aluminum flashings are common, often with counter-flashing to cover the vertical edge where tiles meet a vertical wall or chimney.
- Material-specific tips: Use tile clips or shims to avoid cracking tiles during flashing installation. Ensure the flashing is pitched correctly to shed water and that the sealant is compatible with tile materials.
- Maintenance notes: Look for cracked or displaced tiles near flashings. Repoint or reseal mortar joints as needed to prevent water intrusion around chimney and vent flashings.

- How flashing relates: Slate is brittle; flashings must be precisely cut and installed to avoid cracking shingles while creating a watertight seal at penetrations and terminations.
- What to use and why: Copper or stainless-steel flashings are favored for slate roofs due to durability and low rejection risk from movement.
- Material-specific tips: Use copper counter-flashing where slate meets vertical surfaces. Work carefully to avoid splitting or breaking slate tiles during flashing replacement.
- Maintenance notes: Inspect around chimneys and dormers for loose or displaced slate and flashing; replace damaged slates promptly to preserve the seal.

- How flashing relates: Wood roofs require flexible flashing that moves with the wood while keeping water out at valleys, chimneys, and vents.
- What to use and why: Corrosion-resistant metal flashings (often aluminum or stainless) with proper underlayment. Avoid sealants that trap moisture against wood.
- Material-specific tips: Ensure proper ventilation and avoid forcing flashings beneath tight grooves. Use drip edges and counter-flashing that accommodate wood movement.
- Maintenance notes: Look for leaking at rake edges and around penetrations; treat fasteners to prevent rust and wood rot.
Flat Roofs and Membranes (EPDM, TPO, Aged Modified Bitumen)
- How flashing relates: In flat roofs, flashing is integrated into the membrane system at parapets, drains, and penetrations to create a continuous waterproof plane.
- What to use and why: Pre-formed membrane flashings, self-adhesive base flashings, and compatible sealants designed for EPDM/TPO or bitumen systems.
- Material-specific tips: Ensure seams are fully bonded and not lifted by foot traffic or debris. Use compatible adhesives and primers; never mix incompatible solvents with the membrane.
- Maintenance notes: Inspect around vents and drains for lifted edges; re-adhere or reseal any gaps to maintain a seamless waterproof layer.
Bitumen/Modified Bitumen Roofs
- How flashing relates: Bitumen roofs require flashings that bond well with tar, asphalt, or bitumen surfaces and accommodate expansion and contraction.
- What to use and why: Cold-applied or hot-applied asphalt sealants, compatible metal flashings, and counter-flashing to seal around penetrations.
- Material-specific tips: Use flashings with flexible joints that move with the membrane. Seal edges thoroughly at terminations to prevent water intrusion.
- Maintenance notes: Check for blistering or cracking near flashings after temperature swings and reseal promptly.
Understanding the Cost of Roof Flashing Repair and Installation
Typical average costs for Roof Flashing Repair & Installation
Costs vary by material, area, and roof complexity, but these ranges give a solid baseline:
- Small flashing repair (localized leak fix, resealing seams): $150–$500
- Moderate repair (replacing a section around a vent stack, chimney, or valley): $400–$1,000
- Full flashing replacement (installed per linear foot): Aluminum $8–$15; Copper $20–$40
- Complete transition around chimney, dormer, or roof-to-wall: $400–$1,200 per transition
Note: “per linear foot” reflects both material and labor. Copper or specialty coatings will push toward the higher end.
What influences the price
Understanding the main cost drivers helps you estimate and plan:
- Material choice
- Aluminum or galvanized steel: more cost-friendly
- Copper or zinc: premium materials with higher longevity and aesthetic value
- Roof height, pitch, and accessibility
- Steep or hard-to-reach areas raise labor time and safety gear costs
- Roof complexity
- Valleys, multiple angles, chimneys, dormers, and wall intersections add labor and materials
- Condition of existing flashing and underlayment
- Damaged underlayment or rotten sheathing increases scope
- Local labor rates
- Rates vary by region and contractor experience
- Extent of damage and scope
- Is it a quick reseal, or does it require full removal and replacement of flashing sections?
Cost-saving considerations (less expensive options)
- Reuse and patch
- If existing flashing is intact and properly sealed, a targeted repair can be enough
- Material choice
- Opt for aluminum or standard zinc instead of copper when suitable
- Bundle with other roof work
- Scheduling flashing work alongside shingles, gutters, or vent installs can reduce mobilization
- Schedule wisely
- Dry, mild weather typically speeds work and reduces contingency costs
- DIY precautions
- Minor resealing under supervision may save money, but avoid complex flashing jobs if you're not experienced
Cost-driving considerations that may push the price higher
- Premium materials
- Copper, zinc, or specialty coatings dramatically raise material costs
- High or complex roofs
- Long runs of flashing in awkward locations or around multiple features multiply labor hours
- Extensive damage
- Replacing underlayment, flashing around several penetrations, or repairing roof decking adds to price
- Roof replacement in the same project
- If you're already reroofing, combining flashing work with the new roof may save overall cost but can increase the scope and complexity
- Permit and disposal fees
- Some projects require permits or special disposal for old materials, adding modest costs
Quick estimation steps (to guide discussions with contractors)
1. Measure the linear footage of flashing to be replaced or repaired.
2. Decide on the main material (e.g., aluminum vs copper) and any premium finishes.
3. Assess roof access and complexity (valleys, chimney, dormers).
4. Get at least 3 written estimates that itemize labor, materials, and warranty.
5. Confirm whether underlayment, decking, or ventilation work is included or needed.
How the Roof Flashing Repair and Installation Process Works
1. On-site assessment and plan
A thorough on-site look helps us map out where flashing is needed and how water travels around edges, penetrations, and transitions. We examine the existing flashing over valleys, around chimneys and vents, and along eaves and rake edges. We also note roof type, shingle condition, and any signs of prior leaks.
- Identify all flashing work areas: valleys, chimneys, vent pipes, skylights, and edge flashings
- Check for damaged or missing underlayment and any wood rot behind the flashing
- Confirm materials options and the overall plan, including order of installation and meeting local code requirements
- Establish a realistic timeline based on weather and access
2. Materials selection and preparation
Choosing the right flashing material and sealants is critical for long-lasting performance. We match metal type and thickness to your roof, local climate, and the existing system.
- Common options: aluminum (lightweight), galvanized steel (strong), and copper (premium, long lifespan)
- Sealant and tape choices: compatible roofing sealants, self-adhesive flashing tapes, and butyl mastic where appropriate
- Underlayment and backer materials: ensure smooth, dry surfaces and proper drainage
- Order of operations documented so the crew has a clear plan
3. Safety and site preparation
We secure the work area and plan for weather windows. Safety stays front and center.
- Set up sturdy ladders, anchors, and fall protection as required
- Move or protect nearby shingles and gutters to prevent damage
- Schedule around rain, heavy wind, or extreme heat for best adhesion and safety
4. Removal of damaged flashing and surface prep
Careful removal prevents collateral roof damage and reveals a clean surface for new flashing.
1) Gently pry up the old flashing with hand tools, taking care not to gouge shingles or deck.
2) Clean the area to expose solid substrate; repair any loose or rotten wood.
3) Dry the surface and inspect for hidden issues before proceeding.
5. Install new flashing
We shape and secure the new pieces to create continuous, watertight transitions.
1) Dry-fit first: cut, bend, and test-fit all pieces around penetrations and corners.
2) Install starter and valley pieces, then step flashing up the slope with each course of shingles.
3) Nail with corrosion-resistant fasteners, set with proper spacing, and seal at all seams.
4) Check overlaps and ensure there are no gaps where water could penetrate.
6. Sealing, bonding, and waterproofing
A robust seal and proper bonding keep moisture out long-term.
- Apply roofing-rated sealant along joints, terminations, and fastener heads
- Use self-adhesive flashing tape at critical joints and transitions for extra coverage
- Wipe away excess sealant to prevent staining or staining on shingles
7. Integration with the roof system
Flashing must play well with shingles, counter flashing, and ventilation.
- Reoverlap shingles to shed water over the new flashing
- Install counter flashing where required to cover nail lines
- Seal around penetrations (vents, pipes) to prevent leaks and drafts
8. Final inspection and maintenance guidance
We verify everything is tight and functioning, and share tips to help you preserve the work.
- Perform a close visual inspection and a gentle water test if weather allows
- Check attic space for any signs of moisture after the first rains
- Provide a maintenance plan: periodic inspections, clean gutters, and reseal as needed
Residential vs. Commercial Considerations for Roof Flashing Repair & Installation
Key differences at a glance
- Scale and layout: Residential roofs are typically smaller with more varied pitches; commercial roofs are larger, often flat or low-slope, with complex parapets and multiple penetrations.
- Code and permitting: Commercial projects usually require formal plans, stamped drawings, and stricter permit reviews; residential work tends to be simpler and faster to permit.
- Warranties and maintenance: Commercial flashing work often ties into ongoing maintenance contracts and service-level guarantees; residential warranties vary by product and installer.
- Access and safety: Commercial sites can demand specialized equipment, fall protection, and coordination with tenants; homes are smaller and usually easier to secure, but safety still matters.
Material and flashing types
- Residential flashing: Commonly uses lighter gauges of aluminum or galvanized steel, with step flashing around dormers, skylights, and valleys; counter-flashing installed over base flashing to seal joints; materials chosen to match asphalt shingles or tile.
- Commercial flashing: Uses continuous sheet metal flashings (often galvalume or copper) and integrated curb flashings for hvac, openings, and parapets; larger, more durable pieces designed for long service life on flat or low-slope roofs.
- Compatibility matters: Residential roofs favor flashing solutions compatible with shingles and typical residential underlayments; commercial systems demand compatibility with built-up membranes, TPO/EPDM, or metal decks and ventilations.
Scope and complexity
- Penetrations: Homes commonly have chimneys, skylights, vents, and satellite dishes; businesses may have HVAC curbs, roof drains, mezzanines, and heavy equipment openings.
- Roof geometry: Residential roofs handle steeper pitches and varied angles; commercial roofs contend with wide, flat expanses, parapets, and perimeter channels.
- Drainage considerations: In homes, proper flashing helps shed incidental water around dormers and skylights; in commercial settings, flashing must integrate with extensive drainage plans and parapet cap flashing.
Installation considerations
- Access and staging: Homes allow neighborhood-access approaches and smaller equipment; commercial sites may require large scissor lifts, safety cages, and coordinated shut-downs.
- Safety and codes: Both require fall protection and proper flashing installation, but commercial work often enforces stricter contractor qualification, material specs, and inspection checkpoints.
- Substrate and underlayment: Residential work typically works over standard roof decks with shingle underlayment; commercial work may involve structural decks, insulation boards, and membrane substrates.
Maintenance and inspection frequency
- Residential: Inspect flashing at least twice a year (spring and fall) and after major storms; watch for cracked sealant, lifted shingles, and loose counter-flashing.
- Commercial: Inspections occur more frequently (quarterly or semiannually) and after severe weather, with attention to parapet integrity, drainage blocks, and curb flashings that resist ponding.
- Documentation: Keep maintenance records, as commercial projects often require formal logs for warranty and building management.
Practical tips for homeowners
- Align expectations: Residential flashing should protect shingles and typical roof penetrations; ensure material choices suit your roof type and climate.
- Hire qualified pros: Verify licenses, insurance, and references; ask for product data and warranty terms specific to flashing components.
- Match to the roof system: Choose flashing that complements your roof material (asphalt, tile, metal, or flat membrane) to prevent premature failures.
- Plan for longevity: For installations on aging roofs, consider flashing upgrade together with repairs to avoid repeated access disruptions.
- Warranties matter: Get written warranty coverage that outlines flaws, workmanship, and what maintenance actions could void coverage.
Step-by-step decision checklist
1) Identify roof type and major penetrations (chimneys, vents, skylights, mechanical curbs).
2) Assess whether the project is primarily residential-scale or commercial-scale in scope.
3) Check local code requirements and permit needs for flashing work.
4) Decide on flashing material and style that pair with your roof system and climate.
5) Gather at least two qualified bids and review each proposal's scope, timeline, and warranty terms.
How Roof Flashing Repair and Installation Varies by Location
Flashing is built to protect the strongest seams on your roof, and it reacts to the climate, building codes, and local materials where you live. A flashing detail that's perfect in one city can fail in another if weather patterns, regulations, or typical roofing materials differ. Here's how location changes what you repair or install, and how to plan with your contractor.
Climate and weather patterns
- Freeze-thaw cycles in northern climates push flashing joints to flex and crack. Use corrosion-resistant metals and flexible sealants designed for cold temperatures, plus proper drainage so meltwater doesn't back up.
- Coastal areas with salt spray accelerate corrosion. Opt for stainless steel or copper flashing at critical joints and rinse or inspect more often.
- Extreme heat and UV degrade some sealants over time. Choose UV-stable, high-mlex sealants and compatible flashing materials to maintain a flexible seal.
- Snow-prone regions rely on ice dam prevention. Install adequate drip edges, proper slope, and thermally isolated penetrations to minimize ice buildup at flashing.
Codes, permits, and local requirements
- Building codes and permit rules vary by state, county, and even city. Some places require inspections after flashing work; others allow more streamlined permitting.
- HOA rules can add requirements for flashing color, material, or detailing near visible roof edges.
- In coastal or wildfire-prone zones, there may be extra listings for approved materials or fire-rated underlayment. Always verify the local code and any overlay district rules before starting.
Material choices and installation practices by region
- Underlayment: humid or wet climates benefit from high-performance synthetic underlayment; dry, sunny areas may get standard underlayment with longer service life.
- Flashing metals: coastal and industrial areas may prefer stainless steel or copper for longevity; residential inland areas often use aluminum with sealant compatibility.
- Sealants and tapes: select formulations rated for the local temperature range, humidity, and UV exposure. Replacing incompatible sealants during repair prevents early failures.
- Venting and clearance: higher humidity zones require careful vent placement around roof penetrations to avoid moisture traps near flashing.
Roof design and pitch considerations
- Steeper roofs demand longer, well-seated step flashing and ladder-access safety; valleys on steep roofs need reinforced flashing to resist wind-driven rain.
- Flat or low-slope roofs in wet areas require continuous flashing membranes and more attention to seam sealing at transitions.
- Chimneys, vents, and skylights: in regions with heavy rainfall or snow, extra flashing at these transitions plus proper counter-flashing is crucial to prevent leaks.
Maintenance and inspections by climate
- Regions with seasonal storms or heavy snowfall benefit from more frequent inspections, especially after storms or freeze-thaw events.
- Coastal homes should be inspected annually for salt corrosion and fastener wear.
- Warm, dry climates still require periodic checks for cracking sealants due to heat cycles, but may see longer intervals between major repairs.
How this service varies in different regions in the United States
- Northeast: prepare for ice dam risk; ensure robust metal flashings at eaves and chimneys; use heat-traced or well-insulated penetrations where practical.
- Midwest: hail and wind demand reinforced flashing at valleys and roof-to-wall transitions; prioritize corrosion-resistant fasteners and high-durability sealants.
- Southeast: hurricane and high humidity zones favor corrosion-resistant materials and sealants that tolerate frequent humidity swings and wind-driven rain; consider extra fastener coverage at edges.
- West Coast (coastal): salt exposure near the ocean calls for stainless steel or copper; confirm slip joints and counter-flashing remain watertight with regular inspections.
- West Coast (inland and arid): extreme sun and heat require UV-stable sealants and compatible metals; ensure adequate ventilation to reduce heat buildup behind flashing.
- Mountain West: cold winters with freeze-thaw cycles, plus sun exposure at altitude—choose flexible, temperature-rated materials and ensure proper drainage to curb ice buildup.
- General guidance: always align flashing details with local code requirements and any HOA rules; discuss region-specific products, warranty implications, and maintenance plans with your roofer so your system is built to last in your exact climate.