Ultimate Guide to Hail Damage to Roof
Last updated: Feb 28, 2026
Introduction: Hail Damage to Roofs
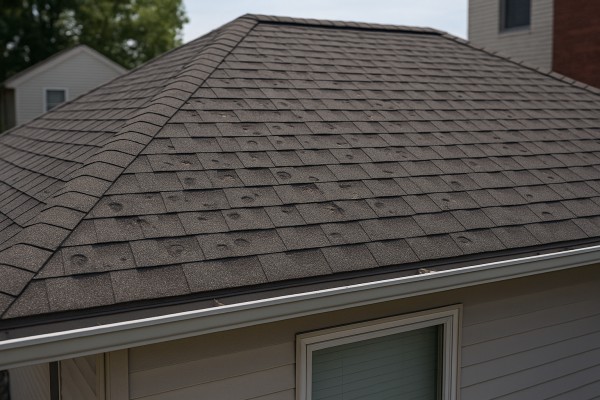
What hail damage looks like
- Dented or bruised asphalt shingles, sometimes with dark, chalky patches where the protective granules have been knocked off.
- Shingle edges that have curled, lifted, or split, exposing softer underlayers.
- Granule loss piling in gutters, downspouts, and the lawn or driveway.
- Dented metal components: vents, flashing, skylights, and metal fascia.
- Small punctures or cracking on softer roofing materials or near penetrations.
- Visible light in the attic or damp spots after a storm.
Is hail damage urgent or common?
Hail is a common consequence of severe weather in many regions, and most damage appears after a big storm. In many cases, hail damage is cosmetic and won't immediately threaten your home's structure. However, it can weaken the roof's long-term performance and, if left unchecked, may lead to leaks or accelerated wear. Here's how to think about urgency:
- Leaks or daylight in the attic: urgent. If you notice water stains or light, address it promptly with temporary protection and professional help.
- Active storms in the area: common, but ongoing exposure can worsen damage; plan inspections after conditions settle.
- No visible leaks but damaged shingles: not an emergency, but should be evaluated to prevent future problems.
- Damaged flashing or metal components: can create leaks or vulnerable seams, worth timely inspection.
Quick checks you can do safely
- From ground level, scan the roof for obvious dents, curled edges, and uneven shingles.
- Inspect gutters and downspouts for an unusual amount of granules or metallic dents in nearby metal parts.
- Check exterior vents, skylights, and flashing for dents or misalignment.
- If you can access the attic safely, look for water stains or daylight peeking through from roof deck gaps.
- Photograph everything you see from multiple angles and distances.
High-level next steps
- Document damage clearly: take wide and close-up photos of shingles, flashing, and gutters, plus any interior signs of leaks.
- Arrange a professional roof inspection: seek a qualified roofer to assess the extent of hail impact beyond what you can see from the ground.
- Get multiple quotes: compare assessments, repair options, and timelines to understand your choices.
- Check your coverage: review your homeowner's policy for wind/hail damage, depreciation, and claim procedures.
- Plan for repairs or replacement: based on the inspector's report, outline a restoration plan, budget, and timeline.
Is Hail Damage to Your Roof an Emergency?
Urgency indicators
Hail damage isn't always a full-blown emergency, but certain signs demand immediate action to protect your home and safety. Use these cues to judge how fast you should respond.
- Call a roofer immediately if
- Water is actively dripping into the living space, attic, or along ceiling lines after a hail event
- Visible daylight or roofing underlayment shows through the roof decking from inside the attic
- Large or multiple shingles are loose, torn, or missing and wind is still a factor
- There is sagging roof sections, cracking fascia, or exposed structural components
- You notice damage to skylights, vents, or flashing that could let water in quickly
- Monitor if
- It's raining lightly or you have a brief shower but no active leaks in the living spaces
- The roof shows dented or misshapen shingles but you don't see water intrusion yet
- Weather forecasts predict a window of dry days and you can arrange an inspection soon
- Can wait if
- Damage appears cosmetic (pitted dents, granule loss) and there's no evidence of leaks or interior dampness
- Your attic remains dry after rainfall and there are no stains or musty odors
- You can schedule a professional roof inspection for the next available daylight period without risk of further water intrusion
If you suspect hail damage, prioritize safety and loss prevention. Do not climb on a potentially damaged roof during or after a storm. Use these steps to minimize further damage until a roofer can assess.
- Protect interior spaces
- Place buckets under any active leaks
- Move valuables away from damp walls or ceilings
- If you can do so safely, cover damaged interior areas with tarps from the inside to reduce further water exposure
- Protect the exterior
- Avoid stepping on damaged shingles; they can break and create more leaks
- If you can access the roof safely, loosely cover large holes with a tarp secured at edges that won't be ripped off by wind
- Document damage
- Take clear photos of dented shingles, broken flashing, gutters, siding, and any exposed underlayment
- Photograph the surrounding area: hail size, storm duration, and weather conditions
Steps you can take now (simple, practical)
1) Assess quickly from ground level with binoculars or a sturdy ladder under safe conditions
2) Note the most exposed areas: ridge line, valleys, and vents are common trouble spots
3) Contact a licensed roofer to perform an inspection as soon as feasible
4) Check with your insurance adjuster about what counts as hail damage and required documentation
Why timing matters
Hail damage can worsen with subsequent storms. Early intervention can prevent interior water damage, reduce mold risk, and support a smoother insurance claim. If you're unsure, err on the side of caution and get a professional assessment soon after the storm passes.
Common Causes of Hail Damage to Roofs
Hail Size, Velocity, and Impact Energy
- The energy of a hail strike rises with the size of the hailstone. Larger hail causes more acute damage per hit and can punch through protective layers more easily.
- Wind speed behind or around the storm can accelerate hail as it lands, increasing impact force on the roof surface.
- The angle of impact matters. Sloped surfaces often take hits at varying angles, concentrating damage on edges, ridges, and the lower edges of shingles.
Roof Material Vulnerabilities
- Asphalt shingles: Hail can crack surface granules, bruise the shingle backing, or puncture weaker spots, leading to accelerated aging and granule loss.
- Metal roofs: Dents, creases, and reduced ability to shed water can occur even if the surface looks intact from the ground.
- Clay or concrete tiles: These are brittle and prone to cracking or breaking when hit by large hailstones.
- Wood shingles/shakes: Bruising and split fibers can occur, creating pathways for water intrusion.
- Composite or synthetic roofing: Depending on composition, hail can deform the surface, fracture embedded granules, or reveal underlying layers.
Age, Condition, and Fatigue
- Older roofs with worn granules or curling shingles offer less protection and are more susceptible to hail-induced penetration.
- Existing gaps, loose fasteners, or lifting shingles create weak points where hail is more likely to cause damage.
- Prior repairs can shift load distribution, causing new damage patterns when hit by hail.
Roof Pitch, Shape, and Exposure
- Steeper pitches can deflect a portion of hail impact, but they also present more edge areas that can be vulnerable to damage.
- Flat or low-slope roofs sometimes experience more concentrated impact in certain zones, especially near skylights, vents, or flashing.
- Roofs with complex features (dormers, valleys, and transitions) present more surfaces and seams for hail to target.
Surroundings, Shielding, and Wind Patterns
- Open, unobstructed exposures (high, coastal, or prairie locations) catch more wind-driven hail and can suffer widespread damage.
- Nearby trees, satellite dishes, vents, and parapets can alter wind flow and strike angles, creating localized damage hotspots.
- Large neighboring structures, chimneys, or tall landscaping can shield parts of the roof while leaving other sections more exposed.
Installation Quality and Maintenance Practices
- Improper shingle nailing, missing or loose fasteners, and damaged flashing increase vulnerability by creating entry points for water after hail strikes.
- Poor installation on valleys, ridges, or around penetrations can cause pre-existing weaknesses that hail exploits.
- Clogged or damaged gutters and downspouts can cause water to back up near the roof edge, aggravating damage once a leak starts.
Weather Patterns and Storm Intensity
- Regions with frequent severe thunderstorms produce more opportunities for hail-related damage over a roof's lifetime.
- Hailstorms spanning multiple minutes or moving across the roof in bands can create uneven wear, with some zones sustaining heavier damage.
Short- and Long-Term Consequences
- Immediate: visible dents, punctures, or granule loss; hail-related cracks in sealant or coatings.
- Long-term: accelerated aging, higher likelihood of leaks, and reduced roof life if hail damage is not addressed.
If you're assessing risk factors for your home, keep these common causes in mind:
- The combination of hail size and strike energy with your roof's material and age.
- How your roof's slope, shape, and exposure influence damage patterns.
- The role of installation quality and ongoing maintenance in resisting hail events.
How Roof Materials Affect Hail Damage to Your Roof

- How hail acts: Hail can bruise, gouge, or puncture the surface. The fiberglass core and asphalt coating absorb impact differently, and a severe hit can loosen granules, speeding UV damage.
- What you'll see: Dented, darkened spots; shiny dents where the granules are dislodged; granule loss in gutters or on the lawn; curling edges in older shingles.
- Durability note: Fiberglass shingles generally have better impact resistance than the older organic type, but size, hail velocity, and angle matter a lot.
- Maintenance implications: Look for exposed asphalt or exposed felt, which signals higher risk of leaks. If many shingles are damaged, you may need repairs or a section replacement; isolated bruising may not threaten immediate integrity.
- Practical tip: After a storm, inspect from the ground or with binoculars, and schedule a roof inspection if you notice unusual granule shedding or spots that look bare.

- How hail acts: Hail often leaves dents and scuffs on metal surfaces. Heavier gauge metal resists denting, but even thick panels can show round dents.
- What you'll see: Dents along the panels, sometimes scratches in the coating, possible color chipping at impact points; fasteners and seals can also be affected over time.
- Durability note: Metal roofs hold up well to hail compared with many other materials, and leaks are less likely unless a panel is punctured or a seam is compromised.
- Maintenance implications: Inspect for dented panels and any lost coating; reseal or replace damaged panels as needed to maintain weather-tightness.
- Practical tip: If you see many new dents or suspect coating damage, have a pro assess whether sealants and flashing need attention.
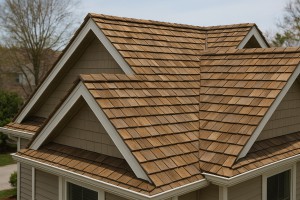
- How hail acts: Cedar is softer than metal or tile and can crack or split on impact, especially on exposed edges or thinner shakes.
- What you'll see: Hairline cracks, splits, or chunks missing from shingles; some damage may not be visible from the ground but can lead to leaks later.
- Durability note: Once cracked or split, cedar is prone to water intrusion and rot, so damaged sections often require replacement rather than patching.
- Maintenance implications: Damaged sections may need to be replaced to preserve rain protection; nearby shingles can be pried up more easily during repairs.
- Practical tip: Inspect for cracking near valleys, edges, and exposed ridges; consider a professional assessment if you suspect widespread damage.

- How hail acts: Tiles are heavy and brittle; hail can crack or break individual tiles, or chip edges and corners.
- What you'll see: Visible cracks or broken tiles; displaced tiles can leave gaps that let water reach underlayment.
- Durability note: Tile systems resist surface wear well, but individual tiles can fail without visible mass damage elsewhere.
- Maintenance implications: Missing or cracked tiles should be replaced promptly to prevent leaks and further tile breakage.
- Practical tip: Pay attention to roof-level gutters and downspouts for broken tile fragments after a storm.

- How hail acts: Slate is extremely durable but brittle; large hail can crack or shatter individual slates, especially near edges and ridges.
- What you'll see: Cracked, chipped, or displaced slates; scattered debris in gutters.
- Durability note: Slate repairs can be specialized and costly; damage may require targeted replacement rather than full roof overhaul.
- Maintenance implications: Check for cracks around fasteners and at joints; damaged slates should be replaced to maintain watertightness.
- Practical tip: If you notice a pattern of new cracks after a hail event, call a slate specialist for a precise assessment.
EPDM Rubber and Other Flat Roofing Materials
- How hail acts: Punctures and tears are possible, especially on older or thinner membranes; hail can compromise seams.
- What you'll see: Puncture marks, bubbles, or small tears; water intrusion risk along seams and flashings.
- Durability note: Typical single-ply membranes can resist light hail but are more vulnerable to heavy hail.
- Maintenance implications: Damaged areas often require patching or membrane replacement; check around penetrations and flashings.
- Practical tip: After hail, inspect the surface for any telltale punctures and schedule a leak-check if you see water spots inside.
After a hail event: quick inspection steps
1. Safety first: avoid climbing on a damaged roof; use binoculars or a professional inspection.
2. Ground level check: look for missing shingles, cracked tiles, or dented metal from the yard.
3. Gutter and downspout check: collect granules, tile fragments, or metal shavings.
4. Photo log: document damaged areas with clear photos from multiple angles.
5. Insurance and roofer: contact your insurer and a licensed roofer for an on-roof assessment if damage is suspected.
The Risks of Ignoring Hail Damage to Your Roof
Hidden damage that isn't obvious
Hail can leave more behind than visible dents. Surface damage is only part of the story, and the real trouble often hides in the layers you can't see from ground level.
- Granule loss from hail exposure speeds aging of asphalt shingles, reducing UV protection and shortening life.
- Hairline cracks and loosened tabs can develop, providing easy entry points for rain during storms.
- Damage to underlayment or the roof deck can weaken the roof's overall structure, making future leaks more likely.
- Flashing, valleys, and penetrations (vents, skylights, chimneys) can be bent or displaced, directing water into the attic.
- Dented metal components (vents, flashing, edges) can lose their seal and invite moisture intrusion, even if the surface looks “okay.”
Water intrusion and moisture risks
Water is sly and will exploit even small openings left by hail. If moisture gets behind the shingles, you may not notice until damage is well underway.
- Hidden leaks in the attic can soak insulation, reducing its effectiveness and promoting mold growth.
- Ceiling stains, warped drywall, or musty odors can be the first visible signs of a hidden leak.
- Elevated humidity in living spaces can lead to wood rot, peeling paint, and compromised indoor air quality.
Structural and deck deterioration
Over time, what appears minor can translate into structural wear that weakens the roof system.
- Damaged shingles and compromised underlayment can allow water to reach the roof deck, accelerating rot and decay.
- Soft spots or sagging areas on the roof deck weaken the surface and may lead to localized failure under heavy snow, wind, or foot traffic during repairs.
- Repeated hail impacts can loosen nails and fasteners, increasing the likelihood of shingles lifting or buckling in windy conditions.
Increased energy costs and comfort issues
Damage that disrupts the roof's ability to seal and insulate can raise energy bills and reduce comfort.
- Air leaks around damaged penetrations or bent flashing can let conditioned air escape, forcing your HVAC system to work harder.
- Moisture intrusion can compromise insulation performance, reducing thermal efficiency and contributing to drafty rooms.
Insurance and financial risk
Ignoring hail damage can complicate insurance recovery and lead to bigger out-of-pocket costs later.
- Some policies require prompt reporting; delaying a claim can complicate coverage or reduce payout eligibility.
- Progressive damage may be treated as new deterioration rather than storm-related, affecting repair options and costs.
- If repairs are postponed, you may face more extensive, expensive fixes down the line rather than a targeted, timely replacement.
Safety risks to you and your property
Deterioration from hail damage isn't just a future concern—it can pose immediate hazards.
- Loose or lifted shingles can blow off during subsequent storms, posing risks to people, vehicles, and landscaping below.
- Water intrusion can create slippery conditions on attic surfaces and lead to mold, which poses health risks over time.
- In cold climates, compromised flashing and underlayment contribute to ice dam formation, which drives water under the roof edge and into walls.
What to monitor after a hail event (quick checklist)
- Look for granule buildup in gutters and downspouts.
- Check for new or enlarged dents on shingles, vents, and flashing from ground level.
- Inspect the attic for signs of moisture, staining, or a musty smell after a dry spell.
- Note any ceiling stains or seepage spots in living spaces.
- Photograph any areas of concern for documentation before arranging a professional assessment.
Steps you can take to assess and protect (optional guidance)
1) Do a careful, safe exterior inspection from the ground; use a ladder with a helper if needed.
2) Mark and photograph suspect areas for reference.
3) Schedule a professional roof inspection with a licensed contractor to confirm hidden damage.
4) Have the contractor assess flashing, underlayment, and deck integrity, not just surface shingles.
5) If needed, obtain estimates for repair or replacement to preserve roof performance and home value.
Diagnosing Hail Damage to a Roof
Ground-level indicators
From the curb or your yard, you can spot some signs of hail damage, especially on darker shingles or newer roofs. Look for patterns or irregularities that don't belong, such as clusters of pitted marks or missing granules along the roof edge. Also note any granules collected in gutters, downspouts, or on the ground near the drip edge. Dented metal components you can see from below—like vents, flashing, or the chimney cap—are a red flag that hail may have struck higher up.
- Discolored or bruised looking shingles
- Shingle edges that are cracked, curled, or lifted
- Granule loss concentrated in certain areas
- Dented metal flashings, vents, or statues of vent pipes
- Excessive granules in gutters within a short time after a storm
Close-up roof examination (safety first)
If you decide to inspect up close, prioritize safety. Use a sturdy ladder, wear non-slip shoes, and avoid steep pitches or damaged sections. Work with a partner if possible. Look for more detailed signs that aren't obvious from the ground.
- Soft, dent-like impressions on shingles when you press lightly
- Cracks or fractures in single shingles or in the protective top layer
- Missing shingles or shingles that don't lay flat
- Granule embedment (granules stuck into the asphalt surface)
- Damage to flashing around dormers, chimneys, vents, and skylights
Attic and interior clues
Hail damage can show up inside the home, sometimes before you see obvious roof damage. Inspect the attic for signs of water intrusion or moisture that wasn't present before.
- Damp insulation or ceiling stains near the peak or penetrations
- Dark spots or streaks on attic sheathing that suggest water infiltration
- Light leakage around penetrations when you're in a dim attic with the outside light on
- Unusual musty smell or new mold growth after a storm
Documenting your findings
Good documentation helps a claim or repair plan move smoothly. Take clear photos from multiple angles, including close-ups of any bruising or missing granules, and wider shots that show the affected area in context.
- Photos of suspected hits on shingles, vents, and flashing
- Photos of gutters, downspouts, and yard where granules collected
- Date of storm, location, and estimated hail size if known
- Short notes describing where each photo was taken
Professional assessment: what to expect (step-by-step)
A roofer or adjuster will typically follow a systematic inspection to verify damage and determine repair needs.
1) Exterior walk-around from ground level and rooftop access if safe
2) Mapping of hail hits and damage severity by roof section
3) Material and component inspection (shingles, flashing, vents, valleys)
4) Moisture assessment using a moisture meter and, if needed, infrared scans
5) Evaluation of attic and interior indicators to confirm leaks
6) A repair or replacement recommendation with an itemized estimate
Timing and reliability of signs
Hail damage isn't always obvious right away. Some hits only show up after days or weeks, especially if granules were displaced but not immediately leaking.
- Immediate leaks aren't guaranteed after a hail event
- Subtle bruising can weaken shingles over time, leading to failure later
- Wind-driven hail may affect different roof areas than obvious hail hits
When damage is questionable
If you're unsure, schedule a professional inspection. A trained eye can distinguish hail damage from wear and tear, misalignment, or manufacturing defects, and they'll document findings clearly for repair planning or insurance purposes.
Repair Options for Hail-Damaged Roofs
Temporary fixes
Right after a hail event, prioritize safety and prevention of further leaks. You can buy time before a full repair plan is in place.
- Safety check: Avoid walking on a damaged roof. Use binoculars from the ground to assess where damage is concentrated.
- Cover leaks: If water is actively entering, lay a heavy-duty tarp or durable plastic over the affected area and weight down the edges with bricks or rocks to keep it in place.
- Seal small gaps: Apply roofing cement or exterior-rated sealant to exposed gaps or loose shingles as a short-term stopgap, not a permanent fix.
- Clear the path: Keep gutters and downspouts free of hail debris to prevent backups that worsen leaks.
- Document for insurance: Take clear photos from multiple angles, including the attic if you can access it, and note the date and location of impacts.
- Plan a professional assessment: Schedule an inspection as soon as you can, especially if weather forecasts suggest more hail risk.
Minor repairs
Localized damage can often be handled without a full roof replacement, provided the damage is limited and the underlayment remains sound.
- Identify the damage: Focus on cracked, dented, or loose shingles, or small lifted tabs in a single area.
- Gather your materials: Replacement shingles that match your roof type, roofing nails, a pry bar, utility knife, and roofing cement.
- Remove damaged material: Gently lift the surrounding shingles and pry out the old nails. Take care not to tear adjacent tabs.
- Install the replacement piece: Cut the replacement shingle to fit, slide it into place, and drive nails at the correct location, usually under the tab above.
- Seal and secure: Apply a bead of roofing cement under the tab and along the edges to seal gaps; press the replacement shingle snugly against its neighbors.
- Check the surrounding area: Ensure neighboring shingles aren't loosened, and reseal any small gaps you notice.
- Inspect after rain: Monitor for any new leaks during the next few storms and note if additional repairs are needed.
Partial replacement
When hail damage is concentrated over a broader swath or beneath the surface layers, a partial replacement can restore protection without a complete overhaul.
- Assess extent with a pro: A roofing professional evaluates damage to shingles, underlayment, and, importantly, the decking in the affected zone.
- Remove the damaged section: Strip away the damaged shingles and underlayment in the affected run or bays.
- Inspect and repair decking: If the plywood or OSB decking shows rot or soft spots, replace those sections before continuing.
- Install new materials: Lay down new underlayment, apply ice and water shield where appropriate, and install matching shingles.
- Integrate with the rest of the roof: Pay attention to flashing at valleys, chimneys, and transitions to ensure watertight seams.
- Final seal and test: Seal joints, reseal flashing, and perform a water test if the contractor recommends it.
- Documentation: Photograph the repair area and note any deviations in color or texture for blending purposes.
Full roof replacement
Extensive hail damage, aging shingles, or widespread granule loss often warrants a full roof replacement for durable, long-term protection.
- Material and design choice: Decide on shingle type (e.g., architectural, dimensional, or 3-tab), color, and warranty. Consider upgrades like better impact resistance and upgraded underlayment.
- Permits and scheduling: Check local permit requirements and coordinate a start date that minimizes exposure to weather.
- Tear-off process: Remove all existing roofing layers down to the decking, examining for damage beneath. Dispose of debris safely.
- Deck assessment and repair: Replace any rotten or damaged decking; ensure a solid, plumb surface for the new roof.
- Install core protections: Lay down a high-quality underlayment and ice-and-water shield in vulnerable areas (valleys, eaves, and around penetrations).
- Shingle installation: Nail patterns, proper ventilation, and flashing installation are key. Install shingles in the manufacturer's specified sequence to avoid wind uplift and leaks.
- Flashing, vents, and accessories: Replace kick-out flashing, step flashing, vent boots, and chimney terminals as needed; seal all penetrations.
- Cleanup and final check: Remove all debris, reattach gutters as required, and perform a thorough inspection for loose nails or exposed fasteners.
- Warranty and inspection: Review workmanship and product warranties; schedule a follow-up inspection to confirm performance after weather events.
Typical Costs to Fix Hail Damage to a Roof
Minor repair description and cost
Small hail hits can crack or loosen a few shingles, cause minor granule loss, or create a tiny drip around flashing. The aim is to stop any active leaks and stabilize the area without touching a large section of the roof.
- What it covers: Replace 1–5 damaged shingles, secure loose edges, reseal flashing, and address minor granule loss.
- Typical steps: Inspect the area, remove damaged shingles, install new ones, re-nail as needed, reseal around penetrations.
- Typical cost: $150–$600.
Moderate repair description and cost
Moderate hail damage affects a larger patch of shingles, requires more flashing work, and may need minor underlayment repair. You'll likely see a noticeable patch but still avoid a full roof lift.
- What it covers: Replacing roughly 6–20 shingles, repairing or resealing flashing, checking and patching underlayment if needed.
- Typical steps: Confirm scope, remove damaged shingles, replace with matching material, reflash and reseal, perform a basic leak test.
- Typical cost: $600–$2,200.
Major repair description and cost
Major repairs come from widespread impact, multiple damaged areas, or compromised underlayment or decking. This level of damage often signals substantial work to restore long-term roof performance.
- What it covers: Large-area shingle replacement, underlayment patching, possible decking repairs, full flashing replacement around penetrations.
- Typical steps: Establish patch plan, remove damaged sections, replace underlayment as needed, re-shingle and seal, replace vent/pipe flashings, perform thorough leak testing.
- Typical cost: $2,400–$8,000. Note: with premium materials (metal, tile) or significant decking damage, costs can climb higher and may approach a full roof replacement.
What factors affect cost
- Roof size
- Larger roofs require more materials and labor; cost scales with area.
- Access
- Steep pitches, tall buildings, or tight spaces increase labor time and safety gear needs.
- Material type
- Asphalt shingles are generally the cheapest to repair; tile, slate, and metal can cost more to match and install.
- Extent of damage
- More damaged shingles, exposed underlayment, or decking drive up labor and material costs.
- Local labor rates
- Regional pricing variations, contractor demand, and seasonality affect final quotes.
How Long Can You Wait to Address Hail Damage to Your Roof?
Do these steps now to limit further damage and keep insurance on track.
- Document damage with clear photos and notes (date, storm location, visible issues).
- Put a temporary tarp or plastic sheeting on any active leaks or exposed decking, if you can do so safely.
- Keep interior spaces protected: place buckets under leaks, move valuables away from water intrusion, and ventilate the attic if safe.
- Do not attempt major roof repairs yourself unless you're trained and equipped for the job.
Emergency window (0-48 hours)
What happens if you wait
- Leaks can spread quickly from the attic to ceilings, walls, and insulation, making the problem harder to fix later.
- Wet insulation loses effectiveness, driving higher energy bills and reducing comfort.
- Moisture in the attic increases the risk of mold growth, which can affect indoor air quality and require longer remediation.
- Wind-driven water can pry up loose shingles or flashing, expanding the damaged area.
What to do
- Prioritize stopping the water: use a tarp or heavy-duty plastic over the affected area, secured by bricks or weights if safe.
- Avoid exposure to electrical systems or outlets near water entry points.
- Photograph every sign of intrusion after a storm event to document conditions.
Short-term window (2-7 days)
What happens if you wait
- Interior staining and occupant odor from damp ceilings become more noticeable.
- Wet decking and underlayment may start to sag or delaminate, signaling broader structural risk.
- If a claim is filed later, the insurer may scrutinize the timing of notice and repair actions.
What to do
- Schedule a professional roof inspection as soon as possible.
- Request a temporary repair plan from the roofer (covering, tarping, plywood protection) to limit further damage.
- Keep receipts for any temporary fixes and related supplies.
Near-term window (1-4 weeks)
What happens if you wait
- Hidden rot can begin in the roof deck, increasing the chance of rapid deterioration with subsequent weather events.
- Plywood sheathing and attic ventilation components may suffer, compromising long-term roof performance.
- More extensive interior damage could appear during rainier periods or storms.
What to do
- Obtain formal repair or replacement estimates from licensed roofing contractors.
- Confirm the scope includes deck, underlayment, flashing, and reframing if needed.
- Notify your insurer of ongoing issues and attach up-to-date photos and notes.
Mid-term window (1-3 months)
What happens if you wait
- Prolonged moisture access to the roof system can lead to significant structural concerns and costly remediation.
- Mold and mildew risks rise in occupied spaces, potentially requiring remediation in addition to roof work.
- Insurance claim decisions or investigations can become more complex if damage appears well after the storm.
What to do
- Engage a licensed roofer to perform a comprehensive assessment and provide a written repair plan.
- Keep a detailed file of all communications, photos, inspections, and bids.
- Begin coordinating scheduling for permanent repairs before the next severe weather season.
Long-term window (3+ months)
What happens if you wait
- Major damage such as rotten decking, warped rafters, or failed flashing becomes likely, often leading to a full roof replacement.
- Interior damage and mold remediation costs can skyrocket.
- Delayed repair can complicate insurance coverage, reduce claim viability, or extend warranty issues.
What to do
- If you haven't already, secure a full inspection and written restoration plan from a licensed contractor.
- Prepare for a comprehensive replacement if damage is extensive.
- Reassess roof maintenance needs and address any other hail-damaged components (siding, gutters, vents).
Next steps to keep on track
1) Open and respond to your insurance claim promptly; document all communications.
2) Schedule a licensed roofer for a thorough inspection and written estimate.
3) Obtain a temporary repair plan and timeline from the contractor.
4) Maintain a damage log with dates, photos, and repair actions.
5) Review policy language on hail damage and any applicable deductibles or claim requirements.
How Hail Damage Varies by Location and Climate
How This Problem Varies by Region & Climate within the United States
- Hail frequency and size differ dramatically by region. In the U.S., you'll hear about the “hail alley” in the Front Range of Colorado and nearby areas, where storms routinely produce large hail. Other regions see hail less often or with smaller sizes, which still warrants attention but isn't as high risk.
- Regional patterns to know:
- Hail Alley (Colorado Front Range, parts of Wyoming, Nebraska, Kansas, and New Mexico): High frequency of hail, often large (golf ball to softball). Damage to asphalt shingles, vents, skylights, and gutters is common.
- Midwest & Great Plains (Texas Panhandle through Nebraska and parts of the Dakotas): Regular hail events with a mix of sizes; strong winds can bend flashing and dent metal edging.
- Southeast & Gulf Coast: Thundery summer storms bring hail, but size varies; coastal exposure adds salt and humidity that affect repairs and coatings.
- Northeast & Pacific Northwest: Hail occurs in strong storms; less frequent than the hail alley but can be damaging to low-slope and flat roofs, skylights, and solar panels in sunny spells after storms.
- Climate factors that change risk:
- Temperature extremes: Hot summers accelerate aging of shingles, making hail damage more apparent or progressive.
- Storm season length: Longer or more intense storm seasons mean more opportunities for hail to strike.
- Roof orientation and pitch: Steeper roofs shed hail more readily, but hard impacts on edges or overhangs still cause leaks.
- Materials in use: Asphalt shingles are common but bruise easily; metal roofs resist dents but need proper sealants; tile or clay can crack on impact; newer synthetic products may offer different resilience.
- Surroundings: Urban canyons and tree cover alter wind patterns and hail trajectories; coastal areas face corrosion considerations after hail hits.
1) In hail-prone regions, expect more granule loss and potential underlayment damage; plan for more frequent inspections after storms.
2) In mixed-prone areas, inspect for edge damage, flashing leaks, and gutter denting; pay attention to attic insulation and ventilation signs of leaks.
3) In coastal climates, check for corrosion-prone fasteners and sealants; consider materials with coastal-grade finishes for future replacements.
- Quick homeowner check after a hail event:
- Look for bruises, dimples, and missing granules on shingles.
- Inspect flashing around chimneys, vent stacks, and skylights.
- Examine gutters for denting or cracking; note any interior staining indicating leaks.
- Material expectations by region:
- Asphalt shingles: Common and affordable, but bruising shows quickly in hail-prone regions; consider impact-resistant options if you're in the hail alley or similar risk.
- Metal roofs: Durable against impact but require proper detailing at seams and fasteners; easier to inspect after storms in open regions but can dent on edges.
- Tile or clay: Heavier and prone to cracking on direct impact; replacement can be more involved in arid or hot climates where movement is common.
- Synthetic/composite: Often engineered for impact resistance; performance varies by product line and climate exposure.