Ultimate Guide to Reused Flashing
Last updated: Feb 28, 2026
Introduction to Reused Flashing
Reused flashing refers to metal flashing pieces that have been removed from another roof or project and installed again on a new roof, patch, or vent. It can save money upfront, but it also carries risks that become leaks or wind damage if not handled correctly. For homeowners, understanding what you're buying and how it should be installed is the difference between a durable patch and a repeat call for leaks.
What reused flashing is and where it shows up
- Pieces pulled from an older roof and reinstalled on a new one, rather than using brand-new flashing.
- Counter-flashing or drip edge that's been trimmed and re-seated.
- Metal segments cut from one area and fitted into another location, often around vents, chimneys, or valleys.
- Sometimes used to patch a roof temporarily, with the expectation of a future full replacement.
This approach can appear tempting on a tight budget, but it changes the quality control equation: you're relying on pieces that carried their own wear and corrosion into a new setting.
Is reused flashing common or urgent?
- Common in budget renovations or small scope repairs where a tradesperson wants to save material cost.
- Not inherently dangerous if the reused pieces are in excellent condition and correctly installed.
- Potential for hidden problems: corrosion, bent edges, mismatched thickness, improper overlaps, or sealant breakdown.
- Urgency depends on conditions: active leaks, visible rust, or loose flashing require prompt attention; otherwise, it's a scenario to assess carefully before proceeding.
How to tell if reused flashing is a problem
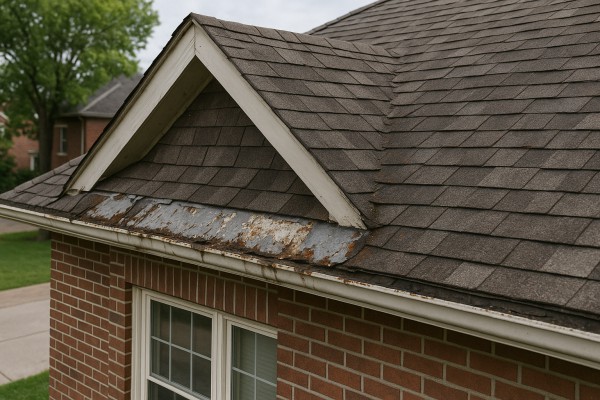
- Signs of corrosion, pitting, or rust on metal that's supposed to shed water.
- Dented or bent edges that don't lay flat against the roof plane.
- Gaps, gaps, or poor overlaps where water can weep behind the flashing.
- Loose or missing fasteners, or nails that aren't driven securely.
- Mismatched materials or finishes that don't match the surrounding roof, which can lead to inconsistent expansion and contraction.
- Cracked or degraded sealant around joints, vents, or chimney bases.
- Evidence of previous repairs or patches that don't align with the current roof design.
High-level next steps
1) Do a careful initial assessment from ground level and, if safe, from the roof edge during daylight. Look for obvious gaps, rust, or loose sections. Do not walk on a questionable roof if you're unsure of safety.
2) Schedule a professional inspection focused on the flashing and surrounding transitions (vent pipes, chimneys, valleys, and edges). Ask the contractor to confirm:
- Whether the reused pieces are in good condition and appropriately sized.
- If overlaps and seams are proper for your roof type.
- Whether corrosion or wear compromises the warranty or long-term performance.
3) Decide between repair or replacement based on condition:
- If the reused pieces show significant corrosion, bending, or poor fit, replacement with new flashing is usually prudent.
- If only small sections are affected and the rest is pristine, selective repair might be acceptable.
4) If replacement is chosen, ensure proper installation:
- Use flashing that matches the roof type (and profile: step flashing for shingles, continuous for metal roofs, etc.).
- Confirm correct overlaps, sealant compatibility, and the sequence with underlayment and counter-flashing.
- Inspect fasteners for proper corrosion resistance and correct length.
5) Verify warranty and code compliance:
- Ensure the flashing materials meet local codes and roof system requirements.
- Check that any work with reused components is documented and backed by warranty terms from the installer.
Quick considerations for homeowners
- Reused flashing isn't automatically bad, but it requires careful evaluation of condition and compatibility.
- The safest approach often hinges on condition more than origin. If in doubt, lean toward new flashing for critical roof-to-sky interfaces.
Is Reused Flashing an Emergency?
Quick assessment: Is this an emergency?
- Call a roofer immediately if:
- There is active water intrusion inside the home after rain (visible leaks, staining on ceilings, or damp insulation)
- The flashing around a chimney, vent, or valley is visibly loose, torn, buckling, or missing sections
- You hear persistent dripping or see water beads running down walls from the roof line
- There is mold, musty odor, or damp drywall near the roof or attic
- You notice rapid rust or sharp edges exposed at the flashing seams, indicating structural compromise
- Monitor if:
- It's recently rained but interior spaces remain dry for the moment
- The exterior flashing shows slight movement or minor lifting but no active leaks
- Weather promises a dry spell and you have time to plan a professional assessment
- You can safely observe from inside the attic with the roof closed and no climbing required
- Can wait if:
- There has been no leakage in several storms and the interior remains dry
- The flashing is older and shows minor cosmetic wear but no leaks or staining
- You're scheduling a repair during a planned reroof or major project and can coordinate timing with a roofer
1. Prioritize safety
- Do not climb onto a wet roof. If you must inspect, use proper fall protection and a sturdy ladder. When in doubt, step back and call for professional help.
2. Contain and divert water
- Place a bucket or bin under the drip to keep interior damage to a minimum.
- Use plastic sheeting or a tarp only if you can do so safely from ground level or with roof access provided by a pro.
3. Protect interiors and belongings
- Move valuables away from the affected area and place towels or plastic over furniture and carpet to reduce moisture absorption.
4. Document the damage
- Take clear photos from multiple angles (interior and exterior) to share with your roofer or insurance.
5. Check for signs in the attic
- Look for damp insulation, stained wood, or light shining through gaps around flashing. Note the exact locations for the contractor.
6. Plan for a professional assessment
- If you're in the “monitor” or “can wait” categories, schedule a roof inspection as soon as possible, especially before the next storm.
Why reused flashing is riskier
- Reused flashing can be corroded, bent, or unevenly seated, creating gaps at seams that admit water.
- Old sealant or butyl tapes degrade over time, increasing the chance of leaks after wind, rain, or freeze-thaw cycles.
- Improperly overlapped joints or mismatched flashing types raise the likelihood of leaks at corners, valleys, and penetrations.
- Visual cues (rust, peeling paint at joints, loose nails, or gaps behind the flap) often indicate it's time for replacement rather than reuse.
How a roofer evaluates urgency
- A professional checks for active leaks, test-sheets the attic for moisture, and inspects the integrity of all flashing joints.
- They determine whether temporary containment is enough or if immediate flashing replacement is required to prevent further damage.
- They'll assess weather forecasts and advise on whether a temporary cover is feasible or if an immediate repair is necessary.
Quick reminders for homeowners
- Reused flashing can save money upfront but often shifts risk to later leaks and structural rot.
- If you're uncertain, treat any suspicious moisture as an emergency and call a roofer. It's safer to err on the side of caution with potential roof leaks.
- A timely professional inspection can prevent small issues from becoming costly repairs.
Common Causes of Reused Flashing
Budget-Driven Reuse
- When price is tight, some crews reuse flashing from older jobs or salvage piles instead of buying new.
- Salvaged pieces may look okay but hide bowing, corrosion, or stress cracks that worsen after install.
- Different roofs or sections get different flashing; patching in mismatched pieces creates weak seams.
Improper Removal and Reinstallation
- Flashing is bent, torn, or deformed during removal and then snapped back into place without proper reshaping.
- Seams aren't realigned, and joints aren't properly sealed, so gaps open up after weathering.
- Old fasteners are reused or left in place, which can fail to hold new sealants or flashings properly.
Material Compatibility and Degradation
- Reused flashing may be different metals (aluminum, copper, steel) that react galvanically in contact with each other or with fasteners.
- Thickness and bend radii may not match the new roof details, leading to stress cracks at corners and edges.
- Corrosion, pitting, or brittle corners can be invisible until leaks appear after a season or two.
Aging and Weathering
- Even if the surface looks fine, aging seals, worn benched edges, and degraded but unseen underlayers weaken performance.
- Old nail holes, scars, or pre-existing leaks create weak points that reappear when the roof is stressed by wind and rain.
- Sealants and coatings lose elasticity over time, so resealing with reused flashing can fail prematurely.
Complex Areas and Shapes
- Valleys, chimney bases, roof-to-wall transitions, and dormers demand precise shapes and fit.
- Reused pieces often don't conform to irregular contours, leaving gaps around corners, hips, and vents.
- Retrofit attempts around these features are prone to leaks if the flashing isn't cut and installed to exact tolerances.
Substandard Repair Practices
- Some quick repairs rely on sealants or roofing cement over old flashing rather than replacing the flashing itself.
- Inadequate cleaning before resealing leaves dust, granules, or old adhesive under new seals.
- Over-tightening fasteners can warp flashing, causing future cracks and leaks.
Invisible Cracks and Hidden Damage
- Microcracks in folds, bent seams, or hidden corrosion aren't obvious from a distance.
- Once exposed to seasonal movement or freeze-thaw cycles, these flaws propagate and cause leaks.
Signs It's Reused (for reference)
- Seams that don't align with the roof geometry or seem forced to fit.
- Color or metal mismatches at adjacent sections; different sheens or patinas.
- Nails or fasteners that don't look original to the section.
- Unusual gaps at joints or around vents and penetrations.
What to Do If You Suspect Reused Flashing
1. Inspect key joints carefully and note any misaligned seams or gaps.
2. Document any visible damage, corrosion, or mismatched materials with photos.
3. Have a professional assess whether salvage pieces can be safely replaced or if a full flashing upgrade is needed.
4. Ensure the installer uses matching metals, correct thickness, and properly sealed seams for every flashing run.
How Roof Materials Affect Reused Flashing
Common roofing materials and how reused flashing is affected
- Asphalt shingles

- Reused flashing around valleys and penetrations can seal well if the flashing is undamaged, properly sized, and not kinked. The main risks are damaged edges from stepping on shingles, granule loss exposing metal, and old sealants not bonding to new materials. Inspect for rust, bent corners, and any metal fatigue before reusing.
- Metal roofing

- When the flashing is the same metal (or compatible alloys) and the coating isn't worn, reuse can be solid. Watch for galvanic corrosion if different metals touch (copper with galvanized steel, for example). Ensure seams are tight and that fasteners don't create new leak paths.
- Clay or concrete tiles

- Tiles are heavy and brittle; reused flashing must fit under or behind tiles without forcing cracks. Old flashing can be stressed by tile movement, leading to leaks. If tiles crack or the flashing doesn't seat cleanly, replacement is wiser.
- Slate

- Slate is rigid and unforgiving to misfit flashing. Reused flashing may not align with slate joints, and sudden pressure can crack slates. If you reuse, expect meticulous trimming and careful seating; otherwise, flashing replacement with slate-appropriate pieces is better.
- Wood shingles/shakes

- Wood moves with moisture and temperature; reused flashing can trap moisture at the joints or become damaged by fasteners. Look for signs of rot or sagging near flashing seams. Seal and treat exposed areas, and avoid forcing flashing into warped wood.
- Composite/engineered shingles

- These act similarly to asphalt with different frictions and expansions. Reused flashing is often acceptable if it's in good shape and matches the shingle profile. Check for compatibility with any sealer or adhesive spec from the shingle manufacturer.
- Cedar shakes
- Cedar behaves like other wood options—expansion, contraction, and potential rot. Reused flashing can fail where wood movement is greatest. If flashing sits against shakes, there should be allowance for movement and proper drainage.
- Flat roofs (EPDM, TPO, BUR)
- In flat-roof systems, flashing is highly dependent on compatible sealants and membranes. Reusing metal or fabric flashings can work, but any old adhesive, tape, or seam material is likely to fail. Expect to reseal with the correct flat-roof flashing method and products.
Quick assessment steps before reusing flashing
1) Inspect all flashing pieces for cracks, bends, corrosion, and fatigue.
2) Check compatibility with the roof material and color-coded or manufacturer-approved sealants.
3) Test fit the flashing to ensure a clean, water-tight seal around penetrations and joints.
4) If any doubt remains about fit or longevity, plan for replacement rather than reuse.
Practical tips by material pairing
- Match metals when reusing flashing on metal roofs to avoid galvanic corrosion; otherwise, replace with compatible metal or non-metal sealants.
- On tile and slate roofs, always verify that the flashing can be properly concealed under the tile lines without forcing tiles or creating pressure points.
- For wood roofs, avoid trapping moisture at joints; use drainage-friendly flashing and treat exposed wood to resist rot.
- For flat roofs, favor updated membranes and adhesives designed for EPDM/TPO/BUR systems; old sealants are a common failure point.
Signs reused flashing may not be worth it
- Visible corrosion, cracking, or bending in the flashing pieces
- Poor fit around penetrations or misaligned joints
- Old sealants that don't bond to new materials or that smear when touched
- Any movement or warping in the roof surface that signals shifting under the flashing
The Risks of Ignoring Reused Flashing
Hidden vulnerabilities that reuse hides
- Reused flashing may not sit flush against the roof surface, leaving gaps at the hips, valleys, chimneys, or vent pipes. Those gaps are channels for wind-driven rain.
- Prior damage is often concealed. Bent corners, creases, or fatigued edges can appear fine but fail under load or temperature swings.
- Material fatigue and corrosion can be hidden inside folds and joints. Small cracks can grow, allowing water to wick into roof decking over time.
- Debris and organic matter trapped under reused flashing promote rot, mold, and attic humidity problems that aren't obvious from the ground.
- Compatibility issues show up as poor seals. Mixing types (aluminum with steel, or old vs. new) or mismatched thickness can cause galvanic corrosion or weak seams.
- Hidden fastener flaws: reused pieces may have stripped or misdrilled nail holes, which reduce clamping force and create leak paths.
- Surface wear from prior exposure can transfer to the new location, especially if the underside isn't clean or the original membrane has been compromised.
How reused flashing leads to leaks
- The seal depends on clean, tight contact along every edge. Reused pieces rarely maintain that precision after being bent, cut, or disturbed previously.
- Edges and corners that were folded or nicked before are prone to re-sealing failure in windy conditions.
- Joints around vent pipes, stacks, and chimneys are common failure points when flashing is pulled from a different roof plane and reinstalled.
- If the roof plane isn't perfectly flat, the reused flashing may not lay flat, creating micro-gaps that wick water.
Long-term damage from ignoring this issue
- Water intrusion in the attic causes staining on ceilings and walls, which can progress to damp odors and visible mold.
- Moisture in the roof deck weakens structural components, promoting wood rot in sheathing and rafters.
- Insulation loses effectiveness when damp, increasing energy costs and reducing comfort.
- Mold growth and mildew can spread to living spaces, triggering health concerns and costly remediation.
- Electrical hazards arise if moisture reaches wiring, outlets, or junction boxes in the attic or crawlspace.
Implications for warranty and resale
- Many flashing materials are covered by manufacturer warranties that assume new, properly installed components. Reused parts can void or complicate warranty claims.
- A roof with reused flashing may raise red flags for buyers and appraisers, potentially lowering resale value or increasing the cost of a professional inspection.
Signs you may be dealing with reused flashing
- Seams that show irregular gaps or misaligned edge lines when you inspect from the ground or attic.
- Unusual or recent nail hole markings far from where flashing should be anchored on the current roof line.
- Visible bends, crimps, or kinks at flashing corners that look inconsistent with new installations.
- Rust or corrosion spots in areas that aren't expected for the current roof material.
- Damp or staining along the flashing path after rainfall, especially near joints and penetrations.
Quick reference: steps to assess and address (numbered)
1) Visually inspect the flashing from the attic and from the ground, noting any gaps, bends, or mismatches with the roof plane.
2) Look for rust, corrosion, or abnormal wear along all flashing seams and around penetrations.
3) Check for water stains, stained insulation, or damp spots in the attic that line up with flashing locations.
4) Compare what you see with the roof plan or original installation records (if available) to verify whether the flashing used complies with design and code expectations.
5) Call a qualified roofer to evaluate the condition and, if needed, propose replacement with new, code-compliant flashing rather than reusing old pieces.
How to Diagnose Reused Flashing
Visual clues from the attic and interior spaces
- Water stains that trace along roof lines or flashing edges, not just random drips. Reused flashing often leaves damp patterns where old material wasn't properly re-sealed.
- Rust or corrosion on fasteners that looks older than surrounding shingles, especially where edges of flashing meet other metal pieces.
- Patches or signs of prior repairs near roof penetrations. If you see fresh caulk or putty over old seams, it can indicate a retrofit that used old flashing.
- Nails or screws in rafters or interior sheathing that look out of place or reused. This can hint that an earlier flashing was removed and reinstalled later.
- Edges of flashing that look uneven or bent in ways that don't match the original installation. Reused pieces may have been tweaked to fit a new gap.
Exterior indicators on the roof
- Flashing color or metal type that doesn't match surrounding flashing. A mismatched piece is a red flag for reuse.
- Fresh caulk or sealant in places where older, dried sealant should be present. Look for ridges, cracks, or peeling where flashing meets siding, brick, or shingles.
- Gaps or misalignment at seams and corners. Reused flashing may not lay flat, creating small gaps that can let water creep in.
- Raised edges or buckling along flashing seams. If a section looks like it was lifted and re-seated, that's a sign of retrofit work using old material.
- Visible fasteners that aren't consistent with the original installation (different screw/nail type, spacing, or head styles).
Common locations to inspect
1. Valleys where roof planes meet. Valleys are high-risk areas for failed seals, and reused flashing there often shows irregular seams.
2. Roof-to-wall transitions (step flashing). Watch for mismatched metal pieces and odd overlaps.
3. Chimneys and skylight bases. These areas get repeated maintenance and are common spots where old flashing gets reused.
4. Plumbing stacks and vents. Look for sealant that looks newer than surrounding aging metal.
5. Dormers and roof penetrations. Penetrations are especially prone to patchwork that uses leftover flashing pieces.
Step-by-step diagnostic process
1) Safety check: use a sturdy ladder, non-slip shoes, and fall protection if you're on the roof. If you're not comfortable, inspect from ground level or attic only.
2) Gather what you know: note colors, metal types, and where you find odd overlaps or patches.
3) Inspect the attic first: look for stains, staining patterns along the ceiling, and signs of moisture near flashing lines.
4) Move to the exterior: study flashing at valleys, walls, chimneys, and vents. Compare the looks of multiple flashing pieces—new vs. old, color, and finish.
5) Check fasteners and sealants: see if you can identify reused fasteners (old screw heads, mismatched nails) and irregular sealant beads.
6) Document with photos: take wide shots and close-ups of seams, overlaps, and fasteners. Note locations and any anomalies for future reference.
How to interpret what you find
- Consistent, clean seams with uniform fasteners and matching metal are typical of new or well-maintained flashing.
- Irregular seams, mixed metals, patchy sealants, and signs of prior patchwork point toward reused flashing.
- If you find multiple indicators across key locations (valleys, chimney bases, wall intersections), reuse is more likely than isolated DIY improvisation.
What to do with findings
- Compare your observations to typical flashing layouts for your home style and roof type.
- If reused flashing is suspected, save photos and notes and consider a professional assessment to confirm and plan replacement.
- Note that even reused flashing can perform well if it was properly resealed and correctly installed; the key question is whether it remains watertight and free of corrosion or gaps.
Repair Options for Reused Flashing
Temporary fixes
- Clean the area around the reused flashing to remove dirt, debris, and loose material. A dry surface helps temporary patches seal better.
- Apply a bead of high-quality roofing sealant or elastomeric sealant along the seam where flashing lifts or leaks. Work with the sealant's direction to form a continuous, watertight line.
- Use self-adhesive flashing tape over the seam as a stopgap. Choose a tape rated for exterior, UV exposure, and low-slope roofs if applicable.
- For penetrations or gaps at corners, place a thin bead of sealant first, then cover with a patch of compatible metal or rubber flashing tape to hold it in place temporarily.
- Consider a temporary cover (such as a tarp secured with battens or weighted edges) if a large area is leaking and you need a quick weather shield while planning a proper fix. Do not leave temporary covers for long stretches without inspection.
Notes:
- Temporary fixes don't address underlying corrosion, loose fasteners, or deck damage. They are to slow leaks until a proper repair can be done.
- Reused flashing often shows weakened edges or compromised laps; plan for a more durable solution soon.
Minor repairs
- Re-fastening: Tighten loose nails or screws with corrosion-resistant fasteners and long-toes for a secure lap. Add neoprene washers to reduce future leaks around fasteners.
- Sealing and bedding: Clean joints, then reseal with high-quality exterior sealant. Re-bed any lifted sections with compatible roofing mastic or sealant to restore a tight seal.
- Corner and lap repairs: If corners are flexing or laps are opening, slide a small piece of flashing under the existing piece where possible and reseal. Use self-adhesive or mastic to lock the joint.
- Targeted replacements: Where a small section of flashing is severely corroded or damaged, replace that short run with a matching piece. Ensure proper overlap (usually 2–4 inches) and seal both edges thoroughly.
- Compatibility check: Match metal type (e.g., aluminum, lead, copper) to the existing flashing to minimize galvanic corrosion. Reuse is fine if color, thickness, and bend radii align.
- Drip edge interface: Inspect the interface where flashing meets the drip edge or shingles; reseal to prevent water ingress at the boundary.
Steps you can follow:
1) Inspect the affected area and clean edges.
2) Remove loose fasteners and replace with corrosion-resistant hardware.
3) Apply sealant along the seam, then press in a restraining patch or new flashing piece.
4) Seal over the joints, allowing proper cure time before rainfall.
5) Re-inspect after a few rain cycles for any new movement or leaks.
Partial replacement
- When only a portion of flashing is compromised, a partial replacement is often cost-effective and durable.
- Process overview:
1) Mark the damaged section and determine material type (aluminum, copper, zinc, or lead).
2) Cut a matching length of flashing that fits with proper overlaps (2–4 inches at laps).
3) Remove the damaged piece carefully without disturbing neighboring flashing.
4) Clean the edge and create a clean mating surface for the new piece.
5) Install the new piece, overlapping onto the existing flashing and into the drip edge if present.
6) Seal all new joints with compatible sealant and secure with corrosion-resistant fasteners.
7) Paint or apply patina to match finish if required to resist corrosion and blend with the roof aesthetics.
8) Recheck all seams after rain to ensure the patch holds watertight.
Tips:
- Ensure the deck beneath is sound before re-flashing; replace any rotten substrate to avoid future leaks.
- Use a seamless lap joint and avoid too-tight compression that can crack sealant.
Full roof replacement
- When reuse of flashing is plagued by widespread corrosion, multiple leaks, or loose, buckled, or missing flashing along large sections, a full roof replacement with new flashing is often the most reliable long-term solution.
- What this entails:
1) Comprehensive assessment of the roof, flashing, underlayment, and deck. Identify any rot or structural concerns.
2) Remove existing shingles, underlayment, and all flashing along the perimeter and penetrations where necessary.
3) Inspect and repair or replace the decking as needed, ensuring a solid, smooth substrate.
4) Install new drip edge and continuous flashing around hips, valleys, and penetrations with high-quality, corrosion-resistant materials.
5) Lay new underlayment and properly integrate new flashing with valley metal, boot flashings, and roof-to-wall transitions.
6) Reinstall shingles or chosen roofing material with attention to proper nailing patterns and sealant usage at all joints.
7) Final inspection of all flashing seams, penetrations, and edge details to confirm a watertight roof system.
Typical Cost to Fix Reused Flashing
Minor repair
- Description: Small issues such as a loose seam, minor rust spotting, or a waning seal where reused flashing is still structurally sound. Usually involves stabilizing the edge and re-sealing rather than replacing material.
- What is done: Clean the area, re-fast en any loose nails or screws, apply a fresh sealant, and touch up overlaps or end laps to ensure a watertight seal.
- Cost: $150–$350.
- Steps:
1. Inspect the seam and surrounding area for signs of wear.
2. Remove loose fasteners and reseal with compatible roofing sealant or mastic.
3. Re-secure flashing and perform a quick water test to confirm the fix.
Moderate repair
- Description: A longer run of reused flashing needs attention, or there's localized damage that requires partial replacement or patching. This is beyond sealant alone but does not require full re-flashing of the roof edge.
- What is done: Remove the damaged section or patch with a matching piece of flashing, seal the joints, and re-flash the area to restore continuity.
- Cost: $400–$900.
- Steps:
1. Evaluate the extent of damage and determine whether a patch or partial replacement is best.
2. Carefully remove the affected flashing and prepare the substrate.
3. Install new or patched flashing, seal all joints, and secure with proper fasteners.
4. Re-flash and test for leaks after installation.
Major repair
- Description: Large sections of reused flashing require replacement, or flashing around critical penetrations (chimneys, valleys, vent pipes) demands a full or near-full re-flashing job. This often involves higher material costs and more labor, especially on steep or complex roofs.
- What is done: Remove old flashing over the affected run, install new flashing (often with upgraded metal), seal thoroughly, and ensure proper overlaps and drainage.
- Cost: $1,200–$4,500.
- Steps:
1. Quantify the full extent of damage and plan a comprehensive re-flashing.
2. Remove and dispose of damaged flashing; prepare the joints and substrate.
3. Install new flashing (potentially upgraded material), seal all joints, and ensure correct laps and drainage.
4. Re-secure the flashing and perform a water test to verify the fix.
What factors affect cost
- Roof size
- Access
- Material type
- Extent of damage
- Local labor rates
- Roof size: Larger roofs require more flashing material and more labor, which increases costs. Complex perimeter layouts or many roof penetrations can dramatically raise the price.
- Access: Steep pitches, difficult reach areas, or multi-story structures increase safety precautions and labor time, driving up price.
- Material type: The choice of metal (galvanized steel, aluminum, copper, etc.) affects material cost and installation complexity. Copper is typically the most expensive but may offer longer life in some climates.
- Extent of damage: More extensive deterioration or corrosion means more flashing sections to remove, replace, seal, and test, pushing the total higher.
- Local labor rates: Regional differences in wages and demand for roofing work can cause noticeable variation in quotes.
How Long Can You Wait Before Reusing Flashing?
Immediate risk: Today (0–24 hours)
- What happens if you wait even a short while:
- A sudden shower or wind-driven rain can start dripping where the flashing is compromised.
- Water can wick behind shingles and begin saturating the roof deck and sheathing.
- Tiny leaks at corners, laps, or around penetrations can escalate quickly with each additional rain event.
- Quick actions you can take now:
- If rain is imminent, cover the area with a sturdy tarp and secure all edges to shed water away from the seam.
- Do a fast exterior check: is the flashing loose, cracked, bent, or missing fasteners? Note any gaps or misalignment.
- Keep interior spaces dry—move belongings away from the suspected leak zone and place buckets or towels where drips appear.
Short term risk: 3–7 days
- What happens if you wait:
- Leaks can become active drips that stain ceilings and walls.
- Moisture behind the flashing can worsen wood rot in eaves, fascia, or roof deck.
- Condensation and humidity rise, inviting mold growth in attic spaces.
- Recommended steps if you're delaying a full repair:
- Re-inspect after rain events; look for fresh stains or damp insulation.
- Don't rely on sealants or mastics as a long-term fix on reused flashing—they're usually temporary.
- Schedule a professional inspection as soon as possible, even if you've applied a temporary cover.
Medium term risk: 1–2 weeks
- What happens if you wait:
- Ongoing water intrusion accelerates deterioration of roofing components, increasing repair scope and cost.
- Insulation quality drops, reducing energy efficiency and comfort in the home.
- Interior finishes (drywall, paint) show water damage; rot can spread to nearby rafters and joists.
- How to manage during this window:
- Document signs of damage with photos and notes; this helps with insurance or contractor estimates.
- Limit access to the affected roof area to prevent accidental damage or injury.
- Collect several quotes for flashing replacement rather than reuse to compare costs and timelines.
Long term risk: 1 month or more
- What happens if you wait:
- Major structural damage becomes likely, potentially triggering more extensive roof replacement work.
- Mold growth can become a health concern for occupants, especially in tight attic spaces or ceilings.
- Water damage spreads to attic insulation, ceiling drywall, and interior finishes, complicating remediation.
- The prudent move in this window:
- Treat reused flashing as a high-priority fix; plan a full flashing replacement with proper overlaps, sealing, and correct profile for your roof.
- Engage a licensed roofer to evaluate flashing type, compatibility with roof age, and the best method for long-term waterproofing.
- If cost is a constraint, discuss staged repair options that still restore the roof's integrity without delaying essential work.
About reusing flashing: practical considerations
- Reusing flashing is typically a stopgap, not a lasting solution. Surface wear, previous bending, corrosion, or nicks can compromise compatibility and seal.
- Acceptable conditions for considering reuse (rare and time-limited):
- The flashing is undamaged, properly shaped to fit the seam, and free of corrosion.
- It can be re-seated with a sound overlap and compatible fasteners, plus a matching sealant rated for exterior use.
- Do not rely on reuse around high-risk areas:
- Valleys, chimney/chimney flashings, roof-to-wall transitions, and penetrations are the most sensitive spots; reuse there is least advisable.
How Reused Flashing Varies by Location and Climate
How This Problem Varies by Region & Climate within the United States
Flashing material and its seals behave differently depending on where you live. Local weather patterns, exposure to salt, heat, cold, and wind, plus the roof style you're common with, all shape the risks and the practicality of reusing flashing. Below are region-specific considerations to help you decide when reuse makes sense in your climate.
Coastal & Salt-Exposure Climates
- Salt spray and humid air speed up corrosion on most metals. Copper and stainless steel resist it better than galvanized steel or aluminum.
- Before reuse, inspect the flashing for pitting, flaking, or coating wear, especially where waves or spray reach the roof edge.
- Sealants and caulks near the coast tend to fail sooner; prioritize mechanical joints and ensure laps and step-flashing are solid.
- Water drainage and high winds can push water into joints; reuse only if flashing is corrosion-free, straight, and free of deformation.
1) Examine metal type, thickness, and bends for rust or cracks.
2) Test for looseness or loose hems by gently lifting edges.
3) Check surrounding shingles and underlayment for salt damage.
4) Confirm compatibility with the roofing system you're integrating with.
Freeze-Thaw Regions
- Repeated freezing and thawing stress can turn tiny flaws into leaks. Any reused piece should be free of cracks, dents, or bent sections.
- Use sealants rated for freeze-thaw cycles, but don't rely on them alone—mechanical fastening and proper flashing laps are critical.
- Look for rust that has penetrated bends or corners; warping or thinning metal indicates failure risk after a few winters.
- Short-term reuse can be tempting, but many pros prefer new flashing in these zones to guarantee a tight seal.
1) Inspect for hairline cracks and corrosion with a good light and mirror.
2) Gently flex the flashing to ensure it still holds its shape.
3) Verify acceptable clearances between flashing and vent pipes or skylights.
4) Schedule a provisional leak test after installation to catch seasonal shifts.
Desert & Extreme Heat Regions
- Extreme sun and high temps accelerate aging of coatings and adhesives. Reused flashing should not rely on aged sealants or heat-damaged bends.
- Favor metals with heat resistance and stable coatings; aluminum may warp in intense sun, so copper or stainless steel can perform better over time.
- Inspect for warping, loose hems, or signs of metal fatigue after long heat exposure.
- Adequate attic ventilation matters more here to keep roof deck temperatures down and protect seals.
1) Check for warping or loosening at folds and corners.
2) Test sealants for UV resistance; if they've aged, plan for replacement.
3) Ensure flashing thickness matches current roof requirements.
4) Confirm that any reused pieces won't interact poorly with the roofing underlayment.
Humid & Wind-Driven Regions
- High humidity fosters corrosion in some metals and encourages moss or algae growth under shingles; dry, clean flashing is essential.
- Wind uplift is a bigger concern in Florida, the Gulf Coast, and coastal mountain areas. Reused flashing must have intact edges and robust fastening.
- Moisture can degrade caulk and adhesives; prefer flashing that relies on mechanical bonds rather than relying solely on sealants.
- Regular inspections after storms are important because wind-driven rain can exploit small weaknesses.
1) Look for corrosion around fastener holes and joints.
2) Check for any soft or warped sections from heat and humidity.
3) Ensure the flashing transitions are fully secured with proper nails or screws.
4) Confirm local wind uplift requirements are met in the installation plan.
Regional Codes, Warranties & Decision Guide
- Some regions allow reuse if the flashing meets current code and shows no damage; others may require new material to protect warranties or insurance.
- For flashing around chimneys, vents, and valleys, reuse is higher risk due to leak potential; consult a pro and your insurer.
- Always verify with the local building department and your roofer about acceptance, required testing, and warranty implications.
- Steps to decide if reuse fits your climate (1–5):
1) Identify the exact metal type, thickness, and condition.
2) Inspect for corrosion, cracks, or deformation.
3) Assess compatibility with your roof system and underlayment.
4) Get a written assessment from a licensed roofer, including a leak test plan.
5) Check local code and warranty requirements before proceeding.