Ultimate Guide to Roof Deck Repair
Last updated: Feb 28, 2026
Introduction to Roof Deck Repair
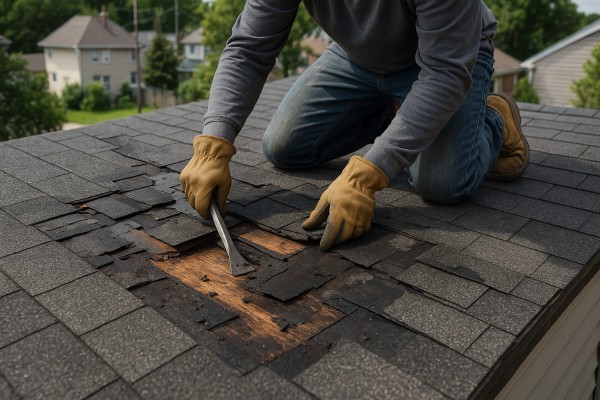
Your roof deck is the sturdy foundation that supports your shingles, underlayment, and waterproofing. When it starts to deteriorate, you may notice leaks, damp insulation, or soft spots that worry you as a homeowner. This page walks you through practical, no-nonsense guidance to understand, inspect, and plan for roof deck repairs with confidence.
What is a roof deck and why it fails
- The roof deck is the plywood or OSB layer that sits under the roofing system and ties the structure together.
- Common causes of deck damage include moisture intrusion, aging materials, improper ventilation, hail or wind damage, and physical impact from foot traffic or fasteners.
- Damage can progress from a small, localized patch to widespread decking rot, which undermines the entire roof assembly if not addressed.
Common signs your roof deck needs repair
- Soft, spongy spots you notice when you walk on the attic side or near a roof line.
- Visible sagging or deflection in the ceiling or attic floor.
- Water stains, damp insulation, or musty odors in the attic.
- Loose or popped nails in interior ceilings or walls.
- Evidence of daylight leaking through the attic or roof penetrations during a crawl-through inspection.
Quick checks you can do from safe spots
1) From the attic, look for daylight coming through the decking, which means gaps or holes.
2) Feel along joists or sections of the attic floor for dampness or crumbling wood.
3) Inspect insulation for consistently wet areas or mold growth.
4) If you must investigate outside, avoid walking on the roof; use a ladder and a professional to confirm anything you find.
When to call a pro
- There are soft spots larger than a few inches, or you notice widespread sagging.
- You find extensive moisture, mold, or structural concerns in the attic.
- You're unsure about ventilation, flashing, or underlayment that could keep a small problem from becoming a big one.
- You don't have the proper safety gear or experience to inspect or replace decking safely.
Repair approaches and what to expect
1) Assessment and moisture mitigation
- A roofer checks the extent of damage, identifies moisture sources, and dries out or removes wet materials.
2) Patch or replace damaged decking
- Small areas can be cut out and replaced with matching plywood or OSB, while larger zones are removed and replaced.
3) Reinforcement and re-sealing
- Damaged joists or blocking receive reinforcement, screws are reinstalled, and any compromised flashing or underlayment is repaired.
4) Protection and finish
- New underlayment, proper ventilation, and a fresh layer of protective coatings help prevent future issues; the roof is resealed to restore weather tightness.
Maintenance tips to extend deck life
- Address leaks promptly: any sign of moisture deserves attention to stop rot from spreading.
- Keep gutters and downspouts clear to prevent water backup near the eaves.
- Ensure proper attic ventilation to control condensation.
- Schedule regular inspections after heavy storms or freeze-thaw cycles.
- Avoid DIY patching on large areas; uneven repairs can lead to future leaks.
Materials and cost snapshot
- Materials: plywood or OSB decking, fasteners, underlayment, flashing, and ventilation components.
- Typical project impact: minor repairs may be several hundred dollars; replacing sections or larger areas runs in the low to mid thousands, depending on extent, access, and finish materials.
- Labor: costs reflect removal of damaged sections, measurement accuracy, and re-sealing to ensure a weather-tight roof.
This overview helps homeowners spot issues early, understand repair options, and know what to expect when engaging a professional for roof deck repair.
Roof Deck Repair: What It Is, Why It Matters, and How to Fix It
Comprehensive definition
The roof deck is the sturdy surface that lies under your roofing material and above the attic or living space. It can be plywood, OSB, or wood planks, and it often includes a waterproofing layer, flashing, and drainage guides. Roof deck repair means fixing or replacing damaged or compromised deck material, restoring the waterproofing system, and ensuring the deck can support the roofing and shed water effectively. Repairs can involve replacing rotten boards, re-fastening loose sections, fixing sagging areas, or reapplying/patching underlayment and flashing. In some cases, access to the deck from above requires removing portions of shingles or other roofing to reach the deck safely. The goal is to restore structural integrity, keep moisture out, and maintain proper ventilation and drainage for the roof system.
Why roof deck repair matters
- Water intrusion travels from deck to insulation, attic, and interior ceilings—leading to rot, mold, and high repair costs.
- A damaged deck can compromise the entire roofing system, reducing lifespan and energy efficiency.
- Properly repaired decks protect fasteners, flashing, and shingles, helping warranties stay valid.
- Even small deck issues can cause big problems over time if left untreated.
When it's typically needed
- Visible rot, softness, or sponginess in deck boards
- Warped, cracked, or missing boards
- Noticeable sagging areas or deflection in the deck
- Leaks or damp spots inside the attic or ceiling beneath the deck
- Loose, rusted, or corroded fasteners and nails
- Damaged or lifted flashing around vents, skylights, chimneys, or parapets
- After storms that cause hail or high winds, especially on the edge of the deck
Signs of damage to look for
- Discoloration, staining, or mold on deck surface or underlayment
- Pillowed or bubbled roofing material indicating trapped moisture
- Stiff, brittle boards that crack easily
- Excessive deck movement when stepping on it
- Water leakage around seams, nails, or fasteners
How to repair (practical, homeowner-friendly steps)
1. Safety first
- Hire a pro for any structural concerns or if you're not comfortable on a roof.
- Use proper fall protection, dry weather, and stable ladders.
2. Assess and plan
- Identify all damaged sections, flashing issues, and underlying moisture.
- Decide whether you'll replace boards only or also repair/replace subdeck or joists.
3. Remove damaged material
- Carefully cut out rotten or severely warped boards.
- Remove debris and inspect the substructure for rot or gaps.
4. Address structural issues
- Replace damaged subdeck/plywood or add sistered joists if needed.
- Install blocking or additional support where sagging is present.
5. Install replacement material
- Use deck-rated lumber or exterior plywood that matches thickness.
- Fasten with corrosion-resistant nails or screws; stagger joints for stability.
6. Restore waterproofing and flashing
- Reinstall or repair underlayment and waterproof membrane where applicable.
- Re-seat or replace flashing at edges, penetrations, and transitions.
7. Refinish and reattach roofing
- Reinstall shingles, shakes, or other roofing material with proper nails and spacing.
- Check that the roof flushes correctly against the deck to prevent water intrusion.
8. ensure drainage and ventilation
- Verify proper slope toward drains or scuppers.
- Confirm vents or attic airflow are unobstructed.
9. Final inspection
- Check for leaks after a light rain or hose test.
- Look for smooth transitions and secure fasteners; address any gaps promptly.
- Replacement boards (pressure-treated or deck-rated)
- Exterior plywood/OSB (matching thickness)
- Waterproof membrane or underlayment (as needed)
- Flashing, nails, screws (corrosion-resistant)
- Circular saw, pry bar, hammer, drill, level
- PPE: gloves, eye protection, non-slip footwear
Quick maintenance tips to prevent future deck problems
- Clear debris and debris from gutters regularly.
- Inspect annually for soft spots, loosened fasteners, and compromised flashing.
- Keep deck surfaces clean and sealed per manufacturer's guidelines.
- Address water drainage and venting to prevent moisture buildup.
When Your Roof Deck Needs Repair
Signs this service is needed
- Soft, spongy, or visibly sunken deck boards when you press them in several spots.
- Warped, cupped, cracked, or splitting boards that create trip hazards or discomfort underfoot.
- Sagging or deflection in beams, joists, or railing posts—noticeable wobble or a noticeable dip along a span.
- Loose, missing, or rusted fasteners, hangers, brackets, or ledger hardware; hardware that's corroded or pulling away from framing.
- Water stains on ceilings or walls directly beneath the deck, or persistent dampness and mold in the underside area.
- Visible rot, fungal growth, soft wood, or crumbling framing members in the deck structure.
- Increasing gaps between boards, or boards pulling away from the joists.
- Posts, railings, or balusters that are loose, cracked, or detached from their connections.
Ways you can confirm yourself as a homeowner
- Do a safe, careful walkaround and visually map out every suspect area on the deck surface and railing.
- Test soft spots: apply gentle pressure with the ball of your hand or a blunt tool on a few boards. If a board yields or crumbles easily, note its exact location.
- Check for signs from below: if you can access the underside safely, look for exposed framing rot, dampness, or staining on joists and beams.
- Inspect hardware closely: look for loose screws, bent or corroded hangers, rust around connectors, or missing flashing where the ledger attaches to the house.
- Look for water intrusion indicators: dampness on the ledger, rusted or rotted areas at post bases, or damp air and mold in the space beneath.
- Check railing stability with a gentle shake or wiggle test; listen for creaks or movement—that can signal a compromised connection.
- Document everything: take photos from multiple angles, note the location (deck level, post, beam, or ledger area), and track the age of the deck and any prior repairs.
- If you're unsure or uncomfortable on the ladder or near the house, stop and call a pro—safe assessment is more important than a DIY check.
When to get a professional assessment
- Any soft spot larger than about 4x4 inches (10x10 cm) underfoot or widespread softness across multiple boards.
- Sagging or deflection beyond light bounce—such as a noticeable dip at mid-span or a deck that pulls away from the house.
- Rot, extensive mold, or fungal growth in structural wood, or crumbling framing members.
- Corrosion, rust, or failure of metal connectors, joist hangers, screws, or flashing near the ledger.
- Cracked, split, or severely warped joists or beams; signs that load paths may be compromised.
- Railing instability, posts pulling away from the deck surface, or loose/failed fasteners that can't be tightened safely.
- Water intrusion around the ledger or flashing, poor drainage, or ongoing leaks that threaten the deck's structure.
- Age-related concerns: decks over 15–20 years old that haven't had a thorough structural assessment recently, especially if you've noticed changes in performance or appearance.
- If you're not comfortable climbing, inspecting from safe heights, or evaluating the structural implications of the findings, a professional assessment is warranted.
What Is Included with Roof Deck Repair
What is typically included
A typical roof deck repair package covers assessment, materials, and labor needed to restore deck integrity and weatherproofing. The goal is to get you back to a safe, usable outdoor space without leaks or structural worry. Expect the following components to be included in most standard contracts:
- On-site assessment of the deck's structural elements: joists, ledger connections, beams, rim joists, fasteners, and anchor points for railings.
- Safety protections and staging: temporary fall protection, guardrails where needed, tarps or plastic to keep dust and debris off interiors, and staging for easy access.
- Removal and disposal of damaged decking and flashing: take out rotted boards, corroded fasteners, and compromised flashing; haul away debris.
- Replacement decking with matching materials: boards that match species, thickness, and finish; compatible fasteners and corrosion-resistant hardware.
- Structural repairs to restore integrity: sistering or replacement of damaged joists, reinforcing sagging sections, and repairing or upgrading ledger connections to meet code.
- Waterproofing and weatherproofing: installation of appropriate underlayment, ice-and-water shield where required, and waterproof flashing around penetrations and wall transitions; sealing joints to prevent leaks.
- Drainage and slope adjustments: ensuring proper deck drainage, correcting or adding slope where needed, and addressing drainage components like scuppers or edge drains as part of the plan.
- Railing and edge details: repair or replacement of posts, rails, and balusters to meet current code; secure fasteners and ensure a safe, solid boundary.
- Finishing touches: staining, sealing, or painting for wood decks; non-slip coatings or surface textures as specified, to extend life and improve safety.
- Permit coordination and inspections: help with obtaining permits, plan review if required, and scheduling final inspections to verify code compliance.
- Cleanup and site protection: thorough cleanup of the work area, protection of landscaping and hardscapes, and disposal of any construction waste.
- Maintenance guidance and short-term warranty notes: a basic maintenance plan and information about workmanship warranties where offered.
What is not typically included
Some items are routinely billed separately or handled by other specialists. Here are common exclusions in a standard roof deck repair package:
- Major structural work beyond the deck framing: house framing, foundation work, or large-scale beam replacements typically done by a structural contractor.
- Interior repairs caused by deck leaks: drywall, insulation, ceiling repair, mold remediation, or paint touch-ups inside the home are usually not included.
- Full roof replacement or large roof repairs: while the deck sits on the roof, a complete roof job is typically a separate contract unless explicitly scoped.
- Extensive railing fabrication or complete redesign: if the existing railing system requires major custom fabrication or replacement beyond repair, those costs may be quoted separately.
- Permit fees and engineering costs: permit application fees, plan stamps, and any required structural engineering drawings are often billed separately, unless the contractor explicitly includes them.
- Excavation, foundation, or site-rework outside the deck footprint: work that affects surrounding ground or structure beyond the deck area is generally outside the scope.
- Landscaping restoration: reseeding, irrigation repair, or other landscape repairs after decking work are usually not included.
- Premium materials or specialty finishes: upgrades to exotic woods, high-end composites, or advanced coatings beyond the originally agreed scope may incur extra charges.
- Temporary living expenses or relocation costs: costs for living arrangements if work disrupts a residence aren't included.
Steps to repair
A practical, step-by-step pathway keeps homeowners aligned with what happens and when.
1) Schedule the initial assessment and confirm scope. The contractor visits, notes conditions, and discusses priorities with you.
2) Create a detailed plan and final estimate. Material choices, finish, and timing are locked in before work begins.
3) Prepare the site. Protective measures are installed to keep interiors clean and landscaping safe.
4) Remove damaged components. Old decking, flashing, and any compromised fasteners are carefully taken out.
5) Implement structural repairs. Damaged joists or ledger connections are reinforced or replaced to restore load capacity.
6) Install decking, flashing, and waterproofing. New boards go down, with flashing details sealed to prevent leaks.
7) Reinstall railings and edge details. Posts and rails are secured to meet code and ensure safety.
8) Apply finish and perform final cleanup. Stain or seal as agreed; remove debris and verify the area is ready for use.
9) Conduct final inspection and handoff. The contractor reviews workmanship with you and documents any maintenance needs.
Common Roofing Materials Used in Roof Deck Repair

Asphalt shingles are the most common choice for residential roofs, and they pair well with a repaired roof deck when the deck is solid and properly prepped. After any deck repair, you'll want a clean, dry substrate and good underlayment to protect the new shingles. Expect to replace any soft or damaged decking planks discovered during repair, as shingles rely on a stable base for proper nail retention and wind resistance.
- What to know for deck repair: replace rotten sheathing, fix any soft spots, and verify there's adequate ventilation beneath the decking.
- Underlayment matters: synthetic or felt underlayment provides a second line of defense against moisture.
- Fastening: follow the manufacturer's nail schedule; improper nailing can lead to leaks or blow-off in high-wind areas.
- Ventilation and drip edge: ensure clean eaves and proper intake/exhaust ventilation to prevent moisture buildup under the shingles.
Steps to prepare the deck for asphalt shingles:
1) Inspect and replace any damaged decking. 2) Install a continuous underlayment over a clean, dry surface. 3) Mark nail lines and follow the manufacturer's fastener pattern during installation.
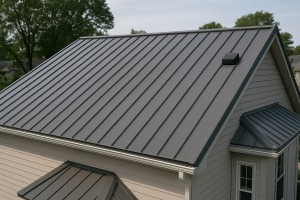
Standing seam metal roofs are durable and work well after roof deck repairs, especially on homes with good structural support. The deck needs to be flat and well fastened because metal panels rely on a solid substrate for long-term performance. Because metal roofs are heavier than shingles, confirm the deck and fasteners are rated for the added load, and plan for precise flashing around chimneys, vents, and transitions.
- Deck prep specifics: fix any warping or uneven spots; use rigid insulation or sheathing if recommended by the metal system.
- Fasteners and seams: concealed-fastener systems reduce surface penetrations but require exact seam placement and sealing.
- Vapor control: ensure a proper moisture barrier beneath the metal to minimize condensation.
- Penetrations: high-quality flashing and sealants are critical around vents and chimneys.
Steps to prepare the deck for standing seam:
1) Verify structural capacity and reinforce the deck if needed. 2) Install a clean, flat underlayment or sub-sheathing as specified. 3) Align and secure panels per manufacturer guidelines, with top-edge seals and precise flashing.

Wood shingles or shakes offer a traditional look, but they demand a well-maintained deck. After deck repair, wood shingles require a moisture-tolerant substrate and proper ventilation to avoid rot and deterioration. Rot-resistant, pressure-treated or naturally durable deck components help extend life, but timber still needs regular maintenance to prevent cupping, splitting, or mildew.
- Deck considerations: anticipate higher maintenance and periodic resealing or staining to protect the wood.
- Attachments: use corrosion-resistant fasteners designed for wood roofs.
- Fire considerations: in some areas, code requirements or fuel-load concerns may influence material choice.
- Ventilation: ensure adequate venting to reduce moisture buildup under wood shingles.
Steps to prepare the deck for wood shingles:
1) Replace any decayed decking with treated plywood/OSB. 2) Install a breathable underlayment suitable for wood. 3) Seal or treat exposed wood edges and ensure proper ventilation paths.

Clay or concrete tiles are heavy and require a robust deck and roof structure. After deck repair, verify the substructure can support the weight, then install a tile-underlayment system and battens. Tile roofs need precise alignment and flashing for valleys and penetrations, plus reinforced edges to handle wind loads. Missteps here can lead to significant leaks and failed tile installations.
- Structural checks: ensure rafters or joists are rated for tile loads; reinforce if needed.
- Underlayment and batten system: use a suitable tile underlayment and a batten frame to support tile placement.
- Wind and drainage: address wind uplift resistance and ensure proper drainage away from penetrations.
Steps to prepare the deck for tile roofing:
1) Confirm structural capacity and reinforce framing if required. 2) Install battens and tile underlayment. 3) Plan precise layout for valleys, hips, and flashing.
Flat Roofing Membranes (EPDM, TPO, PVC)
Flat or low-slope roofs commonly use EPDM, TPO, or PVC membranes. With roof deck repair, these membranes require a smooth, dry deck surface and appropriate insulation or cover boards. The membrane installation relies on clean seams, compatible adhesives, and secure perimeter details to prevent leaks at edges and penetrations.
- Substrate needs: ensure a flat, clean deck with compatible cover board if using insulated systems.
- Seams and adhesives: follow manufacturer guidelines for seam tapes, seam adhesives, and fasteners.
- Penetrations: use compatible flashings and proper sealants around vent pipes and skylights.
Steps to prepare the deck for flat roofing membranes:
1) Repair any deck irregularities and dry the surface. 2) Install the appropriate cover board or insulation as required. 3) Lay and seam the membrane with proper edge details and flashing.
Modified Bitumen and Built-Up Roofing (BUR)
Modified bitumen and BUR systems are durable options on older structures or where a heavier system is desired. They require a solid deck, with either torch-down or cold-applied adhesives. Deck repair must remove rot and provide a stable surface; ballast or cap sheets must be installed according to the chosen system.
- Deck stability: replace compromised decking and ensure a continuous, clean surface.
- Application method: follow the heat-directed or cold-applied process precisely to avoid gaps.
- Maintenance: inspect for membrane wear and edge details, especially around skylights and vents.
Steps to prepare the deck for BUR or modified bitumen:
1) Replace soft decking and clean the surface. 2) Apply a suitable primer and base sheets. 3) Install cap sheets or ballast in the correct sequence with proper detailing.
What Does Roof Deck Repair Cost?
Typical average costs
- Minor patching or sealing (small spots, loose fasteners): roughly $200–$600.
- Localized board replacement (1–4 sheets) and re-fastening: about $600–$2,000.
- Moderate deck repair (several damaged areas, moisture damage, partial deck): $2,000–$5,000.
- Major repair (larger areas, multiple sheets, limited structural work): $4,000–$9,000.
- Full deck replacement (entire deck surface, often when paired with roof work): $8,000–$20,000+.
Note: per-square-foot costs for replacing roof decking (OSB/plywood) typically run about $2.50–$6 per sq ft installed, not including tear-off, disposal, or extensive framing work. When you add removal, waste disposal, underlayment, and upgrades, the total can rise.
Cost by scope
1) Minor repair or patch
- What you're paying for: small rotted spots, re-nailing, or quick resealing.
- Typical range: $200–$800.
2) Moderate repair (a few sheets)
- What you're paying for: replacing a handful of damaged boards, re-fastening, minor framing adjustments.
- Typical range: $1,000–$3,000.
3) Extensive repair (larger areas, multiple issues)
- What you're paying for: bigger patches, several sheets, possible moisture barrier, some structural checks.
- Typical range: $3,000–$7,000.
4) Partial deck replacement
- What you're paying for: removing and replacing a significant portion of the deck, plus fasteners and underlayment.
- Typical range: $7,000–$12,000.
5) Full deck replacement (often with roof replacement)
- What you're paying for: removing the entire deck, installing new plywood/OSB, new fasteners, moisture barriers, and tying into new roofing.
- Typical range: $12,000–$22,000+.
Factors that influence cost (and how they might save you or add to the bill)
- Deck size and span
- Larger decks = more material and labor; smaller, simpler shapes cost less.
- Material choice and thickness
- Standard plywood/OSB is cheaper than premium or higher-thickness options.
- Condition of framing and structural work
- If joists, rafters, or support beings require repair, expect higher costs.
- Access and work logistics
- Difficult access (tight crawlspaces, steep pitches) adds labor time and safety measures.
- Roof and deck integration
- Replacing the deck when you're already re-roofing can save money on labor and disposal; coordinating projects often reduces total cost.
- Permits and inspection
- Some areas require permits for structural work; add permit fees and potential re-inspection costs.
- Local labor rates
- Prices vary by region due to wage levels and material availability.
- Moisture, mold, or pest damage
- Hidden rot or termite damage escalates both material and labor needs.
Ways to keep costs practical
- Bundle with roof replacement
- If your roof is due for replacement, plan deck work in the same project to leverage economies of scale.
- Favor standard materials
- Stick with conventional plywood/OSB and standard underlayment unless there's a compelling reason to upgrade.
- Get multiple no-obligation estimates
- Compare bids that itemize decking, underlayment, disposal, and any structural repairs.
- Schedule in dry weather
- Dry, mild conditions reduce delays and moisture-related complications.
- Maintain realistic expectations
- Minor repairs can stabilize the deck quickly; major issues may require a larger investment but extend roof life and house integrity.
Quick checklist for budgeting
- Assess the deck size in squares (1 square = 100 sq ft) and rough condition.
- Confirm whether the project will be standalone or part of a roof replacement.
- Ask for a breakdown: materials, labor, disposal, permits, and any structural work.
- Request a written plan for any required framing repairs and moisture management.
How the Roof Deck Repair Process Works
Step 1: Comprehensive on-site assessment
We kick things off with a thorough look at the entire deck system—deck boards, joists, ledger, posts, railings, flashing, and drainage. We hunt for rot, moisture intrusion, or prior repairs that could affect longevity. We document everything with notes and photos so you have a clear record of what needs attention and why.
- Visual check of all boards, framing, and fasteners
- Ledger and flashing inspection at transitions to the house
- Drainage review to ensure water flows away from the home
Step 2: Clear scope, options, and estimate
Next, we define the repair plan and options. You'll hear straight talk about repair versus replacement, material choices (wood, composite, or PVC), expected lifespan, and price ranges. We present a transparent written estimate, including timeline and warranty details, with phased options if a full replacement isn't necessary.
- Recommend best path based on condition and budget
- Material choices, maintenance expectations, and warranties
- Timeline, permits (if needed), and payment terms
Step 3: Preparation and safety plan
Safety and protection come first. We outline the plan to protect your home and landscape, set up containment, and coordinate weather windows. If there are permits, we secure them before any work begins.
- Protect adjacent siding, landscaping, and furniture
- Set up safety gear, ladders, and containment
- Confirm permit requirements and access to utilities
If the issue is localized, we carefully remove rotten boards, damaged flashing, and compromised fasteners while preserving as much of the existing deck as possible. If broader damage is found, we stage the removal to minimize disruption.
- Remove compromised decking and hardware
- Disconnect and reconfigure railing components if needed
- Label and store reusable pieces when feasible
Step 5: Structural reinforcement and framing
We address the structural core: joists, beams, and supports. We replace or sister weak members, add blocking, and fix any sag or unevenness. The goal is a solid, level deck that transfers loads correctly to posts and footings.
- Replace or reinforce damaged joists
- Add blocking, hangers, and proper fasteners
- Reestablish a true, level deck frame
Step 6: Weatherproofing, flashing, and moisture control
Water protection is central. We install or repair moisture barriers, ensure proper flashing at ledger lines and edges, and seal transitions to prevent leaks.
- Install continuous underlayment or membrane where needed
- Secure flashing at the ledger and edge transitions
- Seal joints and gaps with exterior-grade sealant
Step 7: Surface installation or repair of decking
Now the surface comes together. We install new boards or refinish existing ones, keeping spacing consistent for drainage and expansion. If using composites, we follow manufacturer guidelines for fasteners and patterns.
- Deck boards laid with proper spacing and alignment
- Compatible fasteners or hidden install methods
- Railings reattached or rebuilt to code
Step 8: Finishing touches and protection
Smoothing and protection finalize the look and feel. We prep rough edges, apply stain or sealant if wood, and add non-slip considerations where appropriate.
- Sand rough edges and remove splinters
- Apply sealant, stain, or protective coating per product specs
- Check hardware and rail attachments for tightness
Step 9: Cleanup, final inspection, and homeowner walk-through
We wrap up with a thorough cleanup and a final walkthrough. We test drainage, check for leaks, and confirm the deck is watertight and safe. You'll receive maintenance tips and warranty information at this stage.
- Debris removal and yard protection
- Drainage test and leak check
- Walk-through of finished deck, care guidance, and warranty terms
Residential vs. Commercial Considerations in Roof Deck Repair
Residential vs Commercial Considerations of Roof Deck Repair
Homeowners are often surprised by how differently a residential roof deck repair plays out compared with a commercial project. The same core principles apply, but the scale, loads, schedules, and code requirements change the approach, risk, and cost.
- Scale and complexity: Residential decks are typically smaller and simpler, with fewer penetrations and straight-forward drainage. Commercial decks can span large areas, multiple levels, and complex geometry, increasing surface-area repair needs and the chance of membrane seams failing.
- Structural loads and design: Homes usually follow standard live-snow and live-load rules, while commercial systems may carry higher, variable, or special loads. A licensed structural engineer may be needed to verify framing, joists, and support elements on larger or higher-use decks.
- Membranes and materials: Residential decks often use wood, composite surfaces, or simple membrane patches. Commercial roofs may rely on EPDM, TPO, PVC, or built-up membranes with more intricate flashings and drainage requirements. Compatibility between the deck surface and the roof membrane is key in both cases, but the specifics are more demanding on the commercial side.
- Water management: Drainage details, scuppers, and flashing play bigger roles on large decks. Small residential patches can fail if the patch isn't fully integrated with existing drainage, but large commercial decks demand a comprehensive water-control plan across seams and transitions.
- Permits and inspections: Residential repairs usually require a building permit and basic code compliance. Commercial work may involve multiple permits, inspections, fire ratings, and stricter documentation. Expect longer lead times and more coordination with building authorities.
- Access, safety, and scheduling: Home projects typically involve a single access point and standard safety practices. Commercial jobs require formal safety plans, fall protection, more robust scaffolding, traffic control, and sometimes after-hours work or phased scheduling to minimize business disruption.
Key differences in approach
- Scope definition: For homes, a deck repair might be a patch, a product upgrade, or a deck-level overhaul. For commercial properties, prepare for a full-system repair or replacement if the membrane is compromised over large areas.
- Warranties and longevity: Residential repairs often target 10–15 year warranties with mid-range guarantees. Commercial work may involve longer-term maintenance agreements and more rigorous performance expectations.
- Contractor qualifications: Residential-focused contractors are common, but commercial projects should involve licensed roofing professionals with experience in large-scale systems and reputable safety records.
Practical considerations for homeowners
- Get a precise assessment: Ask for a written scope that distinguishes patchwork from full-system repair and identifies membrane types, drainage improvements, and flashing fixes.
- Verify compatibility: Ensure proposed materials will integrate with the existing roof deck and membrane to avoid premature failures.
- Insist on written warranties: Look for manufacturer warranties on materials and contractor workmanship, with clear coverage periods and conditions.
- Compare bids on more than price: Favor bids that outline permit plans, safety measures, project sequencing, access requirements, and a clear timeline.
- Plan for weather windows: Schedule repairs during favorable weather to minimize delays and protect newly repaired areas.
Quick decision checklist
1. Determine if the project is a patch, a deck-wide refresh, or a full system replacement.
2. Confirm the contractor has experience with both residential and commercial roof decks or partner with a firm that can handle the complexity.
3. Request a written safety plan, insurance proof, and a detailed workmanship warranty.
4. Review how drainage, flashings, and seams will be addressed across the entire deck.
5. Align on a realistic timeline, permit plan, and on-site access logistics.
How Roof Deck Repairs Vary by Location
Climate and weather impact
Your region's climate shapes every aspect of a roof deck repair, from material choices to timing. In cold, freeze-thaw areas, water intrusion can lead to rot and fastener loosening if drainage and flashing aren't nailed down properly. In hot, sunny regions, sun exposure and UV degradation push us toward high-UV membranes and reflective finishes. Humid coastal zones bring moisture and salt air, accelerating corrosion and mold risk. Dry, wind-prone deserts emphasize expansion joints and robust edge protection. Each climate calls for different details in flashing, ventilation, and waterproofing.
- Freeze-thaw and moisture control: choose rot-resistant framing, correct gaps, and a solid moisture barrier.
- UV resistance and heat management: opt for UV-stable membranes and reflective coatings.
- Ventilation and drainage: ensure proper ventilation under the deck and a slope for water runoff (typically 1/4 inch per foot).
- Wind considerations: in high-wind areas, secure edge details and flashing with corrosion-resistant fasteners.
Codes, permits, and inspections
Regulatory requirements change by state, county, and even city. Some places require permits for structural work on roof decks; others treat minor repairs as maintenance. Codes often reflect local climate, wind, or seismic risks, so what's allowed here may differ there.
- Before you start: contact your local building department for permit needs and required inspections.
- HOA considerations: many developments have stricter rules than the local code.
- Documentation: keep a record of design specs, materials, and inspection certificates for future repairs or resale.
Materials and fasteners by region
Climate and exposure drive what you'll use for boards, membranes, and fasteners. Coastal or salty environments demand corrosion-resistant hardware; inland and dry areas may tolerate different fastener coatings.
- Fasteners: stainless steel or epoxy-coated/hot-dipped galvanized fasteners in corrosive zones; standard coatings in milder regions.
- Deck boards and framing: pressure-treated lumber is common, with termite-resistant species or composites in certain markets.
- Membranes and underlayment: asphalt-based or self-adhering membranes in many regions; PVC or TPO sometimes preferred in very hot climates.
- Ventilation and drainage: regional moisture levels influence how aggressively you need to vent and drain.
How this service varies in different regions in the United States
- Northeast: prepare for snow loads and recurring freeze-thaw cycles. Prioritize rot resistance and robust flashing; plan repairs for late spring after the worst of winter, with attention to ice dam-related concerns.
- Southeast: heat, humidity, and termite pressure shape material choices. Use moisture-ready barriers, termite-resistant framing when needed, and consider hurricane-grade fasteners and edge protection in coastal zones.
- Midwest: wide temperature swings demand stable substrates and strong moisture barriers. Focus on balanced ventilation, proper drainage, and seasonal timing to avoid summer heat or spring rains.
- Southwest: extreme sun and heat increase membrane lifespan considerations and heat expansion. Favor UV-stable products, reflective finishes, and shading considerations where possible.
- West Coast: seismic and wind codes drive attachment methods and bracing. Coastal areas require corrosion resistance due to salty air; inland areas may emphasize structural checks for movement and load paths.
- Pacific Northwest: high rainfall and mold risk call for breathable, well-sealed systems and rapid drainage. Prioritize moisture management, durable membranes, and frequent inspections to catch rot early.
Quick steps for regional planning (numbered)
1) Verify local permit requirements and HOA rules for your county or city.
2) Align repair timing with your climate's best weather window (post-winter or dry season).
3) Specify climate-appropriate materials and corrosion-resistant fasteners; request options.
4) Ensure a plan for ventilation, drainage, and seasonal inspections as part of the repair.