Last updated: Apr 19, 2026
Marquette sits on Lake Superior and is known for heavy lake-effect snowfall, which creates repeated roof loading and unloading through the winter. That means every storm adds a layer of weight, then the melt cycles pull it back down. Over a season, this isn't a single burden-it compounds. If your attic isn't ready to breathe and your gutters aren't ready to shed meltwater, you end up with sagging lines, damaged shingles, and, worst of all, ice dams that back up into the living space. The risk isn't theoretical: it's predictable, and it happens year after year when snow piles up and thaws repeatedly.
Long cold stretches followed by brief thaws make ice damming a primary roof concern in Marquette rather than a secondary winter issue. When heat escapes from the attic or hot rooms, snow near the eaves melts first, then refreezes at the colder attic boundary, forming a dam that traps water behind it. That trapped water can back up under shingles, leak at fasteners, and rot the deck and fascia. The critical window is late winter into early spring, but dam formation can start after the first few big storms. To keep water from diving into walls, you need proactive heat management: a well-sealed, vented attic, consistent insulation, and careful attention to chimney and penetrations where warm air leaks march up to the roof plane.
Homes near the lakefront and on exposed ridges can see stronger wind-driven snow movement, which affects drift patterns along eaves, valleys, and roof-to-wall intersections. Drifts build up under overhangs and in low-slope valleys, creating higher weight zones and increased ice dam risk. If your roof has multiple slopes, check that valleys and ridge lines are properly flashed and that snow guards are installed where needed to prevent rapid sliding that can damage gutters and create blow-off hazards. In windy zones, consider steeper roof pitches or enhanced edge detailing to slow drifting and give meltwater a cleaner path to eaves and gutters.
Start with insulation and ventilation: a tight, well-insulated attic paired with balanced soffit and ridge ventilation reduces heat loss that drives ice dam formation. Check that attic baffles remain in place to maintain airflow above insulation. Seal penetrations around pipes, electrical chases, and vent stacks with warm-air barriers to minimize warm-air leakage into the attic. Gutter maintenance is non-negotiable: clear debris before the first big snow event, install heat cables only as a last resort and with a controlled layout to prevent uniform ice sheets, and ensure downspouts drain away from the foundation. Consider roof edge enhancements-strict attention to fascia, drip edge, and flashing at all wall intersections reduces meltwater intrusion. If you're replacing roofing material, prioritize systems with robust underlayment and proven ice-damming resistance. In Marquette's conditions, you're choosing not just a roof, but a winter defense.
The practical reroofing season in Marquette is concentrated from late spring through early fall because winter conditions and shoulder-season freeze-thaw cycles limit tear-off and installation days. When planning, think of a tight calendar: you want dry decking, moderate temperatures, and predictable days without sudden storms. Roofers will push to finish before lake-effect storms arrive, so the window for a full tear-off tends to be shorter than in southern Michigan. The goal is to time the project to minimize openings that expose underlayment to cold snaps and wind-driven moisture.
Spring brings thaw and rain that can delay access, staging, and decking dry-out after snow season, especially on older homes where hidden moisture is discovered during tear-off. If the roof has experienced repeated freeze-thaw cycles, there is a higher chance of decking moisture or soft spots surfacing in April or May. Plan for a staged approach: first address any ice-dam risk areas with temporary safeguards, then proceed with full tear-off only after the decking has stabilized and is dry to touch. Weather delays in spring are common, so build a buffer into the schedule and keep the crew prepared for back-to-back days of work.
Autumn projects in Marquette face a narrowing weather window as cold nights, wind, and early snow risk complicate shingle sealing and job scheduling. Sealing performance drops as temperatures fall, so many crews avoid late-into-fall starts unless the forecast shows several consecutive days above freezing with low wind. If a project must cross into late autumn, anticipate possible re-sealing challenges and plan for moisture management measures to prevent ice-dam development once heating seasons begin. A well-timed autumn kickoff should align with a forecasted stretch of stable air and daylight hours that allow proper nail-setting and shingle adhesion.
Given lake-effect snow loads, ice-dam prevention is central to every re-roofing plan. Start with a thorough inspection of rafter structure and underlayment compatibility for cold-season performance. Use underlayment that resists meltwater infiltration, and verify attic venting to reduce condensation. During tear-off, prioritize swift removal of snow accumulations and ensure proper channeling of meltwater away from eaves. In Marquette, systems must tolerate rapid temperature swings; confirm that flashing, valleys, and chimney penetrations are sealed with materials rated for low-temperature installation and wind-driven exposure.
Coordinate access during windows of dry weather, and arrange staging areas to minimize snow clearance needs. If aging soffits or fascia exist, address them early to prevent moisture intrusion during thaw periods. Communicate contingency plans for spring rain or autumn geometrics, and schedule ventilation and insulation checks as a complementary task to protect against future freeze-thaw cycles. Finally, select materials that balance rain resistance, wind uplift, and long-term durability given the unique lake-effect climate.
Asphalt shingles remain common in Marquette, and that durability and familiarity can help a homeowner feel confident in a quick build during the short U.P. construction window. However, winter ice backup and repeated freeze-thaw exposure put a spotlight on underlayment choice and attic performance. When choosing asphalt shingles, pay close attention to the underlayment system: a high-quality synthetic or rubberized underlayment paired with a vapor-permeable, well-sealed attic hatch and penetrations reduces the risk of ice dams forming behind soffits and along roof valleys. In practice, that means ensuring proper attic ventilation to keep decking near or above outdoor temperatures during deep cold snaps, and designing overhangs that shed wind-driven snow away from the eaves rather than funneling it toward the walls. In this climate, attic insulation should be continuous and robust, with compression- and moisture-resistant baffles to maintain airflow to the peak. A carefully detailed drip edge and sealing at penetrations help prevent meltwater from seeping into fascia or soffit cavities during occasional thaw events. For homeowners who value a familiar look and straightforward maintenance, upgraded asphalt options paired with an attention to underlayment and attic performance provide a reliable balance of cost, availability, and repairability, especially when the goal is quick interim protection between heavy snow seasons.
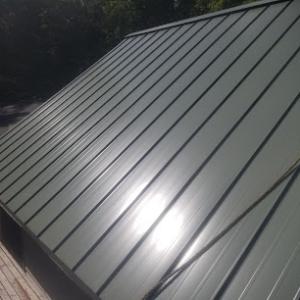
Metal roofing is a strong local fit because it sheds snow efficiently, a clear advantage when Lake Superior-laden storms unload their burden. Yet in Marquette that benefit also requires planning for snow retention over entries, walkways, and lower roofs. If metal is chosen, consider a design with a slightly greater rake and dedicated snow guards or brackets in zones over doors, stairs, and sidewalks, to prevent dangerous descents as temperatures swing above and below freezing. Panel profiles with standing seams reduce seam exposure to wind-driven moisture, but all fasteners and penetrations must be carefully flashed to resist ice buildup around ridge lines and vent stacks. A key practical move is to coordinate overhangs and gutters so meltwater is directed away from walkable paths and foundation edges. For many winters, the metal roof pays back through reduced ice dam risk and faster snow shedding, but it also demands proactive drainage planning and periodic snow management to protect entryways and lower roof faces. If a home includes a shaded or low-slope section, pairing metal with an appropriate hands-on snow management plan ensures the system serves its purpose rather than creating a new set of hazards along steps or porches.
EPDM is relevant on low-slope sections and additions, where standing snow and slow spring melt in Marquette can expose drainage and seam weaknesses. On these surfaces,EPDM's seamless expanse reduces the number of exposed seams that ice can cling to, yet it still requires careful edge detailing and flashing against walls and penetrations. For additions that blend into the original roofline, ensure that drip edges and transition details are matched to the existing envelope so that meltwater does not pool at transitions during the melt season. EPDM performance hinges on proper seam sealing and a robust perimeter seal, especially where the new surface ties into older roofing. In practice, choosing EPDM for low-slope zones minimizes ice-prone pockets, but it benefits immensely from a maintenance plan that inspects and re-flashes any questionable edges after tough winters. For a Marquette home, this approach pairs well with a targeted ice-dam prevention strategy across more exposed areas, while keeping long-term durability and flexibility in mind.
Nash Creek Construction
(906) 202-1294 www.facebook.com
125 Riverland Dr, Marquette, Michigan
5.0 from 1 review
Roofing and siding contractor. Specializing in custom standing seam metal roofs.
Marquette's older housing stock often carries decades of winter history, including condensation and intermittent ice buildup that can go unseen until a thaw. When a roof is pulled back in these areas, moisture that has silently penetrated decking over the years can reveal itself as soft spots, warped boards, or lingering odors. Reroofing can unearth moisture-damaged decking after years of winter condensation and ice backup, and that damage changes the job from a simple covering to a fundamental structural check. If step flashing and eave edge details have never been inspected with an eye for past leaks, the repair bill can rise quickly once uncovering is necessary.
Repeated shoulder-season freezing and thawing in the Upper Peninsula places flashing lines, penetrations, and eave edges on a relentless wear curve. The process pushes water into gaps created by temperature swings, then freezes it into microcracks that extend into the roof assembly. In homes with older vent stacks, skylights, or chimneys, those vulnerable seams are often the first places where frost-related movement becomes visible as icicles lengthen or minor drips turn into active leaks during mid-winter thaws. The best defense is proactive inspection at the first signs of warm spells, before moisture penetrates beyond surface layers.
Homes that have gone through multiple reroof cycles in Marquette may hide ventilation and insulation problems that only become obvious during winter leak events. When decking is layered or compressed by successive coverings, attic air may no longer circulate properly, undermining ice-dam resistance. Look for signs of inadequate ventilation, such as frost buildup near soffits or attic hatch condensation, and consider whether the roof's current configuration truly addresses long-term moisture management. If winter leaks appear after a reroof, it's not just a surface problem-there may be a need to reassess attic insulation depth, vent placement, and overall roof-to-attic transition details.
Engage a contractor who understands Marquette's climate nuance and asks specific questions about past winters, condensation history, and any previous decking exposure. Request a comprehensive attic inspection that includes ventilation balance, insulation rating, and a careful assessment of flashing continuities at chimneys and skylines. When replacing roofing material, insist on addressing not only the surface but the supporting structure: deck condition, moisture content, and the integrity of edge and valley details. In homes with visible prior leaks, map out all known trouble spots and plan for a staged approach that prioritizes ice-dam resistance along eaves, downstream flashings, and penetrations.
In this city, costs reflect the Upper Peninsula labor market and a shorter annual installation window. That compressed season often means tighter scheduling, more tight-fitting crews, and a tendency for higher bids during the late winter-early spring push. When planning, expect prices to reflect the limited workable months and the urgent need to manage snow load and ice dam risk as temperatures swing. Local averages to use as your baseline are: Asphalt Shingles 350 to 600 USD per square, Metal Roofing 600 to 1100 USD per square, Concrete Tile 650 to 1200 USD per square, Synthetic/Composite Shingles 350 to 700 USD per square, Slate 900 to 1600 USD per square, and EPDM Rubber Roofing 4.5 to 7.5 USD per square foot, with each material carrying its own implications for ice-dam resistance and snow shedding.
Steeper pitches help shed snow, but they also introduce more complex tear-offs and decking repair when old layers or winter damage are present. That combination tends to push Marquette projects toward the upper end of the ranges. For asphalt shingles, you'll face a solid value with decent ice-dam resistance when paired with proper underlayment and ventilation, but heavy snows and frequent freeze-thaw cycles can drive up installation time and labor costs. Metal roofing tends to perform well in snowy winters, yet installation involves precise flashing around chimneys and skylights, and access during cold months can complicate scheduling. Concrete and slate offer long lifespans and solid ice-dam control, but their weight and cost can spike the project price, especially when roof structure needs reinforcement.
If a basic re-shingle is needed, asphalt shingles are typically the most economical entry point, followed by synthetic/composite options that blend price with performance. For a roof that prioritizes ice dam prevention and snow shedding, metal and slate deliver superior durability, though the up-front cost is notably higher. Concrete tile provides excellent longevity and a robust barrier against ice dam formation, but install complexity and weight can push bids upward. EPDM rubber is a practical choice for certain flat sections or low-slope areas, offering strong waterproofing at a more favorable price per square foot, though it isn't a standard snow-shedding solution for steep pitches.
Because the installation window is shorter, securing a crew early and confirming a precise start date matters more here than in many other markets. Weather-dependent delays can extend timelines and affect overall cost, particularly for tear-offs and winter-damaged decking. When requesting bids, ask for a detailed breakdown that shows material costs, labor hours, mobilization, and any necessary deck repairs. A well-documented plan helps anticipate ice-d dam mitigation measures, including underlayment choices and proper attic ventilation, which are essential for lasting performance in Lake Superior snow cycles.
A full re-roof project typically requires a permit through the local Building Department, not a no-paperwork maintenance item. In a climate with Lake Superior lake-effect snow and long freeze-thaw cycles, roofing decisions aren't cosmetic-they directly affect ice-dam risk, structural load, and energy efficiency. Expect the permit process to surface questions about the roof framing, attic ventilation, underlayment, and the chosen roofing material. The Building Department uses these details to verify that the installation will perform under Marquette's seasonal demands and comply with code provisions aimed at resisting snow buildup and ice formation along eaves and valleys.
Applicants should assemble project details, contractor information, and material specifications for submission. Include a clear scope of work, roof plan measurements, a materials list with the exact product line and color, and a summary of fasteners and underlayment. In practice, this matters because snow performance and code compliance are closely tied to the roofing system selected. If there is any modification to roof ventilation, eaves protection, or drip-edge treatment, document it precisely. If a repair or partial replacement is contemplated, note whether adjacent components-such as flashing, soffits, or fascia-will be addressed concurrently. Providing complete, organized information can smooth the review and reduce back-and-forth during permit review.
Inspections are generally performed during the work and after completion, with final approval issued once installation meets code and safety requirements. Expect an on-site check of attic ventilation and insulation adequacy, underlayment continuity, correct installation of starter courses, fastener patterns, and proper ice and water shield placement at eaves and transitions. Inspectors will also verify that roof penetrations for chimneys, vents, and skylights are correctly flashed and sealed to prevent ice dam leakage. If any deviations from the approved plan are discovered, the contractor should be prepared to request a plan adjustment or provide confirmation of code-compliant alternatives before final approval. Keep a copy of the permit card visible on site and ensure the contractor coordinates scheduling of inspections to align with the project's progress and Marquette's cold-season timeline.
Michigan homeowners insurance generally covers standard roof replacements when damage is properly documented, but Marquette-area claims often hinge on clear evidence of winter damage rather than obvious catastrophic loss. If ice dams have caused interior staining or multiple leaks, the adjuster will look for a direct link between those effects and the roof condition from recent snow events. A clean chain of causation helps your claim move from "possible" to "approved" more quickly.
Local adjusters may expect detailed photos of ice-dam effects, interior staining, flashing damage, and contractor warranty information before approving a replacement scope. Take a careful photo log across a full winter cycle: snow build-up against eaves, the moment you notice leaks, and any subsequent repairs. Include close-ups of ice dams, sagging gutters, and attic insulation or ventilation changes that relate to the damage. Collect any contractor warranties or written assessments to show the replacement plan is durable and up to Marquette winters.
In more remote Upper Peninsula service areas, claim processing can move slower, so Marquette homeowners benefit from documenting damage early and preserving a weather timeline. Start a dated file as soon as you suspect damage: note the date of heavy lake-effect snow, thaw cycles, and any subsequent freeze-thaw patterns that aggravate ice damming. Record who you spoke with, when, and what was promised. Keeping this historical record helps counter delays and supports a clear narrative for the claim.
Contact your insurer promptly after you observe damage, request an adjuster visit, and ask for guidance on the exact documentation they require. If possible, arrange a contractor to provide a written assessment and warranty details aligned with proven ice-dam prevention and repair measures. Maintain the weather timeline alongside the claim file to illustrate how Marquette's unique winter conditions affected your roof.
Autumn wind and hail events add a second damage pattern in Marquette beyond winter snow, especially on exposed homes influenced by open Lake Superior conditions. Roofs facing the lake bear the brunt of sudden gusts and hard hail that can nick edges, dent metal flare trims, and loosen shingles or fasteners that spent the summer readying for harsher months. The consequence is not always visible from ground level, so a careful post-storm check is essential after any storm that rattles the ridge line or rattles loose corner flashing.
Wind-driven precipitation near the lake can stress flashing details and ridge areas differently than in more sheltered inland neighborhoods. Lake exposure means that snow, wind-driven rain, and ice can peel back metal flashings or create micro-movements at hip-and-run valleys. In practical terms, inspect for lifted edges, loose sealant, or creased metal where gusts press against the roof edge. A small lift at a valley or a seam can become a pathway for moisture during thaw cycles, even if the rest of the roof looks sound.
Homes on exposed sites may need closer post-storm inspection even when damage is not immediately visible from the ground. Look for hairline lifts along the rake edges, suspect silhouettes along the ridgeline, and any unusual frost tracks on the roof surface after a warmer spell followed by a freeze. If moisture pools in any one area or if you notice granule loss clustered near the eaves, plan a focused inspection or a professional evaluation before the next freeze tightens its grip.