Ultimate Guide to Flat Roof Shrinkage
Last updated: Feb 28, 2026
Introduction to Flat Roof Shrinkage
What shrinkage on a flat roof is
Flat roof shrinkage refers to the tightening or pulling back of roof materials over time. It can show up as gaps at seams, edges pulling away, or material layers shrinking away from each other. When left unchecked, these changes can let in water, air, or debris and shorten the roof's lifespan.
Is shrinkage urgent or common?
- Common: Shrinkage is a fairly typical issue on flat roofs, especially as membranes age or endure many temperature cycles.
- Urgent risk: It becomes urgent when you start seeing active leaks, pooling water, obvious seam separation, or soft spots. These signs mean water may be finding its way into the structure and quick attention helps prevent bigger damage.
What causes flat roof shrinkage
- Temperature swings: Daily and seasonal heating and cooling pull and release materials, slowly shrinking the roof assembly.
- Sun exposure: UV can dry out and stiffen membranes, encouraging shrinkage over time.
- Material age and type: Older membranes (EPDM, TPO, BUR, asphalt-based types) tend to shrink as they lose elasticity.
- Substrate or insulation issues: Improper or degraded substrate can push or pull on the membrane.
- Installation gaps: If layers weren't allowed to acclimate or were rushed during installation, shrinkage can start earlier.
- Moisture changes: Wetting and drying cycles in decks or insulation can cause movement and shrinkage.
Quick high-level next steps
1. Do a careful, safe check from ground level or with proper rooftop safety gear to identify obvious problem areas.
2. Document what you see with clear notes and photos of seams, edges, and any membranes lifting.
3. Schedule a professional roof assessment to confirm the extent of shrinkage and potential leaks.
4. Get a written plan: whether repair, re-seaming, or partial replacement is recommended, plus cost estimates.
5. Plan long-term: weigh repair vs. replacement based on roof age, overall condition, and energy efficiency considerations.
What to look for (warning signs)
- Visible seam gaps or lines pulling apart along the roof surface
- Edges or corners lifting away from the substrate
- Cracking or crazing in the surface membrane
- Pockets of standing water after rain or irrigation
- Soft spots, cracking, or blistering in the roof deck or membrane
- Interior signs: ceiling stains, damp spots, or musty odors in the attic or upper rooms
What you can do today (homeowner checks)
1. Clear roof drains and check for any blockage that could exaggerate pooling.
2. Inspect exterior walls and parapets for new or widening gaps at the edge of the roof.
3. Look in the attic for moisture, dampness, or signs of insulation moisture intrusion.
4. Note any seasonal patterns—do problems worsen after heat waves or heavy rain?
5. Keep a simple maintenance log: dates of inspections, signs found, and recent weather conditions.
Is Flat Roof Shrinkage an Emergency? How to Assess Urgency and Take Action
Understanding the urgency
Flat roof shrinkage can signal real trouble, but urgency depends on what the shrinkage is doing. If water is actively intruding or if the roof is visibly damaged, it's more urgent. If the roof looks dry and intact, you have time to plan a professional assessment. Use your eyes, not assumptions, to guide the next steps.
- Active leaks are present inside the home during rain or when you've got standing water on the roof
- Pooling water remains on the roof for more than 24–48 hours after rain, with no signs of rapid drainage
- The membrane shows significant wrinkling, puckering, cracking, or is pulling away from flashing or seams
- Edges, parapets, or flashing are loose, bent, or visibly separating from the roof
- You notice a sudden sag, buckling, or a soft area in the roof deck that you can feel or see from an attic hatch or interior ceiling
Monitor if
- There are no active leaks yet, but you can see shrinkage lines or tension near seams, penetrations, or flashings
- Weather is dry and safe for short inspections; you can observe for 24–48 hours to see if anything progresses
- Drains or scuppers show slower drainage or slight standing water, but no interior leaks
Can wait if
- Minor shrinkage signs exist with no water intrusion and a dry forecast ahead
- Drains remain clear and surface dries quickly after rain
- You're able to schedule a professional roof inspection within the next week or two
Quick safety steps to take now
1) If leaks are active, place a container under drips and protect any valuables inside the home; avoid using hot tools or attempting temporary patches.
2) Keep people and pets off the roof and away from electrical lines or roof edges.
3) Do not attempt to seal, patch, or “tuck” the shrinkage yourself. A professional needs to assess substrate, membrane integrity, and flashing.
4) If you must check from inside, use a flashlight to look for daylight or water stains around seams and penetrations, but do not go onto the roof.
What a roofer will check
- Extent of membrane shrinkage, wrinkles, or curling and how far it extends from edges and penetrations
- Condition of flashing, sealants, and fasteners around vents, drains, and parapets
- Drainage performance and any ponding or blocked scuppers
- Substrate condition under the membrane and signs of deck damage or deformation
- Recommended repair or replacement options and a practical timeline based on current weather and roof use
Practical tips for planning a repair window
- If you're in a dry spell, schedule a professional assessment soon to prevent surprises during the next storm
- Ask for a written inspection report detailing findings, recommended repairs, and expected costs
- Consider long-term fixes that address shrinkage at multiple areas (not just the visible wrinkle) to prevent future leaks
What Causes Flat Roof Shrinkage?
Temperature swings and material contraction
Flat roofs endure drastic temperature changes from sun-soaked days to cool nights. Membranes, coatings, and sealants expand when hot and contract when cold. Over years, repeated cycling can cause micro-cracking, edge lifting, and gradual pull-back of the material away from fasteners or joints. This is especially noticeable around seams, penetrations, and roof edges. Look for subtle waviness along seams, tight corners that seem pulled in, or small straight-line cracks parallel to the membrane.
What to check:
- Seams that look compressed or pulled
- Corners or penetrations with slight puckering
- Soft or overly flexible areas that don't return to shape
Aging membranes and loss of flexibility
As a flat roof ages, especially asphalt-based or older synthetic membranes, plasticizers and bonding agents break down. The result is a stiffer material that can't accommodate movement or slight substrate shifts. Shrinkage can appear as tight lines radiating from fasteners or around flashings. Damage may start small and grow with each thermal cycle.
What to monitor:
- Brittle, stiff spots that crack when bent slightly
- Short, dark stress lines at joints or around penetrations
- Increased sensitivity to cold air and wind
UV exposure and weathering
Direct sun and UV radiation degrade surface layers, making membranes brittle and less able to accommodate expansion and contraction. Weathering also accelerates differential shrinking between coated and uncoated areas. Over time, this uneven aging creates visible shrinkage lines and edge pull-back.
Practical signs:
- Chalky, faded surface leading to uneven color blocks
- Localized shrinkage near the most sun-exposed zones
- Quick-drying, high-silhouette cracks at unprotected seams
Installation quality and adhesive/fastener issues
Poor installation is a leading cause of premature shrinkage. If membranes aren't properly adhered, seams aren't fully bonded, or fasteners are under-driven or over-driven, the material can pull away as it cools. Inadequate curing of adhesives or improper seam sealing can create micro-movements that manifest as shrinkage over time.
What to look for:
- Gaps or bubbles along seams
- Fasteners sitting flush vs. pulling the membrane tight
- Inconsistent adhesive coverage or gaps at lap joints
Substrate movement and deck deflection
If the roof deck experiences movement or flexes under loads, the membrane must accommodate that motion. Structural settling, framing shrinkage, or poor substrate preparation can lead to localized shrinkage as the membrane tries to pull tight against a shifting base.
How to spot it:
- Uneven sagging or deflection at the mid-span of long deck areas
- Seams that repeatedly stress and re-seal after rainfall
- Noticeable gaps at perimeter edges following seasonal changes
Flashing, edge details, and penetrations
Edges, flashing, and penetrations are high-stress zones. If flashing is poorly integrated or sealed with inferior sealants, shrinkage lines often radiate from these points as the material pulls away from the edge or around pipes and vents.
Watch for:
- Peeling around flashings or parapet joints
- Sealant cracks or hardening at terminations
- Narrow gaps between the membrane and metal flashings
Moisture management and ponding
Standing water or poor drainage can indirectly affect shrinkage. Waterlogged substrates and ponding load can stress the membrane and joints, accelerating shrinkage around low-lying areas or drains. Freeze-thaw cycles in ponded areas exacerbate the issue, causing micro-shifts that show up as shrinkage lines.
How to evaluate:
- Check for ponding near drains after rainfall
- Inspect around drains for edge lift or slow drainage
- Look for seasonal changes in flat sections that repeatedly pool water
Quick diagnostic steps (simple homeowner checks)
1. Inspect for visible seam gaps, edge lifts, or puckering near penetrations.
2. Tap the surface to feel for brittle vs. flexible areas.
3. Note any sections that always look tighter after cold nights.
4. Check flashings and edge details for cracks or peeling sealants.
Having this list helps you talk with a roofer about shrinkage causes and targeted repairs without guessing.
How Roof Materials Affect Flat Roof Shrinkage
Shrinkage doesn't hit every flat-roof material the same way. Material composition, cure/age behavior, and how seams are joined all shape how much and where shrinkage shows up. Below is a practical guide to the most common roof types you'll see on flats and how each one responds to shrinkage.
Common roofing materials and how shrinkage affects them
- EPDM (rubber membrane)

- How it's affected: Generally sturdy against shrinking, but over time the edges at laps and flashings can pull apart or form small cracks. Temperature swings and UV exposure can cause seams to “creep” if not properly adhered.
- What to watch for: seam separation near terminations, edge lifting, and fine crack lines at transitions.
- TPO (thermoplastic membrane)
- How it's affected: More prone to shrinkage effects than EPDM in hot climates. Large, flat areas can develop slight wrinkling or edge buckling if edge details or fasteners don't accommodate movement.
- What to watch for: seam peels, wrinkling toward corners, wind-driven edge movement.
- PVC (polyvinyl chloride)
- How it's affected: Generally stable when welded, but improper installation or substrate movement can reveal minor shrinkage around penetrations or at terminations.
- What to watch for: seam puckering, slight gaps at flashing, or movement at collars around vents.
- Modified Bitumen (MB) membranes
- How it's affected: Asphalt-based MB sheets can stiffen and shrink as they age, especially in heat. Self-adhesive MB can show lifting if adhesive ages or if substrate moved during installation.
- What to watch for: wrinkling or ridges along laps, edge lifts near penetrations, small leaks developing with age.
- Built-Up Roofing (BUR)
- How it's affected: Multilayer asphalt systems can shrink as older asphalt dries and hardens. Gravel cap helps protect but doesn't prevent shrinkage at joints and around penetrations.
- What to watch for: seam ridges, blistering along lines, slight edge curl near parapets.
- SPF (Spray Polyurethane Foam)
- How it's affected: SPF is fairly dimensionally stable after cure, but the foam can continue to creep slightly under load and temperature changes. The top coating and flashings are the first to show movement if not well bonded.
- What to watch for: hairline cracking at flashings, micro-seams along joints where the coating is stressed.
How shrinkage shows up by material (signs to look for)
- Edge and seam gaps, especially near parapets, penetrations, and deck joints
- Wrinkling or puckering in the membrane surface
- Raised seams or lifted flashings
- Cracks radiating from fasteners or terminations
- Small leaks developing where membranes meet or where adhesive has aged
Practical steps to address shrinkage (homeowner-friendly)
1. Inspect seasonally
- Check edges, seams, and penetrations after extreme heat or cold; note changes with photos.
2. Prioritize vulnerable areas
- Focus on laps, flashings, and terminations first; these are where shrinkage tends to show most.
3. Use proper sealants and playspace for movement
- Choose flexible, roof-grade sealants that accommodate movement without hardening or cracking.
4. Schedule pro assessments
- If you see repeated seam issues or edge lifts, a professional can audit for substrate movement, improper adhesion, or membrane compatibility.
5. Plan maintenance before damage grows
- Regular resealing or re-adhering high-movement seams can extend roof life and prevent leaks.
Quick mitigation tips by material
- For EPDM and MB: ensure lap joints are properly primed and adhered; consider edge detailing reviews every few years.
- For TPO and PVC: confirm heat-welded seams are intact and inspect around penetrations for edge movement.
- For BUR: maintain gravel cap integrity and monitor for asphalt creep near joints.
- For SPF: verify topcoat adhesion and flashings; touch up coatings to preserve elasticity.
By understanding how each material behaves, you can spot shrinkage early and keep your flat roof performing longer with targeted maintenance.
The Risks of Ignoring Flat Roof Shrinkage
Hidden leaks and moisture damage
Shrinkage creates gaps along the membrane, seams, and flashing where water can seep in during rain or even heavy dew. Over time, that moisture migrates into insulation and the roof deck, quietly compromising the building envelope. Left unchecked, you may notice stains on ceilings, musty odors, and increased humidity in habitables rooms.
- Gaps at edges, around penetrations, and along seams widen with temperature swings.
- Flashing can pull away from parapets, vents, or skylights, inviting leaks even in mild weather.
- Moisture trapped in insulation reduces energy efficiency and can lead to mold behind walls and in attics.
- Early signs might be hidden; you'll often detect them after a rain event rather than on a dry day.
Structural and material damage
Shrinkage puts stress on the roof system as it contracts and moves. That mechanical tug can loosen fasteners, create tenting or wrinkling of the membrane, and pull on flashing details. Over time, this undermines the roof's ability to shed water and resist wind uplift.
- Fasteners can back out or corrode, weakening wind resistance and edge grip.
- Membrane tenting or wrinkling expands small problems into larger leaks.
- The substrate (plywood or OSB) can absorb moisture, warp, or delaminate, complicating future repairs.
- Flashing around vents, skylights, and terminations becomes more prone to failure.
Safety, maintenance, and warranty implications
Ignoring shrinkage signals potential ongoing damage and can put you at risk for safety issues and warranty loss. As edges pull away or sheets lift, trip hazards and sharp edges become more common on access routes.
- Many manufacturer warranties require proper maintenance and timely repairs; neglect can void coverage.
- In cold climates, gaps can trap moisture and ice, increasing the risk of ice dam-related damage.
- Increased wind uplift risk as detailing deteriorates; gusts can peel material away from the roof edge.
- Debris buildup in gutters and drains worsens pooling, accelerating deterioration.
Financial impact: repairs and insurance
What starts as a minor issue can become a major expense if you wait. Small leaks, repeated patching, or delayed replacement often lead to higher overall costs.
- Patch repairs tend to multiply; a shrinking membrane usually means more frequent fixes.
- Delayed repairs can necessitate full roof replacement sooner than anticipated.
- Insurance claims can be complicated if damage is framed as neglect rather than an expected aging issue.
- Damage to insulation, deck, or structural framing adds substantial costs beyond the membrane replacement.
What to do if you notice shrinkage
1. Document every sign with dated photos and notes showing locations and extent.
2. Schedule a licensed roofer to inspect the system and confirm the cause and severity.
3. Obtain a written assessment that lists required repairs, timelines, and costs.
4. Prioritize addressing the most vulnerable areas first (edges, flashings, penetrations) to reduce interior risk.
Preventive mindset: small steps you can take now
- Keep the roof surface clear of debris to support proper drainage and reduce standing water.
- Schedule regular inspections, especially after heavy storms or temperature extremes.
- Inspect and replace worn sealants, damaged flashing, and cracked edging promptly.
- Maintain attic ventilation and consistent insulation to minimize condensation and seasonal shrinkage effects.
How to Diagnose Flat Roof Shrinkage
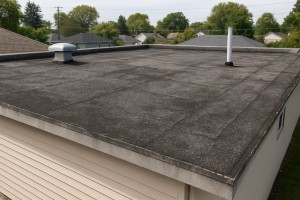
Visual signs to inspect
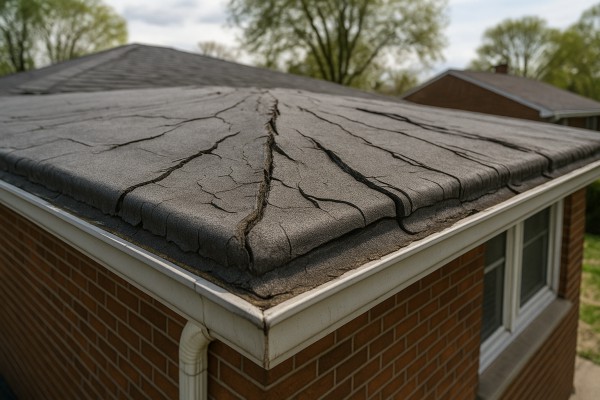
- Wrinkles, folds, or ridges that run parallel to the roof edges or seams.
- Buckling or tenting around flashings, penetrations (vents, skylights, drains), or along perimeter edges.
- Seams pulling apart or flashing backing away from the substrate.
- Gaps between the membrane and parapet walls, edging, or drip edges.
- Uneven surface feel or a noticeable “crown” where the membrane puckers under heat.
These signs don't prove shrinkage alone, but they're the most common, observable indicators that the membrane may be constricting or pulling away due to shrinkage over time.
Step-by-step homeowner diagnostic process
1) Gather roof basics
- Note the membrane type (EPDM, TPO, or PVC, for example) and the roof's age.
- Check recent repairs or coatings, since improper adhesion or overcoating can mimic shrinkage.
- Identify any recent weather events or heat waves that could have affected the membrane.
2) Do a surface survey under safe conditions
- Inspect on a dry, calm day when the roof is accessible from a sturdy ladder or platform.
- Avoid walking on weak or unstable sections; use the ladder or a roof-safe vantage point to view from the edge if you can't safely access the center.
3) Inspect edges, seams, and penetrations
- Pay close attention to seams near parapets, curbs, and around penetrations.
- Look for gaps, pulling, or wrinkling that radiates outward from these points.
- Check the drip edge, flashing, and counterflashing for signs of movement or separation.
4) Check drainage and ponding
- Note any areas where water ponds longer than 48 hours after rain.
- Ponding can accelerate membrane wear and may be mistaken for shrinkage, but persistent ponding often signals substrate or insulation issues that accompany shrinkage.
5) Compare multiple areas
- Shrinkage often shows up in patches, not uniformly. Compare a few representative areas:
- A high-traffic or sun-facing area versus a shaded area.
- Near edges or corners versus the flat expanse in the middle.
- If you find consistent wrinkling or pulling in several spots, shrinkage is more likely than a localized defect.
6) Document with photos and measurements
- Take wide and close-up photos from the same angles.
- Use a tape measure to note the width of a flattish seam or the distance from a known fixed point to the membrane edge at several spots.
- Create a simple map or notes indicating where signs are strongest.
Simple measurement checks you can do
- Measure a straight, uncluttered 6–10 foot stretch of membrane. Place a straightedge along the surface and look for any curvature, buckling, or gaps along the edge of the straight line.
- Mark fixed reference points at the edge and at a seam every 2–4 feet. If measurements vary noticeably over time (for example, from season to season), it can indicate shrinkage-related movement.
- Compare reflections or shadows along seams during morning and late afternoon sun; increased tension may reveal more pronounced wrinkles as temperatures rise.
When to call a professional
- You see consistent wrinkles that span large areas, seams separating, or flashing that's lifted away from the substrate.
- There are signs of sagging or ponding that you can't attribute to a simple drainage issue.
- You're unsure how to safely access the roof or interpret the signs without risking damage.
Documenting the signs and measurements now helps a roofer assess whether shrinkage is the primary issue or if other substrate or drainage problems are contributing to the symptoms.
Repair Options for Flat Roof Shrinkage
Temporary fixes
- Assess the area and keep it dry. Shrinkage wrinkles can trap moisture, so prioritize a dry surface before any patching.
- Clean and dry the surface thoroughly. Remove dirt, debris, and any loose flashing or membrane fragments.
- Use temporary patches for small areas. Apply self-adhesive seam tape or roofing cement over the wrinkle, then cover with compatible fabric reinforcement if available.
- Seal edges to slow water intrusion. Run a bead of compatible sealant along the seam edges and wrinkle borders to reduce leaks until a longer-term fix is done.
- Add light ballast only if you must. Place non-penetrating, flat ballast (like smooth pavers) over a protective mat to keep the patch in place, avoiding sharp edges that could puncture the membrane. Do not rely on ballast as a permanent solution.
- Monitor after rain. Check for any new pooling or creeping wrinkles within 24–48 hours to determine if a more permanent repair is needed.
Minor repairs
- Goal: restore adhesion and seal small areas without replacing large sections. Begin on a dry, clean surface.
- Cut a patch slightly larger than the damaged area. Use compatible membrane scrap or a patch sheet sized about 2–3 inches bigger on all sides.
- Prep and prime. Clean the area, and apply the recommended primer to improve adhesion if the patch calls for it.
- Adhere the patch. Position the patch, roll with a hand roller to smooth out air bubbles and ensure full contact.
- Seal the edges. Run a conservative bead of seam sealer or compatible sealant around the patch perimeter, then press into place to blend with the existing membrane.
- Reinforce if needed. For additional durability, embed a thin fabric reinforcement over the patch and seal the seams again.
- Cure and test. Allow the patch to cure per product instructions and test with a light rain or gentle sprinkler after 24–48 hours to confirm a seal.
Partial replacement
- When shrinkage affects a defined section, partial replacement is a prudent next step. Start by isolating the damaged zone.
- Remove damaged membrane carefully. Use a utility knife to lift the edges and separate the compromised area from sound material, taking care not to tear nearby sections.
- Inspect the substrate. Check the deck for signs of water damage, rot, or deterioration; repair or replace decking as needed before installing new material.
- Install a new membrane patch or panel. Cut a replacement sheet that matches the existing system, align seams, and secure with the recommended adhesive or mechanical fasteners as required by your membrane type.
- Flash and seal the perimeter. Reflash through-penetrations and edges with compatible flashing materials; seal all seams and edge joints thoroughly.
- Perform a controlled water test. After installation, run a test by applying water to the repaired zone and observing for leaks during a short rain simulation or controlled test period.
- Document and verify. Confirm that the entire surrounding area remains dry and that the new panel lays flat without further wrinkling.
Full roof replacement
- When shrinkage is widespread or the substrate has been compromised, a full roof replacement is often the most reliable long-term solution. Begin with a thorough assessment of decking, insulation, and drainage.
- Remove the old roof system. Strip all layers down to the deck, taking care to avoid damaging vents, penetrations, and any embedded hardware.
- Repair or replace the deck. Replace rotten or delaminated decking, repair fascia and edge details, and ensure proper drainage slope before new installation.
- Install new insulation and barrier. Add appropriate insulation, a vapor barrier if required by code, and ensure a clean, dry deck for a superior finish.
- Install the new membrane system. Choose a suitable flat-roof system (TPO, EPDM, PVC, or built-up). Follow manufacturer guidelines for installation, seams, and flashing.
- Flashings and penetrations. Re-flash parapet walls, vents, vents collars, skylights, and any other penetrations to match the new roof system.
- Quality checks and expectations. Perform a leak test, inspect seam integrity, and verify thermal performance. Schedule periodic maintenance as part of the warranty plan.
Typical Costs to Fix Flat Roof Shrinkage
Minor repair: reseal and patch
- Description: Small wrinkles or cracks near seams, corners, or flashings. Shrinkage is localized, and the roof surface remains largely intact.
- Typical cost range: $200–$600 for a single small patch or seam reseal.
- What's included: cleaning and drying the area, applying a flexible sealant or coating, reinforcing with fabric or mesh, resealing seams, and a brief cure/inspection period.
- How it's done: 1) identify the exact problem spot; 2) clean and dry the surface; 3) apply sealant or topcoat; 4) embed reinforcing fabric at the seam; 5) recoat and cure; 6) verify there are no leaks.
- Expected durability: roughly 4–8 years before another touch-up is needed, depending on climate and roof material.
- Benefits: quick fix, minimal disruption, preserves most of the existing membrane.
Moderate repair: patch larger sections or flashing replacement
- Description: Larger patches, multiple seams showing signs of shrinkage, or damaged flashing around vents, edges, or penetrations. Noticing more widespread but still localized failure.
- Typical cost range: $800–$2,500.
- What's included: removing damaged membrane in the affected area, preparing a clean edge, installing a new patch or membrane segment, resealing seams, and applying a protective topcoat.
- How it's done: 1) assess the extent of shrinkage; 2) cut out compromised material; 3) install patch with appropriate adhesive/mastics; 4) reseal all seams and flashings; 5) re-coat and cure; 6) perform a leak test.
- Expected durability: 6–12 years with proper installation and climate considerations.
- Benefits: prevents leaks in a bigger zone and extends roof life beyond a minor repair.
Major repair: full membrane replacement or significant deck/insulation work
- Description: Widespread shrinkage across large sections, buckling, or damage that affects structure, insulation, or multiple penetrations. May require substantial membrane removal and replacement.
- Typical cost range: $4,000–$12,000+.
- What's included: removal of the existing membrane, inspection and possible replacement of damaged substrate or insulation, installation of a new membrane (EPDM, TPO, or PVC), full flashing replacement, re-sealing all penetrations, and surface coating.
- How it's done: 1) demolition/removal of old material; 2) address deck or insulation issues if present; 3) install new membrane; 4) install and seal flashings; 5) apply finish coating if used; 6) perform water intrusion test.
- Expected durability: 15–25+ years depending on material and installation quality.
- Benefits: restores a large roof area, prevents ongoing leaks, and often improves insulation performance.
What factors affect cost
- Roof size
- Larger roofs mean more material and time, often billed per square foot or per 100 sq ft blocks.
- Access
- Limited access, height, or tight corners increase labor time and equipment needs (scaffolding, lifts).
- Material type
- Different membranes (EPDM, TPO, PVC) and coatings have distinct material costs and installation requirements.
- Extent of damage
- Isolated spots stay on the lower end; extensive shrinkage requiring patching across many zones or full replacement rises rapidly.
- Local labor rates
- Region-to-region price variation, plus permit or code requirements, can shift total costs noticeably.
How Long Can You Wait to See the Effects of Flat Roof Shrinkage?
Early warning signs to watch now
- Gaps or separation along roof seams, especially where two materials meet.
- Visible buckling, wrinkling, or curling of the roof membrane.
- Flashing at edges, penetrations, or penetrations pulling away from the wall.
- Interior signs: damp spots, staining, or a musty smell after rain.
- Standing water in low areas that seems to linger longer than it should.
If you notice any of these, you're not failing the roof—you're signaling that shrinkage is progressing and warrants a closer look from a pro soon.
What happens if you wait to address the problem in several timeframes
- 0–3 months
- Seams widen a bit more; small leaks may appear only during heavy rain.
- Insulation can start to absorb moisture, reducing energy efficiency.
- Minor interior staining might show up after storms, but damage is still contained.
- 3–6 months
- Seams and flashing can pull farther apart, increasing the chance of leaks.
- Moisture can migrate into insulation and subroof layers, leading to odor or mildew.
- Pooled water becomes more common in low spots, stressing the membrane further.
- 6–12 months
- Leaks become intermittent and harder to trace; interior water intrusion grows.
- Mold or mildew growth may appear in attic or ceiling cavities.
- Repeated wetting and drying cycles can warp decking and compromise roof support components.
- 1–2 years
- Structural deck damage becomes more likely; fasteners may lose holding power.
- Widespread interior damage: stained ceilings, warped drywall, or paint failure.
- Repair costs rise as smaller fixes are replaced with larger roof or deck repairs.
- 2+ years
- Major system failure becomes a real possibility: you may need a full roof replacement.
- Mold remediation and extensive interior repairs can dramatically increase costs.
- Energy losses and ongoing moisture problems can affect indoor air quality and comfort.
Note: the exact timing varies with climate, roof materials, ventilation, and how well drainage is maintained. Flat roofs are especially vulnerable to water pooling, which accelerates shrinkage effects.
What you can do now to minimize damage
1. Schedule a professional roof inspection to assess seams, flashing, and memory of the membrane.
2. Document issues with clear photos and notes for your roofer or insurer.
3. Keep drainage clear: remove debris and ensure gutters and downspouts are directing water away from the edges.
4. Limit traffic on the roof; avoid walking on fragile areas, and address any interior signs of moisture promptly.
How Flat Roof Shrinkage Varies by Location and Climate
How This Problem Varies by Region & Climate within the United States
- Southwest & Desert Southwest (e.g., Arizona, Nevada, parts of California): extreme sun and high daytime temperatures cause membranes to experience repeated high-heat cycles. Shrinkage tends to show up as edge curling, seam pulling, or micro-cracking near flashings where adhesive bonds are stressed. Less annual rainfall means fewer moisture-related swelling, but surface drying can make coatings stiff and less forgiving.
- Southeast & Gulf Coast (e.g., Florida, Alabama, Louisiana): hot, humid conditions and frequent rain create moisture movement within the roof system. Expansion and contraction from cycling temperatures are compounded by humidity. Shrinkage may appear as softening of some membranes or adhesive joint failure in high-UV areas, especially where coatings have aged. Salt spray in coastal zones can accelerate deterioration of exposed edges.
- Pacific Northwest (Washington, Oregon): mild to warm summers with persistent cloud cover and high rainfall. Shrinkage is often linked to moisture ingress and substrate movement rather than extreme heat. Membranes may stay more pliable, but persistent moisture can loosen seams and flashings if drainage isn't adequate.
- Northeast & Midwest (New England, Great Lakes, Inland Plains): pronounced freeze-thaw cycles. Water that gets behind seams or around flashings can freeze and expand, stressing the roof membrane. When temperatures swing rapidly, joints and edges undergo repeated expansion and contraction, increasing the risk of micro-cracks and edge separations.
- Mountain & Intermountain Regions (e.g., Colorado, Utah, parts of Nevada): wide diurnal temperature swings and high solar exposure. Day-to-night cycling drives shrinkage and expansion at different rates across materials. UV exposure accelerates aging of coatings, making shrinkage cracks appear sooner around penetrations and terminations.
- Coastal vs. Inland Variations: coastal climates add salt exposure and higher humidity, which can corrode metal flashings and degrade bonded seams faster. Inland, alkalinity in some soils and dust can affect substrate prep and adhesion, amplifying shrinkage risks if the roof isn't properly primed.
How the Climate Affects Different Flat Roof Materials
- Asphalt-based membranes (BUR, modified bitumen): more sensitive to UV and temperature shifts; in hot climates these can become brittle at edges, while in humid climates adhesive bonds may degrade faster.
- EPDM: generally forgiving with heat but can show shrinkage at seams if adhesive-based detailing is used; humidity and moss growth in wet regions can affect edge sealant longevity.
- TPO/PVC: typically good reflectivity and heat resistance, but in extreme heat or heavy UV, edge and seam adhesives can fail if not installed correctly. Shrinkage is most visible at transitions to walls and penetrations.
- Coatings: reflective coatings help mitigate heat-induced shrinkage but rely on proper surface prep; in wet climates, coating failure can mimic shrinkage symptoms around seams.
Practical Implications for Homeowners by Climate
- In hot, sunny regions, expect faster aging of surface coatings and more pronounced edge shrinkage. Prioritize reflective finishes and proper edge detailing.
- In humid or coastal climates, keep an eye on seams and flashings for moisture-driven separation. Ensure proper drainage and consider moisture-curing primers where appropriate.
- In freeze-thaw zones, inspect after winter thaws and early spring for crack propagation around penetrations and flashing lines.
- In mixed climates, combine robust substrate prep with quality fasteners, sealants, and compatible membranes to accommodate both heat and moisture.
Practical steps you can take (step-based)
1) Map your climate pattern
- Review your local average temperatures, humidity, and precipitation trends for the past few years.
- Note how many seasonal extremes your roof experiences.
2) Schedule targeted inspections
- Frequency: biannual checks, with an extra inspection after severe heat waves or heavy freezes.
- Focus areas: edges, seams, flashings, penetrations, and drain outlets.
3) Match materials to climate
- Choose membranes and sealants rated for your region's typical temperatures and moisture levels.
- Use proper substrate prep and compatible fasteners to reduce pull-out and seam failures.
4) Maintain drainage and ventilation
- Ensure gutters, scuppers, and internal drainage paths are clear.
- Check roof ventilation and insulation to keep substrate temperatures in a safer range.
5) Track performance after seasonal transitions
- Look for new shrinkage lines, edge curl, or seam gaps after summer heat or winter thaws.
- Document changes to guide future repairs or membrane upgrades.