Ultimate Guide to Membrane Cracks or Tears
Last updated: Feb 28, 2026
Introduction to Membrane Cracks or Tears
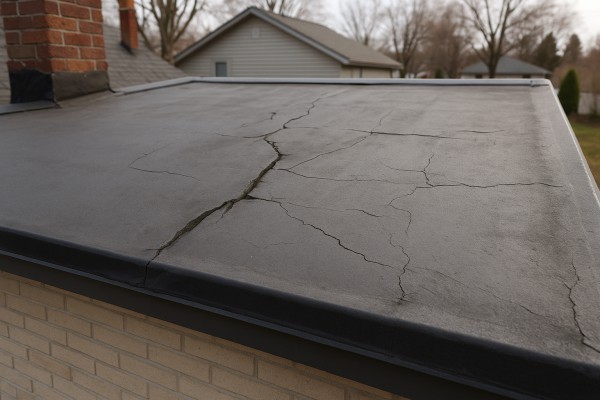
A cracked or torn roofing membrane is more than a cosmetic flaw—it's a sign the top layer protecting your roof is compromised. Membranes, like EPDM, TPO, or PVC, keep water from seeping into the roof deck, insulation, and interior spaces. When cracks or tears appear, water can find its way through seams, fasteners, or penetrations, especially during heavy rain or temperature swings.
Small cracks aren't always urgent, but they can grow if left unaddressed. A shallow crack near a seam or a thin puncture may stay small for a while, while deeper tears or widespread cracking can worsen quickly with sun exposure, wind, and ponded water. The key is recognizing what you're looking at and how it might affect your roof system over time.
What you're seeing
- Hairline cracks along seams or across the surface
- Tears that run through the membrane, sometimes near penetrations (vents, pipes, skylights)
- Wrinkles, blisters, or punctures where the membrane has lifted or shifted
- Seams pulling apart or fastener patches peeling away
- Signs of water intrusion in the attic or on ceilings, such as staining or damp insulation
Is it urgent or common?
- Common: Membrane roofs are designed to be durable, but aging roofs, exposure to sun, and temperature cycling naturally lead to cracks and small tears over time.
- Urgent: Active leaks, interior water intrusion, or large or spreading tears require prompt attention. If you notice dripping, dark stains, or mold, treat it as an emergency, especially after heavy rain or storms.
- Not urgent (in some cases): If a small crack is present but there are no leaks, you have dry conditions, and the roof is otherwise sound, you have time to plan a professional assessment.
High-level next steps
1) Assess safely from ground level when possible, and avoid walking on slick or damaged sections. If you must access the roof, use proper fall protection and cautious footing.
2) Document the damage with clear photos from multiple angles, including the edges of any cracks or tears and nearby penetrations.
3) Look for signs of active leaks inside the home (staining, damp insulation, musty odor) to prioritize urgency.
4) Protect interior spaces: place buckets under any active leaks, remove valuables from affected areas, and minimize movement in the attic near the damage.
5) Decide on professional help: a licensed roofer can evaluate membrane health, edge flashings, and the surrounding decking to determine repair versus replacement.
6) Understand the options: temporary patching (when appropriate) versus a full membrane repair or roof replacement, depending on age, condition, and roof type.
Quick safety and maintenance tips
- Do not attempt large-scale repairs on a wet or windy day; moisture can hide underlying damage and make patches ineffective.
- Use only manufacturer-approved patch kits or tapes for your membrane type if you're handling a temporary fix.
- Keep debris off the roof to prevent further punctures and inspect after severe weather events.
- Schedule a professional assessment if you're unsure about the extent of the damage or the right repair approach.
Are Membrane Cracks or Tears an Emergency?
Signs this is an urgent issue
Cracks or tears in a roof membrane can range from cosmetic to critical. When water is actively entering the home or when the roof shows structural signs, you're in emergency territory. Use these indicators to judge urgency:
- Active leaks into living spaces or ceilings around the affected area
- Large tears, punctures, or openings that expose wood, insulation, or the substrate
- Visible daylight or a strong draft in the attic through the membrane
- Sagging, buckling, or soft spots in the roof deck near the damaged area
- After a severe weather event (hail, high winds) with obvious membrane damage or dislodged flashing
- Persistent dampness, mold, or staining that continues despite a dry spell
There are clear, high-risk conditions that warrant urgent professional help. If any of these apply, get a roofer on site as soon as possible — safety and rapid containment matter.
- Active water intrusion is dripping or pooling inside the home or attic
- The tear is large (roughly 6 inches or more) or actively propagating toward vents, penetrations, or seams
- You notice sagging or soft spots in the roof deck near the damaged membrane
- Exposed plywood, insulation, or fasteners are visible through the membrane
- There was a recent storm with reported damage or you can see wind-driven material shifting or flapping in the breeze
Tip: If you can safely access the attic, snap photos and note the exact location of the moisture source and any daylight or reflections you see. This helps the roofer assess quickly.
Monitor if
If there's no active leak but you see concerning features, monitor the situation carefully. Do not ignore new signs, but use a measured approach to keep things safe until help arrives.
- Small cracks or minor surface cracking with no active water intrusion
- The area is dry now, but you can see moisture staining or damp insulation in the attic
- You cannot access the damaged area safely from the outside right away; you're keeping an eye on it from below or from the attic
- Weather is stable and there's no wind-driven movement of the membrane at the damaged spot
What to watch for during monitoring:
- Any change in the size of the crack or tear
- Appearance of a new drip or sudden wetness in ceilings or walls
- New daylight visible in the attic or from under flashing
- Changes in the attic temperature or humidity near the area
Can wait if
Some cracks are minor and do not show current moisture intrusion or structural risk. These can be scheduled for replacement or repair during a planned project window.
- Tiny hairline cracks with no moisture ingress or staining
- The membrane remains fully weather-tight around penetrations and flashing
- Weather conditions permit a planned, dry-period inspection and repair
- No soft spots or sagging are detected in the roof deck and the attic insulation stays dry
Notes for safe timing:
- Do not wait if rain is forecast or if you notice any new signs of water intrusion
- Avoid stressing the damaged area by foot traffic or heavy equipment until a professional has assessed it
- Keep the attic hatch closed and occupants away from the damaged zone to minimize exposure to any airborne debris or mold potential
Common Causes of Membrane Cracks or Tears
Improper Installation and Handling
Membranes need careful layout, heat, and bonding. If sheets are stretched too tight, overlapped too aggressively, or not fused correctly at seams, stress concentrates along edges and rib lines, leading to micro-cracks that grow over time.
- Misaligned seams
- Over-tensioned edges
- Inadequate adhesion or poor seam fusion
Substrate and Surface Issues
The surface beneath the membrane must be clean, smooth, and free of sharp edges. If the substrate is uneven, chipped, or has protruding fasteners, the membrane can pinch, bunch, or crack where it encounters those irregularities.
- Sharp substrate edges or burrs
- Uneven or damaged decking
- Exposed fasteners or nail heads poking through
Temperature and Weather Stress
Extreme weather cycles are hard on any membrane. Heat softens and stretches the material; cold makes it stiff and prone to cracking. Rapid temperature swings and sun exposure amplify fatigue, especially across large expanse areas.
- Prolonged sun exposure
- Sudden freezes after heat waves
- High daytime temps followed by cool nights
Aging, Wear, and Material Fatigue
Over years, membranes lose elasticity and become more brittle. UV light accelerates aging, and small protections wear away, leaving edges more vulnerable to cracking in everyday use or under minor loads.
- Loss of elasticity
- Brittle edges near joints
- Surface chalking or chalky residue from aging
Punctures and Mechanical Damage
Drops, foot traffic, or equipment rubbing against the roof can puncture or nick the membrane. Even small punctures can widen at seams or with movement from wind or foot traffic.
- Foot traffic over capped areas or skylights
- Ladders or tools dragged across exposed sections
- Falling debris or hail impact
Ponding Water and Drainage
Standing water adds hydrostatic pressure and keeps moisture against the membrane longer. If drainage is poor or slopes are insufficient, wrinkles and micro-tears can form where water sits.
- Inadequate slope or pooling near drains
- Water trapped at laps or seams
- Extended moisture exposure
Penetrations and Detailing
Around pipes, vents, and other penetrations, flashing and detailing must move with the roof. Poorly flashed penetrations, tight bends, or over-stressed collars can crack the membrane at or near these points.
- Improper flashing around vents and pipes
- Relying on hard bends instead of flexible transitions
- Over-tight collars or nail-down flashings
Chemical and Environmental Exposure
Certain chemicals or environmental conditions can degrade membrane compounds or interact with adhesives. Proximity to solvents, fuels, or incompatible coatings can cause softening, embrittlement, or seam failure.
- Exposure to solvents or petroleum products
- Incompatible cleaners or primers used on or near the membrane
- Ozone or aggressive air pollutants in some environments
Incompatible Materials and Accessories
Using the wrong tapes, patches, or primers with your membrane can prevent proper bonding, creating weak seams that crack under stress. Always pair products that are rated for the same system.
- Mismatched seam tapes or primers
- Old or incompatible repair patches
- Incompatible fasteners or sealants
Manufacturing Defects and Warranty Considerations
Although less common, manufacturing inconsistencies can show up as early-separation at seams, thinning in some areas, or flat spots. If a defect is suspected, review warranty terms and manufacturer guidelines.
- Uneven thickness or air bubbles in the membrane
- Seam detachment not due to installation error
- Early aging signs inconsistent with climate exposure
How Roof Materials Affect Membrane Cracks or Tears

- Membrane cracks or tears underneath can let water seep into the underlayment and travel laterally before you see it at a crack or nail head on the surface.
- Shingles depend on a continuous underlayment to bridge small gaps; cracks in the membrane create weak points where leaks can begin around valleys, penetrations, or along edge laps.
- UV exposure and freeze–thaw cycles can widen underlayment cracks, increasing leak risk under shingles that span cracked areas.
- Moisture can condense in the attic even if the outer shingles look intact, especially when cracks are near vent flashing or chimneys.
- Signs to watch: damp attic spots, staining along rafters, musty odor near the soffit, or shingles that show unusual curling near suspected crack zones.

- Metal panels are usually watertight when installed, but a cracked membrane underneath creates persistent moisture paths at seams, fastener lines, and around penetrations.
- If the underlayment is compromised, corrosion can start at exposed fasteners or edges where moisture pools, accelerating wear.
- Snow and ice buildup can exploit membrane tears, increasing stress on panel edges and potentially causing small leaks to propagate.
- Indicators: rust stains at seams, damp insulation near fastener rows, streaks where water travels behind panels after a rain.
Tile Roofing (Clay or Concrete)
- Underlayment cracks under tiles provide a direct route for water to reach the deck, especially where tiles overhang flashing or meet vertical structures.
- Cracks can worsen as tiles shift or crack, letting water reach areas that the tiles themselves don't cover.
- Tile roofs rely on precise integration with flashing; a torn membrane compromises this seal, raising leak risk at hips, valleys, and edge rows.
- Clues: damp spots under a row of tiles, staining near flashings, occasional leaks after heavy rain or wind-driven spray.
Wood Shingles and Shakes
- Wood's porosity magnifies the impact of membrane cracks: water can reach the wood substrate quickly, promoting rot, cupping, and warp.
- A tear under the surface can travel along overlaps, leading to localized dampness inside the attic rather than a single obvious surface leak.
- Membrane damage reduces the wood's natural shed-dry cycle, increasing mold and mildew potential in humid climates.
- Observations: soft spots in attic sheathing, musty odor, or dark staining around shingle overlaps and fastener areas.
Flat Roofs and Single-Ply Membranes (EPDM, TPO, PVC)
- Flat or low-slope roofs rely on a continuous membrane; cracks or tears provide a straight path for water to the insulation or decking with minimal secondary barriers.
- Seams become critical failure points if cracks line up with laps; a tear near a seam can cause a larger leak area than a single puncture.
- Foot traffic or debris can create new cracks, and weathered membranes are more prone to widening existing tears.
- Symptoms: interior ceiling blisters or staining, persistent moisture in the mechanical room, algae or mold growth in damp attic spaces.
1. Inspect the attic and eaves for moisture, staining, or musty smells that trace to a damaged area.
2. Note exact locations of leaks or damp spots and correlate them with the corresponding roof material.
3. Keep the area protected from water entry with a temporary cover if safe to do so.
4. Schedule a professional inspection to confirm membrane cracks or tears and determine the best repair strategy.
5. Plan material-specific repairs (e.g., underlayment replacement, flashing adjustment, or full deck resurfacing) to restore a continuous water barrier.
The Risks of Ignoring Membrane Cracks or Tears
Water intrusion and interior damage
Even tiny cracks can act like pinholes for water during rain or snowmelt. When moisture gets past the membrane, it travels to the roof deck, insulation, and fasteners. Over time this can show up as ceiling stains, damp attic spaces, and warped or softened decking. Left unchecked, mold and mildew can develop in damp insulation, reducing effectiveness and triggering musty odors. The result is not just a few drips—it's a pathway for ongoing interior damage that can affect ceilings, walls, and electrical components.
- Signs include staining, musty odors, and damp insulation.
- Consequences include warped plywood, corrosion of metal fasteners, and compromised electrical boxes near the attic.
Structural and deck issues
Moisture under the membrane slowly compromises the roof structure. Plywood or OSB decking can swell, rot, or delaminate, reducing overall roof stiffness. Nails and screws may loosen as timbers deteriorate, increasing the risk of more leaks. A sagging or soft roof deck is a red flag for imminent problems, and progressive moisture exposure can shorten the life of the entire roof system.
- Corrosion of flashings and fasteners weakens attachment points.
- Sagging, creaking, or springy feel when walking on the roof signals deeper issues.
- Repeated leaks around penetrations (vents, skylights) become more likely as cracks widen.
Mold, mildew, and indoor air quality risks
Stagnant moisture trapped under a damaged membrane creates a perfect environment for mold growth. Mold spores can spread into living spaces through gaps and vents, potentially triggering allergic reactions, coughing, wheezing, and throat irritation. In homes with small children, pets, or people with asthma, the health risks can be more pronounced. Even if you don't see mold, hidden growth can undermine comfort and air quality.
- Visible mold or musty odor in attic spaces.
- Increased allergy or asthma symptoms among occupants.
- Hidden mold behind insulation or drywall, harder to remediate later.
Energy efficiency and comfort losses
A compromised membrane allows air leaks at the roofline. That means conditioned air escapes to the attic, while outside air infiltrates living spaces. You'll notice hotter summers, colder winters, and uneven room temperatures. Your heating and cooling system works harder, driving up utility bills and shortening equipment life.
- Drafts near penetrations, vents, and skylights.
- Higher energy bills without a clear reason.
- Uneven comfort between rooms or floors.
Freeze-thaw and UV damage
In colder climates, water that gets through cracks can freeze and expand, widening the openings with each cycle. Repeated freeze-thaw action accelerates deterioration of the membrane and underlying decking. Sunlight also degrades exposed membrane edges over time, making cracks more susceptible to spreading. The combined effects shorten the membrane's service life and raise the risk of active leaks.
- Progressive cracking after multiple seasons.
- Frozen water expanding cracks and pulling apart seams.
- UV-driven edge deterioration that accelerates crack growth.
Insurance coverage and warranty implications
Ignoring visible cracks can complicate warranties and insurance claims. Many membrane warranties require proper maintenance and prompt repair of damage; neglect can void coverage or reduce payout eligibility. When you eventually file a claim for a leak, insurers may scrutinize whether pre-existing cracks were addressed, potentially complicating or delaying restoration.
- Warranty exclusions for damage from neglect or improper maintenance.
- Higher risk of claim denial or reductions if the damage is tied to delayed repairs.
- Potential difficulty in resale if a seller hasn't disclosed known issues or maintenance gaps.
Escalating repair costs and difficult fixes
Left untreated, small cracks typically don't stay small. They expand, requiring more extensive repairs and sometimes full membrane replacement. At that point, what started as a simple patch becomes a larger project with added labor, more material, and, often, additional deck work. Costs rise quickly as the scope of damage branches out from the initial crack.
- Patch failures and recurrent leaks around the same area.
- Need for extensive deck repairs or replacements.
- Increased labor and material costs due to accessing tight or damaged areas.
How Membrane Cracks or Tears Are Diagnosed
Exterior visual clues
- Look for obvious open cracks, tears, or punctures in the membrane surface.
- Watch for seams that have separated, lifted, or bubbled patches.
- Note any UV wear, especially along roof edges, flashing, or penetrations.
- Inspect for persistent ponding water on flat or low-slope sections, which can reveal stressed areas.
- Observe blistering, creasing, or raised areas where the membrane might be flexing or aging.
Interior clues (attic or living spaces)
- Stains, damp spots, or dark discoloration on ceilings and walls near the roof line.
- Soft, damp, or moldy insulation in the attic or crawlspace.
- Musty odors that don't go away after drying spells.
- Sagging or waviness in ceiling boards or attic decking indicating concealed moisture.
- Infrared thermography to spot temperature differences that reveal hidden moisture behind the membrane.
- Moisture meters (non-destructive) to measure moisture levels in decking, insulation, or substrate.
- Borescopes or inspection cameras to peer under edges, seams, and flashings without heavy disassembly.
- Dye or tracer tests in some cases to trace the path of a leak, typically used by pros with appropriate safety measures.
- Controlled water tests conducted by trained roofers, sometimes with dye, to confirm leak paths while minimizing collateral damage.
Step-by-step diagnostic process (homeowner-friendly guide)
1. Prepare a dry, calm day for inspection and remove loose debris from the roof surface.
2. Do a systematic exterior walkaround, marking every suspect area with chalk or bright tape and photographing each zone.
3. Move indoors to the attic or ceiling space; note any signs that align with exterior findings (stains, moisture pockets, or odor).
4. Take initial moisture readings with a moisture meter in areas that look suspicious from both sides of the roof.
5. If available, use infrared imaging to highlight hidden moisture patterns and confirm where water is traveling.
6. Evaluate nearby flashing, seams, and terminations—where membranes are most vulnerable to movement and weather exposure.
7. If you're considering a test, discuss a safe, professional-controlled water or dye test to validate the leak path without creating unnecessary damage.
8. Compare all data: exterior cracks, interior signs, moisture readings, and tool findings to pinpoint whether the membrane is cracked, torn, or simply mis-seated along a seam.
9. Document the findings with notes and photos to guide repair planning and to compare against post-repair results.
Common pitfalls and how to avoid them
- Jumping to conclusions from one symptom: verify with multiple indicators (interior, exterior, and tool results).
- Ignoring small cracks: even tiny splits can widen with heat, cold, and foot traffic over time.
- Overlooking flashings and edge details: these zones are frequent leak paths even with otherwise intact membranes.
- DIY water testing without safeguards: unintended damage or personal risk can occur; opt for professional testing when possible.
- You see any visible crack or tear that penetrates the membrane.
- Interior signs (stains, damp insulation, or mold) coincide with exterior concerns.
- You lack the safe access, proper equipment, or experience to perform reliable moisture testing.
- The membrane is old or the roof has a history of leaks around flashings, penetrations, or seams.
What to expect in the diagnostic report
- A mapped diagram of suspected areas with marked elevations and notes.
- Photos from exterior and interior views showing all findings.
- Moisture readings and infrared images highlighting hidden moisture zones.
- A professional assessment of whether the membrane needs patching, seam resealing, flashing repair, or full membrane replacement.
Repair Options for Membrane Cracks or Tears
Temporary fixes
- Quick patch tape over clean, dry surface to slow water infiltration until a proper repair can be done.
- Apply a bead of compatible roof sealant or mastic along the crack edges to reduce spreading moisture.
- Place a small patch made from the same membrane material over the damaged area, extending at least 2–4 inches beyond the crack on all sides.
- Avoid patches in rain or freezing temperatures; wait for a dry, moderate day within the product's temperature range.
- Inspect after a weather event and re-check adhesive or sealant in the following days; temporary fixes are not permanent.
Minor repairs
- For small cracks or tears (typically under 6 inches), use a patch with seam tape or a liquid seam sealer designed for your membrane type (EPDM, TPO, or PVC).
- Steps:
1) Clean and dry the area thoroughly; remove dirt, oils, and loose edges.
2) If using seam tape, apply a compatible primer to the substrate per the manufacturer's directions, then press the patch over the crack with even pressure. Use a roller to ensure good adhesion.
3) If using liquid seam sealer, apply a smooth coat over and around the crack, then let cure as directed.
4) Inspect the edges; re-bond any lifted edges with additional tape or sealer.
- For EPDM membranes, a patch with self-adhesive reinforcement plus sealant offers a solid, relatively simple fix.
- For TPO/PVC, you may need a heat-welded patch or a factory-approved seam adhesive; follow the patch kit instructions precisely.
- If moisture has penetrated to the underlying insulation or deck, address that moisture path before closing the repair to prevent future leaks.
Partial replacement
- When damage is localized but extensive enough that a patch won't hold long, a partial replacement can be cost-effective and longer-lasting.
- What to expect:
- A professional will remove the damaged section, clean the substrate, and install a replacement sheet with compatible adhesive and seams.
- Replacement pieces should extend beyond the damaged area by at least 6–8 inches on all sides to ensure a reliable seal.
- Steps:
1) Identify the damaged panel or strip and mark its boundaries.
2) Cut out the damaged material cleanly with a straight edge; remove any rotted substrate if present.
3) Dry-fit the replacement patch to confirm fit, then trim as needed.
4) Clean and prime the edges of the exposed substrate.
5) Install the replacement patch with the correct adhesive, sealant, and seam method (adhesive bond for EPDM; heat-weld or adhesive method for TPO/PVC).
6) Roll or press the seams to ensure full contact; apply seam sealer along the perimeter and reinforce with edge tape if recommended.
- Pros: preserves most of the existing roof, minimizes disruption, and extends life.
- Cons: still requires precise workmanship and may not suit widespread aging or multiple leaks.
- Important: check for repeating failures around penetrations, ridges, or flashings; address root causes to avoid repeat repairs.
Full roof replacement
- Best option when the membrane is near the end of its expected life, widespread cracking, numerous leaks, hail damage, or significant underlying deck deterioration.
- Process overview:
1) Assess and plan: select system (EPDM, TPO, PVC, or built-up), color, and insulation needs; consider warranty and performance.
2) Preparation: protect landscaping and belongings; obtain permits if required; ensure access for equipment.
3) Remove old membrane: inspect the substrate for rot, delamination, or moisture damage; replace damaged decking as needed.
4) Install new roof assembly: install insulation if part of the plan; install the chosen membrane using the approved attachment method (fully adhered, mechanically attached, or ballast-based).
5) Flashings, edges, and penetrations: install new flashings, drains, curbs, and corner details; ensure proper drainage and overlap.
6) Final inspection and warranty: verify seams, adhesion, and drainage; review warranty terms with your contractor.
- Why hire a pro: full replacements involve specialized tools, correct seam welding or bonding, and precise flashing details to prevent future leaks; a licensed roofer can ensure code compliance and provide manufacturer warranties.
- Maintenance tip after replacement: schedule regular roof inspections, keep drains clear, and monitor for any signs of edge lifting or seam separation after storms.
Typical Costs to Fix Membrane Cracks or Tears
Minor repair
Description: A small crack or puncture, typically under 6 inches, with localized damage. Often accessible from above or from a single area. A patch or sealant is applied to stop leaks and prevent widening.
Cost: typically $150–$350. This covers basic patch material (self-adhesive patch or liquid membrane), surface cleaning, priming if needed, and labor for a focused repair.
Repair steps:
1) Inspect the area from a safe vantage point and confirm the crack or puncture.
2) Clean the surface to remove dirt, dust, and moisture.
3) Apply a patch or sealant, pressing firmly to seal edges.
4) Allow the patch to cure and re-check for any moisture intrusion after a rain.
Moderate repair
Description: Cracks larger than a small patch or a few smaller tears grouped together, often up to a couple of feet in total affected length. May require a larger patch, seam reinforcement, or a small section replacement.
Cost: typically $400–$900. This range accounts for material durability, additional primer or seam treatment, and extra labor for a larger repair zone or multiple patches.
Repair steps:
1) Remove any loose material and dry the area.
2) Cut a patch sheet to fit the damaged footprint with clean edges.
3) Install the patch with adhesive and/or heat-wusion methods as required by the membrane type.
4) Seal seams around the patch, re-prime if specified, and test for leaks after curing.
Major repair
Description: Extensive damage across a large area, multiple tears, or a tear that spans a significant portion of the membrane. Often requires removal of damaged sections and installation of new membrane, plus careful seam work and substrate checks.
Cost: typically $1,000–$3,000 for a sizable repair, with larger or more complex jobs climbing higher. If a full section or entire roof membrane needs replacement, costs can rise beyond this range (potentially $4,000–$8,000 for mid-sized homes, depending on roof area and membrane type).
Repair steps:
1) Create safe access and detach the damaged membrane sections.
2) Inspect substrate and roof deck for damage or rot; repair as needed.
3) Install new membrane sheets, ensuring proper alignment and seaming.
4) Apply full edge sealing, flashing, and membrane transitions; perform a thorough water test after installation.
What factors affect cost
- Roof size
- Access
- Material type
- Extent of damage
- Local labor rates
How Long Can You Wait Before Addressing Membrane Cracks or Tears?
What happens in the 0–24 hour window
- The moment you notice a crack or tear, the roof membrane is vulnerable. If rain or heavy humidity arrives, water can start seeping through the opening.
- Moisture can reach attic insulation and deck substrates, diminishing their effectiveness and inviting condensation and mold growth if conditions stay damp.
- Edges and fasteners near the tear are at higher risk of loosening or rusting, which can compromise the seal further.
Timeframe: 1–3 days
- A small leak may become more noticeable inside the attic or ceiling, with damp insulation and possible staining.
- Mold growth can begin on porous materials with sustained moisture, especially in poorly ventilated spaces.
- The tear can widen slightly with wind, foot traffic near the area, or thermal expansion, creating a larger path for water intrusion.
Timeframe: 4–14 days
- Water intrusion is more persistent; you may see active leaks on ceilings, especially during rain events.
- Underlayment and decking can begin to deteriorate where moisture sits, reducing roof system performance.
- Fasteners, flashing, and sealants around the damaged area are at greater risk of failure, which can propagate leaks to neighboring sections.
Timeframe: 2–6 weeks
- Prolonged exposure leads to accelerated deterioration of insulation, higher energy losses, and a bigger mold or mildew footprint in the attic.
- Structural components (wood decking, joists) can begin to show moisture-related issues, such as soft spots or warping, especially in poorly ventilated attics.
- If you have heat or moisture in the attic, mold remediation and insulation replacement can become more costly and time-consuming.
What happens if you wait to address the problem in several timeframes
- 0–24 hours: The risk is primarily moisture intrusion and minor interior signs. Quick action can prevent broader damage.
- 1–3 days: The situation can escalate to visible interior leaks and rising mold risk, making repairs more extensive.
- 4–14 days: Persistent leaks and ongoing moisture can compromise underlayment, decking, and fasteners, leading to higher repair costs.
- 2–6 weeks: Widespread moisture damage, insulation degradation, and potential wood rot become likely, often requiring major repairs or replacement.
- Inspect safely from inside and out to locate the tear and assess the exposure. Note the exact location for the repair plan.
- Protect interior spaces: place a temporary bucket or plastic sheeting under the leak to catch drips and minimize water damage.
- Reduce further exposure: if a weather event is imminent, cover the area with a heavy-duty tarp secured with boards or weighted objects. Do not rely on footwear or ladders to do this yourself if conditions are unsafe.
- Keep the area clear: remove valuables from the attic space near the leak and avoid walking on the damaged membrane.
- Document the damage: take clear photos from inside and outside, noting date, weather conditions, and visible extent of the tear.
- Plan a professional assessment: arrange a roofer with membrane experience to assess the tear, dimensions, and best repair or patch strategy.
Quick, stepwise approach you can use to evaluate urgency
1) Identify all cracks or tears and map their location on the roof plan.
2) Check interior ceilings and insulation for dampness or staining.
3) Assess whether rain is imminent or ongoing; prioritize protection if a storm is approaching.
4) Schedule a professional inspection to determine whether a temporary patch, full membrane repair, or replacement is required.
How This Problem Varies by Location and Climate
How This Problem Varies by Region & Climate within the United States
Climate and geography shape how membrane cracks or tears show up and how fast they develop. The same defect can be minor in one climate and a big headache in another.
- Cold, freeze-thaw areas (Northeast, Midwest, Mountain West)
- Water sneaks into tiny seams, freezes, expands, then thaws. Repeated cycles slowly embrittle the membrane, leading to hairline cracks that widen over time.
- Common signs: small edge cracks, micro-tears near penetrations, flashing lifting at corners.
- Hot, sun-drenched regions (Southwest, sun-exposed pockets of California)
- Intense UV and big daily temperature swings cause polymers to stiffen, then warp with heat cycling. This can cause micro-tears to form or expand along seams and around fasteners.
- Look for shrinkage, wrinkling, or thin, fragile-looking areas near eaves and skylights.
- Humid and coastal zones (Mid-Atlantic, Southeast, Gulf Coast, Pacific Northwest)
- Higher moisture speeds aging; salt spray on coastal roofs accelerates corrosion of metal components. Membranes may blister, detach at laps, or show faster edge deterioration.
- Expect blisters, edge debonding, or algae/mold growth in shaded spots.
- Wind-prone areas (Great Plains, coastal fronts, mountain passes)
- Strong winds uplift edges and corners, widening existing cracks or tearing laps. Ragged edges and fastener loosening are red flags.
- Wind-driven rain can force leaks through small splits between fasteners or along hips.
- Hail-prone climates (Tornado Alley, parts of the Plains)
- Impacts can create shallow ruptures that propagate under thermal cycling. Inspect for dented patches, pocked surfaces, or cracked seams after hail events.
- Regions with heavy snow (Rockies, Cascades, Northeast)
- Snow weight and ice dams apply unusual stress to membranes, especially at eaves and parapets. Meltwater can travel under edges, widening cracks and triggering leaks.
- Coastal vs. inland moisture and salinity
- Inland roofs dry quickly but adapt to heat; coastal roofs face ongoing humidity and salt exposure, accelerating aging of membranes and metal fasteners.
Material fit by region
- EPDM: Excellent for cold climates and flat roofs; handles ponding when sloped correctly but can crack with extreme cold if installed poorly.
- TPO: Common in hot climates; good heat reflectance, but seams must be well-sealed to prevent UV-driven aging.
- PVC: Strong chemical and salt resistance; great for coastal environments with exposure to solvents or salt spray.
- Modified bitumen/rubberized membranes: Versatile but require meticulous seam work in freeze-thaw areas.
Practical region-specific checks (quick-start)
1) Pre-winter inspection
- Look for edge separation, torn laps, or micro-cracks near penetrations. Reinforce flashing where needed.
2) Post-winter inspection
- Check for new cracks after freeze-thaw cycles; pay attention to low-slope sections and around skylights.
3) After major storms (hail, high winds)
- Inspect for punctures, lifted edges, or missing fasteners. Don't rely on cosmetic damage—air and water can bypass these spots.
4) After heat waves or droughts
- Check for wrinkling, shrinking, or softened edges especially around hot roof surfaces and exposed seams.
5) Regular maintenance cadence
- Schedule seasonal inspections and address loose flashings, worn sealant, and any crack patterns before they grow.