Ultimate Guide to Roof Framing Damage
Last updated: Feb 28, 2026
Introduction to Roof Framing Damage
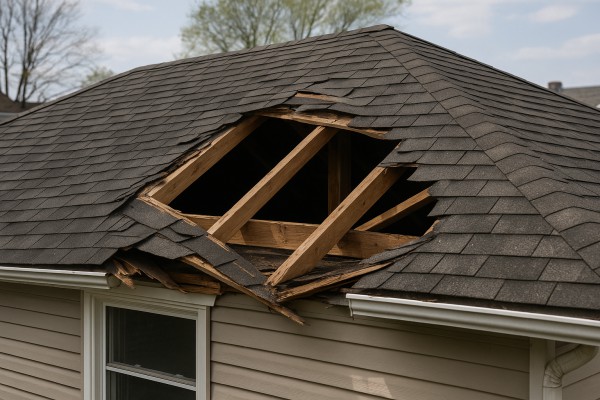
Roof framing damage means the essential structural members that support your roof—rafters, joists, ridge beams, and related connections—are compromised. When framing is weakened, the load distribution can shift, potentially causing sagging, leaks, or even a partial collapse if left unchecked. It's not something you should ignore, but it's also not always easy to spot from ground level. Acknowledging the issue early gives you a clearer path to a safe, lasting fix.
Is it urgent or common?
- It's not unusual for framing issues to develop after severe weather, moisture intrusion, or aging components.
- Some signs require immediate attention, while others indicate a broader problem that should be evaluated soon.
- If you notice any sudden changes in your roof or ceiling, or you hear creaking noises, treat it as urgent and seek professional guidance.
Common signs to look for
- Sagging or uneven ceilings and rooflines
- Cracks where walls meet ceilings or around doorframes
- Bowed or exposed rafters in the attic
- Doors or windows that stick or don't close properly
- Moisture stains, dark spots, or mold near the attic space
- Shingle movement or visible gaps along the edge of the roof
High-level next steps
- Safety first: avoid walking on areas that feel soft or show deflection, and keep others away from the affected spots.
- Get a professional assessment: a licensed roofer or structural engineer will determine whether the framing is compromised and to what extent.
- Plan for stabilization and repair: temporary supports or tarps may be recommended, followed by a formal repair plan and scope.
What to expect during a professional assessment
- A visual inspection of the attic, roof framing, and exterior structure
- Measurements and a determination of load paths, connections, and potential failure points
- Recommendations for repairs, reinforcement, or modifications to restore safe performance
- An itemized estimate that covers materials, labor, and any permitting or structural engineering needs
Quick safety tips
- Do not jump into DIY shoring unless you are trained and equipped for structural work.
- Keep children and pets away from damaged areas and any exposed framing.
- If you must be in the attic, wear a hard hat and sturdy footwear, and avoid walking on unsupported sections.
- Protect interiors from weather by placing tarps or boards as advised by professionals.
Step-by-step: approaching the situation
1. Stop operating in the affected area and secure the space to prevent further loading.
2. Photograph and note the visible damage from multiple angles for your records.
3. Contact a licensed roofer or structural engineer to schedule an inspection.
4. If advised, implement temporary stabilization or weather protection under professional guidance.
5. Review the inspection report, choose an approved repair plan, and timeline, and prepare for permitting if required.
Is Roof Framing Damage an Emergency? How to Assess Urgency and Take Action
Safety first
Your safety comes first. If you see signs of imminent collapse, hear creaking or popping sounds, or there is active water pouring into the house, evacuate the area and call emergency services. Do not attempt risky climbs or inspections on a damaged, wet roof. If you're unsure, treat it as urgent rather than waiting for more signs.
Quick signs that help you judge urgency
From the ground or attic, look for these indicators. If you answer “yes” to several, treat the situation as urgent.
- Sagging, bowing, or visibly deformed roof framing in the attic or exterior.
- Daylight shining through the roof decking or large gaps where deck or rafters are exposed.
- Active leaks, drips, pools of water, or ceiling bulges that worsen with rain.
- Recent storm impact, fallen limbs, or obvious damage to roofing materials near the damaged area.
- Doors or windows near the affected area showing drafts or increased moisture.
Step-by-step quick assessment (homeowner-friendly)
1) Stop and assess from a safe location
- Do not go onto a wet or damaged roof. If you can safely see the attic or exterior from ground level, note any daylight, moisture staining, or warped framing.
2) Document what you see
- Take clear photos and short videos of any sagging, exposed framing, leaks, or damaged decking. This helps the roofer understand the scope before they arrive.
3) Check for active leaks
- If water is actively dripping, pooling, or you notice rapid interior staining, prioritize action. Leaks can worsen quickly in a storm or heavy rain.
4) Consider weather and access
- If rain or winds are ongoing, plan for the soonest safe window to bring in a professional. If the weather is calm and dry, you can prepare for a quicker post-storm inspection.
5) Protect interior spaces (safely)
- Move valuables away from the damaged area. Place towels or buckets to catch drips if you have a manageable, safe position to do so. Do not climb onto the roof or attic if there are signs of structural movement.
Urgency guidelines: when to call, monitor, or wait
- Call a roofer immediately if:
- There is active water intrusion and you cannot stop it with simple measures.
- The roof shows sagging, bending, or visible movement in framing.
- You can see daylight or significant gaps in the roof deck from the attic or outside.
- There was a recent storm or impact that caused obvious structural damage (e.g., fractured rafters, torn decking, large holes).
- Monitor if:
- The signs are mild: light staining, minor dampness, but no active leaks.
- The attic and interior remain dry, and there's no visible sag or movement.
- Weather is clear and stable, and you can safely watch for changes over a short period (24–48 hours).
- Can wait if:
- Interiors stay dry, there is no visible structural movement, and no daylight is present.
- The area is not actively leaking and weather conditions are calm for the next few days.
- You can schedule an inspection within a week or two without risk of worsening conditions.
Temporary measures to limit further damage (when safe)
- Use a tarp or heavy-duty plastic sheeting if you can access the exterior safely and secure it well beyond the damaged area.
- Keep children and pets away from the damaged site and avoid walking on weakened sections.
- If you must be near the area, wear protective gear and proceed with extra caution.
What to tell a roofer when you call
- Exact location and nature of the damage (roof framing, leaks, daylight).
- Recent weather events and timing of the first signs.
- Photos or video you've taken, plus any interior moisture or ceiling bulges.
- Accessibility notes (upstairs, attic, attic hatch, safe entry points).
Common Causes of Roof Framing Damage
Poor installation and design
Framing damage often traces back to how the roof was built. If the design didn't account for loads, or the framing wasn't connected properly, weak points show up fast.
- Undersized rafters or trusses for the load they carry
- Incorrect nailing patterns or missing fasteners
- Inadequate bracing, rafter ties, or collar ties
- Improper spacing or misalignment of rafters and joists
- Damaged or missing structural sheathing connections
Water damage and leaks
Water is the stealthy enemy of framing. A small leak can rot wood just behind the fascia long before you see staining.
- Poor flashing around chimneys, vents, or skylights
- Clogged or damaged gutters directing water toward the roof edge
- Prolonged seepage that causes wood rot, mold, and softened joints
- Ice dams that back up water under shingles in cold climates
Pest and insect damage
Wood-boring critters can weaken framing from the inside out.
- Termites chewing through soffits or joist ends
- Carpenter ants or beetles hollowing framing
- Woodpecker damage that exposes deeper wood
- Old, untreated lumber with existing infestations
Weather and climate exposure
The elements test a roof year after year.
- High wind uplift that lifts edges and loosens connections
- Heavy snowfall or ice loads that exceed design specs
- Hail impact causing hairline cracks in wood and fasteners
- Prolonged sun exposure that dries and checks wood
Structural overload and load changes
Carrying more weight than the framing was designed for is a fast path to damage.
- Adding interior storage or equipment in attic spaces
- Converting unvented spaces into living areas, increasing load
- Roof deck additions or solar installations without adjusting structure
- Local building changes or settlement that stress the framing
Aging and material fatigue
Wood simply wears out. Fasteners corrode, joints loosen, and members sag.
- End grain rot from moisture exposure
- Nail and bolt corrosion reducing connection strength
- Sagging or uneven roof lines signaling weakened members
- Warping or twisting from long-term stress
Improper maintenance and inspections
Neglect lets small issues become big problems.
- Delayed gutter cleaning allows water to pool at the fascia
- Missing or damaged flashing not repaired promptly
- Ignoring signs of moisture intrusion or insect activity
- Delayed repairs after storms, allowing damage to spread
Manufacturing defects and hidden damage
Sometimes the problem isn't what you can see.
- Faulty adhesive for engineered lumber
- Hidden knots or warp in trusses during fabrication
- Repairs done improperly at the factory or on site
- Damage from shipping or handling before installation
Quick homeowner checklist
1. Note obvious signs of water intrusion (stains, soft spots) in the attic or ceiling.
2. Look for sagging ceilings or uneven roof lines in the attic.
3. Check flashing and gutters for damage after storms.
4. Have a licensed professional evaluate any suspected damage.
5. Keep a simple maintenance log of inspections and repairs.
How Roof Materials Affect Roof Framing Damage
Weight load and framing capacity
The weight of the roof material sits directly on the framing. Heavier materials transfer more load to rafters, joists, and the ridge beam. If the framing is already damaged or undersized, that extra load can push it past its limit and lead to sagging, cracks, or sudden failures. Here's the practical sense:
- Light to moderate weight materials (typical asphalt shingles, most metal panels): generally easier on marginal framing, but damage in the attic or at connections can still cause leaks or deflection.
- Moderate to heavy materials (wood shakes, tile): noticeably greater stress on the framing. Any existing damage amplifies deflection and potential failure.
- Very heavy materials (natural slate, concrete/clay tile): require particularly robust framing. Damaged or undersized structures are at high risk of sag, anchor failure, or collapse unless reinforced.
Material-specific vulnerabilities
Different roof materials interact with framing damage in distinct ways. Knowing which ones are more sensitive helps you spot problems early.
- Asphalt shingles: relatively forgiving, but the underlayment and deck rely on solid framing. If the rafters are warped or cracked, shingles can shed or leak sooner because the deck isn't perfectly supported.
- Metal roofing: panels are lightweight and wind-resilient when the framing is sound. If framing is damaged, fastener pull-out and panel misalignment can create leaks and metal sheen gaps.
- Wood shakes/shingles: organic material plus potential moisture sensitivity means framing damage that lets in humidity or allows sagging framing will accelerate rot and warping of the shakes.
- Clay and concrete tiles: heavy, brittle, and sensitive to deflection. Damaged framing can cause tiles to crack, crack neighboring tiles, or slide off. Underlayment and deck must be solid to keep tiles in place.
- Natural slate: among the heaviest options. Any framing compromise quickly becomes critical, risking collapses at seams or ridges unless you reinforce the structure.
- Composite or synthetic shingles: weight varies by product but generally sits between asphalt and heavier options. If the framing has damage, you'll see uneven wear, potential leaks, and accelerated deterioration around fasteners.
- Green roofs or heavy coatings: extremely heavy and energy/structure demanding. On compromised framing, expect rapid deflection, fastener failure, and possible system-wide stress.
How damage shows up across materials
- Visible deflection or sag in the roof line
- Uneven gapping at roof penetrations or along the ridge
- Cracked, chipped, or displaced tiles/shingles
- Leaks or moisture spots inside the attic after rain
- Odd creaking or shifting sounds, especially in windy conditions
Quick-reference: common materials and how they're affected by roofing framing damage
- Asphalt shingles: least sensitive to framing damage, but leaks can appear quickly if the deck sags or is misaligned.
- Wood shakes/shingles: more vulnerable to framing issues due to moisture movement and rot potential.
- Metal panels: frame integrity matters for seal and fastener performance; sag or misalignment can create leaks.
- Clay tiles: require solid framing; deflection leads to cracks and loose tiles.
- Concrete tiles: heavy; similar risks to clay with added stress from weight; framing issues show up as cracking and misalignment.
- Natural slate: very high load; small framing weaknesses become major failure risks.
- Composite/synthetic shingles: depend on underlayment and deck support; framing damage accelerates wear and leaks.
- Green roofs: demand top-to-bottom structural soundness; any damage magnifies weight-related stress and potential failures.
Steps to assess and address (quick, homeowner-friendly)
1. Do a safe attic and exterior inspection for deflection, gaps, or unusual hard spots in framing.
2. Note any sagging, cracked drywall, or daylight in the attic—these signal framing problems that affect all roof types.
3. If you suspect framing damage, call a structural pro or experienced roofer to evaluate load paths and compatibility with your current material.
4. If reinforcement is needed, plan procedures like sistering joists/rings, adding collar ties or rafter bracing, and ensuring proper fasteners and anchor points.
5. When replacing or upgrading materials, choose options that fit the existing framing or budget for appropriate structural upgrades to prevent repeating damage.
The Risks of Ignoring Roof Framing Damage
How framing damage undermines your roof's strength
When rafters or trusses are compromised, the roof loses its ability to carry weight and transfer loads safely to the walls. That weak link shows up as sagging, uneven decking, and a shifting roof plane. Small changes today can become bigger problems tomorrow, especially with wind, rain, or snow.
- Sagging roof lines or uneven ridge height
- Doors or windows that don't latch or close properly
- Interior ceilings with cracks, nail pops, or sudden dips
- Visible gaps or cracking at eaves, ridges, or the attic access
Major risk categories
- Structural failure during weather events: A weakened frame can fail under snow load, high winds, or heavy rain, leading to partial or complete collapse in extreme cases.
- Progressive damage: A tiny, initially hidden flaw can grow as loads shift, moisture gets in, or fasteners corrode, making future repairs much more expensive.
- Water intrusion and mold: Damaged framing reduces the roof's ability to shed water, so leaks become constant and mold can take hold in hidden spaces.
- Energy efficiency and insulation issues: Gaps and uneven decking compromise insulation, driving up heating and cooling costs and creating comfort problems inside the home.
- Pest and vermin entry: Crevices near damaged framing provide access for critters, pests, and birds, which compounds moisture and rot issues.
- Electrical and fire hazards: Moisture and compromised framing can expose or overload electrical paths, increasing risk of shorts or fires.
- Insurance and code compliance: Untreated framing damage can complicate claims, slow repairs, or put you out of compliance with current building and safety codes.
Signs to watch for (inside and outside)
- Exterior: noticeable roof sag, creased or buckled shingles, or new gaps along eaves.
- Interior: cracks in ceilings or walls, doors that rub or don't close flush, flooring that feels uneven.
- Attic: daylight spotting through the roof deck, dampness, or musty smells indicating hidden leaks.
- Moisture and rot: softened wood, frass or powdery dust from decayed framing, or warped decking.
How ignoring framing damage compounds the problem
- Small leaks quickly become widespread water damage, compromising insulation and drywall.
- Hidden rot weakens structural joints, making future repairs more invasive and costly.
- Misaligned structural elements place unusual stress on fasteners and connections, accelerating failure risk.
- Delayed assessments reduce your leverage with insurers and extend the downtime needed for repairs.
Practical steps if you suspect damage
1. Do not walk on or step near roof edges; keep kids and pets away from the area.
2. Limit attic traffic and heavy loads near the affected zone to prevent additional stress.
3. From a safe vantage point, document visible signs with clear pictures and notes.
4. Inspect interior indicators: cracks, door misalignment, or sagging ceilings in rooms below the suspected area.
5. Schedule a professional assessment: a licensed structural engineer or a qualified roofer should evaluate framing and roof deck integrity.
6. Obtain a written report detailing findings, scope of damage, and recommended repairs or shoring options.
7. Plan for repairs that restore load paths: expect possible bracing, replacement of damaged rafters or trusses, and deck restoration to regain a solid, continuous roof plane.
Diagnosing Roof Framing Damage
Visual clues homeowners can notice
- Sagging ceilings or uneven roofline you can see from the attic or from the interior rooms.
- Cracks in drywall or plaster that run along joists or rafters.
- Moisture stains, dark spots, musty smells, or mold in the attic.
- Soft, spongy or creaky attic floorboards or roof decking when you press lightly.
- Warped or cracked plywood/OSB sheathing edges visible near openings, vents, or under access panels.
- Nails popping through walls or ceiling drywall, or gaps around chimneys, skylights, or vent flashing.
- Visible daylight seeping through the roof deck or gaps around penetrations when you're in the attic.
What a roofer looks for during a diagnostic visit
1) Safety and access plan
- The roofer checks for structural instability, confirms access routes, and sets up temporary shoring if needed to prevent further movement.
2) Thorough attic inspection
- Checks rafters, joists, trusses, ridge beam, collar ties, and hangers for cracks, splits, bowing, or separation.
- Looks for signs of previous repairs that hint at ongoing movement or moisture damage.
3) Exterior and interior geometry
- Measures parallel and perpendicular alignments to identify out-of-square framing or sagging spans.
- Verifies bearing conditions at walls, beams, and support posts.
4) Moisture and rot assessment
- Evaluates wood condition (sound versus soft, crumbly, or crumbly edges) and checks for rot in framing members.
- Assesses moisture intrusion pathways: roof leaks, ventilation issues, or attic condensation.
5) Load and connectivity review
- Considers how snow, wind, and roof loads interact with existing framing.
- Checks hardware: nails, screws, metal connectors, joist hangers, and any damaged or missing fasteners.
6) Documentation and planning
- Takes photos, notes dimensions, and records any deviations from the original design or plans.
- Determines whether repairs are localized or if a larger portion of the framing is affected.
- Moisture meter to gauge current moisture content in wood.
- Infrared (thermography) camera to spot cool or damp areas behind insulation or under sheathing.
- Laser level or plumb line to check true vertical alignment of rafters and walls.
- Endoscope or small camera to inspect inside cavities without heavy disassembly.
- Tape measure, chalk line, and string lines to map out sag angles and span irregularities.
- Simple knock test in safe areas to assess wood stiffness and identify soft, decayed spots.
Interpreting findings and what they mean for repair planning
- Minor cracking or short-distance bending with solid still-rigid framing may be repaired with reinforced connections, sistering of members, or small-scale reinforcement.
- Moderate movement with several affected members and moisture signs often points to replacing damaged rafters or joists and possibly reworking connections.
- Severe sag, widespread rot, or structural misalignment indicates a larger-scale repair or replacement, sometimes requiring a structural engineer's input and permit-driven work.
- If moisture is a factor, addressing the leak and drying out the attic is prioritized to prevent further deterioration before any framing work.
- In all cases, safety is the priority. Temporary shoring, load reduction, and protecting the interior from rain are common interim steps while planning long-term fixes.
Options for Repairing Roof Framing Damage
Temporary fixes
- Cover exposed framing and roof openings with a heavy-duty tarp or roof underlayment to prevent water intrusion.
- Install temporary shoring or braces to prevent further sagging. Use adjustable posts, 2x4 members, and secure with ledger screws or nails.
- Secure tarps and edges with ballast (sandbags, bricks) and corrosion-resistant fasteners; check after wind or rain.
- Minimize traffic on damaged areas; move stored items away and avoid stepping on damaged rafters.
- Monitor the area and re-tarp as needed; arrange for a permanent repair plan as soon as possible.
Temporary fixes are not structural repairs; they reduce immediate risk and buy time until a proper repair or replacement.
Minor repairs
- If a single rafter or joist is cracked or slightly bowed, you can often address it with a sistered member or re-nailing.
- Sistering: install a full-length lumber board on the healthy side of the damaged member, matching thickness, and fasten with multiple 16d nails or structural screws, spaced every 6-8 inches.
- Crack repairs: fill cracks with wood epoxy or structural adhesive before re-nailing.
- Blocking: add blocking between rafters near the damaged area to restore lateral support and prevent movement.
- Hardware: install hurricane ties or framing anchors to strengthen connections.
- If rot or insect damage is present, treat and replace affected wood promptly; if damage is extensive, partial replacement may be required.
Steps to follow:
1) Assess damage extent with a careful inspection.
2) Choose a repair method (sistering, blocking, or small replacement).
3) Cut and prepare repair lumber to exact dimensions.
4) Install and secure the repair, then verify alignment and plumb.
5) Re-seal or re-nail as needed and inspect for leaks.
Partial replacement
- When damage spans a few adjacent members, remove the damaged sections and replace with new lumber of the same size and grade.
- Steps:
1) Shore up the area beneath to prevent further movement.
2) Cut out the damaged section cleanly at sound wood.
3) Install new lumber, matching size, thickness, and grade.
4) Reattach to adjacent members with proper fasteners and connectors.
5) Add blocking to restore the load path and reinforce connections.
6) Check for square, plumb, and proper alignment; re-sheath if needed and reseal.
Tips:
- Use the same species and grade; avoid mixing treated with untreated wood unless required by moisture exposure.
- Treat cut ends and all new wood to reduce future rot risk.
- Verify that decks, attic ventilation, and insulation remain properly integrated with the repair.
Full roof replacement
- Widespread damage, multiple compromised rafters, or a warped/rotted ridge beam may call for a full or near-full roof replacement.
- Steps:
1) Have a licensed contractor or structural engineer assess the extent and required scope.
2) Protect interior spaces with temporary coverings and plan for staged work.
3) Remove existing roofing material, decking, and damaged framing as needed to expose sound structure.
4) Replace or sister major framing members to restore the proper load path and geometry.
5) Install new decking, underlayment, flashing, and roofing material; ensure ventilation and insulation are up to code.
6) Conduct a thorough final inspection for structural integrity and weatherproofing.
Considerations:
- This option is most cost-effective when framing damage is extensive or when repairs would be impractical or unreliable.
- Permits, engineering input, and professional installation are typically required.
- Insurance coverage may influence scope and payment.
Typical Cost to Fix Roof Framing Damage
Minor repair
Description: Small, localized fixes that stop a minor problem from getting worse. Think re-nailing loose sections, replacing a short damaged rafter tail, or patching a tiny area of compromised framing. These are quick repairs that don't require extensive disassembly of the roof structure.
- Typical cost: about $200–$800.
- What you get: stabilize the area, restore proper fastener attachment, and re-secure any tired hardware (hangers, toe-nails, plates) with minimal disturbance to surrounding framing.
- Steps you'll typically see:
1) Quick inspection to confirm the issue and scope.
2) Light stabilization or shoring if needed.
3) Replace or reinforce a small section with matching lumber.
4) Re-secure connections and re-check for movement.
Moderate repair
Description: A larger portion of framing is affected, requiring more substantial work but not a full rebuild. This might mean replacing a longer span of rafter or several adjacent members, plus improved connections and supports.
- Typical cost: about $1,000–$5,000.
- What you get: a secure, longer-lasting fix that restores structural continuity and loads transfer across the affected area.
- Steps you'll typically see:
1) Detailed assessment to map the damaged length and determine new framing needs.
2) Temporary shoring to keep the roof stable during work.
3) Removal of damaged lumber and installation of new framing (often with sistering where appropriate).
4) Upgrading connections (joist hangers, ties, and blocking) and ensuring proper alignment.
5) Inspections or field checks to confirm everything is plumb and square.
Major repair
Description: Extensive framing damage that impacts large sections or multiple components of the roof, potentially involving ridge beams, multiple rafters, or a rebuilt knee wall. Often requires engineering input, permits, and careful sequencing to keep the roof load path correct.
- Typical cost: about $5,000–$20,000+, with higher-end projects approaching or exceeding this range for full or near-full framing replacements.
- What you get: a reestablished, code-compliant framing system designed to support the roof for many years, sometimes with design refinements (e.g., improved soffit ventilation or updated load calculations).
- Steps you'll typically see:
1) Structural assessment and, if needed, a structural engineer's review.
2) Plans and permits as required by local code.
3) Full or partial removal of compromised framing and replacement with engineered lumber.
4) Re-anchoring and re-connecting all load paths (ridge, collars, ties, joists).
5) Thorough inspection and, if necessary, adjustments after settlement or weather events.
What factors affect cost
- Roof size: larger roofs require more materials and labor, increasing both material costs and time on site.
- Access: roofs with steep pitches, tight crawlspaces, or limited entry points slow work and raise safety and equipment costs.
- Material type: lumber grade and species, treated lumber, or engineered products (like I-joists or laminated beams) change price per linear foot and overall project cost.
- Extent of damage: the more framing members involved and the more complex the repair, the higher the labor and material costs.
- Local labor rates: quotes vary by region, union vs. non-union crews, and current demand for skilled roof carpentry.
- Additional considerations: permits, inspections, temporary coverings, and any required structural engineering can add time and cost.
How Long Can You Wait Before Addressing Roof Framing Damage?
Immediate risk — act now
If you notice pronounced sagging, daylight through the sheathing, creaking on windy days, or a sudden drop in attic temperature, treat it as urgent. Do not climb on or near the damaged area, and prioritize safety for everyone in the home.
1) Keep people and pets away from the affected area.
2) If safe, cover exposed areas with a heavy-duty tarp or plywood, then secure edges so wind won't lift it.
3) Photograph the damage from inside and outside for insurance and your records.
4) Call a licensed roof framing contractor or structural engineer to assess.
- What happens if you wait (minutes to hours):
- The load path can shift further, increasing the risk of a sudden, partial or full structural failure.
- Moisture intrusion can begin, soaking insulation and contributing to mold growth and indoor humidity spikes.
- Electrical hazards may appear if wiring runs through damaged framing.
24–48 hours
By the second day, damage can advance even if the roof looks “the same.” The risk is more about moisture and progressive weakness rather than a complete collapse—yet it's still a high-priority situation.
- What to do in this window:
- Re-check and re-secure tarps; ensure they don't shed in wind.
- Limit attic access; keep traffic off the attic floor where framing is compromised.
- Schedule a professional inspection to determine load-path safety and any needed temporary shoring.
- What happens if you wait (24–48 hours):
- Water can seep deeper into sheathing, attic framing, and ceiling materials, increasing dry rot risk.
- Insulation performance declines, raising heating/cooling costs and comfort issues.
- Small structural shifts can become larger as weather and temperature change impact wood.
3–7 days
If the damage isn't stabilized, the structural risk grows daily. This is a critical window where temporary shoring and proper evaluation can prevent more serious failures.
- What to do in this window:
- Keep a log of weather events and any new signs of movement or leaks.
- Have a sharp, documented plan for repairs or a partial rebuild if needed.
- Obtain written estimates from at least two qualified professionals.
- What happens if you wait (3–7 days):
- Prolonged exposure accelerates framing rot and wood stiffness loss, making repairs more extensive and expensive.
- Prolonged moisture increases mold risk on ceilings, insulation, and drywall.
- Interior finishes may show new cracks or staining, indicating spreading damage.
1–2 weeks
At this stage, visible damage often aligns with hidden framing issues. Labor and material costs rise as the problem becomes more complex to fix.
- What to do in this window:
- Secure interior access; limit loads on ceilings near the affected area.
- Prepare for possible temporary interior containment or removal of compromised drywall to dry and repair framing.
- Confirm permitting and inspection steps with your local building department if a larger repair is planned.
- What happens if you wait (1–2 weeks):
- Framing continues to deteriorate from moisture, leading to permanent warping or loss of connection points.
- Pests may exploit gaps created by open areas, bringing additional damage and contamination.
- Insurance claims can become complicated if ongoing damage is not documented promptly.
1–2 months
The framing and roof deck may be significantly compromised. Delays here can force more invasive restoration, longer outages, and higher costs.
- What to do in this window:
- Engage a structural engineer or qualified roofer for a formal assessment and repair plan.
- Start coordinating permits, temporary weather protection, and any required interior remediation.
- What happens if you wait (1–2 months):
- Wood rot and corrosion of fasteners escalate, potentially requiring replacement of large framing sections.
- Roof deck integrity deteriorates, increasing the likelihood of widespread leak channels and costly rebuilds.
- Insurance coverage may be questioned if damage progression isn't documented promptly.
Longer than 2 months
A sustained delay places you at substantial risk of partial or full roof failure, with major safety and financial implications.
- What to do in this window:
- Have a hands-on assessment from a licensed structural expert.
- Prepare for a long repair or a full roof framing replacement, depending on extent.
- What happens if you wait (long term):
- Structural collapse risk rises in severe weather, threatening interior spaces and occupants.
- System-wide moisture and mold development can require extensive remediation beyond framing work.
- Rebuild costs typically exceed initial estimates due to compounded damage and longer downtime.
How Roof-Framing Damage Varies by Location and Climate
How This Problem Varies by Region & Climate within the United States
The same framing flaw can behave very differently depending on where you live. Regional weather patterns drive the loads, moisture exposure, and aging processes that affect roof framing. Understanding your region helps you spot the most common failure modes and tailor maintenance and repairs accordingly.
- Snow and freeze-thaw regions (Great Lakes, Northeast, Mountain West)
- Heavy snow loads and ice dams push downward on rafters and can cause sagging, cracked joints, and weakened supports.
- Repeated freeze-thaw cycles loosen fasteners and open gaps around penetrations.
- High-wind regions (Tornado Alley, Gulf Coast, Southeast, coastal zones)
- Strong wind uplift stresses roof-to-wall connections and edge detailing.
- Flying debris and shifting wind paths can nick fasteners and cause intermittent failure over time.
- Coastal and hurricane-prone zones (Southeast, Gulf Coast, parts of the Atlantic and Pacific coasts)
- Salt air accelerates corrosion of metal connectors and fasteners.
- Combined wind, rain, and storm surge pressure intensifies the risk of framing movement and water intrusion.
- Moisture-rich, pest-prone areas (humid Southeast and parts of the Gulf Coast)
- Persistent high humidity and rainfall promote rot, mold, and wood-destroying pests.
- Ventilation and insulation become critical to limit interior condensation that compounds framing damage.
- Dry, hot regions (Southwest)
- Extreme heat and UV exposure dry and stiffen wood components, increasing the chance of cracking at joints.
- Rapid temperature swings can cause wood movement and weaken connection points, even without heavy loads.
- Seismic zones (California, parts of the Pacific Northwest, Alaska)
- Lateral forces during earthquakes stress rafters, joists, and nailing patterns.
- Retrofit needs, like hurricane ties doubled with reinforced screws, become important for maintaining integrity under motion.
Regional implications at a glance
- In snow-heavy areas, prioritize structural redundancy for rafters, proper attic ventilation, and ice-guard installation.
- In windy and coastal zones, focus on secure anchoring, aggressive fastening schedules, and corrosion-resistant hardware.
- In humid regions, emphasize moisture control, rot prevention, and termite/pest management.
- In hot, dry climates, monitor wood movement and UV-related deterioration of coatings and edges.
- In seismic zones, consider engineered connections and periodical re-evaluation of bracing.
Practical steps for homeowners by region
1. Identify your climate risks
- Check local building codes and weather data for your area's typical snow loads, wind speeds, and seismic concerns.
2. Inspect for region-specific signs
- Snow regions: sagging rafters, ice dam seepage, sagging ceiling lines.
- Wind/coastal regions: loose shingles at edges, rust on metal connectors, loose eave soffits.
- Wet regions: soft or crumbly wood, mold on framing, musty attic smells.
- Seismic regions: cracked joints, gaps between members, uneven roof plane.
3. Maintain with regional priorities
- Ensure effective attic ventilation and insulation to minimize condensation.
- Keep gutters clean and downspouts directing water away from the fascia.
- Apply corrosion-resistant fasteners and coatings in coastal areas.
4. Plan upgrades when needed
- Add hurricane clips or strap systems in wind-prone zones.
- Upgrade to treated or higher-grade framing lumber in rot-prone areas.
- Improve roof deck underlayment and edge protection in snow-prone regions.
5. Hire a locally experienced pro
- Find a contractor familiar with your climate and regional code requirements.
- Ask for a climate-specific inspection: look for load calculations, fastener schedules, and corrosion considerations.
6. Document seasonal checks
- Schedule a seasonal visual inspection after major storms or seasonal transitions.
- Keep photos and notes on any movement, cracking, or moisture intrusion to track changes over time.