Ultimate Guide to Uneven Roof Lines
Last updated: Feb 28, 2026
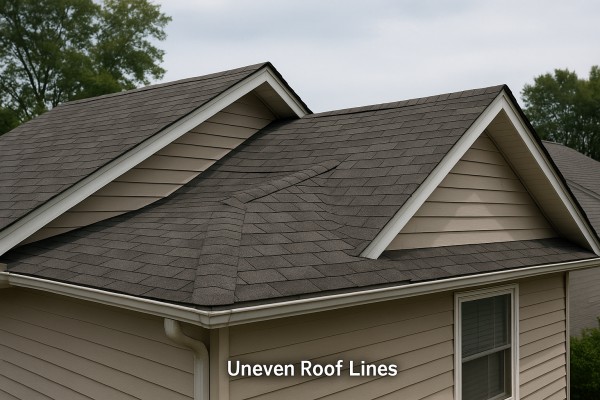
Introduction to Uneven Roof Lines
Uneven roof lines show up in many homes for different reasons, from age and settling to weather and installation quirks. They can range from a barely noticeable tilt to a pronounced ridge that affects appearance, water flow, and attic comfort. Recognizing and understanding the issue helps you decide what to do next without panicking.
Is this urgent or common?
- Common, especially in older homes or roofs that have seen seasons of weather and normal settling.
- Urgent when you notice daylight peeking through attic gaps, sagging sections, or significant misalignment that could signal structural stress.
- Not every uneven line is a disaster, but it's a sign you should inspect further to prevent leaks or energy loss.
Common causes
- Settling and framing shifts over time.
- Improperly installed or repaired sections during past renovations.
- Structural movement due to moisture damage, rot, or termite activity.
- Sun, heat, and temperature swings causing shingles to curl or warp.
- Roof age catching up to the materials' lifespan.
- Heavy loads (snow, wind-driven debris) stressing one side more than another.
Signs to watch for
- A visibly uneven ridgeline or warped sections along eaves.
- Shingles cupping, buckling, or curling out of place.
- Daylight visible through attic hatches or under flashing.
- Gutter or fascia that looks tilted or separated on one side.
- Localized sagging or dips in the roof plane.
- Ice damming or water stains that track toward a particular side of the house.
Potential risks
- Leaks, water intrusion, and hidden mold in the roof deck or attic.
- Accelerated wear on nearby flashing, vents, and sealants.
- Reduced attic ventilation and increased energy loss.
- Complications with warranties or insurance if the issue is mischaracterized.
- Higher repair costs later if the problem worsens or spreads.
High-level next steps
1) Do a safe, ground-based check and note the areas that look uneven. If you can safely access the roof with proper equipment, inspect for obvious gaps, sagging, or missing shingles. Avoid climbing if the roof is slick or unstable.
2) Document what you see. Take clear photos from multiple angles and map any problem spots against attic access points or interior leaks you've noticed.
3) ReviewRecent conditions and history. Consider if recent storms, heavy snow, or long-term aging could explain the uneven lines, and check for signs of moisture or rot behind soffits and under the shingles.
4) Schedule a professional assessment. A licensed roofer should examine both the exterior roof and, if needed, the attic framing and ventilation. Ask for a written assessment and a clear explanation of what needs repair, why it's needed, and the expected timeline and costs.
Quick homeowner checks you can do now
- Stand at ground level and look for one side of the roof that sits higher or lower than the other.
- Inspect gutters for uneven drainage or pooling that might indicate a slope issue.
- Check attic access for daylight, obvious leaks, or musty odors, and note any changes in insulation or ventilation.
- Keep a simple log of weather events and any roof-related issues you've observed to discuss with a pro.
Are Uneven Roof Lines an Emergency?
Uneven roof lines can be a sign of stress or moisture in the attic. Some situations demand urgent attention; others are safer to monitor. Use these guidelines to gauge how quickly you should act and what to tell a roofer when you call.
- You see sagging, buckling, or a roof edge that feels soft to the touch. Structural movement can progress quickly after a storm or heavy rain.
- There is active water intrusion: ceiling drips, wet spots, or new stains appearing after a rainstorm.
- Shingles are cracked, displaced, or torn, and you can see exposed underlayment or decking from the attic.
- The attic shows daylight through the roof plane, or there are visible bowing or twisting rafters/joists.
- You heard cracking, creaking, or popping noises from the roof or attic, especially during wind gusts.
- There was a severe storm ( hail, high winds) and you notice abrupt misalignment, missing sections, or tilt at the ridge.
- Fascia, soffit, or roof edges are visibly pulling away from the house, posing a fall or collapse risk.
Monitor if
- A small amount of unevenness is present but the attic is dry with no leaks. The lines may be due to aging materials or minor sagging that isn't progressing.
- The roof has wear typical of its age and you don't see new gaps, exposed decking, or active moisture.
- Weather is calm and you don't hear new noises. You plan a professional assessment, but there's no immediate threat.
- You recently had a storm but there are no leaks or visible movement yet; you're watching for changes over the next few days.
Can wait if
- There are minor, localized uneven sections with no water intrusion, no daylight in the attic, and no signs of movement.
- The roof is in otherwise solid condition, and you're scheduling a repair in the coming weeks or months due to planned replacement or maintenance.
- You have time to compare estimates and coordinate a professional evaluation when weather looks clear and the contractor has openings.
Quick safety checks and a simple plan
- Do not climb on or walk across an uneven roof yourself. Movement can worsen damage and put you at risk.
- If you notice leaks indoors, place a bucket under drips and protect valuables; document the area with photos for your records.
- Inspect from the attic side (with a strong flashlight and careful footing) for daylight, moisture, or sagging framing. If you see daylight or significant moisture, treat it as urgent.
- Keep pets and children away from the affected area. If there's a storm coming, secure exterior furniture or debris that could become projectiles.
- Photograph damage from the ground and inside the attic so your roofer has a clear starting point when you call.
What to tell a roofer when you call
- Describe the exact location and what you've observed (sagging edge, daylight, leaks).
- Note recent weather events (storms, hail, heavy rain) and any changes since then.
- Mention attic indicators (dry or wet spots, bowing rafters, new stains).
- Ask about temporary protections and how soon they can inspect and repair.
Documentation and next steps
- Keep a log of observed changes over days or weeks.
- Take dated photos of any new damage or leaks.
- Schedule a professional assessment as soon as possible if you're in the “Call immediately” or “Monitor” categories, so the underlying issue doesn't escalate.
Understanding the Common Causes of Uneven Roof Lines
Foundation and structural movement
When a house settles or shifts over time, the walls and roof framing can move unevenly. This movement pulls the roof line out of true and can create visible dips, twists, or a skewed edge along the eaves.
- Uneven foundation settlement on one side of the home
- Frost heave or soil movement from seasonal changes
- Tree roots or landscape changes affecting soil support
- Sill plate or framing shifts from moisture or improper curing
Framing and roof structure problems
The roof is only as straight as its framing. Problems in rafters, studs, or the ridge line translate directly into an uneven roof plane.
- Warped, bowed, or undersized rafters or trusses
- Sagging roof deck from rot, insect damage, or moisture
- Inaccurate ridge board alignment or loose ceiling joists
- Inconsistent rafter spacing or miscuts during construction
Additions, remodels, and alterations
A later addition or patchwork can disrupt an originally planned roof line if it isn't properly tied into the existing structure.
- Dormers, sunrooms, or extensions not integrated with the main roof framing
- Partial roof replacements that don't align with the old line
- Changes to overhangs, fascia widths, or guttering that throw off alignment
- Cutting or removing structural members without proper reinforcement
Moisture, rot, and weather damage
Water intrusion weakens wood, causing boards to shrink, warp, or sag and pull the roof line out of level.
- Rot in rafters, roof sheathing, or ceiling joists
- Plywood or OSB warping from sustained moisture exposure
- Ice damming, excessive snow load, or wind-driven rain leading to sagging
- Leaks around vents, chimneys, or skylights accelerating decay
Aging, wear, and material fatigue
Roofs age, fasteners loosen, and components settle differently, especially after decades of service.
- Corrosion or failure of metal connectors and nails
- Deterioration of sealants and shingles, allowing uneven movement
- UV exposure causing boards to dry, crack, and bow
- Mixed material thicknesses or mismatched new and old sections
Design features and intentional irregularities
Some homes incorporate features that intentionally alter a roof line, but if not planned or executed with precision, they can read as uneven.
- Dormers, skylights, chimneys, or vents that aren't flush with surrounding planes
- Different roof pitches, transitions, or ridge elevations that aren't blended
- Inconsistent fascia, drip edge, or underlayment heights across sections
Quick homeowner checklist (numbered steps)
1) Do a visual walk around the exterior and attic to note edges that don't appear level or straight.
2) Inspect gutters and fascia for gaps, sagging, or misalignment that hint at underlying shifts.
3) In the attic, look for creaky or bowed rafters, exposed moisture, or stained decking.
4) Check for signs of past remodeling that might not have tied into the roof framing (new dormers, patched areas).
5) After heavy rain or thaw, re-check for new soft spots, leaks, or uneven sagging that wasn't there before.
How Roof Materials Affect Uneven Roof Lines

- What goes wrong: Asphalt shingles want a straight, stable surface. Uneven roof lines create high/low spots that can cause shingles to sit crooked, bunch up at edges, or lift at corners. Missed alignment can lead to gaps that trap moisture and let wind lift occur.
- Key failures to watch: buckling, excessive nail heads exposed, and visible seams where the underlying deck isn't true.
- How to mitigate: use a solid underlayment and ensure the deck is properly prepared; when the roof line is notably uneven, consider adjusting the starter course to compensate rather than forcing a straight line across a jagged edge. Flashing around penetrations must be carefully integrated to avoid leaks.

- What goes wrong: Metal panels rely on a flat or uniformly curved substrate to seal along seams. Uneven lines can cause misaligned seams, telegraphed ridges, and panel distortion (oil-canning) under load.
- Key failures to watch: loose or kinked panels, fasteners too close to the edge, and visible gaps where panels meet.
- How to mitigate: install with appropriate substrate support (often purlins or furring strips) to create a near-flat surface, then use longer, properly spaced fasteners with gasketed washers. Pay extra attention to field seams and drip edges where the line runs off the roof.

- What goes wrong: Tile roofs are heavy and require precise alignment. Uneven lines exaggerate edge cuts, cause tiles to crack at ends, and create uneven bed surfaces that can lead to voids under tiles.
- Key failures to watch: cracked or loose tiles at high/low transitions, misfit starter and rake tiles, and improper flashing where the roof meets walls or a chimney.
- How to mitigate: ensure battens and a solid substrate are correctly fitted to create a uniform plane; cut tiles carefully at slopes and edges; inspect for proper tailing of flashing and ensure underlayment remains continuous beneath tiles.

- What goes wrong: Wood expands and contracts with moisture; uneven lines magnify gaps and distortion. Shakes can cup or curl toward high spots, creating leaks and wind issues.
- Key failures to watch: warping edges, gaps at joints, and increased maintenance needs in higher wind zones.
- How to mitigate: use properly spaced battens and gap management; seal ends and consider tighter custom-fitting at irregular lines; maintain clear ventilation to reduce moisture buildup under the wood.

- What goes wrong: Slate is very rigid and heavy. Uneven roof lines stress the deck and can lead to lippage, cracked slates, or misaligned courses.
- Key failures to watch: cracked slates near low spots, loose fasteners, and uneven ridge lines that pull on adjacent slates.
- How to mitigate: require a true, flat deck and expert layout to offset irregularities; use full-thickness slates where possible and ensure proper nailing patterns and flashing details around penetrations.
Single-ply membranes (EPDM, TPO, PVC)
- What goes wrong: Membranes are flexible but still depend on a reasonably flat substrate. Large deviations can cause wrinkles, seams that pull apart, or punctures at sharp transitions.
- Key failures to watch: seam separation, ballooning or wrinkling in the field, and edge lift at eaves or transitions.
- How to mitigate: assess substrate irregularities and apply appropriate taper or smoothing underlayment; ensure edge details and terminations are designed to accommodate the actual roof shape.
Common fixes and considerations for uneven lines
- Use a straightedge to map high and low spots, then plan where to build up or shave back to create a workable plane.
- When the mismatch is significant, re-sheathing or adding a furring system to create a stable base can be more cost-effective long term than forcing a material to fit a curved or irregular edge.
- In all cases, prioritize proper flashing, underlayment continuity, and ventilation to protect against leaks and moisture.
Practical steps for homeowners
1. Inspect the roof lines with a level or straightedge and mark high/low areas.
2. Consult a licensed roofer to evaluate substrate health and material suitability.
3. Decide if flattening the base is feasible (furring, replacement decking) or if a material change is wiser.
4. Plan for flashing, edge details, and potential rework around penetrations to ensure a long-lasting seal.
The Risks of Ignoring Uneven Roof Lines
Structural stress and framing concerns
Uneven roof lines aren't just a cosmetic issue. They often signal that the roof isn't sitting square on the walls, which can misdirect loads and create uneven stress across rafters, trusses, and the decking. Over time, this can lead to:
- Sagging sections or warped framing
- Nail pops, cracked drywall, or misaligned ceilings in upper levels
- Accelerated wear on fasteners and flashing due to irregular movement
Water intrusion and moisture risk
When lines aren't true, flashing, valleys, and joint areas can misfit. Water can find paths around poorly aligned edges, allowing leaks to travel under shingles and into the attic. If moisture lingers, you'll see:
- Leaks around chimneys, vents, or where roof lines change direction
- Rot in sheathing and rafters from prolonged exposure
- Mold growth or musty insulation in the attic
Ice dams and snow load
In colder climates, uneven lines can create inconsistent heat loss, melting snow unevenly and refreezing at the eaves. This promotes ice dam formation and adds abnormal weight in spots that aren't built to carry it. Risks include:
- Ice buildup along lower edges
- Increased pressure on high spots with packed snow
- Potential gutter damage from uneven weight distribution
Energy efficiency and comfort
Gaps and misalignments can compromise insulation and ventilation. That means your home works harder to stay comfortable, and you'll feel it in bills and drafts. Practical consequences:
- Drafts in the attic and upper living spaces
- Uneven temperatures between rooms
- Higher heating and cooling costs over time
Long-term costs and insurance implications
Ignoring uneven lines often leads to a cascade of avoidable expenses. Small problems become big, fast, and may affect coverage if damage is tied to poor maintenance. You might see:
- Escalating repair costs as moisture damage spreads
- More extensive roof replacements sooner than expected
- Potential impact on claim outcomes if the issue is framed as neglected maintenance
Practical steps for homeowners (numbered)
1) Observe and document: From ground level and in the attic, note where lines appear off, gaps exist, or daylight shows through decking. Take clear photos from multiple angles.
2) Map the problem: Compare ridge lines, gutters, and fascia to identify high/low spots. A simple sketch can help communicate what you see.
3) Schedule a professional assessment: Hire a licensed roofing contractor or structural pro for a formal inspection, written report, and recommended scope of work.
4) Prioritize safety and scope: Do not attempt structural corrections yourself. If you access the attic, wear proper fall protection and avoid stepping on weak decking.
5) Plan for a proper fix: Expect a repair or replacement plan that addresses decking, flashing, ventilation, and drip-edge alignment to restore true lines and proper drainage.
How Uneven Roof Lines Are Diagnosed
What uneven roof lines look like
- The ridge line isn't straight when you sight along the peak from end to end.
- Shingles, tiles, or metal panels appear offset or cupping, curling, or lifting in places.
- The roof plane seems to sag or dip in certain zones, especially near hips, valleys, or openings.
- Flashing or fascia don't seat flush, leaving gaps or visible gaps along edges.
- Gutters or downspouts sit unevenly, and water drainage looks irregular.
The basic approach to diagnosis
- Start with a careful exterior check from ground level to the roof edge.
- Validate any eye-skew with precise measurements and alignment tests.
- Look into the attic for signs of movement or structural change that aren't obvious from outside.
- Differentiate cosmetic surface issues from actual structural movement to decide on repair vs. replacement.
Step-by-step diagnostic process
1. Ground-level survey: Walk around the house and look for obvious dips, bends, or a crooked silhouette along the edges of the roof. Note any areas that look visually off from the rest of the roof line.
2. Exterior edge inspection (safely): Use a stable ladder and inspect the roof edge for loose, cracked, or cupped shingles, lifted tabs, or disturbed flashing near vents, chimneys, or dormers.
3. Ridge line check: From the ends of the house, visually assess whether the ridge runs in a straight line. If you see a bend, kink, or uneven taper, mark it with chalk for reference.
4. Straight-edge/level checks: Place a long straight edge or laser level along suspected sections of the roof. Any gap or gap drift between the tool and the roof surface signals deflection or warp.
5. Attic evaluation: Go inside the attic with ample light. Look for:
- Deflection in rafters or ceiling joists.
- Cracks in framing or uneven ceiling heights.
- Daylight around joints, seams, or flashing that shouldn't be there.
- Insulation compression indicating past movement or settling.
6. Compare points: Take measurements at multiple points along the same plane and compare to overall roof width and adjacent sections to assess consistency.
Distinguishing cosmetic from structural issues
- Cosmetic signs: minor shingle curl, small lifts, surface irregularities, or flashing that looks off but shows no daylight in the attic.
- Structural signs: sustained sag or deflection, visible framing movement, attic daylight, cracks in structural members, or widespread unevenness along the ridgeline.
When to call a pro
- You see daylight in the attic, large deflections, or obvious wood rot or termite damage.
- There's persistent, unexplained movement across multiple sections or the ridge line cannot be aligned with straight-edge checks.
- You're unsure about safety or need a professional assessment to determine if repair, reinforcement, or replacement is required.
Options for Repairing Uneven Roof Lines
Temporary fixes
- Cover exposed areas with a heavy-duty, UV-resistant tarp. Secure edges with sandbags or weights and fasten edges to minimize wind uplift. This buys time during rain while you plan a proper repair.
- Apply a temporary seal at seams. Use roofing cement and self-adhesive flashing tape to slow water intrusion on small gaps or lifted shingles. Remember, this is a stopgap, not a cure.
- Patch small leaks with compatible repair products. For isolated spots, you can place a patch over the damaged area with appropriate patch material, then re-check after a rain to ensure it's holding.
- Prioritize safety. Avoid traversing steep, uneven sections without proper ladders, fall protection, and a trained helper. If in doubt, call a pro for a quick inspection.
Minor repairs
- Identify the root cause. Uneven roof lines often come from sagging decking, settling framing, or previous improper installation. A precise diagnosis helps you avoid chasing symptoms.
- Re-secure fasteners and ridge caps. Tighten loose nails or screws and replace any corroded or missing fasteners. Re-nail shingles accurately to restore a straight line and wind resistance.
- Replace damaged shingles in the affected zone. Match shingle type and color as closely as possible. Install with correct offset and nailing pattern to maintain uniform lines.
- Check flashing and valleys. Re-seal or replace flashing around chimneys, vents, skylights, and valley areas where misalignment can magnify uneven lines.
- Inspect underlayment and decking. If you detect soft spots, rot, or delamination, replace those sections before re-covering. A solid base helps prevent future misalignment.
- Re-caulk and seal edges. Re-seal eaves, rake edges, and drip edges where water can seep under the edge of the roof, helping the line stay visually straight and watertight.
Partial replacement
- Define the replacement boundary. Map out the exact section that shows persistent unevenness or damage and determine how it ties into surrounding shingles.
- Safe removal and preparation. Protect interior spaces, remove shingles and underlayment from the targeted area, and check the decking for rot or deflection. Replace damaged decking with matching thickness and span.
- Install new components in steps. Lay down underlayment, flashing, and ice-and-water shield as needed. Align the new section with existing lines to preserve a cohesive look.
- Match materials and details. Use shingles that match the existing color, profile, and weathering characteristics. Reproduce ridge caps, vents, and flashing to integrate the patch with the rest of the roof.
- Refit and test. Re-nail and seal new shingles, then perform a water test or careful inspection after a rain to confirm the repair holds and the line remains even.
Full roof replacement
- When to consider full replacement. If the unevenness is widespread, if multiple sections show ongoing damage, or if the roof is at or beyond its expected life, replacement may be the most cost-effective long-term option.
- Structural evaluation. Have a pro assess roof framing for sagging rafters or damaged trusses. Address any structural issues before or during the roof removal to keep the line straight across the entire roof.
- Material and design choice. Choose roofing material appropriate for your climate and budget (asphalt shingles, architectural shingles, metal, or tiles). Consider color, texture, and how well it'll aging uniformly to restore straight lines.
- Contractor selection. Obtain multiple bids, verify licenses and insurance, and review past projects with similar uneven-line issues. Confirm warranty terms on both materials and workmanship.
- Preparation and execution. Plan for interior protection, debris containment, and staged removal/install. Install a high-quality underlayment, drip edge, and appropriate flashing. Ensure proper attic ventilation and insulation to prevent future movement.
- Timeline, inspections, and cleanup. Schedule a realistic timeline with milestones for tear-off, decking work, and re-covering. Arrange a final inspection to verify straight lines, proper drainage, and a leak-free finish.
Typical Costs to Fix Uneven Roof Lines
Minor repair
- Description and cost: Small adjustments to bring a localized area back into level, such as shimming a sagging rafter, resecuring loose sheathing, or minor nail repairs. Most fixes are quick and don't require major teardown.
- Typical cost: about $300–$1,200, depending on scope and access.
- Steps:
1) Inspect the affected area to confirm the cause of the uneven line.
2) Install shims behind a sagging rafter or secure loose decking and fasteners.
3) Re-nail and reseal flashing around the fix.
4) Reinstall or touch up nearby shingles if needed.
- Timeframe: usually a few hours, with minimal disruption.
Moderate repair
- Description and cost: When uneven lines span a larger section or when more substantial reinforcement is needed, such as sistering rafters, adding blocking, or replacing a limited deck area. May involve temporary supports during work.
- Typical cost: roughly $1,500–$6,500, depending on length of the affected run and materials.
- Steps:
1) Do a comprehensive diagnostic of framing to determine exact scope.
2) Set up temporary supports and safety gear.
3) Apply structural reinforcement: sister existing rafters, add blocking, or replace a partial deck section.
4) Re-deck, re-flash, and re-seal as needed; re-apply underlayment and roofing material.
5) Verify proper alignment and drainage after the repair.
- Timeframe: longer than a minor fix, often a full day or two.
Major repair
- Description and cost: For significant sag, rot, or widespread misalignment affecting a large portion of the roof structure. This may require removing and replacing substantial framing, extensive decking, or a partial/full roof tear-off and re-roofing. Permits and more extensive labor are common.
- Typical cost: $8,000–$40,000+ depending on roof size, material, and extent of damage.
- Steps:
1) Stabilize and safely support the roof to prevent further damage.
2) Remove damaged decking and framing; assess for rot or pest damage.
3) Install new rafters, sheathing, and repaired or new decking.
4) Reinstall underlayment, flashing, and final roofing material.
5) Perform final alignment checks and navigate any required permits or inspections.
- Timeframe: several days to weeks, depending on scope and permitting.
What factors affect cost
- Roof size
- Larger affected areas drive more material and labor; costs are commonly calculated per square (100 sq ft) or per linear foot for structural work.
- Access
- Steep pitches, limited staging, or tight work zones increase time, safety measures, and equipment needs.
- Material type
- Deck material (OSB vs. plywood), roofing type (asphalt shingles, metal, tile), and finish influence both material price and installation effort.
- Extent of damage
- Deeper rot, multiple damaged rafters, or extensive decking replacement substantially raise costs.
- Local labor rates
- Regional wage differences and availability of skilled labor affect total project price.
How Long Can You Wait Before Addressing Uneven Roof Lines?
Immediate (0–3 days)
What happens if you wait:
- Small irregularities can channel water into the attic or along ceiling joints, turning a minor uneven line into a noticeable leak.
- Heat and humidity indoors can cause attic mold growth and wood framing to dry-rot faster if moisture is present.
- If there are exposed fasteners, rust or corrosion can accelerate, possibly loosening flashing or edge metal.
What to do now:
1) Do a quick, safe assessment from the ground. If you must go on the roof, only do so with proper fall protection or have a professional do it.
2) Contain the area inside: place buckets under drips, lay tarps or plastic on the attic floor to slow water damage.
3) Photograph the area for documentation and insurance records.
4) Contact a licensed roofer or contractor for triage within 24–72 hours to determine if there's an active leak and what temporary protection is appropriate.
Short-term (4–14 days)
What happens if you wait:
- Water intrusion becomes steadier, accelerating swelling of plywood or decking near the affected ridge line.
- Quick fixes (like loose shingles) may fail in wind or rain, allowing more moisture to travel under the shingles and into the attic.
- Gaps around flashing can widen, inviting pests or birds into the roof line and soffits.
What to do now:
- Schedule a thorough inspection with a reputable roofer for a diagnosis and staged repair plan.
- If weather allows, provide temporary protective coverings (properly installed tarps) to minimize further water entry, but avoid nail-through tarps that can create new leaks.
- Check gutters and downspouts for blockages that could force water toward the roof edge. Clear them if safe to do so.
Medium-term (2–8 weeks)
What happens if you wait:
- Prolonged moisture exposure damages roof decking, leading to sagging, soft spots, or hidden rot that weakens structural integrity.
- Insulation and attic ventilation can break down, increasing energy costs and reducing indoor comfort.
- Mold growth and musty odors may develop in the attic or upper walls, potentially affecting indoor air quality.
What to do now:
- Obtain a formal roof inspection and a written repair estimate that includes deck replacement if needed.
- Start coordinating with insurance if weather-related damage is involved and you have documented leaks and photos.
- Prepare for repairs: clear the area around the roof line, ensure access for crew, and arrange temporary accommodations if a ceiling or attic can't be safely occupied.
Long-term (2–6 months and beyond)
What happens if you wait:
- Extended exposure can lead to widespread deck damage, fastener rust, flashing corrosion, and fascia or soffit rot.
- Structural concerns may arise if joists or rafters have been compromised, increasing the risk of larger, costlier failures.
- The roof's overall lifespan is shortened, and warranties may require timely maintenance as a condition of coverage.
What to do now:
- Plan for a full or partial roof replacement or a major repair as recommended by your roofer, ideally scheduling in a weather window that minimizes disruption.
- Review attic ventilation and insulation to prevent moisture buildup after repairs.
- Keep up with seasonal inspections to catch shifting lines or minor problems before they become major.
What happens if you wait to address the problem in several timeframes?
- 0–3 days: risk of immediate interior water damage and electrical hazards if wiring is involved.
- 4–14 days: leaks become steadier and faster to propagate; flashing and gutters may fail under continued moisture.
- 2–8 weeks: decking damage and insulation issues start to compound, increasing repair costs.
- 2–6 months+: severe structural risk, long-term mold, and potential warranty or insurance complications.
How Uneven Roof Lines Vary by Location and Climate
How This Problem Varies by Region & Climate within the United States
- Northeast & Great Lakes
- Heavy snow and repeated freezing–thaw cycles-pry and settle roof framing, making lines look uneven as insulation and decking shift.
- Ice dams form along eaves, lifting shingles and fascia unevenly and accelerating fastener loosening.
- Salt and moisture from winter storms can accelerate corrosion of metal components near the edges, contributing to misalignment over time.
- Southeast & Gulf Coast
- Prolonged heat and high humidity cause decking and rafters to swell and then dry out with temperature swings, creating subtle warps.
- Strong thunderstorms and hurricanes bring gusts that stress roof edges and hips, nudging lines out of true.
- Humidity promotes mold and rot in poorly vented attic spaces, which can sag or settle rafter bays, showing up as uneven lines.
- Midwest & Plains
- Wide temperature fluctuations and freeze–thaw cycles loosen fasteners and joints, especially in poorly supported long spans.
- Winter snow loads and ice buildup push on roofing members, then melt, creating cyclical movement that adds to visible irregularities.
- Wind gusts from plains weather systems can shift edges of the roof over time if the ridge or overhangs aren't tied down well.
- West Coast (marine and desert zones)
- Coastal areas contend with salt air, fog and heavy rain in some seasons, promoting moisture-related warping in decks and underlayment.
- Desert Southwest sees extreme heat and UV exposure, which can dry out and curl shingles or boards, making lines appear uneven.
- Pacific Northwest must contend with persistent rainfall and moss growth, which can mask true alignment and hide underlying deck movement.
- Mountain and High-Elevation Areas
- Snow loads are variable; rapid melt cycles stress roof-to-wall connections and ridge lines, creating creeping misalignment.
- Temperature swings between day and night foster expansion and contraction of materials, revealing buckling along hips and ridges.
- Climate-informed material and design differences
- Regions with ice dams (Northeast) benefit from thicker insulation, improved ventilation, and underlayment choices that resist interlayer movement.
- Wind-prone areas (Southeast, Gulf Coast, Great Plains) require reinforced clips, hurricane-rated fasteners, and continuous edge protection to prevent edge lift.
- Moss-prone zones (Pacific Northwest) need moisture-control gaps, treated decking, and more frequent inspections for rot that can show up as uneven lines.
- UV-heavy zones (Southwest) should prioritize materials with high UV resistance and adequate attic ventilation to minimize differential expansion.
Practical implications by climate (quick take)
- Expect more noticeable uneven lines where moisture, freeze–thaw, or wind stress dominate.
- In drier, hotter climates, look for cosmetic warping from expansion and shrinking of decking and shingles.
- In humid, rainy zones, focus on rot, moss, and fastener corrosion as drivers of misalignment.
Quick-start regional assessment (step-by-step)
1) Identify your climate drivers: snow and ice, heat and humidity, or heavy rain and moss exposure.
2) Inspect edge lines after seasonal shifts (early spring and late fall) for visible gaps or waviness.
3) Check attic ventilation and insulation as a first indicator of how the roof line might be affected by temperature swings.
4) Look for signs of rot, rust, or corrosion near fasteners, especially along eaves, overhangs, and ridges.
5) Note any recent weather events (heavy storms, rapid freezes, or heat waves) that could have stressed the roof structure.
6) If you're in a storm-prone region, plan a professional evaluation after major events to verify line alignment and fastener integrity.