Last updated: Apr 19, 2026
Winter in this area brings a relentless combination: long periods of heavy snowfall followed by rapid thaw cycles. Ice damming creeps up the eave lines, pushing water under shingles and into attic spaces if gutters are blocked or ventilation is poor. Roofs with improper slope or aging underlayment are especially vulnerable. The weight of fresh snow compounds structural concerns, stressing rafters and trim boards. If a roof already shows curled shingles, missing granules, or worn flashing, the risk of hidden water intrusion spikes during a thaw. Storms can deliver sudden wind-driven snow slides that dislodge edges and sealants, creating more opportunities for leaks before spring can even get a proper footing. The immediate actions are simple but critical: clear gutters and downspouts before the thaw, keep attic vents unblocked, and inspect for any ice buildup near eaves after a heavy snow event. Delaying diagnosis allows concealed damage to compound, potentially turning a manageable ice dam into a full retrofit when the next freeze hits.
Spring in this climate can expose damage from winter snow and thaw cycles before full replacement season begins. As temps swing, shingles contract and expand, and small gaps can open along valleys, flashing, and chimney lines. Any signs of water staining or squishy insulation in the attic signals the need for a pro assessment before the heavy rain and wind period resumes. The window between thaw onset and traditional contractor scheduling is tight: roofing teams often book out weeks, not days. You should act quickly when you notice curling, cupping, or shingle shingle-edge lifting, especially near valleys or along chimney flashing. Documented leaks, even if currently manageable, should trigger a professional diagnostic to confirm whether ice damming patterns persist or if wind-driven damage has created hidden vulnerabilities. Plan a thorough, focused inspection early in spring so evidence doesn't vanish under late-season weather stress.
Summer storm activity can inflict sudden roof damage while also delaying contractor schedules during peak demand. Hail strikes, hail density changes, and wind gusts from afternoon storms can dent metal edges, crack or shift shingles, and tear away protective granules. When crews are scarce and weather windows narrow, urgent repairs can slip toward the back burner if demand spikes after a big hail event. The practical consequence is a cycle of reprioritization: minor leaks become urgent calls as heat accelerates interior damage, and a late-summer repair can collide with the demand surge from many homeowners. The immediate response is to initiate an expedited inspection after a notable hail or wind event, focusing first on structural integrity and flashing condition. If a roof shows any newly visible gaps, lifted tabs, or compromised seals, arrange a targeted temporary measure to maintain weatherproofing while the full repair or replacement plan is scheduled. In this climate, timely triage is not optional-it preserves the structure and prevents insurance delays from compounding the risk.
The cyclical pattern of ice damming, thaw exposure, and summer storm damage means homeowners must remain vigilant year-round. A proactive, season-aware approach minimizes the chance of escalating repairs and keeps the roof resilient through the entire annual lifecycle. Start the cycle with a targeted inspection after major winter storms, before the spring thaw progresses, and again after the first sustained warm period. Maintain clear communication with contractors about scheduling constraints and anticipated peak times, so urgent issues do not drift into weeks-long delays. The goal is to catch problems when they're small, before they multiply with the advancing seasons.
Minot sits in a landscape where hail with wind-driven storms can turn a normal roofing season into a high-claim reality. In the late winter and early spring, ice damming and heavy snow loads push shingles and underlayment to their limits, and that same cycle later in the year makes the roof vulnerable to wind uplift and hail impact. You're not imagining the pattern: insurers see the local weather history and expect detailed damage photos paired with contractor estimates. This means your success hinges on clear documentation that ties the damage to the storm events rather than aging or neglect.
Insurers serving Minot routinely review the local weather record when evaluating a claim. They want precise, timestamped evidence: photos of hail impact patterns, wind-stripped edges, and any moisture intrusion visible from attic spaces. Before submitting, you should capture close-up shots of damaged flashing, ridge caps, and gutters, plus a broader view of the roof slope and overall condition. A reputable contractor's assessment should extend beyond cosmetic fixes to identify hidden damage that could undermine attic insulation, ventilation, and the roof deck over the coming seasons. Expect a detailed narrative that connects the storm event to observed failures.
In this market, adjusters may compare proposed replacements against code-compliant, wind-rated roofing products rather than a like-for-like match with older materials. The point is not to chase the familiar look if the new system improves performance under wind uplift and hail exposure. A roof that resists wind and sheds hail effectively reduces the risk of future claims and minimizes future disruption. Your best path is to discuss durable, tested options with a contractor who understands how local wind loads and hail histories influence performance. The goal is a replacement that stands up to the climate while satisfying structural and warranty considerations.
After a major hail or wind event, the window to act is narrow. Insurance settles quickly when there is a clear, consistent damage narrative: dated photos, third-party estimates, and a professional assessment that outlines scope of work and timelines. Do not wait for the first sunbreak to start compiling this package. Keep a running record of weather impacts, any interior signs of leakage, and the sequence of repairs. When you sit down with a contractor, request a full write-up that emphasizes wind resistance, hail impact resistance, and a roof-to-attic evaluation that captures the health of underlayment and ventilation.
Begin by documenting the entire roof from multiple angles after any significant storm. Note any curled or missing shingles, dented metal profiles, lifted edges, and flashing gaps. If an adjuster arrives, a prepared folder with photographs, a detailed damage list, and the contractor's estimates will expedite the review. Throughout the process, keep communications clear and consistent, and have the contractor's contact information ready to provide direct quotes and product specifications. In a market where insurance-driven replacements are common, having a disciplined, evidence-based presentation can influence outcomes toward a durable, code-aware solution rather than a quick fix.
Flying B Roofing
(701) 509-2728 flyingbroofing.com
7601 US-83, Minot, North Dakota
5.0 from 9 reviews
Flying B Roofing is a local, family owned and operated business with over 10 years experience. Specializing in commercial and residential metal roofing. Protect your investment!
Jessen Roofing
(701) 838-2687 jessenroofinginc.com
Serving
5.0 from 22 reviews
Jessen Roofing began in 1981 as a local, family owned and operated business serving customers with roofing needs in Minot, ND. In a market with roofing businesses coming and going, we pride ourselves on remaining a cornerstone of the community by serving both commercial and residential customers with complete roofing services. We moved to our present location in 1985, which is 3 miles west of Minot.

Straight Line Construction
6300 11th Ave SE, Minot, North Dakota
Full service Contractor
Minot's cold, windy winters make ice damming a primary roof-system issue rather than a minor maintenance concern. When snow piles high and temperatures swing above and below freezing, meltwater refreezes at the eaves, backing up under shingles and into soffits. Over multiple seasons, that cycle can loosen fasteners, saturate decking, and push moisture into attic spaces. A roof that looks fine from the ground may be failing on the inside. The practical takeaway is simple: in this climate, moisture control is a frontline concern, not a later judgment call.
Ice damming happens most often along cantilevered eaves and poorly ventilated roofs. The problem isn't only the ice itself; it's the heat that travels from an insulated attic into the roof deck. That heat melts snow at the top of the slope while the colder edge remains frozen, so water seeks a path under shingles. In Minot, where long, windy snow seasons endure, that damming effect compounds year after year. The remedy relies on two sturdy pillars: a well-sealed, continuous underlayment and a balanced ventilation system that keeps the roof cold at the eave and warm higher up. If an existing roof shows signs of recurrent ice dams, addressing insulation gaps and adding proper underlayment become permanent fixes rather than temporary patchwork.
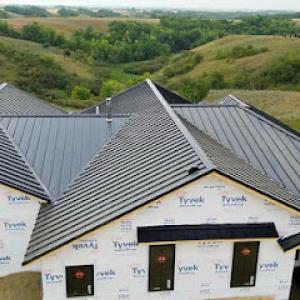
Local inspections for full re-roofs specifically verify underlayment and venting, reflecting how critical moisture control is in winter conditions. When a crew approaches a re-roof, the first question isn't only what color shingles will be installed, but whether the underlayment is continuous across the entire deck and whether the attic is vented to maintain a cold roof deck during freeze-thaw cycles. In practice, this means seamless synthetic or at least high-quality felt underlayment that overlaps correctly at every seam, plus adequately placed soffit and ridge vents or turbine vents that work in concert. If attic space is crowded with insulation, consider baffles to preserve ventilation paths and prevent blockages that trap warm air near the deck.
Heavy snowfall in Minot stresses roof systems over long durations, so weak ventilation and underlayment details tend to show up as leaks during freeze-thaw periods. An effective approach combines snow-rated decking where applicable, continuous underlayment that reaches eave edges, and a ventilation strategy designed to move air from eave to peak without creating cold spots. During a re-roof, verify that any roof penetrating fixtures (vents, pipes, chimneys) are flashed with attention to wind-driven rain and snow exposure unique to local gusts. Addressing these elements not only reduces the risk of ice dams but also extends the life of the new roof by limiting moisture intrusion during those stubborn Minot winters.
Asphalt shingles and metal roofing are the most practical fits for Minot because they align better with the city's cold winters, wind exposure, and storm-driven replacement market. Asphalt shingles offer a robust, familiar option that handles heavy snow loads relatively well when installed with proper underlayment and ventilation. Metal roofs bring enhanced wind resistance, rapid shedding of snow, and a proven track record in frozen cycles, which helps when the January thaw and late-season blizzards arrive. In neighborhoods that see frequent hail and seasonal storms, these two materials perform predictably year after year and pair well with typical roof pitches found on local homes.
Clay and concrete tile appear in broad material lists but are less naturally aligned with Minot's freeze-thaw and snow-stress conditions than lighter systems commonly used across the northern Plains. Heavy tiles can strain older roof structures, and their weight compounds when snow sits on top for long periods. If a tile roof is considered, ensure the structure is rated for the additional load and that proper ice and water shield strategies are in place at eaves and penetrations. In practice, many homeowners lean toward lighter, more forgiving systems for easier snow management and quicker, insurance-friendly replacements after severe storm events.
Wood shingles and shakes bring a traditional look but require scrutiny beyond appearance alone. In Minot, hail resistance, wind rating, and winter moisture performance are decisive factors. Wood can be more prone to moisture-related issues if attic ventilation, condensation control, and underlayment are not meticulously maintained. Synthetic or composite shingles offer improved hail resistance and consistent performance in wind, yet performance varies by product line. When evaluating these options, prioritize products with tested wind uplift ratings and strong proprietary moisture barriers, and verify that installation details address cold-season movement and ice dam potential.
For homes facing long wind-driven snow seasons, a retrofit approach that prioritizes tight connections, continuous underlayment, and strategic attic ventilation matters as much as the chosen material. Lightweight systems that shed snow efficiently can reduce ice dam risk, while properly installed wind clips and edge restraints minimize panel or shingle uplift during spring storms. In practice, the best choice balances local climate realities with existing roof geometry, ensuring a durable, storm-ready roof that can withstand Minot's extreme seasonal cycle.
Provided Minot-area cost ranges per square are: asphalt shingles 360 to 680, metal 520 to 1100, clay tile 1100 to 2600, concrete tile 1000 to 2300, wood shingles/shakes 420 to 900, and synthetic/composite shingles 420 to 800. In practice, the total reroof price responds not only to material type but to roof complexity, attic access, and local supplier pricing cycles. Asphalt remains the most common choice for a good balance of cost and performance in this climate, while metal projects push the budget higher but can offer longer life and better wind resistance. Clay and concrete tiles provide durability in hail-prone years but weight and installation complexity add to the bottom line. Wood shakes bring a distinctive look but require extra maintenance, and synthetic options often set a middle ground on cost with varied longevity.
Storm-driven surges in demand after hail or wind events can push scheduling pressure and replacement pricing higher during peak season. When a hail event hits, you may see a scramble for material and labor, and crews can be booked weeks out. That pressure shows up in bid gaps and expedited timelines, so planning ahead or starting the process early after storm notices helps avoid premium surcharges. If you already faced damage, documenting impact with photos and securing a reputable contractor before further weather shifts can keep costs more predictable.
Cold-weather installation limits, winter carryover damage, and the need for code-compliant underlayment and venting details can materially affect final reroof pricing. In extreme cold, some adhesive fasteners and certain underlayment products behave differently, potentially slowing progress and adding labor time. Proper attic ventilation and ice-dam mitigation measures matter, especially after long snow seasons, and missteps here can drive short- and long-term costs. Expect quotes to reflect a complete package: material, fasteners suitable for low temps, underlayment, ventilation, and wrap-up detailing to resist winter storms.
In Minot, a building permit is required for a full re-roof. The permit ensures that work aligns with local codes that address northern Plains extremes, including snow load, venting, and underlayment standards. The permit application can be filed by the contractor or by you, the homeowner, and should include project details and scope, such as roof size, materials, and any ventilation or drainage changes.
The application goes to the city building department, and the process is straightforward when the details are complete. Include the project address, planned shingles type, underlayment, venting layout, attic access, and any structural repairs. If the roofer handles the permit, they should pull it and keep you informed of approvals and any plan corrections. If you file yourself, attach the contractor's information and ensure the scope matches what will be installed. Keep a copy of the permit and any amendments on site during the job.
A Minot building inspector verifies that underlayment, venting, and shingle installation meet code during the inspection process. Expect an inspection schedule that follows mid-project milestones or a final check, depending on the scope. The inspector pays particular attention to attic ventilation balance, ice-dam protection details, and proper nailing patterns for the chosen material. Be prepared to provide access to the attic and roof edge during inspection windows and to furnish product specifications and installation manuals as requested by the inspector.
With ice damming risk in winter and hail-prone periods in warmer months, align the permit and inspection timeline with typical Minot weather windows and insurer timelines. Start the permit process early if damage prompts a roof replacement after a storm, as delays can impact project sequencing and approvals. Ensure that chosen ventilation and underlayment choices remain within code to avoid rework. If repairs are staged, confirm how inspections apply to partial work and what constitutes final approval.
Spring work starts with careful timing because the thaw cycle and late-season hail can reveal damage before the ideal installation window fully opens. If a hailstorm has hit, you may see dents, lifted shingles, or granule loss show up as temperatures rise. Schedule a roof inspection once temperatures have stabilized and the ground dries enough to support equipment access. In Minot, that often means pushing the start date into late April or May, but be prepared for delays if recent storms produced soft ground or lingering moisture. Have a contingency plan with your contractor for temporary protective measures to keep interior finishes safe if a sudden freeze thaws recur.
Summer is the main replacement window, with longer days and more predictable dry spells. Expect busy schedules, as storm activity-wind and hail-can interrupt tear-off and installation. To reduce disruption, aim to secure a start date during the early hot stretch when crews can work efficiently from morning into afternoon, and both meteorology and local contractors help you anticipate windows of calm weather. If a heat wave or strong gusts push work back, maintain flexibility and keep a clear line of communication with the project manager so crews can re-sequence tasks without compromising material performance.
Fall work in Minot has to account for freeze-thaw conditions that can affect sealants and installation quality. With temperatures dropping, moisture can freeze at critical joints and impact adhesion. Schedule earlier in autumn to allow for a successful seal and lining up interior work that may follow. If the season tightens, request a thorough checklist from the crew: proper attic ventilation review, ice dam risk assessment, and a staged plan that prioritizes critical sections first so waiting time on less exposed areas doesn't extend into winter.
Even if conditions look favorable, winter storms can derail progress. Build in a buffer period between tear-off and shingles to allow for any unexpected cold snaps or drifting snow. Ensure a clear path for material delivery and a dry, heated workspace where possible. In a city built for big skies and big temp swings, planning around the seasonal rhythm helps keep roof work moving with fewer surprises.