Ultimate Guide to Storm Damage to Roof
Last updated: Feb 28, 2026
Introduction: Storm Damage to Roofs
Storm damage can strike quickly and quietly. A hailstorm or strong gust can leave behind hidden issues that reveal themselves days or weeks later as leaks or interior staining. Damaged flashing, torn shingles, or compromised underlayment can undermine a roof's ability to shed water, even when the surface still looks decent from the ground.
Storm damage is both common and situationally urgent. Most roofs experience some wear after extreme weather, and small granule loss or minor shingle lift isn't automatically an emergency. But certain signs demand prompt attention: active leaks, ceiling stains, damp insulation in the attic, a sagging section, or debris resting near power lines. If you notice any of these, treat the situation as urgent and prioritize safety.
High-level next steps to keep things moving in the right direction:
- Prioritize safety and protective measures right away.
- Document the damage with clear photos and notes.
- Schedule a professional roof inspection to determine scope and needed repairs.
- Begin the insurance conversation with your provider and contractor, using your notes and photos.
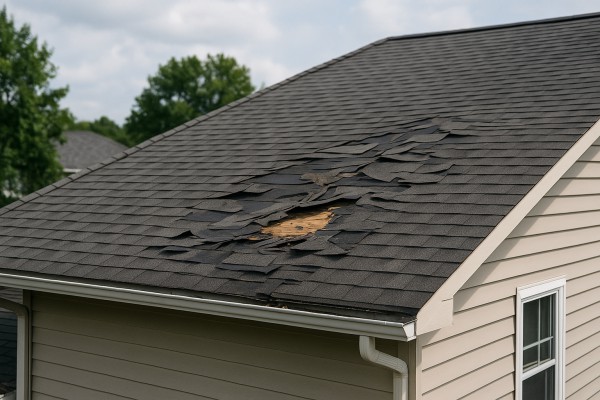
What storm damage looks like
- Missing, cracked, curled, or buckled shingles, especially after a wind event.
- Damaged or displaced flashing around chimneys, vents, valleys, and skylights.
- Granule loss visible in gutters or on the ground—signs the shingles' surface is compromised.
- Hail dents on metal components, gutters, or flashing; dented gutters can indicate broader roof damage.
- Water intrusion signs: attic condensation, brown stains on ceilings, or damp insulation in the attic.
- Visible sagging or soft spots on the roof deck, which may signal structural concerns.
- Debris-related damage: broken skylights or damaged vent boots.
- Shingle granules accumulating in gutters, signaling accelerated wear.
Is it urgent or common?
- Common: Storms routinely cause minor damage that isn't immediately dangerous but should be evaluated soon.
- Urgent: Active leaks, obvious water intrusion, sagging roof sections, or structural concerns require faster action to prevent further damage.
1. Do not walk on a damaged or wet roof. A fall is a serious hazard.
2. If you can access leaks safely, place buckets or tarps to control water, and move valuables away from the path.
3. Protect interiors from further damage: cover exposed areas from the inside or outside with a tarp if you can do so safely.
4. If you see downed power lines or signs of exposure near electrical sources, stay clear and call the utility or emergency services.
High-level next steps
- Arrange a licensed roof inspection as soon as it's safe to do so, ideally within a few days after the storm.
- Gather evidence: take dated photos, note which areas were affected, and keep a simple damage log.
- Contact your insurance provider with a concise summary of what happened, plus photos and the expected scope of work.
- Get a written assessment from a contractor, including recommended repairs or replacement, and a rough timeline.
- Discuss temporary protection options with your contractor (e.g., tarps, leak-blocking measures) to minimize further damage while repairs are planned.
Is Storm Damage to the Roof an Emergency? Assessing Urgency and Immediate Steps
Quick triage: emergency signs
- Active leaks during rain, pooling water on ceilings or walls, or water dripping from rafters.
- Visible daylight or openings in the roof deck from the attic.
- Sagging roof sections, bulging ceilings, or noticeable structural movement.
- Large areas of missing shingles or exposed underlayment after a storm.
- Debris on the roof or in the gutters that indicates a severe impact or wind event.
If you notice any of these, treat it as an emergency and take immediate safety steps.
- You have active water intrusion you can see or hear, such as dripping water inside the home during rain.
- There is visible structural damage: a sagging roof, ceiling bulge, or rafters pushing through the attic.
- A large portion of shingles is missing, or the roof deck is exposed over a wide area.
- You cannot safely access the attic or roof due to instability, darkness, or ongoing weather risk.
- There are signs of electrical hazards near the roof area (sparking, buzzing, or exposed wire) or you suspect a downed power line nearby. In this case, stay clear and call the utility provider and emergency services.
Monitor if
- The weather is clearing and there is no active interior leak at the moment.
- You can safely observe the roof from the ground or through the attic without risking your safety.
- The damage appears localized (a few shingles or minor surface indentations) and interior moisture is not spreading.
- You want to track changes over the next few hours or days to decide on next steps.
Notes for monitoring:
- Check for new leaks after each round of rain or wind.
- Keep an eye on the attic for fresh signs like damp insulation, fresh staining, or new daylight spots.
Can wait if
- There are no active leaks, no visible daylight, and the roof is not showing sagging or structural signs.
- The storm has passed and weather conditions are calm, allowing scheduled inspection without urgency.
- The damage is cosmetic (scuffed shingles or minor surface granules) and there is no risk of interior damage or worsening conditions.
- You have a planned roof inspection window within 24–72 hours and can safely manage temporary precautions in the meantime.
Step-by-step immediate actions (do these now if there's any risk)
1) Safety first: stay off wet or damaged roof surfaces; avoid leaning on or touching loose shingles or decking. Keep children and pets away from the affected area.
2) Stabilize the exterior: if it's safe, place a sturdy tarp or heavy-duty plastic over the damaged section to slow water entry. Secure with roofing nails, duct tape rated for outdoor use, or weights on the edges. Do not staple tarps to a wet or fragile roof surface.
3) Protect the interior: lay down plastic sheeting or towels to catch leaks, move valuables away from the leak path, and place containers to collect dripping water. Photograph the interior and exterior damage for insurance purposes.
4) Minimize further damage: clear gutters and downspouts of loose debris if it's safe to do so; ensure drainage paths are unobstructed to reduce standing water on the roof.
5) If you suspect electrical risk: if you see sparking, buzzing, or downed lines, keep everyone away and call the utility company or emergency services immediately. Do not approach the roof or touch any electrical components.
6) Document everything: note the time, weather conditions, and the extent of visible damage. Take clear photos from the ground and attic if accessible. This helps with insurance and contractor planning.
7) Contact a professional promptly: even if it seems safe to wait, a licensed roofer can assess hidden damage, such as compromised decking or underlayment, that isn't obvious from the ground.
If you're ever unsure, err on the side of caution and treat the situation as an emergency until a professional confirms otherwise.
Common Causes of Storm Damage to Roofs
Wind uplift and wind-driven damage
Strong winds can lift shingles, peel back flashing, and loosen fasteners. Even a few missing or damaged pieces can let water reach the decking.
- Shingle blow-off and lifted tabs
- Exposed underlayment and roof decking
- Damaged ridge, hip caps, vents, and flashing around chimneys
- Gullies, valleys, and dormers vulnerable to wind pressure
Hail impact
Hail can gouge, crack, or abrade the roof surface, sometimes without instantly visible leaks. Over time, granule loss accelerates wear and allows water to penetrate.
- Dented shingles and abnormal wear patterns
- Granule loss exposing asphalt layers
- Cracked or punctured shingles and metal components
- Hidden damage to underlayment and roof deck
Falling debris and branches
Storms often throw branches, limbs, and other debris against the roof, causing punctures and impact damage. Damaged gutters and fascia are common accompaniments.
- Punctures or tears in shingles and underlayment
- Groove marks or dented metal components
- Gutter and gutter-fastener damage
- Fascia board and soffit impact
Heavy rain, downpours, and drainage problems
Even without direct impact, heavy rain can overwhelm inadequate drainage or compromised flashing, leading to leaks. Clogged gutters allow ponding and water backing up under the roof edge.
- Leaks at flashing, valleys, and around roof penetrations
- Clogged or damaged gutters and downspouts
- Poor roof slope or ponding that forces water under edges
- Skylight or vent leaks from improper sealing
Ice damming and freeze–thaw cycles
In cold climates, melting snow at the top can refreeze at the eaves, forming ice dams that push water back under shingles. This process can lift shingles and damage flashing.
- Ice dams backing water onto the roof deck
- Shingle lift and edge damage from expanding ice
- Gutter and downspout stress or damage
- Meltwater intrusion under shingles and flashing
Aging materials and installation issues
A roof that's nearing the end of its life or was installed with shortcuts is more prone to storm damage. Deterioration accelerates once a storm hits.
- Loose or missing nails, nail pops, or shifting fasteners
- Worn granules and curling or curling shingles
- Inadequate underlayment or flashing integration
- Poor attic ventilation contributing to moisture buildup
Lightning and extreme weather events
Lightning can strike the roof or nearby equipment, potentially causing fires or damaging metal components and vent stacks. High-velocity events can also rip off or lift components.
- Direct strikes causing material damage or fires
- Damage to metal vent stacks, flashing, and chimney areas
- Secondary damage from electrical surges in connected systems
Tornadoes, hurricanes, and microbursts
Very strong winds can shear, peel, or tear apart roofing assemblies, especially around edges, penetrations, and seams.
- Severe shingle uplift and complete sections blown off
- Roof deck exposure around penetrations and along edges
- Structural damage near a roofline or attic voids
- Debris intrusion that compromises waterproofing
Quick safety-focused post-storm checks (simple, practical steps)
1. Observe from the ground for obvious signs of damage such as missing shingles or new gaps.
2. Use binoculars to inspect difficult-to-reach areas; avoid climbing on a damaged roof.
3. Document damage with photos and notes, including dates and weather conditions.
4. If leaks are present, place a temporary tarp or plywood patch only if it's safe to do so; otherwise wait for a professional assessment.
5. Contact a licensed roofer to assess wind, hail, and debris damage and to verify flashing, underlayment, and decking integrity.
How Roof Materials Affect Storm Damage to Roofs
Wind Uplift Susceptibility by Material
- Asphalt shingles: The most common vulnerability is edge lifting and tab peel-back in strong winds, especially on older or poorly installed roofs.
- Metal roofing: When properly fastened, metal panels resist uplift well, but loose screws, clips, or poorly seated panels can fail and create leaks.
- Clay/concrete tile: Tiles are heavy and can handle wind better in some designs, but inadequately installed decks or broken underlayment can let wind push tiles off or crack them.
- Wood shingles/shakes: Lightweight and prone to lifting in high winds; installation quality and spacing matter a lot.
- Slate: Very durable, but individual slates can loosen or crack with gusty winds; overall uplift depends on underlayment and nail quality.
- EPDM/TPO membranes: Uplift depends on edge sealing and seams; poorly sealed edges can billow in high winds.
Hail Impact and Material Resilience
- Asphalt shingles: Susceptible to hail dents and punctures; granule loss accelerates aging and exposes the asphalt beneath.
- Metal roofing: Prone to denting from hail, though thick gauges and quality coatings reduce cosmetic damage and maintain function.
- Clay/concrete tile: Prone to cracking or breaking with hail impact, creating leaks where tiles shatter.
- Wood shingles/shakes: Hail can cause splits and checks; repeated impacts worsen durability.
- Slate: Very impact-resistant surface but brittle; large hail can crack individual slates.
- Synthetic/composite shingles: Often engineered for better impact resistance; cheaper options may crack or delaminate under heavy hail.
Water Infiltration and Flashing Considerations
- Asphalt shingles: Leaks almost always trace to damaged flashing around chimneys, vents, and valleys if wind or hail damage has occurred.
- Metal roofing: Leaks typically come from bent seams or loose fasteners around penetrations; flashing integrity is crucial.
- Clay/concrete tile: Underlayment and flashing beneath tiles must seal properly; broken or displaced tiles expose the underlayment.
- Wood shingles/shakes: Damaged or missing shakes expose underlayment; flashing must be intact to prevent leaks at penetrations.
- Slate: Requires precise flashing; damaged slates near flashings can lead to moisture intrusion.
- EPDM/TPO: Seams and penetrations are the weak points; punctures or pulled seams can let water in.
Debris, Branches, and Surface Condition
- Asphalt shingles: Granule loss and curled edges trap debris; damaged areas are easy to overlook from ground level.
- Metal roofing: Dented panels can trap water and debris; loose edges invite further damage after a storm.
- Tile: Broken pieces create gaps and edges that catch debris; replacement tiles are often needed to prevent leaks.
- Wood shakes: Debris can force moisture into exposed wood; damaged shakes rot more quickly.
- Slate: Debris and missing slates expose underlayment; sharp edges can cause additional damage to adjacent slate.
- Synthetic: Generally resistant to denting and debris, but check for cracks after heavy impacts.
Post-Storm Inspection: Quick Practical Steps
1. From the ground, look for missing, curling, buckled, or displaced material.
2. Inspect around penetrations (chimneys, vents) for exposed flashing or gaps.
3. If safe, perform a careful close-up check or hire a pro to assess underlayment and deck damage.
4. Document damage with photos for insurance and contractor estimates.
5. Schedule a professional roof evaluation to verify hidden damage and underlying structure.
Common roofing materials and storm effects
- Asphalt shingles: wind uplift, granule loss, potential leaks at penetrations
- Metal roofing: denting, fastener/ seam issues, potential leaks
- Clay/concrete tile: cracking, breakage, heavy roof weight implications
- Wood shingles/shakes: lift risk, splitting, rot potential
- Slate: durable yet brittle; crack risk with hail or heavy impact
- EPDM/Rubber: puncture risk from large debris; seam integrity matters
- PVC/TPO: seam vulnerability; material wear from UV exposure can influence storm performance
- Composite/Synthetic shingles: variable impact resistance; higher-quality models tend to perform better
- Solar roof components: penetrations and mounting points introduce additional leak points and potential panel damage in storms
The Risks of Ignoring Storm Damage to Your Roof
Hidden damage that can escape notice
- Storm debris can bend, crack, or lift shingles without obvious signs on the surface.
- Water can seep under the shingles and into the underlayment, decking, or attic insulation, even if you don't see a drip inside yet.
- Over time, small issues multiply: loose granules, weakened fasteners, and compromised flashing create bigger failures after the next weather event.
Water intrusion and mold risk
- Water that enters the attic or ceiling can travel along joists and rafters, reaching insulation and interior walls.
- Damp insulation loses effectiveness, raising energy bills and encouraging mold growth that may affect indoor air quality.
- Mold can spread behind walls and in corners you can't easily inspect, leading to expensive remediation later.
Structural concerns that worsen over time
- Repeated exposure to moisture can rot sheathing and rafters, reducing roof stiffness and overall support.
- A compromised deck or framing can shift loads, increasing the risk of sagging, leaks, or even collapse in severe cases.
- Ice dam formation in winter can force water to back up under shingles, accelerating rot and weakening structure.
Higher repair costs the longer you wait
- Small, fixable issues become larger, pricier projects if left untreated.
- Delayed repairs can necessitate full roof replacement sooner than expected, plus additional costs for interior damage.
- Emergency or after-hours repairs cost more than routine, scheduled work.
Insurance and warranty implications
- Some policies require prompt mitigation of damage; ignoring leaks can affect coverage eligibility.
- If a claim is delayed and further damage occurs, insurers may reduce or deny compensation for the additional harm.
- Warranties on shingles and underlayments often have stipulations about proper maintenance and timely repairs; neglect can void protections.
Safety hazards to your home and family
- Weakened roofs can fail under wind, rain, or snow, posing risk of falling debris or sudden leaks.
- Damaged flashing and vents create pathways for pests and rodents, and can invite critters into the attic.
- Wet attic spaces and mold growth can create poor air quality and health concerns for household members, especially kids and sensitive individuals.
How ignoring damage affects energy efficiency
- Air leaks around compromised flashing or missing shingles allow outdoor temperature swings to cross the attic and living spaces.
- A leaky roof forces your HVAC to work harder, driving up energy costs and reducing comfort year-round.
Long-term consequences for resale value
- Unaddressed storm damage can show up in home inspections, delaying or complicating sales.
- Persistent leaks can lead to interior stains, damaged ceilings, and visible roofline issues that buyers view as red flags.
Practical steps to address damage promptly
1. Document damage with photos and notes from the storm event.
2. Do a quick temporary mitigation if safe: cover exposed areas with a sturdy tarp or board if you can do so without risking injury.
3. Schedule a professional roof inspection as soon as reachable; early assessment prevents guessing about extent.
4. Keep a file of estimates, receipts, and communication with your insurer and contractor for claims and warranties.
5. Avoid DIY roof repairs beyond basic, safe measures; entrust structural and water-related issues to licensed roofers to prevent further harm.
Diagnosing Storm Damage to Your Roof
Exterior Visual Inspection
- After a storm, start with a careful ground-level check around the house. Look for obvious issues like missing or visibly damaged shingles, curling edges, or shingles that are lifting at the corners.
- Inspect flashing around chimneys, vents, skylights, and roof penetrations. Dented or displaced flashing is a common entry point for leaks.
- Watch for hail bruising or pockmarks on shingles, which can indicate panel damage even if it isn't obvious from the ground.
- Check gutters, downspouts, and fascia for granule buildup, staining, or detachment. Excess granules in the gutter can signal accelerated wear.
- Note any sagging sections, buckling, or visible gaps along roof seams. If you see noticeable deformations, treat them as high-priority.
- Do not climb onto a roof unless you're trained, equipped, and confident in your safety. Use binoculars for an initial review and save roof-side checks for a pro if there's any doubt.
Interior Indicators
- In the attic, look for daylight leaking through roof boards or flashing gaps. Any glow between rafters or around penetrations may indicate a bad seal.
- Check for water stains, damp insulation, or moldy smells on the underside of the roof deck. Moisture intrusion often travels along rafters, not just straight down.
- Note any signs of ice damming in colder weather, which can mask or exacerbate damage and lead to hidden leaks.
- Prioritize safety: wear proper gear, use a solid ladder, and work with a partner if you must go aloft.
- Essential tools: flashlight, tape measure, moisture meter (if you have one), and a camera or phone to document conditions.
- Techniques pros use:
- Tracing leaks from interior stains back to their exterior source, which isn't always direct above the stain.
- Infrared or thermal imaging to spot cooler, damp areas behind insulation or deck boards.
- Detailed flashing and seal checks around all roof penetrations and transitions.
- If you're uncertain about the extent of damage, it's better to pause and call a professional for an in-person assessment.
Step-by-step Diagnostic Process
1) Ground-level assessment: walk the perimeter, take clear photos from multiple angles, and note any irregularities.
2) Safe access by a pro or trained climber: if you're unsure about roof safety, wait for a roofer to inspect.
3) Attic check: assess the roof plane from above by looking for daylight, moisture, or stained rafters and insulation.
4) Inspect flashing and seals: examine around chimneys, vent pipes, skylights, and transitions between roofing materials.
5) Gutter and soffit review: look for broken, loose, or overflowing gutters that reveal water issues.
6) Damage documentation: compile photos, dates, locations of damage, and any related weather data for references.
7) Damage assessment and next steps: determine whether the issue is localized (repairable) or widespread (potential replacement), and plan with your contractor accordingly.
When to Call a Professional
- You notice significant wind uplift, hail impact, or widespread shingle damage.
- Interior leaks appear after rain or there are new, unexplained stains in the attic.
- You're unsure about safety or the full extent of damage, or you need an insurance-ready assessment with a written report.
Repair Options for Storm-Damaged Roofs
Temporary fixes
- Cover exposed roof areas with a heavy-duty tarp or plastic sheeting. Secure the edges with roofing nails or weighted objects (sandbags, bricks) and extend several inches beyond the damaged zone to shed water.
- Protect interior spaces. Place plastic sheeting or a tarp in the attic to keep rain out of insulation and ceilings. Use a bucket or trash can under active drips temporarily.
- Clear the area below. Remove outdoor furniture, planters, and other items that could be damaged by wind-driven water or falling debris.
- Avoid risky climbs. If the damage is extensive or the roof feels unstable, don't climb on it. Hire a professional for any work beyond basic, safe tarping.
- Document everything. Take clear photos from ground level and inside the attic. This helps with insurance claims and repairs.
Minor repairs
- Re-seat loose shingles. Lift the loose edge, apply a dab of roofing cement under the shingle, and press back down. For a more secure fix, add a corrosion-resistant nail through the shingle's tab, staying within the manufacturer's nailing zones.
- Replace cracked or missing shingles. Remove the damaged piece, cut or lift a new replacement shard to fit, and fasten with asphalt slate nails or appropriate fasteners. Cover the nail heads with a dab of asphalt cement to seal.
- Seal exposed flashing. Examine metal flashing around chimneys, vents, and dormers. Re-nail loose flashing and reseal with high-quality roofing cement or silicone sealant. Ensure a tight, continuous seal to prevent water intrusion.
- Check attic and underlayment. If you find damp insulation or visible water stains, dry the space as soon as possible and replace any affected underlayment or insulation. Improve attic ventilation to reduce future moisture buildup.
- Schedule a professional inspection. Minor, localized damage may be manageable, but a pro can confirm that there's no hidden trouble (like compromised deck boards or multiple leaks) that could worsen with the next storm.
Partial replacement
- When it's the right move. If damage is extensive but localized to a section or two of the roof, partial replacement can save time and money while restoring performance and warranty.
- Plan the scope. Identify all damaged shingles, underlayment, and any compromised flashing in the affected area. Include vent flashing and nearby chimneys if they show signs of wear.
- Remove and inspect. Lift shingles in the damaged zone and inspect the deck. Replace portions of degraded underlayment or decking as needed.
- Install new materials. Install new underlayment, starter strips, and matching shingles in the affected area. Re-seal flashing and ensure roof-to-wall transitions are watertight.
- Blend and protect. Ensure color and texture match as closely as possible for a seamless appearance. Re-inspect after a storm to catch any overlooked fasteners or flashing gaps.
Full roof replacement
- When to consider it. If widespread damage exists, multiple leaks persist, or the roof is near the end of its lifespan, a full replacement may be the most cost-effective, long-term solution. Structural damage to the deck or significant storm-related wear often mandates replacement.
- Prepare with a professional evaluation. A licensed roofer will assess deck integrity, ice-and-water shield sufficiency, ventilation, and flashing around penetrations. They'll discuss material options, warranties, and expected timelines.
- Tear-off and dispose. The old roofing system is removed, including underlayment and any compromised flashing as needed. Deck surface is checked and repaired if rot or damage is found.
- Install new system. A proper installation includes a fresh underlayment, starter strips, shingles or chosen material, ridge venting, and all flashing, vents, and attic penetrations correctly sealed.
- Final checks and cleanup. After installation, a thorough inspection ensures cams, nails, and seals are set. Confirm warranty coverage, and ensure the site is clean and safe.
- Insurance and documentation. Keep all receipts, invoices, and photos from each stage. Coordinate with your insurer to align documentation with your claim and ensure coverage for substantial repairs.
Typical Costs to Repair Storm Damage to a Roof
Minor repairs
- Description: Small fixes that stop leaks or prevent further issues. Examples include replacing a handful of loose or damaged shingles, resealing around vents or flashings, and tightening loose components. Often completes in a few hours on a single section.
- Typical cost: $150–$600
- What you get: Quick fix to restore watertight integrity and prevent peeling or further exposure.
Moderate repairs
- Description: More substantial damage affecting larger sections of roof, multiple shingles, or flashing around valleys, chimneys, or skylights. May involve replacing several shingles, repairing or upgrading flashing, and addressing minor underlayment wear. Could include patching damaged decking in a limited area.
- Typical cost: $1,000–$4,000 (often up to $5,000 depending on materials and access)
- What you get: Stronger protection across a broader expanse and a more durable seal against future storms.
Major repairs
- Description: Significant storm impact that risks widespread water intrusion and structural concerns. Includes substantial decking replacement, fascia/soffit repairs, extensive flashing work, or repairs to multiple penetrations. In some cases, major repairs may lead to a partial roof replacement if the damage is extensive but localized.
- Typical cost: $4,000–$12,000 for large-scale repairs on an asphalt shingle roof; $10,000–$25,000+ if the damage triggers a larger partial replacement or a full roof replacement
- What you get: Comprehensive restoration of integrity and protection, with attention to long-term durability and future storm resistance.
What factors affect cost
- Roof size
- Larger roofs require more materials and longer labor time. Costs rise with the number of squares (1 square = 100 square feet) and with more complex layouts.
- Access
- Steep pitches, limited workspace, and difficult terrain increase safety measures, time, and equipment needs (scaffolding, temporary containment), driving up labor and disposal costs.
- Material type
- Asphalt shingles are typically the most affordable; metal, tile, slate, or composite materials add to material costs and may require specialized crews or tools.
- Extent of damage
- Localized issues are cheaper to fix than widespread damage that involves decking, ventilation, or structural components.
- Local labor rates
- Regions with higher living costs or stricter licensing requirements often see higher labor charges. Availability of skilled storm-damage crews can also influence pricing.
Steps to estimate costs
1. Schedule a professional inspection
- An on-site assessment helps identify hidden damage (underlayment, decking, or flashing) that could influence the price.
2. Get itemized quotes
- Ask for separate line items for materials, labor, disposal, and any needed permits or inspections. Include potential contingencies for hidden fixes.
3. Compare scopes, not just totals
- Ensure each bid covers the same scope (shingles, underlayment, flashing, decking where applicable) so you're comparing apples to apples.
4. Check insurance alignment
- If applicable, verify what your homeowner's policy will cover and whether the contractor will work with your insurer to document damage and repairs.
5. Consider long-term value
- A lower upfront price may lead to higher maintenance costs later if decking, ventilation, or flashing aren't addressed properly.
Quick tips for reading a storm-damage estimate
- Look for clear scope: “replace X shingles, repair flashing at Y locations, inspect decking for moisture.”
- Watch for added costs: disposal fees, permit costs, or staging charges.
- Favor contractors who provide photos of damage and a written repair plan, not just a lump-sum figure.
How Long Can You Wait Before Addressing a Storm-Damaged Roof?
Within 24 hours
Right after a storm, safety comes first. Do not climb onto a damaged roof. From the ground, inspect for obvious exterior damage and watch for interior signs of leakage.
1) Photograph all visible damage from ground level and inside the attic or ceilings where leaks are showing.
2) If safe, place a temporary tarp or plastic sheeting over the most exposed area to slow water entry. Have a professional install a proper temporary cover if the job requires roof access.
3) Protect your interior: move valuables away from leaks, place buckets under drips, and switch off electrical circuits if there's active water near outlets.
4) Contact a licensed roofer for a temporary mitigation plan and a permanent repair estimate. If your insurer requires, start a claim and keep notes of conversations.
5) Keep all receipts for any mitigation supplies or services you purchase.
- What happens if you wait (within 24 hours):
Water can start traveling and wicking into joists and sheathing, expanding the area of damage.
Early mold growth becomes more likely in damp, warm conditions.
Electrical hazards may rise if water reaches outlets, breakers, or wiring.
Wind-driven leaks can loosen more shingles or flashing, accelerating deterioration.
48–72 hours
The weather often shifts the dynamics: tarps can fail in wind, and interior damage may become more pronounced.
1) Reassess and re-secure temporary protection. Re-tape or replace tarps as needed; verify they're anchored and not blocking proper drainage.
2) Document new damage with fresh photos and update your insurer or contractor.
3) Engage a roofer for a more durable temporary fix (slap-on patches, roofing fabric, or a temporary roof wrap) while you arrange permanent repairs.
4) Prioritize interiors: check for ceiling stains, damp insulation, or mold-prone areas; address ventilation as needed to limit moisture buildup.
- What happens if you wait (48–72 hours):
Moisture penetrates deeper into attic insulation and wall cavities, reducing R-value and increasing drying time.
Sheathing and framing can start to show softened spots, compromising structural integrity.
Mold and mildew risk rises, especially in humid climates or poorly vented spaces.
Insurance timelines can be affected if proactive mitigation wasn't documented.
1 week
By one week, minor leaks can become persistent, and the window for straightforward repairs narrows.
1) Obtain written repair timelines from your contractor and confirm permit requirements if needed.
2) Schedule a solar or header inspection if the damage is near critical roof components or chimney/vents.
3) Continue to manage interior moisture: run dehumidifiers in affected areas and ensure proper drying of any damp insulation or drywall.
4) Keep communication open with your insurer and document any changes in the roof's condition.
- What happens if you wait (1 week):
Prolonged water intrusion can lead to elevated drywall staining, warped ceilings, and damaged interior finishes.
Structural elements behind the scenes (sheathing, rafters, and plywood) can deteriorate, increasing repair complexity and cost.
Persistent moisture encourages mold colonization, which may require remediation beyond roofing work.
Delays can complicate insurance claims if the mitigation steps weren't clearly documented or performed promptly.
Beyond 1 week
If damage remains unrepaired for more than a week, the risk profile shifts significantly.
1) Prioritize a permanent repair plan with a trusted contractor and confirm material timelines.
2) Schedule a thorough interior moisture assessment and mold screening if leaks persisted.
3) Review all documentation for your claim, including mitigation work and temporary protections.
4) Consider temporary interior repairs (drywall patches, paint touch-ups) only after professional guidance to prevent trapping moisture.
- What happens if you wait (beyond 1 week):
Comprehensive structural repairs may be necessary as rot and widespread moisture damage set in.
Mold remediation becomes more complex and costly, potentially delaying occupancy.
Insurance coverage can be more complicated if there's evidence of prolonged neglect or incomplete mitigation.
How Storm Damage to Roof Varies by Location and Climate
How This Problem Varies by Region & Climate within the United States
Storm damage risk isn't the same everywhere. Local weather patterns, typical storm types, and even how homes are built and maintained shape what fails first and how quickly you'll need repairs. Understanding regional differences helps you spot weak spots before a storm hits and choose a roof that can hold up under your specific conditions.
Regional Patterns: Common Storms and Roof Impacts
- ### Northeast & Midwest
- Winter storms bring ice damming, heavy snow loads, and freeze-thaw cycles that stress underlayment and flashing.
- Blizzards and nor'easters deliver strong winds that can lift edges and expose fasteners.
- Spring and summer thunderstorms introduce hail and gusty winds that leave granule loss and punctures.
- Short, intense rain events can overwhelm gutters and cause leaks at poorly sealed penetrations.
- ### South & Southeast
- Hurricanes, tropical storms, and high-wind squalls drive sustained uplift on shingles and damage to drip edges and flashing.
- Heavy rainfall and repeated deluges test low-slope roofs and flashing details.
- Hail occurs in some outbreaks; impact resistance matters for durability.
- Lightning and rapid temperature swings can affect roof vents, skylights, and sealants.
- ### West & Mountain States
- Thunderstorms and hail are common in many inland areas; wind damage and punctures can occur with fast-moving cells.
- Atmospheric rivers on the West Coast introduce long-duration rain that stresses seams, underlayment, and decking.
- Snow and ice in the mountains add weight and cause freeze-thaw damage on slopes with limited drainage.
- Coastal sections face wind-driven rain and corrosion from salty air, requiring durable edge details and fasteners.
Materials & Design Adaptations by Region
- Hail-prone regions (Great Plains, Rockies, parts of the Northeast)
- Favor Class 4 impact-resistant asphalt shingles or metal roofing.
- Ensure flashing is continuous and properly sealed; inspect underlayment for punctures.
- Consider a higher wind-resistance rating for chosen materials.
- Wind-prone regions (Gulf Coast, Southeast, Atlantic Seaboard; also exposed coastal areas)
- Use wind-rated shingles (often tested to high mph) and secure fasteners with corrosion-resistant coatings.
- Add sealed drip edges, improved flashing at chimneys and vents, and optional hurricane clips or straps where codes allow.
- Keep roof edges protected with solid fascia and reinforced soffits.
- Cold-climate regions (Northeast, Mountain West)
- Install an ice-and-water shield along eaves and penetrations to reduce ice damming.
- Improve attic insulation and ventilation to minimize condensation and freeze-thaw damage.
- Choose materials with good performance in freezing temperatures and ensure proper sealing around penetrations.
- Coastal, salty-air regions (Pacific Coast, Southeast Atlantic)
- Select corrosion-resistant fasteners and flashing materials; rinse or wash salt deposits from metal components as needed.
- Consider color and reflectivity to reduce heat gain and maintain material lifespan in hot, sunny climates.
- Mountain and dry-influenced regions
- Plan for snow guards and retention systems on steeper pitches to manage sliding snow.
- Ensure drainage lines and scuppers are clear to prevent water backups during rapid rain.
Quick Regional Prep Steps
1) Inspect trees near the house and trim branches that could break onto the roof during a storm.
2) Clean gutters and downspouts; ensure proper drainage away from the foundation.
3) Inspect flashing around chimneys, vents, and skylights; reseal as needed before storm season.
4) If you're in a hail-prone area, discuss impact-resistant shingles or metal options with your roofer.
5) Schedule a regional wind or flood test if you live in hurricane-prone or flood-prone zones and follow local code guidance.
Post-Storm Checks by Region
- Look for missing or lifted shingles and dents or granule loss in hail-prone areas.
- Check flashing at vents, chimneys, and dormers; inspect around skylights for leaks.
- Inspect attic for signs of water intrusion or condensation, especially after heavy rains or thaw cycles.
- Document damage with photos and notes, and contact your insurer promptly if you suspect roof damage.