Ultimate Guide to Blistering Shingles
Last updated: Feb 28, 2026
Introduction to Blistering Shingles
Is blistering urgent or common? It's a relatively common issue, especially in hot climates, on aging roofs, or with rapid temperature swings. It doesn't always mean imminent failure, but it can progress if left unchecked. A small blister may stay put, or it can grow, rupture, and start letting water into your attic. The key is to assess scope and take appropriate steps.
Below are practical pointers to help you identify, assess, and plan the next moves without getting overwhelmed.
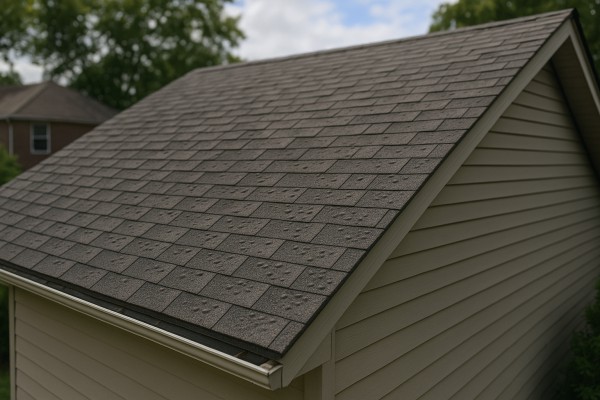
What blistering shingles look like
- Raised bubbles or pockets on the shingle surface, often along the roof slope.
- Shingle edges that appear wavy or puckered.
- Discolored patches where the protective coating has weakened.
- In some cases, blisters may burst, leaving thin, shiny patches or torn film.
Common causes
- Heat and sun exposure pushing moisture or air under the shingle film.
- Poor attic ventilation or insufficient insulation trapping heat.
- Moisture from improper attic moisture control or roof leaks that gets sealed under the shingle.
- Defective or thin shingles from certain batches.
- Rapid temperature changes that stress the asphalt and adhesive layer.
- Improper installation or nailing too high/low, which can affect adhesive performance.
Is blistering urgent or common?
- Common, but not always critical. If blisters are small and localized, you may monitor them while planning a future repair.
- More urgent if you see active leaks, water stains in the attic, or many blisters that are growing or bursting.
- If the roof is nearing the end of its expected life, or if a large portion of shingles is affected, professional assessment is wise to prevent unexpected failures.
High-level next steps
1) Safety first
- If you're comfortable, need to handle exterior checks from the ground with binoculars.
- Do not ladder-close under windy or wet conditions; if you're unsure, call a pro.
2) Do a quick attic and exterior check
- Look for signs of moisture, staining, or mold in the attic.
- Check for unusual warmth in the attic after sunny days, which might indicate heat buildup.
3) Document the condition
- Take clear photos of the blistering pattern, location, and any leaks or stains.
- Note the age of the roof and any recent weather or installation issues.
4) Assess the scope
- Count how many shingles show blisters and whether they're clustered or scattered.
- Look for adjacent areas with curling edges or missing granules.
5) Plan for professional input
- If the blisters cover a small, isolated area or if your roof is relatively new, a repairs-focused plan may be appropriate.
- For widespread blistering, multiple leaks, or aged shingles, a full replacement or significant repair is typically advised.
6) Implement preventive measures
- Improve attic ventilation and insulation to reduce heat buildup.
- Ensure proper attic moisture control to minimize moisture under the roof deck.
- Schedule a professional inspection to confirm underlying causes and to discuss warranty coverage if applicable.
Blistering Shingles: Is It an Emergency?
Quick assessment
Blistering looks like raised, bubble-like domes on the surface of shingles. They can be filled with air or moisture and may start as cosmetic, then worsen over time. Common causes include prolonged heat exposure, trapped moisture beneath the shingle layer, poor attic ventilation, or aging asphalt. If blisters break or shingles lift, the roof can lose its waterproof barrier quickly, especially with rain or wind.
- There is active leakage into the attic or living spaces (water dripping, wet insulation, or ceiling stains appearing after a rain).
- A large patch of shingles is blistering, buckling, curling, or lifting—especially near valleys, edges, or chimneys.
- The damage occurred after a severe storm or hail, and blistering shows up in multiple areas.
- You're dealing with a steep or unstable roof where walking near the affected area could be unsafe.
- The attic shows high humidity, mold growth, or obvious moisture intrusion that isn't resolving with normal ventilation.
Monitor if
- Blisters are small, isolated, and there's no current or recent leakage.
- Weather is dry and forecast looks stable for several days, reducing the risk of water intrusion.
- There's no visible cracking or missing shingles around the blistered area yet.
- The roof is relatively new or well-maintained, and blistering appears limited to a few spots.
Can wait if
- There are no leaks and the blistering remains minor and localized.
- Forecast calls for dry weather for an extended period, allowing a scheduling window for repair.
- The roof overall shows good condition aside from a few blister patches, and you plan a professional assessment within a reasonable timeframe.
- Access to the affected area is straightforward and you're comfortable arranging temporary repairs after a professional inspection.
1. Do not climb onto the roof or walk near blistered areas. Blisters are fragile and could burst under foot, creating leaks.
2. If you notice active leaks, place a bucket or container under the drip and move valuables away from the affected area in the attic.
3. Document the damage with photos from the ground and inside the attic (ceiling stains, moisture, or visible leaks) to share with the roofer.
4. Improve attic ventilation temporarily if you can do so safely (ensure vents aren't blocked and soffit vents are clear) to reduce moisture buildup.
5. Schedule a professional inspection as soon as possible, and provide the contractor with your photos and notes about when the blistering started and any leaks you've seen.
6. If you have homeowner's insurance, report the issue and ask whether a wind, hail, or leak inspection is covered, especially if there's recent storm activity.
Quick tips for communicating with a roofer
- Share exact location and size of blistered areas, and whether you've seen leaks.
- Mention any recent weather events in your area and the age of your roof.
- Ask about temporary protective measures and the expected timeline for a full assessment and repairs.
What Causes Blistering Shingles?
Moisture Trapped During Manufacturing or Storage
Shingles can trap moisture inside during production or while they're stored in bundles. When heat and sun hit the roof, those damp pockets can turn to steam and push against the shingle surface, creating raised blisters. Factors to look for:
- Elevated humidity or damp bundles at the supplier or on-site
- Temperature swings from shipping to installation
- Bubbles that appear as the shingle ages and dries
Excessive Heat and Sun Exposure
Direct, prolonged sun exposure and high temperatures soften asphalt-based shingle coatings. As heat builds, trapped volatiles move and form blisters, especially on roofs with long sun exposure or dark colors. Keep an eye on:
- Shingles in full sun without shade or overhang
- Areas near attic vents or skylights that run hotter
- Rapid heating and cooling cycles that stress the material
Installation and Ventilation Issues
Poor installation practices and insufficient attic ventilation can create a hot, humid underside that promotes blistering. Common culprits:
- Improper nailing: nails driven too high, too low, or through the nailing line can loosen shingles and trap air
- Inadequate underlayment or improper flashing around edges, chimneys, and vents
- Inadequate attic ventilation: limited soffit, ridge, or gable vents let heat and moisture build up under the roof
Aging Materials and Manufacturing Defects
Shingles have a finite lifespan, and a portion of blistering cases come from aging or defective stock. Consider:
- Older shingles losing elasticity and additives
- Manufacturing lot defects that produce local blister spots
- Variations between batches that don't seal or bond as well as intended
Deck Moisture and Leaks
If the roof deck is damp before or during installation, or develops moisture afterward, blisters can form as the shingle reacts to the wet surface. Signs to check:
- Residual moisture in the decking after rain or high humidity
- Slow leaks that wet the underside of the deck
- Warped or softened decking beneath blistered areas
Environmental and Chemical Influences
Certain environmental conditions and exposure to chemicals can contribute to blistering in some cases. Not as common, but possible:
- Proximity to salt spray or corrosive environments
- Contact with solvents, solvent-based cleaners, or incompatible roofing products nearby
- Severe hail or wind damage that exposes inner layers
Quick diagnostic checks (how to tell what's going on)
1) Look for uniformity: widespread blisters suggest heat, moisture, or manufacturing issues; isolated blisters point to localized causes like installation or deck moisture.
2) Check attic conditions: inspect soffit and roof vents, look for signs of humidity, condensation, or warm air buildup.
3) Inspect the deck: check for dampness, staining, or soft spots directly under blistered shingles.
4) Consider shingle age and batch: older shingles or recently installed materials from a questionable batch may be the culprit.
5) Review installation details: confirm nailing pattern, underlayment type, and flashing around edges and penetrations.
How to photograph and document
- Take close-up photos of the blisters and surrounding areas
- Note the location, size, and density of blistering
- Record roof age, shingle brand, and batch numbers if visible
When to suspect multiple contributing factors
If blistering appears in multiple areas with different exposure patterns, or if it's clustered around vents, chimneys, or skylights, you may be dealing with a combination of heat, moisture, and installation issues.
How Roof Materials Affect Blistering Shingles
Common materials and how blistering affects them
- Asphalt shingles (fiberglass or organic-mat)

- Risk level: High
- How blistering shows: Blisters form as air or moisture pockets push against the asphalt coating; you'll often see round, raised bumps that can crack or lift the tabs in strong sun.
- Why it happens with this material: Asphalt shingle layers include adhesive seals and bitumen that can trap moisture or fail to seal properly when heat is intense or moisture is present in the decking.
- What to check or look for: Deck dryness before installation, attic temperature, and proper ventilation; nail placement near the tab line; signs of moisture in the roof cavity.
- Practical prevention tips: Ventilate the attic well, install in mild weather if possible, use quality underlayment, follow manufacturer nailing patterns, and avoid installing over damp decking.
- Wood shingles/shakes

- Risk level: Moderate
- How blistering shows: If an asphalt-based coating or overlay is used on wood, blisters can form in the coating layer beneath the wood or in the overlay itself; wood can also warp or buckle, making blisters more visible.
- Why it happens with this material: Wood's moisture content and breathing can trap humidity under asphalt-based coatings or underlayment; sun-exposed heat can cause rapid expansion of pockets.
- What to check or look for: Moisture content in the wood, proper underlayment compatibility, and evidence of trapped moisture behind any coatings.
- Practical prevention tips: Ensure wood is properly dried and acclimated, use breathable underlayment designed for wood shingles, and provide adequate ventilation to reduce heat buildup.
- Metal roofing

- Risk level: Low to Moderate (for the metal itself); higher for underlayment systems beneath
- How blistering shows: Metal roofs themselves don't blister, but underlying underlayment/or asphalt layers can blister if trapped moisture or radiant heat is concentrated; you may notice blisters in the underlayment that show through over time.
- Why it happens with this material: Radiant heat off metal can raise substrate temperatures; improper or incompatible underlayment on a metal roof can trap moisture.
- What to check or look for: Compatibility of underlayment with metal, signs of heat-related damage in the substrate, and proper flashing and ventilation.
- Practical prevention tips: Use breathable, roof-specific underlayments for metal systems; ensure proper attic or roof space ventilation; verify that heat-reflective details are in place.
- Clay and concrete tiles

- Risk level: Low for the tiles; underlayment risk remains
- How blistering shows: Blisters typically appear in the underlayment or in any asphalt-based coating beneath the tile system; tiles themselves rarely blister.
- Why it happens with this material: High solar gain can push moisture in the underlayment to form pockets; improper underlayment installation can trap moisture.
- What to check or look for: Underlayment condition under the tile, ventilation adequacy, and compatibility between tiles and the chosen membrane.
- Practical prevention tips: Use appropriate underlayment designed for tile roofs, ensure proper ventilation, and follow tile-specific installation guidelines.
- Slate

- Risk level: Very low
- How blistering shows: If blistering occurs, it's usually in the underlying underlayment rather than the slate itself.
- Why it happens with this material: Slate is durable, but the roof system underneath must still manage moisture and heat correctly.
- What to check or look for: Condition of the underlayment and flashing; any signs of moisture intrusion.
- Practical prevention tips: Prioritize high-quality underlayment and good ventilation; keep fasteners and flashing in good condition to prevent leaks that can contribute to blistering in adjacent layers.
- Flat roofs and membrane systems (BUR, EPDM, TPO)
- Risk level: Membranes, not shingles
- How blistering shows: Blisters occur in the membrane itself rather than on shingles; can appear as bubbles or raised areas when air or moisture is trapped.
- Why it happens with this material: Heat buildup, improper seam workmanship, or moisture infiltration behind the membrane.
- What to check or look for: Underside insulation moisture, seam integrity, and any signs of bubbling on the membrane surface.
- Practical prevention tips: Use compatible membranes and properly sealed seams; ensure adequate ventilation above and beneath the roof deck.
Quick reference: steps to reduce blistering risk in any roof system
1) Confirm decking is dry and sound before applying any shingles or overlays.
2) Ensure adequate attic or roof space ventilation to control heat buildup.
3) Use materials and underlayment rated for your roof type and climate.
4) Check fastener placement and sealing to avoid moisture traps.
5) Inspect for signs of moisture intrusion after storms or high humidity, and address promptly.
The Risks of Ignoring Blistering Shingles
What blistering shingles signal
Blisters are raised, bubble-like pockets on the surface of asphalt shingles. They form when heat and moisture get trapped between the shingle layers, or when the deck beneath is damp. Causes include excess attic moisture, poor ventilation, improper installation, or a weather-driven flaw in the shingle itself. When you see them, it's your roof signaling that conditions up top aren't ideal and warrant attention.
Progressive damage when left unchecked
1. Water can seep through ruptured blisters during rainstorms.
2. Continuous moisture can cause the roof deck to rot and decay, weakening the structure over time.
3. Delamination and lifting of adjacent shingles become more likely, creating additional leaks.
4. Wind can grab loose or weakened shingles, accelerating damage and increasing the chance of blow-off.
5. Small issues tend to compound, leading to larger, more expensive repairs or earlier roof replacement.
Hidden water intrusion and attic risks
- Moisture in the attic promotes mold and mildew growth, which can affect indoor air quality and trigger allergies.
- Hidden leaks can cause interior staining, warped ceilings, and damp insulation that undermines thermal performance.
- Ongoing moisture can corrode flashing and fasteners around vents, chimneys, and valleys, inviting more leaks.
Structural and safety concerns
- Prolonged moisture exposure can weaken roof sheathing and framing, reducing long-term roof longevity.
- Localized rot or sagging is less common but possible in older or poorly ventilated homes.
- A compromised surface raises the risk of sudden failure during storms, especially in high-wind events or heavy rain.
Energy loss, comfort, and long-term costs
- Damaged shingles reduce reflectivity and insulation efficiency, pushing your cooling and heating costs higher.
- Uneven moisture and heat in the attic can worsen insulation performance and contribute to ice damming in cold climates.
- Delaying repairs often means a larger portion of the roof must be replaced later, increasing total project cost.
Warranty, insurance, and resale impact
- Some manufacturers require timely repair of blistering to keep a warranty valid; ignoring signs can void coverage.
- Insurance adjusters may require mitigation or documentation of repairs to honor claims.
- A roof with visible blistering can impact curb appeal, buyer confidence, and resale value, and may prompt questions about the roof's underlying condition.
Practical next steps
1. Do not climb onto the roof to poke at blisters; arrange a professional inspection instead.
2. Have a licensed roofer assess the extent of blistering, identify underlying causes (ventilation, moisture intrusion, or installation defects), and recommend repair or replacement.
3. Check attic ventilation and insulation; ensure proper intake and exhaust balance to minimize moisture buildup.
4. Obtain written estimates for repair or replacement, including deck, flashing, underlayment, and shingles, and compare options.
5. Address any attic moisture or mold promptly so remediation can proceed in tandem with roof work.
Here are a few grammatically correct section heading options you can use:
- Diagnosing Blistering Shingles
- How Blistering Shingles Is Diagnosed
- The Diagnostic Process for Blistering Shingles
- Methods and Steps in Diagnosing Blistering Shingles
If you want a concise option exactly matching your prompt, "How Blistering Shingles Is Diagnosed" is perfectly correct. (Shingles is treated as a singular disease name in this context.)
What blistering looks like on your roof
Blistering shingles show up as raised bubbles or pimples on the shingle surface. They often form on sun-exposed slopes near vents, chimneys, and along eaves. In severe cases, the blistering can cause waviness, cupping, or cracking of the shingle surface. The blister itself may fill with air, moisture, or asphalt, weakening the protective layer and increasing the risk of leaks. Look for:
- Raised, bubble-like areas on multiple shingles
- Shingles that appear blistered, puckered, or swollen
- Granule loss around blistered spots or on the roof surface
- Localized leaks after rain or wind-driven moisture
Step-by-step visual inspection
1. From the ground, scan the roof with binoculars to spot irregular bulges and clusters of blisters.
2. Pay attention to areas around roof penetrations (vents, pipes) and along the ridges where heat concentrates.
3. Head inside to the attic and check the ceiling beneath suspected blistered areas for moisture stains or halos.
4. Note any patterns (more blisters on one slope or in sunlit sections) that point to heat, ventilation, or exposure issues.
Advanced diagnostic methods a contractor may use
- Moisture meter tests on the attic side to measure moisture levels and dew point near blistered spots.
- Infrared (thermography) scans to identify cooler areas that indicate trapped moisture under shingles.
- Core sampling or controlled removal in a small, inconspicuous area to view the shingle, underlayment, and decking (performed only with consent and safety precautions).
- Roof deck checks after removing a few shingles in a test area to confirm decking moisture and damage.
Determining cause, extent, and urgency
- If moisture is entering the attic or living space, there may be an active leak requiring attention.
- Poor attic ventilation or insufficient insulation can trap humidity under the roof, contributing to blistering.
- Age, sun exposure, and weather events (hail, heavy rain) are common contributing factors.
- Widespread blistering with brittle shingles often indicates replacement is more economical than patching.
What this means for your next steps
1. Decide whether to repair localized blisters or replace affected shingles based on deck condition and the extent of blistering.
2. Obtain at least two written estimates from qualified roofers, with clear scopes of work.
3. Inquire about warranty coverage for both labor and materials.
4. Plan timing to minimize interior disruption and moisture intrusion, ideally avoiding wet seasons or extreme heat.
When to call a professional
- You're uncomfortable inspecting the roof or performing safe checks from a ladder or attic.
- You find active leaks or blistering covers a large roof area.
- The attic shows widespread moisture, staining, or signs of mold risk.
- You want an expert assessment to determine whether repair or replacement is the best long-term solution.
Repair Options for Blistering Shingles
Temporary fixes
- Protect the area from rain and wind damage. Cover blistered sections with a sturdy tarp, secured at the edges with weighted objects or temporary fasteners. Avoid driving nails through the shingles themselves; use edge anchors or a frame to hold the tarp.
- Limit foot traffic on the blistered area. Walking on blistered shingles can worsen them or cause more hail, wind, or water damage.
- Do not try to pop or puncture the blisters. Popping can release moisture and create a larger opening for leaks.
- Check for leaks after rain and document any wet spots inside the attic or ceiling. This helps you and your roofer understand the urgency and scope.
- Improve ventilation in the attic if possible. Better air flow can slow deterioration in the long term and reduce the chance of new blisters forming.
Minor repairs
- Use only on isolated, non-separating blisters. For small, attached blisters, you can reseal and secure the area to slow further damage.
- Steps to perform a small reseal:
1) From the ground or with a safe ladder, gently lift the edge of the blister to check for moisture under the shingle.
2) If dry, apply a thin bead of asphalt roofing cement under the edges to reseal it. Press the edge back down firmly.
3) Lightly press along the seam with a flat, blunt tool to ensure a good seal.
4) Re-nail the shingle if edge lift is present, using nails placed above the perforation line and driven snugly.
5) Seal over the top edge with a small patch of roofing cement or compatible sealant.
- If the blister has started to crack or peel away from the underlayment, treat that area as a partial-repair candidate rather than a quick seal. A crack often signals deeper issues that need professional attention.
Partial replacement
- When blistering is localized to a handful of shingles or a small area, replacing those shingles is usually the most cost-effective option.
- Steps:
1) Identify the exact row and extent of damaged shingles.
2) Remove the damaged shingles carefully with a flat pry bar, taking care not to cut the surrounding shingles or underlayment.
3) Cut new shingles to match the exact size and shape of the missing pieces.
4) Slide the new shingles into place, align with neighboring tabs, and secure with nails two inches from edges and per manufacturer guidelines.
5) Seal the nail heads and edges with matching roofing cement or sealant.
6) Check that the new shingles lay flat and align with the surrounding surface to avoid wind uplift.
- After replacement, inspect adjacent shingles for any early signs of blistering or lifting and address promptly.
Full roof replacement
- Consider full replacement when blistering is widespread, the roof is near or past its expected life, or there are multiple signs of underlying problems (poor ventilation, damaged underlayment, widespread delamination).
- When to choose full replacement:
- More than a few dozen shingles blistered across a large area.
- Visible underlayment damage, curling, or widespread edge lift.
- Roof age is at the end of its expected service life (commonly 20–30+ years for asphalt; longer for certain materials).
- What to expect during a full replacement:
1) Assessment: a professional evaluates underlayment, ventilation, and overall roof condition.
2) Material selection: choose shingles and underlayment that fit climate, aesthetics, and warranty goals.
3) Ventilation and upslope improvements: ensure attic ventilation is adequate to prevent future blistering.
4) Scheduling and protection: plan for weather windows, protect landscaping and interiors, and minimize disruption.
5) Installation: proper removal of old material, careful exposure of decking, and meticulous installation of new underlayment and shingles.
6) Inspection and warranty: final checks for alignment, sealing, and wind resistance, plus documentation of workmanship and material warranties.
Typical Costs to Fix Blistering Shingles
Minor repair
Blistering is confined to a small patch or a few isolated shingles. In many cases, the fix is quick and inexpensive, especially when the underlying roof deck and flashing are sound.
- What it involves: Remove and replace 1–3 blistered shingles, reseal along nail lines, and inspect nearby shingles for hidden moisture. Check underlayment in the immediate area and ensure proper venting to prevent new moisture buildup.
- Typical cost: $150–$350
- Timeframe and notes: Often a same-day repair for a straightforward patch. Access and roof pitch can affect how long it takes fuel up. If the patch is near a vent, small adjustments to flashing may be included.
Moderate repair
A moderate repair covers a larger patched area or several blistered zones. The scope increases when blistering is more widespread or adjacent components show signs of moisture intrusion.
- What it involves: Remove and replace a larger patch (roughly 4–12 shingles), re-nail with proper fastening, replace any damaged underlayment, and reseal edges. May include minor adjustments to flashing around nearby vents or chimneys.
- Typical cost: $400–$900
- Timeframe and notes: Typically longer than a minor patch, often half a day to a full day depending on roof layout and access. If blistering is creeping toward valleys or near pro valleys, costs rise due to extra labor and potential sealing requirements.
Major repair
Major repair is needed when blistering spans a wide area or indicates broader moisture issues, potentially affecting structural components or multiple roof sections.
- What it involves: Replace a sizable section of shingles, possibly entire roof face, with new underlayment as needed. Inspect and reseal flashing around multiple protrusions, and assess deck condition for moisture damage. In some cases, improving ventilation or addressing attic moisture becomes part of the job.
- Typical cost: $1,000–$3,000 or more, depending on roof size, shingle type, and extent of damage
- Timeframe and notes: Can require a multi-day project for larger roofs or complex layouts. If deck damage or extensive flashing replacement is found, expect higher costs and potentially additional materials.
What factors affect cost
-What factors affect cost
--Roof size
--Access
--Material type
--Extent of damage
--Local labor rates
-How these factors influence pricing:
- Roof size: Larger areas mean more shingles to remove, replace, and seal, increasing material and labor time.
- Access: Steep pitches, tight eaves, or difficult terrain slow down work and raise safety requirements and equipment needs.
- Material type: Asphalt standard shingles are usually the least expensive to replace; architectural or specialty shingles cost more, both in materials and matching complexity.
- Extent of damage: Isolated blistering costs less; widespread blistering or moisture-related damage to underlayment or deck drives up both labor and materials.
- Local labor rates: Regions with higher wage scales or demand for roofing services tend to have higher overall job costs.
How Long Can You Wait to Seek Treatment for Blistering Shingles?
Quick assessment (today)
Blistering shingles on asphalt or composite shingles is usually a heat/moisture issue or a ventilation shortfall. The goal is to catch it early before leaks start or the damaged area grows. Do a careful look from the ground, and if you can safely access the attic, note any water stains or damp insulation.
- From the ground, spot obvious blistering, lifted edges, or multiple affected shingles.
- In the attic, check for moisture, dark stains, or a musty smell.
- Photograph the blistered area and any signs of leaks to have on hand for your roofer.
- Avoid stepping onto the blistered area or prying at shingles—they can crack and worsen quickly.
- If rain is forecast, plan a professional inspection as soon as it's safe to do so.
24–48 hours: early consequences of delaying
Waiting just a couple of days can make a noticeable difference in damage and repair scope.
- Water intrusion risk rises with wind-driven rain; blistered areas can start letting in moisture.
- Blisters may crack or split under pressure or heat, expanding the damaged zone.
- The adhesive bonds nearby can loosen, increasing edge lift and the chance of adjacent shingles failing.
- attic moisture can spread to insulation, reducing R-value and potentially driving up energy costs.
- Insurance or warranty claims can become more complex if the issue has progressed without documented inspection.
What this means in practical terms:
- A minor patch up might turn into a larger section replacement.
- You may need more fasteners and shingles than originally planned.
- The timeline for a fix slides from “simple repair” to “partial roof replacement” in some cases.
1–2 weeks: moisture and structural concerns rise
If you still haven't addressed blistering after a week or two, the risk escalates significantly.
- Deeper moisture reaches the roof deck, raising the chance of wood rot and soft spots.
- Blisters can merge, creating larger, harder-to-repair patches that may require full shingles replacement.
- Ventilation problems persist or worsen, which can trigger recurring blistering in future seasons.
- Insulation and attic air sealing degrade, impacting energy efficiency and comfort.
- Prolonged exposure can affect warranty coverage or complicate claims if the issue is tied to installation quality or materials.
What this means in practical terms:
- Repair costs can jump as the scope expands; you may see more labor hours and material needs.
- A single-area repair might no longer be adequate, pushing toward a broader mitigation plan.
- If mold or mildew appears, remediation adds another expense and time requirement.
2 weeks or more: high-risk, high-cost scenario
Delaying that long often leads to extensive damage and more invasive repairs.
- The deck or roof sheathing may show signs of rot, requiring replacement in large sections.
- You might end up replacing a larger roof area rather than just blistered spots, increasing material and labor costs.
- Interior effects become more likely (ceiling stains, attic condensation, and potential insulation replacement).
- Insurance claims become more involved, with higher scrutiny and documentation requirements.
- The overall project timeline can extend due to material lead times and permit considerations.
What this means in practical terms:
- A worst-case scenario can shift from a targeted patch to a full roof replacement in some homes.
- Prolonged moisture exposure can shorten the lifespan of neighboring shingles, compounding future maintenance needs.
Quick-reference timeline takeaway
- Act now if you notice blistering: don't wait for rain or a visible leak to appear.
- Progression can be gradual, but the cost and complexity typically rise with time.
- A professional inspection early in the process provides a clear path—whether it's a minor repair or a larger replacement.
Short, practical steps if you're deciding on timing
1. Photograph the issue and note dates of recent weather events.
2. Schedule a roof inspection with a licensed contractor experienced in blistering shingles.
3. Get a written assessment and a scope-of-work that outlines patch versus replacement options.
4. Request at least two estimates to compare scope, materials, and warranties.
5. If safe, prepare a temporary protective measure (tarps) under professional guidance; otherwise rely on the pros to install a secure weatherproof cover.
How Shingles Vary by Location and Climate
How This Problem Varies by Region & Climate within the United States
Shingle blistering is driven by heat, moisture, sun exposure, wind-driven rain, and freeze-thaw cycles. In the United States, where climate zones shift from coast to coast, the same problem shows up differently. The timing, severity, and most common causes of blistering hinge on regional weather patterns, attic ventilation, and roof age. Below are region-focused realities and the climate factors that shape them.
Regional Variations by Climate
- Northeast and Great Lakes
- What to expect: Cold winters with repeated freeze-thaw cycles, spring rain, and high moisture in many years.
- Why it matters: Moisture can seep under shingles during wet months, then expand when it freezes, promoting blister formation and adhesive failures.
- Practical tip: Prioritize attic ventilation and insulation; check for signs after winter thaws and before heavy spring rains.
- Southeast and Gulf Coast
- What to expect: High heat, humidity, frequent thunderstorms, and coastal salt exposure.
- Why it matters: Persistent heat and moisture accelerate aging of asphalt granules and the asphalt-menthes binder, increasing blister risk in sunlit areas.
- Practical tip: Look for blistering on southern and southwestern-facing slopes; ensure proper drainage and clear roof valleys of debris.
- Southwest and Mountain West
- What to expect: Intense sun, high daytime temperatures, and dry conditions with dramatic temperature swings.
- Why it matters: UV exposure and heat can dry out shingles, making edges and overlays brittle and prone to blistering; wind erosion can expose underlayment.
- Practical tip: Consider UV-resistant shingles and reflective underlayment; trim trees to reduce sun exposure on roof faces.
- Pacific Northwest
- What to expect: Heavy rain, frequent overcast days, and long periods of moisture on the roof.
- Why it matters: Constant moisture can saturate underlying deck and underlayment, promoting blistering and moss growth that traps more moisture.
- Practical tip: Maintain roof cleanliness, ensure gutters are clear, and monitor for hidden moisture behind lifted shingles.
- Plains and Interior West
- What to expect: Strong winds, hail events, and wide temperature swings between day and night.
- Why it matters: Mechanical damage from hail or wind-driven grit can initiate blisters; rapid cooling after heat exposure can stress shingles.
- Practical tip: Inspect after storms for surface damage, and consider impact-resistant shingle options if you have a history of hail.
Climate Factors That Drive Blistering
- Heat and Sun Exposure
- Higher heat accelerates aging of the asphalt binder and granule loss, increasing blister formation on exposed spots.
- Humidity and Moisture
- Moist environments push moisture under the shingle edges, lifting up surfaces and forming blisters.
- Freeze-Thaw Cycles
- Water trapped under shingles expands when it freezes, creating micro-blisters and adhesive failure over time.
- Wind and Rain
- Wind-driven rain can force moisture under loose edges; debris blown into vents or seams can worsen blistering.
- Ultraviolet Light and Aging
- Long-term sun exposure degrades protective coatings, making shingles more prone to blistering and curling.
Practical Takeaways by Region
- Do a seasonal check tailored to your climate:
- After winter in cold regions, inspect for ice dam-related leaks and blistering near eaves.
- Before and after hurricane or heavy rain seasons in warm, humid regions, look for moisture pockets and lifted edges.
- In hot, dry areas, inspect sun-facing shingles for granule loss and edge brittleness.
- Focus on attic health:
- Ensure adequate ventilation and insulation to limit heat buildup that accelerates blistering.
1) Look for raised, bubble-like blisters on the shingle surface.
2) Note any curling or loose edges.
3) Check under the roof deck for moisture stains in the attic.
4) Record sun-exposed vs. shaded areas to spot climate-driven patterns.
5) If you see widespread blistering or moisture, consult a roofing professional to assess underlayment and deck integrity.
- Maintenance choices by region:
- Choose shingles with enhanced heat resistance or reflective granules in hot, sunny areas.
- In wet climates, prioritize shingles with robust weather seals and reliable underlayment compatibility.
- In hail-prone zones, consider impact-resistant options and reinforced underlayment to guard against edge blisters.