Ultimate Guide to Lichen Growth on Roof
Last updated: Feb 28, 2026
Introduction to Lichen Growth on Roofs
Lichen on roofs is a common sight in many neighborhoods, and it's easy to mistake it for a simple stain or debris. While it's not typically an urgent safety hazard, the presence of lichen does signal moisture and can contribute to faster wear on certain roof materials over time. Understanding what causes it and how to respond can help you protect your roof without overreacting.
Lichen is a slow-growing organism made of a partnership between fungi and algae or cyanobacteria. On a roof, it tends to form in patches where moisture lingers and shade is partial or persistent. Key points to know:
- It loves north-facing slopes, overhanging trees, and climates with regular drizzle or mist.
- It can attach to shingles, tile, or metal, and may appear green, gray, tan, or black.
- It often starts as a thin film and can slowly creep into the surface if left unchecked.
Is it urgent or common?
- Very common in many regions, especially in damp or shaded spots.
- Not usually an immediate danger, but it can worsen problems if left untreated.
- Lichen itself doesn't “eat” roofing material, but it holds moisture against the surface, which can contribute to faster aging, granule loss on asphalt shingles, and potential moss growth underneath.
How lichen affects your roof
- Moisture retention: Lichen traps moisture, keeping the roof damp longer after rain.
- Surface damage: Some lichen can lift or displace granules on certain shingle types, reducing UV protection and lifespan.
- Aesthetic impact: It can make your roof look dirty or unkempt, which may affect curb appeal.
- Underlying problems: If there are gaps, loose flashings, or organic debris, lichen growth may accelerate wear.
High-level next steps
1) Assess safety and roof condition
- If you can access the roof safely, take a quick look for loose shingles, cracked tiles, or signs of water intrusion.
- If you're unsure about your footing or the slope, skip the climb and proceed to step 2.
2) Identify the extent of growth
- Note where lichen is concentrated (shaded vales, eaves, or entire roof face).
- Check for any visible signs of moisture stagnation (dark patches, moss, or algae).
3) Decide on a cleaning approach
- For light, isolated patches, a careful hand-cleaning with a soft brush may suffice.
- For larger areas, consider gentler cleaning methods to avoid damaging the roof surface or flashing.
4) Choose a maintenance plan
- Regular cleaning every few years can keep lichen in check.
- Address underlying moisture issues (tree shade reduction, proper drainage, or attic ventilation) to slow re-growth.
5) Monitor and schedule professional input when needed
- If you notice curling, curling edges, or repeated patches of new growth after cleaning, a professional inspection is warranted.
Quick care tips
- Use a soft-bristle brush or plastic scraper—avoid metal scrapers that can scratch shingles or tiles.
- Rinse with water rather than applying high-pressure spray.
- Work from the ground or use a stable ladder and fall-protection when you must go up.
- Choose roof-safe cleaners that are appropriate for your material; read labels for compatibility with shingles, tiles, or metal.
- Clear nearby branches that shade the roof to reduce ongoing moisture retention.
When to call a professional
- If the roof is steep, damaged, or you're unsure about ladder safety.
- If there is notable granule loss, visible structural damage, or signs of leaks.
- If DIY cleaning hasn't reduced the growth or you're considering chemical treatments.
Is Lichen Growth on Your Roof an Emergency?
Quick reality check
Lichen itself isn't an instant disaster, but it can signal ongoing moisture and potential trouble that can worsen if ignored. Lichen holds moisture against shingles, which over time can lead to raised granules, accelerated wear, and in some cases hidden leaks. The key is to separate normal, cosmetic growth from conditions that pose a safety or structural risk. If the roof looks dry and intact and there are no interior signs of water intrusion, this is typically a non‑emergency situation you can monitor and plan for a professional assessment.
If you notice any of these during inspection or daily life, treat it as an urgent issue and do not delay seeking professional help.
- Active leaks or damp ceilings in the home, especially after rain
- Sagging, soft, or visibly rotten roof decking
- Shingle damage where underlayment is exposed (cracked, curling, or missing shingles)
- Large, rapidly spreading patches of lichen or moss with heavy moisture retention, particularly near eaves, valleys, or skylights
- Ice damming or water intrusion at the roofline during freezing weather
- Call a roofer immediately if you observe any of the above signs, since rapid water intrusion or structural compromise can escalate quickly.
Monitor if
- The lichen growth is limited to small, dry patches and there are no signs of moisture intrusion inside the home
- Shingles appear generally intact, not curling or lifting, and the roof deck feels firm to a cautious touch from the ground
- It hasn't rained recently, there's no damp attic odor, and there are no ceiling stains or musty smells
- Weather conditions are dry and safe for inspection, and you're not planning to go up on the roof yourself
- Monitor if you notice these milder indicators: slight discoloration on shingles, light surface growth, or patches that look established but haven't spread in the last season
Can wait if
- The roof shows no leaks, no soft areas, and lichen is present but not worsening
- The growth is superficial, primarily cosmetic, and there are no signs of moisture retention inside the attic or walls
- You have a planned inspection window (for example, the next scheduled roof check or next off‑season maintenance)
- Local weather is dry and favorable for a non‑urgent cleaning or treatment, and you can schedule professional services within a reasonable timeframe
Quick triage steps you can take (no roof access required)
1) From the ground, use binoculars to survey the roof for obvious damage, missing shingles, and dense patches of lichen
2) Check the attic after rain for signs of moisture: damp insulation, visible dark staining, or a musty smell
3) Photograph any areas of concern to share with a roofer for a preliminary assessment
4) Note recent weather events (heavy wind, hail, or freeze‑thaw cycles) that could have affected the roof
5) Plan a professional inspection timeline based on the severity and your findings
When to escalate to a professional
If you're unsure about stability, or if there are any signs of leaks, sagging, or extensive damage, it's prudent to bring in a licensed roofer for an in‑person assessment. They can evaluate the roof's condition, the impact of lichens, and what remediation steps are necessary—whether that's cleaning, treatment, or replacement.
Common Causes of Lichen Growth on Roofs
Moisture and Retention
Lichens thrive where moisture lingers. On roofs, persistent dampness from rain, high humidity, dew, or poor drainage creates a friendly stage for lichens to attach and mature.
- Areas with slow-drying surfaces stay damp longer
- Valleys, gutters, and low-slope sections collect water
- Shingle textures and micro-cracks trap moisture
How lichens establish themselves (quick overview)
1) A moisture source arrives (rain, dew, humidity) and the surface stays damp.
2) The fungal partner attaches to the surface while algae provide photosynthetic energy.
3) Debris and minerals accumulate nearby, boosting nutrients and giving lichens a foothold.
Shade and Sunlight
Sunlight helps keep roofs dry. When a roof stays shaded by trees, buildings, or a north-facing orientation, it dries slowly, giving lichens more time to establish.
- Overhanging branches increase shade year-round
- North-facing slopes in temperate climates stay damp longer
- Seasonal shadows from nearby structures reduce sun exposure
Surface Condition and Roofing Materials
The roof's surface quality influences lichen growth. Porous or aged materials retain moisture and nutrients that lichens feed on.
- Worn asphalt shingles or cedar shakes roughen the surface, giving lichens grip
- Porous materials (older shingles, degraded coatings) hold moisture and dirt
- Metal roofs can still host lichens in shaded, damp corners
Organic Debris and Nutrients
Accumulated debris provides nutrients and moisture for lichens, especially when it sits against the roof surface for weeks.
- Leaves, needles, and moss trap moisture and soil
- Debris in valleys, around penetrations, and in gutters creates damp micro-habitats
- Soil or organic material washed to roof edges delivers nutrients
Roof Age, Damage, and Micro-Cracks
Over time, roofs develop micro-cracks and rough spots that invite lichens to anchor themselves and survive.
- Aging shingles and deteriorated coatings increase surface roughness
- Cracked flashings or sealants create damp pockets
- Clogged gutters and downspouts worsen wet areas
Climate Patterns and Local Environment
Regional climate and local conditions strongly influence lichen growth patterns.
- High humidity, regular rain, and mild temperatures are a favorable mix
- Polluted air can contribute nutrients that drive lichen growth on roofs
- Prolonged wet seasons extend the window for establishment
Tree Coverage and Landscaping Proximity
Nearby trees and plants can create the exact conditions lichens need: shade, moisture, and nutrients.
- Tree branches overhanging the roof cast year-round shade
- Falling needles and seeds accumulate on the roof
- Soil and organics from landscaping wash onto the roof via rain runoff
How Roof Materials Affect Lichen Growth on Roofs
Lichen thrives where moisture lingers and the surface offers a good grip. The roof material you choose shapes how easily colonies take hold, how long they stay wet, and how hard they are to clean off.
Key factors that influence lichen on roof materials
- Surface porosity and roughness: rough, porous surfaces hold water and dust, giving lichens a foothold.
- Moisture retention and shade: shaded spots stay damp longer, speeding lichen establishment.
- Debris and microclimates: leaves, dust, and pollen accumulate in crevices, feeding lichens.
- Thermal cycling and UV exposure: materials that stay damp after sunset and warm up slowly support slower drying.
Common roofing materials and lichen interactions
Asphalt shingles
- Likelihood of growth: Moderate to high in cool, shaded, humid climates.
- Why it happens: The granular surface is rough and porous enough to trap moisture and debris that lichens feed on.
- Growth pattern: Colonies often start in shaded edges, roll along ridges, and spread into small crevices between tabs.
- Maintenance implications: Gentle brushing helps without dislodging granules; avoid high-pressure washing which can loosen asphalt and shorten roof life.
Metal roofs
- Likelihood of growth: Lower overall, but not impossible in persistent shade or where coatings wear thin.
- Why it happens: Smooth metal sheds water, but seams, fasteners, and degraded coatings create damp microhabitats.
- Growth pattern: Lichens tend to form along seams, fastener lines, and shaded louvers where moisture can linger.
- Maintenance implications: Rinse with low-pressure water; inspect coatings and sealants for wear; clean early to prevent patchy growth.
Clay or concrete tiles
- Likelihood of growth: Moderate to high in humid climates or under overhanging vegetation.
- Why it happens: Porous surfaces and many flat areas collect moisture and organic debris.
- Growth pattern: Lichens cluster on flat tile surfaces and along joints; crevices near edge rain channels are common sites.
- Maintenance implications: Use a soft brush to remove growth; avoid aggressive power washing that can crack tiles; replace damaged tiles to maintain a dry, clean surface.
Cedar shingles/shakes
- Likelihood of growth: High due to organic wood fibers and frequent moisture retention.
- Why it happens: The wood's porosity and rough grain provide excellent anchors for lichen and moss alike.
- Growth pattern: Dense colonies often appear on shaded faces and overlapping edges where moisture lingers longest.
- Maintenance implications: Keep surfaces dry where possible; trim nearby branches to reduce shade; consider protective sealants and periodic cosmetic cleaning with care to avoid wood damage.
Slate
- Likelihood of growth: Lower than organic materials but present in damp, shady spots.
- Why it happens: Slate is dense and relatively smooth, but fissures, edges, and textured joints offer places for lichens to cling.
- Growth pattern: Patches form along joints, around fasteners, and in microcracks where moisture is slow to dry.
- Maintenance implications: Brush gently to avoid cracking; inspect for loosened slates and repair promptly; avoid high-pressure washing near edges and fasteners.
Practical steps to limit lichen growth by material
1. Schedule regular roof inspections, focusing on shaded and north-facing sections.
2. Use a soft-bristle brush and a roof-safe cleaner; avoid power washing on most roofing materials.
3. Improve drainage and sun exposure: trim overhanging branches, clear debris, and remove leaf buildup.
4. Align deterrents with material: consider zinc or copper strips along the eaves as directed by the manufacturer.
5. If repeated growth concerns arise on cedar or clay, plan professional cleaning and resealing or targeted repairs to prevent moisture retention.
The Risks of Ignoring Lichen Growth on Your Roof
Lichen: more than just an eye sore
Lichen on your roof isn't just a stain. It holds moisture against the surface, slows drying, and can work its way into tiny cracks and edges. Over time, that constant dampness accelerates wear, weakens shingles, and creates the kind of micro-damage that looks small but adds up to bigger problems.
- Moisture retention against shingles keeps parts of the roof damp longer, speeding aging.
- Lichen's structure can lift and roughen shingle surfaces, leading to granule loss and reduced UV protection.
- Growing into tiny cracks, lichen expands weaknesses, especially during freeze-thaw cycles.
Material and roof type impacts
Different roof types react to lichen growth in different ways, and some are more vulnerable than others.
- Asphalt shingles: lichens trap moisture, promote granule wear, and can cause curling or edge lifting; prolonged exposure may shorten roof life and affect performance.
- Wood shingles/shakes: wood is inherently more porous; lichens retain moisture against the fibers, accelerating rot, warping, and splitting.
- Metal roofs: moisture remains against seams and fasteners, which can contribute to corrosion or pitting if not cleaned and sealed properly.
- Slate or tile: lichens can irritate mortar joints and tile edges; removing growth without proper technique risks cracking or breaking tiles.
Leakage and structural risk
Ignoring lichen growth can translate into actual leaks and structural concerns.
- Debris and growth clog valleys, gutters, and drainage paths, increasing standing water on the roof.
- Growth near flashing, chimneys, or vent penetrations can pry edges loose and invite water intrusion.
- Prolonged moisture exposure can rot roof decking, framing, and insulation, compromising structural integrity and indoor comfort.
Warranty and resale implications
Lichen growth can influence both warranties and the value of your home.
- Some roof warranties require regular maintenance and preventative cleaning; neglect can affect coverage.
- Visible staining and uneven roof appearance reduce curb appeal and may complicate resale negotiations.
Safety and maintenance burden
Addressing lichens safely beats letting them fester and worsen.
- Removing or cleaning lichens can be slippery and risky for DIY attempts; professional crews have proper safety gear and technique.
- Aggressive scrubbing or pressure washing can damage shingles and sealants; improper removal often leads to more costs later.
- If you ignore growth, you'll typically face more extensive repairs or earlier-than-expected roof replacement.
Practical steps to assess risk (1–5)
1. Ground and roof-line check: visually map dense patches and darker stains; note exact locations for reference.
2. Inspect from the attic: after rain or on humid days, look for moisture staining, mold, or damp insulation beneath the roof.
3. Surface assessment with caution: if you safely can, gently test a small, inconspicuous area for softness or looseness—avoid aggressive scraping.
4. Age and type comparison: consider your roof's age and material; older roofs and vulnerable materials carry higher risk from lichens.
5. Plan for a professional assessment: if growth covers a large area, shows signs of leaks, or you're unsure about safety, schedule a roof inspection with a qualified contractor.
How to Diagnose Lichen Growth on Roofs
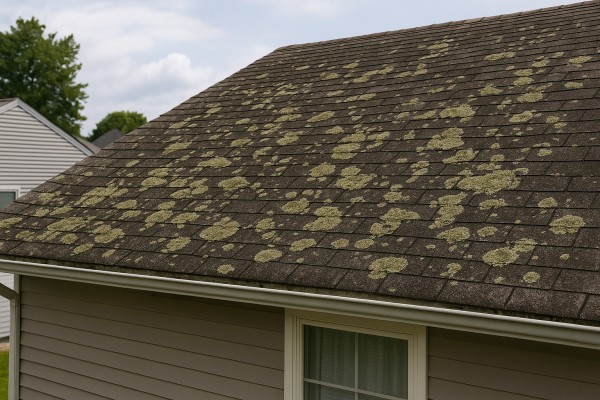
Visual cues: what lichen looks like on roofs
- Lichen appears as flat or crusty patches, often pale green, gray, brown, or black.
- Patches can be irregular in shape and range from a few inches to several feet across as they slowly spread.
- The surface is usually crusty or leaf-like (thallus) and adheres tightly to the shingle or tile.
- Lichen grows more slowly than moss, but you'll notice it accumulating in damp, shaded spots over time.
Common locations to inspect
- North-facing slopes and shaded areas, where moisture lingers longer.
- Valleys, eaves, around chimneys, vents, and dormers—anywhere water tends to collect.
- Areas with older or less-ventilated roofs, where surface drying is slower.
Safety and preparation
- Never rush up a slick or steep roof. Use a stable ladder, fall protection, and have a helper if possible.
- If you're unsure about your roof's condition, start with a ground-level inspection and use binoculars or a telephoto lens to map patches before climbing.
- Wear non-slip shoes and avoid working after rain or during high winds.
Step-by-step diagnosis
1. Do a ground survey: from a safe distance, map visible patches, noting their size, color, and location on the roof.
2. Up-close inspection (if safe): examine a few patches for texture (crusty vs. leafy), color, and how firmly the growth is attached.
3. Assess surrounding roof condition: look for signs of moisture, staining, or delayed drying nearby—these conditions encourage lichen but don't prove damage.
4. Check for shingle or tile impact: gently look for lifted edges, cracked shingles, or granule loss near lichen patches, which can indicate longer-term wear.
5. Differentiate from other growths:
- Moss is tufted, green, and softer to the touch.
- Algae often appears as dark or black bands or streaks.
- Dirt or debris is usually non-structured and moves with rain.
6. Document with photos: take wide shots of the roof, close-ups of patches, and images of any problem areas around vents, chimneys, and eaves.
7. Consider roof material and age: asphalt shingles, wood shakes, and tile all interact differently with moisture; note roof type and approximate age to estimate how lichen may influence wear over time.
Distinguishing features to look for
- Lichen patches tend to be crusty, flat, and firmly attached; they often sit on a damp, shaded surface.
- They don't “eat” roof material like some algae or moss might, but they hold moisture against the surface, which can accelerate aging.
When to call a professional
- Patches cover large roof areas or you see curling, cracked, or missing shingles near the lichen.
- You're unsure about ladder safety or you notice structural concerns beneath or around the patches.
- The roof is old or you're considering preventive treatment or cleaning that could affect warranty.
Quick-reference checklist
- Patch color and texture: crusty/flat vs. leafy
- Location: shaded, moisture-prone areas
- Roof condition: no obvious structural damage signs, or only minor wear
- Safety readiness: ladder, fall protection, and partner plan in place
- Documentation: clear photos from multiple angles and distances
Repair Options for Lichen Growth on Roofs
Temporary fixes
- Gentle removal first: use a plastic putty knife or stiff-bristled brush to lift lichen from shingles. Work from the top down and avoid metal tools that can scratch shingles.
- Rinse with low-pressure water: never use a power washer. A garden hose with a spray nozzle lightly rinses away debris without damaging granules.
- Kill the spores: apply a diluted solution of household bleach and water (about 50:50) or a commercially labeled roof cleaner. Spray on, let dwell for 10–15 minutes, then thoroughly rinse. Protect nearby plants and grass; wear eye protection and gloves.
- Protect landscaping and gutters: cover delicate plantings with a tarp or plastic sheeting; rinse gutters after treatment to prevent clogs from loosened spores.
- Monitor for re-growth: after a few weeks, re-inspect and re-clean any stubborn patches before they establish a foothold again.
Minor repairs
- Inspect for damage: look for curling, cracked, or missing shingles, and loose or exposed fasteners.
- Replace up to a small patch: remove and replace 1–6 affected shingles with matching pieces. Use corrosion-resistant nails and sealant at the edges to lock them down.
- Tighten and reseal flashing: check metal flashing around chimneys, vents, and valleys. Re-seal with roof-approved sealant if you notice lifting or gaps.
- Clean and protect the area: after replacement, re-clean the surface to remove residual lichens. Apply a light protective cleaner or enzyme-based treatment recommended for your shingle type to slow future growth.
- Check attic ventilation and underlayment: ensure vents aren't blocked, and that underlayment beneath the repaired area is dry and intact.
Partial replacement
- When to consider: heavy or widespread lichen that has compromised several courses, or when decking shows signs of rot in a defined area.
- Plan the area: identify a contiguous section (for example, a rectangular patch on one slope) to minimize mismatch and waste.
- Remove and replace: carefully lift the affected shingles and underlying underlayment in the chosen area. Inspect decking for rot; replace decking as needed.
- Install new materials: lay matching underlayment, drip edge, and starter strips. Install replacement shingles in the same orientation and pattern as the existing roof; ensure proper nailing and alignment.
- Re-flash and seal: replace or reseal flashing around penetrations at the new edge. Check and reseal adjacent joints to prevent leaks.
- Finish with a cleanup pass: remove debris, confirm proper granule coverage on new shingles, and perform a light cleaning to prevent early re-lichen growth.
Full roof replacement
- When to choose it: extensive lichen penetration, widespread granule loss, significant shingle damage, or compromised decking across multiple sections.
- Assessment and planning: have a professional inspect the entire roof structure, decking, and attic ventilation. Confirm permits and roof style compatibility with replacement materials.
- Tear-off and deck check: remove the entire roof system down to the decking. Replace any rotten or damaged sheathing; treat or seal deck surfaces as needed.
- Install new system: lay new underlayment, ventilation upgrades, and drip edges. Install new shingles with correct nailing patterns and spacing; ensure color and style match or select a fresh look.
- Flashing, vents, and penetrations: reinstall all flashing around chimneys, skylights, vents, and valleys. Seal around every penetration to prevent leaks.
- Post-install care: clean gutters, check for any gaps, and consider zinc or copper strip installations along the ridge to slow lichens. Schedule regular inspections and keep attic ventilation adequate to reduce future growth.
Typical Costs to Fix Lichen Growth on a Roof
Minor repair
- What it covers: Light surface cleaning to remove lichens from small, easily accessible areas; a gentle rinse, and a preventative treatment to slow regrowth. Minor repairs may include tightening loose flashing or resealing small seams, if needed.
- Included work: soft cleaning, application of a lichen-inhibiting treatment, minor cosmetic repairs, and debris removal from gutters and valleys.
- Typical cost: $150–$500
- Quick notes: Most homes only require this level when the infestation is shallow and shingle damage is minimal. Scheduling is flexible, and work tends to be completion in a few hours for a single-story home.
Moderate repair
- What it covers: More thorough cleaning over a larger roof section, often with a soft wash and longer dwell time for cleaners. May include repairing or replacing a handful of damaged shingles, re-sealing edges, and checking flashing. Preventative treatments are applied to a broader area.
- Included work: deeper cleaning, treatment for regrowth, patching or replacing several shingles, flashing inspection, and basic ridge/valley maintenance.
- Typical cost: $500–$1,800
- Quick notes: For moderate infestation or mild granule loss, expect a multi-hour service, potential ladder or temporary access equipment, and more material use.
Major repair
- What it covers: Heavy lichen growth with significant staining, extensive shingle damage, and possible structural concerns in the roof deck or underlayment. This category often triggers replacements or extensive repairs to affected sections and thorough flashing and ventilation checks.
- Included work: full-area cleaning and treatment, replacement of multiple shingles or entire sections, flashing and vent flashing repairs, possible roof deck inspection, and cleanup of debris from valleys and gutters.
- Typical cost: $2,000–$6,000+ (can be higher on large or complex roofs, or when full replacement is needed)
- Quick notes: Major repairs may reveal underlying moisture or hardware issues. Costs can climb quickly if roof replacement or substantial repairs are required.
What factors affect cost
- Roof size
- Access
- Material type
- Extent of damage
- Local labor rates
1) Roof size
- Larger roofs need more cleaning time, materials, and labor, driving the price up proportionally.
2) Access
- Steep pitches, multiple stories, or restricted access (fences, tight yards) increase setup time and safety measures, raising costs.
3) Material type
- Asphalt shingles are typically cheaper to treat and repair than slate, tile, or metal, which may require special cleaners, tools, or replacement pieces.
4) Extent of damage
- Light growth with intact shingles stays on the lower end; extensive granule loss, curling shingles, or rotted decking pushes costs into the higher ranges.
5) Local labor rates
- Wages, permit requirements, and contractor demand vary by region, influencing overall pricing.
Quick reference steps for estimating
1) Estimate roof area prone to lichens (in square feet) and identify hard-to-reach sections.
2) Assess visible damage: loose shingles, missing granules, flashing issues.
3) Get at least 2–3 written quotes based on a similar scope (inspection, cleaning, and treatment).
4) Ask about warranties on cleaning products and on any repairs or replacements.
5) Consider long-term costs: preventative treatments and routine maintenance to minimize future occurrences.
How Long Can You Wait Before Treating Roof Lichen?
Timeframe outcomes (what happens as you wait)
- 0–2 weeks (early signs)
- Lichen shows up as light staining or small, sparse patches. It's loosely attached and easy to spot with a quick roof walk. The risk to shingles is low, but the growth is starting to establish itself.
- 2–8 weeks (coverage grows)
- Patches expand and begin to form mats. Moisture is held under the growth, which can start to accelerate wear on the protective surface of the shingles. Granule loss around edges may become more noticeable.
- 2–6 months (established growth)
- Growth becomes denser and harder to remove. Rhizines grip the shingles more firmly, increasing the chance of lifting edges or lifting granules over time. Moisture retention continues, which can contribute to accelerated aging of the roof surface.
- 6–12 months (entrenched infestation)
- A sizable portion of the roof can be shaded and damp, with more persistent staining. Larger areas of shingles may show wear, and the risk of leaks rises when heavy rain comes through the roof valleys or around penetrations.
- 1–2 years (heavy infestation)
- Widespread coverage can trap significant moisture. Granule loss becomes more visible, and shingles on susceptible slopes may begin to curl or lift at edges. The potential for roof deck exposure or localized leaks increases, especially after storms.
- 3+ years (advanced damage)
- Very large infestations can contribute to accelerated deterioration of the roof deck and framing underneath. Leaks may be episodic and harder to diagnose, and replacement of sections or entire roof could become the more economical long-term option.
Practical implications by timeframe
- Short delays (weeks) often mean minimal extra cost if you act soon. Quick cleanup or spot-treatments can keep the problem from spreading.
- Moderate delays (weeks to months) usually require more involved cleaning and may reveal weak spots or granule loss that wasn't obvious before.
- Long delays (months to years) raise the likelihood of structural stress on shingles and underlayment, increasing the chance of leaks and the need for professional remediation or roof repairs.
What you can do now to buy time
- Keep gutters and downspouts clear so water flows away from the roof correctly.
- Trim overhanging branches to reduce shade and debris buildup, improving drying and reducing organic material that feeds lichens.
- Avoid high-pressure washing on asphalt or asphalt architectural shingles; if you choose cleaning, opt for a gentler approach or a roof-safe cleaning product appropriate for your roof type.
- Monitor after rain: look for newly darkened patches, new growth, or changes in staining patterns.
Quick-start plan (3 steps)
1) Inspect and document growth.
- Take photos from the ground and up close. Note the extent, location (shading, valleys, edges), and any signs of edge lifting or granule loss.
2) Set a monitoring schedule.
- Check key areas monthly or after heavy rain. Track whether patches are spreading or staying the same size.
3) Decide on a treatment timeline.
- If growth remains small and contained, you may opt to treat proactively before it broadens. If patches are spreading or already dense, plan a professional assessment sooner rather than later.
How Lichen Growth Varies by Location and Climate
How This Problem Varies by Region & Climate within the United States
Lichens are tough little organisms that depend on moisture and a stable surface more than anything else. In the U.S., climate bands—from humid coastlines to dry deserts and snowy mountains—shape how quickly and where lichens appear on your roof. The result: some roofs host lush lichen mats, while others see little to none. Understanding your region helps you plan when to inspect, clean, and protect your shingles.
Pacific Northwest & Coastal Climates
- High humidity year-round, frequent rain, and coastal fog create ideal conditions for lichens to establish and thrive.
- Dense growth often appears on shaded surfaces, especially north-facing slopes, eaves, and in roof valleys.
- Roofing materials: cedar shingles and dark asphalt surfaces tend to show lichen growth more visibly.
- Maintenance approach:
- Inspect annually; plan cleaning every 2–3 years if growth is noticeable.
- Use a soft brush or a roof-safe cleaner; avoid high-pressure washing that can lift shingles.
- Trim overhanging branches and keep gutters clear to reduce moisture pockets.
- Consider zinc or copper strip installations along the ridge to slow regrowth.
Northeast & Great Lakes
- Warm summers and cold winters with freeze-thaw cycles mean moisture can linger on the roof longer after storms.
- Lichens tend to colonize shaded, north-facing sections and roof valleys where dew and meltwater accumulate.
- Growth can accelerate shingle wear if left untreated, since moisture sits on the surface longer.
- Maintenance approach:
- Inspect at least twice a year, focusing on shaded areas.
- Clean every 2–4 years, or sooner if heavy growth is present.
- Gutter upkeep and branch trimming help reduce moisture retention on the roof surface.
Southeast & Gulf Coast
- High humidity and frequent rainfall foster steady lichen activity, with warm temperatures promoting growth during much of the year.
- Growth is common under dense tree canopies and on surfaces that stay damp after rain or storms.
- Maintenance approach:
- Schedule inspections after heavy rains or hurricane season.
- Plan cleaning every 2–4 years, or sooner where shading is heavy.
- Improve attic and roof ventilation to minimize interior moisture that can contribute to surface dampness.
Southwest & Great Plains
- Arid to semi-arid climate means less overall lichen growth, but dew, fog, or early-morning moisture can still support colonies in microclimates.
- Growth is most likely on shaded spots, roof overhangs, or canyons where moisture persists.
- Maintenance approach:
- Expect less frequent cleaning, typically every 3–5 years unless shading promotes visible growth.
- Prioritize debris removal and ensure good drainage to reduce lingering moisture.
- Monitor for wind-blown dust and soil deposits that can trap moisture and seed lichens.
Mountain & High Elevation Regions
- Cooler temperatures and frequent fog create persistent dampness, especially on shaded roofs.
- Lichens often flourish on north-facing surfaces and in roof valleys where moisture lingers.
- Maintenance approach:
- Regular inspections during shoulder seasons (spring/fall) detect early growth.
- Cleanings can be every 1–3 years depending on exposure; gentler methods protect fragile shingles.
- Manage tree encroachment to reduce sustained shade and moisture pockets.
Quick regional takeaways for homeowners
- Climate drives moisture availability more than temperature alone.
- Shaded, damp surfaces are the hotspots—plan inspections there first.
- Pressure or aggressive cleaning can damage delicate shingles; opt for gentler methods.
- Air quality and debris influence growth—rural, urban, and coastal areas differ in how often you'll see lichens return after cleaning.
How to tailor your maintenance by climate
1. Identify your climate zone and typical moisture sources (rain, dew, fog, snow melt).
2. Map your roof's shaded versus sunny areas and note where moisture tends to linger.
3. Set a cleaning interval aligned with growth patterns in your region (roughly every 2–4 years in many humid climates; less often in dry areas).
4. Use regionally appropriate prevention (ventilation improvements, debris management, and selective trimming) to slow regrowth.
What to do if you see lichens growing on your roof (simple steps)
1. Do a quick assessment: where is growth concentrated, and how extensive is it?
2. Plan a gentle cleaning approach (soft brush, roof-safe cleaner, low-pressure rinse).
3. Protect nearby surfaces and landscaping from cleaners.
4. After cleaning, consider preventive measures for your climate (shading control, metal strips, gutter maintenance).