Ultimate Guide to Roof Movement in High Winds
Last updated: Feb 28, 2026
Introduction to Roof Movement in High Winds
Movement in high winds is not unusual in storm-prone areas, but it's not something to ignore. Some movement is minor and cosmetic, while others signal structural or installation issues that worsen with every gust. Understanding when movement is a sign of trouble—and when it's just a temporary wobble—helps you decide the right next steps without overreacting.
What causes roof movement in high winds
- Wind uplift on the roof plane and edges, especially overhangs and ridges.
- Poorly fastened or aged nails/screws, or degraded sealants and underlayment.
- Damaged flashing around vents, chimneys, and hips that lets air and moisture penetrate.
- Deteriorated roof deck or structural connections that flex under pressure.
- Loose or missing shingles, granule loss, or curled edges that catch gusts.
- Debris on the roof or in gutters that creates uneven weight and wind interaction.
- Penetrations (chimneys, exhausts, skylights) that disrupt wind flow and create gaps.
Is movement urgent or common?
- Common during strong winds and storms, especially on older roofs or roofs with prior repairs.
- Urgent concerns arise when movement is active, obvious, or accompanied by leaking, exposed flashing, or rotten decking.
- If you notice sections of the roof visibly lifting, shingles torn away, or a soft deck when pressed, treat it as an immediate risk.
Signs you might see
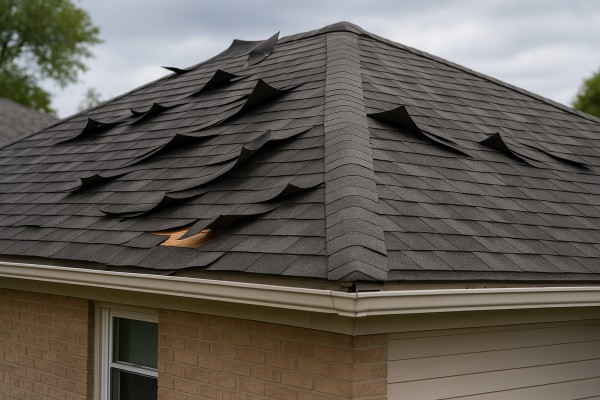
- Shingles that are cupped, buckling, or visibly lifting at edges.
- Flashing seams that appear separated or rusted.
- Granules in gutters or downspouts, like sandy ballast around the home.
- A noticeable ripple or wave along the roof line from wind pressure.
- Soft, spongy feel when walking on attic decking (if you have attic access).
- Odd creaks or pops during windy periods.
High-level next steps
1) Stay safe and assess from ground level
- Use binoculars or a camera with a zoom to document suspected problem areas.
- Note exact locations (valleys, ridges, vents) and any visible movement.
2) Minimize immediate hazards
- Clear loose items in the yard that could become projectiles.
- Do not go up on the roof during high winds or in a storm unless you're trained and equipped.
3) Document and monitor
- Take dated photos; keep a simple log of wind events and any new signs of movement.
- Check after weather passes for changes in the observed areas.
4) Plan a professional evaluation
- Schedule a roof inspection with a licensed roofer or a building professional to confirm structural integrity, fastener condition, and flashing status.
- Be prepared to discuss recent storms, age of the roof, and any prior repairs.
5) Consider temporary protections if advised by a pro
- A pro may recommend tarping or other temporary measures to reduce further uplift and water intrusion until repairs can be completed.
- Ensure any temporary protection is installed by or under the supervision of a trained professional.
Quick safety reminders
- Do not climb onto a wind-worn roof yourself. Wind and slick surfaces are dangerous.
- Keep people and pets away from damaged areas and avoid stepping on loose shingles.
- If you notice active movement during a storm, prioritize safety and seek professional advice as soon as the weather allows.
When to call a pro
- Visible lifting, gaps, or exposed decking.
- Repeated gusts cause new movement after previous repairs.
- Leaks, water stains, or staining in the attic following wind events.
- Age or prior damage suggest the roof may not hold up under future storms.
Determining Whether Roof Movement in High Winds Is an Emergency
Quick triage: obvious emergencies
A gusty day can move roofing materials enough to worry you. If you see active movement that suggests the roof is losing its grip, treat it as an emergency. Do not stand or walk under the area while the wind is gusting.
- Visible movement: shingles or flashing lifting, edge lift, curled shingles that catch wind.
- Audible signs: loud banging, popping, or rattling from the roof or gutters.
- Light or leaks: daylight in the attic through roofing gaps, or water leaking into the ceiling after gusts.
If you smell gas, see electrical hazards, or hear a transformer popping nearby, call emergency services as you move away from the structure.
Safe observations from the ground
From ground level, you can gauge risk without putting yourself in danger.
- Look for areas where the roofing is pulling away from the structure or where flashing is lifting.
- Check for missing shingles, exposed underlayment, or soft spots along the roof edge.
- Note any tarps or temporary protective covers that look loose or shifting.
Keep a safe distance; never go onto the roof, climb ladders, or try to push back loose material.
1. Call a roofer immediately if:
- The roof is visibly lifting, shingles are fluttering, or flashing is moving more than a few inches with the wind.
- You can see daylight through the attic or ceiling after a gust, or there is active water intrusion.
- There are signs of structural distress (sagging ridge, bending decking) or persistent movement that cannot be safely managed.
2. Monitor if:
- Winds are still strong but you aren't seeing new movement or leaks after gusts.
- You can safely observe from inside a window or doorway without stepping onto the ground outside.
- The area remains dry and protected, and you can check the situation every 15-30 minutes from a safe vantage point.
3. Can wait if:
- Winds have subsided and there are no new signs of movement.
- There are no leaks, no sagging sections, and the roof looks intact from the ground.
- You can arrange a roof inspection within the next 24-72 hours, depending on forecast and weather window.
Document and plan
- Take photos from the ground at several angles if it's safe to do so.
- Record wind speed and gusts from your weather app to share with the roofer.
- Create a simple plan for securing pets and interior contents in case water intrusion occurs.
Understanding the Common Causes of Roof Movement in High Winds
Wind Uplift and Pressure Changes
Strong winds don't just push on the roof; they create suction on the windward surface and pressure on the leeward side. This steady push-pull can gently or aggressively lift roof edges, ridge lines, and any weak points. Vulnerable areas include:
- Long roof planes and exposed ridges
- Edges of the roof where flashing or sealing has failed
- Areas near dormers, skylights, and vents
Fastening and Deck Attachment
If the roof deck isn't securely fastened, movement is more likely in gusts. Common issues:
- Inadequate number of fasteners or incorrect nailing pattern for the deck and shingles
- Corroded, loose, or damaged fasteners that loosen over time
- Fasteners not long enough to penetrate solid substrate
These weaknesses let the deck and shingles shift with wind loads, especially at edges and near penetrations.
Roof Sheathing and Underlayment
The layer beneath the shingles plays a big role in how a roof responds to wind. Problems include:
- Warped, cracked, or delaminating sheathing
- Soft spots from moisture damage
- Underlayment that's torn or detached around edges and penetrations
When the sheathing loses rigidity, the shingles rely more on surface adhesion and the fastener system, increasing movement during gusts.
Roof Geometry and Overhangs
The shape and size of a roof influence wind behavior. Key factors:
- Long overhangs create leverage that can lift edges
- Complex rooflines (combination gables, hips, and valleys) can trap and channel wind, producing localized uplift
- Narrow eaves or poor alignment with the wind direction can amplify movement at corners
Roof Penetrations, Flashing, and Details
Chimneys, vents, skylights, and roof-to-wall transitions introduce weak points. Common failure modes:
- Flashing that's lifted, corroded, or improperly sealed
- Seals around flashing that shrink or crack with age
- Poorly integrated vent boots or pipe collars
Movement often starts at these transition points and can cascade along the surrounding roof plane.
Material Quality and Age
A roof's age and the quality of materials affect wind performance. Consider:
- Brittle shingles or losing adhesive seals on older roofs
- Granule loss reducing shingle grip and UV protection
- Deteriorated drip edges or metal components that rust and loosen
Older roofs may move more in high winds simply because their components aren't as cohesive as when new.
Maintenance, Hidden Damage, and Debris
Neglected roofs hide issues that wind can exploit. Watch for:
- Missing, cracked, or lifted shingles
- Debris-packed gutters or clogged vents adding weight or directing wind incorrectly
- Hidden water damage that softens the decking or rafters
Wind Exposure and Surroundings
Your local environment matters. Exposure factors include:
- Roofs on exposed ridgelines vs. sheltered valleys
- Nearby trees, buildings, and terrain that funnel or break gusts
- Seasonal wind patterns and extreme events like microbursts
Steps to Assess Common Causes (Quick Guide)
1. Inspect the fasteners: look for missing or loose nails/screws along edges and near penetrations.
2. Check the deck: look for soft spots, warping, or moisture damage on the plywood/OSB.
3. Examine flashing and seals: test around chimneys, vents, skylights, and wall interfaces.
4. Review roof geometry: note long overhangs, valleys, and complicated transitions.
5. Assess age and materials: identify brittle shingles, granule loss, or corroded metal.
6. Observe wind exposure: walk the property to map likely gust paths and vulnerable corners.
7. Look for signs of prior repairs: mismatched fasteners, patchy sealant, or uneven shingle edges.
If you notice repeated movement, sagging, lifted edges, or consistent gaps around flashing after a wind event, these are strong indicators of one or more of the common causes above. A careful, staged inspection focusing on fasteners, deck integrity, and flashing will usually pinpoint the primary driver of movement.
How Roof Materials Affect Roof Movement in High Winds
How wind interacts with roof systems
In high winds, your roof moves because uplift, suction, and gusts apply forces to every component. The material type, fastener pattern, flashing, and underlayment determine how much movement occurs before fasteners loosen, edges lift, or seams fail. A roof that's properly matched to its environment and installed correctly can tolerate more wind-driven movement; one that isn't can fail sooner.
Common roofing materials and how they respond to wind-driven movement
- Asphalt shingles

- How movement shows up: edge lift, cupping, and sometimes detachment of tabs; granules may loosen and reveal nail heads.
- Why it happens: the shingles rely on a combination of fasteners and adhesive sealant. If nails work loose or seals degrade, wind can pry tabs upward.
- What to monitor: check fasteners per manufacturer specs; ensure sealant tabs remain intact; replace damaged shingles promptly.
- Metal roofing

- How movement shows up: panel flutter or seam uplift when clips or fasteners aren't securing panels tightly; edges and ridges may flex.
- Why it happens: metal is strong but moves with the structure and wind loads; proper clips and interlocking seams resist uplift well.
- What to monitor: verify clips are intact and properly installed; inspect seam seals after storms.
- Clay or concrete tiles

- How movement shows up: individual tiles can crack or lift; wind can move under adjoining tiles if gaps exist.
- Why it happens: heavy weight helps resist uplift, but cracked or poorly seated tiles create paths for wind to grip under the surface.
- What to monitor: replace broken or loose tiles; keep shifting tiles secured and reseal flashing as needed.
- Wood shakes/shingles

- How movement shows up: edges can lift and gaps can form between courses; nails can loosen and shakes may warp.
- Why it happens: natural material expands, contracts, and can curl; wind finds any looseness to grab onto.
- What to monitor: reseal or re-nail loose shakes; prune nearby branches that brush the roof during storms.
- Composite or engineered shingles
- How movement shows up: similar uplift patterns to asphalt but with different durability; misfit pieces can lift at edges.
- Why it happens: designed to mimic asphalt with added durability, but installation quality still dictates wind performance.
- What to monitor: ensure proper nailing pattern and adhesive use per product specs.
- Synthetic slate or tile
- How movement shows up: heavier panels can transfer wind loads to fasteners; edges may lift if not well anchored.
- Why it happens: designed to look like natural slate but requires robust anchoring; poor fastener seats reduce wind resistance.
- What to monitor: confirm panels are securely fastened and flashing is intact.
- Flat roofing membranes (EPDM, TPO, PVC)
- How movement shows up: wind can peel or curl edges along seams; lifted edges become vulnerable to further uplift.
- Why it happens: seams and adhesive bonds are critical; heat and aging can weaken bonds.
- What to monitor: check seam integrity and ballast (if ballast systems are used); re-adhere or re-seal worn seams.
Practical steps to reduce wind-induced movement
1. Use wind-rated products and follow the manufacturer's installation instructions to the letter.
2. Have a professional verify the nail/fastener pattern for your material and climate; adjust for local wind loads.
3. Inspect flashing, edge metal, and seam tapes regularly; replace damaged pieces before a storm hits.
4. Keep the roof surface clean of debris; add or repair underlayment where needed to maintain a continuous protective layer.
5. After severe winds, perform a careful roof check (from a safe vantage) for lifted edges, missing fasteners, cracked tiles, or torn seals.
6. If you notice recurrent movement or uplift signs, consult a roofing pro about wind-rated upgrades or re-nailing/re-seaming specific areas.
Quick reference: key material takeaway
- Flexible shingles (asphalt/composite) rely heavily on proper fasteners and seals; uplift is common if installation drifts from specs.
- Interlocking metal systems resist wind better when clips/seams are intact.
- Heavy tiles resist uplift but require solid seating and maintenance to prevent breakage.
- Flat membranes depend on secure seams and proper adhesion; aging bonds increase wind vulnerability.
The Risks of Ignoring Roof Movement in High Winds
How wind loads cause movement and why it matters
High winds don't just “lift” a roof once; they push, pull, and gust along edges, causing the roof to flex slightly with each gust. A little movement is normal, especially on older roofs or those with valley flashing and ridge vents. But when movement is ignored, those small cycles can loosen fasteners, shift flashing, and open pathways for water and pests. Over time, that unseen wear compounds and can lead to bigger problems than a few loose shingles.
- Uplift at edges, rakes, and the ridge line is common; the problem is when fasteners or sealants no longer hold.
- Repeated cycles can loosen nails, screws, and clips, reducing the roof's ability to resist future winds.
- Flashing gaps and improper sealing around penetrations (vents, chimneys, skylights) are common weak spots exposed by movement.
Signs movement is more than cosmetic
Move from “looks a bit wavy” to “this needs a closer look.” If you notice movement that correlates with wind events and persists after the wind dies down, it's a red flag.
- Visible lifting or curling of shingles on the edges or near penetrations
- Loose or missing metal flashing around vents, chimneys, skylights, or valleys
- Warped fascia boards or soffit damage with gaps where water can seep in
- Dark stains or moisture in the attic ceiling indicating hidden leaks
What happens if you ignore it
Ignoring movement can turn a manageable issue into a structural repair job. The consequences aren't just cosmetic.
- Water intrusion and interior leaks that worsen with rain
- Accelerated deterioration of the roof deck, sheathing, and insulation
- Shear and fastener failure that can lead to shingle blow-off during another wind event
- Ventilation and insulation performance declines due to compromised ridge and soffit areas
- Increased risk of sudden, more extensive damage during severe storms
Factors that raise the risk
Some roofs are more susceptible to movement-related damage, so match your vigilance to your setup.
- Roof age, material quality, and installation integrity
- Roof pitch, exposure (open coastlines or hilltop sites are harsher)
- Flashing condition around penetrations and transitions
- Condition of underlayment and sealants beneath shingles or tiles
Practical steps you can take now (safe, homeowner-friendly)
Follow these steps to evaluate and mitigate risk without climbing onto a windy roof.
1) Do a ground or safely elevated inspection after winds subside. Use binoculars to spot lifted edges, missing nails, or flashing gaps around penetrations.
2) Photograph problem areas from multiple angles for documentation and to share with a roofer.
3) Check interior for signs of water intrusion or staining in the attic or ceilings after any rain event.
4) Note the roof sections most affected by wind (edges, ridges, penetrations) to guide a professional inspection.
5) Schedule a professional inspection focusing on fasteners, underlayment integrity, flashing, and ridge vent performance.
When to bring in a professional
If you observe persistent movement, widespread shingle lift, or recurring leaks after wind events, a licensed roofer should assess the system promptly. A pro can verify fastener security, flashing integrity, and the condition of the deck and underlayment, and recommend targeted repairs rather than a full replacement if possible. A timely, expert assessment helps prevent small issues from ballooning into costly damage.
Diagnosing Roof Movement in High Winds
Signs movement may have occurred
- Shingles that are lifted at the edges or corners, especially on windward slopes
- Edges curling or waving away from the roof deck
- Missing granules concentrated near a roof edge or vent openings
- Ridge cap or flashing that appears loose or shifted
- Small gaps between flashing and countertops, or along metal drip edges
- Interior clues like occasional small water stains after windy days or heavy rain
On-site evaluation: how a pro diagnoses movement
1) Safety check first
- Wear a harness if you're on a steep roof; use a stable ladder and a spotter
- Avoid walking on weak or saturated areas; if in doubt, call a pro
2) Exterior wall-to-wall inspection
- Start at the windward side and work across to the leeward side
- Look for lifted shingles, torn tabs, or misaligned ridge and edge components
- Check around roof penetrations (chimneys, vents, flare flashing) for gaps or lifted flashing
3) Fasteners, underlayment, and flashing
- Inspect visible nails or screws for rust, pulling, or missing fasteners
- Look for raised or bubbled underlayment and any suspicious buckling
- Examine flashing at hips, valleys, skylights, and chimneys for displacement or gaps
4) Soffits, fascia, and drip edges
- Check for loose or damaged drip edge and fascia, which can amplify wind damage
- Look for gaps where the roof deck meets the gutter line
5) Attic and interior indicators
- With the attic access open, check for light coming through gaps or fluttering insulation
- Look for signs of air pressure differences that might push shingles up from beneath
- Binoculars for distant inspection when you can't safely reach the roof
- A ladder, harness, and roof brackets for safer access
- Chalk line or marker to note affected areas on the deck
- Infrared camera or moisture meter to detect hidden moisture behind lifted shingles
- Tape measure and straightedge to check for deck deflection or raised seams
- Photos labeled with coordinates to document conditions
Distinguishing wind movement from normal wear
- Sudden, localized lifting on multiple adjacent shingles after a storm is more telling than gradual warping from age
- Movement that reappears with subsequent wind events and corresponds to the same locations is a red flag
- Structural movement (ridge line sag, deck deflection) tends to show up as larger, more persistent deformations, not just cosmetic shingle movement
Documentation and what comes next
- Photograph each affected area with date stamps and orientation notes
- Map the problem spots on the roof plan (row/column coordinates or compass directions)
- Record wind speeds, gusts, and storm dates to correlate events with observed movement
- Note potential risks to interior spaces and gutter systems, so a repair plan can be prioritized
How movement is confirmed in a follow-up
- Re-inspection after a lull in wind to see if issues resolve or worsen
- Comparison with pre-storm photos or previous inspection notes
- If movement is evident or if flashing, fasteners, or decking show instability, plan a temporary protective measure and arrange repairs with a licensed roofer
Repair Options for Roof Movement in High Winds
Temporary fixes
- Safety first: avoid climbing on a roof during high winds. If winds are too strong, protect the interior from leaks and wait for calmer conditions to assess from ground level or with a qualified professional.
- Protect exposed areas: cover with a heavy-duty tarp or plastic sheeting, anchored securely with plywood battens and ballast (sandbags, bricks) to resist wind uplift.
- Seal small leaks: apply roofing cement or a compatible elastomeric sealant around exposed gaps, flashing seams, and penetrations to slow water intrusion until permanent repairs can be made.
- Stabilize loose pieces from where you can safely reach: gently press down any lifted shingles and temporary-nail them if you have a safe, secure stance and proper tools. Use corrosion-resistant nails and seal the nails with roofing cement.
- Clear the path: remove loose debris, branches, and clogged gutters from ground level to reduce wind-driven damage and improve drainage after a storm.
Minor repairs
- Assess from a safe distance or from a stable ladder on solid ground: look for clearly lifted or torn shingles, loose flashing, and exposed underlayment.
- Re-nail loose shingles: if a shingle is only lightly lifted, re-seat it and drive in a couple of galvanized roofing nails to hold it in place. Seal with a dab of roofing cement at the edge of the shingle.
- Replace damaged edges: for small edge shingles that are cracked or broken, remove the damaged piece and install a new piece, ensuring alignment with surrounding shingles and proper nailing pattern.
- Flashing touch-ups: inspect step and counter flashing around chimneys, valleys, and vents. Re-secure with the appropriate flashing nails and seal seams with high-quality roofing sealant where needed.
- Seal penetrations: re-caulk or seal around vent pipes, plumbing stacks, and skylights to prevent water intrusion from wind-driven rain.
- Gutter and vent checks: ensure gutters and vent ducts are clear and watertight. Blocked vents or overflowing gutters can worsen movement-related issues and leaks.
Partial replacement
- When to consider: damage is concentrated to a defined section (e.g., a single slope, a chimney area, or a localized ridge line) and the rest of the roof is sound.
- Plan the scope: identify the extent of damaged decking, underlayment, and shingles in the affected area. Keep adjacent sections' shingles intact to minimize further disruption.
- Remove and replace in sections: strip damaged shingles, underlayment, and any compromised flashing in the affected zone. Replace decking if there are soft spots or rot.
- Install with continuity: roll out fresh underlayment, align new shingles to match the existing roof, and reinstall flashing to ensure water-tight transitions. Pay attention to fastener spacing and sealing at all joints.
- Blend and inspect: ensure the new materials align visually with the existing roof and perform a thorough inspection for any missed gaps or leaks after the next rainfall.
Full roof replacement
- When it's the best long-term option: widespread movement, extensive shingle loss, significant curling, or damaged decking across large areas often warrants a complete roof replacement.
- Preparation: obtain permits as required by local codes, and work with a licensed contractor who can assess decking integrity, ventilation, and attic insulation needs.
- Removal and decking check: carefully remove the existing roof layers, then inspect every sheet of decking for rot, warping, or mold. Replace any compromised boards before applying new layers.
- Installation sequence: install new underlayment, proper ventilation, drip edge, and sturdy flashing around perimeters, chimneys, and vents. Install the new shingles with correct nailing patterns and roof sealants where needed.
- Final touches: reseal flashing seams, ridge caps, and ventilated intakes. Clean up thoroughly and perform a comprehensive post-install inspection to verify wind resistance and water tightness.
Notes for homeowners:
- Weather and safety come first. Do not take on risky climbs during high winds or after a storm until the roof has been declared safe.
- Document damage with photos for insurance and contractor reference.
- Consider wind-rated or impact-resistant shingles for better resilience if you're due for a replacement.
Typical Cost to Fix Roof Movement in High Winds
Minor repair description and cost
A minor movement fix covers small areas where shingles are loose or lifted and where flashing is only slightly disturbed. The goal is to re-secure the surface and prevent further wind-driven damage without touching the structural deck.
- Typical tasks: Re-nail loose shingles, reseal or reflash flashing around vents and penetrations, reset a handful of lifted shingles, replace a small number of damaged nails, apply roof cement or sealant to seal minor gaps.
- Estimated cost: Typically $150–$500, depending on accessibility, roof pitch, and local labor rates.
Moderate repair description and cost
Moderate movement affects a larger area or involves more components, such as multiple shingles, sections of underlayment, or minor fascia/vent issues. You may see several shingles peeling back, damaged boot flashings, or small exposures in the roof deck that are still repairable without full replacement.
- Typical tasks: Re-nail and reseal a larger handful of shingles, repair or replace damaged flashing around skylights or vents, patch or replace small sections of underlayment or sheathing (up to a couple of panels), fix fascia or soffit-related movement, reseal ridge caps.
- Estimated cost: Generally $600–$2,500, influenced by the extent of underlayment or sheathing work, access, and material choices.
Major repair description and cost
Major movement indicates significant wind-driven damage that may affect structural components or a substantial portion of the roof deck. This can involve warped or rotten sheathing, damaged rafters or trusses, and compromised support systems. In many cases, it triggers a more comprehensive repair plan and may lead to partial roof replacement if the structure is compromised.
- Typical tasks: Replace damaged sections of sheathing or decking, reinforce or replace compromised rafters or trusses, repair or replace fascia and rafter tails, secure or rebuild ridge lines, address any ventilation or drainage issues, and potentially install new flashing and underlayment. Permits and inspections may be required.
- Estimated cost: Usually $2,500–$10,000 for extensive structural repairs. If the damage necessitates a larger-scale repair or partial roof replacement, costs can rise to $10,000–$30,000 or more, depending on roof size, materials, and access.
What factors affect cost
- Roof size
- Access
- Material type
- Extent of damage
- Local labor rates
- Roof size: Larger roofs have more material and labor requirements, driving up both materials and hourly costs.
- Access: Roofs with difficult access, steep pitches, or limited staging space require more time and equipment, increasing labor charges.
- Material type: Asphalt shingles cost less to repair than premium materials (like slate, concrete, or tile), which can require specialized installers and higher material costs.
- Extent of damage: A small patch is cheaper to fix than replacing sections of decking or structural members.
- Local labor rates: Regions with higher wage levels or demand for emergency repairs will show higher total costs.
How Long Can You Wait When the Roof Moves in High Winds?
Quick safety reminders
- Roof movement during strong winds is a warning sign. Do not stay on or near the roof edge. If you can safely observe from the ground, note any obvious damage but avoid climbing.
- Keep people and pets away from exterior walls and entry points near the affected area. If you hear creaking, cracking, or see shingles shifting, treat it as urgent.
- If you suspect interior damage (water stains, new drafts, musty smell), head to a safe area inside and limit use of affected rooms.
- DIY fixes on a moving roof are risky. The safest path is a licensed roofer with emergency readiness.
Time-sensitive actions you can take now (within hours)
1) Prioritize safety over everything. Do not climb on a wet or windy roof; wait for a professional.
2) Minimize interior damage:
- Move valuables and electronics away from affected ceilings and walls.
- Place containers under obvious leaks to keep water from pooling.
- Close doors to affected rooms to slow the spread of water.
3) Document the situation:
- Take clear photos of any visible movement, loose flashing, or missing shingles from a safe distance.
- Note wind conditions and the time you observed changes.
4) Contact a licensed roofer for a rapid assessment. Ask about any emergency services or temporary protections (like tarping) they provide.
5) If a tarp is ever suggested, rely on professionals for installation. Improvised tarps can slip or fail in high winds and create more damage.
Immediate follow-up window (24–72 hours)
- What to expect: Winds may continue or subside; movement can persist even if you no longer feel it as strongly.
- Practical steps:
- Schedule an on-site inspection as soon as safely possible. Share your photos and notes with the contractor.
- If you have a leak, keep it contained with buckets and towels; document additional intrusion.
- Temporary protections may be installed to limit water intrusion. Ensure any temporary cover is secured and does not create a wind-catching issue.
- Check with your insurance about what constitutes hail/wind damage and what documentation they require.
- Red flags that demand earlier attention: rising interior moisture, growing damp spots, or new ceiling sagging.
Medium-term window (3–7 days)
- What to watch for: Ongoing movement, more shingles lifting, or flashing pulling away from walls.
- Actions to take:
- Get a professional assessment of the roof deck, underlayment, and flashing. Movement can expose decking and fasteners to moisture.
- Begin planning for temporary or permanent repairs. If repairs require significant replacement, the roofer can walk you through options and timelines.
- If interior spaces show moisture spread, consider mold mitigation steps and ventilation improvements in collaboration with a contractor.
Long-term outlook (2 weeks and beyond)
- Potential consequences of delaying beyond a few days:
- Increased water damage to attic framing, insulation, and ceiling finishes.
- Accelerated deterioration of flashing and roof deck, possibly leading to more costly repairs.
- Higher risk of mold or structural rot if moisture persists.
- What to do next:
- Develop a repair plan with your roofer: scope, materials, and warranty coverage.
- Coordinate with your insurer on a supported claim with documentation from the inspection.
- Schedule any required permanent fixes or to rebuild affected sections as recommended.
What happens if you wait to address the problem in several timeframes
- Within hours: Small gaps can widen; crack propagation or nail pops may occur, increasing leak potential even if wind seems to ease.
- 1–3 days: Shingles and flashing can shift further, leading to more rapid water intrusion and potential interior damage begetting additional costs.
- 1–2 weeks: Decking and framing exposed to moisture can start to show warping or rot; repairs become more extensive and expensive.
- 3–4 weeks and beyond: Prolonged exposure may trigger mold growth, insulation degradation, and long-term structural concerns, complicating insurance and warranty claims.
- Bottom line: The longer you wait, the higher the risk of escalating damage and the more involved and costly the repairs become. Prioritize a quick professional assessment and a plan for stabilizing the roof movement and preventing water entry.
How Roof Movement in High Winds Varies by Location and Climate
How This Problem Varies by Region & Climate within the United States
- Regional wind patterns drive different uplift risks
- Coastal hurricane zones (Gulf and Atlantic coasts) face powerful, unpredictable surge winds that can pry shingles and flashing upward from edge to ridge.
- The Great Plains and Midwest see strong, straight-line winds and gusts from fast-moving storms, testing eave connections and ridge lines.
- Mountainous and desert regions contend with gusty downslope winds and local terrain effects that create abrupt loading on roofs.
- The Northeast experiences Nor'easters and winter wind events that combine with snow loads to stress roofing edges and penetrations.
- Climate shapes how movement shows up on your roof
- Hot, sunny climates speed up material expansion and can loosen edge fasteners over time; heat resistance matters.
- Cold climates magnify movement through freeze–thaw cycles, causing fasteners to work loose and flashing to loosen.
- Salt-laden coastal air accelerates corrosion of metal fasteners and flashings, increasing the chance of movement at vulnerable joints.
- Snow and ice in winter add weight and create ice dams, which push against roof edges and increase uplift risk when combined with wind.
- Roof style, materials, and regional preferences matter
- Regions with frequent high winds often favor roof shapes and assemblies that resist uplift (for example, hips and wind-rated edge details) and more robust fasteners.
- Material choices (asphalt shingles, metal, clay/tile, or composite) behave differently under wind loads and temperature swings, affecting movement likelihood.
- Local building practices and codes reflect climate risk; some states require uplift-rated fasteners, hurricane clips, or additional nailing patterns in windy areas.
- Where movement tends to show first
- Eaves and rake edges often lift first in many wind events.
- Penetrations (vent pipes, skylights, chimneys) and flashing joints are common failure points if movement concentrates there.
- Ridge lines can move when internal rafters or purlins aren't adequately restrained.
- Practical takeaway for homeowners
- Know your region's weather threats and how they interact with your roof design.
- Understand that the same wind speed can cause different movement in different climates, because temperature, moisture, and terrain combine with wind.
How This Problem Varies by Region & Climate within the United States (Practical Focus)
- Coastal, hurricane-prone:
- Look for uplift-focused upgrades: reinforced fasteners, hurricane clips, and edge restraints.
- Prioritize flashing integrity where salt air can corrode metal.
- Inland and plains (gusty storm winds):
- Emphasize secure ridge-to-eave connections and brace roof deck fasteners.
- Consider higher nailing patterns and edge protection tailored to local wind histories.
- Cold climates with freeze–thaw cycles:
- Ensure fasteners and sealants tolerate repeated expansion and contraction.
- Check for ice dam risks that push water under flashing during wind events.
- Hot and dry or hot and humid regions:
- Inspect for heat-related loosening of fasteners and aging underlayment.
- Use weather-resistant materials and consider venting and soffit design to reduce thermal stress.
- Salt exposure (coasts and islands):
- Prioritize corrosion-resistant fasteners and properly protected metal flashings.
- Schedule more frequent inspections after major wind events.
Top actions to tailor your approach by region (stepwise)
1) Identify your area's wind and climate profile: hurricane exposure, winter storms, or high heat—all matter for uplift risk.
2) Review local codes and retrofit options common in your region (hurricane clips, ring-shank nails, approved fasteners).
3) Inspect critical areas after wind events: eaves, ridge cap, penetrations, and flashing joints.
4) Plan region-appropriate upgrades with a qualified roofer (fasteners, edge restraints, underlayment, and flashing).
5) Maintain vegetation clearance and roof cleanliness to prevent wind-driven debris from catching on edges.