Ultimate Guide to Roof Repair Services
Last updated: Feb 28, 2026
Introduction to Roof Repair Services
Roof repair is about restoring integrity, preventing further damage, and protecting your home. This page explains practical, trustworthy approaches homeowners can rely on when a repair is needed. You'll find clear explanations, realistic timelines, and steps you can take to keep your roof in good shape.
What roof repair covers
- Leaks and penetrations around vents, pipes, and flashing
- Damaged or missing shingles, tiles, or metal panels
- Wailing or loose ridges, soffits, or fascia boards
- Damaged underlayment or flashing that allows water intrusion
- Moss, algae, or debris that compromise drainage and deck health
- Small structural issues, such as sagging or or displaced components, that affect performance
- Quick fixes to extend life while you plan a longer-term solution
Common signs you may need a repair
- Water stains on ceilings or walls after rain
- Light visible from attic through roof panels
- Curling, cracking, or missing shingles
- Granules accumulating in gutters or downspouts
- Dampness or musty smells in the attic
- Increased attic warmth or drafts on windy days
- Patchy or uneven spots on the roof surface
Our repair process (step-by-step)
1. Schedule a no-hassle inspection to assess the source, scope, and urgency.
2. Identify the exact cause of the problem, not just the symptom.
3. Present practical options with clear cost and time estimates.
4. Prepare and protect surrounding areas to keep your home clean.
5. Execute the repair with quality materials and methodical workmanship.
6. Conduct a final inspection and share maintenance tips to prevent recurrence.
Materials and options
- Asphalt shingles: affordable, versatile, and quick to install or repair
- Metal panels: durable, long-lasting, and excellent for standing-seam roofs
- Tile or clay: distinctive look with strong longevity when properly installed
- Underlayment and flashing: critical for weatherproofing around valleys, vents, and chimneys
- Sealants and coatings: used as temporary or supplementary protection in certain climates
- Fasteners and ventilation: ensuring long-term performance and roof health
Maintenance tips to extend roof life
- Keep gutters clear and ensure proper drainage
- Trim overhanging branches that could damage or drop debris
- Schedule seasonal inspections, especially after heavy storms
- Address signs of wear promptly rather than delaying repairs
- Clean moss and algae with appropriate products or professional help
When to repair vs. replace
- Repairs are often ideal for isolated leaks, minor flashing issues, or small areas of damage
- Replacement becomes more sensible when widespread damage, multiple failed sections, or aging components threaten safety and efficiency
- Consider long-term costs, energy efficiency, and the roof's remaining life when deciding
- Quick decision points to consider:
- Is the damage localized and manageable without risking other areas?
- How old is the roof, and what is its expected remaining lifespan?
- Will a repair restore performance for a reasonable period, or does it just buy time?
Roof Repair Services: What They Include
What roof repair encompasses
Roof repair is the comprehensive process of diagnosing, fixing, and restoring a roof's ability to keep water out and protect the home. It targets structural integrity, waterproofing, and attic health, with the goal of stopping leaks, preventing further damage, and extending the roof's service life.
- Leaks and water intrusion
- Damaged or missing shingles or tiles
- Damaged flashing around chimneys, vents, and skylights
- Damaged underlayment or roof deck
- Wind, hail, or ice damage that lifts or punctures materials
- Improper penetrations or degraded sealants around roof penetrations
When roof repair is needed
Repairs are typically pursued when damage is localized and the remaining roof has enough life left. Look for signs such as water stains, damp/soft attic insulation, curling or missing shingles, granules in gutters, or hard-to-find leaks after rain.
- Post-storm damage or impact from branches
- Visible cracks, gaps, or lifted flashing
- Recurrent leaks despite a quick temporary fix
- Excessive granule loss on shingles or exposed roof deck
- Ice damming and related interior staining
The repair process: steps you can expect
1) Inspection and assessment
- A professional checks shingles, flashing, underlayment, and penetrations to locate the exact source of the problem.
2) Plan and estimate
- A clear repair plan is outlined, including materials, scope, and a written estimate.
3) Preparation and safety
- Area is prepared, ladders and containment are set, and safety precautions are reviewed.
4) Execution
- Damaged components are replaced or resealed: shingles, flashing, underlayment, vents, or sealants as needed.
5) Final inspection and warranty
- A leak test is performed and the workmanship is documented with a warranty for covered repairs.
Materials and methods commonly used
- Shingles and tiles: matching asphalt, architectural shingles, or other shapes to restore seamless appearance
- Flashing: metal (aluminum, copper) around chimneys, vents, skylights, and walls
- Underlayment: synthetic or felt, chosen for durability and weather resistance
- Sealants and mastics: used for small gaps and around penetrations
- Patching and deck repair: when the roof deck is damaged but salvageable
- Temporary coatings or cement: sometimes used for minor, short-term watertightness
Maintenance tips to prevent future repairs
- Schedule seasonal inspections to catch early issues
- Clean gutters and downspouts to prevent water backing up under the fascia
- Trim overhanging branches that could rub or impact the roof
- Ensure proper attic ventilation and insulation to reduce condensation
- Address small issues promptly before they grow into larger repairs
When You Need Roof Repair Services
Signs this service is needed
- Missing, cracked, curled, or buckled shingles after a storm or strong winds
- Bald spots or exposed underlayment visible on the roof surface
- Damaged or loose flashing around chimneys, vent pipes, skylights, or edges
- Granules accumulating in gutters, downspouts, or along the eaves
- Dark stains, staining, or musty odors in the attic or ceiling warm spots inside
- Water marks on ceilings or walls, or active drips from the ceiling during rain
- Daylight visible in the attic through roof framing or shingles
- Soft or spongy spots when you press in the attic or along the decking
- Ice dams or ice buildup on the roof in cold climates
Ways you can confirm yourself as a homeowner
- Do a safe, ground-level visual check: use binoculars to spot obvious damage from the ground; avoid walking on a roof unless you're trained and equipped
- Inspect the gutters and downspouts after a storm: look for loose shingles, granules, and material that shouldn't be there
- Check the attic with care: look for wet or stained insulation, mold, or a musty smell; scan for daylight near vents or along the rafter lines
- Look for interior clues: peeling paint, damp spots, or a new damp area on the ceiling after rain
- Keep a photo log: snap images before you start any DIY inspection so you can show a professional the progression of issues
- Note weather history: combine your observations with recent storms, hail size, and wind speeds to understand potential damage
- Prioritize safety: never step on a wet or unstable roof, and avoid working alone on roofs; use a sturdy ladder and fall protection if you must access the exterior
When to get a professional assessment
- You have an active leak or visible water intrusion inside the home
- Severe weather just occurred (large hail, high winds, or tornado activity) and you notice damage or leaks afterward
- More than a few shingles are damaged, missing, or curling, or there's widespread granule loss
- You cannot safely access or inspect the roof from the attic due to height, slope, or instability
- The roof is older (often 20–25 years or more) and you're unsure whether to repair or replace
- You notice sagging, soft spots, or suspect structural decking issues in the attic
- You observe chronic ice damming in winter or recurring damp spots even after repairs
- You've found mold, rot, or widespread moisture intrusion that could affect framing or insulation
- What to expect from a professional assessment: a thorough exterior and attic inspection, checks of shingles, flashing, vents, and decking, assessment of roof age and remaining life, documentation for insurance or warranty, and a clear repair vs. replacement plan with a rough timeline and cost estimate
What's Included in Roof Repair Services
What's typically included
A standard roof repair focuses on stopping leaks, restoring weatherproofing, and preventing further damage. Here's what you can generally expect to be included in a professional repair:
- Comprehensive on-site inspection and leak diagnosis to identify the exact source and scope
- Safety measures and site protection to keep your home and workers safe
- Temporary protection to minimize exposure to the elements while the repair is being prepared
- Removal and proper disposal of damaged shingles, tiles, or other roofing material
- Replacement of damaged roofing material with color/texture matched to your existing roof
- Repair or replacement of compromised flashing around chimneys, vents, dormers, valleys, and other penetrations
- Sealing and resealing with roof-approved sealants and underlayment as needed
- Replacement of nails, fasteners, and nail flashing to secure the repair and prevent nail pops
- LimitedDeck assessment and patching of damaged decking when feasible (not a full deck replacement)
- Attic/roof ventilation check and small adjustments if poor ventilation contributed to the issue
- Water management improvements such as resealing penetrations and checking drip edges and gutter attachments
- Thorough cleanup and debris removal, plus a final walkthrough with you
- Written estimate, scope of work, warranty information, and clear notes on any limitations or follow-up care
What's not typically included
Some items are outside the usual scope and may be priced separately or require a larger project. Not typically included:
- Full roof replacement or major re-roofing projects
- Extensive structural repairs to roof decking or framing beyond basic patching
- Re-sheathing or replacing large areas of decking (beyond what's necessary for the repair)
- Major chimney rebuilds or extensive flashing work that involves carpentry or framing
- Complete re-flashing of the entire roof perimeter (minor flashing repairs may be included)
- Replacement of gutters, downspouts, fascia, or soffit as a standalone service (often offered separately)
- Cosmetic-only fixes that do not address the underlying leak or cause
- Permits, engineering reports, or design work (these may be billed separately depending on location and scope)
- Emergency or after-hours work not included in the agreed scope (may incur additional charges)
Step-by-step: How a typical roof repair unfolds
1) Schedule and initial on-site assessment: a technician arrives, inspects the roof, and documents findings with notes or photos.
2) Safety setup and site protection: tarps, boards, and fall protection are put in place to keep interior areas dry.
3) Confirm leak source: they pinpoint the exact location of the leak, including flashing joints, valleys, and penetrations.
4) Plan, materials, and temporary protection: they determine the best patching approach and select matched materials.
5) Perform the repair: damaged shingles or tiles are replaced, flashing is repaired or resealed, and underlayment is addressed as needed.
6) Verify leak remediation: a water test or rainfall observation helps confirm the repair holds.
7) Cleanup and disposal: debris is removed, the site is swept, and nails are collected.
8) Documentation and warranty: you receive a written report with photos, warranty terms, care tips, and any follow-up recommendations.
Common Roofing Materials Used in Roof Repair Services

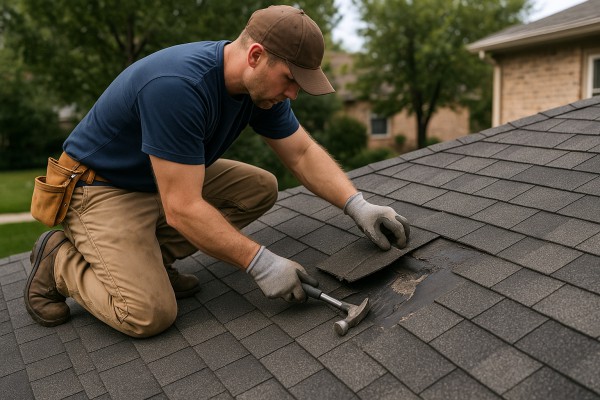
Asphalt shingles are the workhorse of residential roofs and the easiest to repair because replacement shingles are widely available and affordable. Repairs usually involve patching small areas, resealing with asphalt-safe sealants, and ensuring the underlayment and flashing are sound.
- Common issues: curling or buckling shingles, missing tabs after wind events, granule loss that signals aging, and damaged flashing around skylights, vents, or chimneys.
- Repair options: replace damaged shingles one-for-one, reseat loose tabs with proper nails, repair or replace flashing as needed, and seal exposed fasteners or edges to prevent water intrusion.
- Material-specific notes: color matching can be imperfect, especially on older roofs; if the shingle layer is thin or the deck is moisture-damaged, you may need more substantial repairs or a partial roof replacement. Ensure attic ventilation is adequate to slow further deterioration.
Steps for typical asphalt shingle repairs:
1) Locate all damaged shingles and confirm the extent of underlayment exposure.
2) Remove the damaged shingles without disturbing neighboring tabs.
3) Slide in replacement shingles, nail with corrosion-resistant nails, and seal the nailing area.
4) Check and repair nearby flashing; apply sealant to seal any exposed nail heads if needed.

Metal roofs require different attention: fasteners, seams, and coatings drive most repairs. Service focuses on fixing leaks at seams, replacing damaged panels, and resealing fasteners.
- Common issues: loose or corroded fasteners, opened seams, dents from hail, and rust at edges or penetrations.
- Repair options: reseal seams with compatible sealant, replace damaged panel sections, tighten or replace faulty fasteners, and restore protective coatings to halt corrosion.
- Material-specific notes: expansion and contraction cycle can loosen seals over time; use sealants compatible with the metal and coating system, and consider refreshing the protective coating after major repairs to extend life.
Steps for typical metal roof repairs:
1) Inspect seams, fasteners, and panels for movement or corrosion.
2) Remove or replace damaged panel sections; reseal seams with a compatible sealant or tape.
3) Reattach fasteners to spec, then apply a fresh protective coating if warranted.
4) Test for leaks by simulating rain or using a professional inspection to confirm the repair.

Wood shingles or shakes add warmth but require careful handling during repairs due to rot and insect damage. Repairs emphasize replacing rotten pieces and protecting against further decay.
- Common issues: rot at the edges, splitting or cracking, insect damage, and moisture infiltration around penetrations.
- Repair options: replace individual damaged shingles/shakes, treat nearby wood with preservative, and enhance ventilation to slow deterioration; replace damaged flashing as needed.
- Material-specific notes: wood is susceptible to moisture absorption, so ensure proper sealing and stain/protective treatments after repair. Damaged sections can affect neighboring pieces if not addressed.
Steps for typical wood roof repairs:
1) Identify all rotten or damaged shingles/shakes and nearby soft spots.
2) Remove the compromised pieces with care to avoid splitting adjacent shingles.
3) Install new wood shingles/shakes, secure with corrosion-resistant nails, and treat exposed wood with preservative or stain.
4) Reflash penetrations and check ventilation to prevent future moisture buildup.
Tile Roofing (Concrete and Terra-Cotta)
Tile roofs require precise handling due to breakage risk. Repairs focus on replacing broken tiles, inspecting underlayment, and ensuring proper bedding and flashing around penetrations.
- Common issues: cracked or shattered tiles, slipped tiles, and damaged underlayment.
- Repair options: replace broken tiles with matching ones, inspect and repair underlayment, reseal around chimneys and vents, and adjust ridge and hip flashing as needed.
- Material-specific notes: tiles can be fragile; work with a skilled technician to avoid fracturing adjacent tiles. Matching tile color and profile can affect aesthetics and warranty.
Steps for typical tile repairs:
1) Locate all broken or loose tiles and inspect the area beneath for water intrusion.
2) Remove the damaged tile carefully and replace with an identical tile.
3) Re-anchor tiles with proper spacing and reseal around penetrations; reseal hips and ridge flashing if needed.

Slate repairs demand precision because slate is strong yet brittle. Repairs generally involve matching slates, re-nailing, and reestablishing a sound barrier.
- Common issues: cracked slates, loose or missing nails, and leaks at joints.
- Repair options: replace matching slate pieces, re-nail with corrosion-resistant fasteners, and inspect surrounding flashing for corrosion or gaps.
- Material-specific notes: matching weight and thickness is critical for weatherproofing and historical accuracy; slate repairs often require a skilled roofer with slate-specific tools.
Steps for typical slate repairs:
1) Identify damaged slate and check adjacent pieces for stability.
2) Remove the faulty slate and install a matching replacement with proper nails.
3) Re-seal the nail heads and inspect surrounding flashing to confirm watertightness.

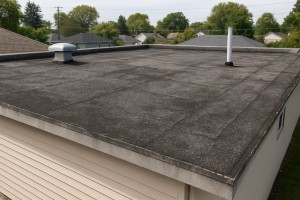
Flat roofs rely on seamless membranes. Repairs concentrate on patches, seam reinforcement, and coating to stop leaks.
- Common issues: seam leaks, punctures, ponding water, and aging waterproofing.
- Repair options: patch with compatible membrane pieces, reseal or replace compromised seams, and consider reflective coatings to extend life.
- Material-specific notes: ensure patch materials and adhesives are compatible with the membrane type; improper adhesives can lead to faster deterioration.
Steps for typical flat roof repairs:
1) Dry and clean the damaged area, then cut a patch slightly larger than the damaged spot.
2) Adhere the patch with the correct adhesive and press firmly to bond.
3) Seal all edges and test for leaks after patch cures.
BUR systems use layers of bitumen and gravel. Repairs focus on cracks, blisters, and damaged cap sheets.
- Common issues: cracks in asphalt layers, blisters from moisture, and exposed or loose gravel.
- Repair options: apply roofing cement and fabric over cracks, reseal blisters, and restore cap sheets or overlay with new BUR as needed.
- Material-specific notes: BUR repairs require compatible cold- or hot-applied materials and proper embedding of fabric to ensure long-lasting adhesion.
Steps for typical BUR repairs:
1) Clean and dry the area, removing loose gravel and debris.
2) Apply roof cement and embed repair fabric over cracks or blisters.
3) Smooth and reseal to restore the waterproof layer; re-cover with cap sheet if necessary.
How Much Do Roof Repair Services Cost?
Typical average costs
- Minor repairs and patches: $150–$500
- Shingle repair (replacing a few shingles): $200–$800
- Flashing repair around chimneys or vents: $300–$900
- Leaks fixed with surface sealant or membrane patch: $350–$1,000
- Vent pipe or chimney flashing replacement: $100–$350
- Extensive repairs (multiple issues, damaged decking, or multiple penetrations): $1,000–$3,000
Average project cost you'll see most often: roughly $500–$1,500 for a single, well-defined repair. Larger or more complex repairs tend to push toward the higher end of that range or beyond.
Factors that can make costs less expensive
- Early detection and quick fixes: catching a small leak before it spreads saves material and labor.
- Standard materials: using asphalt shingles or basic flashing instead ofPremium options lowers material costs.
- Simple access and low pitch: easier work with fewer safety precautions and equipment.
- No decking replacement needed: repairs that don't require replacing plywood or other substrate stay cheaper.
- Off-season scheduling or promotions: some contractors offer lower rates during slower months.
- Limited scope: fixing one localized issue rather than multiple problems reduces total labor hours.
Factors that can make costs more expensive
- Severe weather damage or hail: widespread or repetitive damage increases labor, materials, and cleanup.
- High or steep roof: steep pitches require more safety gear, longer setup, and slower progress.
- Extensive decking or structural issues: replacing rotted sheathing or repairing framing adds major cost.
- Complex penetrations: multiple vents, skylights, chimneys, or unique flashings raise labor and material complexity.
- Premium materials or specialty products: metal flashings, slate, tile, or designer shingles cost more.
- Permits, inspections, and disposal: permit fees, dumpster rental, and recycling or disposal add to the bill.
- Emergency or after-hours work: expedited scheduling or storm-response crews can carry a surcharge.
How costs are determined (short, practical steps)
1. Identify the exact problem and scope (visible leak, hidden flashing issue, or multiple penetrations).
2. Estimate material needs (shingles, flashing, sealants, decking replacement if needed).
3. Calculate labor hours based on roof size, pitch, and access challenges.
4. Add ancillary costs (permits, dumpsters, safety equipment, and travel if the job is out of town).
Quick guide to cost ranges by common repair scenarios
- Small leak or patch on asphalt shingle roof: $150–$600
- Replacing a section of shingles: $200–$800
- Flashing around chimney/vent: $300–$900
- Roof vent repair or replacement: $100–$350
- Decking replacement or extensive repair: $1,000–$3,000+
What to ask your pro to keep costs predictable
- Ask for a written estimate with a breakdown by material and labor
- Confirm whether disposal fees are included or separate
- Inquire about weather-related risk surcharges and lead times
- Request an itemized list for any recommended premium materials or upgrades
How the Roof Repair Process Works
- We begin with a quick conversation to understand what's showing up on your roof and inside your home.
- What we gather: location, roof age, known leaks, weather conditions, and any photos you can share.
- We then coordinate a convenient time for an on-site inspection and set expectations for what will happen next.
Step 2: On-site Inspection and Safety
- Our team performs a thorough, hands-on assessment of exterior and interior signs of damage.
- We look at shingles, flashing, underlayment, and vents, and check attic insulation and roof decking for moisture.
- Safety comes first: workers, ladders, and fall protection are in place to protect your home and our crew.
Step 3: Damage Assessment and Prioritization
- We identify all issues: leaks, missing or damaged shingles, cracked flashing, vent seals, and any insulation or sheathing concerns.
- Issues are ranked by urgency: immediate leaks, potential structural risks, and long-term durability.
- You'll receive a clear summary of findings so you can see what needs attention now versus what can wait.
Step 4: Repair Plan and Quote
- We present a detailed repair plan with options: spot repairs, partial replacements, or full roof surface work.
- You'll get an itemized quote, estimated timeline, and material choices (shingle style/color, flashing types, underlayment).
- We explain trade-offs, such as temporary fixes versus permanent repairs, so you can decide with confidence.
Step 5: Prep and Scheduling
- We arrange access protection for your landscaping, siding, and any outdoor furniture.
- Weather windows are considered to minimize disruption and ensure durable results.
- We confirm a start date, expected duration, and any required precautions for pets and occupants.
Step 6: Permits and Materials
- If permits are needed for the repair scope, we handle the application and approvals.
- We source high-quality, matching materials and stock common sizes in advance to keep the project on schedule.
- Material choices are discussed openly, including color matching and warranty terms.
Step 7: Execution: Repairs
- We begin with removing damaged areas without disturbing sound sections of the roof.
- Key steps include:
- Replacing damaged shingles and any compromised underlayment.
- Re-sealing and re-flashing around chimneys, vents, skylights, and roof-to-wall transitions.
- Replacing damaged or degraded flashing and anchor points with corrosion-resistant materials.
- Re-nailing and resealing edges to ensure wind-proof performance.
- Installing new drip edge, gutters protection, and ventilation if needed.
- We maintain weatherproofing throughout and minimize any intrusion into your living space.
Step 8: Quality Check and Cleanup
- A rigorous quality control walk-around confirms all repairs are solid and watertight.
- We perform a leak test where feasible and verify proper flashing and sealant performance.
- We remove all debris, protect landscaping, and leave your property cleaner than before we arrived.
Step 9: Post-Repair Follow-Up and Warranties
- We review the work completed, answer any questions, and provide maintenance tips to extend roof life.
- You receive warranty details for workmanship and for any manufacturer-backed components.
- We offer a follow-up check to ensure the repair holds up through the next rain event and address any minor adjustments if needed.
Residential and Commercial Considerations for Roof Repair
Residential vs Commercial Considerations of Roof Repair Services
- Residential roofs are typically steep-sloped, with asphalt shingles, tile, or metal panels designed for homes. Commercial roofs are more often flat or gently sloped, using membranes (EPDM, TPO), built-up roofs, or modified bitumen.
- Crew size, equipment needs, and access differ. Homes usually require smaller crews and ladders; commercial jobs may need cranes, scissor lifts, or scaffolding and coordination with tenants or building managers.
- Scheduling pressure is different. Home projects often fit evenings or weekends; commercial sites may need to align with business hours, deliveries, and occupancy restrictions.
- Warranty and maintenance expectations vary. Residential warranties focus on the roof system for a homeowner, while commercial projects emphasize long-term performance, energy codes, and preventive maintenance plans.
- Permits and codes can differ by type of structure. Homes usually follow local building codes for residential roofing; commercial projects may involve more complex code reviews, fire ratings, and accessory protective measures.
- System longevity and replacement cycles vary. Residential roofs might be replaced every 15–30 years depending on material; commercial roofs may last 20–40+ with proper maintenance and membrane selection.
Materials, Design, and System Considerations
- Residential materials: asphalt shingles (cost-effective, broad availability), metal, concrete or clay tiles, slate. Warranties often cover material and installation for decades.
- Commercial materials: flat or low-slope membranes (EPDM, TPO, PVC), built-up roofing, ballast or mechanical attachment. Insulation and vapor barriers are typically integrated into the system.
- Drainage and flashing: homes rely on traditional eaves, valleys, and penetrations; commercial roofs require dedicated edge detail, parapets, penetration flashing, and roof hatches.
- UV and weather exposure: homes face seasonal weather with manageable expectations; commercial roofs confront higher foot traffic on the roof, equipment HVAC units, and rooftop systems which necessitate robust access paths and safety planning.
Safety, Permits, and Compliance
- Safety standards: both settings require fall protection, harnesses, and trained crews; commercial work often follows stricter OSHA protocols due to higher risk and more workers on site.
- Permits: residential projects usually need a basic building permit; commercial projects may require project plans, fire-safety reviews, and permit approvals from multiple authorities.
- Access control: homes may need homeowner coordination for pets and children; commercial sites require signage, visitor controls, and coordination with tenants or building management.
Scheduling, Access, and Disruption
- Access considerations: residential jobs are planned around daily routines; commercial jobs must minimize disruption to business operations, customer traffic, and HVAC exhausts.
- Work hours: homeowners may prefer daytime or after-work slots; commercial projects often need to fit within non-peak hours or weekend shutdowns to reduce impact.
- Material storage: homes can store limited materials on a driveway or yard; commercial sites need organized staging areas, containment for debris, and weather planning for large quantities of material.
Cost, Value, and Longevity
- Upfront costs: residential projects typically show a straightforward price per square foot with material choice as a major driver.
- Long-term value: commercial roofs emphasize lifecycle costs, energy efficiency, and maintenance plans that extend system life and reduce disruptions.
- Warranties: read specifics for weather exposure, contractor workmanship, and any requirements for regular inspections to keep coverage active.
Step-by-Step: Quick Evaluation for Your Roof Repair Project
1) Identify roof type and size (sloped residential vs flat commercial) and note any HVAC units or equipment on top.
2) Check existing warranties and confirm what's covered for repair vs replacement.
3) Gather at least three licensed contractor bids; compare scope, timelines, and safety plans.
4) Verify insurance, licensing, and required permits; confirm debris containment and site protection.
5) Plan for access, disruption, and cleanup; set a realistic timeline with contingency for weather.
How Roof Repair Services Vary by Location
Climate and weather patterns shape repairs
Regional weather drives what can go wrong and how fast it progresses. Roofs endure different stresses, so repair priorities shift by location.
- Extreme cold and freeze–thaw cycles in the Northeast and Great Lakes drive ice dam risk, shingles lifting, and attic ventilation needs.
- Hot, sunny climates in the Southwest accelerate UV and asphalt wear, prompting emphasis on reflective coatings, underlayment, and energy efficiency.
- Humid, wet environments in the Pacific Northwest foster moss, rot, and moisture intrusion, so moisture barriers and proper drainage matter more.
- Coastal regions (Southeast and Gulf Coast) face wind-driven rain, corrosion from salt air, and hurricane season considerations, affecting fasteners and sealants.
- Dry interiors in the Southwest and deserts demand material durability under heat and radiant heat transfer, plus dust and wind considerations.
Local codes, permits, and licensing
Code requirements and permit processes vary widely. Local rules govern what must be inspected, how attic access is created, and which materials are approved.
- Some cities require specific wind uplift ratings for shingles or metal roofs.
- Permit timelines and re-inspection steps differ; in storm-prone regions, you may see expedited post-storm permitting but stricter documentation.
- Roofing contractors must hold state or city licenses, and insurance proof must meet local mandates for workers compensation and general liability.
Materials availability and regional preferences
The market for roofing products is not universal. Availability, cost, and suitability shift by region.
- Asphalt shingles dominate many markets, but enhanced options (impact-resistant, high-wlag shingles) are common where wind or hail is a concern.
- Clay or concrete tiles are popular in hot, dry climates and in parts of the Southwest and West Coast.
- Metal roofing is favored in areas with wildfire risk, heavy rain, or snow load considerations.
- Cedar shakes or shingles show up in humid or forested regions but require maintenance against rot and insects in some climates.
Seasonal scheduling and storm windows
Seasonality shapes when repairs happen and how long they take.
- Cold climates limit roofing work to late spring–early fall to avoid ice and frozen materials.
- Coastal and hurricane-prone areas may see tighter windows around hurricane season and after storms for rapid assessments and emergency repairs.
- Wet regions require dry-weather planning and prompt drainage management to prevent leaks during rain.
Insurance, risk management, and warranties
Local risk profiles influence how insurers view roof repairs and what constitutes a proper warranty.
- Regions with high hail or hurricane risk often have stricter requirements for deck protection, underlayment, and fastener corrosion resistance.
- Warranties may reference climate zone specifics; workers must meet local installation standards to honor the warranty.
How this service varies in different regions in the United States
- Northeast and Mid-Atlantic: Ice dam mitigation, attic insulation improvements, and venting upgrades; slate, asphalt, and metal options common; strict snow load considerations.
- Southeast and Gulf Coast: Wind-rated shingles, sealants designed for high humidity, corrosion-resistant metals, and prompt storm-damage response; coastal codes emphasize salt resistance.
- Midwest: Robust snow-load design, durable underlayments, and regular roof ventilation checks; hail considerations influence material choice.
- Southwest: UV resistance, radiant barriers, tile and metal options, and long-term heat management; drought and dust can affect maintenance cycles.
- Pacific Northwest: Moss control, rot prevention, and continuous moisture barriers; cedar and composite options popular in damp climates.
- Alaska and Hawaii: Extreme temperatures and unique exposure (coastal salt, volcanic environments in Hawaii) drive specialized fasteners, sealing, and ventilation strategies; shipping times can affect material availability.
Practical steps for homeowners navigating location差
1. Verify local licensing, insurance, and required permits with your city or state.
2. Ask about climate-specific details: wind uplift ratings, moisture barriers, and ventilation plans.
3. Choose materials suited to your region's weather patterns and your HOA or code requirements.
4. Schedule work around favorable seasons and known storm windows to minimize interruptions.