Ultimate Guide to Bubbling or Blistering Flat Roof
Last updated: Feb 28, 2026
Introduction to Bubbling or Blistering Flat Roofs
What bubbling or blistering on flat roofs looks like
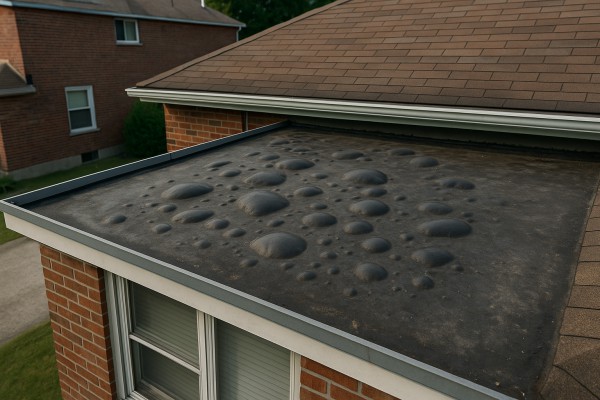
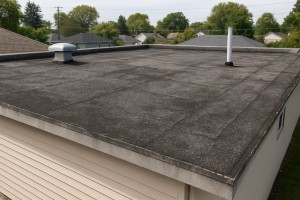
Bubbling or blistering shows up as raised, pillowy pockets on the roof surface. The membrane may push up away from the substrate, or the edges may curl and lift. In some cases the blister feels soft when you press, and finally it can split open, exposing underlayment or insulation. These signs are most common on flat or low-slope roofs such as EPDM, TPO, PVC, or built-up asphalt.
Common signs to look for:
- Raised, bubble-like pockets across the membrane
- Edges of the blister lifting or curling
- Soft, spongy feel underfoot in the blister area
- Damp spots or water stains on ceilings beneath the area
- Sunken or darkened spots that worsen after rain
Why it happens
Blisters form when air or moisture becomes trapped between layers of a membrane and the substrate, or when the adhesive bond fails. Several factors can contribute, including:
- Trapped moisture in insulation, decking, or underlayment
- Ponding water that sits on the roof for days
- Heat and sun exposure causing expansion and contraction cycles
- Improper flashing or penetrations near edges and seams
- Poor installation or aging materials
- Structural or deck moisture issues that migrate upward
Is it urgent or common?
Bubbling is a fairly common issue on older or lower-slope roofs, especially in warm climates. Its urgency depends on size, location, and whether water is entering the building.
- Common but not always urgent: small, dry blisters without leaks can often be monitored
- Urgent red flags: active leaks, blister near a seam or flashings, or a blister that's growing or wet inside the building
- Longer-term risk: sustained moisture can rot decks, degrade insulation, and lead to more extensive, costly repairs
Quick safety and assessment tips
- Do not poke or puncture a blister. Puncturing can release moisture and worsen damage.
- Avoid walking on fragile areas. If you must inspect, use a safety plan and proper gear.
- Check the attic or ceiling below for new or growing water stains and damp insulation.
- Take photos from ground level or access points to document the area before arranging help.
- If you notice active leakage, protect interior spaces with tarps or buckets and redirect water away from the affected zone.
High-level next steps
1) Document the issue
- Photos of the blister, surrounding membrane, and any adjacent penetrations or flashing
- Note size, location, and whether it's dry or wet, and if it correlates with rain
2) Create temporary protection
- If feasible, place a tarp or board over the blister to channel water to a drain
- Protect interior spaces from potential leaks
3) Plan a professional assessment
- Schedule a licensed roofer or building contractor for an on-site evaluation
- Ask to identify root causes (underlayment moisture, deck condition, flashing, and drainage)
4) Compare repair options
- Request high-level repair paths: localized blister repair, membrane patch, or full roof section replacement
- Discuss expected lifespan, warranties, and any necessary deck or insulation work
5) Decide on a path forward
- Repair or patch strategies for minor issues
- Full reroof considerations if moisture or structural damage is extensive
- Consider long-term performance, energy efficiency, and future maintenance
By recognizing the signs, understanding the causes, and weighing the urgency, you can plan a practical, cost-aware approach to Bubbling or Blistering on flat roofs.
Is a Bubbling or Blistering Flat Roof an Emergency?
Quick way to gauge urgency
Bubbling or blistering on a flat roof usually means moisture is trapped somewhere beneath the surface, or warm air is pumping up under the membrane. That can lead to faster deterioration, leaks, and, in worst cases, structural damage. On flat roofs, blisters can inflate when heat softens the adhesive or when moisture expands inside the insulation. If you notice rapid changes after rain, heat waves, or heavy sun, treat it as a potential emergency and assess carefully.
- Visible water entry or active leaks are happening inside the home
- A blister or bulge is large, enlarging quickly, or feels soft, unstable, or spongy
- There is standing water on the roof that won't drain after rainfall
- You notice interior ceiling staining, damp insulation, or mold growth near the affected area
- The blistering is near electrical systems, outlets, or lighting fixtures in or around the space
- There are creaking, popping, or shifting sounds from the roof or framing
- Active leaks are dripping into living spaces
- A roof bulge is growing or feels like it could give way under weight
- The blistering covers a sizable area or is near the edge of the roof where it could fail
- Pooled water remains on the surface even after the weather clears
- You observe heat or flame-related signs around the area (smell of burnt material, scorch marks, or melted components)
- There is any sign of compromise to electrical components or wiring in the upper levels
Monitor if
- The blistering is small and there are no leaks indoors yet
- The roof area is dry and weather is calm, allowing safe observation from within the home or a low-risk exterior spot
- There's no sagging or noticeable movement in the roof structure
- Interior signs are limited to slight dampness or a cool, damp smell near the attic or ceiling without active dripping
- You're able to schedule a professional evaluation soon during dry weather
Can wait if
- The blistering is minor, flatly raised but not expanding, and there are no interior consequences
- There is no water intrusion, no ceiling staining, and the area is dry for several days
- Weather conditions are poor now, and a window exists for a planned inspection in the near future
- You only see small surface blisters with intact roofing liner and no sign of moisture in insulation or decking
- A nearby professional inspection can be booked within a reasonable timeframe, and temporary mitigation is not required immediately
- Keep people and pets away from the affected area and avoid walking on the blistered surface
- If water is entering the home, place buckets or towels under the leaks and protect valuables
- Do not attempt DIY repair on a blistering flat roof without proper safety gear and training
- If accessible, note the blister size and location and photograph for the roofer's assessment
- Temporarily reduce heat exposure to the area by shading, if possible, to slow blister growth until a pro arrives
What the roofer will look for
- Cause of the blistering: moisture under the membrane, trapped air, or failed insulation
- Whether the deck or framing shows signs of rot or structural weakness
- The extent of moisture damage and whether decking replacement is needed
- Appropriate repair path: surface reseal, partial deck replacement, or full roof system replacement
Safety reminder
Bubbling and blistering can mask hidden water damage and electrical hazards. Treat any signs seriously, keep distance from the area, and prioritize professional assessment to prevent collapse risks or long-term interior damage.
Common Causes of Bubbling or Blistering on Flat Roofs
Moisture Entrapment Under the Membrane
- Bubbles often form when moisture is trapped between the membrane and the deck or insulation. This can happen from leaks, humid indoor air, or moisture left behind during installation.
- Condensation from warm indoor spaces, combined with rain-driven moisture, can travel into the roof assembly and create pockets under the membrane.
Improper Installation and Adhesive Failures
- Inadequate substrate preparation, wrong adhesive choices, or skipping manufacturer cure times can leave air pockets behind the membrane.
- Seams that aren't properly bonded or rolled to remove trapped air can balloon into blisters once heat hits them.
Heat, UV, and Temperature Cycling
- Sun exposure heats the membrane and any trapped air or vapor, expanding those pockets into visible blisters.
- Repeated heating and cooling (day/night cycles) causes expansion and contraction that widens seams and pushes pockets outward.
Damaged or Saturated Insulation and Substrate
- Waterlogged insulation or under-slab boards can push up against the membrane, forming blisters as the material expands.
- Rotting or warped decking beneath the membrane creates soft spots that show as raised areas on the surface.
Punctures, Penetrations, and Drains
- Foot traffic, HVAC curbs, vents, and fastener penetrations can create weak points where water seeps in and air pockets form.
- Inadequately sealed penetrations allow moisture to migrate behind the membrane, promoting blister formation.
Structural Movement and Substrate Shifts
- Roof deck movement from wind uplift, building settling, or framing shrink/expand cycles can separate layers and leave air gaps.
- Large flat roofs without sufficient expansion joints are more prone to blistering as the structure moves.
Aging Membrane and Material Fatigue
- Over time, membranes lose elasticity and adhesives break down, making blisters easier to form under normal heat and sun exposure.
- Using incompatible or low-quality products can accelerate this aging process and increase blister risk.
Ventilation, Condensation, and Indoor Moisture
- Poor ventilation in the attic or roof cavity traps humidity that can migrate into the roof assembly.
- Condensation under the membrane is more likely in cold climates or when warm indoor air meets a cool roof deck.
Ponding and Drainage Problems
- Standing water behind the membrane increases the pressure on the roof system and can force air pockets to form.
- Slow or clogged drains leave water perched on the surface, extending the time moisture stays in contact with the roof layers.
Material Compatibility and Installation Gaps
- Using an incompatible top membrane with underlying coatings or primers can prevent a proper bond.
- Gaps at edges, terminations, or around penetrations create paths for moisture to get under the membrane and blister the surface.
Quick visual signs to look for on a flat roof
- Small raised bumps that flatten when pressed, or larger puckered areas.
- Localized areas that tighten or crack when temperature changes.
- Edges around penetrations that show lifted membrane or bubbling underneath.
How to differentiate likely causes (at a glance)
1) Widespread, uniform blisters across large sections often point to moisture entrapment or aging membrane.
2) Isolated blisters near a penetration or seam suggest installation-related issues.
3) Blisters that appear after a heavy rain or rapid heat spike point to drainage problems or vapor intrusion.
How Roof Materials Affect Bubbling or Blistering on Flat Roofs

- Causes of blistering:
- Moisture trapped under the membrane from wet insulation or ground moisture.
- Air pockets created during installation or seam bonding.
- Sun heat expanding trapped air or moisture.
- Poor substrate preparation or incompatible primers.
- How it presents:
- Soft, rounded bubbles along seams or across large areas.
- Blisters may lift at edges when pressed.
- What to do (homeowner-friendly steps):
1) Note where blisters form and check for ponding water nearby.
2) Have a pro test for moisture in insulation and check for delamination.
3) If blisters are moisture-related, patch or reseal with compatible EPDM materials and ensure the substrate is dry before resealing.
- Causes of blistering:
- Inadequate seam bonding or mis-sealed edges.
- Heat-driven expansion and contraction, plus improper venting.
- Incompatible or degraded adhesives over time.
- How it presents:
- Bubbles that line up with seams or spread across flat sections.
- What to do:
1) Inspect seams and edge seals for signs of delamination.
2) Have a contractor re-seal or re-fuse seams as needed.
3) Confirm the substrate is clean and dry and that the installation method (mechanical fasteners vs. fully adhered) matches the system requirements.
- Causes of blistering:
- Solvent entrapment or improper adhesive cure.
- Chemical incompatibilities or dirty substrate preventing full bond.
- Heat exposure over time weakening bonds.
- How it presents:
- Blisters near penetrations or along seams with visible edge lifting.
- What to do:
1) Check adhesive conditions and substrate cleanliness.
2) If needed, re-adhere or reseal seams with the correct PVC-compatible products.
3) Have the installer verify heat exposure limits and system compatibility with current roof use.
- Causes of blistering:
- Moisture in insulation or substrate.
- Faulty torch technique creating air voids.
- Overheating of asphalt or poor overlaps.
- How it presents:
- Raised blisters along hot seams and rolled areas.
- What to do:
1) Identify moisture in the insulation first.
2) Patch blistered zones after the area dries; reseal with proper torch-down technique.
3) Use a qualified pro to re-torch seams and ensure proper overlap and ventilation.
- Causes of blistering:
- Wet or damp insulation under multiple asphalt plies.
- Poor ventilation and trapped air during construction.
- Inadequate drying before applying top layers.
- How it presents:
- Irregular, multi-ply blisters across the roof surface.
- What to do:
1) Locate and dry out any moisture sources.
2) Replace wet insulation or damaged plies as needed.
3) Reapply with proper drying time and ventilation; verify edge and flashing seals.
Spray Foam (SPF) Roofs
- Causes of blistering:
- Moisture in the substrate or during cure.
- Humidity or rain during spraying and inadequate post-cure drying.
- Topcoat incompatibility or poor adhesion to foam.
- How it presents:
- Raised, bubble-like pockets in the foam or top coating.
- What to do:
1) Confirm the foam has fully cured and the substrate is dry.
2) Recoat or re-spray after proper cure conditions.
3) Ensure a compatible topcoat and correct environmental controls during application.
Liquid-Applied Membranes (Silicone, Acrylic, Polyurethane)
- Causes of blistering:
- Substrate moisture or dirt preventing a continuous film.
- Inadequate priming or improper curing conditions.
- Ponding water that interferes with film formation.
- How it presents:
- Micro-blisters or localized raised areas where film didn't cure evenly.
- What to do:
1) Clean and dry the surface; re-prime if required.
2) Recoat under dry, moderate temperatures.
3) Use a product compatible with the substrate and ensure proper cure time.
- Causes of blistering:
- Poor ventilation during installation or moisture in the deck.
- Improper heating and air pockets under the mat.
- Inadequate surface preparation.
- How it presents:
- Blisters forming at joints or around penetrations.
- What to do:
1) Check deck moisture and repair any leaks or damp insulation.
2) Patch blisters and reseal seams with correct material.
3) Ensure proper ventilation and follow manufacturer guidelines for installation.
- General note: Across materials, common root causes include moisture in the substrate or insulation, trapped air or improper adhesion, and heat-related distortion. Always verify drainage to prevent standing water and have a qualified roofer assess persistent blistering to determine if repairs or full replacement are needed.
The Risks of Ignoring Bubbling or Blistering on Flat Roofs
Water intrusion and interior damage
Bubbling shows moisture trapped under the membrane. If you ignore it, the blister can enlarge and puncture, letting water seep into insulation, the roof deck, and even ceilings below. Small leaks today often become bigger leaks tomorrow.
- Ceiling stains, warped drywall, or peeling paint can appear without warning
- Saturated insulation loses its R-value, making your home harder to heat or cool
- Damaged decking can lead to structural concerns over time
Structural and deck damage
A flat roof relies on a dry, stable substrate. When moisture sits in layers, wood and fasteners rot and weaken.
- Joists and plywood can rot, sacrificing load capacity
- Delamination or warping reduces the roof's ability to shed water properly
- Soft spots or sagging areas may form, signaling growing risk of a full roof failure
Insulation and energy efficiency loss
Moisture-filled insulation isn't doing its job, so your HVAC works harder and your energy bills rise.
- Damp insulation conducts heat more readily, increasing heat loss in winter and heat gain in summer
- Condensation can form on the underside of the roof deck, promoting further moisture problems
- Temperature swings become more noticeable inside the building
Mold, mildew, and health risks
Moist environments under roofing materials foster mold and mildew growth, which can affect indoor air quality.
- Visible mold may appear in ceilings, attic spaces, or walls
- Musty odors, allergic reactions, or respiratory irritation can surface
- Extended moisture exposure raises remediation costs and health concerns
Safety hazards and liability
Bubbling often means the roof surface is unstable. Walking on it can lead to sudden failures or injuries.
- Increased slip and puncture risk for you and family members
- Potential for hidden leaks to worsen into more dangerous structural issues
- Water damage can affect belongings, ceilings, and electrical systems
Cost, warranties, and long-term risk
Ignoring bubbling almost always increases total project costs later.
- Partial patches can fail, forcing a full membrane replacement sooner than expected
- Some warranties require timely repairs by qualified pros; delaying can void coverage
- Insurance claims may be more complicated or denied if damage is deemed neglect
Signs this is an urgent issue
- The blister enlarges after rainfall or irrigation
- Water is actively dripping inside or pooling on the roof surface
- Multiple blisters appear across the roof in a short period
Quick action steps for homeowners
1) Safety first: avoid stepping on blistered areas; keep kids and pets off the roof.
2) Take photos from a safe distance to document the condition and any visible leaks.
3) Check indoor spaces for new stains, musty smells, or damp insulation.
4) Schedule a professional roof inspection with a licensed flat-roof contractor for a written assessment.
5) Plan for proper repair or replacement based on the pro's evaluation; beware of quick fixes that don't address the root moisture issue.
Diagnosing Bubbling or Blistering on Flat Roofs
Visual signs you can spot from ground or up close
- Bubbles or blisters in the flat roof membrane, indicating trapped air or moisture.
- Wrinkling, raised seams, or edges that are lifting away from the substrate.
- Localized patches where the surface feels soft or spongy when pressed lightly.
- Stains or damp spots visible in attic ceilings beneath the area.
- Fading or sun-damaged spots showing aging membrane.
Safety first
- Only inspect from ground level or in the attic unless you have proper fall protection and training.
- Avoid stepping on suspect areas; flat roofs can be slick and fragile.
- Wear gloves, eye protection, and a sturdy pair of shoes.
- Binoculars for distant viewing, flashlight for low light, camera or phone to document.
- Notepad or notes app to record location, size of each bubble, and any moisture scent.
- Tape measure, utility knife (only if you're trained and comfortable), moisture meter if available.
Step-by-step diagnostic process
1) Map the affected spots: roughly outline each bubble's location and size on a diagram of your roof.
2) Ground check: from ground level, inspect the roof as best you can; look for drainage patterns or pooled water that could contribute to moisture buildup.
3) Inspect the edges: examine seams, flashing, and penetrations for loosening, peeling, or gaps.
4) Probe carefully: if you can access the surface, press the bubble gently to see if it yields moisture or feels hollow.
5) Tap test: listen for a hollow or drum-like sound which can indicate a pocket of air beneath a compromised layer.
6) Attic check: go to the attic or interior ceiling; look for wet insulation, dark damp stains, or a musty odor above the blister.
7) Core sample (if you have training and necessary tools): slice a small test patch at the edge of a bubble to inspect the substrate for rot or water damage.
8) Substrate and underlayment: look for delamination or moisture stains beneath the membrane; check for wood rot in plywood or OSB.
9) Ventilation and drainage: confirm roof vents are clear and that there isn't poor ventilation causing heat buildup under the membrane.
10) Decide repair vs replacement: note whether bubbles are localized or widespread, whether the substrate is compromised, and the age of the roof.
How to interpret common findings
- Moisture under the membrane with soft patches usually means a leak has allowed water underlayment; you may need professional repair.
- A dry, firm bubble may be caused by air pockets from an installation flaw or aging film; it might warrant reseaming.
Common culprits to verify
- Trapped moisture under the membrane from leaks or condensation.
- Heat buildup due to poor attic ventilation.
- Aging or damaged underlayment and improper adhesion.
- Poor initial installation or damaged flashing around penetrations.
Documentation and planning next steps
- Take clear photos of each bubble, note location, approximate size, and any changes over time.
- Create a simple roof map with measurements; keep it for reference during inspections or repairs.
When to call a professional
- You find signs of rot, widespread blistering, or you're unsure how to proceed safely. If the interior shows active leaks, or the substrate behind the membrane is soft, get expert help.
Repair Options for Bubbling or Blistering Flat Roofs
Temporary fixes
- Stop or slow water entry: If a leak is active, lay a heavy-duty tarp or plastic sheeting over the blistered area and anchor it firmly at the edges to shed rain. This buys time until a proper repair can be done.
- Reduce exposure: Keep foot traffic off the blistered section and block access to the area to prevent further damage.
- Stabilize the area with a quick seal: Apply a generous bead of compatible roofing sealant or roofing cement around the blister edges and over the patch area to form a temporary, water-resistant seal. Do not puncture or pop the blister; the goal is to keep moisture out.
- Patch temporarily if you have the right material: Use a patch membrane (sized larger than the blister) and press it firmly into place with a roller or hand tool, ensuring at least 2–3 inches of overlap beyond the blister edges. Seal the edges again with sealant for a basic temporary fix.
Notes:
- Temporary fixes are only stopgap measures. They don't address underlying deck or adhesion failures and won't last in heavy rain or sun.
- If you're unsure about compatibility of patching materials, consult the roof material manufacturer's guidance or a local pro before applying anything.
Minor repairs
- Identify the cause: Common culprits for blisters include trapped moisture, poor adhesion, and substrate movement. Confirm there's no active leak traveling under the membrane before proceeding.
- Prepare the area: Clean and dry the surface around the blister. Remove loose edges or peeling flaps so you have solid surfaces to work from.
- Vent and flatten the blister (if small): For small, non-structural blisters, carefully cut a shallow X or strip along the center of the blister to vent air and water. Allow moisture to escape, then press the area flat and reseal with a patch.
- Apply a proper patch seal: Cut a patch larger than the blister (2–4 inches bigger per edge). Prime if required for your system, then apply the patch with compatible adhesive or self-adhesive backing. Press firmly to ensure full contact and seal all edges with the appropriate sealant.
- Re-seal surrounding seams: Inspect nearby seams and flashing. Re-seal loose laps or joints with compatible seam tape or roof cement to prevent future bubbling from moisture intrusion.
- Dryness check and cure: Allow any adhesive or sealant to cure according to the product instructions before resuming normal use. If the membrane remains unstable or the blister returns, escalate to a partial replacement.
Notes:
- Minor repairs are best for localized issues. If the blistering covers a large area or recurs, move to partial replacement.
- Always use materials compatible with your roof type (EPDM, TPO, modified bitumen, etc.). If in doubt, consult a professional.
Partial replacement
- When to consider: If blistering is widespread in a defined area, the substrate shows signs of damage, or a patch repair keeps failing, a partial replacement is more reliable than redoing the whole roof.
- Materials planning: Choose a compatible membrane or patch for the exposed roof system. Ensure matching thickness, UV resistance, and wind/temperature performance.
- Remove damaged section: Carefully lift the blistered area and cut out damaged membrane and any compromised substrate beneath it. Clean and dry the deck, checking for rot or delamination.
- Prepare edges and backing: Smooth and feather the edges of the remaining roof. Replace any damaged decking if needed, and install a solid base for the new patch.
- Install the replacement patch: Lay the new membrane patch with proper laps over the surrounding undamaged area. Adhere and press edges firmly to seal. Overlap seams and flashings to create continuous waterproofing.
- Reflash and reseal: Reattach or replace flashing around penetrations and perimeters. Seal all seams with appropriate seam tape or sealant to ensure watertight performance.
- Inspection and cure: After installation, inspect for wrinkles, gaps, or lifted edges. Allow the system to cure per product guidelines before exposure to weather.
Notes:
- Partial replacement requires careful matching to the existing roof type and proper integration with flashing and penetrations.
- If replacing decking or large sections, ensure deck ventilation and insulation aren't compromised.
Full roof replacement
- When to choose a full replacement: If blistering covers most of the roof, multiple layers are compromised, the substrate is delaminating, or the roof is near the end of its service life, a full replacement is often the most cost-effective long-term option.
- Planning the project: Decide on the roof system (EPDM, TPO, modified bitumen, PVC, etc.), evaluate insulation, ventilation, and flashing needs, and schedule installation with a licensed contractor.
- Remove existing roof: Carefully strip off the old membrane, flashings, and any damaged decking. Inspect the underside of the decking for rot or structural concerns and replace as needed.
- Install the new system: Install underlayment if required, then lay the new membrane or composite roof system. Ensure proper seams, heat-welded joints (for single-ply systems), or adhesive bonding as specified by the manufacturer. Reflash edges and penetrations with new flashing.
- Post-install checks: Verify all penetrations, vents, and drainage are functioning correctly. Conduct a water test or allow the system to acclimate before exposing to full weather.
- Ongoing maintenance: Establish a maintenance check plan to look for punctures, seam failures, or weathered edges before they escalate back to blistering.
Tips:
- A full replacement is a bigger upfront investment but can restore waterproofing integrity across the entire roof and may improve energy efficiency and curb appeal.
- Always prioritize safety: working on a flat roof can be risky. If you're not comfortable with heights, roof systems, or tool use, hire a licensed roofer.
Typical Costs to Fix Bubbling or Blistering Flat Roofs
Minor repair
Small blisters (usually under 6–8 inches) caused by moisture intrusion or adhesion failure can often be repaired without a full roof replacement. Typical cost range: $150–$600.
What it includes:
- Localized patch or re-adherence of the blistered area
- Small edge repairs and resealing
- Brief moisture check and dry-out if needed
Steps to fix (quick guide):
1) Inspect the blister to confirm it's dry and not a sign of broader damage.
2) Excavate or trim away loose material around the blister to create a clean edge.
3) Dry out the area if moisture is present.
4) Re-adhere the patch with compatible roofing adhesive or seam tape.
5) Seal the edges with matching sealant.
6) If required, recoat the surface with the roof coating and monitor for a short period.
Moderate repair
Blisters larger than 6–8 inches or several blisters spanning roughly 6–15 square feet, possibly with minor underlying substrate concerns, typically require patching a larger area or replacing a small section of membrane/flashings. Typical cost range: $600–$2,000.
What it includes:
- Removal of the blistered area and replacement with a patch or small section of new membrane
- Addressing nearby flanges, seams, or flashing as needed
- Basic inspection of the deck and insulation for moisture damage
Steps to fix (moderate):
1) Isolate the area and ensure the roof is dry.
2) Remove the blistered patch and inspect the substrate for moisture or rot.
3) Cut and fit a new patch or replacement membrane over the prepared substrate.
4) Re-seal seams and flashing around the repaired patch.
5) Re-adhere and seal the new section with appropriate adhesive or heat-weld where required.
6) Apply a compatible roof coating over the repaired area and confirm a watertight seal.
Major repair
Extensive blistering over a large area (typically 15 square feet or more), widespread substrate damage, or multiple zones requiring replacement may necessitate replacing a substantial roof section or the entire flat roof. Typical cost range: $2,000–$8,000+, with larger or more complex roofs potentially higher.
What it includes:
- Comprehensive removal of damaged roofing and substrate inspection
- Replacement of multiple patches or a large portion of the roof, possibly including insulation or decking
- Full reinstallation of roofing membrane, flashing, and edge details
- Full coating and protection per material requirements
Steps to fix (major):
1) Secure the area and remove the damaged roof sections safely.
2) Inspect and replace damaged decking or insulation as needed.
3) Install a substantial patchwork or new membrane over the prepared deck.
4) Rebuild flashing, parapets, and edge details to ensure proper drainage.
5) Heat-weld or adhere the new membrane as required by the material type.
6) Apply finish coatings and perform a thorough moisture test and water intrusion check.
What factors affect cost
- Roof size
- Access
- Material type
- Extent of damage
- Local labor rates
How Long Can You Wait Before Fixing Bubbling or Blistering on a Flat Roof?
Quick safety check
Bubbling or blistering on a flat roof usually means moisture is trapped under the surface. If you see active leaks, feel heat or hear running water, treat it as urgent. Do not crawl around the roof unless you're trained and it's safe. Keep people and pets away from the edge, and avoid stepping on soft, squidgy areas that could give way.
General timing guidance
Flat roofs perform best when moisture isn't allowed to linger. A small blister that's dry and not actively leaking might seem like it can wait, but the underlying issue—water trapped under the membrane—will intensify over time. If you can seal off interior leaks and protect the area temporarily, you gain time for a proper repair. In most cases, aim to have a professional assess and repair within days to a couple of weeks, especially if weather is dry and the blister is not growing. If there is an active leak or signs of damage spreading, don't wait.
What happens if you wait to address the problem in several timeframes
- 0–7 days (urgent window)
- Moisture continues to penetrate the decking and insulation.
- The blister can grow, stressing the roof membrane and fasteners.
- Small leaks may widen, potentially staining ceilings or walls inside.
- Risk of mold growth when indoor humidity rises.
- 1–4 weeks
- Water damage can reach structural components, increasing repair costs.
- Insulation loses effectiveness, reducing energy efficiency and increasing heat loss.
- The patched area may delaminate or peel further, making the problem harder to fix later.
- Insurance coverage or warranty could be affected if delayed repairs are interpreted as neglect.
- 1–3 months
- Wood decking or roof substrate may begin to rot, compromising structural integrity.
- Prolonged moisture can trigger rust on metal fasteners and supports.
- Prolonged leaks increase chances of interior damage, such as drywall cracking and staining.
- A larger portion of the roof may require replacement rather than a localized repair.
- 3+ months
- Likely need a full or major roof replacement, not just a patch.
- Higher repair bills, longer project timelines, and more invasive restoration inside the home.
- Potential for private insurance or manufacturer warranty disputes if it's considered persistent neglect.
What to do now (practical steps)
- Protect the interior
- Place a bucket or tarp under drips; use towels to catch minor leaks on ceilings or walls.
- Move valuables away from the affected area and document damage with photos.
- Limit additional moisture
- If you can safely access the roof and there's a temporary cover option (tarp or roofing-grade tarp), secure it over the blister to minimize water entry during rain forecast.
- Document and plan
- Take clear photos of the blister, surrounding membrane, and any interior leaks.
- Note dates, weather conditions, and any changes in the blister's size or shape.
- Seek professional assessment
- Schedule a roofing contractor or flat-roof specialist for an on-site inspection as soon as possible.
- Ask for a written assessment detailing the cause (e.g., trapped moisture, poor installation, sun damage), recommended fixes, and a rough timeline.
- Check for safety and warranty
- Verify if your roof warranty covers blistering and what limits apply.
- If you rent or have homeowners insurance, contact the provider to understand your coverage options.
Quick-start checklist
- [ ] Ensure interior safety and document damage
- [ ] Apply temporary protection if safe to do so
- [ ] Schedule a pro inspection within days
- [ ] Review warranty and insurance implications
- [ ] Plan for a repair path (patch vs. replacement) based on professional advice
How This Problem Varies by Location and Climate
Bubbling and blistering on flat roofs happen when heat, moisture, and poor adhesion trap air beneath the membrane. Climate shapes how those forces interact, so the most common causes and the best fixes shift by region.
How This Problem Varies by Region & Climate within the United States
- Northeast & Midwest (cold winters, humid summers)
- What tends to happen: Freeze‑thaw cycles push moisture into the substrate; snowmelt and rain can infiltrate through seams or around penetrations. Poor attic ventilation and moist insulation exacerbate the problem, creating pockets under the membrane that blister as temperatures swing.
- What to watch for: Blisters near roof penetrations or edges, edges that lift, or blisters that grow after a thaw.
- Regional fixes: Improve attic ventilation and insulation to reduce interior humidity; ensure proper drainage to limit standing water after thaw; use membrane products and seam systems proven in cold weather; patch or replace blisters after membranes are dry and fully cured.
- Southeast (hot, humid, frequent rain)
- What tends to happen: High humidity accelerates curing and can trap moisture under the membrane. Repeated heavy rains and ponding on flat roofs stress seams and flashing, causing bubbling where the substrate holds moisture.
- What to watch for: Consistent blisters that appear after a steady rain cycle, soft edges around penetrations, or blisters that form in shaded, damp spots.
- Regional fixes: Ensure good drainage and slope, plus proper acclimation of materials. Use weather-rated adhesives and membranes suited for humid conditions. Keep the roof surface clean of organic debris that can trap moisture.
- Southwest (extreme sun, heat, arid conditions)
- What tends to happen: Intense sun and heat cause rapid expansion of the membrane; UV exposure can break down some adhesives and coatings. If installation was done in very hot conditions or with improper substrate prep, blisters can form as the material ages.
- What to watch for: Sun‑faded edges, blisters that track with sun exposure, or patches that loosen during hot spells.
- Regional fixes: Install or patch during cooler parts of the day or year when possible; use UV‑resistant membranes and reflectivity‑enhancing finishes; verify seam bonding and adhesive compatibility with high temperatures; ensure proper substrate drying before patching.
- Pacific Northwest (high rainfall, high humidity)
- What tends to happen: Constant moisture, moss or algae growth, and limited sun exposure can hide or slow the drying of the deck. Moisture trapped under a membrane often shows up as blisters after rain or in humid seasons.
- What to watch for: Blisters that appear in shaded wet areas, edges that stay soft, and recurring bubbling after rain events.
- Regional fixes: Improve drainage and roof slope, keep the subdeck dry before repairs, and choose membranes with moisture tolerance. Regular cleaning and de‑mossing can help keep the surface dry and patch materials from failing prematurely.
- Mountain West & Plains (large temperature swings & wind)
- What tends to happen: The big swings between hot days and cold nights stress the membrane and flashing. Wind can push debris into seams, and pressure changes can create or expand blisters.
- What to watch for: Blisters that appear near corners or along seams after cold snaps or windy spells.
- Regional fixes: Use membranes rated for wide thermal cycles, ensure robust flashing, and inspect for wind‑driven damage. Maintain a clean, dry surface before repair work; address ponding and edge sealing to minimize future blistering.
- General regional considerations you'll see anywhere
- Moisture management: trapped moisture under the membrane is a common root cause across climates.
- Drainage first: poor drainage and ponding worsen blistering more than you might expect.
- Material compatibility: choose EPDM, TPO, or PVC brands and adhesives rated for your climate and season of installation.
5 steps to tailor your approach (regardless of region)
1) Do a dry‑weather inspection and map all blisters. 2) Check drainage, slope, and ponding spots. 3) Verify attic ventilation and insulation moisture. 4) Patch small blisters only with compatible materials; large or widespread blisters usually mean a roof‑system repair or replacement. 5) Schedule maintenance aligned with your climate's optimal repair window.