Ultimate Guide to Poor Roof Drainage
Last updated: Feb 28, 2026
Introduction to Poor Roof Drainage
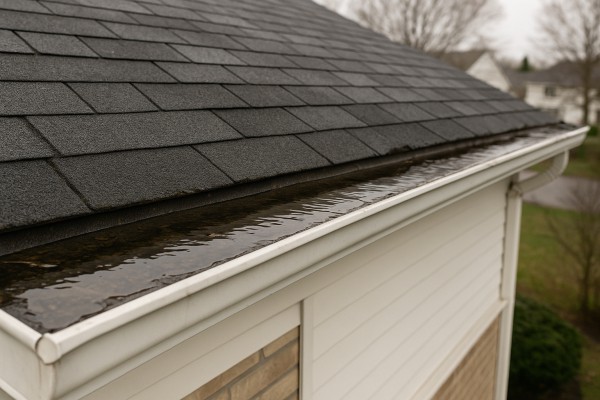
Poor roof drainage means water isn't leaving the roof and gutters as it should. When drainage is blocked or misdirected, you'll see gutters overflowing, water running down siding, and pooling along the eaves. In cold months, those pools can freeze into ice dams that press against shingles and create leaks inside. This is a common issue that often sneaks up gradually as debris builds up, gutters sag, or downspouts clog. It's not unusual, but left unchecked it can lead to moisture damage in your attic and along roof edges.
If you've noticed damp spots in the attic, peeling paint on the ceiling, or faster-than-usual icicles along the eaves, these are red flags that drainage isn't doing its job. Addressing drainage promptly helps prevent bigger, more expensive problems down the line.
Is this urgent or common?
- Common: Many homes experience some form of drainage trouble, especially after storms, with aging gutters, or in areas with a lot of trees.
- Urgent signs: Active leaks inside the house, visible water staining, sagging gutters, or ice dams forming on the roof indicate you should act sooner rather than later.
What causes poor drainage
- Debris blocking gutters and downspouts (leaves, needles, pine cones)
- Gutters that have pull-downs, sag, or loose hangers
- Downspouts that are clogged or not directing water away from the foundation
- Inadequate slope or improper alignment of gutters
- Roof features that funnel water toward a single spot (valleys, parapets) without proper drainage
- Ice dam buildup in winter that creates a temporary block on flow
High-level next steps
1) Safety and quick check: From ground level, inspect the roof edge, gutters, and downspouts. Note any sagging, bends, or obvious blockages. Avoid stepping on the roof unless you're comfortable and it's dry.
2) Clear and test flow: Remove loose debris by hand or with a scoop. Use a garden hose to run water through the gutters and downspouts. Confirm water exits freely at the bottom and that no joints are leaking.
3) Inspect for damage: Look for bent or cracked gutters, rusty sections, loose hangers, and any fascia wood rot. Check the roof edge where water flows to ensure shingles aren't loose or curling.
4) Plan next steps:
- If debris removal and minor adjustments fix the issue, you've likely completed a simple fix.
- If you notice persistent sagging, repeated leaks, or significant damage to gutters, fascia, or roof edge, it's time to consider professional assessment. A pro can evaluate gutter sizing, proper slope, and any underlying roof or structural concerns.
Quick DIY checks you can do safely
- Wear gloves and use a sturdy ladder on level ground; never climb wet or icy surfaces.
- Ensure downspouts discharge at least 3–4 feet from the foundation; add extensions if needed.
- Look for uneven gutter drainage after a rain and track where the water pools to identify misalignment or blockages.
When to bring in help
If you find persistent clogs, misalignment, or signs of rot in the fascia or roof deck, professional guidance can prevent costly damage. A qualified roofer or gutter specialist can assess gutter sizing, confirm proper slope, reseal joints, and recommend replacement if the system is beyond simple repair.
Is Poor Roof Drainage an Emergency? Signs, Urgency, and Immediate Steps
Signs this is an emergency
- Active leaks into living spaces or attic
- Standing water on flat or low-slope sections of the roof after rains
- Visible deflection, sagging, or missing roofing material
- Water stains or dripping from ceilings directly below the roof
- Water backed up into the attic around insulation or electrical fixtures
- Ice damming with water backing up and leaking through eaves (winter)
- Safety first: If there is any chance of stepping on a wet roof or near damaged edges, don't. Stay off ladders and keep kids and pets away.
- Protect interiors: Move furniture and valuables away from leaks; place buckets or towels to catch drips; use plastic sheeting to cover furnishings if feasible.
- Limit further damage: Do not try to permanently patch the roof from ground level; avoid power tools or heavy equipment on a wet surface.
- Temporary weatherproofing (only if safe): If you can safely reach the exterior, securely fasten a tarp or plastic sheeting over the leaky area using weights or rope, not nails into the roof. Anchor from the top edge to the fascia or a sturdy support, letting water drain away from the house.
- Clear nearby gutters from the ground: If a safe, non-climbing option exists, remove obvious debris from the ground-level portions of the gutter with a long-handled tool. Do not climb onto the roof to clean gutters during a storm.
- Document the damage: Take clear photos and notes of where the water is entering, the visible blockage, and any sagging areas. This helps with insurance and the roofer's inspection.
Quick decision guide: Call, Monitor, or Can Wait
- Call a roofer immediately if:
- You have active water intrusion through ceilings or walls or near electrical fixtures.
- The roof shows obvious structural distress (sagging, deflection, or large sections missing).
- Ponding persists after rainfall ends, especially on flat roofs or low-slope sections.
- There is water leaking from the attic through insulation or into living spaces.
- Monitor if:
- The leak is minor and only occurs during heavy rain, with no interior damage yet.
- Water pooling is occasional and clears after a brief period; you're not seeing rapid spread or new leaks.
- You can safely observe from the ground and prepare for a repair without immediate risk of interior damage.
- Can wait if:
- There is no current water intrusion and no visible damage.
- Dry weather is forecast and you can schedule a repair without risk of further interior leaks.
- The issue seems minor and non-emergent, and you can address it during a planned service visit rather than an urgent fix.
Common Causes of Poor Roof Drainage
Insufficient slope and flat spots
Water needs a clear path to run off. When a roof is too flat or has low pitch, water tends to pool in depressions, valleys, or near penetrations. Over time, ponding can accelerate wear, loosen fasteners, and invite leaks. Common culprits include aging shingles, sagging framing, modifications that reduced slope, and damaged roofing where the material no longer sheds water efficiently.
- Low pitch from design or after remodeling
- Sagging or warped sections that create depressions
- Pooled water in valleys or around penetrations
- Damaged shingles that trap water
What to do:
1) Watch for standing water after rain and note the locations.
2) Have a licensed roofer measure slope and assess for sag.
3) If needed, correct the slope or rebuild the affected area to restore proper drainage.
Clogged gutters and downspouts
If gutters are full of leaves, needles, or debris, water can back up and sit along the roof edge, pushing water toward eaves and penetrations. Downspouts blocked or poorly directed discharges can force water back onto the roof edge or against the fascia, undermining drainage.
- Debris buildup reduces flow capacity
- Misaligned gutters slope toward the house
- Undersized gutters or downspouts for heavy rain
- Downspouts discharging toward the foundation
What to do:
1) Clean gutters and downspouts thoroughly, especially after storms.
2) Install guards or screens to limit future debris.
3) Ensure downspouts direct water away from the house and foundation.
Poor attic ventilation and insulation
Hot, humid attic air can condense on the roof deck, softening materials and promoting rot, mold, and ice damming. Inadequate ventilation slows evaporation of moisture, which can worsen drainage problems and create hidden areas where water sits and migrates.
- Blocked or undersized soffit and ridge vents
- Insulation blocking vents or creeping into the attic space
- Vents not properly balanced for the roof area
What to do:
1) Inspect attic vents for obstructions and clear them.
2) Confirm a balanced vent path (intake at soffits, exhaust at ridge).
3) Ensure insulation isn't impeding airflow or covering soffits.
Damaged, missing, or poorly installed flashing and roof penetrations
Flashing around chimneys, vents, skylights, and transitions is a primary defense against water intrusion. If flashing is cracked, lifted, or improperly sealed, water can seep and pool near edges or drain paths, complicating drainage and leading to leaks.
- Cracked or corroded metal flashing
- Deteriorated sealant or poor flashing orientation
- Improperly sealed joints around penetrations
What to do:
1) Inspect flashing at penetrations for cracks, gaps, or lifting.
2) Replace damaged flashing and reseal joints with compatible materials.
3) Recheck sealant and drip edges to ensure water sheds correctly.
Debris, moss, and winter buildup
Leaves, needles, and moss spread across the roof surface trap moisture and create irregularities that slow water flow, especially on shaded or humid roofs. In winter, organic buildup and trapped moisture can contribute to ice damming and increased drainage pressure.
- Overhanging trees deposit debris regularly
- Moss and algae grow in damp, shaded areas
- Debris creates uneven surfaces that hold water
What to do:
1) Clear debris and remove moss with appropriate products or gentle scrubbing.
2) Trim branches that shed leaves onto the roof.
3) In winter, address ice dams by improving insulation/ventilation and carefully removing ice buildup from the eaves.
Structural sag or warped decking
If the roof deck sags or warps, water can pool in irregular spots where the deck fails to shed runoff properly. This is a sign of framing or structural issues that require prompt attention.
- Warped plywood or OSB
- Settling or moisture damage in framing
- Replacing damaged decking and correcting supports
What to do:
1) Have a structural assessment to confirm sag.
2) Repair or replace damaged decking and supports.
3) Reassess drainage after structural work to ensure effective shedding.
How Roof Materials Affect Poor Roof Drainage
How roof material interacts with drainage
When drainage is poor, the way water sits on or runs off a roof can speed up wear and lead to leaks. Different materials respond to standing water in distinct ways: some tolerate moisture for a while but soften or corrode; others stay mostly water-shedding but can trap water at joints or around fasteners. Understanding these nuances helps you spot trouble early and plan repairs that don't compound damage.
Common roofing materials and how they are affected by Poor Roof Drainage
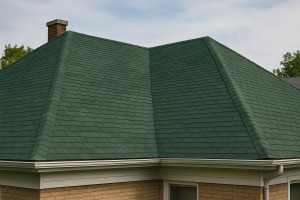
- Asphalt shingles

- Prolonged ponding accelerates granule loss, curling, and edge lifting. Water lingering at low spots can seep under edges, increasing the chance of leaks and rot in the deck.
- Algae, moss, and staining thrive in damp areas, which weakens the protective surface and shortens life expectancy.
- Metal roofing

- Metal sheds water well, but standing water around seams and fasteners invites corrosion, rust streaks, and fastener wear. Over time, reflective coatings can degrade where water sits.
- Poor drainage can trap moisture under flashing and seals, leading to leaks in seams or over fastener lines, especially on older panels.
- Clay or concrete tiles

- Tiles are heavy and rely on proper slope to shed water. With poor drainage, water can penetrate cracked or dislodged tiles, and the underlayment may saturate, increasing the risk of leaks behind the tile layer.
- Freeze-thaw cycles in damp conditions crack and spall tiles or loosen them, creating new pathways for water.
- Wood shingles and shakes
- Wood is vulnerable to rot, mold, and insect damage when moisture sits on the surface. Prolonged wet conditions at eaves and valleys invite cupping, splitting, and decay that can propagate underlayment corrosion.
- Surface checks and splits widen as wood expands with moisture, letting water reach the roof deck more easily.
- Slate

- Slate is durable, but poor drainage concentrates water at valleys and joints. Water infiltration between slates or at nail heads can compromise underlayment and lead to slow leaks that are hard to trace.
- Freeze-thaw moisture in vulnerable joints increases the chance of slates cracking or detaching over time.
- Synthetic or composite shingles
- These imitate asphalt but may have different moisture tolerances. Prolonged ponding can cause swelling, curling, or discoloration in areas where water sits.
- Adhesive bonds and fasteners can degrade faster in damp, stagnant air pockets, increasing the risk of edge leakage.
- Flat roofs and membrane systems (EPDM, TPO, PVC)
- Ponding water is a primary failure driver. Membranes are designed to shed water, not hold it, so standing water accelerates seam and flashing deterioration, blistering, and punctures.
- Over time, hydroxide and chemical degradation can occur in damp conditions, shortening membrane life and creating micro-leaks.
- Green roofs (vegetated systems)
- Excess moisture retention is essential, but poor drainage leads to root rot, plant die-off, and added weight stress on the structure. Waterlogged soil increases the risk of membrane puncture and deck rot if drainage layers are compromised.
Quick notes for homeowners by material
- For shingle and shake roofs: prioritize clearing gutters and ensuring a proper slope to keep water moving off the roof.
- For metal roofs: inspect seams and fasteners where water tends to pool; look for rust or staining after rains.
- For tile roofs: check for cracked or loose tiles and ensure the underlayment is dry and intact beneath the tile layer.
- For flat roofs: schedule professional assessment if you notice puddles that linger after a typical rain event; consider updating drainage or upgrading to a more forgiving membrane with proper slope.
- For slate and concrete tiles: monitor for hairline cracks and ensure ballast is secure; verify flashing around chimneys and vents remains watertight.
- For green roofs: ensure drainage tiles or mats are free of debris and that the irrigation system (if present) does not flood the membrane.
Practical steps to assess drainage by material
1. Observe after a heavy rain: does water pool in the same spots for more than 24–48 hours?
2. Inspect low-slope areas, valleys, and around penetrations (vents, chimneys) for signs of moisture intrusion.
3. Check for visible wear that matches material type (granule loss on shingles, rust on metal, cracks in tile, mold on wood).
4. Look for moss, algae, or plant growth that indicates persistent moisture.
5. Schedule a professional evaluation if you notice recurring damp patches, any suspected leaks, or sagging gutters.
The Risks of Ignoring Poor Roof Drainage
Hidden Water Damage Begins
Neglecting drainage lets water linger near the roofline and behind gutters. Over time, moisture sneaks into places you can't easily see, quietly weakening materials and inviting bigger problems.
- Moisture intrusion into attic insulation and framing
- Stains on ceilings and interior walls
- Warping or soft spots in decking where water collects
Structural Damage That Wears Down Your Roof
Water doesn't respect seams or fasteners. Continuous exposure accelerates rot, rust, and corrosion, compromising the roof's supporting elements.
- Rot in roof deck, rafters, and fascia
- Soffit and gutter hangers corrode or detach
- Increased risk of leaks during wind-driven rain and storms
Mold, Mildew, and Indoor Air Quality
Moist, dark corners become mold magnets. This isn't just cosmetic—it affects comfort, health, and the overall integrity of your home.
- Mold growth in attic insulation and framing
- Musty odors and higher humidity in spaces below
- Potential respiratory issues for family members, especially kids and seniors
Ice Dams and Freeze-Thaw Harm (cold climates)
In climates that freeze, poor drainage fosters ice dams that back up water under shingles and into the attic.
- Ice dam buildup on eaves and in gutters
- Water penetration behind roofing and into ceilings
- Accelerated wood rot and fascia damage when ice melts
Increased Repair Costs and Shortened Roof Lifespan
Small drainage problems become big-ticket repairs if left unfixed.
- Repeated patchwork on flashing, underlayment, or decking
- Premature replacement of underlayment, shingles, or fascia
- Higher long-term maintenance costs and a shorter overall roof lifespan
Insurance and Warranty Implications
Maintenance gaps around drainage can affect warranties and insurance coverage. Some policies require proof of regular upkeep, and neglect can complicate claims.
- Warranty exclusions tied to improper drainage or neglect
- Higher deductibles or claim disputes after water damage
- Possible impact on homeowner's insurance premiums due to higher risk
How the Risks Compound Over Time
The effects stack up season after season, often quietly at first.
1) Water collects at eaves and penetrates tiny gaps
2) Wood framing and decking begin to rot or weaken
3) Mold and moisture migration affect insulation and indoor air quality
4) A cascade of repairs adds up, often sooner than you expect
Quick Check to Spot Problems
Use this practical, homeowner-friendly guide to keep an eye on drainage health.
- Look for damp spots, staining, or bubbling paint on ceilings below attics
- Inspect gutters and downspouts for clogs, sagging sections, or loose hangers
- Check attic for condensation, damp insulation, or daylight through the roof deck
- Note any peeling paint or warped fascia boards along the roof edge
Diagnosing Poor Roof Drainage: Techniques and Indicators
Visual and surface indicators
- Ponding water on flat or slightly sloped roof areas after a rain, which suggests water is not draining away quickly enough.
- Water cascading or spilling over the edge gutters instead of flowing cleanly into downspouts.
- Visible debris, silt, or sediment in gutters and on the roof that can clog channels.
- Sagging or loose gutters, misaligned seams, or flashing that's pulling away from corners or valleys.
- Dark streaks or staining on the roof deck near eaves or along slopes, indicating prolonged moisture contact.
Gutters, downspouts, and outlets
- Blocked or partially blocked downspouts that don't discharge water far enough from the foundation.
- Gutter hangers and brackets that have shifted, causing gutters to sag and trap water.
- Cracked or leaking gutter seams, or gaps where water can spill onto fascia or into attic areas.
- Inadequate gutter size for the roof area, or extensions that don't direct water away from the building.
Attic and interior signs
- Damp, musty smells or visible moisture staining on roof sheathing or framing inside the attic.
- Condensation on rafters or rafters that show frost in winter, suggesting poor ventilation or chronic moisture intrusion tied to drainage issues.
- Ice dams in cold weather, when melted roof drainage refreezes at eaves, indicating water is not exiting properly.
A practical diagnostic walkthrough
1) Gather safety gear and note conditions
- Use a sturdy ladder, non-slip footwear, gloves, and eye protection.
- Take photos from multiple angles, including gutters, downspouts, and likely ponding spots.
2) Inspect the roof surface and edge
- Look for obvious ponding areas after a rain or after simulated moisture with a hose on a calm day (see Step 5 for how to test safely).
- Check for damaged shingles, exposed nails, or flashing gaps near valleys and chimneys.
3) Examine gutters and downspouts
- Clear debris from gutters and ensure water flows freely to downspouts.
- Verify hangers are secure and gutters are level; fix sagging sections.
- Inspect downspouts for blockages and ensure outlets discharge away from the foundation.
4) Check attic access points for moisture
- Look for water stains, mold, or damp spots on roof sheathing and insulation.
- Note any daylight peeking through roof boards or flashing gaps around vents and skylights.
5) Perform a controlled water test (safety-first)
- On a dry, calm day, gently run water along the roof surface, focusing on suspected ponding zones.
- Observe how quickly water exits to gutters and downspouts; note any backflow or overflow points.
- If water pools and drains slowly, document the exact location for reference when planning repairs.
Interpreting the findings
- Slow or standing drainage with clogged gutters typically points to debris buildup or undersized drainage paths.
- Drainage problems with properly cleared gutters but lingering moisture near the roof edge suggest undersized or misdirected downspouts, or insufficient slope.
- Recurrent moisture signs in the attic indicate leaks that may be tied to drainage patterns, flashing, or roof penetration details.
Documentation and planning
- Record locations of ponding, gutter issues, and any flashing gaps with photos and notes.
- Map likely drainage bottlenecks (e.g., specific roof zones, valleys, or corners) to guide repairs or upgrades.
Repair Options for Poor Roof Drainage: Practical Solutions and Considerations
Temporary fixes
- Protect interiors first. If water is actively intruding, deploy tarps over the wet area and secure edges with weights or contractor-grade fasteners. Do not leave tarps loose; a well-secured tarp buys time without creating new leak paths.
- Stabilize drainage where you can. Clean gutters and downspouts so water can flow freely away from the house. Temporarily extend downspouts with elbows or splash blocks to direct flow at least 4–6 feet from the foundation.
- Seal obvious gaps. Apply a high-quality roof sealant or polyurethane caulk to small gaps around flashing, vents, and penetrations as a stopgap measure. Recheck after every heavy rain and replace with a proper fix when possible.
- Limit interior damage. Place buckets or plastic sheeting under drips and protect ceilings with temporary patches if feasible. Keep an eye on attic insulation; saturated insulation loses its R-value and can mold if left damp.
- Document and monitor. Take photos of the affected areas and track how long the temporary fixes hold. They're meant to buy time, not be a substitute for permanent repairs.
Minor repairs
- Clean and tune drainage paths. Start with a thorough gutter and downspout inspection. Remove leaves, debris, and standing water; reattach any loose sections securely.
- Replace damaged shingles. If only a few shingles are curling, cracked, or missing, replace them. Steps:
1) Lift the surrounding shingles carefully and remove nails.
2) Slide in a new shingle and nail it down with proper nail spacing.
3) Seal tab edges and flashing if needed.
- Re-seal flashing and penetrations. Inspect flashing around chimneys, vents, and valleys. Re-caulk or apply asphalt cement where flashing is lifting or gaps are evident.
- Drip edge and valley care. Ensure drip edges are intact and properly fastened. If valleys are contributing to drainage problems, consider a temporary ice-and-water shield or enhanced sealant along the valley seams.
- Ventilation check. Confirm attic ventilation isn't contributing to frost or ice buildup that worsens drainage; add vents or baffles if you notice poor airflow.
Partial replacement
- When drainage problems are localized. If a defined section shows rot, widespread shingle failure, or rotten decking, a partial replacement can restore drainage without replacing the entire roof.
- Steps:
1) Mark and remove the affected portion of shingles, underlayment, and damaged decking.
2) Install new decking where needed, then lay down underlayment to match the existing roof system.
3) Install flashing and drip edge to integrate with neighboring sections.
4) Install new shingles to blend with the existing roof line and color.
5) Re-visit flashing details and add ventilation if required to improve overall drainage performance.
- Pros and cons:
- Pros: Lower cost than full replacement, targeted fix, faster completion.
- Cons: May not address hidden damage beyond the replaced area; may reveal additional issues later.
Full roof replacement
- When drainage issues are widespread or the deck shows extensive damage, full replacement is often the most durable cure.
- Steps:
1) Obtain permits as required and perform a thorough roof inspection to confirm the scope.
2) Remove the entire roof system down to the decking, carefully sorting waste.
3) Inspect and repair or replace any rotten decking; clean and dry the roof deck.
4) Install a high-quality underlayment and improved ventilation plan to optimize drainage.
5) Install new flashing, drip edges, and all penetrations with precision.
6) Lay new shingles, staggering seams and ensuring consistent coverage and alignment.
7) Perform a final inspection: check seals at vents, chimneys, valleys, and edges; tidy up debris and confirm proper water shedding.
- Pros and cons:
- Pros: Longest lifespan, modern underlayment and ventilation improve drainage, consistent warranty coverage.
- Cons: Highest upfront cost, longer project duration, more disruption.
Note: Each option should be evaluated based on the extent of drainage issues, decking condition, local climate, and budget. If you're unsure about deck integrity, flashing, or ventilation, consult a licensed roofer for an assessment before proceeding.
Typical Costs to Fix Poor Roof Drainage
Minor repair: Description and cost
- What it covers:
- Gutter cleaning to remove leaves, dirt, and debris that impede flow.
- Small gutter realignment and resealing at joints to stop minor leaks.
- Adding or adjusting a downspout extension to move water farther from the fascia and foundation.
- Typical cost: $150–$400.
- Short note: This quick fix addresses most clogged or misaligned gutters and is usually completed in a few hours with simple tools.
Moderate repair: Description and cost
- What it covers:
- Replacing one or more damaged gutter sections or downspout segments.
- Installing an additional downspout or re-routing existing downspouts for better drainage coverage.
- Correcting fascia hangers, minor roof edge flashing, or minor flashing gaps that affect drainage.
- Supplemental measures such as splash blocks or drip edge adjustments to improve water flow away from the roof edge.
- Typical cost: $500–$1,800.
- Short note: Moderate repairs address more serious gutter and downspout issues and may involve minor fascia work or adjustments to improve overall drainage effectiveness.
Major repair: Description and cost
- What it covers:
- Replacing the entire gutter system (or substantial portions) and re-designing the drainage layout.
- Installing multiple downspouts, larger or differently routed downspouts, or new scuppers for flat or low-sloped sections.
- Addressing water intrusion into roofing decking, fascia rot, or significant gutter support failure; may include fascia repair or replacement.
- If necessary, re-sloping or reconfiguring portions of the roof edge to restore proper drainage, plus any required permits or inspections.
- Typical cost: $2,000–$8,000+, depending on scope and materials.
- Short note: Major repairs are substantial investments and may uncover related issues such as deck or fascia rot, requiring broader repairs beyond the drainage system.
What factors affect cost
- Roof size
- Larger homes or roofs with many valleys and edges require more materials and labor, increasing overall cost.
- Access
- Height, steepness, and the need for scaffolding, lifts, or specialized safety gear can raise labor time and price.
- Material type
- Aluminum is typically cheaper; vinyl is budget-friendly but less durable; copper or premium steel lasts longer but costs more, affecting total price.
- Extent of damage
- Minor leaks and small gutter issues are cheaper to fix than widespread gutter failure, fascia rot, or roof decking damage.
- Local labor rates
- Regional differences in wages, permit fees, and material sourcing can cause significant price variation.
Quick planning tips (optional steps you can take now)
1. Schedule a professional roof drainage inspection to pinpoint the exact causes.
2. Get at least two written estimates with itemized line items.
3. Confirm material choices and whether any fascia or decking repairs are included in the scope.
4. Check if permits or inspections are needed in your area and what that adds to the timeline and cost.
How Long Can You Wait Before Poor Roof Drainage Causes Damage to Your Home?
0–24 hours
Within the first day, the effects are often subtle. You may not see active dripping yet, but the risk is rising as moisture sits on the roof and in the attic.
- Signs to watch
- Damp insulation or small ceiling stains forming below a blocked gutter line.
- A musty attic smell or unusually high humidity.
- Water spilling over the lip of gutters or downspouts that aren't draining away from the house.
- What to do now
- Don't walk on a wet roof. If possible, inspect gutters from the ground and remove loose debris.
- Clear the downspouts and ensure water is directed several feet away from the foundation.
- Catch leaks inside with buckets or towels; move valuables away from the affected area.
- Photograph any staining or pooling for your roofer and insurer.
- What happens if you wait
- Moisture begins soaking into plywood, sheathing, and insulation.
- Mold and mildew can start to grow in dark attic spaces.
- Small leaks can turn into larger, faster-spreading leaks with more interior damage.
2–7 days
If drainage remains poor, water intrusion typically widens and intensifies, with more noticeable interior effects.
- Signs to watch
- Increasing ceiling sag or new drywall staining in several spots.
- A stronger attic odor and higher humidity levels.
- Warped fascia boards or rust on metal gutters from prolonged wet conditions.
- What to do now
- Schedule a roof and gutter inspection with a licensed roofer or drainage pro.
- Keep dehumidifiers running in affected rooms and improve air exchange.
- Temporarily improve drainage by flushing debris from gutters and downspouts and re-securing loose gutter sections.
- What happens if you wait
- Drywall damage and insulation degradation become more costly to replace.
- Wood rot can start in rafters or sheathing in exposed areas.
- Mold growth can spread to living spaces, affecting air quality and health.
1–4 weeks
Ongoing poor drainage can push damage beyond the roof line, affecting ceilings, walls, and the attic structure.
- Signs to watch
- Irregular floor or wall staining near affected rooms; paint bubbling or peeling.
- More pronounced attic moisture, yellowing or darkening of sheathing edges.
- Pest activity as damp, dark areas attract insects.
- What to do now
- Bring in a roofing/drainage professional for a full assessment, including gutters, downspouts, and roof penetrations.
- Consider temporary interior containment: seal off damp spaces and boost ventilation in the attic.
- Begin planning repairs or replacements for damaged insulation, drywall, and wood.
- What happens if you wait
- Structural components may start to weaken from prolonged moisture exposure.
- Interior remediation becomes significantly more expensive.
- The risk of recurring leaks increases if the underlying drainage problem isn't corrected.
1–3 months
Long-term neglect of poor roof drainage leads to broad, costly damage and ongoing safety concerns.
- Signs to watch
- Persistent dampness around windows and attic access points; seasonal mold outbreaks.
- Soffit and fascia corrosion or rot; warped attic access doors.
- Foundation concerns may emerge from groundwater seepage near the foundation.
- What to do now
- Hire a drainage-focused roofer or contractor to redesign and restore proper flow away from the home.
- Install or reconfigure gutters and downspouts to ensure full, unobstructed drainage.
- Plan a comprehensive repair or replacement of decayed framing, insulation, and interior finishes as needed.
- What happens if you wait
- Extensive structural repairs become necessary, often with higher costs and longer downtime.
- Health risks from mold and mildew persist or worsen.
- Home performance and energy efficiency decline due to compromised insulation.
How Poor Roof Drainage Varies by Location and Climate
How This Problem Varies by Region & Climate within the United States
- Northeast (New England, Mid-Atlantic): Cold winters mean frequent freeze–thaw cycles and ice damming. Snowmelt can overwhelm gutters and downspouts, and road salt near streets can accelerate corrosion of metal gutters. Homes here benefit from heated cables on the gutters or roof edge, plus properly sized gutters to handle spring runoff.
- Midwest: Wide temperature swings combine with heavy spring rains. Snow and ice buildup followed by rapid melt push more water toward the eaves. Fallen leaves in autumn add clogs, and gusty storms can overwhelm downspouts. Plan for larger gutters, extra downspouts, and robust splash blocks or splash pads to keep water away from foundations.
- Southeast: Thunderstorms, tropical downpours, and hurricane season drive high rainfall intensities in short bursts. Water can pool on flat sections or overwhelm undersized systems. Tree debris and salt air in coastal areas add clogging and corrosion risks. Ensure sufficient slope, inspect flashing, and consider guards to minimize clogs.
- Southwest: Dry spells punctuated by dramatic monsoons create sudden, powerful downpours. Long dry periods dry out gutters and seals, then a storm dumps a heavy load of water. Debris from desert flora can clog screens; heat can soften sealants and fasteners if gutters are neglected. Focus on reliable overflow paths and regular checks after monsoon events.
- Pacific Northwest: One of the wettest regions, with high annual rainfall and lush vegetation. Moss, algae, and leaf buildup are common, so gutters clog more quickly. Persistent dampness can promote corrosion on metal systems and require more frequent cleaning and sealing checks.
- Coastal vs Inland: Homes near the coast face salt spray and wind-driven rain that stress flashing, joints, and metal gutters. Inland locations contend with tree debris, seasonal freezes, and more variable rainfall. Both need robust drainage planning, but coastal homes should emphasize corrosion resistance and sealed connections.
Climate and Seasonal Patterns That Drive Drainage Needs
- Freeze-thaw cycles and ice dams: In cold regions, ice forms at the eaves and can back water under shingles if drainage isn't sufficient.
- Snowmelt surges: Rapid melt increases the load on gutters in spring; systems must handle sustained high flow.
- Severe, short-duration downpours: Regions with strong convective storms test gutter capacity and downspout placement.
- Humidity and vegetation: Year-round dampness and shade encourage moss, algae, and leaf buildup that clog gutters.
- Coastal wind-driven rain: In storm-prone areas, wind pushes rain horizontally, stressing flashing and joints.
- Seasonal debris: Autumn leaves, pine needles, and fruit cases can clog screens and downspouts, regardless of region.
Roof Type, Slope, and Gutter Layout by Region
- Roof pitch matters: Steeper pitches shed water faster; flatter roofs need explicit drainage planning, scuppers, or internal drains.
- Gutter size and count: Regions with heavier rainfall typically require wider gutters (5"–6") and more downspouts, placed to balance flow around corners and doorways.
- Roof materials and flashing: Material choice (metal, asphalt, tile) interacts with climate—coastal and salty environments demand corrosion resistance; arid regions may use sealants that tolerate heat cycles.
- Overhangs and drainage paths: Longer eaves help direct water away from siding and foundations, but require more robust gutters and downspouts to handle the added runoff.
Practical Steps for Managing Region-Specific Drainage (Numbered)
1) Inspect gutters and downspouts twice a year, with extra checks after severe storms or heavy snowmelt in your region.
2) If your region sees heavy rainfall, upgrade to larger gutters (5"–6") and add additional downspouts where water concentrates near corners or footpaths.
3) Direct runoff away from foundations: extend downspouts 3–4 feet or more, and consider splash blocks or subsurface drainage to avoid pooling.
4) Minimize clogs with guards or screens suited to local debris loads; keep an eye on moss, algae, and leaf buildup in damp climates.
5) In cold regions, install heat cables at the eaves where ice dams form and ensure attic insulation and ventilation minimize heat transfer to the roof edge.
6) After major weather events, schedule a professional inspection to verify flashing integrity, roof edge seals, and downspout connections, especially in storm-prone coastlines.