Ultimate Guide to Roof Deck Rot
Last updated: Feb 28, 2026
An Introduction to Roof Deck Rot
Roof deck rot is the quiet thief you don't always notice until it's a problem. It happens when moisture lingers on the wood decking beneath the shingles, allowing fungi to break down the fibers and soften the surface. When the deck softens, it loses its strength to support the layers above, which can lead to leaks, sagging, and more extensive repairs down the road.
This page introduces what roof deck rot is, why it happens, whether it's urgent or common, and the high-level steps homeowners can take to understand and address it with confidence.
What is roof deck rot?
- Wood rot is decay that weakens the roof deck—the plywood or sheathing that sits under the roof covering.
- It starts with dampness that isn't properly dried out, then fungal growth takes hold and consumes the wood fibers.
- Rotin the deck is different from minor surface staining; it often shows up as soft, spongy spots that give under light pressure.
Common causes and risk factors
- Chronic leaks around flashing, skylights, chimneys, or valleys that feed moisture into the deck.
- Poor attic ventilation or insulation allowing humidity to condense on the decking.
- Age-related wear and weather exposure, especially in climates with heavy rain, snow, or humidity.
- Debris or clogged gutters directing water toward the roof edge rather than away from it.
- In some cases, prior roof repairs or improper nail sealing can create new moisture entry points.
Is it urgent or common?
- It's a common issue in homes with older roofs or long-standing moisture exposure.
- The urgency depends on extent:
- Light, localized rot with intact structural members may be manageable and reversible with repair.
- Widespread rot, soft decking, sagging, or water intrusion into the attic is a warning sign that needs prompt attention.
- Left unchecked, rot can spread and compromise roof integrity, increasing repair costs and risk of leaks.
Signs to watch for
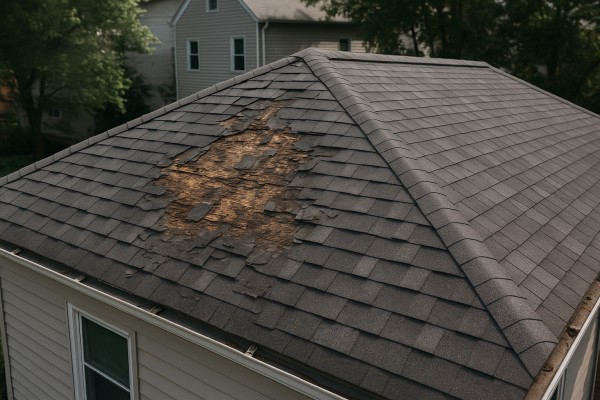
- Soft, spongey areas you can press with a finger or tool.
- Dark stains, warped boards, or visible crumbling along the deck.
- Musty attic odor or signs of moisture behind insulation.
- Sagging roof areas or creaking sounds when walking on the deck.
- Recurrent leaks after a known rain event.
How we approach diagnosis (high level)
- Start with a careful exterior inspection for leaks, worn flashing, and moisture intrusion.
- Check the attic for signs of water intrusion, condensation, or mold on sheathing.
- Assess the extent of decay: is it isolated or spread across larger sections of the deck?
High-level next steps
1) Safety and initial assessment
- Avoid extensive walking on weakened areas.
- Photograph visible damage and note locations of soft decking or staining.
2) Gather information from inside and outside
- Look for attic signs of moisture and check gutter flow and roof pitch from the ground.
3) Professional evaluation
- Schedule a roofer or carpenter to confirm the extent of rot and identify whether deck repair or complete deck replacement is required.
4) Decide on repair strategy
- If rot is localized, spot repairs and deck patching may suffice.
- If the deck is extensively compromised, replacement is typically the safer long-term choice.
5) Plan for moisture control and prevention
- Address underlying leaks, improve attic ventilation, and ensure proper roof drainage to reduce future moisture buildup.
Quick homeowner checks
- Inspect the attic on a dry day for damp spots on the decking or insulation.
- Look for recurring leaks around flashing and at joints after rain.
- Note any soft areas you can safely probe with a tool, and size up how widespread they feel.
Is Roof Deck Rot an Emergency? How to Assess Urgency and Take Action
Quick cues for urgency
Rot on a roof deck can be tricky. Some signs mean you should act now, others mean you can watch for a short spell. Use this quick framework to decide how serious things are and what to do next. If you're unsure, or if you see multiple warning signs, err on the side of urgency and get a pro to inspect.
What counts as a structural emergency
- The deck shows visible sagging, bending, or deflection near edges, openings, or supports.
- You can feel or hear movement when you step on the boards, or a hollow sound when you tap a board with a hammer.
- There is active water intrusion into the home (stains on ceilings/walls or a dripping roof) during rain.
- There is exposed framing, mold growth, or signs of pest damage (termite frass, swarmers, or chewed wood) in the decking area.
- A large area of rot is present, especially around penetrations (vents, chimneys) or guardrails.
- Soft, mushy, or crumbly boards that aren't severely deflected but feel unreliable.
- Small water stains inside the home after a recent rain, with localized deck rot visible from above.
- Limited rot near a non-critical area, where no loads or stair access are affected.
- Dry weather is forecast, giving you time to plan repairs without pressure from rain.
- Active water leaks from the deck into the interior during a rainstorm.
- The deck shows significant sagging, soft spots spanning more than a few boards, or noticeable deflection under load.
- There is exposed framing, widespread rot near structural elements, or signs of pest damage compromising support.
- Guardrails or attachment points look unstable or loose, creating a fall risk.
- You're unsure about the extent of damage after an initial inspection and need an expert opinion right away.
Monitor if
- The rot is limited to a small, superficial area on non-structural decking and there's no interior leak.
- The weather is dry, and you can observe for a short period without rain risk.
- You don't see movement when you walk on the deck, and the boards don't feel unusually soft across a broad area.
- Visual signs of rot are localized, easily accessible, and away from critical load paths (edges away from the house or far from the main supports).
Can wait if
- The affected area is small and clearly non-structural, with no exposed framing and no signs of moisture entering the home.
- There's ample weather clearance for a planned repair, and you can schedule a professional assessment within a few weeks.
- There's no evidence of pest activity, and the rot doesn't appear to be spreading quickly based on your checks.
- Do not rely on decorative or lightweight foot traffic on suspect areas. Keep kids and pets away from the deck until inspected.
- If you must inspect, wear sturdy footwear and avoid stepping on soft, discolored, or spongy boards.
- Keep a clear path for access by a roofer or contractor; avoid blocking access with stored goods or furniture.
Documentation steps to help a professional
- Take clear photos of the affected area from multiple angles, including close-ups of soft boards and any exposed framing.
- Note the date of the first signs and any recent weather events that could have contributed.
- Record whether interior leaks were observed and where they occurred.
Quick actions you can take today
- Gently test boards with a light pressure to map out soft spots, staying off the edge where rot often concentrates.
- Cover exposed openings only if rain is imminent and you have a sturdy, sealed tarp setup that won't trap moisture inside.
- Prepare for a professional visit by marking the rot area and gathering photos and notes.
How to communicate urgency to a roofer
- Share your “Call a roofer immediately if” observations first to set expectations.
- Include your monitoring notes and any photos from the “Monitor if” section.
- Ask for a thorough deck and underlying structure assessment, plus a plan for temporary mitigation if needed.
What Causes Roof Deck Rot?
Inadequate Ventilation and Airflow
Moisture in the attic has to escape somewhere. When vents are blocked or airflow is poor, humidity lingers, condensation forms on the underside of the decking, and wood can start to rot.
- Blocked soffit vents from insulation or debris
- Damaged or missing attic vents (ridge, soffit, or gable) reducing airflow
- Too much insulation that seals off the attic space
- Lack of proper venting pathways (no baffles or obstructed baffles)
- Signs to watch for: higher attic humidity, warm or humid smelling attic, visible condensation on rafters in humid weather
What to do now:
1. Check all vents and clear any blockages.
2. Install or repair roof baffles to maintain a clear airflow from soffits to the ridge.
3. Reposition or trim insulation that is blocking vents to restore proper clearance.
Water Intrusion and Leaks
A small, persistent leak can soak deck boards and support framing over years, even if you don't see a dramatic roof leak every storm.
- Damaged or missing flashing around chimneys, skylights, and roof penetrations
- Loose, cracked, or missing shingles near the deck perimeter
- Gaps where the deck meets walls or penetrations
- Poor sealant or deteriorated waterproofing at joints
- Signs to watch for: soft or spongy decking, staining on ceilings, damp spots in the attic after rain
What to do now:
1. Inspect flashing and surrounding shingles; replace damaged pieces.
2. Re-seal joints and re-flash penetrations.
3. Repair or replace damaged decking and consider applying a proper waterproof underlayment.
Decking Material Deterioration and Age
Deck boards and structural panels have a finite life, especially when moisture is involved. Aging decking is a common rotting trigger.
- Using thin or low-quality plywood/OSB for decking
- Warping, cupping, or bending of boards
- Soft, crumbly, or dark rot at edges and fastener zones
- Prior repairs that hid moisture problems instead of fixing them
- Signs to watch for: soft spots underfoot, unusual squeaks, visible cracks that widen with moisture
What to do now:
1. Test for softness by pressing with a tool; replace suspect boards.
2. Consider upgrading to thicker, moisture-rated decking materials.
3. Improve moisture barrier and ensure ventilation around the deck.
Condensation, Ice Dams, and Seasonal Stress
Temperature swings and winter conditions push moisture around the roof deck, accelerating rot if moisture isn't managed.
- Condensation from warm attic air meeting cold decking
- Ice dams that push water under shingles and onto the deck
- Snow accumulation that takes long to melt, seeping into joints
- Poor attic sealing amplifies seasonal moisture movement
- Signs to watch for: winter frost on the underside of decking, damp patches in the attic after cold snaps
What to do now:
1. Tighten attic air sealing and boost insulation to reduce temperature swings.
2. Keep gutters clear to minimize ice dam formation.
3. Promptly remove heavy snow with a roof rake.
Biological Growth and Pests
Mold, mildew, fungi, and wood-destroying insects thrive on damp wood, speeding up rot and weakening the deck.
- Visible mold or dark staining on boards
- Musty odor in the attic or crawlspace
- Signs of pests (termite or carpenter ant activity)
- Soft, crumbly wood with powdery frass
- Signs to watch for: recurring dampness and new pest activity after rain
What to do now:
1. Eliminate the moisture source; fix leaks to stop ongoing mold growth.
2. Remove affected decking material and treat or replace as recommended.
3. Consider professional treatment or replacement with rot-resistant materials.
Installation Flaws and Design Shortfalls
Poor construction practices and design choices make decks more vulnerable to rot.
- Inadequate moisture barrier between deck and framing
- Incorrect fastener type, spacing, or exposure that invites water intrusion
- Inappropriate decking material for the climate
- Missing or poorly installed flashing at edges and terminations
- Signs to watch for: uneven deck surfaces, gaps between boards widening, exposed fasteners showing rust or corrosion
What to do now:
1. Have a pro audit flashing and moisture barriers around the deck.
2. Replace compromised fasteners and reseal joints.
3. Upgrade to materials and flashing methods rated for your environment.
How Roof Materials Affect Roof Deck Rot
Asphalt shingles and deck rot
Asphalt shingles are common because they're affordable and easy to replace, but they rely on a solid underlayment and proper flashing to keep the deck dry. The shingles themselves shed water well, but if the underlayment or decking is compromised, leaks can reach plywood or OSB and start rot.
- What to watch
- Missing granules, curling edges, or lifted shingles that expose underlayment.
- Signs of moisture intrusion in the attic: stains, soft spots, or musty odors.
- Damaged flashing around vents, chimneys, and where the roof meets walls.
1) Inspect after heavy rain or wind for evidence of leaks in the attic.
2) Replace damaged shingles and any torn underlayment promptly.
3) Ensure proper attic ventilation to aid drying and reduce condensation.
Wood shingles/shakes and deck rot
Wood is attractive and durable when kept dry, but it's highly susceptible to moisture. Damaged or curled shakes allow water to soak into the deck area, and wood decking (like plywood) can rot quickly if moisture doesn't dry out.
- What to watch
- Cracked, split, or warped wood pieces.
- Areas where moss or mildew accumulates, indicating lingering moisture.
- Underlayment and deck show signs of rot or softness.
1) Replace damaged shakes promptly and treat exposed wood with preservative if appropriate.
2) Keep gutters clean to prevent water backup onto the wood roof line.
3) Improve ventilation in the attic and ensure there's a clear path for drying.
Metal roofs shed water efficiently and resist many forms of deterioration, but rot on the deck below tends to stem from bad flashing, fasteners, or roof penetrations rather than the metal itself. Condensation can also create damp conditions in the attic if ventilation is poor.
- What to watch
- Rusted or loose fasteners, or seams that leak around flashings.
- Condensation on underside of roof sheathing in non-ventilated spaces.
- Stains or soft spots on the deck where water pools near penetrations.
1) Ensure all flashings and sealants are intact and properly sealed.
2) Use vented soffits and ridge ventilation to minimize condensation.
3) Inspect around chimneys, skylights, and vents for moisture intrusion.
Clay and concrete tile and deck rot
Tile roofs are durable and water-shedding, but water can still reach the deck if underlayment fails or tiles crack. The weight of tiles means decking damage can be severe before it's obvious from above.
- What to watch
- Cracked, chipped, or loose tiles, especially around valleys and edges.
- Damaged underlayment and signs of water staining in the attic.
- Poor slope or drainage that allows water to back up at eaves.
1) Replace cracked tiles promptly and inspect underlayment for tears.
2) Maintain proper drainage and clean gutters to avoid ponding.
3) Have a pro inspect roof-to-deck interface during tile replacement.
Slate roofing and deck rot
Slate is very durable, but it relies on a solid underlayment and proper installation. If the underlayment fails or flashing is compromised, water can reach the deck and cause rot.
- What to watch
- Slipped or missing slate, and gaps around flashings.
- Attic signs of moisture despite an apparently dry roof surface.
- Soft spots on decking after heavy rain or snow melt.
1) Monitor for loose slate and replace as needed.
2) Ensure underlayment is intact and all flashing is watertight.
3) Schedule periodic inspections after severe weather.

Flat roofs rely on continuous membranes and proper flashing. Ponding water, seam failures, or UV degradation can let moisture reach the deck, especially if the substrate is plywood or OSB.
- What to watch
- Bumps, blisters, or lifted edges along seams.
- Standing water after rain or poor drainage.
- Delamination or soft spots in the roof deck beneath the membrane.
1) Keep drainage paths clear and test for proper drainage after installation.
2) Inspect seams and edges regularly for signs of lifting or penetration.
3) Replace compromised decking or underlayment before leaks worsen.
Common roofing materials and how they are specifically affected by Roof Deck Rot
- Asphalt shingles: underlayment and decking vulnerability if shingles fail; leaks reach the deck.
- Wood shingles/shakes: high rot risk with prolonged moisture; underlayment and deck exposure critical.
- Metal roofing: low direct rot risk, but flashing and fastener seals drive deck moisture risk.
- Clay/concrete tile: good water shedding; deck rot tied to underlayment integrity and tile condition.
- Slate: durable, but underlayment and flashing determine deck safety.
- Flat membrane roofs (EPDM/TPO/PVC): drainage and seam integrity drive deck rot risk.
The Risks of Ignoring Roof Deck Rot
Structural risk and potential collapse
Rot weakens the wood that carries loads. On a roof deck, compromised joists, rim boards, or decking can give way under foot or snow. Even a small area can spread as rot grows, reducing overall strength.
- Soft spots you can press with a finger
- Boards that crack or bend when stepped on
- Nails or screws that loosen, causing boards to lift
- Visible sagging at edges or mid-span
Water intrusion and interior damage
Rot creates pathways for water to reach the attic and interior. Water intrusion can lead to leaks, insulation damage, and compromised seals around the roof.
- Stains on ceilings or walls below the deck
- Dampness in attic or between decking layers
- Condensation around penetrations or vents
- Musty odors in the attic or living space
Mold, mildew, and health risks
Moist wood invites mold and mildew, which can affect air quality and health, especially for sensitive individuals.
- Visible mold growth on wood or decking
- Allergic symptoms: sneezing, coughing, wheezing
- Increased humidity and musty smells
- Persistent moisture around the deck area
Pest invasion and structural wood damage
Rot signals to pests that food is nearby. Termites and carpenter ants can move fast through rotted wood, worsening the problem.
- Clicking or rustling noises in the wood
- Small brick-shaped droppings (frass) near joists
- Hollow sounds when tapping wood
- Visible insect activity around deck framing
Escalating repair costs and cascading damage
The longer rot is left, the more extensive the repairs. Early fixes are simpler and cheaper; later, you may be replacing large sections of deck framing and roof structure.
- Patch repairs that don't stop the spread
- Replacing multiple joists, rim boards, or plywood
- Re-decking over compromised framing vs. full system replacement
- Possible need for underlayment and flashing upgrades
Insurance, codes, and resale implications
Damage from rot can affect insurance claims, code compliance, and how buyers view the home.
- Claims may be limited if neglect is suspected
- Lenders require a sound structural deck for financing
- Appraisers may flag the area as a safety risk affecting value
- Potential requirement for permits and up-to-date weatherproofing changes
How rot progresses if ignored (a rough timeline)
1. Within weeks: moisture sits on wood, soft spots appear
2. Weeks to months: rot expands into joists and supports
3. Months: visible sagging and decking instability
4. Year or more: significant structural risk, possible deck failure
How Roof Deck Rot Is Diagnosed
Safety and planning
Rot issues can hide under shingles, flashing, and underlayment. Before you start, plan a careful route, wear gloves, eye protection, and sturdy footing. If you see sagging or hear creaks when you step, stop and reassess—structural rot can be dangerous. When in doubt, limit access and call a pro for an assessment.
Visual signs to look for
- Dark stains, mold, or mildew on decking, sheathing, or rafters
- Soft, spongy spots that give to simple pressure
- Warped, cupped, or curling boards, especially near eaves or penetrations
- Crumbling edges, powdery sawdust, or loose fasteners
- Water stains or dampness that persists after dry days
- Musty odors in the attic or crawl space
- Flashlight and mirror for hard-to-see spots
- Flat-headed screwdriver or awl for probing
- Moisture meter (pin-type or pinless)
- Camera or phone for documentation
- Ladder with a helper (if you must go on the roof)
- Protective gear: gloves, eye protection, and a respirator if mold is present
Step-by-step diagnosis
1) Start in the attic or under the deck: look for daylight through decking, signs of seepage, damp sheathing, and rust on nails. Note any sagging or bowing members.
2) Inspect visible exterior areas: walk the deck surface where safe. Pay attention to soft boards, loose or rusted fasteners, and staining around vents, chimneys, and flashing.
3) Probe test: gently press with a flat screwdriver or awl on suspect boards. If the wood yields easily, sounds hollow, or breaks apart with light pressure, rot is likely present.
4) Measure moisture: take readings on suspicious boards and compare with unaffected wood nearby. Moisture content above roughly 15–20% is a red flag and often indicates active decay or ongoing moisture intrusion.
5) Check for hidden rot: inspect behind flashing, under roofing felt, around penetrations (vents, skylights, chimneys). Look for mold growth, fungal texture, or a musty odor that indicates moisture trapped in the substrate.
6) Assess structural elements: extend your check to joists, rim boards, and blocking. If you find rot in multiple locations or spanning structural members, the repair may be substantial.
Interpreting the results
- Isolated, shallow rot on a few deck boards with dry joists nearby? This may be repairable by replacing those boards and addressing moisture sources.
- Rot in joists or rim boards with sagging or widespread softness? This signals structural risk and likely more extensive repair, possibly requiring temporary support and professional framing work.
- Surface staining with dry, firm wood elsewhere? Treat the surface, address moisture ingress, and monitor, but prioritize removing moisture sources before replacing decking.
Documentation and tracking
- Photograph each suspect area from multiple angles.
- Note exact location (deck section, joist, board number) and severity.
- Create a simple map of affected zones to guide repairs and future maintenance.
When to escalate to a professional
- Rot spans multiple joists or rim boards, or you see sagging, creaking, or floor movement at the interior.
- You're unsure about moisture sources or how to restore structural integrity safely.
- You discover hidden rot around penetrations or under flashing where detailed repair requires flashing, membrane work, or structural reframing.
Repair Options for Roof Deck Rot
Temporary fixes
If you've just spotted rot and you're waiting on a proper repair, these quick, non-permanent measures can slow water intrusion and protect the space.
- Cover exposed deck areas with a heavy-duty tarp or roofing-grade plastic, secured well. Ensure the cover slopes so water runs off rather than pools.
- Seal seams and gaps with a roof sealant or tape to reduce dripping until a full repair can be done.
- Apply a temporary patch over small rotted spots using compatible roofing cement and a patch of roofing felt or membrane.
- Keep gutters clear and downspouts directed away from the damaged area; reduce moisture exposure where possible.
- Limit foot traffic on the damaged area to prevent further deterioration.
- Monitor the area after rain and re-seal as needed until you can tackle a proper fix.
Minor repairs
Use this option when rot is confined to a few boards or a shallow surface area and the structural framing still feels solid.
- Identify the full extent of the rot with a careful probe; mark out all soft spots.
- Remove rotted boards back to solid, sound edges. Make clean, straight cuts to ensure a tight fit for patches.
- Dry and treat exposed wood; apply a wood hardener or preservative to ensure the edges are solid before patching.
- Patch with new decking boards or patch slabs. Fasten with corrosion-resistant screws or nails; leave proper spacing between boards.
- Seal the patched area and any nearby seams with exterior-grade sealant or caulk; reattach or replace flashing as needed.
- Reinspect after a few rain events and re-seal any new gaps that appear.
- Consider applying a fresh coat of exterior deck sealer or weatherproof coating to protect the repaired zone.
Partial replacement
Choose this when rot affects a larger section of the deck but the rest of the roof structure remains sound.
- Map the boundaries of the damaged zone so you don't miss any compromised lumber.
- Remove rotted decking and any affected joists within the marked area.
- If the surrounding framing shows minor weakness, reinforce it by sistering joists or adding blocking for support.
- Install new decking material to match the existing deck, maintaining proper spacing and fastener pattern.
- Inspect underlayment, flashing, and the edge detailing; replace damaged backing or membrane as needed.
- Restore drainage and ventilation paths; reseal edges and flashing to keep moisture out.
- If you're replacing a substantial area, consider upgrading to higher-grade plywood and a more durable sealant/or coating for longer life.
Full roof replacement
Opt for a full replacement when rot is widespread, the deck is severely compromised, or the roof is near the end of its life.
- Get a professional assessment to verify the extent of structural damage; sagging or soft rafters require expert attention.
- Plan the project with attention to permits, weather windows, and material choices.
- Tear off the old roofing material and deck sheathing down to the framing if needed.
- Replace damaged deck boards and any compromised joists; install new, properly rated deck sheathing.
- Install new underlayment, flashing, and drip edges; ensure valleys and penetrations are properly sealed.
- Install the new roof covering (shingles, metal, or other) per manufacturer guidelines.
- Recheck attic ventilation and insulation; correct any issues that contributed to moisture buildup.
- Schedule final inspections to confirm code compliance and warranty coverage.
Typical Costs to Fix Roof Deck Rot
Minor repair
A small patch is needed when only a few boards show light rot. This usually means replacing 1–3 boards, resealing the edges, and applying a rot-inhibiting treatment to slow any spread. The rest of the deck remains sound, and no structural components are touched.
- Typical cost: $200–$800
- What it covers: replacement of a handful of boards, edge sealing, and a protective treatment.
- Steps:
1) Inspect and mark the affected boards
2) Remove the damaged boards
3) Install replacement boards and reseal
4) Apply rot inhibitor and weather sealant
Moderate repair
Moderate repair covers a larger area, usually a 4x8 foot section, where several boards or a section of subdeck plywood needs replacement. You may also need to reinforce nearby joists or blocking if they're compromised. Expect more labor and material costs than a minor patch.
- Typical cost: $1,000–$3,000
- What it covers: replacement of a larger deck area, possible replacement of subdeck plywood, and light structural reinforcement.
- Steps:
1) Clear the area and protect interior spaces
2) Remove all damaged decking in the section
3) Install new plywood or boards; reinforce framing as needed
4) Reinstall underlayment, flashing, and reseal
5) Treat surrounding wood to prevent further rot
Major repair
Extensive rot that affects a large portion of the deck, or structural framing, requires major repair or full deck replacement. Water intrusion may have affected the attic, insulation, or roof sheathing, and mold remediation could be needed. This is the most variable in cost and can run well into the tens of thousands in severe cases.
- Typical cost: $3,000–$12,000+
- What it covers: full or near-full deck replacement, major framing repair, potential mold remediation, and comprehensive waterproofing.
- Steps:
1) Stop water intrusion and perform a structural assessment
2) Remove large sections of decking and damaged framing
3) Replace plywood, joists, and blocking as needed; tie into the roof structure
4) Rebuild the deck surface, install underlayment and flashing
5) Complete finish work and perform moisture/mold remediation if required
What factors affect cost
- Roof size: larger decks require more material and longer labor time.
- Access: difficult access (attic, crawlspace, tight gaps) adds safety steps and labor.
- Material type: plywood vs. OSB, thickness, and whether treated or rot-resistant options are used.
- Extent of damage: localized pockets are cheaper to fix than widespread rot that reaches structural framing.
- Local labor rates: regional pricing varies; permits, inspections, and seasonal demand can influence total cost.
How Long Can You Wait Before Addressing Roof Deck Rot?
Rot starts fast once moisture settles in. In the first week or so, you may notice soft spots under surface coatings, a mild musty smell, or staining on ceilings where leaks have begun to travel. The deck's outer layer may still look fine, but the wood beneath can be soft and unstable.
- Soft, spongy boards when pressed
- Dark or damp patches on the underside of the decking or rafters
- Unstable railing connections or boards that move more than they should
- A musty odor near the roof or in the attic
What to do now (safe, quick actions):
1) Avoid walking on any visibly soft or sagging areas. Distribute weight only on solid sections if you must go up.
2) Check for any active leaks in ceilings or attic and note their location.
3) Clear gutters and downspouts to prevent standing water from backing up onto the roof.
4) If you can do so safely from the ground or from a sturdy ladder, remove standing water or debris from the deck surface to reduce moisture retention.
Short-term consequences: 1–4 weeks
If moisture keeps sitting, rot will spread beyond the visible surface. You'll start to see more boards softening, fastener connections loosening, and small sections showing signs of swelling or cupping. Mold and mildew can appear on shaded or damp areas, and interior leaks may widen from previously isolated spots.
- Accelerated decay of joists and framing members near the deck
- Increased deck movement or bounce in high-traffic areas
- More widespread staining and potential interior moisture intrusion
- Hidden rot that compromises structural integrity without obvious exterior signs
What to monitor:
- Any new soft spots or creaking under foot
- Changes in lighting or attic condensation after rain
- Intrusions of moisture into attic insulation or drywall
Medium-term consequences: 1–3 months
By this stage, structural issues become more serious. Rot can compromise the decking framework, leading to sagging, loose fasteners, and greater risk of a sudden failure. If water continues to infiltrate, you may see and smell mold inside the home, higher repair costs, and more extensive interior damage.
- Compromised joists, rim boards, and blocking
- Noticeable deck deflection or warping
- Water damage spreading to attic sheathing, insulation, and ceiling finishes
- Potential pest activity (termites or carpenter ants) attracted to rotted wood
What to do if this is your timeline:
- Have a professional assess the extent of the rot, including hidden framing
- Start planning for targeted repairs or partial replacement as needed
- Prioritize sealing leaks to slow further moisture ingress
Long-term consequences: 3+ months
Prolonged neglect can lead to partial or full deck failure and serious interior damage. The longer rot goes untreated, the more likely you'll face a major rebuild rather than a repair. Structural members may be unsalvageable, requiring costly replacement and more invasive work.
- Severe framing deterioration requiring replacement of multiple joists or the entire deck structure
- Roof decking and attic components damaged by ongoing moisture
- Higher risk of collapse in severe cases, especially under snow load or heavy foot traffic
- Substantial repair bills and longer construction timelines
What to expect if you're in this window:
- Higher labor and material costs due to extensive demolition and reconstruction
- Possible need to re-trim or re-flash areas around penetrations to restore roof integrity
- Longer disruption to living spaces and outdoor use while repairs are underway
Quick self-checks and action steps if you're waiting for a pro:
- Do a visual scan for new soft spots, more mold, or any sagging near edges
- Keep water away from the area (clear gutters, redirect runoff)
- Document with photos to track progression for a repair estimate
- Note leaks in the attic and ceiling, plus dates of rain events that correlate with new staining
If you see progressive softening, visible sag, or persistent interior leaks, the risk of a bigger, more expensive repair rises quickly the longer you wait.
How Roof Deck Rot Varies by Location and Climate
How This Problem Varies by Region & Climate within the United States
The U.S. climate mosaic shapes how often deck rot becomes an issue. Moisture sources, temperature swings, sun exposure, and ventilation all push rot risk up or down depending on where you live. Use the regional lens to tailor inspections, maintenance, and fixes.
- Northeast and Great Lakes: frequent freeze-thaw cycles, snow and ice dams, and wet springs push moisture behind flashing and into deck gaps. Rot can advance quietly behind gutter lines and ledger boards.
- Southeast: high humidity, long wet seasons, and hot summers keep timber damp longer. Fungal growth and mold become more likely if ventilation is poor or drainage is blocked.
- Midwest: dramatic seasonal swings with spring rains and winter freezes create repeated moisture cycles in joists, fasteners, and ledger connections.
- Pacific Northwest: abundant rain and damp air mean rot, mildew, and moss flourish. Drainage clarity and moisture control are essential to prevent slow-developing rot.
- Southwest: hot sun and arid spells reduce typical wood rot, but monsoon storms can saturate decks quickly. UV exposure also dries finishes, making cracks that invite water entry.
- Mountain West: cold, sunny winters and rapid thaws create sharp moisture funnels in poorly flashed edges. Snow load and ice can trap water near ledger and flashing if not addressed.
Regional maintenance priorities
- Check flashing around the ledger and parapet joints twice a year, especially after winter and heavy rain.
- Ensure proper drainage: slope decks 1/4 inch per foot toward gutters, clear gutters and downspouts, and keep scuppers open.
- Mind ventilation: allow air under the deck to dry out wood and prevent mold. If you have an enclosed or screened deck, add vents or a breathable under-deck system.
- Use region-appropriate materials: rot-resistant lumber or composites in high-moisture zones; sealed wood with UV protection and durable fasteners in sunny, dry climates.
- Control vegetation: trim back shrubs and vines that trap moisture against the deck and fascia.
Material and fastener considerations by climate
- Humid/coastal regions: choose rot-resistant species (cedar, redwood) or quality composites; install stainless or galvanized hardware to resist corrosion; ensure proper drainage to avoid standing water.
- High-UV, dry regions: apply UV-blocking sealants, maintain finishes, and pick color-fast materials to minimize thermal expansion and cracking; consider sealed gaps to prevent water intrusion.
- Cold, freeze-thaw areas: use pressure-treated or rot-resistant lumber and solid flashing; seal joints well and check for gaps that could let water seep behind ledger boards.
- Termite-prone areas: use pressure-treated lumber or naturally resistant species; keep soil away from the deck base and inspect around posts for signs of infestation.
Inspection timing and weather windows by climate
1. After winter thaw and spring rains: inspect for hidden water intrusion, warped boards, and rusted fasteners.
2. During dry spells in hot seasons: look for surface cracks, deteriorated sealant, and exposed fasteners that could begin to rust.
3. After major storms or heavy downpours: reassess flashing, gutters, and drainage paths; fix any pooling or seepage promptly.
4. Before and after winter: verify that water barriers and flashing still seal the ledger properly and that the deck drains effectively during snowmelt.