Ultimate Guide to Emergency Roofing Services
Last updated: Feb 28, 2026
An Introduction to Emergency Roofing Services
Emergency roofing problems strike without warning. When a storm leaves a gaping leak, or a tree crashes onto the roof, every hour counts. Emergency roofing services are designed for rapid assessment, immediate protection, and safe, durable fixes that hold until permanent work can begin. This section helps homeowners recognize emergencies, understand what a proper emergency response looks like, and learn practical steps to take now.
What counts as an emergency?
- Active leaks during rain or snow
- Visible sagging, cracking, or collapse risk
- Structural damage from a storm, fallen tree, or hail
- Missing shingles, exposed flashing, or compromised underlayment
- Ice dam buildup or extreme water intrusion
- Exposed electrical wiring or gas lines around the roof area
What to expect from a proper Emergency Roof Response
- Rapid triage and safety assessment (typically within hours)
- Safety-first protocols on site to protect people and property
- Temporary protection measures (tarps, tarred sheathing, plywood) to minimize water intrusion
- Clear scope, expected timeline, and next steps
- Documentation of damage with photos for your records
- Coordination with insurers or adjusters if you'll be filing a claim
Key steps for homeowners
1) Ensure personal safety first — if there's active danger, move away from the area and call emergency services if needed
2) Protect interior spaces — place buckets for leaks, move valuable items, and create a dry barrier where possible
3) Minimize further damage — implement temporary coverings and avoid walking on a compromised roof
4) Document the damage — take clear photos from multiple angles and note dates and times of events
5) Contact an emergency roofing service — request a rapid assessment and a written plan for temporary protection and permanent repairs
Common emergency roofing solutions
- Roof tarping and weatherproofing to stop active leaks
- Temporary leak containment and water diversion to protect ceilings and walls
- Roof deck stabilization to prevent further collapse or debris fallout
- Debris removal and hazard mitigation around the home
- Quick patch options for damaged flashings or seams when feasible
- Drainage direction adjustments to reduce interior water buildup
How to choose an emergency roofing service
- Availability and response time — 24/7 capability is ideal
- Proper licensing, insurance, and safety certifications for your area
- Experience with your roof type, age, and local building codes
- Transparent pricing, written estimates, and a clear plan of action
- References, reviews, and a track record of reliable emergency work
- Warranty or guarantee on temporary and permanent repairs, and follow-up support
Temporary protections are in place and the leak is contained. A thorough inspection by the roofer determines the full extent of damage and guides permanent repair or replacement decisions. Your contractor can assist with documentation for insurance claims, provide a detailed repair plan, and schedule any required follow-up work.
Emergency Roofing Services: What They Include and When to Call
Comprehensive definition
Emergency roofing services are rapid-response interventions designed to protect your home from further damage when a roof is compromised. They combine triage, temporary containment, and swift repairs to stop leaks, prevent debris intrusion, and stabilize the structure so weather and additional harm don't worsen the situation. Reputable roofers offer 24/7 on-call service, prioritizing safety and clear communication so you're never left waiting in a storm. Key elements include on-site safety assessment, temporary protective coverings, immediate leak control, and a plan for permanent repair or replacement.
What emergency roofing services typically include
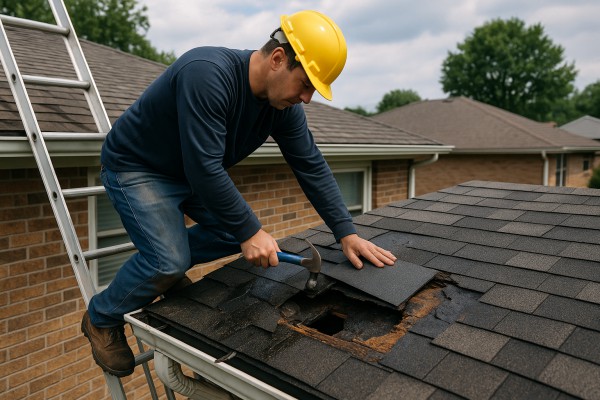
- Temporary tarping or covering of exposed roof areas to prevent water intrusion
- Quick leak stopping, flashing stabilization, and securing loose shingles or flashing
- Debris removal and scene containment to protect inhabitants and pets
- Structural stabilization if there's visible sagging or risk of collapse
- Temporary shingle replacement or patching to seal gaps while awaiting permanent work
- Roof ventilation or chimney/vent flashing repairs to restore weatherproofing
- Safety measures such as safe access planning, fall protection, and post-work cleanup
When emergency services are typically needed
- After severe weather: high winds, heavy rain, hail, or tornado damage
- When active water intrusion or leaks are evident, especially during rain
- If shingles, flashing, or gutters are damaged or loose
- When there's visible sagging, creaking, or signs of structural concern
- After a fallen tree or branch damages the roof or penetrates the envelope
- When debris creates unsafe conditions or blocks access to the roof
- If there's an electrical hazard nearby (power lines involved) and access is restricted
What to expect from the crew
- Quick arrival and a safety-focused on-site inspection
- A triage plan prioritizing temporary containment first, then permanent repairs
- Clear communication about scope, timeline, and costs
- Coordination with your insurer and provision of restoration documentation
- A clean handoff with instructions for monitoring and follow-up work
Quick steps you can take before help arrives
1) Move valuables away from the affected area and keep children and pets clear.
2) If safe, locate and use a water shutoff to limit further damage and avoid standing water inside.
3) Do not attempt risky roof work or touch damaged flashing or loose materials.
4) Photograph damage from ground level and from inside attic spaces to document leaks.
5) Create a clear path for responders and provide access to the roof if requested.
When You Need Emergency Roofing Services
Signs this service is needed
- Active leaks or ceiling stains appearing after rain or windy events.
- Visible daylight or sagging areas in the attic or roof deck.
- Missing shingles, torn underlayment, or shingles scattered in the yard after a storm.
- Damaged flashing around chimneys, vents, skylights, or along the roof edges.
- Water pooling on the roof or near gutters, indicating drainage or flashing failure.
- High winds lifting shingles or flashing, exposing the underlayment.
- Soft spots or spongy feel when you walk on the roof (if you can access safely).
- Persistent musty smell, mold growth, or damp insulation in the attic.
- Cracked or displaced roof components after hail or severe weather.
Ways you can confirm yourself as a homeowner
- Locate property documents and confirm your name is on the deed or title. If you're unsure, check the county recorder or assessor records online or in person.
- Match your name to the most recent property tax bill or mortgage statement to verify ownership.
- If you're not the owner, ensure you have written authorization from the owner or property manager to arrange emergency roof work; keep a copy on hand.
- For rentals or HOA properties, review lease or HOA rules to confirm who can authorize urgent repairs and which contractor is approved.
- Have a valid photo ID and the property address ready when contacting a roofing professional or contractor.
- If you're unsure, contact the county office or your mortgage lender to confirm ownership status before proceeding with emergency work.
When to get a professional assessment
- Immediately, if you see visible structural damage, sagging sections, or a roof that looks ready to fail (even if it's not leaking yet).
- Within 24 hours of any significant storm, hail, or high-wind event, especially if you notice shingles missing, flashing damaged, or attic light shining through.
- As soon as you detect water intrusion into living spaces, attic, or insulation, to prevent mold, rot, or further structural harm.
- If you're unsure about the extent of damage or the safety of accessing the roof, schedule a professional evaluation rather than climbing onto the roof yourself.
- For roofs older than 15–20 years, or after multiple weather events, a professional assessment helps determine current condition and urgent repairs versus future planning.
- If you smell gas, see smoke, or suspect a damaged metal vent or flue, treat as an emergency and contact appropriate emergency services in addition to a roofer.
What's Included with Emergency Roofing Services
What is typically included
Emergency roofing is about stopping the immediate damage, not completing a full rebuild. Here's what you can typically expect during an emergency call.
- 24/7 rapid response and on-site triage by a licensed roofer
- Immediate hazard mitigation: securing loose shingles or debris, stabilizing edges, and setting up fall protection
- Temporary waterproofing to stop leaks: tarps, heavy-duty patches, sealants, and quick stabilization
- Short-term repairs within a defined scope to reduce water intrusion and further damage
- Roof protection for interior spaces: tarping vents, skylights, chimneys, and other openings to limit additional water entry
- On-site inspection and documentation: photos, notes, damage mapping, and a written initial estimate
- Safety-focused site protection and clean-up of obvious hazards
- Temporary stabilization of damaged decking or critical seams when needed
- Cleanup and site protection after the emergency work is complete
- Insurance guidance: we provide documentation to support your claim and help you communicate with your insurer
- Priority scheduling for follow-up visits and a permanent repair plan
Quick steps you can expect
1) Contact and triage: you reach out with a few details, and we confirm after-hours availability and the expected arrival window.
2) On-site assessment and temporary mitigation: we perform a rapid safety check, secure the site, and deploy tarps or patches to stop further damage.
3) Permanent repair planning: we outline the scope, provide a written plan and price for the next steps, and schedule the follow-up visit.
What is not typically included
- Full roof replacement or major reconstruction during the emergency visit
- Long-term repairs beyond temporary patching and stabilization
- Structural repairs to framing or decking beyond immediate stabilization
- Interior repairs caused by roof leaks (drywall, insulation, painting) unless specifically included in the scope
- Extensive gutter or flashing replacement beyond the emergency patches
- Permits, large disposal fees, and major material costs outside the emergency patch scope
- Full resealing or cosmetic color-matching of shingles beyond temporary patchwork
- Insurance claim processing or payouts; we provide documentation to support your claim but do not handle claim settlements
- Work outside the agreed emergency scope or that requires a separate contract or longer-term project planning
Common Roofing Materials Used in Emergency Roofing Services

- What they are: The most common residential option, made of fiberglass or organic mat with asphalt layers and mineral granules. They're widely available, affordable, and easy to work with in emergencies.
- How emergency services relate: When leaks are caused by a few damaged shingles, crews often patch with matching or similar shingles, re-nail loose pieces, and seal raw edges with roofing cement to buy time until a full repair or replacement can be scheduled.
- material-specific notes: Color and granule wear aren't as critical for temporary fixes, but wind uplift can blow patched pieces loose. Expect a quick, temporary patch now with a longer-term plan for replacement if shingle age is high or underlying decking is compromised.
- Practical tips for homeowners: Avoid stepping on damaged areas; have a tarp ready to cover exposed sections after a patch, and ask your responder to save any salvaged shingles for color and sizing consistency.

- What they are: Panels or sheets that interlock or overlap, often with standing seams. Very durable and resistant to heavy rain.
- How emergency services relate: If your roof already has metal, a quick emergency patch might use a metal patch panel, flashing, or fasteners to seal a leak. Metal patches can be secured with self-tapping screws and seam fasteners to restore water-tightness rapidly.
- material-specific notes: Metal withstands leaks well once secured, but improper flashing or mismatched seams can create new leaks. Coordination with existing panels is key to a tight seal.
- Practical tips for homeowners: Ensure the patch is integrated with proper flashing at vents and chimneys. Request a temporary patch that won't damage adjacent shingles or coatings.

- What they are: Heavy, brittle coverings that come in curved or flat shapes. They're visually appealing but require careful handling.
- How emergency services relate: Because tiles can crack easily, emergency work often focuses on temporary protection (tarps or plywood) and careful replacement of broken tiles rather than a rushed full tile replacement.
- material-specific notes: If a tile is damaged, matching exact profiles can be tricky and time-consuming. Any temporary fix should preserve ventilation and avoid cracking neighboring tiles.
- Practical tips for homeowners: Ask for temporary stabilization to prevent further breakage during bad weather, and plan for a precise tile match and proper ridge and flashing corrections as soon as possible.
EPDM Rubber and Other Flat-Membrane Systems (TPO/PVC)
- What they are: Flexible, durable membranes used on flat or low-slope roofs. EPDM is black rubber; TPO/PVC offer lighter colors and different seam technologies.
- How emergency services relate: For leaks on flat roofs, emergency crews often patch with self-adhesive or liquid-applied sealants, sealant tapes, and patch membranes to stop water ingress temporarily.
- material-specific notes: EPDM and modern membranes respond well to quick repairs, but seams and penetrations (vents, skylights) require careful sealing to prevent moisture wicking.
- Practical tips for homeowners: Verify that any temporary patch covers the entire leak source and that flashing around penetrations is secured to prevent new leaks.
Tarps and Temporary Protection (Poly, Polyethylene, and Fabric Tarps)
- What they are: Heavy-duty tarps designed for weather protection, often reinforced with grommets and bound edges.
- How emergency services relate: Tarps are the backbone of a rapid response to stop ongoing water intrusion while a permanent fix is planned. They're typically anchored with boards, nails, or straps to resist wind.
- material-specific notes: Tarps are a temporary solution; UV exposure and wind will degrade them over days to weeks. Choose heavy-duty, weather-rated tarps for longer protection.
- Practical steps: Ensure a tight, leak-free cover with secure fasteners and angled overhang to shed water. Plan a follow-up visit for permanent repair or replacement.
Plywood/OSB Sheathing and Decking
- What they are: Exterior-grade plywood or OSB used as the roof deck or as a temporary panel to cover gaps.
- How emergency services relate: If the roof deck is damaged, emergency crews may install exterior plywood or OSB patches to create a solid surface for temporary protection or phased replacement.
- material-specific notes: Plywood patches must be weather-rated and properly fastened to prevent further sagging or uplift. Structural assessment may be needed before loading with permanent materials.
- Practical tips for homeowners: Don't walk on uncertain patches; request a plan that includes a full deck assessment and a staged repair timeline.
Flashing, Sealants, and Flashing Accessories
- What they are: Aluminum, copper, or galvanized steel flashing; compatible sealants and roofing cements.
- How emergency services relate: Leaks around chimneys, vents, and roof-to-wall interfaces are often stopped with temporary sealants or re-sealed flashing to create a quick, water-tight barrier.
- material-specific notes: Sealants differ by material compatibility; using the wrong product can trap moisture. Ensure the service uses weather-rated, roof-appropriate sealants and flashing materials.
- Practical tips for homeowners: After a temporary fix, request a detailed assessment of all flashing joints and penetrations to prevent recurring leaks and to inform planning for permanent repairs.
Understanding the Costs of Emergency Roofing Services
Typical average costs for Emergency Roofing Services
- Emergency call-out and on-site assessment: 100–350
- Temporary protection and tarping (to stop further water intrusion): 150–600
- Minor emergency repairs (patch leaks, seal flashing, quick fixes): 300–1,500
- Moderate repairs (shingle replacement, flashing works, underlayment tweaks): 1,000–3,000
- Major repairs (decking or structural sheathing work, multiple penetrations): 2,500–6,000
- Partial roof replacement due to emergency damage: 4,000–12,000
- Full roof replacement prompted by emergency damage: 8,000–20,000 (typical ranges vary by roof size and material)
- By roof material (general ranges): asphalt $8,000–15,000; metal $12,000–25,000; tile/slate $15,000–30,000
Notes:
- These figures are rough ranges to help you plan. Exact prices depend on your roof size, pitch, accessibility, extent of damage, and the local market.
- Emergency pricing often includes additional labor due to after-hours work, storm surges in demand, and faster mobilization.
What affects price (factors that may lower costs)
- Containment first: Quick, effective tarping can prevent more damage and reduce the total scope of repairs.
- Scope of damage: If damage is localized, costs stay lower than when decking, flashing, or multiple areas are compromised.
- Materials choice: Standard, widely available materials tend to be cheaper than premium options.
- Scheduling timing: Off-peak seasons or non-storm periods can reduce labor surcharges and overtime.
- Insurance alignment: Having a clear, itemized estimate for the insurer and understanding deductible can prevent surprise charges.
- Contractor competition: Getting two or three written estimates helps you identify fair pricing and avoid inflated quotes.
- Documentation: Clear photos and notes speed up the claim and reduce back-and-forth that can rack up costs.
Quick steps to manage costs during an emergency
1. Ensure safety and prevent further damage with temporary protection.
2. Document the damage (photos, notes) for insurance and quotes.
3. Obtain two to three itemized estimates from licensed contractors.
4. Review and compare scope, materials, warranties, and timeline before choosing a pro.
Factors that may raise costs
- Structural decking damage or mold/rot requiring extensive removal and replacement.
- Roof height, steep pitch, or difficult access that requires extra safety measures, scaffolding, or special equipment.
- Severe weather or winter conditions causing delays or need for after-hours work.
- Premium materials, custom features, or complex roof geometry (multiple dormers, valleys, chimneys).
- Additional permits, code corrections, or specialized inspections tied to the repair.
- Widespread damage across a large portion of the roof increasing labor and material orders.
- Insurance claim complexity or delays that extend project duration and increase labor time.
Additional considerations for homeowners
- Insurance and deductibles: Many emergency roof projects are governed by an insurance claim. Be sure you know what your deductible covers and what the insurer will reimburse. Ask for an line-item estimate that matches your insurer's scope.
- Permits: Some repairs, especially those involving decking, structural elements, or full replacements, may require permits. Factor in permit fees and processing time.
- Material decisions: If you're managing a repair on the fly, you may opt for temporary fixes now and a planned, cost-conscious long-term replacement later. Communicate clearly with your contractor about interim versus permanent solutions.
Homeowner-facing tips to keep costs predictable
- Prioritize long-term fixes over quick patches when damage is extensive, to avoid repeat visits.
- Request a written, itemized estimate detailing labor, materials, and any extra charges (after-hours, trip fees, disposal).
- Ask about warranties on workmanship and materials; a solid warranty can save money down the line.
- Consider a phased approach if the budget is tight: secure the structure first, then schedule staged repairs or replacement.
After-hours and storm-season realities
- After-hours work typically carries higher labor rates and potential surcharge for emergency response.
- Storm season may drive up availability and pricing due to demand. If possible, schedule at a time when crews can work efficiently and safely.
How Our Emergency Roofing Process Works
- We operate a 24/7 phone line and triage urgency by listening for active leaks, visible damage, and safety concerns. Fast, clear communication helps us prioritize your case.
- Safety comes first. We evaluate hazards, secure occupants if needed, and outline immediate protective actions to prevent further damage while we mobilize.
2) On-Site Evaluation and Safety Check
- Our crew arrives equipped with fall protection, PPE, and monitoring gear to inspect the roof, flashing, gutters, and attic space from safe vantage points.
- We identify urgent dangers (loose shingles, exposed decking, leaning chimneys) and log measurements, so you'll have an accurate starting point for the plan and the estimate.
3) Temporary Protection and Water Control
- We install tarps, drip shields, or plywood to contain ongoing water intrusion and shield interior spaces from more damage.
- If interior leaks persist, we set up interior containment and guide you on how to minimize further moisture exposure until permanent repairs begin.
4) Documentation and Scope Determination
- We photograph the damage, take measurements, and note wind, hail, or storm-driven causes to build a transparent picture of what happened.
- A written scope of work is prepared, distinguishing emergency/tarp needs from temporary fixes and from permanent repair or replacement work, with a clear, itemized estimate.
5) Insurance Coordination and Communication
- We provide you with an itemized scope and work plan and coordinate documentation with your insurer, helping the claim flow stay smooth.
- You receive regular progress updates and answers to questions as they come up, so you're never in the dark about what's happening.
6) Priority Repairs and Temporary Fixes
- Essential temporary fixes stop active leaks and stabilize the roof structure to prevent escalation of damage.
- Examples include sealing leaks from exterior when possible, re-securing loose flashing, and clearing debris from gutters and vents if it's safe to do so.
7) Scheduling Permanent Repairs
- Once weather and material availability align, we schedule the permanent repair or replacement with your calendar in mind.
- We confirm permit requirements (if applicable), coordinate access, and set a realistic timeline for the full repair package.
8) Materials, Safety, and Quality Assurance
- We use manufacturer-approved underlayment, shingles, flashing, and fasteners, following local codes and best practices for durability.
- Our crew follows strict safety protocols, uses fall protection, and conducts mid-project quality checks to prevent avoidable mistakes.
9) Final Inspection, Handover, and Care
- After completion, we perform a thorough leak test, sign off with you, and review care instructions to maximize the life of your repair.
- We provide warranty details, maintenance tips, and a clear path for future support should any issue arise.
Residential vs. Commercial Considerations in Emergency Roofing
What changes between residential emergencies
- Roof size and geometry matter: homes usually have simpler, smaller layouts; commercial roofs often span large areas, with flat or low-slope designs and multiple access points.
- Materials and systems vary: residential roofs commonly use asphalt shingles or small-scale membranes; commercial roofs may use TPO, EPDM, built-up, or metal systems that require specialized equipment and crews.
- Access and staging: residential jobs typically have one driveway or easy street access; commercial sites may involve loading docks, parking lots, tenant areas, and restricted zones.
- Codes, permits, and inspections: commercial projects often trigger more stringent code reviews, multiple permits, and coordinated inspections with property management and local authorities.
- Safety and liability: larger crews, fall protection, and site safety plans are standard on commercial sites; residential projects still require safety, but the scale and risk profile differ.
- Insurance and billing: commercial claims may involve a property manager, building owner, and multiple tenants; billing is sometimes project-wide rather than per unit.
1) Ensure the area is safe for occupants and responders. Keep kids and pets away, and avoid walking on a wet or damaged roof.
2) Document damage: take clear photos from ground level and nearby vantage points. Note any active leaks, electrical hazards, or water intrusion.
3) If safe, cover exposed sections with a watertight tarp or temporary membrane to slow further damage.
4) Do not attempt structural repairs or heavy climbing. Loose materials, slick surfaces, or sagging sections pose serious danger.
5) Contact an emergency roofing service that can triage quickly and bring appropriate equipment for your property type.
Permits, codes, and coordination
- Residential: many emergencies can be stabilized without obtaining a full permit, but major repairs or replacements will require a permit and inspection.
- Commercial: permits, fire marshal involvement, and building department coordination are more common. Expect a formal project plan, site safety plan, and potential occupancy restrictions during work.
- Inspections: commercial sites often require interim inspections or progress checks due to tenant safety and business continuity needs.
Access, logistics, and site management
- Residential: straightforward access with a single point of entry, typical ladder work, and on-site crew coordination.
- Commercial: plan logistics around tenants, deliveries, and work hours. You may need:
- A dedicated staging area and material storage
- Traffic management and signage
- Night or weekend work windows to minimize business disruption
- Coordination with property management, facility managers, and possibly union labor
Insurance and budgeting realities
- Residential: homeowners' policy and standard contractor bid processes govern the claim.
- Commercial: multiple stakeholders (owner, property manager, tenants) may be involved. Expect formalized bids, change orders, and possibly capital expenditure budgeting or deductibles tied to the entire building or complex.
Quick decision checklist for homeowners
- Is there active water intrusion or electrical hazard? If yes, prioritize safety and call emergency services or utility coordination.
- Do you own a single-family home or a multi-unit dwelling? This affects permits, scheduling, and communications.
- Are there tenants or neighboring businesses affected? Plan communications and access around their hours.
- Do you have updated photos and a recent insurance claim number ready? This speeds up the triage and documentation process.
- Is the roof type common to residential or commercial systems on your property? Materials and crews differ in tooling and expertise.
- Can you provide access details for the contractor (parking, elevators, loading docks) in advance? Good coordination saves time and reduces risk.
Coordination and communication pointers
- For homeowners: designate one point of contact to relay decisions to the contractor and insurer.
- For property owners or managers: share the emergency plan with tenants, post safety notices, and establish temporary access routes.
- In all cases: expect a phased approach—stabilization, assessment, temporary protection, and then permanent repair or replacement work.
How Emergency Roofing Services Vary by Location
Weather patterns and seasonality
- The urgency and type of emergency you experience depend on regional weather.
- Northeast: ice dams, heavy snow, and freezing temperatures drive leaks and decked-out tarps after winter storms.
- Southeast: hurricane and tropical storm season pushes rapid wind damage assessments and tarping during late summer and fall.
- Midwest: spring and summer hail, strong thunderstorms, and quick temperature swings trigger sudden leaks and roof damage.
- Southwest: heat, monsoon rains, and wildfire ash can compromise roofs and ventilation, with repairs kicking off as soon as crews can safely access the site.
- West Coast: earthquakes, windstorms, and wildfire smoke can create urgent needs, especially near timberlands or coastal regions.
- Practical impact for homeowners:
- Weather windows guide when we can safely tarps and seal gaps.
- Emergency crews often prioritize storm-driven claims, which can affect scheduling.
- Seasonal staffing shifts mean longer waits in some regions after big storms.
Building codes and permit requirements by region
- Local rules shape what counts as an acceptable emergency repair and when permits are required.
- Some areas allow temporary tarps and deck protection without a full permit; others require quick permit submissions for any roofing work.
- Inspections may be mandated before permanent fixes, especially in historic districts or HOA-managed communities.
- What this means for you:
- Expect different documentation needs (photos, storm reports, permit numbers) depending on your state and city.
- HOA covenants can add a layer of approval before work begins, even in urgent situations.
Labor availability and response times
- Availability varies with population density and storm load.
- Urban and coastal regions often have faster 24/7 emergency response because of larger contractor networks.
- Rural areas may face longer travel times and fewer nearby crews, extending response windows.
- Practical tips:
- If you're in a sparsely populated area, ask about prioritization for true emergencies and what constitutes an emergency in their policy.
- In peak seasons, schedule may slide to a few days rather than hours—plan temporary measures (tarps, debris removal) in the interim.
Material availability and installation methods
- Regional climates drive material choices and stock.
- Coastal areas lean toward moisture-resistant underlayments and corrosion-resistant metal options.
- Arid and hot regions favor reflective shingles, clay or concrete tile, and robust underlayments to manage heat.
- Snow-prone zones prioritize ice and water shields, ridge vents, and snow-load-rated assemblies.
- What to expect:
- Lead times for specialty materials (tile, slate, or custom metal) can vary by region.
- Local suppliers and trucks may experience weather-related delays.
Insurance and storm-damage claim processes
- Insurance practices differ by state and insurer networks.
- Some states have widespread use of assignment of benefits (AOB), which can streamline or complicate claims depending on your preferences and policy.
- Deductibles, depreciation holdbacks, and scope reviews can vary, influencing how quickly a temporary fix becomes a permanent repair.
- How to prepare:
- Document damage with timestamps and photos for your insurer, and keep notes on conversations with adjusters.
- Check your policy for emergency repair allowances and whether temporary fixes are covered.
How this service varies in different regions in the United States
- Northeast
- Ice-dam mitigation and cold-weather tarping are common; crews plan for snow clearance and safe access.
- Permits may be required for permanent repairs sooner due to municipal rules.
- Southeast
- Post-hurricane surge of emergency work; salt spray and wind damage safety considerations.
- AOB prevalence can influence claim handling and contractor selection.
- Midwest
- Hail-driven spikes in claims; rapid assessment and temporary shingle or deck repairs.
- Drying and moisture control are critical to prevent secondary damage.
- Southwest
- Heat-resistant materials and efficient daylight scheduling; monsoon-related leaks.
- Tile and metal systems commonly used, with careful inspection of fasteners and underlayment.
- West Coast
- Seismic considerations and wildfire ash exposure; potential for additional retrofit work.
- Variable permit climates; earthquakes may trigger different inspection and retrofit requirements.