Ultimate Guide to Flashing Failure
Last updated: Feb 28, 2026
Introduction to Flashing Failure
Flashing is the thin metal or waterproof membrane that seals roof joints where water is likely to sneak in—around chimneys, vents, skylights, valleys, and at the edges of a roof. When flashing fails, even well-made roofs can leak. This page helps homeowners understand what flashing failure looks like, why it happens, and what to do next.
What flashing is and why it matters
- Flashing creates a water-tight barrier at roof penetrations and joints.
- It works in concert with shingles, underlayment, and sealants to keep rain from wicking into the structure.
- When flashing deteriorates or is poorly installed, tiny leaks can become bigger problems—think wood rot, mold, and insulation damage.
Common causes of flashing failure
- Age and wear: metal can corrode, membranes crack, and sealants dry out over time.
- Poor installation: improper overlap, insufficient fastening, or incorrect flashing size leads to gaps.
- Weather and temperature cycles: sun, freezing, and heating expand and contract joints, loosening fasteners.
- Weakened roof penetrations: damaged chimneys, vent pipes, or skylights can pull flashing out of position.
- Physical damage: storms, hail, or foot traffic can bend or lift flashing.
Signs to look for (early warning)
- Visible gaps or lifted edges of flashing around vents or chimneys.
- Water stains or mold in the attic near roof penetrations.
- Bubbling or staining on interior ceilings beneath a roof joint.
- Rusty, bent, or missing flashing pieces, or shingle tabs pulled away from joints.
- Damp or musty odors near the affected area after rain.
Is flashing failure urgent or common?
- It's one of the most common leak sources on asphalt and shingle roofs, especially in older homes.
- Early-stage flashing issues may be passive leaks that worsen over time; they're not always immediately hazardous, but they can escalate quickly with heavy rain or freeze-thaw cycles.
- An active drip, pooling water, or signs of ongoing interior moisture is urgent and should be addressed promptly to minimize structural damage.
High-level next steps
1) Safely identify the problem area
- Look for patterns from attic or ceiling stains to map the most likely flashing location.
- Photograph suspect areas to share with a professional.
2) Control interior moisture
- Place a bucket or towels under active drips.
- Move or cover stored valuables and reduce humidity in the attic if possible.
3) Schedule a professional assessment
- A licensed roofer can confirm flashing condition, identify underlying causes, and determine the right repair approach.
- Ask about material options (tin, copper, galvanized steel, or synthetic flashing) and flashing details (overlaps, sealant choices, and how joints are sealed).
4) Plan repairs with a practical timeline
- Minor flashing resealing or re-seaming may be a quick fix; larger failures may require flashing replacement or roof edge work.
- Consider long-term options such as upgrading flashing materials or addressing related roof components (valleys, chimneys, vents) to prevent recurrence.
5) Consider temporary measures if waiting for repair
- In some cases, a temporary tarping or covering can reduce immediate leaks, but this is not a replacement for proper flashing repair and should be done in accordance with safety guidelines and local weather conditions.
If you're unsure about what you're seeing on your roof or attic, documenting the issue and noting dates of heavy rain events can help you and a roofer pinpoint the flashing failure quickly.
Is Flashing Failure an Emergency? Understanding Its Severity and Required Actions
Flashing is the thin metal, rubber, or sealant ring that joins roof surfaces and protects joints around chimneys, vents, skylights, and along the edges. When flashing fails, water can seep behind the roof deck and under shingles. Whether that situation counts as an emergency depends on what you're seeing inside and outside the home, plus the weather. Here's how to gauge urgency and the actions you should take.
- There is active water intrusion during rain: water is dripping from ceilings, walls, or fixtures, and you can visibly trace the leak toward a flashing area.
- You notice daylight, gaps, or exposed fasteners in the flashing from the attic or roof line, especially after a storm.
- The leak is progressing quickly or you feel a draft or wind-driven moisture around a flashing location.
- Interior damage is spreading: ceilings stain, drywall softens, or mold begins to form near the flashing zone.
- Electrical hazards are possible: water is near outlets, switches, or exposed wiring, or you smell burning insulation.
If any of these apply, treat it as urgent. Protect yourself from slips and avoid going on the roof during wet or windy weather. Contact a licensed roofer or emergency service as soon as you can.
Monitor if
- No interior water is yet present, but flashing shows signs of wear such as rust, loose pieces, or cracking sealant.
- The roof has stopped leaking temporarily because the storm has passed, but you see ongoing wear that could fail with another rain.
- The area is accessible and you can observe it safely from inside (or from a balcony/ground) without opening ceilings or walls.
- Weather conditions are mild, and you can schedule a repair window within a few days without worsening the situation.
During monitoring, keep an eye on any changes in leakage intensity after subsequent showers or wind events, and document with photos in case conditions worsen.
Can wait if
- There is no interior water intrusion and the attic and living spaces stay dry with current weather conditions.
- The flashing shows only minor cosmetic wear or surface rust that doesn't threaten a seal and you have a stable, dry forecast.
- You have a planned repair window and can safely schedule a mid-week or next available appointment without rain in the forecast.
Even if it can wait, it's wise to plan a repair soon. Delaying too long can turn a minor flashing issue into a larger roof repair later, especially if the underlying roof deck or underlayment has been compromised.
Quick actions you can take now (no special equipment required)
1) Protect interiors: place a bucket under drips, move valuables away from the leak area, and place towels or a plastic sheet as a temporary shield.
2) Minimize further water entry: if it's safe, temporarily cover the area with a heavy-duty tarp or plastic sheeting, anchored securely to resist wind.
3) Keep people and pets away from the affected area and avoid walking on a wet, steep roof.
4) If you can access the attic, gently inspect for obvious signs of active leaks (water staining, damp insulation) without disturbing any wiring or insulation.
Documentation helps later: take clear photos of the flashing, any gaps, the surrounding roof, and interior water damage. This information can assist your roofer in diagnosing the failure and planning a solid repair plan.
Common Causes of Flashing Failures
Poor installation and flashing details
Flashing failures often start at the job site. When flashing is rushed, mis-sized, or misaligned, water finds a way in at every seam and corner.
- Using the wrong type or size of flashing for the location (valleys, chimneys, roof-to-wall transitions)
- Not embedding base flashing properly into the roof deck or under shingle tabs; leaving gaps at joints
- Inadequate or misaligned counter-flashing around penetrations (vents, flues, etc.)
- Insufficient or poorly placed fasteners that damage shingles or fail to hold flashing in place
- Missing or poorly applied sealant at joints, corners, and nail holes
Quick checks:
1) Look for gaps, lifted edges, or loose seams along flashing.
2) Verify counter-flashing overlaps joints and terminates above shingle courses.
Deterioration and wear over time
Over years, metal flashing corrodes, sealants lose elasticity, and nails corrode. Age and weather take a toll.
- Seams and joints show rust or corrosion; galvanized steel or copper patina changes indicate trouble
- Sealants crack, dry out, or pull away from edges, allowing water behind flashing
- Seams gradually pull apart or flashing lifts with wind
- Fasteners creep loose or back out; nails or screws corrode
- Coatings fade, bubble, or peel, signaling moisture behind the flashing
Quick checks:
1) Inspect seams for rust stains or flaky sealant.
2) Check around corners and joints for cracking sealant or gaps.
Improper material choice or compatibility
Materials that don't play well together are a common culprit. Incompatibility can create galvanic corrosion or poor performance in your climate.
- Mixing metals (e.g., aluminum flashing with copper nails) can cause galvanic corrosion
- Plastic or vinyl flashing in areas with high UV exposure or severe winter conditions
- Sealants not compatible with asphalt shingles or underlayment
- Not accounting for thermal expansion differences between metals and roof materials
- Using low-quality or non-rated flashing for wind uplift and weather exposure
Quick checks:
1) Confirm flashing material is appropriate for your roof type and climate.
2) Ensure sealants are compatible with the adjacent shingles and underlayment.
Roof movement and substrate issues
Roofs move. If the deck or underlayment isn't solid, flashing can't stay put.
- Deck rot or sag reduces contact between flashing and the roof surface
- Temperature swings cause expansion and contraction that separate seams
- Inadequate counter-flashing to accommodate movement or improper flashing-to-deck abutment
- Edge flashing not tied properly into surrounding roofing, increasing uplift risk
Quick checks:
1) Look for soft spots or signs of rot near chimneys, vents, or valleys.
2) Check that flashing sits tightly against the deck with no visible gaps.
Weather events and seasonal stress
Storms push flashing to the limit. Ice, wind, and heavy rain can reveal or accelerate flaws.
- Ice dams force water under edge flashing during melt cycles
- Wind uplift can bend, crack, or lift flashing at ridges, chimneys, and vents
- Storms and hail can dent or nick flashing, creating entry points
- Freeze-thaw cycles expand and contract metals, weakening seals
Quick checks:
1) After a major storm, inspect for lifted edges or displaced flashing.
2) Check around penetrations for gaps and resealed joints.
Maintenance gaps and damage from debris
Neglect and neglect-related debris are quiet leaks waiting to happen.
- Clogged gutters and downspouts back up water behind flashing
- Debris buildup in valleys or at roof penetrations interferes with drainage
- Moss, algae, or grime keeps water against flashing longer, accelerating deterioration
- Small leaks from neglected flashing slowly worsen over time
Quick checks:
1) Clean gutters and clear debris from valleys twice a year.
2) Inspect around vents, chimneys, and edges for signs of grime buildup or standing water.
How Roof Materials Affect Flashing Failures
How material properties influence flashing failures
Flashing life hinges on how the surrounding roof material moves, ages, and sheds water. Different roof types expand and contract at different rates, tolerate moisture in distinct ways, and require specific flashing details. When flashing is not matched to the substrate or installed with the right technique, joints can kink, seals can fail, and water can seep behind the flashing. Small gaps under one type of material can become bigger leaks over time, especially with wind-driven rain.
List of common roofing materials and how they are specifically effected by Flashing Failure
- Asphalt shingles: Shingles age and curl; the underlying deck can show movement. Flashing needs proper integration with step and counter flashing. If nails or overlaps are not sealed correctly, wind uplift can pull flashing away at valleys, chimneys, and dormers, creating leaks.
- Metal roofing: Metal expands and contracts with temperature swings. Flashing must be corrosion-resistant and properly lapped. Incompatible fasteners or metals can cause galvanic corrosion, and poorly sealed seams around penetrations can leak even when the roof looks solid.
- Wood shingles/shakes: Wood swells with moisture and dries out with heat. Flashing must flex with the wood. Improper connections to chimneys or dormers can crack wood around the seal and let moisture creep behind flashing.
- Clay/concrete tile: Tiles are heavy and brittle. Flashing must accommodate tile patterns and underlayment. If flashing is too rigid or installed under tile without proper counter-flashing, water can back up behind tiles or crack flashing at edges.
- Slate: Highly durable but brittle, requiring careful handling around penetrations. Poorly sealed through-holes and poorly sized flashing can crack or lift with wind, especially at edges and near chimneys.
- Flat roof membranes (EPDM/TPO): Membranes sit flush with parapets and around penetrations. Flashing relies on seals and fabric tapes, which can degrade with heat and UV exposure. When sealants fail, edge peels and leaks appear at terminations and along seams.

Material-specific failure patterns (quick references)
- Asphalt: Mostly leaks at valleys, near chimneys, and where shingles meet walls due to improper flashing transitions.
- Metal: Leaks around panel seams and penetrations from corrosion or improper overlaps.
- Wood: Leaks where wood expands and the flashing can't move with it; rot behind flashing is common.
- Tile: Leaks at transitions if counter-flashing and underlayment aren't properly used with tile layouts.
- Slate: Cracks near penetrations if flashing penetrates slate or is not sized for the slate roofing system.
- Flat membranes: Peeling edges and failed seals where sealants wear out or tapes fail in heat.
Quick prevention steps for homeowners
1. Inspect twice a year and after storms for loose nails, torn sealant, and lifted edges.
2. Ensure flashing material matches the roof material (galvanized steel for steel roofs, corrosion-resistant options for metal, compatible sealants for asphalt, etc.).
3. Hire a roofer who uses flashing methods appropriate for your roof type (step flashing with counter-flashing for shingles, correct integration with tile or slate, etc.).
4. Use flexible, material-appropriate sealants and avoid generic products that don't tolerate roof movement.
5. Replace worn shingles and keep underlayment in good condition to provide a solid foundation for flashing.
Signs of flashing failure to watch for
- Drips or staining along valleys, chimneys, and roof-to-wall transitions.
- Ceilings or upper walls showing new staining after rain.
- Loose flashing sections, exposed fasteners, or visible corrosion around penetrations.
- Cracking or lifting at the edges of tiles, slate, or shingles where flashing should seal.
The Risks of Ignoring Flashing Failure
Water intrusion and interior damage
When flashing fails, rain and melting snow can sneak behind the flashing and into the roof structure, attic, and, ultimately, living spaces. Small leaks today can become big, costly problems tomorrow.
- Leaks around penetrations like vents, chimneys, and skylights as water finds gaps.
- Attic moisture saturates insulation, reducing efficiency and promoting rot.
- Water stains, warped drywall, bubbling paint, and musty odors can appear in ceilings and walls.
Structural damage
Persistent moisture weakens wood, fasteners, and roof deck. Over time, you may notice:
- Rot in rafters, sheathing, and support members.
- Sagging or soft spots in the attic floor or ceiling.
- Faster deterioration of shingles and underlayment where flashing is needed.
Mold and health risks
Damp, hidden spaces encourage mold growth, which can affect indoor air quality and family health.
- Allergies, asthma flare-ups, and eye irritation can worsen with mold.
- Hidden mold behind walls or in the attic can go undetected for years.
- Pets and children are more sensitive to exposure.
Energy loss and comfort issues
Gaps around flashing let warm air escape in winter and hot air infiltrate in summer, creating uncomfortable spots and higher utility bills.
- Drafts near the roofline reduce comfort.
- Higher heating and cooling costs due to heat transfer.
- Ice dams and condensation risks if warm attic air meets cold roof areas.
Escalating repair costs
Ignoring flashing failure usually leads to bigger, more expensive fixes.
- Small leaks become wet decking and damaged insulation, tripling material costs.
- Water intrusion into the attic may require mold remediation and air sealing.
- In severe cases, whole-roof components—deck, shingles, and ventilation—need replacement sooner than expected.
Safety hazards for occupants
Water intrusion can compromise electrical systems and create slip hazards.
- Short circuits or electrical fires can occur near wiring, outlets, or fixtures.
- Mold and dampness increase slip risk on attic surfaces and flooring.
- Structural weaknesses raise the risk of partial roof collapse in severe weather.
Quick checks you can do (safely)
- From the ground, look for lifted, cracked, or missing flashing along roof edges, around vents, and near chimneys.
- Do not walk on a wet or icy roof. Use binoculars or get a professional to inspect the area you can't safely reach.
- In the attic, check for damp insulation, stains, or a musty smell indicating hidden moisture.
- If you notice signs, schedule a professional inspection and plan repairs before further damage occurs.
How Flashing Failure Is Diagnosed
Visual clues you can spot from inside the attic or ceiling
- Water stains or damp insulation along the base of walls where the roof penetrates, or right under flashing seams.
- Dark, mineral-like streaks or salt deposits near chimney or vent connections.
- Soft, discolored or sagging roof sheathing adjacent to areas where flashing is installed.
- Condensation on metal flashing or rust spots along the edges, which signals active moisture intrusion.
Exterior clues from the ground or along the eaves
- Shingles near flashing that are cracked, lifted, or have worn granules, exposing the underlayment.
- Gaps or gaps widening between flashing and the roof deck, or dried-out sealant and caulk that's cracked or missing.
- Visible corrosion or distorted metal flashing, especially at chimney bases or vent penetrations.
- Occasional wet patches on siding or fascia boards after a rain, suggesting hidden leaks behind flashing.
Common flashing trouble spots to inspect
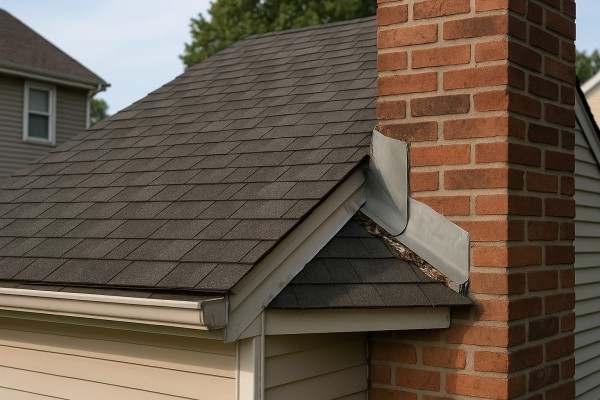
- Chimney flashing: Look for gaps at the base or along the sides where lead or copper flashing meets brick and roof material.
- Vent pipes and plumbing stacks: Cracked or lifted flashing around the pipe collar can allow water to seep behind the flashing.
- Valleys and roof-to-wall transitions: Step flashing can be crushed, bent, or tied down by closely laid shingles, creating leaks.
- Skylights and dormers: Edges and seals around skylights often fail first, with flashing pulling away from the curb.
- Protrusions and edges: Exhaust vents, gutters, and rake edges can pull flashing away if fasteners are loose or the sealant has failed.
Step-by-step diagnosis: how to walk through the leak without jumping to conclusions
1) Safety first: If the roof is wet, steep, or you're unsure, use binoculars from ground level or inspect from the attic. Don't crawl on a slick surface.
2) Inspect the attic for moisture: Look for wet or damp insulation, dark stains along rafter lines, and any daylight leaking through thin spots around penetrations.
3) Trace the moisture trail: Water often travels down rafters from a distant source. Start at the suspected flashing area and follow the path to where it shows up on ceilings or walls.
4) Check exterior flashing details: From a safe stance, examine the base of chimneys, around vents, skylights, and along step flashing. Note any lifted metal, gaps, or tired sealant.
5) Perform a controlled test (if safe): With a helper, gently spray water over the suspected flashing zone during dry weather. Have someone inside observe for new leaks or dampness; stop if it worsens or if you feel uneasy about roof stability.
6) Compare over time: Take photos from multiple angles under different lighting to see if leakage patterns change with weather. Revisit suspected spots after a rain to confirm progression.
- Basic: flashlight, sturdy ladder, and binoculars for distant inspection.
- Moisture-focused: moisture meter or dampness sensor, infrared camera if available.
- Documentation: notebook or smartphone to capture dates, locations, and measurements.
When to call a professional
- Leaks persist after you've re-sealed obvious flashings or after a controlled water test.
- Flashing is visibly damaged, bent, corroded, or has considerable gaps that require replacement.
- The roof is steep, high, or unsafe to access, or you're unsure about working near electrical or vent penetrations.
Repair Options for Flashing Failures
Temporary fixes
- Clean and dry the area around the flashing. Remove dirt, moss, and loose nails so you can see the true leak path.
- Seal the seam with exterior-grade roofing sealant or polyurethane caulk. Run a generous bead along the interior edge and over any small gaps or cracks.
- Apply a self-adhesive flashing tape or metal patch over the problem spot as a quick patch. Press firmly and ensure the patch overlaps surrounding flashing by at least 2 inches.
- If flashing is only slightly lifted, wedge it back into place and seal along the edge with caulk. Hold with a weighted object while the sealant cures.
- Use a temporary weatherproof barrier on the exterior side (e.g., a tarp or temporary membrane) during heavy rain, but plan for a proper repair soon after.
Notes:
- Temporary fixes are not a substitute for proper flashing repair. They slow leaks but don't stop them long-term.
- Safety first: work from stable ladders, wear non-slip shoes, and avoid working on a wet or steep roof.
Minor repairs
- Re-secure loose flashing: If screws or nails have backed out or weathered nails have popped, remove and reattach with corrosion-resistant fasteners. Use rubber or plastic washers to seal penetration points.
- Re-seal joints and corners: Clean joints, then apply high-quality exterior caulk or polyurethane sealant to vertical and horizontal seams. Feather the edges so water sheds away.
- Bend and align flashing: If strip flashing has buckled, carefully bend it back to follow the roof line. Use a flattening tool or a soft hammer to avoid kinked edges.
- Patch small damaged areas: For small punctures or rated wear, place a patch of metal flashing or a patch membrane over the damaged area and seal the edges with sealant.
- Replace tiny sections of damaged flashing: Cut out the bad section with tin snips, fit a matching size piece, seal all joints with caulk, and fasten with corrosion-resistant screws or nails.
When to choose minor repairs:
- Damage appears localized to a single joint, small crack, or a short run of step flashing.
- The roof is otherwise sound, and the deck beneath is dry and solid.
Partial replacement
- What this covers: Damaged flashing along a single wall, along a chimney, or a short stretch of valley or hip flashing where a clean, continuous piece can be installed without removing large areas of shingles.
- Steps:
1) Mark and carefully remove the damaged flashing piece without disturbing nearby shingles more than necessary.
2) Clean the edge and prepare a matching replacement flashing piece.
3) Fit the new piece in place, overlapping existing flashing by at least 2 inches at joints.
4) Seal all joints with a high-quality roof sealant and secure with corrosion-resistant fasteners.
5) Reinstall shingles or re-flash with metal; reseal all edges to ensure water sheds properly.
- What to watch for: Rust on metal, torn underlayment near the repaired area, or recurring leaks after a heavy rain. If leaks persist, it may indicate broader flashing problems or deck damage requiring a larger scope.
Full roof replacement
- When this makes more sense: Widespread flashing failure, multiple leaks across the roof, or the roof and its underlying deck are approaching the end of their service life (common lifespans vary by material but age and repeated leaks are strong indicators).
- What changes: A full roof replacement often includes replacing all flashing with continuous, properly integrated membrane flashing at penetrations, along edges, around chimneys, and at transitions; new underlayment; and new shingles or roofing material.
- Steps:
1) Thorough inspection to evaluate deck condition and determine if any decking needs replacement.
2) Remove the old roofing and flashing system in stages to protect the interior.
3) Install new leak barriers, drip edge, and all flashing components in a coordinated sequence.
4) Reinstall shingles or other roofing material, ensuring proper alignment and nailing patterns.
5) Perform a final inspection for proper flashing integration at all penetrations and transitions.
- Considerations: This is a major project that typically requires a licensed roofer. It offers the longest-term solution and often reduces ongoing leak risk, but it comes with higher upfront cost and disruption.
Typical Costs to Fix Flashing Failures
Minor repair: description and cost
A small, localized issue usually caused by a loose fastener, a narrow seam gap, or aged sealant. You'll typically notice a tiny water spot after a heavy rain or a dry, cracked bead of sealant around a vent or seam. This repair is often quick and can be done without dismantling large sections of shingles.
- What it covers:
- Re-sealing small seams with appropriate roof sealant
- Re-nailing loose flashing or securing flashing in a tight, marginal area
- Replacing a short piece of metal flashing (up to about 2–3 feet) if it's aged or corroded
- Minimal cleaning and resealing around vent pipes or penetrations
- Typical cost: $150–$450
- Time estimate: Half a day to a full day, depending on accessibility
Moderate repair: description and cost
A moderate repair addresses longer or more evident flashing issues, such as a longer run of faulty flashing along a chimney chase, a valley, or a section with multiple loose fasteners. Expect minor deck exposure if the flashing has shifted enough to allow minor leaks, but not extensive damage.
- What it covers:
- Replacing or re-flashing a longer section (roughly several feet) along a chimney, roof valley, or other high-traffic area
- Repairing or replacing damaged step flashing where it's warped or pulled away
- Resealing and re-securing surrounding shingles and membranes
- Typical cost: $450–$1,000
- Time estimate: 1–2 days, depending on roof slope and access
Major repair: description and cost
A major repair involves substantial flashing replacement and may include adjacent roof work. This is common when flashing has failed around a large vertical opening (such as a tall chimney), several intersecting roof planes, or there's noticeable water intrusion behind siding or decking. In some cases, you may need minor roof deck repair as part of reinstalling proper flashing.
- What it covers:
- Full or near-full flashing replacement along roofline, around chimneys, dormers, skylights, or large valley areas
- Replacing damaged or weakened deck sections revealed during flashing work
- Reinstalling surrounding shingles and ensuring a watertight transition at penetrations
- Typical cost: $1,000–$3,500 (and higher if significant deck repair or multiple penetrations are involved)
- Time estimate: 2–4 days, depending on roof complexity and access
What factors affect cost
- Roof size
- Larger roofs require more flashing material and more labor, driving up both material and labor costs.
- Access
- Steep pitches, tight crawl spaces, or difficult-to-reach areas add time and safety considerations, increasing price.
- Material type
- Aluminum, copper, lead, or specialty flashed systems cost more than basic galvanized steel; some materials last longer and may reduce long-term maintenance.
- Extent of damage
- Isolated leaks with intact surrounding shingles cost less than widespread damage requiring deck repair or re-flashing large sections.
- Local labor rates
- Wages, permits, and contractor availability vary by region; urban and high-demand areas typically have higher rates.
How Long Can You Wait Before a Flashing Failure Becomes Critical?
Hours to 24 hours
A flashing failure is most dangerous the moment water starts finding its way in. In the first hours, you may only notice a small drip, but moisture is already testing the seal around the edge where flashing meets the roof deck. If rain continues, that tiny leak can widen quickly.
- Water penetration can travel behind shingles and into the attic, soffits, or ceiling.
- Electrical hazards can appear if moisture reaches electrical boxes, outlets, or light fixtures.
- Cold weather can push water under roof joints and create ice dam-related issues once temperatures drop.
- Early signs can be subtle: damp insulation, a musty smell, or damp rafters even if the ceiling looks dry.
2–7 days
If you don't address the leak in the first week, water has more time to saturate surrounding materials and spread through the attic or ceiling cavity. The problem stops being “just a drip” and becomes a moisture issue that affects insulation and wood.
- Insulation loses its R-value when it stays wet, making your attic more energy-inefficient.
- Plywood or OSB sheathing and roof decking can swell, warp, or begin to rot.
- Mold and mildew can start to form in damp, dark corners, especially behind drywall or in the attic.
- Drywall may show stains, bubbling paint, or soft spots; the attic floor can feel damp to walk on.
2–4 weeks
Waiting into the second to fourth week compounds damage and raises repair costs. Moisture is now affecting structural components more deeply, not just surface materials.
- Framing lumber can begin to rot if exposed to ongoing moisture, compromising roof integrity.
- Ceiling and wall finishes may sag, crack, or detach as the load path weakens.
- Ventilation barriers and insulation can become clogged with water, creating a long-term humidity problem.
- Electrical systems can be jeopardized if water reaches wiring or junction boxes, presenting a safety risk.
1–6 months (seasonal and longer)
If a flashing failure is ignored for months, the cumulative moisture can lead to major, costly repairs and potential health concerns.
- Full roof deck replacement may become necessary in severely damaged areas.
- Widespread mold growth can require specialized remediation, especially in hidden cavities.
- Structural repairs, including framing and support members, may be needed if rot progresses.
- Long-term moisture can degrade attic and roof ventilation, increasing energy bills and reducing comfort.
Quick checks and practical actions you can take now
- Inspect from safely accessible spots: look for fresh stains on ceiling drywall, moldy smells, or damp insulation in the attic.
- Check the flashing along the wall line and around penetrations (vent stacks, pipes) for lifting, gaps, or corrosion.
- If you see active dripping, avoid climbing on a wet roof; don't attempt to seal from above if you're not equipped to do so safely.
- Temporarily manage the moisture: cover the affected area with a sturdy tarp if you can do so without creating a safety hazard; ensure tarps are securely fastened and won't blow off in wind.
- Document with photos and notes: date, time, weather conditions, the exact location of the leak, and what you observed.
- Schedule a professional roof inspection promptly. A licensed roofer or contractor can assess flashing failure, identify all paths of water intrusion, and recommend permanent repair options.
Where timing matters most
- Heavy rain or wind-driven moisture accelerates damage; the sooner you act, the smaller the repairs.
- Cold weather introduces ice damming risks and can cause fast-moving meltwater to push underneath flashing.
- Humidity and warm conditions inside attics speed up mold growth and insulation damage.
Signs to watch for that mean you should not wait any longer
- Active leaks during rain or thaw cycles.
- Visible flashing lifting, corrosion, or loose fasteners.
- Water stains that keep spreading or new stains appearing after dry weather.
- Musty attic smells persisting after ventilation.
How Flashing Failure Varies by Location and Climate
How This Problem Varies by Region & Climate within the United States
Flashing performance isn't the same in every climate. The region you're in shapes which flaws show up first, how quickly they worsen, and which fixes last. Keep this regional lens in mind when you inspect, maintain, or plan repairs.
- Moisture load and rainfall: wetter regions see more corrosion, faster sealant degradation, and higher risk of water tracks beneath flashing.
- Temperature swings: areas with big day/night or seasonal temps stress joints, causing gaps to open and close.
- Wind exposure: exposed ridges, gables, and vent flashings take more uplift and can loosen first.
- Salt air near coasts: coastal air accelerates corrosion of metal flashing and fasteners.
- Sun and UV exposure: intense sun ages sealants and membranes, making them brittle or cracked sooner.
- Roof slope and debris: steep or debris-filled roofs channel water differently and can lift flashing faster during storms.
Coastal, Wet Climates
- What you'll typically see: frequent rain, high humidity, and salt spray on the coast. Flashing around chimneys, vents, and roof-to-wall joints may corrode or loosen sooner.
- Common warning signs: rust on metal flashing, bubbling or cracking sealant, gaps where flashing meets siding or shingles.
- Practical fixes: choose corrosion-resistant flashing materials, use high-quality, salt-rated sealants, and ensure a continuous, integrated seal around penetrations.
- Quick checks: after big rain or wind events, look for lifting along the eaves and near vents; keep gutters and downspouts clear so water doesn't back up onto flashing.
Cold, Freeze-Thaw Climates
- What you'll typically see: repeated freezing and thawing drives water into joints, then expands, lifting flashing and loosening fasteners.
- Common warning signs: cracks in sealant, lifted step flashing at corners or around chimneys, ice dams near eaves.
- Practical fixes: ice and water shield in critical areas, flexible sealants that move with temperature, proper ventilation to reduce condensation under the roof.
- Quick checks: inspect eaves, valleys, and chimney flashing after freezes or heavy snowfall; replace cracked sealant and reseal joints before warm months.
Hot, Sun-Heavy Climates
- What you'll typically see: relentless sun and heat age sealants, causing that soft, rubbery sealant to crack or shrink. Metal flashing can expand and contract, stressing joints.
- Common warning signs: shrinkage or cracking of caulk and sealant lines, loose or wiggly flashing where it's been under solar exposure.
- Practical fixes: use high-elongation, heat-resistant sealants; allow for expansion gaps; consider reflective, heat-resistant coatings on metal flashing if appropriate to the system.
- Quick checks: look for hairline cracks in sealant, especially on southern exposures; test flashing that runs along high-sun walls for looseness.
Severe Weather, Wind-Borne & Hurricanes
- What you'll typically see: high wind uplift, storm-driven rain, and flying debris can tear loose flashing at joints and penetrations.
- Common warning signs: visible gaps, missing nails or screws, flashing that no longer sits flush against the deck or wall.
- Practical fixes: secure with corrosion-resistant fasteners, overlap joints securely, and seal high-mlood/vent areas with wind-rated sealants.
- Quick checks: after storms, inspect around roof penetrations, edges, and along any ridge-line flashing; replace damaged pieces promptly.
Maintenance & Regional Actions
- Inspect twice a year, plus after big storms in your region.
- Focus checks where roof meets walls: chimney, vents, skylights, valley and edge flashings.
- Look for: lifted edges, rust, dried or cracking sealant, gaps at penetrations.
- For repairs: prioritize corrosion-resistant materials, flexible sealants, and properly flashed penetrations.
- When to call a professional: if flashing is severely damaged, the roof pitch is steep, or you notice widespread rust, corrosion, or multiple lifted sections.