Ultimate Guide to Old Roof Removal Services
Last updated: Feb 28, 2026
Introduction to Old Roof Removal Services
What old roof removal involves
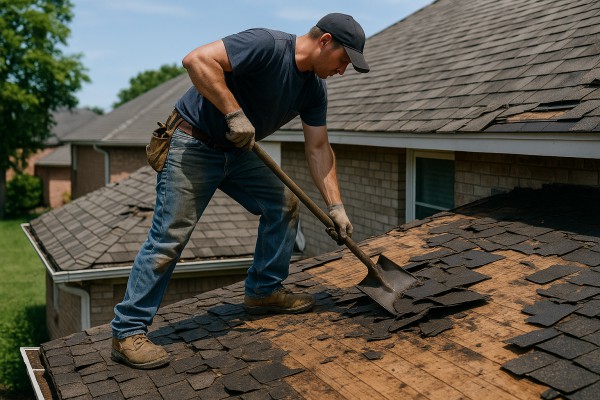
Removing an aging roof is more than just taking off shingles. A careful removal protects your home, your property, and your wallet in the long run. The core steps you'll see on a typical project include:
- Stripping shingles and underlayment to expose the decking
- Inspecting and replacing damaged or rotten roof decking
- Removing metal flashing, vents, and chimneys as needed
- Cleaning up nails, fasteners, and debris to a safe, broom-clean standard
- Sorting materials for disposal or recycling ( asphalt shingles may be recycled where programs exist)
- Preparing the roof deck for a solid, weather-tight new roof
Signs you may need old roof removal
Consider removal when several warning signs show up together, not in isolation:
- Widespread curling, cracked, or missing shingles
- Persistent leaks or widespread attic moisture and staining
- Sagging roof sections or creaky decking
- Granules in gutters or downspouts indicating advanced wear
- Extensive flashing rust or corrosion around vents and along edges
- Age beyond typical life expectancy for your material (e.g., 20–30+ years for shingles)
The removal process in practical steps
A transparent plan helps you understand timing, costs, and risk. Common steps include:
1. Assessing scope and permits: confirm replacement needs, measure square footage, and check local permit requirements.
2. Safety planning: set up fall protection, ladders, tarps, and weather contingencies.
3. Roof stripping: remove shingles and underlayment, then inspect decking for damage.
4. Deck repair or replacement: replace damaged plywood or sheathing as needed.
5. Underlayment, flashing, and ventilation prep: install new underlayment, drip edge, and ensure proper venting for the new roof.
6. Debris management: contain nails and debris, haul away waste, and perform a final sweep of the work area.
7. Final inspection and handover: verify weather-tightness, address any code items, and review care instructions for the new roof.
Safety and permitting
- Always require a formal safety plan and licensed, insured crews
- Verify fall protection, proper ladder setup, and weather-related shutdown criteria
- Confirm permits are pulled and inspections scheduled as required by your city or county
- Check for potential hazards, such as asbestos-containing materials on very old homes, and address them with specialized handling if needed
Disposal and recycling options
- Recycling programs for asphalt shingles can reduce landfill impact
- Cardboard and paper waste from packaging is typically recycled
- Wood decking or framing may be recycled or disposed of per local rules
- A contractor can provide a waste management plan with expected disposal costs
Timelines, costs, and planning
- Removal timing depends on roof size, complexity, weather, and material condition
- Typical projects span 1–3 days for standard homes; larger or steeper roofs take longer
- Cost factors include labor, disposal fees, decking repairs, flashing replacement, and whether any permit or crane services are needed
- Getting a line-item estimate helps you compare bids and understand where costs arise
Choosing a contractor for old roof removal
- Verify licensing, insurance, and workers' compensation coverage
- Ask for recent, local references and sample projects of similar scope
- Request a written, detailed estimate with scope, materials, and timeline
- Check warranties on both removal and the new roof installation
- Confirm site protection practices, cleanup standards, and accountability for debris
- Ensure clear communication channels and a named project supervisor for the job
Old Roof Removal Services: What They Include
Comprehensive definition
Old roof removal is the systematic process of removing all existing roofing materials from a building, from the outer surface down to the decking. It includes assessing the deck's integrity, addressing hidden damage, protecting the interior, and managing waste so the replacement roof can be installed properly. The service goes beyond tearing off shingles; it coordinates safety, disposal, and prep work to prepare a solid foundation for the new roof.
- Tear-off to bare decking and any underlayment
- Deck and structural inspection for rot, mold, or damage
- Hazard assessment for materials like asbestos or lead paint (where applicable and compliant)
- Interior and landscape protection to prevent debris intrusion
- Waste sorting, recycling when possible, and proper disposal
- Permits, inspections, and required documentation
When it's typically needed
Look for these signals that old roof removal is the right next step.
- Old age: most roofs reach their effective life after 20–30+ years, depending on material and climate
- Extensive damage: widespread leaks, rot, curling or missing shingles, or structural sagging
- Material upgrade or change: moving from asphalt to metal, tile, or another system
- Repair limits: patching becomes impractical or cost-prohibitive
- Preparation for new insulation or ventilation changes
What's included in the service
A typical old roof removal package covers planning, removal, and prep.
- Site assessment and staging plan
- Roof tear-off and debris containment (tarps and dumpsters)
- Safe removal methods to minimize nails and sharp edges
- Deck inspection and necessary repairs prior to the new roof
- Weather protection during removal (temporary coverings)
- Waste handling: sorting recyclables, recycling options, and proper disposal
- Hazard handling: asbestos, lead paint, or other regulated materials with licensed professionals
- Permits and scheduling coordination
- Final site cleanup and protection checks
The tear-off process (step-by-step)
A transparent tear-off sequence helps homeowners understand progress.
1) Prepare the site: protect landscaping, cover vents, and set up containment
2) Remove outer layers: shingles, tiles, or metal panels, exposing the deck
3) Inspect and repair the deck: note moisture, rot, or fastener issues; perform needed repairs
4) Clean and sort debris: collect nails, shingles, and flashing; separate recyclables
5) Prepare for the new roof: install underlayment and ventilation plan, or address structural fixes
6) Final check: ensure all debris is cleared and the site is safe before the crew leaves
Safety and waste management
Key priorities in old roof removal.
- Personal protective equipment for all workers
- Fall protection and secure ladder setup
- Debris containment to protect you and neighbors
- Nail and sharp object cleanup with magnetic rollers
- Compliance with local waste disposal rules and recycling options
- Hazardous material handling by licensed professionals when required
Timeline and cost considerations
Understanding timing and budget helps plan ahead.
- Typical duration: 1–3 days for a standard home roof; longer for larger or complex roofs
- Costs vary by materials, complexity, and disposal needs
- Insurance and permit costs: verify with your contractor and insurer
- Weather impact: delays are common in rain or wind seasons
When You Need Old Roof Removal Services
Signs this service is needed
- Shingles are curling, cupping, blistering, or missing in multiple areas.
- Repeated leaks occur despite several repairs.
- Water stains appear on ceilings or in the attic, and staining keeps spreading.
- The roof deck feels soft or shows noticeable sagging when you walk on it (safely, or from a safe vantage point).
- A lot of shingle granules are ending up in gutters, downspouts, or the yard.
- The roof is beyond its typical life expectancy for its material (e.g., asphalt shingles often around 20–25 years; metal roofs can span 40–70+ years, depending on style and maintenance).
- There are multiple roof layers, especially if you aren't sure how many layers exist—extra weight can indicate a removal is needed.
- Moisture or mold is present in the attic, or there are signs of rot in roof decking.
- Last storms caused widespread damage, and leaks persist even after localized repairs.
- You can't locate the source of a leak or leaks keep reappearing after fixes.
Ways you can confirm yourself as a homeowner
- Do a ground-level look with binoculars or a zoomed camera to spot missing or heavily damaged shingles, curling edges, or sagging areas.
- Inspect the attic (carefully). Look for daylight through the decking, dark damp spots, mold, or soft, spongy wood.
- Check inside your living spaces for new or enlarging stains, musty odors, or sudden humidity changes.
- Review your home's roof history. If you inherited the house, request records on previous repairs, age, and number of layers.
- Note any weather events (hail, high winds, heavy rain) and how quickly leaks appeared after them.
- If you're unsure what you're seeing, take clear photos from multiple angles and bring them to a professional for a quick, informed read.
When to get a professional assessment
- You've spotted one or more signs above, or you're unsure whether removal is needed vs. repair.
- The roof has aged beyond its expected life for its material, and repairs are becoming frequent.
- There's moisture, rot, or mold in the attic or decking, or you see soft spots on the roof sheathing.
- There are multiple roofing layers or a confusing blend of materials that could compromise decking and load-bearing support.
- Severe weather damaged a large area, and you need a careful, code-compliant plan for replacement.
- You're planning major structural work, a home sale, or a re-roofing project and want a precise scope.
Steps to prepare for a professional assessment
1) Gather photos: exterior roof shots, attic views, and any stained ceilings or walls.
2) List known issues and repairs, including dates and what was done.
3) Note accessibility concerns, such as gated yards, two-story access, or safety hazards.
4) Prepare questions about removal scope, decking condition, ventilation, flashing, and any required permits.
5) Have the home's age and roofing material ready, plus any existing warranties or prior work details.
What to expect during the assessment visit
- A thorough exterior roof inspection, including condition of shingles, flashing, and vents.
- An attic inspection to assess decking integrity, insulation, and signs of moisture.
- A determination of whether removal is necessary, or if repair is viable and cost-effective.
- A written assessment with recommendations, timelines, and an estimated range for removal versus repair costs.
What's Included with Old Roof Removal Services
Typical Inclusions
- Pre-removal assessment and plan development: a quick walk-around to note soft decking, signs of water intrusion, and the step-by-step removal plan.
- Full removal of roofing materials: shingles or tiles, underlayment, flashing, nails, vent pipes, and any accessories that are part of the existing roof system.
- Debris disposal: loading and transporting materials to a licensed disposal facility; recycling of metal flashing or other recyclable components when feasible; disposal fees often bundled into the base price.
- Site protection and safety measures: roof edge protection, ladder safety, fall-arrest devices where required, tarps to protect walls and windows, and temporary ground protection to keep nails from damaging the yard.
- Debris cleanup and yard magnet sweep: thorough cleanup of nails and small debris from the ground, driveway, and landscaping; final sweep to ensure safety.
- Roof deck inspection and minor repairs: check for soft spots, rotten boards, and signs of prior leaks; recommendations for repairs or replacement if minor in scope; major deck work billed separately.
- Weather protection during removal: tarps over openings and temporary seals to keep water out if rain is expected.
- Coordination of permits and inspections (where included): some contractors pull building permits and schedule inspections; others provide the paperwork only, with permit costs billed separately.
- Documentation and warranty notes: a brief summary of what was removed, what remains, and any warranty terms related to cleanup or partial repairs.
How the Removal Process Typically Unfolds
1. Pre-removal assessment and planning: finalize scope, confirm access, and outline safety measures.
2. Material removal day: crew arrives with safety gear, removes roofing materials, and protects adjacent surfaces.
3. Debris cleanup and site stabilization: debris hauled away, nails and small fragments swept up, yard and driveway checked for hazards.
4. Final inspection and handover: verify complete removal, note any issues, and provide a written summary of the work performed.
Not Typically Included
- New roof installation materials and labor: shingles, underlayment, ventilation, flashing, pipe boots, and ridge caps for the new roof are typically separate from removal.
- Major structural repairs: replacing damaged rafters or roof decking beyond minor repairs noted during inspection; structural work is a separate scope and pricing.
- Interior repairs for leaks or water damage: drywall, ceiling, insulation, or other interior repairs caused by prior leaks are generally not part of removal.
- Hazardous material abatement: asbestos, lead paint, or other regulated hazards require licensed abatement professionals; this work is not included unless specifically added.
- Permit costs and inspections fees beyond basic coordination: some contracts exclude fees; others pass them through at cost.
- Landscaping or exterior improvements damaged during removal: tree trimming, fence, shrubs, or hardscape restoration are not included unless specified.
- Solar or attachment work: if you plan to add solar panels or other roof-mounted equipment, removal is separate from the new installation scope.
- Additional debris handling beyond standard removal: bulky items outside the roof or special recycling requests may incur separate charges.
Roofing Materials Commonly Used in Old Roof Removal Services

- Why it's common: Most suburban homes still use asphalt shingles, so old-roof removal often involves tearing off decades of bundled shingles and paper underlayment.
- What removal looks like: Large amounts of shingle debris, scattered nails, and deteriorated felt. Expect some rusted nails in nails-down areas.
- How this service relates to replacement: After removal, the roof deck is inspected for rot, soft spots, or water damage. Replacement typically uses architectural or 3-tab asphalt shingles with a synthetic underlayment for better weather resistance.
- Material-specific notes: Modern asphalt shingles come in varied thickness and wind ratings. If wind speeds were high, you may need upgraded nailing patterns or upgraded underlayment to meet code.
Wood Shingles and Shakes (Cedar, Redwood)
- Why it's common: Historic homes and certain neighborhoods still feature wood shingles/shakes.
- What removal looks like: Splinters, potential cupping or split boards, and more care needed to avoid damaging the roof deck.
- How this service relates to replacement: Wood products are vulnerable to moisture and insects. After removal, a stable deck is essential. Replacements are often fiber cement, asphalt architectural shingles, or metal, depending on climate and fire code.
- Material-specific notes: Cedar and other woods have fire-rating implications and may require treated underlayment or a fire-resistant option in some zones.

- Why it's common: Durability and architectural appeal keep tile roofs popular in certain regions.
- What removal looks like: Heavier debris with many tiles; risk of breakage during lifting; often requires scaffolding and careful panel removal.
- How this service relates to replacement: The roof structure must support heavy tile. After removing old tile, the deck and supports are evaluated, and a compatible underlayment and fastener system chosen for tile installations.
- Material-specific notes: Tiles can be ceramic or concrete; options include continuing with tile (new weight and battens) or switching to metal or shingle, depending on structure and climate.

- Why it's common: Premium homes may have slate, prized for longevity.
- What removal looks like: Very heavy, brittle pieces that crack easily if mishandled; often requires experienced roofers and extra disposal considerations.
- How this service relates to replacement: Slate removal almost always triggers a full deck assessment. Slate roofs commonly transition to high-quality shingles, metal, or synthetic slate, with structural reinforcement if needed.
- Material-specific notes: Slate fragments are dense and expensive to replace; salvage or recycling is common when feasible.

- Why it's common: Durable, energy-efficient, and increasingly popular for replacements.
- What removal looks like: Interlocking panels or standing-seam systems; nails or clips must be removed without damaging the roof deck or flashing.
- How this service relates to replacement: If the substrate is sound, you may reinstall more metal or switch to another material with proper flashing, venting, and insulation improvements.
- Material-specific notes: Copper lasts longer but costs more; aluminum is lighter and resistant to corrosion in coastal areas; proper roof-to-wall transitions are crucial to seal out water.
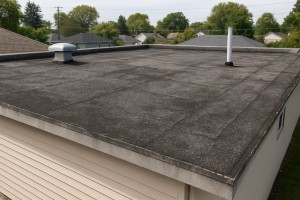
- Why it's common: Flat or low-slope roofs frequently use BUR or modified bitumen in many commercial and some residential settings.
- What removal looks like: Tar and gravel assemblies or layered membranes, with heavy debris and hot tar exposure in some installations.
- How this service relates to replacement: Often replaced with single-ply membranes (EPDM, TPO, PVC) or newer built-up materials; ensures proper slope, drainage, and insulation.
- Material-specific notes: Tar and gravel removal can release strong odors and requires proper containment and ventilation.
Flat Roof Membranes: EPDM, TPO, PVC
- Why it's common: Modern flat roofs favor single-ply membranes for reliability and energy efficiency.
- What removal looks like: Scraping away old membranes, adhesive residues, and seam tapes; careful disposal of old materials.
- How this service relates to replacement: Installation involves new insulation, vapor barriers, and precise seam sealing. Replacement choices depend on climate, UV exposure, and energy goals.
- Material-specific notes: EPDM is black and durable; TPO/PVC offer lighter colors for heat reflectivity but can be more temperature-sensitive during installation.
Underlayment and Decking Materials (Plywood, OSB, Plank)
- Why it's common: The condition of the roof deck determines the quality of any new roof.
- What removal looks like: Exposed framing, rotted sections, and potential water damage detection.
- How this service relates to replacement: Damaged decking is replaced with new plywood or OSB, and new underlayment is installed to protect against moisture.
- Material-specific notes: Sheathing thickness and grade affect insulation, wind uplift resistance, and the long-term performance of the new roof system.
Understanding the Cost of Old Roof Removal Services
What the price generally includes
Most quotes cover tearing off the old roofing materials, proper disposal, debris cleanup, and basic site protection. They may also include a quick inspection of the roof deck and flashing, but major deck repairs or structural work are typically extra. If a second layer or unexpected damage is found, the price can shift.
Typical average costs
- Asphalt shingles tear-off (most common): $1.50–$3.50 per sq ft, including disposal
- Rough totals: about $3,000–$7,000 for a typical 1,000–2,000 sq ft roof
- Larger or more complex roofs:
- Metal tear-off: $2.50–$6.50 per sq ft
- Tile or slate tear-off: $8.00–$15.00 per sq ft
- All-inclusive estimates by roof size:
- Small to mid-size homes (1,000–2,000 sq ft): roughly $3,000–$7,000
- Large or complex roofs: $8,000–$15,000 or more
Note: disposal/dumpster fees are often bundled into asphalt tear-offs but may be charged separately for other materials.
What drives the cost (components you'll see itemized)
- Labor: crew wages, safety equipment, and efficiency
- Disposal: dumpster rental and tipping fees
- Permits and inspections (if required by your municipality)
- Debris cleanup and site protection
- Deck repair, flashing, vents, and attic access if needed
- Specialty materials or warranties (more for premium roofs)
Cost-saving factors (things that may cut the price)
1. Simpler roof design with a single-layer tear-off
2. Easy access and favorable weather during removal
3. Bundling removal with a roof replacement from the same contractor
4. Scheduling in off-peak seasons or during slower market times
5. Accurate measurement and scope to avoid change orders
Cost-increasing factors (things that raise the price)
- Steep pitch, complex geometry, or restricted access
- Multiple roof layers or removal of underlayment/roofing felt
- Premium materials (tile, slate) with heavier disposal and more handling
- Hidden rot, water damage, or need for plywood/deck repairs
- Permits, additional inspections, or disposal surcharges
- Specialty work: chimney flashing, skylight adjustments, vent relocation
- Remote locations or needs for cranes/large equipment
A simple 4-step approach to estimating costs
1. Determine roof size in squares (1 square = 100 sq ft) and how many layers you'll remove
2. Request a detailed line-item estimate: tear-off, disposal, deck repair, flashing, and permits if applicable
3. Confirm whether plywood or deck repairs are included or priced separately
4. Compare at least three quotes and verify contractor licenses, insurance, and references
How Our Old Roof Removal Process Works
Step 1: Pre-Removal Assessment and Planning
- On-site evaluation of the existing roof, attic, decking, and surroundings.
- Identify hazards (rot, damaged sheathing, prior repairs, moisture pockets) and plan safety measures.
- Confirm permits, access routes, staging areas, and a realistic timeline.
- Review any materials that require special handling (asbestos concerns, venting, or prohibited waste).
We lay out a clear plan before any tool touches the roof, so you know what's happening and when.
Step 2: Preparation and Site Setup
- Set up fall protection, perimeter fencing, and debris containment to protect people and landscaping.
- Protect doors, windows, siding, and vegetation with boards, tarps, and ground covers.
- Verify utilities and service clearances; mark electrical lines and gas metering as needed.
- Brief the crew on safety, communication, and sequence to minimize disruption.
A well-prepped job site keeps neighbors happy and reduces the chance of surprises during removal.
Step 3: Tear-Off of Old Roofing Materials
- Remove shingles, asphalt felt, and flashing in staged sections to manage weight and wind exposure.
- Lift and haul away waste with minimal disruption to the rest of the home.
- Collect nails and fasteners with magnets; keep the work area clean and tripping hazards rare.
- Inspect underlying deck for obvious issues as you uncover layers.
This is the core of old-roof removal—methodical, careful, and focused on safety.
Step 4: Deck and Structural Inspection
- Inspect roof decking for rot, mold, or water damage; measure for any sag or soft spots.
- Replace damaged boards or call in a licensed pro for structural repairs as needed.
- Note vent openings, chimney details, and any penetrations that will influence your new roof.
- Confirm the deck is solid and square before moving to underlayment.
Caring for the deck now prevents costly fixes after a new roof goes on.
Step 5: Temporary Weatherproofing and Protection
- Install temporary coverings or a wind-rated barrier to limit leaks during removal.
- Seal penetrations (vents, chimneys) to reduce water intrusion between cycles.
- Maintain ventilation where needed to prevent condensation buildup.
- Keep edges draped to minimize wind-driven debris from entering the home.
We create a shield against weather while the work proceeds.
Step 6: Underlayment and Flat Roofing Prep (If Applicable)
- If the plan includes a re-roof with updated underlayment, lay it out according to code and manufacturer guidelines.
- Install drip edges and starter courses aligned with the new roof design.
- Coordinate any ventilation improvements or insulation upgrades tied to the replacement.
This step ensures the new roof has the proper foundation for performance and longevity.
Step 7: Final Cleanup and Debris Disposal
- Sweep and vacuum work areas; remove all nails with strong magnets.
- Load and haul away all old materials; verify all waste is contained and removed.
- Check gutters, downspouts, and surrounding grounds for stray debris.
- Perform a final walk-through to confirm site cleanliness and safety.
A spotless site is part of doing the job right.
Step 8: Documentation, Closure, and Next Steps
- Provide a brief project recap, photos of the removal, and notes on any remaining concerns.
- Share recommendations for the new roof system, ventilation, and insulation options.
- Schedule the next phase (new roof installation) and discuss timelines, warranties, and maintenance tips.
We finish with clear records and a plan for moving forward, so you're ready for the next phase without guesswork.
Residential vs. Commercial Considerations for Old Roof Removal
Scope and Material Differences
- Residential roofs on single-family homes are usually sloped and cover a smaller footprint. Common materials include asphalt shingles, clay/ceramic tile, metal, or synthetic options. Removal often centers on replacing shingles, flashing around chimneys and vents, and resealing edges.
- Commercial roofs are typically flat or low-slope and span large areas. They use membranes (EPDM, TPO, PVC) or built-up roofing. Removal involves stripping multiple membrane layers, ballast, flashing at parapets, and often dealing with roof penetrations for HVAC and plumbing.
- The scale changes the logistics. Residential work is usually quicker and more contained; commercial work requires staged removal, crane access or large debris containment, and careful coordination with tenants or building operations.
Permits, Codes, and Inspections
- Residential: a building permit is common. You'll focus on weatherproofing, energy-code compliance (insulation and ventilation), and proper venting. Inspections tend to be straightforward and fewer in number.
- Commercial: plan reviews and more stringent code compliance are typical. Structural load considerations, life-safety codes, fire ratings, elevator and stairwell access during work, and sometimes asbestos or lead paint assessments come into play. Expect more documentation and longer lead times.
- In both cases, your roofer should verify local requirements and keep a detailed permit packet and inspection plan.
Access, Safety, and Site Management
- Residential: smaller crews, limited equipment, and easier access via driveway or yard. Protect landscaping, driveways, and siding with tarps and edge protection. Ladder use and fall protection are still critical.
- Commercial: job sites may require traffic control, hoarding, scaffold towers, and equipment storage areas. You might need to coordinate with tenants, suppliers, and city or campus facilities. Safety plans are typically more formal, with daily briefings and risk assessments.
- Utility proximity, height, and surrounding structures drive the safety approach in both cases, but the scale and coordination requirements are heavier on commercial roofs.
Structural, Underlayment, Ventilation, and Drainage Considerations
- Residential: assess the roof deck's condition, underlayment, attic ventilation, and insulation. Pay attention to chimney, skylight, and vent penetrations; reseal with appropriate underlayment and flashing.
- Commercial: ensure the structural deck can support any additional weight (even ballast or equipment). Parapets, multiple roof drains, curbs for HVAC units, and extensive penetration detailing are common. Drainage and edge detailing are more complex due to larger, flatter areas.
- Insulation and energy performance play a bigger role in both, but the strategies differ with intended indoor climate control and roof assembly.
Weather, Scheduling, and Disruption
- Residential: weather windows for roof work are often flexible but limited by season. Shorter project durations mean fewer disruption days for homeowners.
- Commercial: occupancy and business hours influence timing. Night work or phased removal by zones is common to minimize downtime. Weather planning remains important, but the schedule is usually driven by tenant needs and permit constraints.
Cost, Timeline, and Logistics
- Residential: costs are typically lower per square foot because of smaller scope and simpler logistics. Projects often run from a few days to a couple of weeks depending on size and material.
- Commercial: project costs reflect scale, scaffolding, debris containment, and additional engineering or permitting steps. Timelines extend longer, with careful sequencing to avoid interrupting building services.
- Debris management, disposal methods, and recycling options differ by scale; commercial sites may require larger dumpsters, frequent debris removal, and on-site waste segregation.
Quick Reference: Residential vs Commercial Considerations of Old Roof Removal Services
- Residential vs Commercial Considerations of Old Roof Removal Services: Key differences summarized to help homeowners compare bids, schedule around daily life, and plan for safety, permits, and disruption.
- When choosing a contractor, ask about site-specific plans for access, staging, and coordination with occupants.
- Ensure the quote distinguishes material options, scope (deck and insulation checks), and any required inspections or tests before and after removal.
How Old Roof Removal Services Vary by Location
Regional Code and Permit Requirements
Across the U.S., permit rules and inspections for roof removal vary by state, county, and city. Some jurisdictions require a permit for full reroofing; others require only a notice. Inspections typically occur at key milestones: before removal, after new material is installed, and sometimes for final clearance. If asbestos or lead paint is suspected in older roofs, special abatement rules apply.
- Check with your local building department to verify permit needs and fees.
- Ensure your contractor pulls the permit and coordinates inspections.
- If the roof contains asbestos or other hazardous materials, hire a licensed abatement contractor before removal.
Climate, Terrain, and Roof Design
Climate and site conditions drive scheduling, safety protocols, and material choices. In snow-prone regions, removals are timed to avoid heavy storms; in hot regions, crews may start early or work later to beat the heat. Roof pitch and surrounding terrain affect how work is staged and how waste is cleaned up.
- Snow load, ice dam risk, and wind considerations influence removal method.
- Steep pitches or tight eaves demand extra safety equipment and skilled fall protection.
- Access constraints (tight driveways, mature trees, or dirt paths) can affect dumpster placement and crane needs.
Local Access, Regulations, and Safety Rules
Site rules and local ordinances shape the day-to-day of a roof removal project. From equipment parking to debris handling, local rules matter.
- Street-use permits may be needed for dumpsters, cranes, or large crews.
- Disposal and landfill rules can differ; some areas require clean, segregated waste streams.
- Noise, work-hour restrictions, and neighbor notification requirements vary by municipality.
Material and Labor Costs by Region
Cost landscapes shift with local wages, insurance rates, disposal fees, and travel distances. Areas with higher tipping fees or limited landfill capacity tend to have higher disposal costs. Conversely, competitive markets may lower labor rates.
- Expect regional differences in permit fees and inspection charges.
- Transportation distance to the nearest landfill or recycling center affects total cost.
- Seasonal demand can push prices up in peak remodeling months.
How this service varies in different regions in the United States
- Northeast: Older housing stock, tighter urban spaces, and stronger emphasis on asbestos and lead paint regulations. Expect longer permitting timelines and potentially higher disposal costs due to stricter material handling.
- Midwest: Weather windows strongly impact scheduling. Snow, ice, and rapidly changing temperatures influence removal speed and roof teardown sequencing.
- South: Hot climates, humidity, and heavy rain patterns shape daily work hours and material selection (durable under heat). Licensing requirements can vary state-to-state.
- West: Wide regional variation—coastal zones vs. inland deserts—driving differences in permitting, wildfire considerations, and disposal logistics. Access from hillsides or mountainous terrain may require specialized equipment.
Practical Planning Steps
1. Determine local permit requirements and whether asbestos or hazardous materials are a concern.
2. Verify contractor licenses, insurance, and any region-specific cleanup rules.
3. Schedule removals during favorable weather windows and consider roof pitch and access constraints.
4. Clarify disposal pathways, dumpster placement, and any local recycling mandates.
5. Compare multiple bids that itemize permits, safety measures, disposal fees, and timeline.
Quick regional checks for homeowners
- Northeast: ask about asbestos testing and disposal costs; confirm lead-safe practices if applicable.
- Midwest: discuss winter scheduling and weather delays; confirm snow and ice safety planning.
- South: confirm heat-mitigation plans and licensing requirements; verify roof material compatibility with heat.
- West: ask about wildfire-adjacent precautions and permit variability by county; check access in rugged terrain.