Ultimate Guide to Roof Installation Services
Last updated: Feb 28, 2026
Introduction to Roof Installation Services
This page explains what roof installation entails, what homeowners should expect, and how to think through choices from materials to timing. It's written for practical, real-world decisions—clear, plain-language guidance you can apply when planning a new roof, working with a contractor, or evaluating bids.
What this page covers
- Planning and inspections to set a solid foundation
- Material options and curb appeal versus performance
- How to hire a trustworthy contractor
- The step-by-step installation process
- Warranties, maintenance, and long-term care
- Safety, codes, and weather considerations
How a typical roof installation unfolds
1) Pre-installation assessment and permits
A contractor will review your roof structure, check for damage, confirm attic ventilation, and ensure permits are in place before work begins.
2) Tear-off or overlay decision
You'll decide whether to remove the old roof or install over it, weighing debris, deck condition, and warranty requirements.
3) Deck preparation and underlayment
The roof deck is inspected and repaired as needed, then a waterproof underlayment or membrane is installed to protect against leaks.
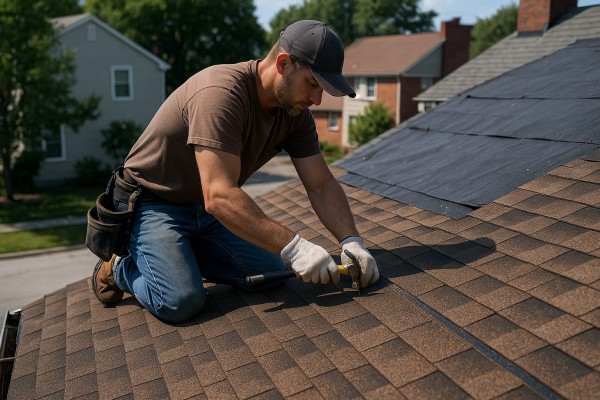
4) Installing the roofing material
Shingles, metal panels, or tiles are laid in courses, aligned, and fastened per manufacturer specs and local code.
5) Flashing, vents, and ventilation
Flashing around chimneys, skylights, and vents is sealed, while roof vents and soffit intake ensure proper attic airflow.
6) Drip edge, drainage, and final details
Edge metal is installed to control water flow, gutters are integrated if needed, and seals around penetrations are checked.
7) Final inspection and cleanup
A walkthrough confirms fasteners, seals, and alignment, followed by debris removal and a tidy job site.
Material options at a glance
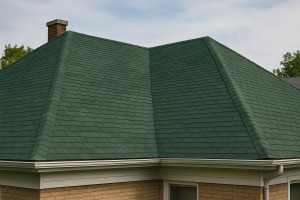
- Asphalt shingles: Affordable, versatile, easy to install.
- Metal panels: Long-lasting, lighter weight in some profiles, good for modern looks.
- Tile or slate: Durable and distinctive, heavier and often more expensive.
- Synthetic/composite: Flexible aesthetics with good performance and weight characteristics.
Planning considerations
- Home style, climate, roof pitch, and budget influence choices.
- Local code, warranty requirements, and contractor recommendations shape decisions.
How to pick a contractor you can trust
- Check licenses and insurance, request references, verify warranty terms, and review written estimates.
Quick maintenance reminders after installation
- Keep gutters clear, inspect for damaged flashing after storms, and schedule a routine roof inspection every 3-5 years.
Roof Installation Services: What They Include
Comprehensive definition
Roof installation services encompass the full process of putting a new roof on a home or building, from planning and material selection to installation and final inspection. It includes removing the old roof, evaluating and repairing the deck, applying a weatherproof barrier, installing the chosen roof covering, and finishing with flashing, ventilation, and edge details. A complete install also ensures proper ventilation, adherence to local codes, and a solid warranty. Expect coordination of permits, inspections, and debris removal as part of the service.
- Remove old roofing materials and dispose of debris
- Inspect and repair or replace damaged roof decking
- Install underlayment or moisture barrier
- Install flashing around chimneys, vents, skylights, and edges
- Add proper ventilation and attic insulation considerations
- Install the chosen roof covering (shingles, metal, tile, etc.)
- Install drip edge and edge protection
- Include venting for soffits, ridge vents, or mechanical exhaust as needed
- Apply ice and water shield in vulnerable areas
- Thorough cleanup and protection of siding, landscaping, and vehicles
- Final inspection, warranty documentation, and owner orientation
When it's typically needed
- New construction or full roof replacement on an existing building
- Aged roofs reaching the end of their useful life (loss of granules, curling, or extensive leaks)
- Significant storm or hail damage requiring deck and roof system repairs
- Upgrading materials for durability, energy efficiency, or curb appeal
- Building renovations that change roof geometry or venting needs
- Construction projects where the roof must meet current codes or manufacturers' requirements
- Situations where existing flashing, venting, or underlayment are failing and need renewal
- When adding attic insulation or improving ventilation to reduce energy costs
The installation process
1. Initial consultation and measurement
- Confirm goals, budget, and material options; review permits and timeline.
2. Material selection and ordering
- Choose shingles, metal, tile, or other coverings; finalize color and accessories.
3. Site preparation and safety planning
- Protect landscaping, cover entryways, and set up staging and safety gear.
4. Old roof removal and deck assessment
- Remove existing roofing; inspect decking for rot, mold, or damage.
5. Deck repairs and edge preparation
- Replace damaged boards; install drip edge and edge protection.
6. Underlayment and moisture barrier
- Lay the water-shedding layer and address any slopes or transitions.
7. Flashing around penetrations
- Install or reseal flashing at chimneys, vents, skylights, and valleys.
8. Ventilation and attic integrity
- Ensure soffit and ridge ventilation are functional; verify insulation details.
9. Roof covering installation
- Fasten shingles, panels, or tiles per manufacturer specs; maintain alignment and spacing.
10. Finishing touches and flashing details
- Seal gaps, install ridge vents, cap accessories, and complete corner trim.
11. Cleanup, inspections, and handoff
- Remove debris, confirm warranty paperwork, and schedule final inspection.
Materials and options
- Asphalt shingles (3-tab and architectural) for cost-effective, reliable coverage
- Metal roofing (steel or aluminum) for durability and low upkeep
- Tile or slate for a long-lasting, distinctive look
- Underlayment choices (felt, synthetic, or peel-and-stick) and moisture barriers
- Ventilation options (soffit vents, ridge vents, turbine vents, or powered exhaust)
- Flashing materials (metal types and coatings) and drip edge finishes
- Color, texture, and profile options to match home style and climate
- Warranty types and coverage (manufacturer and workmanship)
- Lightweight vs. heavy materials based on existing deck and climate needs
When You Need Roof Installation Services
Signs this service is needed
- Age and condition of the roof: Asphalt roofs typically reach the end of their useful life around 20–25 years. Metal can last 40–70 years, tile 50+ years, and wood shakes 20–40 years. If your roof is near or past its expected life, installation may be the smarter choice than ongoing repairs.
- Widespread, recurring leaks: A few drips can sometimes be repaired, but frequent or mounting leaks after rain or snow often indicate widespread damage or deck failure.
- Visible shingle damage: Missing, curling, blistering, or cupped shingles, excessive granule loss in gutters, or obvious wear across large sections.
- Structural or attic concerns: Sagging roof deck, soft spots, warped boards, mold or persistent damp spots in the attic, or cracked flashing around chimneys and vents.
- Energy and comfort issues: Noticeable drafts, cold spots, or unusually high energy bills that can't be explained by other factors.
- After severe weather: Hail, high winds, or fallen limbs can compromise the integrity of the roof even if damage isn't immediately obvious.
- Persistent repairs becoming impractical: If you're paying for repeated patches rather than a long-term fix, replacement is often more cost-effective.
- Aesthetic or property-value goals: If you're updating your home for sale or for a fresh look, a new roof can boost curb appeal and value.
Ways you can confirm yourself as a homeowner
- Check your ownership documents: Locate the deed, closing papers, or a mortgage statement in your name. Compare the name on those documents with who you are today.
- Gather key proof of ownership: Have a recent property tax bill, mortgage statement, or HOA correspondence showing you're the authorized resident or owner.
- Verify authorization if you don't own the property outright: If you're a manager, renter with written permission, or handling the project for a trust, obtain a signed written authorization from the owner and a copy of their ID.
- Confirm you're allowed to hire for roof work: Check with your HOA, landlord, or property management company for any rules, permits, or restrictions before you proceed.
- Bring two forms of ID and the property address to any appointment: This helps confirm you're authorized to discuss or authorize work on the property.
- Use public records to double-check ownership: Local assessor or recorder records can verify the current titled owner. If names don't match, you'll want the correct signer on contracts.
- Prepare a simple file for the project: Keep the deed or ownership documents, mortgage statements, and any HOA approvals handy so bidding and inspections go smoothly.
When to get a professional assessment
- You see significant, widespread damage or structural concerns: sagging, warped decking, or widespread shingle failure that affects large areas.
- Interior signs of roof problems: recurrent leaks, ceiling stains, or attic moisture/mold after multiple rain events.
- The roof is older than typical life expectancy: if you're unsure of the roof's age or if it's well beyond its expected lifespan.
- You're planning major renovations or upgrades: attic conversions, skylights, or adding living space that relies on a solid roof.
- You want an objective, documented evaluation: a professional assessment provides a written report, repair vs. replace recommendations, and warranty guidance.
- After severe weather: post-storm inspection to identify hidden damage and to guide insurance claims.
- You're unsure about safety or scope: if accessing or inspecting the roof feels risky, contact a pro for a thorough, safe evaluation.
What to expect in a professional assessment (typical steps)
1) Exterior inspection from ground level and safe access points to identify visible damage.
2) Attic inspection for signs of leaks, ventilation issues, and insulation moisture.
3) Deck and flashing check around penetrations, vents, and chimneys to assess seal integrity.
4) Written findings with recommended next steps, material options, timelines, and cost ranges.
What's Included in Roof Installation Services
What's typically included
When you hire a professional roof installation crew, the job typically covers a complete, code-compliant replacement from start to finish. Here's what you can expect most contractors to include in a standard full roof replacement:
- Removal and disposal of old roofing materials. Old shingles, underlayment, flashing, and saturated decking are removed and disposed of properly. The worksite is swept clean at day's end.
- Deck inspection and plywood/sheathing repairs. The roof deck is inspected for rot or damaged boards. If needed, rotten sections are replaced to create a solid base for the new roof.
- Underlayment installation. A weather-resistant underlayment is installed over the deck to provide an extra layer of protection before the new roofing material goes on.
- New roofing material installation. The chosen roofing material (asphalt shingles, metal, tile, or another option) is installed per the manufacturer's guidelines and local codes.
- Starter strips, drip edge, and flashing. Starter courses kick off the edge properly, drip edges protect eaves and rake edges, and flashing around walls, chimneys, vents, and skylights seals joints against leaks.
- Ventilation and attic protection. Proper ventilation is assessed and installed or upgraded if needed (soffit vents, ridge or powered vents) to promote airflow and prolong roof life.
- Ice and water shield where recommended. In cold or high-risk areas, ice/water shield is installed in critical areas (eaves, valleys, around penetrations) to prevent leaks from ice dams.
- Roof penetrations and sealant work. Vents, pipes, and chimneys are carefully flashed and sealed to prevent water intrusion.
- Ridge caps and vent terminations. Ridge caps or vented ridge systems are installed to cover the tops of the roof and maintain ventilation.
- Fasteners, sealants, and accessories. Corrosion-resistant nails or screws, sealants, and corrosion inhibitors are used as appropriate for metal flashings and penetrations.
- Cleanup, protection, and debris management. The site is organized daily, with tarps and ground protection as needed, and a final debris sweep and cleanup after installation.
- Warranty information and documentation. Most installations come with a manufacturer's material warranty plus a workmanship warranty from the contractor (terms vary by company and product).
- Permits and inspections coordination (where required). Some roofers handle permit pull and scheduling; others provide the paperwork and the homeowner obtains permits—verify what's included in your contract.
- Final inspection and walkthrough. A contractor conducts a walkthrough to verify proper installation, provide care tips, and address any last questions.
What's not typically included
Some items are not part of a standard roof installation unless you request them as add-ons or a custom scope. These are commonly excluded in base packages:
- Major structural repairs to decking or framing. If the roof reveals extensive rot, sagging, or framing damage, repairs are treated as a separate scope.
- Complete decking replacement beyond minor repairs. Significant deck replacement or reinforcement is usually quoted separately.
- Skylight installation or relocation. New skylights or relocating existing ones require additional flashing details and seals.
- Solar panel installation or roof-mounted solar hardware. Solar integration is typically a separate project or add-on.
- Gutters, downspouts, or gutter guards. These are often installed by a separate contractor unless specifically included.
- Chimney rebuilding or major brickwork/repointing. Flashing work is included, but substantial masonry repairs are beyond standard roof replacement.
- Exterior painting or siding repairs. Color-matched work or siding repairs are outside the roof install scope.
- Interior cosmetic work caused by roof work. Water damage repairs or interior remodeling related to the roof are not covered.
- Self-performed trades or non-listed brands. If you want a specific product or a non-standard installation method, confirm as an add-on in the contract.
Common Roofing Materials Used in Roof Installation Services

- Most common residential option for a reason: affordable, versatile, and easy to install. They pair well with standard plywood or OSB decks and a solid underlayment.
- How installation relates to this material: ensure a clean, dry deck, install a moisture barrier or synthetic underlayment, and follow a 4- or 6-nail pattern per shingle, depending on wind zone and shingle type.
- Key considerations: impact resistance, color choices that affect heat gain, and manufacturer warranties that hinge on proper ventilation and attic insulation.
- Practical steps homeowners should know:
1) Inspect the roof deck for damage before starting.
2) Install underlayment across the entire surface.
3) Place starter shingles and work up in straight courses.
4) Seal hips, ridges, and transitions with proper flashing.
5) Ventilate the attic to maximize shingle life.

- Durable, long-lasting, and highly reflective options that shed snow and rain efficiently. Metal can be standing-seam or exposed-fastener, each with its own install nuances.
- How installation relates to this material: metal roofs require precise flashing, solid substrate, and appropriate fasteners for the panel type and climate. Substrates must be clean and plumb to avoid misalignment.
- Key considerations: panels expand and contract with temperature, so proper gaps and sealants are essential; color choices can reduce cooling loads; some metals carry a higher upfront cost but longer lifespans.
- Practical steps homeowners should know:
1) Confirm roof framing can handle the panel weights.
2) Install an underlayment or insulated panel where needed.
3) Secure panels with correct fasteners and spacing to prevent leaks.
4) Flash hips, ridges, and walls with compatible sealants.
5) Plan for gutter integration and snow-load considerations.

- Classic look with excellent longevity, but very heavy. Concrete and clay tiles require a stronger structure and precise installation to prevent breakage.
- How installation relates to this material: roof framing must support weight; underlayment and battens are often used to create a ventilated space and proper tile alignment.
- Key considerations: tile color and texture affect aesthetics and heat absorption; tiles can crack from hail or impact, so repair plans should allow for replacements.
- Practical steps homeowners should know:
1) Have structural support evaluated for tile weight.
2) Install a breathable underlayment and battens as recommended.
3) Use proper nail spacing and clay/concrete-specific fasteners.
4) Ensure flat, sloped surfaces and clean drainage for each tile course.
5) Seal penetrations with compatible flashing.
Wood Shingles and Shakes (Cedar)
- Natural warmth and texture; these require careful maintenance to prevent rot and insect damage.
- How installation relates to this material: cedar needs an adequate ventilation gap and a moisture barrier; fastener choices must resist wood movement.
- Key considerations: fire codes may impact suitability; cost includes ongoing maintenance such as resealing or staining.
- Practical steps homeowners should know:
1) Inspect for splits or cupping and replace damaged pieces.
2) Maintain a clean, well-ventilated attic space.
3) Apply protective finishes as recommended by the manufacturer.
4) Use corrosion-resistant fasteners and proper spacing to accommodate expansion.

- Very long-lasting and elegant, but exceptionally heavy and costly. Proper structural support and skilled installation are essential.
- How installation relates to this material: slate requires precise nailing or clipping methods and superior underlayment; a professional knows how to mitigate breakage during handling.
- Key considerations: repair can be challenging; expect a higher upfront cost but long service life.
- Practical steps homeowners should know:
1) Verify structural load capacity for slate.
2) Use slate-specific fasteners and careful alignment.
3) Install a reliable vapor barrier and appropriate flashing.
4) Prepare for occasional slate replacement from time to time.

- Made from polymer or rubber composites mimicking traditional materials, offering good durability with lower weight.
- How installation relates to this material: often easier to handle than natural stone or wood; installation guidelines emphasize proper adhesive, nail, or clip systems.
- Key considerations: color stability and UV resistance vary by product; warranties depend on correct venting and maintenance.
- Practical steps homeowners should know:
1) Check compatibility with existing deck materials.
2) Follow manufacturer adhesive and fastening specs.
3) Maintain trim and flashing with appropriate sealants.
4) Schedule periodic inspections to catch seam wear early.

- Popular on low-slope or flat roofs; seamless or minimally seamed, with specialized flashing.
- How installation relates to this material: requires a clean, smooth substrate and precise seam work; drainage and slope are critical.
- Key considerations: EPDM is often black and heat-absorbent, while TPO/PVC aim for energy efficiency; each has different repair and replacement cycles.
- Practical steps homeowners should know:
1) Ensure proper substrate preparation and drainage plan.
2) Install seams with the correct adhesives or mechanical fasteners.
3) Flash penetrations and terminations thoroughly.
4) Schedule regular inspections for potential punctures or seam issues.
- An eco-friendly option adding plant cover on a waterproof membrane, requiring extra structure and drainage planning.
- How installation relates to this material: adds weight, moisture management, and irrigation needs; drainage layers and root barriers are essential.
- Key considerations: climate, maintenance access, and plant selection influence longevity and performance.
- Practical steps homeowners should know:
1) Strengthen roof structure to support added weight.
2) Install a root barrier and proper drainage layer.
3) Choose plant species suited to sun exposure and irrigation plan.
4) Plan ongoing maintenance for irrigation, weeding, and seasonal care.
Understanding the Cost of Roof Installation Services
Typical average costs for Roof Installation Services
- Asphalt shingles (basic 3-tab): $4–$7 per sq ft installed. For a typical 1,500 sq ft roof, this is roughly $6,000–$10,500.
- Asphalt architectural/shingle: $5–$8 per sq ft installed. Typical 1,500 sq ft roof runs about $7,500–$12,000.
- Metal roofing: $7–$12 per sq ft installed. Typical 1,500 sq ft roof runs about $10,500–$22,000.
- Concrete tile: $9–$16 per sq ft installed. Typical 1,500 sq ft roof runs about $13,500–$24,000.
- Clay tile: $18–$40 per sq ft installed. Typical 1,500 sq ft roof runs about $27,000–$60,000.
- Wood shakes/shingles: $6–$9 per sq ft installed. Typical 1,500 sq ft roof runs about $9,000–$13,500.
Note: These are broad ranges to give you a sense of order of magnitude. Your final price depends on roof size, pitch, complexity, local labor costs, and chosen materials. Always compare apples-to-apples bids that spell out scope, permits, removal, and disposal.
What factors affect cost (influences that can lower or raise price)
- Roof size and pitch
- More squares (100 sq ft) means more material and longer labor time. Steeper pitches increase labor risk and equipment needs.
- Roof complexity
- Dormers, multiple ridges, valleys, and difficult transitions add hours of labor and more flashing, which boosts price.
- Material choice
- The difference between basic asphalt and premium options (architectural shingles, metal, tile) is the main driver of cost.
- Old roof removal and disposal
- Full tear-off and disposal are costlier than a re-roof in some cases. Some areas require tear-off for warranty or code reasons.
- Permits, code upgrades, and inspections
- Permit fees and potential required upgrades (ventilation, attic insulation, skylight wiring) add to the bill.
- Roof accessibility and removal logistics
- Limited access, nearby power lines, or tight yards can raise crew time and equipment needs.
- Location and labor market
- Regional wage differences and material shipping costs affect final numbers.
- Warranties and installation quality
- Longer warranties or certified installers can raise upfront costs but may save money through fewer problems over time.
Ways to reduce costs (without compromising safety)
- Choose a standard asphalt shingle over premium materials.
- Keep roof design simple (fewer penetrations, fewer valleys, no skylights or custom features).
- Get multiple bids and compare scope carefully (who handles removal, disposal, and flashing?).
- Schedule work in off-peak seasons when crews are more available and rates may be lower.
- Maintain accurate measurements and order only what you need to avoid waste.
Ways costs can increase (things to watch for)
- Steep or multi-story roofs needing specialized equipment and safety protocols.
- Full tear-off plus disposal fees, especially if the old roof has hazardous materials or unusual waste.
- Upgrades in underlayment, ice dam protection, high-end flashing, or ventilation systems.
- Structural repairs or deck repair discovered during removal.
- Permits, impact-resistant shingles, or extended manufacturer warranties.
- Access challenges or project delays due to weather or supply shortages.
Step-by-step cost estimation (how to plan)
1) Measure or confirm roof area (in squares; 1 square = 100 sq ft).
2) Pick material and profile (basic asphalt, architectural asphalt, metal, tile, etc.).
3) Decide on removal vs. over-layer approach (check local codes and warranty implications).
4) List required accessories (underlayment, flashing, vents, drip edge, ice/water shield).
5) Include permits, disposal, and potential upgrades (ventilation, insulation).
6) Collect bids that spell out scope line-by-line; check for exclusions and contingencies.
7) Add a contingency (5–10%) for surprises and unplanned work.
How the Roof Installation Process Works
Step 1: Comprehensive On-site Evaluation
- We inspect the existing roof's condition, including shingles, flashing, underlayment, decking, and ventilation.
- We assess attic access, insulation, drainage patterns, and roof pitch to plan the best approach.
- We discuss goals, material preferences, budget, and a realistic timeline.
- You receive a written scope of work and a transparent estimate before any work begins.
Step 2: Material Selection & Design
- Choose the right materials (e.g., asphalt architectural shingles, metal, tile) based on durability, climate, and budget.
- Pick underlayment type and any specialty products (ice/water shield, high-wan vented options, flashing kits).
- Decide on ventilation strategies (ridge vent, soffit vents, powered vents) and color coordination.
- Review warranties, expected lifespan, and delivery timing to align with your schedule.
Step 3: Prep, Safety & Permits
- We verify any required permits and confirm local code compliance.
- The job site is prepared: tarps and ground protection are laid, ladders are secured, and safety protocols are established for workers and neighbors.
- We establish a clean staging area for materials and protect landscaping, fixtures, and exterior details.
Step 4: Old Roof Removal & Deck Inspection
- Old shingles, underlayment, and debris are carefully removed and disposed of.
- The roof deck is inspected for rot, warped boards, or structural issues; any damage is repaired or reinforced.
- Roof penetrations (vents, chimneys, plumbing stacks) are inspected, and flashing areas are prepared for the new installation.
Step 5: Installation Sequence
1) Install eave drip edge and starter strips to guide shingles and protect the edges.
2) Lay down the underlayment in a careful, stepped pattern to ensure full coverage.
3) Apply ice/water shield at eaves and other vulnerable areas to prevent wind-driven leaks.
4) Begin with the starter course and establish the first full row of shingles, keeping lines straight.
5) Move in uniform, overlapping courses up the roof, using the specified fasteners and spacing for your material.
6) Install flashing around all penetrations (vents, chimneys, dormers) and perform step flashing where needed.
7) Place ridge vent or cap shingles for proper attic ventilation and a finished look.
8) Perform a final on-roof check to verify alignment, seam integrity, and fastener depth.
Step 6: Ventilation, Insulation & Weatherproofing
- We confirm balanced attic ventilation to prevent heat buildup and moisture buildup in the attic.
- If accessible, we verify insulation alignment and seal gaps to improve energy efficiency.
- All seams, penetrations, and roof-to-wall transitions are sealed to maintain a weatherproof envelope.
Step 7: Quality Assurance, Clean-Up & Handover
- A thorough final inspection is conducted to catch any loose nails, misaligned flashing, or cosmetic issues.
- All debris and equipment are removed; the site is swept and landscaping protected.
- We review maintenance tips, your warranty details, and care recommendations so you know what to expect going forward.
Residential vs. Commercial Considerations in Roof Installation
- Residential vs Commercial Considerations of Roof Installation Services
Key Differences at a Glance
- Scale and footprint: A home roof is smaller and simpler to access; commercial roofs cover large areas and may require staging, permits for whole buildings, and coordinated shutdowns.
- Roof types and systems: Homes typically use pitched roofs with asphalt shingles, metal, or tile. Commercial buildings frequently use low-slope or flat systems like membrane roofing (TPO, EPDM) or built-up roofs.
- Design priorities: Residential projects focus on curb appeal, energy efficiency, and proper attic ventilation. Commercial projects emphasize roof drainage, long-term durability under equipment loads, and ease of maintenance for large HVAC units and vents.
- Safety and access: Home projects usually stay within neighborhood safety rules and decently manageable access. Commercial jobs often demand site coordination with tenants, crane or lift access, fall protection plans, and specialized safety procedures.
Materials and Systems
- Home-oriented options: Asphalt shingles, architectural shingles for longer life, occasional clay or concrete tiles, or standing-seam metal on select homes.
- Commercial options: Low-slope membranes (TPO, EPDM) or bituminous systems, with ballast or fastened assemblies. Insulation needs differ, and vapor barriers are sized for larger zones.
- Durability considerations: Homes want reliable color and wear resistance; commercials prioritize long-term waterproofing, wind uplift resistance, and compatibility with rooftop equipment.
- Roof penetrations: Homes may have vents, skylights, and chimneys; commercial roofs often house mechanical curbs, vents, skylights, solar arrays, and access hatches, all needing careful detailing to prevent leaks.
Permits, Codes, and Inspections
- Permitting complexity: Residential projects typically require local building permits and small-scale inspections. Commercial work may involve multiple plan reviews, structural calculations, and fire-safety considerations.
- Compliance focus: Expect deeper attention to wind uplift ratings, fire ratings, and energy codes in commercial jobs, plus coordination with property management or HOA guidelines for multifamily or office spaces.
- Documentation: For homes, you'll usually receive a straightforward warranty and inspection report. Commercial projects often require more formal closeout documentation, maintenance manuals, and record drawings.
Scheduling, Crew, and Safety
- Timeline expectations: A typical home roof replacement might span a few days to a week. Commercial crews can be on site for weeks or months, with busy seasons and restricted hours.
- Crew logistics: Residential jobs rely on a small crew with direct access through the yard or driveway. Commercial projects demand larger teams, specialized equipment, and often temporary access routes or street closures.
- Safety focus: Home projects emphasize resident safety, ladder use, and neighborhood noise. Commercial sites require formal safety plans, fall protection, OSHA-compliant practices, and coordinated access controls for tenants and visitors.
Budgeting, Warranties, and Maintenance
- Cost drivers: Home projects hinge on material choice, roof size, existing decking condition, and finish. Commercial budgeting accounts for additional drainage, insulation, and potential structural reinforcement.
- Warranties: Residential warranties commonly cover materials and workmanship for 20–50 years, depending on product. Commercial warranties may be longer for certain membranes but can be more complex due to maintenance responsibilities and roof-owner relationships.
- Maintenance cycles: Homes typically pair seasonal inspections with minor upkeep. Commercial properties need planned preventive maintenance to manage roof-penetrations, HVAC equipment, and drainage pathways.
Quick steps to navigate residential vs commercial roof installation
1) Identify building type and roof type (sloped vs flat/low-slope).
2) List current penetrations and equipment present on the roof.
3) Check local permit requirements and HOA or tenant coordination needs.
4) Gather at least 3 detailed quotes that break out material, labor, and warranties.
5) Confirm long-term maintenance plans and warranty coverage, including service intervals.
How Roof Installation Services Vary by Location
Climate and Weather Impacts on Roof Installations
Weather patterns shape everything from material choice to scheduling. In cold, snowy regions, ice dams, freeze–thaw cycles, and snow loads push for robust underlayment, proper ventilation, and reliable drip edges. In hot, sun-drenched areas, heat resistance, reflective surfaces, and UV tolerance guide material selection and installation details. Coastal and hurricane-prone zones demand wind-guided details and storm-rated fasteners. In moist, rainy climates, moisture management and moss prevention become priorities.
- Northeast and Upper Midwest: prioritize ice-dam prevention, venting, and sealing against water intrusion.
- Southeast and Gulf Coast: emphasize wind resistance, fastener patterns, and edge protection for storms.
- Pacific Northwest: focus on moisture control, drainage, and algae/moss mitigation.
- Southwest: choose materials with high heat resistance and consider clay tile or metal if fire risk is a concern.
- Mountain regions: balance wind directives with snow-clearance considerations.
Local Building Codes, Permits, and Licensing
Code rules and approval processes vary widely by state and municipality. They influence how a roof is designed, installed, and inspected.
- Licensing: some states require contractor licenses; others rely on trade certifications or local permits.
- Permits: many areas require structural or wind-load assessments for replacements; plan reviews can delay projects.
- Wind and seismic provisions: hurricane zones and earthquake-prone regions have stricter fastener and attachment requirements.
- HOA or historic district rules: some neighborhoods have additional rules about materials and appearance.
Availability of Materials and Local Trade Skills
Regional preferences shape what you'll see on roofs and what crews can install efficiently.
- Asphalt shingles: common nationwide, with regional blends and warranties.
- Metal roofing: prevalent in the West and parts of the South for durability and fire resistance.
- Clay/terracotta tile: popular in the Southwest and parts of the Southeast.
- Slate or wood shingles: more common in the Northeast and select historic districts.
- Local suppliers: lead times, color options, and price volatility vary by region; remote areas may face longer lead times.
Scheduling and Weather Windows
The ideal installation window shifts with climate and seasons.
- Dry seasons: aim for late spring to early fall in many regions.
- Winter installations: feasible in milder climates with proper underlayment and temporary heating; not ideal in deep freezes.
- Atlantic and Gulf coast seasons: plan around hurricane seasons and potential weather delays.
- Seasonal lull: some regions offer better labor availability and pricing outside peak seasons.
Energy Efficiency and Insulation Standards by Region
Energy codes influence roofing decisions and long-term running costs.
- IECC adoption: states vary in required insulation, ventilation, and reflective roofing.
- Cool roofs: more common in hot climates to reduce cooling loads.
- Ventilation and insulation: requirements differ; improper attic ventilation can negate roof performance.
Costs and Contractor Availability by Region
Regional factors drive price and access.
- Labor rates: higher in urban coastal areas; lower in rural inland regions.
- Material costs: shipping distance and local demand affect prices.
- Permitting and disposal: fees and processing times differ by jurisdiction.
- Availability of crews: some regions have a tighter market and longer lead times.
Warranties, Insurance, and Maintenance Considerations
Regional conditions can shape warranty terms and maintenance needs.
- Manufacturer warranties: typically require professional installation and proper drainage, flashing, and ventilation.
- Maintenance expectations: regions with heavy rainfall, salt exposure, or hail may see more frequent inspections recommended.
- Insurance requirements: some insurers consider local risks (wind, hail, seismic) when underwriting roof work.
Regional Quick-Reference Checklist for Homeowners
1. Verify local licensing and permit requirements before hiring.
2. Confirm wind, hail, and seismic design criteria apply to your area.
3. Discuss material options that suit climate, budget, and aesthetics.
4. Schedule installation within the optimal weather window for your region.
5. Ensure proper attic ventilation, insulation, and moisture management as part of the install.