Last updated: Apr 19, 2026
The North Coast maritime climate brings persistent fog, high humidity, and long wet periods that keep roof surfaces damp far longer than inland markets. In this environment, the top failure mode isn't heat but continual moisture intrusion and lingering surface moisture. When a roof stays damp, algae and moss proliferate, fast-tracking deck rot and underlayment breakdown. Your primary job is to keep that moisture from sitting on or penetrating through the roof deck. Choose assemblies that dry quickly after rain, resist microbial growth, and shed moisture efficiently. Every component-from shingles to underlayment to vented soffits-must be selected with rapid drainage and continuous drying in mind.
Older homes with attic and soffit configurations often rely on cramped, under-ventilated spaces that trap humidity. Condensation on cooler nights and in fog-heavy mornings can saturate the deck and rafters, even without dramatic temperature swings. If re-roofing, focus on correcting attic ventilation and soffit intake. A balanced vent strategy-adequate soffit intakes paired with ridge or soffit-to-ridge exhaust-helps push moist air out before it condenses on the deck. Pay attention to baffles, insulation landing, and soffit blocking that impede airflow. In many cases, increasing intake and ensuring unobstructed exhaust paths is the simplest, most impactful upgrade you can make during the re-roofing window.
In this climate, deck rot often starts with moisture trapped behind a failed or undersized underlayment. A modern, rain-ready roof assembly requires a water-shedding top layer, a durable barrier beneath, and a ventilation strategy that keeps the deck dry behind it. Ensure the underlayment is rated for prolonged exposure to damp conditions and is properly lapped to shed water toward the eaves. Look for reinforced, self-sealing options that resist curling and tearing when damp. Seal penetrations tightly around vents, chimneys, and skylights to prevent capillary wicking. Any sign of edge degradation or loose fasteners should trigger a re-seal or replacement, because once water finds a path into the roof system, drying becomes slow and costly.
Material choice matters more here than in drier climates. If moss growth is a recurrent problem, select shingles and underlays with algae resistance and dimensional stability in damp conditions. Dark colors may absorb more heat and promote evaporation, but in foggy climates, surface drying is already hindered; therefore, prioritizing moisture- and moss-resistance can pay off over cosmetic tone. In older structures, consider roof systems that accommodate more generous overhangs and better drip edges to carry water away from the fascia and soffit. This reduces splash-back and moisture into vulnerable eave areas.
Coastal roofs endure wind-driven rain that can exploit even small gaps. Re-roofing offers an opportunity to rework flashings around dormers, chimneys, and eaves to maintain a continuous moisture barrier. Pay particular attention to low-slope transitions and valley details where moisture tends to pool. Each seam and corner should be treated as a moisture-control checkpoint: pre-seal, back-seal, and test for leaks after install with targeted water exposure. The perimeter detailing-fascia, drip edge, and gutter integration-must be designed to funnel water away without backflow onto the deck or into soffit cavities.
During installation, verify that ventilation paths are open and continuous from soffice to ridge, that underlayment is uniform and properly secured, and that deck attachment points are free from moisture intrusion. Inspect for signs of prior moisture damage behind fascia and at eave corners, and plan repairs that restore a dry, breathable cavity. Choose a system with robust moisture management characteristics, including favorable drainage geometry, algae-resistant surfaces, and durable, water-tight flashings. In this foggy, damp climate, the real performance gain comes from a roof that dries quickly after rain, resists microbial growth, and protects the attic from condensation-driven rot. Prioritize these elements, and the roof becomes a lasting shield rather than a recurring moisture vulnerability.
Eureka's year-round moisture means tear-off, dry-in, and inspection windows hinge on breaks in persistent rain rather than isolated showers. When planning a multi-day project, target stretches of several dry or only lightly damp days, not merely a forecast that looks dry for the morning. Coordinate with crews to lean on long-range forecasts that show at least two to three low-rain periods in a row, with overnight temperatures that won't trigger condensation issues under new roofing. Build in extra buffer if a recent storm has left damp decks or saturated insulation in the attic; even a small depth of moisture can stall a dry-in phase or extend the inspection window.
Coastal wind events near Humboldt Bay can complicate shingle sealing, flashing work, and installing on exposed roof planes. In spring, windy days aren't rare, and they can push moisture-laden air under edges, making sealants take longer to cure. When a forecast calls for east or north winds, adjust the schedule to areas with the most exposure first, reserving the protected slopes for later in the week. Secure temporary barriers to reduce blow-off risk for roofing materials and protect vulnerable penetrations. If wind gusts exceed practical limits for safe work, pause operations, cover exposed materials, and re-check sealants and flashing after the wind dies down.
Homeowners in Eureka often need replacement planning before winter because emergency leak calls surge once prolonged rain exposes weak valleys, flashing, and aging penetrations. If a roof shows intermittent weeps in high-rain periods or creaking soffits with heavy precipitation, expect a spike in urgent repairs once steady rain begins. Establish a fall-to-winter schedule that prioritizes critical leaks and compromised flashing while leaving less vulnerable sections for a controlled, dry-in phase later. Use a staged approach: secure the most vulnerable penetrations first, then address the broader deck and field shingles when a sustained dry spell appears.
Start with a careful moisture assessment of the roof deck and attic space before any tear-off. If deck boards feel damp or show dark staining, allow additional drying time or bring in dehumidification to reduce moisture content before removing shingles. When tearing off, protect the interior with heavy plastic or tarps to minimize rain intrusion into attic spaces during brief, unexpected showers. During re-covering, pre-fit and test flashing around chimneys, vents, and eaves on a dry day, so that flashing can be sealed in steady conditions rather than rushed during a gusty, damp afternoon.
Coastal moisture management is not just about shingles; it includes attic ventilation and the pathways that moisture uses to move from eaves to interior spaces. Inspect soffit vents and ridge ventilation for blockages, especially where winter fog can condense on cooler roof sections. Plan for a dry-in that prioritizes adequate ventilation and a breathable roof assembly. If a temporary ventilation fix is needed to prevent condensation during the late-season dry-in, implement it before sealing. This helps prevent moisture-related fasteners and shim creep as temperatures drop and rain returns.
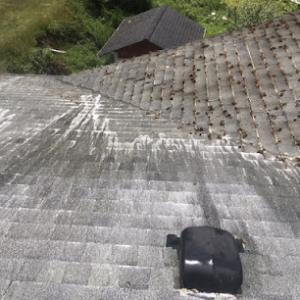
Asphalt shingles remain common in Eureka, but moisture exposure makes underlayment quality, flashing execution, and algae resistance especially important. When you're choosing or upgrading, look for a high-grade, synthetic or felt underlayment with a solid moisture barrier and good tear resistance. Install through-fastened metal flashing at valleys, rake edges, and around roof penetrations, paying attention to a continuous drip edge to keep moisture off the fascia. In coastal fog and winter rain, algae growth on shaded surfaces can take hold quickly; select algae-resistant shingles and ensure proper ventilation to minimize lingering humidity beneath the roofline. Don't skip a secondary drainage plane behind the shingles if the roof deck has any irregularities. Regular inspections after the wet season help catch edge lift, flashing gaps, or shingle de-lamination before leaks emerge.
Wood shingles and shakes fit some older Eureka architecture but face added risk from coastal moisture, biological growth, and maintenance demands compared with drier inland areas. If you have this profile, prioritize one of two paths: a durable, milled cedar option with tight grain and good preservative treatment, or a modern engineered wood alternative that resists moisture better than traditional shakes. Regardless, pay close attention to the underlayment and ventilation. Wood roofs need precise flashing around chimneys, skylights, and transitions to prevent moisture traps at the deck. Install a continuous vented soffit system and ridge vents to promote air movement, which reduces surface moisture and slows aging of the wood. Maintenance should be regular: clean debris that can trap water, treat for mildew promptly, and schedule resealing or re-staining as needed to preserve the wood's integrity in a damp maritime climate. If the house features tall slopes or complex intersections, consider upgrading to a more moisture-tolerant profile or adding a protective cap flashing over vulnerable joints.
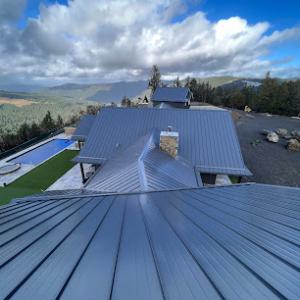
Metal roofing can perform well in the rainy climate because it sheds water quickly, but detailing at fasteners, penetrations, and dissimilar-metal interfaces matters in salty coastal air. Choose panels with adequate corrosion resistance and a factory-applied sealant system, especially around seams and penetrations. Use stainless steel or coated fasteners, and plan for sealant products that handle repeated wet-dry cycles without cracking. In areas where roofs meet upper-story walls, ensure proper clearance for ventilation and avoid trapped moisture near the eaves. When flashing at valleys and transitions, a mechanically fastened, corrosion-resistant system reduces the risk of leaks under heavy winter rain. If you're considering metal, a standing-seam profile often provides the most robust performance in foggy coastal conditions, provided the fasteners are kept watertight and the edge details are properly integrated with the gutter system. Regular checks after storms help catch loose panels, degraded sealant, or head-of-wall leaks before they spread.
Perkins Professional Roofing
Eureka, California
4.7 from 13 reviews
We're family owned and operated, and here to serve you! Customer satisfaction is our number one priority! We’re knowledgeable and keep our customers updated with the progress on their project. We're committed to being detail oriented in every job that we begin. We’re prompt, honest, reliable, and thorough, and seek to be our customers’ premier roofing company.

McMurray & Sons
(707) 443-3088 www.mcmurrayandsons.com
1818 Allard Ave, Eureka, California
3.9 from 58 reviews
Since 1919 McMurray & Sons has earned a reputation for providing top quality roofing materials and installation. Since our founding over 100 years ago, our family-owned business, now with four generations, has been focused on customer satisfaction with every job we do. We are proud to be a GAF Master Elite Contractor. Only 3% of roofers in the United States have earned this designation. GAF is the leading producer of quality roofing products in North America and their confidence in the quality of our work allows us to offer exclusive GAF Golden Pledge and Silver Pledge warranties, in addition to our own outstanding workmanship guarantees. Please contact us for a free estimate on your roofing project.

Blue Sky: Roofer & General Contractor
(707) 280-8417 www.blueskyroofer.com
Serving
4.8 from 38 reviews
Protect your largest investment with our reliable roofing services. We are a locally owned and operated roofing company currently serving McKinleyville, CA and surrounding communities. If you want to make your roof last as long as possible, it is vital that you never put off a roof repair. Small issues with roofing become big issues in a hurry. No matter how major or minor the repair you need, we are here to help. We offer roofing services, roof installation, and roof replacement. Please note: Clear-sighted Inspections also does business as Blue Sky: Roofing and General Contractor. Regarding home inspections and contracting services: You are entitled to and recommended to get a second opinion.

Redwood Empire Roofing
(707) 725-7663 redwoodempireroofing.com
Serving
4.3 from 16 reviews
Specializing in metal, composition shingle and single-ply roof systems for residential and commercial clients.

Detherage Roofing
(707) 444-3668 www.detherageroofingca.com
Serving
3.4 from 5 reviews
Detherage Roofing, proudly serving Humboldt County, California, and its surrounding areas within a 75-mile radius, stands as the region's trusted roofing authority. Under the dedicated ownership and operation of Delmar and Jeanette Deatherage, our team boasts over three decades of unwavering commitment to superior craftsmanship and roofing excellence. Specializing in a comprehensive range of roofing services, including Roofing, Roof Repairs, Roof Replacement, Skylight Installation, Roof Maintenance & Cleaning, and Torch Down and Composition Roofing, we are your premier choice for all roofing needs.
Corradini LLC Roof Restoration & Exteriors Ca#1116143
(707) 497-8879 www.corradiniexteriors.com
Serving
3.7 from 3 reviews
We specialize in quality roof restoration and exterior cleaning services using soft wash techniques and solutions approved by the Roof Cleaning Institute of America(RCIA). Our vision is to improve our customer’s quality of life by maintaining the integrity of your roof to save your money in the long term. Benefits of our roof cleaning service includes: Restore color and proper function of your shingles. Keep roof guaranty effective Prevention of moss or algae re-growth Keep your gutters clog free Improve home and business curb appeal and value of your property Extend the life of your roof, saving you money We are environmentally safe. Exterior Power Washing Service: Decks, Patios, Driveways, Walls and Window Cleaning.
Victorian and early-era homes bring steep pitches, dormers, turrets, and decorative transitions that create more flashing and leak points than a modern ranch. Those complex lines look timeless, but they demand meticulous detailing where two roofs meet, around chimneys, and along eyebrow dormers. In practice, the more intricate the silhouette, the more opportunities there are for moisture to travel from roof to attic if flashing isn't properly integrated or if ventilation is limited. You're balancing period charm with the realities of a damp, marine climate, where fog and winter rain settle into every seam.
Many older Eureka roofs conceal prior patchwork over spaced sheathing or aged decking. When a tear-off begins, what looks like a straightforward job can reveal compromises that were already stretching the structure. Plywood or oriented strand board may be delaminating, or gaps between planks hidden under layers of roofing can expand as moisture moves. That reality means a planned project may evolve into a more extensive repair once the old layers are exposed. If the deck has seen years of wet seasons, expect additional repair work to restore a solid, continuous surface for the new roof.
The more transitions you have-valleys, skylights, turret bases, and multi-slope junctions-the greater the chance of a leak sneaking in. Flashing must not only seal joints but also accommodate seasonal movement from wind-driven rain and coastal humidity. In a cladding-heavy environment, even small gaps around dormer cheeks or decorative trim can become moisture conduits. The result can be slow, persistent leaks that complicate the attic environment and indoor comfort.
Historic appearance concerns influence material choices in neighborhoods where homeowners want modern weather performance without losing period character. Some options can mimic the old look while improving moisture resistance, but every choice carries trade-offs in weight, underlayment compatibility, and flashing details. You'll want to plan for who handles the visible details and who addresses the hidden, moisture-control layers behind the scenes. In this climate, robust ventilation and continuous exterior protection are not optional add-ons; they're essential to keep an old roof from becoming a recurring maintenance problem.
Expect inspections to focus on flashing rims, valley reinforcements, dormer interfaces, and turret bases, especially after heavy rains. Annual checks identifying lifted shingles, corrosion at metal components, or soft decking can prevent sudden failures. In foggy, maritime conditions, proactive moisture management isn't glamorous, but it's the practical foundation for preserving a roof that defines a home's historic character.
In Eureka, using the provided ranges, homeowners can expect per-square pricing to vary by material, with asphalt shingles generally the lowest and clay or concrete tile the highest. Asphalt Shingles run roughly from 350 to 750 USD per square, while metal roofs sit around 650 to 1200. Clay Tile tends to push up toward 1100 to 1800, and Concrete Tile from about 1000 to 1700. Wood Shingles or Shakes commonly fall in the 600 to 1100 range, and Synthetic or Composite Shingles land around 700 to 1200. The coastal moisture, fog, and frequent wind-driven rain exert more influence on install details than on outright warranty terms, so the decision often hinges on long-term moisture management and ventilation needs as much as upfront material costs. If the home already has complex roof geometry, specialties like integrated gutters, or extensive flashing, those line items tend to ride along with the base material choice and can push square-foot costs higher.
Costs in this area can rise when prolonged wet weather forces smaller work windows, extra dry-in steps, or schedule gaps during the North Coast rainy season. Wet-season interruptions mean crews may expend additional days on staging, tarp protection, and moisture management measures, all of which add to labor hours and potential weather-related contingencies. You'll often see a premium attached to any re-roof that requires extended moisture control during the job, including temporary ventilation boosts and more frequent site checks to prevent moisture infiltration during a leaner season.
Steep historic rooflines, hillside access, hidden deck repairs from moisture damage, and the logistics of serving a smaller far-North-Coast labor market can all push Eureka roofing costs upward. Narrow, windy roads, and the need to haul materials up tight routes or across rooves with limited staging space add transport time and manpower. When crews need to dismantle old decking or repair substrate before new layers go on, expect those steps to show up as added line items that can widen the overall per-square price beyond the basic material and labor rates.
A full re-roof in this coastal town generally requires a permit through the local building department rather than being treated as minor maintenance. The permit process ensures the roof assembly is designed and installed to handle year-round maritime moisture, persistent fog, and wind-driven rain common to older Victorian and hillside homes. You'll need plans or a clear scope of work, and the permit review will look closely at ventilation, drainage, and flashing details to prevent moisture intrusion into the attic and roof deck.
Expect inspections at key tight points: underlayment or rough-in and a final inspection after completion. The underlayment/rough-in check confirms that the chosen roof system and underlayment are properly installed to keep out moisture during the wet season. The final inspection verifies that the entire assembly-including flashing around hips, valleys, chimneys, dormers, and any penetrations-meets code requirements and is suitable for Eureka's damp, foggy climate. If your project includes ventilation upgrades or soffit and ridge vent work, those elements will be reviewed during these visits as well.
Inspection timing in Eureka can slow during busy construction periods or when reviewers require added wind- or moisture-related corrections before sign-off. Weather-sensitive steps, such as securing underlayment and installing vented soffits, may see schedule shifts if coastal conditions are unfavorable. Plan for possible hold times between rough-in and final to accommodate corrective items identified by the inspector, especially if the project involves retrofits on older structures where retrofit compatibility matters for long-term moisture control.
Coordinate the permit timeline with your roofing crew's sequence to avoid rework. Confirm with the contractor which drafts or calculations are needed for the plan review, and keep a dedicated contact available in case the inspector requests clarifications on flashing details or ventilation upgrades. On site, have a clearly marked access path and staging area to keep debris away from delicate hillside drainage paths and prevent moisture-related damage to vulnerable areas during the build. Remember, the goal is a rain-ready roof assembly that resists moisture intrusion through every seam and penetration.
In California's coastal insurance environment, Eureka homeowners may face tighter underwriting, especially on older roofs where carriers want clear age and installation records. That reality means the moment a roof enters its later years, the risk notes tighten, and the emphasis shifts from failure avoidance to proven history. Older Victorians and hillside homes with pronounced eaves, valley work, or clay tile accents are particularly scrutinized, because moisture pathways can mirror roof age more than actual storm events. Understanding this lens helps set expectations before filing a claim or renewing a policy.
For Eureka claims tied to winter leaks or storm damage, insurers may scrutinize whether damage came from a sudden event versus long-term moisture intrusion. A rapid impact or wind-driven rain can trigger coverage discussion, but progressive seepage from chronic moisture often lands in the gray area. In foggy maritime climates, that distinction matters a lot, because long-term dampness can masquerade as wear rather than a covered peril. Clear documentation showing a recent, abrupt incident can make a big difference.
Homeowners in Eureka should keep permit records, inspection sign-offs, contractor invoices, and dated photos because documentation can matter when coastal-county claims move slowly. A well-organized file helps demonstrate roof age, installation method, and any retrofits aimed at moisture control. When weather repeatedly tests a roof-fog, wind-driven rain, and damp winters-the ability to confirm timely repairs and proper venting becomes part of the claim story. Anticipate delays and keep records ready for recovery negotiations.
In this climate, valleys and chimney flashing take the brunt of winter rain pushed by coastal winds. Start by inspecting where two roof planes meet or where masonry and roof join. Look for lifted shingle edges, loose metal flashing, and sealant failures that allow wind-driven moisture to back up under materials. The first step is a careful rain-season check: clear debris, reseal any flashing with a compatible sealant, and verify that flashing turns up and over the shingle line rather than under it. If valleys show staining or soft spots, treat them as urgent and address any underlying decking rot before re-covering.
Chimneys, skylights, and other penetrations are perpetual trouble spots in foggy maritime weather. A common pattern is damp, dark valleys around flashing that invites moss and algae growth to grip the edge. Inspect flashings for gaps and ensure joint sealants stay flexible in damp winters. Replace cracked boot flashings and confirm that flanges are sealed on all sides. For skylights, confirm proper pan installation and that the surrounding flashing sheds water outward rather than pooling. If you notice blisters or soft decking near penetrations after rain, treat as a sign of saturated substrate and plan a careful reseal or reseat.
Wind-driven winter rain can back up under roofing materials at low-slope areas. Step-by-step, verify that underlayment and drip edges extend correctly beyond eaves and that ribbed metal or membrane underlayment sits flat with no wrinkles. Pay close attention to joints at transitions to walls or dormers, where wind pressure can force moisture inward. When inspecting, look for algae and moss that may hold moisture against the deck; remove growth and improve drying by ensuring adequate ventilation and trimming overhanging branches.
Damp, shaded sections harbor moss and algae more readily. Remove organic buildup promptly and consider a periodic cleaning plan that includes mechanical brushing and a moss-inhibiting treatment compatible with the roofing material. In Eureka's climate, shaded roofs deserve more frequent attention, especially on older Victorian and hillside homes where historical detailing can trap moisture. Debris retention compounds moisture, so maintain clean gutters and valley channels to keep rainwater moving freely. If roof surfaces stay damp for long periods, inspect decking for rot and address any soft spots before re-covering.