Last updated: Apr 19, 2026
Blackfoot sits on the Upper Snake River Plain in eastern Idaho, where winter snow cover followed by thaw periods creates repeated freeze-thaw stress on roof coverings and flashing. That means your shingles, underlayment, and vent penetrations are pushed to the edge of their resilience as water seeps into tiny gaps, freezes, and expands. In a single year, you get cold snaps, rapid melts, and urban snowload that shifts with wind and sun. The result is faster wear on sealants, quicker edge degradation, and more frequent micro-leaks that never quite reach the surface until a heavy spring rain or a warm afternoon. The consequence is a roof system that looks solid but is quietly deteriorating at the joints, valleys, and penetrations where flashing meets decking.
The city's climate pattern of cold winters and warm summers means roof systems are exposed to both snow-related moisture loading and strong summer UV aging in the same year. Snow piles on the ridge and tails of your roof will melt unevenly, shedding water onto lower spots where drainage is poor or where misaligned flashing channels water toward vulnerable spots. Summer UV can bake exposed surfaces, drying seals and edge caulking until tiny cracks widen. These combined forces shorten the life of sealants, ridge caps, step flashing, and booted penetrations if neglected. If you skip proactive checks after heavy snowfall or after a week with blistering sun, you'll be chasing leaks that started as micro-cracks months earlier.
Spring thaw and heavy precipitation are a known local project risk in this area, making drainage performance, leak detection, and replacement timing more critical than in milder Idaho locations. If gutters and downspouts aren't tuned to handle the spring rush, meltwater can pool along eaves, forcing runoff into soffits and fascia where rot begins. Valleys and dormer junctions are common trouble spots because melted snow rides along the roof plane and concentrates at these low points. Look for vertical lines of dampness along interior ceilings after warm snaps or sudden rain; that's your first sign a leak is traveling through flashing or under shingles. Regular checks during thaw cycles are not optional-they're a line of defense against hidden rot and more extensive repairs down the road.
Schedule a mid-winter walk-around after a heavy snowfall and again after a significant thaw. Pay special attention to ridge caps, flashing at chimneys and vent stacks, and valley seams. Inspect gutters for ice dam blockage, as backed-up meltwater will force water under shingles. If snow piles against fascia or into drip edges, gently clear to maintain airflow and reduce ice dam risk, but avoid torch-applied heat near eaves. In the early spring, have a professional assess drainage paths, confirm flashing integrity, and verify that the roof's slope and valley channels direct water away from the foundation rather than toward it. Early repair beats a leak-driven remodel when the next thaw arrives.
Replacement windows in this area should be scheduled with the same eye for seasonal risk that roofing work needs. Winter snows and ice can limit access to both attic and exterior work spaces, so plan window installations for milder months when weather and ground conditions are more stable. Late spring and early fall provide the best combination of workable temperatures and daylight, making it easier to complete flashing detail work tied to the roofline without fighting a cold snap or deep freeze. If a window project must push into winter, expect shorter days and the need for extra safety measures, and always have a contingency plan for post-storm drying conditions.
Spring in this region can expose weak spots around existing openings as frost-thaw cycles stress framing and sealants. This is a good reminder to verify structural integrity before removal of old windows. If you notice shifting sills, cracked drywall, or敢 moisture stains near windows after a thaw, address those issues first or plan a coordinated sequence with the roofing crew. Dry-in work may be delayed by heavier precipitation, so partner with a contractor who can secure temporary weather protection and maintain a steady workflow when days are soggy. The goal is to minimize backtracking and keep the window rough opening straight and square as the season shifts from thaw to more predictable spring conditions.
In Blackfoot, the connection between roof flashing and window units matters more than in milder climates. Ensure the chosen window system installs with compatible flashing that integrates cleanly with siding and roof drip edges. A solid plan includes sealing strategies that resist wind-driven rain and the freeze-thaw cycle, especially where the roof line meets the wall. If a soffit or fascia replacement is planned alongside new windows, coordinate the sequence so that waterproofing transitions are continuous. Any misalignment can create a path for ice dams or moisture intrusion during the spring melt.
Summer thunderstorms and hail can interrupt active jobs and create demand spikes after storm events. Build in buffer days for weather-related delays and have a clear communication plan with the window crew. A practical approach is to front-load interior finishing tasks when outdoor conditions are at their most volatile, so the exterior installation can pause during a storm without compromising the seal or the interior environment. If a hail event hits the neighborhood, temporarily protecting exposed openings can prevent minor impacts from becoming longer-term issues while the crew reschedules.
Choose window materials that tolerate Blackfoot's temperature swings and snow load expectations. Insulation value matters, but so do edge spacers and glazing that resist condensation during thaw cycles. Consider glazing options that minimize external maintenance while delivering air-tight performance through the seasons. In this climate, a tight, well-sealed unit with robust weatherstripping around the sash will help reduce drafts and heat loss, particularly during the shoulder seasons when HVAC use fluctuates with the external conditions. Pair the choice with a contractor who understands how to seal around rough openings without compromising the exterior aesthetics or the adjacent roofing details.
Asphalt shingles dominate the local market because they fit the typical detached-home footprint here and are familiar to most crews. They must withstand regular freeze-thaw cycling as well as summer UV exposure. In practice, that means choosing a sealed system with reinforced underlayment, and selecting a granule profile that resists flaking after a long winter. When you plan replacement, look for shingles with good, dimensionally stable mats and a reflective top layer to help reduce heat buildup during the hotter weeks. A clean, well-ventilated attic helps these shingles hold up through the thaw and melt cycles that spike moisture at the eaves.
Metal performs well for snow-shedding and ongoing durability, which is appealing when winter accumulates and hail risk spikes during late spring. In this area, a standing-seam or similarly continuous fastening system tends to handle wind-driven snow and temperature swings better than some panel styles. If you lean toward metal, your choice should emphasize a robust coating and solid fastening with a protective sealant around penetrations. Pay attention to flashing at roof-to-wall junctions and any overhangs where ice dams might form. A well-designed valley and edge detail reduces snow migration and helps drainage during the rapid thaw that follows heavy snowfall.
These options are available, but their heavier weight requires careful evaluation against local freeze-thaw stress and roof structure limits. Clay tile and slate can crack or delaminate with temperature swings and repeated freeze cycles, especially if the roof deck isn't able to carry the extra load or if the roof experiences significant differential movement. Wood shakes bring a natural look but respond poorly to sustained moisture and freezing; they demand a precise ventilation plan and a high-quality underlayment to resist rot in the shoulder seasons. Synthetic and composite products can offer a lighter, more uniform performance in this climate, but still need to be matched to structural capacity and proper flashing. In all these cases, confirm that the selected system is rated for the local freeze-thaw pattern and warrants adequate expansion and contraction allowances.
When evaluating options, consider how each system handles drainage and flashing in the presence of spring runoff and summer hail. A roof that directs meltwater away from the eaves and directs it toward a safe drainage path reduces stress on the underlying structure. Taller or gently sloped roofs benefit more from options that shed snow efficiently, while steeper pitches need materials that resist impact from hail without becoming brittle. Regardless of the material, ensure the roof is thick enough to resist cracking during cold snaps and that a durable underlayment is installed to bridge temperature transitions between seasons.
Caldys All Weather Roofing
Blackfoot, Idaho
5.0 from 1 review
We are a locally owned roofing company based in Blackfoot, ID. We work on shingles, metal, single ply, etc. we also do siding and soffit. For any further questions feel free to give us a call.
Two State Roofing
(208) 523-8406 www.twostateroofs.com
Serving
4.2 from 19 reviews
We understand and know the harsh and varied weather conditions in this area and what the environment can do to your home or building, and we have the roofing solutions to solve your specific concerns and issues. We are absolutely committed to providing the highest degree of customer service, excellent materials and workmanship, and customer satisfaction for both our residential and commercial customers. We enjoy working personally with our customers to provide reliable information while exploring various possibilities. Our attention to detail guarantees a hassle-free experience in every phase of the job project.

Pro-Star Llc. Roofing & Siding
Serving
4.5 from 8 reviews
PRO-STAR ROOFING & SIDING is a family owned company located in Shelley, Idaho. We are here to serve the community and surrounding areas. Our team specializes in all types of roofing and sidings. From asphalt shingles, metal roofs, membrane roof, etc.We also specialize in all different types of siding. From vinyl siding to metal siding. Experience and quality matters most to us!
red head roofing
(208) 821-4658 www.facebook.com
Serving
5.0 from 2 reviews
We provide excellent service! we can remove your old roof and replace it with a beautiful new roof of your choice. shingles, shakes, or metal, you name it and we can put on for you no sweat! If you think your roof needs some repairs, no problem! we got you covered! call now for your free estimate!
A & H Exteriors
(208) 604-2617 www.myroofid.com
Serving
5.0 from 50 reviews
At A & H Exteriors, we understand that your home is your biggest investment. That’s why we take great care to ensure that all our work is done with the highest level of craftsmanship and attention to detail. We use only the best quality materials, and our team is trained and experienced in the latest techniques and technology to deliver superior exterior home services.

M & M Contracting
Serving
4.7 from 61 reviews
Being in business for 20 years has given us an unparalleled advantage over our competition and allowed us to provide the finest and most efficient customer service possible. We strive to ensure you’re confident and satisfied with our work. We look forward to providing excellent customer service to you!
Summer thunderstorms and hail are a stated seasonal risk in Blackfoot and can cause sudden roof damage even outside the main winter wear cycle. The snap of hail against a metal seam or the thud of a heavy hailstone on a shingle edge can create micro-damage that looks minor at first but can accelerate through rapid temperature swings. In normal years, dry days between storms help roofs dry out, but in peak season these cycles can push existing wear past a tipping point. Be vigilant after each storm and check for shallow dents, granule loss, and lifted flashing before the next weather system rolls in.
Because Blackfoot is not an extreme-claim insurance market, homeowners may need clear photo documentation and a contractor estimate to distinguish legitimate hail or wind damage from older wear. Start with a walk-around while the attic is dark and the roof is wet if access is safe, noting mismatched granules, curling edges, and any lifted or loose shingles. Take wide-angle and close-up photos from multiple angles, and keep a dated record of patches or felt visible interiors near penetrations. If a contractor identifies damage, ask for a written assessment that separates new impact or wind effects from existing wear in the past few seasons. This helps avoid confusion when the insurance review process begins.
Post-storm demand surges in Blackfoot can affect scheduling and material availability, especially when multiple neighborhoods seek inspections at once. If a hail event hits a few blocks, local crews may be tied up for days or weeks. Plan ahead by arranging a visual assessment within 24 to 72 hours of a storm when possible, and be prepared to document any changes you observe between the first inspection and a follow-up. For shingle types prone to denting or granule loss, decisions about temporary protection (like tarping) should consider a drying window and the forecast, so interior damage from leaks is minimized during the wait for a reliable contractor. Keep a simple log of storm dates, observed roof changes, and who you spoke with to streamline follow-up conversations.
Blackfoot requires roofing permits through the City Building Department for reroofing work. Before any tear-off begins, you or your contractor should contact the Building Department to start a permit application. The process is straightforward: provide basic project details, such as address, roof type, square footage, and the scope of work. Once the permit is issued, keep that paper on site and ready for any city inspector to see. The goal is to have a clear record of the work being performed so it aligns with local codes and the city's expectations for disruption and safety.
Contractors or homeowners must submit basic project details and arrange inspections with the city. Inspections are a two-step process in this climate, with timing tied to the seasonal schedule and weather windows. The first inspection occurs after tear-off, once the old roof is removed and the deck is exposed. The second inspection happens after completion, when the installation is finished and all components are in place. Weather or scheduling can occasionally delay inspection timing, so you should plan with a cushion and stay in contact with the contractor and Building Department to reschedule promptly if needed.
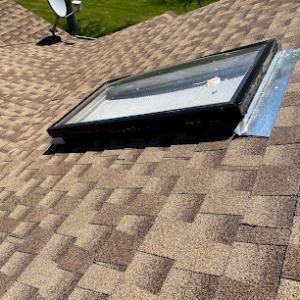
During the post-tear-off inspection, inspectors verify that the roof deck is sound, ventilation is in place, and flashing details meet code. The final inspection checks installation quality, proper flashing around penetrations, attic ventilation balance, and overall weatherproofing. In this climate, adequate ventilation and properly flashed valleys, chimneys, and skylines are critical to prevent freeze-thaw stress and snowmelt issues. If an item fails, expect a defined list of corrections and a re-inspection timeline to keep the project moving.
Coordinate your tear-off timing with dry, moderate days to avoid compounding snowmelt issues during installation. Have the permit number and inspector contact handy for quick communication. If inspections run long or weather shifts, use the delay as an opportunity to address minor flashing or vent adjustments so the final pass meets Blackfoot's winter performance demands.
Typical Blackfoot pricing runs about $350 to $650 per square for asphalt shingles. This range keeps projects moving during late fall freeze-thaw cycles and in spring when mud and thaw slow crews. If a roof needs a faster tear-off to avoid lingering winter water exposure, you may see prices push toward the higher end. In most homes, asphalt remains the best balance of cost, installation speed, and performance against snowmelt and ice dam risk.
Metal roofs in this market run roughly $700 to $1100 per square. Metal can ride out freeze-thaw cycles with less weight than heavier systems, but installation complexity and panel choices affect pricing. When spring rains collide with construction windows, or when crews wrestle with flashing around chimneys and vents, costs tend to climb. A metal roof can pay off later in maintenance and drainage performance during rapid snowmelt.
Clay tile tends to be $1000 to $1800 per square here. Heavier systems bring structural and labor considerations that add to cost, especially if rafters or supports need inspection or reinforcement. In Blackfoot, winter-access constraints and the rush to complete before spring storms can elongate schedules, nudging prices higher. Tile roofs also demand careful flashing detail to manage snow buildup and melt flow.
Wood shingles or shakes run about $600 to $1100 per square. Weight and hand-cut detailing drive materials and labor, particularly when crews must carefully navigate snow pockets and potential ice dams. Spring thaw periods and summer storm bursts can extend job timelines, nudging the final price upward if access is limited or sections dry out slowly.
Synthetic or composite options are generally $500 to $900 per square. They offer decent resilience to freeze-thaw cycles and can flex with drainage patterns in thawing conditions. Expect some price bumps if crews work around peak summer demand or restricted winter-access windows.
Slate finishes sit in the $1100 to $1900 per square range. This is a heavy, long-lasting option that often requires additional structural work and meticulous flashing, especially to manage snowmelt direction and ice formation at eaves. In Blackfoot, heavy installations may face scheduling gaps caused by winter weather and spring delays, reflected in higher labor costs.
You'll find Idaho's insurance environment relatively stable for homeowners in this area, with hail and wind claims happening but not at the extreme levels seen in the highest-risk markets. That steadiness can work in your favor, but it also means a careful, timely approach helps you avoid claim delays or disputes. Plan ahead to keep documentation organized so when a storm hits, you're not scrambling to assemble everything.
After a hail or wind event, expect insurers to request photos and an estimate from a licensed contractor. Clear, well-lit images that show entire roof sections, plus close-ups of damaged shingles, flashing, gutters, and any interior signs of leakage, help speed the process. Have a licensed contractor provide a formal estimate that outlines the scope of work, materials, and the immediacy of necessary repairs. This isn't about guesswork; it's about having a credible, verifiable plan tied to Blackfoot's weather realities.
Because adjusters may inspect the roof before finalizing a claim, documenting damage promptly after a thunderstorm or winter event is especially important. Start a simple log: note dates, weather conditions, and any new leaks or water intrusion you observe inside the home. Take dated photos from multiple angles, including the roof edge and valley areas where snowmelt and ice can accumulate. If you can safely access the roof, capture a few representative shots of damaged areas, then connect with a licensed contractor to prepare an estimate that you can share with the insurer.
Keep digital copies of all communications, photos, and estimates. When you file, attach the contractor estimate and the best photo evidence you have. If an adjuster schedules a visit, mark your calendar and ensure access to the attic or ceiling areas where signs of damage might be hidden. In-season hail and wind events can create reporting backlogs, so timely, organized documentation minimizes back-and-forth and clarifies the roof's true condition for a fair settlement.