Ultimate Guide to Leak Detection & Repair
Last updated: Feb 28, 2026
Introduction to Leak Detection & Repair
Leaks can hide in plain sight and strike when you least expect them. This section introduces practical strategies to find the source of water intrusion and stop it before it causes more damage. We'll cover common leak paths, safe detection methods you can do from inside the house or attic, and when to call in a pro.
What this page covers
- A practical, non-technical approach to locating leaks
- Step-by-step detection and basic repair ideas for common roof types
- Clear guidance on DIY vs professional service
- Maintenance tips to reduce future leaks and extend roof life
How leaks typically start
Most leaks begin at a connection point: flashing around chimneys and vents, shingles lifted by wind, or gaps where the roof meets walls. Heat and age can degrade sealants, while clogged gutters and improper attic ventilation can push water into vulnerable spots.
The detection approach we advocate
1) Confirm interior signs: water stains, soft spots, or mold patches that appear after rain or snow melt.
2) Narrow the source: identify suspect roof features (flashing, penetrations, roof edge) with a careful exterior and attic inspection.
3) Verify and assess: determine if damage is superficial or structural, and plan a targeted repair or replacement.
- Inspect the attic after a rain for drips, damp insulation, or blackened wood.
- Look for lifted shingles, cracked sealant, and loose flashing at vents and chimneys.
- Clean gutters and downspouts; water should flow away from the house, not pool against the fascia.
- Check for condensation on the underside of sheathing, which can mimic leaks.
- Ladder with sturdy footing, roof harness if available
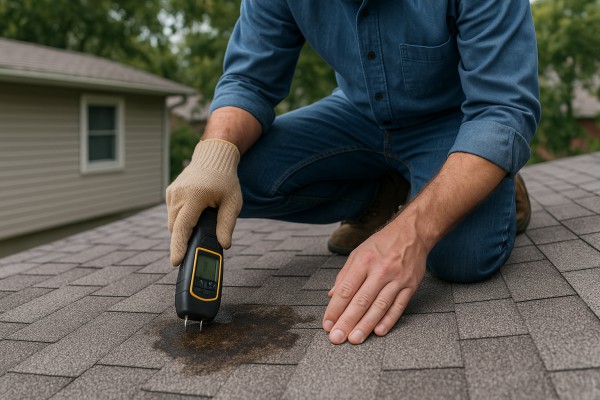
- Flashlight, moisture meter, and a screwdriver for probing flashing seams
- Sealant and roofing cement for small, temporary fixes (only if you're confident in the seal)
- Work with a partner; never work on a wet or icy roof
When to call a professional
- Roofs over 15-20 years old, widespread staining, or multiple leaks
- Damaged or buckled decking, or compromised flashing that you cannot safely reseal
- Steep pitches or difficult-to-access areas where proper safety equipment is required
What you'll gain from proper leak detection
- A clear sense of source and urgency
- A repair plan that matches the problem and your skill level
- A safer, drier home with fewer surprises
What Leak Detection & Repair Involves
Comprehensive Definition
Leak detection and repair is the systematic process of finding where water is entering a roof assembly, assessing how far damage has spread, and implementing durable fixes to stop the leak and prevent future intrusions. It combines exterior inspection, interior checks, moisture measurements, and sometimes advanced imaging to pinpoint the exact entry point and the best repair approach. The goal is to address the root cause (not just the visible stain) and to restore the roof's integrity while considering material age, weather exposure, and overall home safety.
When It's Typically Needed
- After a major storm, wind-driven rain, or hail impact
- When you notice ceiling stains, peeling paint, mold, or musty odors
- If flashing, vents, chimneys, skylights, or gutters look damaged or loose
- On aging roofs showing widespread shingle wear, curling, or granule loss
- Before selling or after purchasing a home to verify roof integrity
How Leak Detection Works
- Exterior inspection: review shingle condition, flashing around penetrations, vent boots, chimneys, valleys, and drip edges; check gutters and downspouts for blockages or overflow.
- Interior checks: inspect attic for condensation, staining, and moisture saturation; assess insulation and decking for rot or mold.
- Moisture measurement: use moisture meters and infrared thermography to locate hidden dampness behind walls or under decking.
- Functional tests: perform controlled water application or pressure testing on suspected areas when safe to do so to reproduce a leak.
- Mapping and tracing: document the path water takes from the entry point to outlets inside the attic or ceilings to confirm the source.
Step-by-Step Detection & Repair Process
1. Schedule a diagnostic visit and share symptoms (locations, rainfall history, etc.).
2. Conduct a thorough exterior and attic inspection with proper safety gear.
3. Identify likely leak points and prioritize areas with the greatest risk of damage.
4. Use non-destructive testing (moisture meters, infrared imaging) to confirm moisture pockets.
5. Pinpoint the leak source and outline a repair strategy that suits roof type and age.
6. Present a detailed repair plan and estimate; obtain approval before work begins.
7. Perform repairs (flashings, shingle replacement, re-sealing, decking repairs) and re-test to verify the leak is stopped.
8. Confirm dry-out and implement preventive measures (ventilation improvements, drainage adjustments, moss removal, fascia and drip edge checks).
Common Repair Options
- Shingle replacement or reseating; re-grading granules for protection
- Flashing repair or replacement around chimneys, vent pipes, skylights
- Valley repair or replacement if worn or damaged
- Decking repair or replacement for rotten or warped plywood
- Sealing and membrane applications at seams, edges, or higher-risk joints
- Gutter and downspout fixes to prevent water backing onto roof edges
- Vent boot replacement and duct sealing to prevent air leaks into attic
Do-It-Yourself vs Hire a Pro
- DIY for small, accessible issues (carefully resealing a minor leak, clearing clogged gutters, replacing loose shingles with proper safety)
- Hire a licensed roofer for structural concerns, complex flashing, hidden leaks, or if the roof is older than its expected lifespan
- Get multiple written estimates; verify license, insurance, and references
What to Expect After Repair
- A follow-up water test or rain simulation to confirm success
- Short-term monitoring during the next rain event for any signs of recurrence
- Advice on preventive measures (ventilation improvements, attic moisture control, routine inspections) to reduce future leaks
When You Need Leak Detection & Repair
Signs this service is needed
- Water stains on ceilings or upper walls after rain, snowmelt, or a storm.
- Musty, damp, or moldy odor in attic, crawlspace, or living areas.
- Visible mold growth, damp insulation, or dark spots in the attic.
- Dripping sounds in the attic or along interior walls, especially near penetrations.
- Pooling water or damp spots on the ceiling below a roof section.
- Increased utility bills with no clear explanation.
- Roof damage: missing, curling, or cracked shingles; loose or deteriorated flashing around chimneys, vents, or skylights.
- Ice damming or water intrusion along eaves during winter.
- Water staining around penetrations: chimneys, vents, skylights, or along the fascia.
Ways you can confirm yourself as a homeowner
- Do a safe attic check after a rain: look for active drips, wet insulation, staining, or a musty smell. Photograph findings and note location by joist or rafter.
- Inspect interior ceilings and upper walls for new stains, paint bubbling, or soft spots that appeared after a weather event.
- From the ground with binoculars (avoid climbing on a wet roof): inspect the roof edge, flashing around chimneys and vents, and any missing or damaged shingles.
- Look at gutters and downspouts: accumulated shingle granules, rust, or water overflowing near the walls can indicate leakage or overflow paths.
- Check around penetrations on the outside: sealant cracking around skylights, vents, or chimneys may be the culprit.
- Rule out plumbing as the source: note if the issue correlates with rainfall vs. constant indoor leaks from appliances or fixtures.
- Document with date-stamped photos and keep a simple leak diary to track when and where you see signs.
When to get a professional assessment
- You have an active leak that you cannot stop or pinpoint safely; a licensed roofer should assess promptly.
- Signs persist for more than a couple of days after DIY checks, or reappear after temporary fixes.
- You live in an older roof (15–20+ years) or you notice sagging ceilings, stained joists, or soft decking—these can indicate structural risk.
- The source is hidden behind walls or insulation, or you're unsure whether the water is from the roof or plumbing.
- Insurance or warranty considerations require a professional report; a formal assessment can document moisture levels and damage.
- You want a professional determination of the leak's extent, moisture migration, and an appropriate repair plan (detection, remediation, flashing repair, or roof replacement).
What's Included with Leak Detection & Repair
What is typically included
- On-site assessment by a qualified roofer to locate the source and determine the extent of the leak.
- Non-destructive leak tracing: visual roof and attic inspection, moisture meters, and infrared/thermal imaging when accessible.
- Documentation of findings: notes, photos, and a clear map of problem areas for reference.
- Dye testing or tracer methods to confirm the leak path when needed and safe to do so.
- Inspection of common leak pathways: shingles, flashing (step and counter flashing), valleys, vents, chimneys, skylights, and any areas where gutters or drainage influence the leak.
- Safe access setup and interior protection during the diagnostic and repair process (tarps, drop cloths, floor protection).
- Temporary containment to minimize further interior damage during the diagnostic phase.
- Targeted repairs that address the leak source. This can include resealing seams, repairing or replacing flashing, patching shingles, or applying compatible membranes.
- Replacement of damaged components directly tied to the leak: flashing, underlayment, fasteners, and small sections of decking or roof deck if necessary for a solid repair.
- Proper installation of repair materials, using appropriate products for your roof type and ensuring a weatherproof seal.
- Interior protections during work and thorough post-work cleanup.
- Final verification of the repair: water testing when feasible, or a controlled rain test; a repair checklist to confirm the leak is resolved.
- Written report with findings, scope of work performed, and practical maintenance tips.
- Short-term workmanship warranty on the repair (length and coverage vary by contractor and material).
- Optional maintenance recommendations to help prevent future leaks (gutter upkeep, flashing checks, granule loss monitoring, etc.).
How the process unfolds (step-by-step)
1) Schedule and prepare: confirm access, discuss the problem area, and review roof type and any safety considerations.
2) Diagnose and confirm: perform non-destructive tests to locate the leak source and confirm the path. Present findings and a recommended scope.
3) Perform the repair: implement patching, flashing work, and replacement of damaged components as needed; ensure a durable, weatherproof seal.
4) Verify and document: clean up the work area, run a verification test, provide a written report with photos, and discuss maintenance tips and any warranty details.
What is not typically included
- Major structural repairs beyond the repairable scope, such as extensive decking replacement or framing work not directly tied to the leak path.
- Interior water damage mitigation, drywall repair, insulation replacement, painting, or mold remediation resulting from the leak.
- Remodeling or renovation work related to the leak (beyond necessary repair scope).
- Chimney rebuilds or vent stack relocations not directly connected to the leak source.
- Electrical or plumbing repairs unrelated to the roofing leak path.
- Exterior siding work or gutter replacement that isn't a direct part of stopping the leak.
- Permits, impact fees, and inspection costs (not included unless the contractor quotes them in writing).
- Insurance claim processing or handling on your behalf.
- After-hours service, out-of-area travel, or additional services not specified in the written contract unless quoted and agreed in advance.
Roofing Materials Commonly Used With Leak Detection and Repair

- How leaks relate to this material: Most homes use asphalt shingles due to cost and ease of repair. Leaks often start at flashing details (chimneys, vent pipes), at valleys, or where shingles have curled, lifted, or been damaged by hail or wind. Water can travel under overlapping layers before you notice it in the attic.
- What leak detection focuses on: Visual attic staining, moisture meters behind suspect shingles, and infrared scans to spot cool, damp pockets under shingles and underlayment.
- Repair considerations:
- Replace damaged shingles and reseal loose tabs; ensure proper nail patterns and sealant where necessary.
- Inspect and, if needed, replace underlayment and step flashing along penetrations.
- Install or extend a protective ice/ water shield in vulnerable eaves and valleys.
- Use compatible sealants sparingly around flashings; avoid over-sealing asphalt shingles.

- How leaks relate to this material: Seams, panel laps, and fastener penetrations are common weak points. Corrosion or loose fasteners can create small channels for water.
- What leak detection focuses on: Thermal imaging to identify moisture intrusion behind panels, plus careful inspection of flashings and seams from the roof and attic.
- Repair considerations:
- Re-seal seams with compatible sealants (silicone or polyurethane) and re-cover lap joints as needed.
- Replace or retrofit fasteners with neoprene washers and approved fasteners; tighten where appropriate.
- Address damaged panels or compromised flashing around penetrations; consider a metal roof coating for extra protection if warranted.

- How leaks relate to this material: Tiles protect underlayment but cracked, broken, or slipped tiles allow water to reach the deck and underlayment.
- What leak detection focuses on: Visual inspection from above and in the attic to locate darkened or damp decking; infrared can help identify hidden moisture behind tiles.
- Repair considerations:
- Replace broken or cracked tiles and reseat properly with correct clips or nails.
- Inspect and replace underlayment or damaged deck material beneath the tile.
- Re-flash around vents and chimneys; ensure proper ventilation and drainage to prevent future cracking.

- How leaks relate to this material: Slate is durable but brittle; cracks or lifted fasteners at flashings can lead to leaks that travel along the slate bed.
- What leak detection focuses on: Close inspection of slate joints, nails, and flashings; attic moisture checks to confirm hidden intrusion.
- Repair considerations:
- Replace cracked or loose slate with matching pieces; re-nail with appropriate hardware.
- Inspect lead or copper flashings and reseal as needed; consider installing corrosion-resistant flashing.
- Verify underlayment integrity beneath slate and address any rot or decay.

- How leaks relate to this material: Wood is porous and expands/contracts with moisture. Leaks often occur at valleys, ridges, fasteners, and where shakes have warped or decayed.
- What leak detection focuses on: Moisture in decking, attic staining near intersections, and irregular shading on infrared scans.
- Repair considerations:
- Replace damaged or rotted shakes; maintain a tight starter course and proper nailing pattern.
- Treat underlying decking for rot and ensure adequate ventilation.
- Seal around penetrations and re-flash where wood meets other roofing materials.

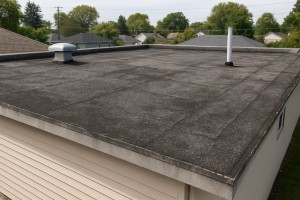
- How leaks relate to this material: Seams and penetrations are the most common leak sources; punctures and improper installations show up quickly in flat-roof setups.
- What leak detection focuses on: Dye tests or infrared to locate moisture under the membrane; careful seam inspection where patches may have failed.
- Repair considerations:
- Patch damaged areas with compatible self-adhesive patches or field seams using the correct adhesive system for the membrane.
- Re-seal penetrations (stacks, valves) and replace compromised flashings.
- For EPDM, consider liquid rubber coatings or peel-and-stick patches; for TPO/PVC, use manufacturer-approved seam tapes or adhesives.
- How leaks relate to this material: Multi-ply asphalt systems can fail at ply delamination, cracks, or around flashing details; traffic wear can expose underlying layers.
- What leak detection focuses on: Moisture in the deck via infrared and moisture meters; inspection of tar and gravel surface for blisters or soft spots.
- Repair considerations:
- Patch with compatible bitumen material and re-seal seams; re-cover or re-surface worn cap sheets as needed.
- Address flashing and perimeter details; ensure proper adhesion and edge detailing.
- If extensive damage is found, a partial patch or full re-cover may be recommended depending on deck condition and roof age.
Understanding the Cost of Leak Detection & Repair
Typical average costs
- For a single, localized roof leak: detection plus a basic repair usually falls in the $500–$1,200 range.
- For leaks that require flashing work, shingle replacement, or localized underlayment repairs: $1,200–$3,000.
- For more extensive repairs (multiple leaks, long roof sections, or damaged structural components): $3,000–$8,000.
- If the issue leads to a full roof replacement: costs can jump to $5,000–$12,000 or more, depending on the roof size, materials, and complexity.
- Detection-only scenarios (without repair) typically run $100–$300; advanced diagnostic methods (infrared, moisture mapping, borescopes) can push detection costs to $300–$500 in many markets.
What affects the price
- Roof access and height: harder access or steep pitches require more time and safety gear.
- Roof material and age: newer, specialty materials (tile, slate) or aging roofs may need more careful handling and additional materials.
- Location and extent of damage: a small attic leak is cheaper to fix than a widespread moisture problem across bays or decks.
- Detection method: basic visual inspection is cheaper; infrared imaging, moisture meters, scanning, and specialized equipment add to the bill.
- Labor and permit considerations: some jurisdictions require permits or additional labor for flashing removal, decking work, or vent repairs.
Cost-saving considerations
- Address leaks early: small problems are cheaper to fix before they invite water damage.
- Schedule during off-peak times: storm seasons drive rates up in many areas.
- Combine inspection and repair: some contractors offer bundled pricing if they diagnose and repair in the same visit.
- Maintain your roof: routine upkeep (clean gutters, replace missing shingles promptly) can prevent recurrent issues.
- Check warranties and insurance: if the leak is covered by a warranty or homeowner's policy (or if a contractor's workmanship warranty applies), you may reduce out-of-pocket costs.
- Request a written scope: a clear list of what's included helps avoid surprise add-ons later.
Cost-increasing considerations
- Hidden leaks: leaks that are behind walls or under decking take longer to locate and require more equipment, driving up costs.
- Structural damage: if the decking, fascia, or framing is compromised, repairs become significantly more expensive.
- Multiple leaks or extensive decking repair: when several areas are affected, expect higher labor and material costs.
- Roof replacement: if the leak signals widespread failure, replacement costs can dwarf patch repairs.
- Access equipment needs: commercial-grade elevation gear or safety systems can add to the price.
How the cost is calculated
- Diagnostic fee: a baseline charge for inspecting and pinpointing the source.
- Labor: hours needed to locate, access, and repair the leak.
- Materials: flashing, sealants, shingles, underlayment, or replacement decking.
- Equipment: infrared cameras, moisture meters, borescopes, or other specialized tools.
- Site conditions: attic insulation removal, interior water mitigation, or hardwood floor damage can add steps and costs.
- Permits and disposal: any required permits or waste disposal fees.
Steps to get an accurate estimate
1. Document the issue: note when you first noticed the leak, where it appears, and any recent weather events.
2. Ask about methods: inquire what diagnostic tools (visual inspection, infrared, moisture meters) will be used.
3. Request a written plan: a detailed scope with a breakdown of detection and repair costs.
4. Compare bids: obtain at least two or three written estimates that cover scope, materials, and timelines.
5. Review warranties: ask about workmanship guarantees and material warranties for any repairs.
How the Leak Detection and Repair Process Works
Step 1: Schedule and Gather History
To begin, we collect what you already know and set up a convenient time for the inspection. This helps us target the right areas and avoid surprise delays.
- What prompted the visit: visible stains, drips, or after a heavy rain
- Roof age and any past repairs or patches
- Access to the attic, ventilation, and insulation status
- Known leaks and their locations
- Ideal timing and any weather constraints
Step 2: On-site Exterior and Interior Inspection
Our technician performs a thorough look at both the roof surface and the interior to map signs of leakage.
- Exterior: shingles condition, flashing, vents, chimneys, valleys, and gutter system
- Interior: ceiling stains, wet insulation, mold, rafters, and attic moisture
- Safety and access: ladder setup, skylight protection, and fall risk assessment
- Note any drainage issues that could drive water toward the roof line
Step 3: Diagnostic Testing
We use non-destructive tests to confirm the path water takes.
- Moisture meters to locate elevated moisture behind walls or decking
- Infrared camera scans to spot hidden dampness not visible to the naked eye
- Dye or spray testing to trace a suspected flow without widespread damage
- Controlled water tests when weather allows and it's safe to do so
Step 4: Source Identification and Assessment
We combine findings to pinpoint the exact leak origin and contributing factors.
- Primary leak source (e.g., flashing seam, shingles failure, vent boot)
- Secondary pathways that may carry water to the interior
- Condition of underlayment, decking, and attic ventilation
- Urgency level and potential for interior damage if left unrepaired
Step 5: Repair Plan and Temporary Measures
We present a clear plan with timing, costs, and options.
- Temporary protections (tarps, leak barriers) to buy time in bad weather
- Scheduling around weather windows to ensure lasting repairs
- Estimated scope and price ranges for temporary vs permanent fixes
- Materials choices and any permit requirements
Step 6: Permanent Repair and Replacement
We implement the agreed repair with attention to detail.
- Step-by-step actions: reseal or replace flashing, fix or replace damaged shingles, replace underlayment, seal penetrations, and address gutter or downspout issues
- Proper nail patterns, shingle alignment, and flashing terminations
- Materials used: asphalt shingles, metal flashings, sealants, and vent boots
- Cleanup and protection to prevent debris from causing future problems
Step 7: Post-Repair Verification
We verify the fix before declaring victory.
- Indoor check: look for any signs of new staining after rain
- Exterior check: ensure seams and flashings are watertight
- Optional follow-up infrared check to confirm dryness
- Documentation: work completed, warranty details, and care notes
Step 8: Maintenance and Prevention Tips
Keep leaks at bay with simple, proactive steps.
- Regular roof cleaning and moss or lichen control
- Keep gutters clear and properly pitched
- Ensure attic ventilation and insulation are balanced
- Schedule annual or biannual roof inspections
Residential and Commercial Considerations in Leak Detection and Repair
Residential vs Commercial Considerations of Leak Detection & Repair
- Roof type and scale: residential roofs are typically pitched with shingles, while commercial roofs are often flat or low-slope membranes (EPDM, TPO, built-up). The approach to detection and repair changes with the surface area, penetrations, and drainage details.
- Access and safety: homeowners can generally work around a house with standard ladders, but commercial projects may require stricter fall protection, site safety plans, and coordination with tenants or building managers.
- Detection tools: at home, you rely on visible signs, handheld moisture meters, and basic inspection. Commercial jobs commonly use infrared cameras, moisture sensors, and more advanced diagnostics to trace leaks over large membrane areas.
- System integration: residential leaks often involve flashing around chimneys, vents, skylights, or failed shingles. Commercial leaks can involve parapets, edge flashing, roof penetrations for HVAC units, and complex drain and scupper systems.
- Codes, permits, and warranties: code requirements, building permits, and manufacturer warranties differ between home roofs and commercial systems. Commercial work often requires more formal permits and adherence to specific roofing assemblies.
- Maintenance cadence: homes benefit from seasonal checks and quick-response repairs. Commercial properties may need ongoing inspection programs, tenant coordination, and scheduled roof-asset maintenance.
- Costs, disruption, and timing: residential repairs usually happen with homeowners present and can be shorter in duration. Commercial repairs may involve phased work, temporary relocation of operations, or business-hours restrictions.
- Insurance and warranties: warranties on residential products differ from commercial warranties, and insurance claims may have different forms and documentation requirements.
- Coordination and communication: a home project is typically a single homeowner or family decision. Commercial projects involve property managers, facility teams, and possibly multiple stakeholders.
How leaks typically present in residential vs commercial settings
- Residential signs: ceiling stains, attic dampness or mold near penetrations, curling or lifting shingles, gutter overflow after storms.
- Commercial signs: larger ceiling or wall stains, pooled water near flat sections, membranes showing seam failures, drainage- or parapet-related issues, and water intrusion around large HVAC footprints.
- Hidden pathways: both sectors can hide leaks along flashing laps, vents, and penetrations, but hidden leaks in commercial roofs can travel longer distances before surfacing inside.
- Seasonal factors: ice damming and wind-driven rain are common in homes; snow load, thermal expansion, and long-term membrane wear are frequent commercial considerations.
Practical steps for homeowners
1. Observe and photograph: note where stains appear, how they grow after rain, and any attic moisture.
2. Check exterior drainage: clear gutters, downspouts, and splash blocks; ensure water moves away from the foundation.
3. Inspect visible flashing: around chimneys, vents, skylights, and transitions from roof to walls (only from safe positions).
4. Look for early signs: curling shingles, granule loss, or soft decking in the attic after a storm.
5. Document with dates: keep a simple log of when issues appeared and how they progressed.
6. Schedule a professional evaluation: a qualified roofer or leak-detection specialist can map the leak path and avoid unnecessary, invasive probing.
What to expect from a leak-detection plan (residential-focused)
- Safety first: roof access, ladder use, and attic air flow are reviewed with you before any work begins.
- Diagnostic phase: moisture meters, inspection mirrors, and, if needed, infrared imaging to locate hidden moisture.
- Path mapping: the pro traces the leak from the stain back toward the source, documenting penetrations and flashing failures.
- Temporary measures: tarping or spot-sealing to prevent further water intrusion during heavy rain.
- Repair plan: a clear scope, materials list, and a timeline tailored to your roof type and budget.
- Warranty clarity: explanation of coverage for workmanship and materials, plus maintenance tips to extend life.
Budgeting and priorities
- Prioritize active leaks: address areas actively allowing water in before cosmetic concerns.
- Age and material: older shingles or membranes may push you toward replacement, rather than multiple patch repairs.
- Insurance and claims: document damage for possible claims and understand deductible implications.
- Phasing options: for large commercial sites or multi-story homes, discuss staged repairs to minimize disruption.
Quick residential leak-detection checklist
- Stains or damp spots on ceilings or walls after rain
- Attic moisture or musty odors
- Sign of damaged flashing around vents or chimneys
- Missing or loose shingles and granule buildup in gutters
- Proper drainage away from the house foundation
How Leak Detection & Repair Varies by Location
Regional climate impacts
Climate drives when leaks show up and how we investigate them. In colder, northern zones, freeze-thaw cycles aggravate hidden leaks and ice dam-related intrusions. In hot, humid areas, moisture can hide behind saturated attic insulation and grow mold more quickly. Coastal regions face salt spray and high humidity that speed corrosion around flashing and fasteners. Dry, sunny regions may see asphalt shingle drying and aging differently, making timely detection even more important after monsoon or monsoon-like events.
- Ice dams and attic condensation are common in snowy regions.
- Humidity-driven mold risk is higher in warm, wet climates.
- Salt erosion near coastlines can affect flashing components.
- Extreme heat can accelerate material aging and expand/contract behaviors.
Building code and permitting differences
Codes and permitting shape how leak work is done and what warranties cover. States, counties, and cities set rules for underlayment, flashing, ventilation, and access to permits. Some areas require licensed roofing contractors, specific inspection steps, and recorded notice-of-work.
- Always check local permit requirements before repairs.
- Some regions mandate certain underlayment types or venting standards.
- Warranties may be void if work isn't performed by a licensed pro in that jurisdiction.
Roofing materials by region
Regional preferences influence leak risk and detection approaches. Asphalt shingles are common nationwide, but other regions favor metal, clay tile, or slate. Each material has unique flashing needs and failure patterns.
- Snow belts favor durable, structural underlayment and robust ice-dam protection.
- Southwestern regions use clay or concrete tile with distinctive flashing details.
- Coastal areas often blend metal or tile with corrosion-resistant fasteners.
Seasonal considerations and timing
Season affects both detection methods and repair scheduling. In winter, inspections may need to verify attic warmth, ice dam prevention, and heater-related moisture. In spring and fall, heavy rains or wind-driven leaks reveal weaknesses in flashing, gutters, and roof-to-wall transitions.
- Plan inspections after the wettest season for best visibility.
- In spring, inspect for after-storm leakage from wind-driven rain.
- In winter, evaluate for ice dam-related leaks and venting issues.
Local hazards and disaster-prone regions
Disaster risk shapes leak priorities. Hurricanes, tornadoes, hail, and earthquakes each create typical trouble spots and require region-specific mitigation and inspection routines.
- Hurricanes and tropical storms demand checking roof edge protection, hurricane clips, and wind-driven rain leaks.
- Hail-prone areas track dented or compromised shingles and fractured flashing.
- Earthquakes may affect roof deck integrity and fastener connections in some regions.
Insurance and warranties by region
Insurance practices and warranty terms vary. Some regions have stricter claim processes after storm damage, while others emphasize routine maintenance inspections to keep coverage valid. Local codes can also influence what repairs are eligible for warranty support.
- Verify what your policy covers for leak-related repairs.
- Ask how regional code updates affect warranty eligibility.
Service availability and cost variations by region
Labor costs, material prices, and contractor availability differ widely. Rural or high-demand markets may have longer wait times and higher travel fees, while urban areas may offer faster response but tighter schedules.
- Expect regional variation in hourly rates for leak detection, infrared tests, and dye tests.
- Some remote areas require mobile units or regional travel from nearby cities.
Local best-practice approaches
Different climates push us to adapt detection tools and sequences. In the north, you'll emphasize ice-dam checks and attic diagnostics; in the south, moisture mitigation and venting optimization take precedence. In coastal regions, corrosion-friendly hardware and timely flashing inspections dominate.
- Use infrared moisture detection and controlled water tests when permitted by local codes.
- Prioritize venting, insulation, and underlayment choices aligned with regional conditions.
- Schedule pre-season inspections to catch region-specific failure patterns before peak rain or heat.