Last updated: Apr 19, 2026
Williston's warm season brings heavy hail and strong thunderstorms that can pummel steep-slope homes with little warning. When a major storm hits, you're not just dealing with a roof that's taken a hit-you're up against a regional surge of claims that swells contractor backlogs and stretches insurer response times. In practical terms, that means your first call after a hail event may sit in a queue longer than you expect, and scheduling a firsthand inspection can hinge on the storm's ongoing activity in nearby neighborhoods. The risk isn't only a torn shingle or dented fascia; it's a cascade that slows every step from assessment to approval. If you wait for perfect sunshine before you act, you may miss the window entirely and end up fighting to keep water out while the pressure builds.
Full roof replacements are routinely pushed into late spring through fall, because winter conditions simply won't tolerate tear-offs or on-roof installation. That timing is baked into local practice: crews, suppliers, and working daylight align with longer days and milder temperatures. But the same seasonality that helps you progress also compresses your schedule after a major event. As hail and wind claims stack up across the region, insurer adjusters can take longer to flow through the pipeline, and repair teams can fill up fast. You can't rely on a best-case, one-week turnaround. The reality in this market is a multi-step process with potential delays at the inspection, appraisal, and scheduling stages. Planning steps must account for those delays so you're not left scrambling when the calendar turns cold.
Given the early return of freeze-thaw conditions, you have a narrow window to move from storm inspection to insurance approval to completed replacement before cold weather clamps down on progress. The moment hail damage is detected, you should initiate a formal claim promptly, document all visible damage with clear photos from multiple angles, and secure a temporary protective measure to limit interior damage while the claim works its way through. It's critical to assemble your documentary package quickly: photos, a roof map noting damaged elevations, and any prior maintenance records that support the necessity of replacement rather than repair. Delays at any step can ripple into the next season's constraints, forcing you into less favorable weather and tighter labor windows.
Start by contacting a local, storm-season experienced roofer who understands the Williston market and its peak-traffic periods. Ask for a same-season inspection to inventory all damage-shingle granule loss, lifted tabs, dented metal, and compromised underlayment-and to forecast the likely replacement scope. When the insurer arrives, have your documentation ready so the adjuster can move quickly from damage recognition to approval. If you encounter a backlog, request a written timeline and keep in touch regularly; don't assume a delay is acceptable or inevitable. Finally, prepare your house for a fall window by coordinating with your contractor on the order of operations, ensuring scaffold setup, material lead times, and crew scheduling align so that completion can occur before the first hard freeze. In this market, decisive action is your best defense against a long winter wait and a weather-tight mismatch.
The Missouri Plateau's exposed, wind-swept plains shape every roof detail you choose. In this area, roofs endure long winters with heavy freeze-thaw cycles, hot summer days, and sudden storm surges that carry hail and strong winds. The temperature swings stress materials unevenly, so the same roof that holds up through a windy spring can come off better after a cold snap if it's paired with a durable underlayment and properly sealed edges. Because there's little natural wind shielding in open, non-wooded neighborhoods, even modest gusts can test ridge lines, penetrations, and edge detailing. A roof's compatibility with a venting plan and attic moisture control matters as much as the surface layer itself, since trapped heat and condensation worsen shingle and underlayment wear over time.
Storms in our region bring hail and wind that often leave visible pockmarks, bruises, or granule loss on asphalt and composite shingles, and they can dent softer metal and vents. In Williston's climate, damage can appear suddenly after a powerful thunderstorm, or gradually as wind-driven hail wears away surface protection. Steep-slope homes in open lots are especially vulnerable to edge and ridge damage where wind gusts funnel along roof planes. Freeze-thaw cycles then push moisture into any micro-cracks, causing micro-delamination that can become bigger leaks over a season. When you inspect, focus on elevated signs such as lifted shingles, exposed underlayment, dented flashing, and damaged soffits that can funnel water into the attic if left unchecked. Don't assume a roof is fine after the first sunny day; hail damage can be deceptive, and small breaches compound with temperature swings.
Regional oilfield activity drives Williston's roofing schedule. When Bakken work ramps up, crews can be in high demand, and you may face tight windows to secure skilled labor after a storm. The install season is relatively short-late spring through early fall-so aggressive timelines are common, and weather-fronted delays can push projects into critical weeks. Plan ahead: after a major hail event, start coordinating with a roof crew as soon as moisture infiltration is obvious, and be prepared for back-to-back scheduling if multiple homeowners in your neighborhood need work. Communicate clearly about whether tarping, temporary repairs, or full replacement is more appropriate, and confirm that crews can handle steep pitches and extended eave runs typical of Williston homes. If your property uses metal or tile, confirm installation teams have the right equipment to work safely on tall or exposed sections, where wind can complicate long-run installs.
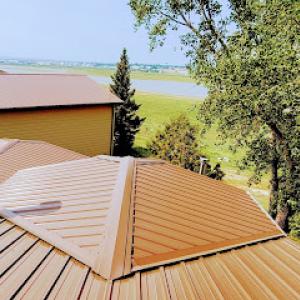
In this climate, you want a surface that resists hail bruising, holds up to wind loads, and tolerates freeze-thaw cycles. Metal roofing offers high wind resistance and rapid shedding of hail impacts, but requires careful seam detailing and chimney/vent flashing to avoid leaks in fluctuating temperatures. Asphalt and synthetic shingles provide flexibility and ease of repair, with a straightforward replacement path when damaged sections are small, yet still rely on a solid underlayment and proper attic ventilation to mitigate freeze-thaw stress. For homes with a more traditional look, composite options can balance aesthetics with resilience. Regardless of material, emphasize a robust underlayment, well-sealed penetrations, and appropriate attic ventilation to reduce the risk of moisture accumulation during long North Dakota winters.
Asphalt shingles remain common because they fit local housing stock and cost expectations, but they are especially exposed to hail bruising, granule loss, and wind damage during northern plains storm season. In practical terms, look for impact-resistant options and thicker granules, and be prepared for quicker granule wear after a heavy hail event. If a hail season hits your area, you'll notice more granule loss on the driveway and gutters, signaling the need for closer inspection of the roof deck and underlayment. The asphalt choice can be solid for Williston homes when paired with a quality underlayment and a steep enough pitch to shed wind-driven hail, but expect more frequent inspections after storms and during spring thaws.
Metal roofing is a strong regional fit in Williston because it handles snow shedding and repeated freeze-thaw well, but detailing at fasteners, penetrations, and edges matters in the city's wind exposure. Metal shines on steep slopes where wind and ice can cause edge lift, and it resists granular wear and hail bruising better than asphalt. The critical areas are fastener patterns, sealant durability around vents and chimneys, and the transition zones at eaves and ridges. Plan for robust flashing, roof-to-wall terminations, and concealed fasteners where possible to minimize leakage paths. If you're upgrading from shingles, a metal system with a well-sealed edge detail can reduce maintenance calls between spring storms and mid-winter freezes.
Clay and concrete tile are listed material options but are less naturally aligned with Williston's freeze-thaw climate and structural loading realities than lighter steep-slope systems more typical in northwestern North Dakota. Tiles add weight and complexity, which can stress existing roof framing in areas with deep frost cycles and shifting soils. They also tend to be less forgiving on impact from hail and can crack in freezing temperatures after a strike. If considering tile, ensure structural assessment and wind-rated underlayment are in place, and expect more frequent inspections after hail events.
With a short installation window in late spring through early summer, planning ahead for a hail season is essential. Choose a roof that allows for rapid inspection after storms, and keep a reliable contact with a local roofing crew that understands local wind zones and snow load expectations. Regular maintenance between storms-clear debris, check fasteners, and monitor edge seals-helps prolong the life of the system you select. In a region where steady freeze-thaw cycles are the norm, prioritizing edge details, vent flashing, and snow guards for steep pitches reduces the risk of ice damming and water intrusion as temperatures swing. For most homes, pairing a resilient roof type with solid underlayment and thoughtful installation details offers the best defense against Williston's harsh seasonal shifts.
Williston Roofing Company
(701) 339-2345 willistonroofingcompany.com
904 2nd St W, Williston, North Dakota
4.9 from 57 reviews
Williston Roofing Company is a family-owned and operated business with a combined ownership experience of approximately 45 years in roofing, sprayfoam and construction. Our commitment to integrity is evident in the practice of installing the same high-quality products on clients' houses as we do on our own. This dedication reflects our ethos of doing the right thing and ensures trust and reliability in the services provided. Williston Roofing Company is Williston Basin's Premier Roofing Contractor.
Empire Roofing
622 6th Ave W, Williston, North Dakota
4.0 from 3 reviews
Empire Roofing is a Residential and Commercial Asphalt Roofing company with the following services: - Roof Inspections - Roof Repairs - Roof Replacement - Strom Damage Roof Repair Empire Roofing was started in 1998 by Marlin Nelson in Williston ND.

Aspen Contracting
(701) 354-2001 www.roofsbyaspen.com
13551 Bassett Ln, Williston, North Dakota
5.0 from 1 review
We specialize in residential and commercial roofing, siding and gutters services. Whether your home has experienced storm damage, you are building a new home, or your older roof requires some annual maintenance, we’re the best for the job. We have the expertise, products and services to answer your needs. We always provide a FREE inspection and estimate and we never request payments up-front. We use trained representatives and crews for the satisfactory completion of your home. Our work is backed by the Aspen Ironclad lifetime warranty. Our consultants specialize in the insurance claims process and are ready to help homeowners understand their policy and navigate the process to restoring their home.
Williston's long cold season creates repeated freeze-thaw stress that can open vulnerable shingle tabs, flashings, sealant joints, and underlayment transitions. When the sun climbs on a stubborn snowpack, then cools again at night, every layer of the roof moves slightly. Those tiny movements add up, especially in areas where shingles meet vents, stacks, and eaves. The result is small cracks that let moisture sneak in and refreeze, widening gaps over time. What looks like a simple blister or a lifted corner could be a sign that the next thaw will push moisture further under the surface.
Ice-related moisture problems are a major local concern because roofs can move from snow cover to melt events and back to hard freezes, especially around eaves and roof penetrations. Ice dams push melted water up under shingles where the protective layers meet deck and flashing. In Williston this is common after a stretch of warmer days followed by sudden cold snaps, when gutters clog and ice builds a stubborn barrier. If water climbs past the edge, it can follow nail lines and sealants into the attic, staining rafters, molding, and ceiling futures you've already lived with.
Repairs that seem minor in late fall can worsen over winter in Williston because trapped moisture and thermal cycling continue working on the assembly for months before full replacement weather returns. A quick patch may seal against current leaks, but the next freeze can reopen seams and shift flashings again. This means small fixes that look adequate in mild weather might become costly headaches after the ground freezes and the moisture inside your roof system keeps moving with the temperature.
During shoulder seasons, look for hairline cracks along shingle edges, loose granules in gutters, and wet spots that appear after melt events. Around penetrations, pay attention to caulk and sealant joints that look tired or crusty. If you notice any unusual moisture on ceilings beneath the attic or in the upper walls, treat it as a warning flag rather than a cosmetic issue. In these conditions, addressing problems promptly is the best way to avoid a larger, colder setback when the next winter arrives.
Typical local material ranges are Asphalt Shingles 350 to 700 USD per square, Metal Roofing 600 to 1200, Clay Tile 900 to 1800, Concrete Tile 900 to 1700, Wood Shingles/Shakes 600 to 1100, and Synthetic/Composite Shingles 450 to 900. Those numbers reflect the tight market around the Bakken region, where crews and materials move quickly and prices can shift with demand. When a hail event hits, you'll see prices tilt higher as crews are booked out during the already short replacement season.
Hail-driven damage turns into a two-part challenge: identifying actual damage and lining up replacement crews fast. In a town built on northern plains exposure, storm crews may be in high demand after every major hail event, and travel logistics can add days or weeks to a project timeline. Expect longer wait times for specialty materials or experienced storm-restoration crews, especially if a popular color or profile is limited locally. If your roof is due for upgrade anyway, a hail claim can shorten the decision window-but it also means you should be ready to move quickly on quotes and scheduling.
Your budget guide starts with material choice. Asphalt shingles remain the most common and typically the most economical route. If you're chasing longer life and higher wind resistance, metal roofing lands in a higher price band but often pays back in maintenance-free years. Clay or concrete tiles bring distinct aesthetics and excellent durability, but they add weight and require a structurally sound, higher-budget install. Wood shingles or shakes carry a classic look but can be more sensitive to hail and freeze-thaw cycles. Synthetic/composite options offer a middle ground on cost and performance. In Bakken-area conditions, expect labor and travel costs to push project pricing up relative to larger metro markets.
When your hail claim is approved, confirm material lead times and crews early in the season, then lock in a date as soon as possible. Have a clear scope: roof deck condition, underlayment, flashing, and ventilation checks included. Request written warranties and a payment schedule that aligns with project milestones. For a practical fit, prioritize a reputable local crew with experience on steep slopes and northern plains weather, as travel logistics and safety requirements can affect schedule and price more than in centralized markets.
In Williston, a roofing permit is required for a full roof replacement through the Williston Building Department. The process typically begins before any shingle nails go into the sheathing. Make sure you or your contractor has a current, valid contractor license on file with the city and that the project address matches the permit application. Because the area experiences rapid weather shifts and a compressed spring-to-fall window, securing approval early helps avoid delays caused by hail checks, wind alerts, or code updates.
The permit review focuses on basic plan details and compliance with local code requirements. Have a concise project description ready, including roof type, underlayment, attic ventilation strategy, and any ventilation or drainage changes. Expect the reviewer to verify that fasteners, flashing, and seam work meet Williston's wind and impact standards, given the region's exposure to hail and freeze-thaw cycles. If your contractor plans a change in material or roof pitch, ensure the plan explicitly addresses those details and aligns with the adopted local amendments.
Inspections occur during and after installation. Your contractor should arrange the rough-in inspection at key milestones, typically before shingles go on, after underlayment and flashing are installed, and again as the project nears completion. The goal is to confirm proper nail patterns, flashing around chimneys and vents, and that attic ventilation remains effective after the new roof is installed. Expect weather-related pauses but keep the team aligned with the inspection schedule to prevent backlogs.
The final inspection verifies completion and code compliance. Ensure all penetrations are sealed, drip edges are continuous, and all components meet Williston's standards for wind, impact resistance, and drainage. Once the inspector signs off, your new roof can be formally considered finished, and you can proceed with any required documentation for warranty or insurance purposes.
Roofing in this area moves to a very different rhythm when hail hits and winds roar across the northern plains. Williston is part of a hail- and wind-exposed insurance environment where claim activity is elevated and replacement timelines can be shaped by storm volume as much as by contractor availability. That means busy seasons aren't just a convenience issue for homeowners; they can push response times and scheduling into a squeeze, especially when the Bakken-driven labor swings tighten the market. Being prepared for a compressed window after a major event helps a homeowner avoid being left with a hurried decision when the next storm rolls in.
After a damaging hail event, insurers may ask for thorough photo documentation and detailed damage records. In this region, prompt documentation is especially important before temporary repairs or additional weather alter the evidence. Take clear, timestamped photos of the roof from multiple angles, including interior signs like attic moisture or ceiling staining. Keep an organized file of notes that tie each photo to a date and location on the roof. If crews perform temporary patches, document those actions as well, so the claim file reflects an accurate before-and-after trail rather than a dashed line on a map of damage.
After a roof replacement, carriers may revisit coverage terms or underwriting assumptions, so you should ensure the contractor's scope, permit status, and completion records align with policy requirements. A thorough, itemized scope that matches what the insurer expects reduces the risk of later coverage questions. In Williston, where storm volume can influence both timing and decisions, a precise handoff between the contractor and the insurer helps keep the process from unraveling as the weather tests the region again. Maintain a clean ledger of work performed, exactly what was installed, and the dates of major milestones to support any future policy review.
Spring rains in Williston can delay tear-offs and material delivery, and muddy site conditions can complicate access around homes before the main summer roofing push begins. When the ground stays soft, crews may stall at driveways or around flower beds, and equipment like tarps, dumpsters, and loaders can't maneuver safely. Expect short pauses for a weather window that clears, not a full day's work, and plan for weather-driven gaps that push the schedule outward.
Because the city's workable season starts after winter but before peak summer storm demand, spring delays can push projects into a more crowded part of the calendar. If hail or wind damages occur in late spring, you might face back-to-back projects or tight crews finishing prior jobs. Coordinating with the contractor to lock a tentative sequence helps lock in the earliest feasible dates without stacking too many arrivals on the same week.
Homeowners in Williston often need to balance urgency from winter damage with the reality that wet spring conditions can slow staging, cleanup, and inspection timing. Before a crew arrives, keep pathways clear, move vehicles away from the work zone, and trim back overhanging branches to reduce cleanup time once tarps come off. Mud control measures, like gravel or matting at the entry points, can minimize tracking and protect landscaping ahead of a busy install window.
Inspectors and adjusters may work around weather gaps, so expect some variability in timing before the main summer push. When conditions finally firm up, crews will prioritize safety checks, roof edge protection, and debris containment to prevent mud from migrating across yards. If access remains challenging, coordinate a brief, targeted inspection to confirm material staging and venting readiness, then plan a solid block of non-rain days for the bulk of the tear-off and installation.