Ultimate Guide to Commercial Roofing Services
Last updated: Feb 28, 2026

An Introduction to Commercial Roofing Services
What counts as commercial roofing?
Commercial roofs serve larger footprints, flat or low-slope designs, and different load and drainage requirements than typical homes. They protect a building, its occupants, and its contents, while accommodating equipment like HVAC units and skylights. Think of a commercial roof as a full system: flashing, insulation, membranes, ballast, and drainage all working together.
Common roof types for businesses
- Built-up roofing (BUR): multiple layers for durability and weather resistance.
- Modified bitumen: ply sheets with flexibility for movement and temperature changes.
- Single-pply membranes: TPO, EPDM, and PVC offer good seam integrity and lighter weight.
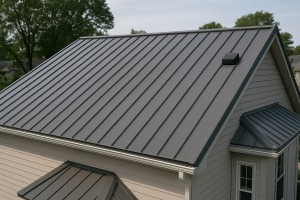
- Metal roofs: long-lasting, reflective panels that handle heat and wind well.
- Ballasted or hybrid systems: combinations that balance cost, performance, and upkeep.
Each type has its own pros, cons, and maintenance needs. A knowledgeable roofer can help you match the design to climate, budget, and building use.
How to tell if your commercial roof needs service
- Visible signs: standing water, curling or blistering membrane, or obvious patches.
- Interior indicators: staining, damp spots, or warmth loss near ceilings or walls.
- Performance cues: longer periods of weatherproofing failure after rain or wind events.
- HVAC and equipment issues: poor rooftop drainage affecting equipment efficiency.
Documented issues and a careful inspection can pinpoint whether a repair, retrofit, or full replacement is most cost-effective.
The inspection process
1. Schedule a thorough rooftop and interior inspection with a licensed contractor.
2. Assess drainage: scuppers, gutters, downspouts, and slope to prevent ponding.
3. Examine membranes and flashing: seams, joints, penetrations, and edge details.
4. Review insulation and decking condition: moisture, rot, and structural integrity.
5. Deliver a prioritized report: immediate repairs, near-term maintenance, and long-term replacement options.
A good inspection looks beyond surface wear and considers future weather exposure and energy efficiency.
Maintenance matters
Regular upkeep extends life and protects investments. Short, targeted maintenance beats large, sudden repairs later. Focus areas include:
- Clearing debris and ensuring clear drainage paths.
- Checking flashings around vents, skylights, and mechanical units.
- Inspecting for ponding water and addressing low spots.
- Keeping HVAC curbs and equipment seals in good shape.
Cost and budgeting basics
- Replacement vs repair: small leaks may be patchable, while widespread membrane failure often requires replacement.
- Material choices: single-ply membranes tend to cost less upfront but may have different long-term warranties than BUR or metal systems.
- Longevity and downtime: roof work can affect building use; plan for temporary disruptions.
- Warranties and service agreements: a solid warranty can stabilize long-term costs and maintenance.
Working with a contractor
- Verify licensing, insurance, and safety records.
- Ask for references and photos of similar projects.
- Review the proposed scope, timelines, and expected downtime.
- Confirm warranties on materials and workmanship, plus maintenance options.
- Request a written, itemized estimate with a clear payment schedule.
Quick maintenance checklist for homeowners and building managers
- Clear gravel, leaves, and debris from the roof and drainage paths.
- Check for standing water after rain and address low spots.
- Inspect flashings and perimeter edges for damage or movement.
- Monitor interior ceilings for signs of moisture or temperature changes.
- Schedule a professional inspection after severe weather or visible damage.
What Commercial Roofing Services Include
Comprehensive definition
Commercial roofing services cover the inspection, repair, maintenance, replacement, and restoration of roofs on non-residential buildings—think offices, retail centers, multifamily properties, and light industrial facilities. These roofs are typically flat or low-slope and rely on membranes, metal, or built-up systems to shed water. A typical project includes an on-site assessment, material selection, a written scope, cost estimate, safety plan, and a long-term maintenance strategy. Work often touches the roof surface, flashings, penetrations (vents, pipes, curbs), parapets, drainage paths, and insulation. The goal is to prevent leaks, extend roof life, improve energy efficiency, and protect the interior. Because commercial roofs host HVAC equipment, skylights, and complex drainage, projects require coordination with other trades and strict safety standards.
- Common system types you'll encounter: flat/low-slope roofs, TPO, EPDM, PVC, built-up roofing (BUR), modified bitumen, and metal roofs.
- Key components: flashings, penetrations, drains or scuppers, parapets, insulation, and ventilation.
- Scope often spans beyond the membrane to include insulation upgrades, curb re-flashing, and rainwater management.
When it's typically needed
Use of commercial roofing services is driven by age, damage, and performance needs. Typical triggers include:
- Visible leaks or ceiling staining after rain
- Persistent ponding water and poor drainage on the roof surface
- Hail, wind, or storm damage to roofing membrane or flashing
- Aging materials showing blistering, cracking, curling, or granule loss
- Rising energy costs or poor indoor comfort due to roof-related heat gain or loss
- Tenant build-outs, expansions, or reconfigurations that affect the roof or penetrations
- Planned maintenance or coating programs to extend life and reflectivity
Core services you'll encounter
- Inspection and diagnostics
- Comprehensive on-site assessment to identify leaks, damage, and drainage issues
- Material and system suitability recommendations
- Preventive maintenance
- Routine cleaning, seam and flashing checks, debris removal, and coating touch-ups
- Schedule to extend life and avoid surprises
- Repairs and patching
- Patching leaks, resealing seams, replacing damaged flashings, and curb repairs
- Roof replacement
- System demolition, substrate prep, installation of a new membrane or metal roof, and warranty setup
- Coatings and restoration
- Reflective or elastomeric coatings for energy efficiency and extended life
- Emergency stabilization
- Temporary tarping and rapid response to stop leaks during storms
- Drainage and parapet work
- Re-establishing proper slope, clearing blocks, and flashing parapets to prevent water intrusion
- Ventilation and insulation upgrades
- Upgrading vents, curbs, and insulation to improve comfort and reduce energy use
Planning steps (a practical workflow)
1. Schedule a professional roof inspection and site assessment.
2. Review findings, select a system, and draft a written scope of work.
3. Compare warranties, permits, and contractor safety plans.
4. Develop a long-term maintenance plan, including inspections every 1-3 years.
5. Schedule the work with minimal disruption to occupants and operations.
Maintenance and care for longevity
- Establish a regular inspection cadence (at least annually, plus after major storms)
- Keep drainage paths clear and verify scuppers and downspouts are functioning
- Monitor for ponding, membrane damage, and flashing integrity
- Address small issues promptly to avoid costly damage later
Quick checks homeowners can understand
- Look for water stains on ceilings during rain and at interior walls near the roofline
- Check for obvious membrane damage or exposed insulation at roof edges
- Note any unusual indoor temperature variation or HVAC issues that might trace back to roof performance
This approach gives homeowners a practical, trustworthy overview of what commercial roofing services include, when they're needed, and how the work is typically planned and executed.
When You Need Commercial Roofing Services
Signs this service is needed
- Visible damage on a flat or low-slope roof: blistering, bubbling, cracks in the membrane, or peeled seams.
- Ponding water after rain or poor drainage that stays on the roof for days.
- Water leaks inside: stains on ceilings or walls, musty odors, or signs of mold in the attic or upper floors.
- Frequent leaks around penetrations: vents, skylights, HVAC curbs, or roof-top equipment show moisture intrusion.
- Damaged flashing or parapets: corrosion, lifted edges, or gaps around joints.
- Hail or wind damage after a severe storm: dented metal, damaged seams, or punctures that compromise waterproofing.
- Deteriorating edge details: exposed fasteners, rusted components, or rotted wood at the gutter line.
- Structural concerns visible from the interior: sagging ceilings, unusual roof creaks, or noticeable changes in interior temperature near the roof line.
Ways you can confirm yourself as a homeowner
- Review ownership and property records: confirm you're the legal owner and understand who's responsible for the roof (HOA rules, if applicable).
- Check the roof age and material type: note the roof system (single-ply membrane, built-up, metal) and approximate age, which influences needed maintenance or replacement.
- Inspect from the ground safely: look for lifted edges, wide gaps around flashing, or missing granules on asphalt surfaces; use binoculars rather than leaning over edges.
- Inspect the attic or ceiling for signs: dark spots, wet insulation, or daylight showing through roof decking indicate leaks or compromised decking.
- Assess drainage paths: ensure gutters and downspouts are clear and directing water away from edges; standing water on the roof is a red flag.
- Document with photos: take clear images of damage, flashing, penetrations, and any interior staining to share with a contractor.
- Check recent weather events: after hail or severe winds, note if there are new dents, punctures, or loose components.
When to get a professional assessment
- You see active leaks or visible interior water intrusion, even if it's minor.
- A storm recently damaged the roof (hail, high winds, or falling debris).
- Your roof is older than its expected life for its material, or you're unsure of the roof system.
- There are signs of widespread membrane distress, sagging, or structural concerns.
- You're considering repair, replacement, or an insurance claim, and you want an objective estimate.
1) Schedule a professional roof assessment if any of the above apply.
2) Ask for an on-site evaluation that includes both roof and interior checks (attic, ceiling), as needed.
3) Request a written report with findings, recommended scope of work, and phased timing.
4) Get multiple bids to compare approaches, materials, warranties, and timelines.
What a professional assessment covers
- Comprehensive roof condition review: membrane integrity, seams, flashings, penetrations, and equipment curbs.
- Drainage and ventilation assessment: surface water flow, internal drainage if present, and venting adequacy.
- Structural and deck evaluation: decking condition, insulation performance, and load-support considerations.
- Life expectancy and options: repair vs. replacement, material choices, and warranty terms.
- Code and permitting: adherence to local codes, necessary permits, and historical warranty or manufacturer requirements.
- Budget and timeline: scope of work, phased replacements if needed, and expected completion windows.
- Documentation for claims: detailed notes and photos to support insurance or financing discussions.
Quick planning tips
- Gather records: past roof reports, warranties, and any previous repairs.
- Align with insurance if applicable: understand deductible, coverage limits, and claim steps.
- Confirm accessibility and safety: identify temporary access needs, crane or equipment requirements, and site safety plans.
- Prepare for downtime: discuss scheduling with the building occupants and plan for contingencies if work disrupts operations.
What's Included with Commercial Roofing Services
What is typically included
A well-scoped commercial roofing project walks you from assessment to handoff with clarity, quality checks, and predictable timelines.
- Comprehensive roof condition assessment and written report
- Formal scope of work, project schedule, and budget
- Guidance on material selection and procurement coordination
- Permits, code compliance coordination, and plan review as needed
- Site safety plan, fall protection, warning signage, and project staging
- Protection of surrounding areas and daily cleanup
- Roof removal or surface repair of damaged sections, as applicable
- Installation or repair across common commercial systems: EPDM, TPO, PVC, BUR, or metal
- Roof deck inspection, repair, or replacement to support the new system
- Insulation upgrade or replacement and installation of a vapor barrier
- Flashing, edge metal, base flashings, termination bars, and parapet detailing
- Seams, sealants, adhesives, seam tapes, and proper lap details for membranes
- Fasteners, mechanical attachments, and ballast where required
- Drainage components: penetrations, scuppers, internal drains, and edge drains
- Roof penetrations, curbs, and flashing for vents, plumbing, and HVAC units
- Roof-mounted equipment supports or curbs and associated hardware
- Skylight and hatch flashing where present
- Ventilation improvements and moisture management
- Weather protection measures during construction and daily cleanup
- Final inspection, punch list, and sign-off on workmanship
- Handover of project documentation: warranty certificates, as-built drawings, maintenance guides
- Limited post-project support: warranty terms and optional maintenance plan
Process you can expect (typical steps you'll see documented in the project plan)
1) Pre-site assessment and scope agreement
2) Material selection and procurement coordination
3) Permitting, scheduling, and mobilization
4) Roof installation or repair work
5) Quality control checks and punch list walkthrough
6) Final handover and warranty documentation
What is not typically included
Some items fall outside the usual scope of a standard commercial roofing engagement and are handled as add-ons or separate contracts.
- Interior work, finishes, drywall, or damage to interior spaces caused by roof work
- Structural changes to the building shell not directly related to the roof system
- Cosmetic repairs to non-roof areas (painting, siding) unless specifically tied to the roof scope
- Design work beyond the agreed scope, or engineering updates not required by the project
- Abatement of hazardous materials (asbestos, lead) unless specifically contracted; requires separate assessment and budget
- Long-term maintenance plans, ongoing inspections, or coating schedules not included in the base contract
- Interior access, utilities upgrades, or ancillary systems not directly tied to the roof
- Major relocation of equipment or changes to drainage systems outside the roof scope
Common Roofing Materials Used in Commercial Roofing Services
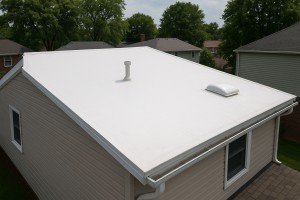
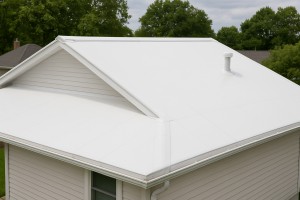
A lightweight, single-ply membrane common on flat and low-slope roofs. It's favored for energy efficiency because of its reflective surface and comparatively affordable installation.
- How the service relates:
- Preparation: clean and dry the deck, verify insulation compatibility, and address any penetrations.
- Installation specifics: heat-welded seams, reinforced edges, and proper ballast or attachment per project needs.
- What to watch for:
- Seam integrity, puncture resistance, and UV aging; regular inspections help prevent latent leaks.
- Typically 15–20 year life with proactive maintenance and proper weatherproofing.
- Quick steps for a TPO job:
1) Inspect substrate and insulation
2) Lay out membrane and establish seal lines
3) Weld seams and perform a seam test
4) Final edge detailing and roof penetration checks

Ethylene Propylene Diene Monomer is a durable rubber membrane used on many commercial flat roofs. It's known for long service life and good weather resistance, especially in varying climates.
- How the service relates:
- Installation options: full or partial adhered, or mechanically attached, depending on deck and wind loads.
- Insulation compatibility: works well with varied insulation schemes and can be easily patched.
- Pros/Cons:
- Excellent wind uplift resistance and flexibility, but black EPDM can absorb heat; white or reflective additives mitigate this.
- Typical lifespan 20–30+ years with proper maintenance.
- Steps you'll see:
1) Deck assessment and insulation checks
2) Membrane placement and fastening method selection
3) Seam sealing or bonding, plus edge detailing
4) Post-install inspection and drainage verification
Polyvinyl chloride is a sturdy, chemical-resistant option often used where roof deck conditions are challenging or chemical exposure is a concern. It's also highly fire-resistant and durable.
- How the service relates:
- Installation is heat-welded for watertight seams; requires precise substrate preparation.
- Suitable for roofs with penetration-heavy layouts due to strong flashing capabilities.
- Pros/Cons:
- High durability and UV resistance, but higher material cost and specialized welding equipment needed.
- Lifespan commonly 20–30 years with good maintenance.
- Steps to install:
1) Verify substrate for bond and drainage
2) Install continuous base sheets and flashings
3) Weld seams and conduct seam testing
4) Perform a final roof penetration inspection
A reinforced asphalt-based membrane installed as multiple plies, often with a granulated cap sheet. It blends familiarity with durability.
- How the service relates:
- Application methods include torch-down, cold adhesive, or self-adhesive options depending on roof conditions.
- Works well on aging substrates where a single-ply system isn't ideal.
- Pros/Cons:
- Excellent puncture resistance and legacy performance; heavier than single-ply systems.
- Typical lifespan: 15–25 years, depending on traffic and climate.
- Installation highlights:
1) Surface prep and primer as needed
2) Apply first plies and ensure alignment
3) Add cap sheet with final detailing
4) Gravel or reflective coating for long-term performance
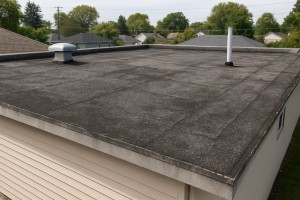
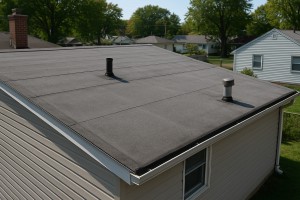
Multiple asphalt layers reinforced with fabric and capped with gravel or a reflective surface. BUR is a time-tested choice for durability and ballast.
- How the service relates:
- Layered construction requires careful insulation assessment and ventilation checks.
- Gravel ballast helps protect the membrane from UV exposure and temperature swings.
- Pros/Cons:
- Very durable and predictable performance; heavy and labor-intensive to install.
- Lifespan often 20–40 years with maintenance; gravel cap needs periodic replacement.
- What you'll see in a project:
1) Insulation and deck condition review
2) Sequential topping ply installation
3) Surfacing cap or gravel application
4) Roof drains and perimeter detailing inspection
SPF (Spray Polyurethane Foam)
A spray-applied foam that creates a seamless, insulated roof surface. It's great for improving energy efficiency and filling irregular spaces.
- How the service relates:
- Excellent for retrofit work and roofs with complex contours or penetrations.
- Requires proper surface preparation and post-application coatings for UV protection.
- Pros/Cons:
- Superior insulation, potential for fast turnaround; maintenance depends on coating integrity.
- Lifespan varies with coating and environmental exposure; recoats every 10–20 years are common.
- Application steps:
1) Surface prep and moisture check
2) Uniform spray application and thickness verification
3) Protective coating cure and adhesion test
4) Final inspection of seams and edges
Standing seam metal roofs use vertical or near-vertical seams with minimal penetrations; they're robust and recyclable.
- How the service relates:
- Fast installation with tight control over flashing and panel joints; excellent weather resistance.
- Requires precise substrate flatness and expansion joint management.
- Pros/Cons:
- Long life (40–70+ years) and high wind resistance; higher upfront cost and potential denting in hail-prone areas.
- Installation notes:
1) Check deck rigidity and insulation compatibility
2) Install panels, secure with concealed fasteners
3) Seal seams and flash penetrations
4) Conduct a water-test and finish inspections
Roof Coatings and Liquid-Applied Coatings
Elastomeric or silicone coatings rejuvenate aging roofs and extend service life; ideal for retrofit projects with minimal disruption.
- How the service relates:
- Applied over existing membranes or decks to seal minor leaks and add reflectivity.
- Ideal for flat or gently sloped roofs with good substrate condition.
- Pros/Cons:
- Affordable and flexible; not a full replacement and may require periodic recoat.
- Lifespan depends on coating system and climate; recoats every 5–15 years are common.
- Application steps:
1) Thorough cleaning and defect remediation
2) Primer if required, then coating application in uniform passes
3) Cross-check thickness and adhesion
4) Final inspection for adhesion and drainage performance
Understanding the Cost of Commercial Roofing Services
Typical cost ranges for common systems
- EPDM or TPO flat roofs: generally $5–$9 per sq ft installed, tear-off included.
- BUR (built-up roof): typically $4–$8 per sq ft installed.
- Modified bitumen: about $5–$9 per sq ft.
- PVC membranes: around $8–$12 per sq ft.
- Metal roofing (standing seam or similar): roughly $7–$14 per sq ft.
- Roof coatings and maintenance coats: commonly $1.50–$3.50 per sq ft as a preventative or partial-refresh option.
Notes:
- These are installed prices and usually include removal of old material, flashing, and basic insulation where applicable.
- Costs vary by region, contractor availability, building size, and access. For larger projects, price per sq ft often becomes more favorable, but mobilization and waste disposal can still push totals up.
What affects price
- Material choice and thickness
- Roof size, layout, and complexity (parapets, curbs, skylights, vents)
- Removal vs. overlay (roof write-offs and deck condition)
- Insulation and substrate condition
- Building height and access for equipment
- Local labor rates and permit costs
- Warranties, certifications, and energy-efficiency incentives
Cost-saving considerations
- Overlay instead of full tear-off when the deck is sound and code allows
- Standard materials (no premium or specialty coatings)
- Fewer penetrations or simpler roof geometry
- Scheduling during off-peak seasons or bundling multiple buildings into one project
- Comprehensive maintenance contracts that include routine inspections and timely repairs
Factors that may increase the price
- Required roof teardown and disposal of hazardous or dated materials
- Damaged decking, mold, or rot needing structural repair
- High-height access, limited staging space, or complex edge details
- Numerous penetrations, HVAC curbs, skylights, or venting that demand extra flashing and detailing
- Local permit fees, special inspections, or code upgrades (for energy efficiency or fire ratings)
- Premium materials, extended warranties, or specialized installers
How to approach pricing (5-step plan)
1. Define the system you want and the roof area to cover (square footage, slope, and penetrations).
2. Get at least 3 written bids with detailed scope, materials, and warranty terms.
3. Confirm removal needs: tear-off vs. overlay, disposal costs, and any required deck repairs.
4. Check contractor qualifications and references; verify licenses and insurance.
5. Review guarantees and long-term upkeep options (maintenance plans, inspections, and potential energy rebates).
How the Commercial Roofing Process Works
- Share basic details: building address, roof type, approximate size, current issues, and desired timeline.
- We discuss scope (repair vs. replacement), material preferences, and budget to set realistic expectations.
- We schedule a no-obligation on-site inspection to begin the process.
Step 2: On-Site Inspection and Measurements
- A thorough roof and attic assessment is performed: surface condition, flashing, drainage, vents, insulation, and ventilation.
- We take detailed measurements, photos, and note decking condition, moisture indicators, and potential safety concerns.
- Any access constraints or weather limitations are recorded to plan the next steps.
Step 3: Condition Report, Options, and Proposal
- You receive a written report with findings, photos, and recommended options.
- Options typically include repair, partial replacement, or full roof system replacement; material choices (asphalt, metal, TPO/EPDM) and warranties are outlined.
- A transparent estimate, proposed timeline, permit needs, and payment terms are presented.
Step 4: Material Selection and System Design
- We explain available roofing systems and their pros for your building use and climate.
- Details covered: underlayment, insulation, ventilation, flashing, drip edge, and wind resistance.
- We help finalize color, warranty terms, and maintenance expectations, ensuring code compliance.
Step 5: Pre-Job Prep, Permits, and Safety Plan
- Permits are secured if required; coordination with building management or HOA is handled as needed.
- A site safety plan is established: protect landscaping, set up containment and debris control, and plan equipment staging.
- Utility coordination and access routes are confirmed to minimize disruption.
Step 6: Removal, Decking Inspection, and Repairs (if needed)
- Old roofing materials are removed carefully to expose the decking.
- Decking is inspected for rot, damage, or moisture intrusion; damaged boards are replaced or reinforced as necessary.
- Decking is treated and prepped to create a solid, stable foundation for the new roof system.
Step 7: Installation of New Roof System
- Underlayment and ice/water shield are installed where required, followed by flashing and drip edge.
- The primary roofing material is installed per manufacturer specs, with proper nail pattern and spacing.
- Penetrations, valleys, and transitions are sealed; ventilation and attic access are checked for proper function.
Step 8: Quality Checks, Waterproof Test, and Cleanup
- Ongoing quality checks ensure fasteners, flashing, and alignment meet standards.
- A leak/water intrusion check is performed before, during, and after installation.
- The job site is cleaned thoroughly; waste is disposed of and landscaping is protected.
Step 9: Final Walkthrough, Documentation, and Warranty
- We walk you through the completed roof, answer questions, and explain maintenance needs.
- Warranty documents, material certifications, and care manuals are provided.
- We review any remaining contingencies, finalize documentation, and confirm the handoff.
Step 10: Post-Installation Support and Maintenance Plan
- A follow-up inspection is scheduled after initial heavy rainfall or seasonal change.
- You'll have access to maintenance plans, seasonal check-ins, and rapid repairs if needed.
- A dedicated contact point remains available for future concerns or adjustments.
Residential vs. Commercial Considerations in Roofing
Residential vs Commercial Considerations of Commercial Roofing Services
Homeowners often encounter two different worlds when it comes to roofs. The basics are similar—protect the house, shed water, and stand up to weather—but the approach, materials, and timelines diverge once you switch from a house to a larger building. Here's a practical guide to help you compare and decide.
- What changes most: the roof type (steep residential vs flat or low-slope commercial), the scale of the project, and the required permits and inspections.
- Why it matters: different systems mean different maintenance needs, warranties, and long-term costs.
Material and System Differences
- Residential roofs typically use asphalt shingles or metal tiles on steep pitches. They're familiar, readily available, and often simpler to install.
- Commercial roofs are usually flat or low-slope. Common materials include TPO, EPDM, PVC membranes, or built-up roofing (BUR), plus metal or concrete decks.
- Patching and maintenance differ: residential shingles are easy to replace in small sections; commercial membranes cover large areas and require precision seam work.
- Ventilation and insulation strategies differ too. Homes rely on attic ventilation; commercial roofs lean on roof exhaust, curb details, and insulation within a mechanical room or above-ceiling plenum.
Design, Sizing, and Installation Considerations
- Sizing and scope drive access and safety needs. Large commercial roofs may require hoists, crane access, or street closures, which impact scheduling.
- Drainage matters more on flat or low-slope systems. Internal drains, scuppers, and parapet walls need careful planning to prevent ponding.
- Flashing and curbs are critical on commercial roofs because equipment (HVAC, skylights, vents) is heavier and more numerous.
- For homes, expect simpler penetrations and a shorter installation window. For commercial projects, multi-day or multi-phase installs are common, with contingencies for weather and site coordination.
Timeline, Logistics, and Budget
- Residential projects usually finish quickly: 1–5 days depending on size and weather.
- Commercial projects can span weeks or months, with staged work to keep areas usable or to accommodate tenant occupants.
- Budget drivers: residential roofs hinge on material choice and roof size; commercial budgets hinge on membrane type, rooftop equipment, and required warranties.
- Warranties differ: residential shingles often have 20–50 year guarantees; commercial warranties depend on membrane, ply layers, and system installation specifics.
Permits, Codes, and Inspections
- Residential work typically requires a straightforward building permit and final inspection.
- Commercial work demands more rigorous documentation: AHJ (Authority Having Jurisdiction) review, fire code compliance, energy code considerations, and potentially fire-rated assemblies.
- Accessibility and roof-mounted equipment clearances (parapets, guardrails) come into play for commercial jobs.
Maintenance, Longevity, and Ongoing Costs
- Residential roofs: periodic inspections (2–3 times a year), gutter cleaning, and shingle replacement as needed.
- Commercial roofs: semiannual or quarterly inspections, membrane seam integrity checks, roof‑top equipment maintenance, and ballast or ballast-free options depending on the system.
- Long-term budgeting: expect higher upfront costs on commercial membranes but often longer service life and fewer frequent patchwork repairs.
Practical Checklist for Homeowners Facing Commercial Considerations
1) Identify roof type and age. Are you dealing with steep residential or flat/low-slope commercial sections?
2) List equipment and penetrations. HVAC units, skylights, vents, and ladders affect layout and safety.
3) Confirm access and disruption plans. Will tenants be affected? Are there street closures or crane needs?
4) Compare materials with warranty expectations. Do you prioritize energy efficiency, UV resistance, or durability?
5) Gather quotes and verify warranties. Ensure the contractor documents system specifics, maintenance responsibilities, and service window.
Steps to Evaluate Your Situation (Quick, Practical)
1) Inspect the current roof: note leaks, ponding, and wear around penetrations.
2) Gather age and history: when was the last major upgrade? What maintenance has been performed?
3) Prioritize goals: longest-lasting solution vs. lowest up-front cost.
4) Check local code requirements and permit expectations.
5) Choose a contractor who can clearly explain system options, installation sequence, and warranty coverage.
How Commercial Roofing Services Vary by Location
Regional Climate and Roofing Materials
Local climate drives what you install, how it's installed, and how long it will last. In hot, sun-drenched regions, reflective membranes help control energy costs and heat gain. In cold, snowy areas, you'll prioritize drainage, seam integrity, and moisture resistance. Coastal zones may require corrosion-resistant metals and wind-resistant attachments. Your choice of membrane, insulation, and fasteners should align with these conditions.
- Membrane options commonly used by region: TPO or PVC in warm climates; EPDM in cooler dark-wedge climates; metal or built-up roofs where hail or salt exposure is a concern.
- Insulation and ventilation needs shift with climate and energy codes.
- Reflectivity and color choices can impact long-term energy bills and roof temperature.
Building Codes and Permit Requirements
Codes and permitting vary by state, county, and city. They affect fire ratings, wind uplift, fire barriers, and overall roof assemblies. Work with a contractor who understands your local rules to avoid delays or noncompliant installations.
1) Check with the local building department for required permits.
2) Verify the contractor's license and insurance in your jurisdiction.
3) Schedule inspections at key milestones (pre-work, mid-project, final).
4) Ensure products meet local fire and wind uplift standards.
Local Weather Patterns and Seasonal Scheduling
Seasonal weather shapes scheduling, safety, and warranty considerations. Short windows between storms can influence crews, material delivery, and cure times.
- Plan around rainy seasons, extreme heat, or icy conditions.
- Allow for proper adhesive cures and seam sealing during the right temperatures.
- Build in contingency days for weather-related delays.
Regional Construction Practices and Trade Availability
Your region affects who can do the job, how quickly they can start, and how much equipment is needed. Demand spikes, supply chain quirks, and local workmanship standards all matter.
- Availability of skilled crews may vary by metro area.
- Lead times for membranes, insulation, and fasteners can shift with regional demand.
- Local preferences may favor certain systems (e.g., TPO in one region, EPDM in another).
Insurance, Permits, and Compliance by Region
Region-specific requirements influence risk management, warranties, and payment terms. Some areas require additional certifications or certain types of warranties to be eligible for permits or insurance coverage.
- Expect region-tailored warranty expectations tied to local codes.
- Lien waivers and certificate of insurance handling may differ by jurisdiction.
- Confirm that your contractor handles all regional compliance paperwork.
How this service varies in different regions in the United States
- Northeast: Snow loads and snow-drainage is critical. Wind uplift ratings must meet local codes, and fire resistance standards may be stricter in urban cores. Expect longer winter pauses and careful scheduling around frozen substrates.
- Southeast: Hurricane and high humidity exposure drive corrosion resistance, moisture management, and prompt storm-response planning. Fasteners and sealants must tolerate salty air near coastlines.
- Midwest: Freeze-thaw cycles demand robust seam integrity and reliable drainage. Seasonal windows for installation are shorter, so crews optimize pre-season planning and material staging.
- Southwest: Extreme heat and UV exposure push for highly reflective, heat-resistant membranes and energy efficiency incentives. Materials must withstand desert conditions and possible dust ingress.
- West Coast: Seismic considerations and wildfire risk influence attachment methods and fire-rated assemblies. Coastal areas require corrosion protection and careful handling of salt spray, with permit processes varying by city and county.