Ultimate Guide to Failing Roof Warranty
Last updated: Feb 28, 2026
Introduction to Failing Roof Warranty
When a roof warranty isn't covering a leak, damaged flashing, or other failures, it can feel confusing and frustrating. This page helps you understand why a warranty might fail, what it often means for your situation, and the practical steps you can take next. You're not alone—warranty programs are complex by design, and homeowners frequently run into gaps between what's promised and what's paid for.
Is this urgent or common?
- Leaks and active water intrusion are usually urgent and deserve prompt attention to prevent interior damage.
- Coverage gaps are a common hurdle. Many homeowners discover that portions of a claim are denied or deferred due to exclusions, maintenance requirements, or timing limits.
- The likelihood of a denial or partial coverage varies by policy type, installer standards, and the warranty terms offered at the time of purchase.
What this typically covers and what it doesn't
- Coverage you may encounter
- Manufacturer warranties on shingles or underlayment, often covering manufacturing defects.
- Workmanship warranties from installers, intended to cover installation-related failures.
- Coverage for flashing, vents, and other components when they fail due to a covered defect.
- Common exclusions you might see
- Damage from improper maintenance or neglect.
- Impacts from storms or weather events not deemed to be a covered defect.
- Damage caused by improper installation or non-approved repairs.
- Normal wear and aging, or cosmetic issues that don't threaten the roof's integrity.
- What to confirm with your policy
- The exact components and timeframes covered.
- Required maintenance schedules and documentation.
- The process and timeline for filing, evaluation, and resolution.
High-level next steps
1) Identify your warranty types and key dates
- Determine if you have a manufacturer warranty, a workmanship warranty, or both.
- Note purchase date, installation date, and any transfer or renewal deadlines.
- Locate your policy documents, claim forms, and any required endorsements.
2) Gather evidence of the issue
- Take clear photos and videos of the problem from multiple angles.
- Record dates of leaks, moisture signs, or structural concerns.
- Compile receipts for recent maintenance, inspections, or repairs.
3) Review the policy language
- Read the coverage, exclusions, and claim procedure sections.
- Check for required inspection or disclosure steps and any documentation you must submit.
4) Initiate a formal claim or request
- Contact the warranty provider or installer in writing, referencing your policy number and defect details.
- Ask for a written timeline for evaluation, inspection, and decision.
5) Prepare for the assessment
- Be ready for a field inspector or independent appraiser to visit your home.
- Have a list of questions about coverage limits, potential costs, and next steps if parts are denied.
Quick tips to improve your odds
- Keep a clean maintenance log and save all communications.
- Photograph any prior repairs or alterations that could affect coverage.
- If a claim is denied or limited, request a written explanation and ask about appeal or mediation options.
- Consider getting a second, independent roof diagnostic if the warranty requires an official check and you disagree with the assessment.
Is a Failing Roof Warranty an Emergency?
- Active leaks during rain, water is dripping into the living space, or you see pooled water below the roof line.
- The ceiling or walls are bulging, sagging, or there's a sudden drop in the attic floor or decking.
- Daylight or a bright gap is visible through the attic, roof deck, or under loose shingles.
- There's obvious damage from a recent storm: missing shingles, torn flashing, or large hail that left dimples or dents.
- You hear unusual noises (creaking, popping) from the roof or attic that coincide with wind or temperature changes, suggesting structural loading issues.
Monitor if
- Minor damp patches appear after heavy rain but dry out quickly and there's no ongoing dripping.
- A few loose or cupped shingles, or granules in gutters, without active water intrusion.
- The attic feels unusually warm or cold, but there's no visible water entry and the ceiling remains dry.
Can wait if
- There are no leaks, no sagging, and no daylight visible from the attic or roof deck; you can safely schedule a repair window.
- The issue is cosmetic (slight curling or color fading) and does not compromise waterproofing or structural integrity.
- You're in a dry spell and the warranty claim process allows planning repairs over a few weeks without risking further damage.
- If it's safe, move valuables away from the leak path and put a bucket under any active drips.
- Avoid climbing on a wet roof or touching damaged flashing; loose shingles can be slippery and dangerous.
- If you smell gas, hear a hiss, or see electrical arcing near the roof, evacuate and call emergency services.
What to do next (document and plan)
- Photograph the affected area from ground level and from the attic or ceiling when possible, capturing the extent of the damage.
- Gather your warranty documents, policy numbers, and the install date; note any prior claims or repairs.
- Record dates of storms or events that preceded the damage, plus weather conditions.
- Note what you observed: leaks, snowfall, wind direction, and whether the problem worsened after rain.
- Contact the warranty provider or a qualified local roofer who understands warranty language to assess coverage and next steps.
- If you need to file a claim, keep a simple log of conversations: dates, names of representatives, and what was promised.
How to triage with your warranty
- Distinguish between manufacturer warranties (often focusing on material defects) and workmanship warranties (covering the installer's work).
- Some warranties require timely notification; others have specific claim windows or inspection milestones. Review the fine print or have a roofer read it with you.
- Even if a problem seems urgent, your claim may take time to process. A professional can advise on immediate temporary measures that minimize further risk while you pursue coverage.
Wrapping up practical checks
- Regularly inspect after storms, especially in the first few years after installation.
- Keep an up-to-date photo record and a simple map of attic access points and known vulnerabilities (vent flashing, pipe penetrations, edge details).
- Maintain clear communication with your roofer and warranty provider so you're aligned on status, required documentation, and expected timelines.
Common Causes of Roof Warranty Failures
Incorrect installation practices
A well-installed roof is the best guard against early warranty trouble. When installation deviates from the manufacturer's instructions, warranty coverage can be denied or limited.
- Nailing: wrong pattern, insufficient fasteners, or over- or under-driving nails.
- Underlayment and flashing: skipping steps or using incompatible materials around valleys, chimneys, dormers, and roof-to-wall transitions.
- Shingle compatibility: installing shingles that don't match the roof pitch, exposure, or climate requirements.
- Ventilation details: neglecting prescribed venting locations or not accounting for attic ventilation in the installation.
System design and ventilation mistakes
Roofs are part of a system; neglecting that fact invites warranty issues down the line.
- Inadequate intake/exhaust ventilation causing trapped moisture and accelerated deck rot.
- Improper insulation in the attic leading to condensation or heat buildup that affects roof components.
- Incompatible attic barriers or vapor retarders that interfere with the roofing system's performance.
Material compatibility and environmental factors
Warranties assume certain material pairings and environmental conditions.
- Mixing shingles or products not approved to work together can void the warranty.
- Using coatings, sealants, or detergents not approved by the manufacturer.
- Environmental stressors (high humidity, heavy foliage, persistent shade) that accelerate wear beyond normal expectations without proper maintenance or adjustments.
Maintenance neglect
Many warranties require ongoing upkeep to stay valid.
- Debris buildup, clogged gutters, and standing water near roof edges inviting moisture intrusion.
- Damaged flashing, cracked shingles, or lifted edges left unrepaired.
- Failure to perform routine inspections after severe weather or seasonal changes.
Weather events and improper repairs
Weather damage is common, but claims hinge on coverage terms and repair history.
- Damage from storms that exceed listed wind speeds or are not covered by the policy's weather coverage.
- Repairs performed by unqualified DIYers or non-certified contractors, which can void workmanship coverage.
- After-damage modifications or non-original components that aren't approved by the manufacturer.
Aging and wear
All roofs have a design life; warranties aren't unlimited.
- Normal wear and tear beyond the expected lifespan of the shingles or components.
- Granule loss or fading that falls within the warranty's cosmetic or wear limits.
- Structural deck deterioration or plywood/OSB damage beyond the product's anticipated performance.
Installer reputation and warranty terms
Who installed the roof and how rights are managed can affect coverage.
- A contractor without an active workmanship warranty or proper warranty transfer can complicate claims.
- Inadequate documentation of the installation and product details can obscure eligibility.
- Failure to complete required warranty registration or to adhere to transfer procedures.
Documentation, registration, and claim timing
Warranties hinge on clear records and timely action.
- Missing or lost receipts, installation date, product type, batch numbers, and warranty card information.
- Lack of maintenance records or service notes that demonstrate ongoing care.
- Delayed reporting of issues beyond the warranty's claim window or failure to provide requested evidence.
How Roof Materials Affect Failing Roof Warranties
How warranties relate to material type
Warranties are not one-size-fits-all. Different roof materials fail in different ways, and manufacturers carve out exclusions based on the material. When a claim is filed under a failing roof warranty, the material type often determines whether the issue is considered a defect, normal wear, or damage from installation and maintenance. Understanding how your material behaves helps you spot where a warranty claim might succeed or be denied.
Common roofing materials and how they are affected by Failing Roof Warranty
- Asphalt shingles

- What's typically covered: manufacturing defects in the shingles themselves during the warranty period (material-only or combined with limited labor coverage, depending on the plan).
- How failure shows up: curling, cupping, granule loss, or delamination that points to a defect rather than weathering or improper installation.
- What can void it: improper nailing, insufficient ventilation, or poor installation practices can void workmanship coverage and sometimes void material coverage if the installation caused the damage.
- Metal roofing (steel, aluminum, zinc)

- What's typically covered: coating wear, corrosion, or manufacturer defect in the panels or fasteners for a stated period.
- How failure shows up: paint peeling, rust, or panel deterioration not caused by hail or impact, or loose/failed seals due to installation.
- What can void it: improper underlayment, incorrect flashing, or wrong seam details can negate warranty coverage even if the metal itself is sound.
- Clay and concrete tiles

- What's typically covered: tile defects and sometimes underlayment or system components for a long period.
- How failure shows up: cracked or spalled tiles that aren't caused by impact; but structural issues or improper substrate preparation can void coverage.
- What can void it: heavy or improper installation, inadequate substrate support, or misaligned fasteners.
- Wood shingles and shakes
- What's typically covered: manufacturing defects for the wood components under the warranty term.
- How failure shows up: cupping, splitting, or decay from moisture—often a sign of maintenance gaps or improper ventilation.
- What can void it: failure to maintain, improper cleaning or sealing, or installation mistakes that accelerate moisture intrusion.
- Slate

- What's typically covered: slate tile defects for many years, sometimes paired with a workmanship component depending on the policy.
- How failure shows up: cracked or delaminating slate from a defect rather than from thermal cycling or wind-driven damage.
- What can void it: improper installation, use of incorrect fasteners, or movement in the roof deck.
- Concrete tiles
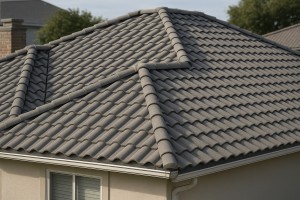
- What's typically covered: tile defects and occasionally system components for a long term.
- How failure shows up: delamination or spalling due to manufacturing issues; more commonly, failures stem from structural support or installation errors.
- What can void it: insufficient underlayment, wrong pitch, or poor attachment methods.
- Composite or engineered shingles
- What's typically covered: material defects during the warranty period for the specific product line.
- How failure shows up: premature fading, curling, or loss of granules that indicate a defect.
- What can void it: improper installation, mismatched components, or noncompliant ventilation and flashing.
- Flat roof membranes (EPDM, TPO, PVC)

- What's typically covered: manufacturing defects in the membrane and sometimes adhesive or seam issues within the warranty window.
- How failure shows up: seam splitting, premature aging of the membrane, or adhesive failures not caused by environmental exposure alone.
- What can void it: improper seam sealing, improper substrate preparation, or incompatible flashings and coatings.
Factors that commonly affect claims across materials
- Improper installation by non-certified contractors
- Inadequate or missing maintenance
- Alterations or repairs that don't follow the manufacturer's guidelines
- Ventilation and attic moisture management
- Damage from improper flashing or underlayment
- Prolonged exposure to conditions not addressed by the warranty (seasonal extremes, improper storage of materials)
Step-by-step: navigating a failing roof warranty by material
1) Gather your warranty and project documents: product name, model, install date, and coverage terms. Note any maintenance requirements.
2) Inspect for material- and installation-related red flags: curling, granule loss, flashing gaps, improper fasteners, or signs of moisture intrusion.
3) Compare findings to the warranty's exclusions and coverage scope for your material.
4) Collect evidence: photos, dates, and notes from a qualified roofer or installer about whether the issue is a defect or damage from installation/maintenance.
5) Initiate contact with the manufacturer and/or installing contractor: request a formal assessment and written determination on coverage.
6) If needed, obtain a third-party inspection: an independent roofer can help interpret whether failure is a defect or caused by installation, ventilation, or maintenance gaps.
7) Track deadlines and required actions: warranty claims have submission windows and documentation needs; stay organized to preserve coverage.
The Risks of Ignoring a Failing Roof Warranty
Hidden signs escalate into costly damage
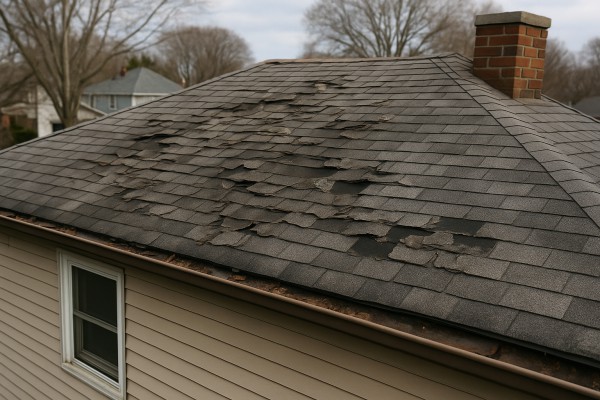
A failing warranty doesn't just cover a broken shingle. It signals that underlying workmanship or material issues may be present. If you ignore small signs—wavy ceilings, persistent dampness in the attic, or occasional dripping—you risk unchecked water intrusion, wood rot, mold growth, and compromised attic ventilation. Small problems that aren't addressed early often become big, expensive repairs.
Warranty coverage is time-sensitive
Most roof warranties have specific windows for reporting issues and filing a claim. Delays can lead to denial or reduced coverage. Even if you're within the contract window, late notice can complicate the investigation and weaken your position. Treat a failing warranty as a ticking clock, not a suggestion.
Voiding the warranty through improper maintenance
Warranties assume reasonable care: regular inspections, cleaning gutters, and using approved materials for repairs. Doing DIY fixes, hiring unqualified contractors, or altering flashing details without approval can void coverage. If a claim later reveals unauthorized work, the manufacturer may deny it entirely, leaving you on the hook for repairs.
Insurance peace of mind can be fragile
Your homeowner's policy may respond differently if a warranty is involved. If a defect is found to have existed before you owned the home or wasn't disclosed, insurance claims can be complicated or denied. Relying solely on insurance while ignoring warranty obligations can create gaps in protection and surprise costs.
Financial impact: out-of-pocket repair costs rise
When a warranty fails or is voided, you lose access to funded repairs that were supposed to be covered. The longer you wait, the more structural damage can accumulate, driving up labor, material, and temporary stabilization costs. Even if you eventually file a claim, you may face higher deductibles or limited coverage.
Resale value and market confidence
Homebuyers often scrutinize roof warranties during inspections. A lapsed or disputed warranty can reduce buyer confidence, slow closing, or lower your asking price. Prospective buyers may request proof of ongoing warranty coverage or reimbursements, adding friction to the sale.
Documentation and record-keeping matter
Without solid records, a claim can become a he-said-she-said situation. Missing receipts, warranty certificates, inspection notes, or dated photos make it harder to prove defect origin or verify timely reporting. Proper documentation strengthens your position and speeds resolution.
Practical steps to assess risk now
- Review your warranty document: note coverage scope, exclusions, and claim deadlines.
- Inspect for signs of moisture, staining, or ceiling bulges in living spaces and attic.
- Check shingles, flashing, underlayment, and gutters for visible damage.
- Confirm the contractor you used is authorized or recommended by the warranty issuer.
- Document with photos and notes: where, when, and what you observed.
- Record dates of any leaks or water intrusion.
- List all materials and contractors involved in any prior work.
- Reach out to the original installer or manufacturer as your first point of contact.
- If they're unresponsive, contact the warranty administrator for guidance on next steps.
- Consider a licensed roofer for an independent assessment to verify defect origin.
3) Prepare for a claim review
- Gather warranty papers, purchase receipts, and maintenance records.
- Have a recent, professional inspection report ready.
- Note any unauthorized repairs you've authorized and when.
4) Plan for contingencies
- Budget for potential out-of-pocket costs if coverage is denied or delayed.
- Schedule repairs promptly to minimize further damage, even while a claim is in process.
How a Failing Roof Warranty Is Diagnosed
Claim intake and scheduling
- A homeowner reports a suspected warranty issue to the manufacturer or installer's claims department.
- A claim number is assigned and information is requested, including basic roof details and photos if available.
- An appointment is scheduled for an on-site diagnostic inspection, or a remote review is requested if allowed by the program.
Pre-inspection documentation you should gather
- Photos of all affected areas, including close-ups of shingles, flashing, and any granule loss.
- A timeline of events: when the problem started, any storms or impact events, and any prior repairs.
- Roof age, original warranty terms, and copies of the warranty document and prior contractor invoices.
- Notes on attic conditions: signs of moisture, mold, condensation, or ventilation issues.
On-site inspection: the diagnostic sequence
1) Exterior visual assessment
- Inspect the roof surface from multiple vantage points for curling, cracking, missing granules, buckling, or blistering.
- Check flashings around chimneys, skylights, vents, and valleys; look for gaps, lift, or corrosion.
2) Interior signs of leakage
- Look for stains, rot, or mold growth on ceilings and walls below suspect areas.
- Examine attic insulation for dampness and note any ventilation blockages or excessive condensation.
3) Structural and installation checks
- Verify shingle exposure, alignment, and nail patterns; confirm fasteners are present and properly driven.
- Inspect surrounding components: drainage routes, gutters, downspouts, and drip edges.
4) Non-destructive testing and moisture checks
- Use moisture meters or infrared guidance to detect hidden moisture behind roof decks or under flashing.
- If permitted, perform non-invasive tests to confirm whether moisture is present without removing materials.
5) Documentation during the visit
- Record all findings with timestamps, photographs, and labeled diagrams of affected bays or planes.
- Moisture meters and infrared imaging to reveal concealed dampness.
- Material sampling only if required by the warranty language or to verify product type and batch information.
- Review of installation quality indicators such as nail size, nail spacing, and proper use of accessories like underlayment.
Distinguishing covered defects vs. wear and tear
- Manufacturing defect: a flaw in the shingle or adhesive that the warranty explicitly covers.
- Installation workmanship issue: improper nailing, misflashing, or incorrect shingle alignment that compromises the system.
- Environmental or maintenance factors: wind damage, hail risk, improper venting, or lack of routine maintenance.
- Normal wear and tear: expected aging within the warranty period may be excluded if it's not tied to a defined defect.
Root-cause analysis and determination
- Inspectors compare observed conditions against warranty language to determine if the failure stems from a covered defect.
- They assess whether damage is a direct result of product defect, installation error, or external conditions beyond the warranty scope.
- Where needed, a second opinion or specialist review may be requested to confirm conclusions.
Coverage decision and what it means
- Outcome categories: covered, partially covered, or not covered based on evidence and policy terms.
- If covered, define scope (repair vs. replacement), material specifications, and a proposed timeline.
- If not covered, document reasons clearly and reference the specific warranty clauses relied upon for denial.
Records and communication
- Maintain a centralized file: claim portal entries, inspector reports, photos, and all correspondence.
- Request a written rationale that cites the exact warranty language and findings.
- If the decision is unclear, request clarification or an independent review per warranty rules.
Repair Options for a Failing Roof Warranty
Temporary fixes
When a warranty claim is pending or the weather is unstable, these are quick, non-structural steps to slow leaks and protect interiors. They are not a substitute for a proper repair.
- Use a heavy-duty roof tarp or plastic sheeting to cover the affected area, secured at the edges to shed water.
- Place buckets or containers under active drips and keep the area dry to limit interior damage.
- Apply roofing sealant or roof cement sparingly to seams or small cracks as a stopgap, understanding it's short-term.
- Clear debris from the area to restore drainage and prevent clogging drains or valleys.
- Prioritize safety: avoid climbing on a wet or steep roof; if you're not comfortable, call a pro.
- Document with photos and dates; keep receipts for any temporary materials you install.
Limitations: temporary fixes don't address underlying moisture intrusion, deck or underlayment damage, or warranty coverage requirements. They buy time while you arrange a formal assessment.
Minor repairs
Minor repairs target small, localized failures that don't require replacing a large portion of the roof. They're typically within the scope of common warranty remediation when the issue is confined to a few shingles, flashing, or fasteners.
- Common targets: cracked or damaged shingles, loose or missing fasteners, damaged flashing around vents, cornices, or chimneys, and sealed leaks at penetrations.
- What to do (step by step):
1) Inspect the area carefully and isolate it from the weather as best you can.
2) Remove damaged shingles and replace with an exact or closely matched shingle using corrosion-resistant nails.
3) Repair or replace flashing if it's bent, loose, or corroded; reseal joints with a high-quality, compatible sealant.
4) Refill any gaps or nail holes with roofing cement and ensure a tight, watertight fit.
5) Re-inspect after a rain shower and check for renewed leaks; document the repair with photos.
- Materials: matching shingles, appropriate nails, compatible flashing, and roofing sealant.
- Notes: confirm that the repair aligns with the warranty's coverage and any required manufacturer-approved methods.
Partial replacement
Partial replacement is appropriate when a localized area has significant degradation that cannot be reliably repaired with minor fixes. This is common for defects in a section of shingles, underlayment, or decking.
- When to consider: several adjacent shingles are failing, or there's moisture damage confined to a specific roof plane or valley; the rest of the roof remains sound.
- What to do (step by step):
1) Have a licensed roofer assess the scope and determine if the warranty supports a localized replacement.
2) Remove the damaged section, inspect the deck and underlayment, and replace any compromised plywood or underlayment as needed.
3) Install new shingles with a matching profile and color; use proper nailing patterns and seal all joints.
4) Integrate flashing and ventilation trims to ensure a seamless transition with the surrounding roof.
5) Obtain documentation of the work and any warranty adjustments; verify permit requirements and warranty transfer terms.
- Considerations: color match, warranty eligibility, and the potential need to address underlying moisture or structural concerns. Partial replacement can be an efficient compromise when a full roof isn't necessary.
Full roof replacement
A full roof replacement is the most comprehensive option and may be required if the warranty dispute involves widespread failures, aging materials, or extensive moisture intrusion.
- When to consider: leaks across multiple roof areas, significant shingle wear, failed underlayment, or structural concerns that undermine the entire roof system; age often drives this decision.
- What to do (step by step):
1) Gather multiple bids from licensed roofers; check licensing, insurance, and references.
2) Verify warranty coverage and any requirements for full replacement to honor the claim (materials, installation method, and transfer process).
3) Plan the project: choose materials compatible with the existing deck, arrange debris disposal, and set a realistic timeline.
4) Prepare the interior: protect ceilings and valuables; arrange temporary accommodations if needed during work.
5) Post-installation: conduct a final inspection, obtain warranty documentation, and ensure proper ventilation and attic sealing.
- Materials and choices: consider durability, warranty terms, and energy performance; discuss impact on resale value and long-term maintenance with your roofer.
- Notes: a full replacement often provides the clearest path to restoring a reliable, long-term roof when the warranty coverage supports it, but it's a larger investment and requires thorough documentation.
Typical Costs to Fix a Failing Roof Warranty
Minor repair: description and cost
A minor fix covers small, localized issues that don't threaten structural integrity, such as a small leak or a few damaged shingles around a vent or flashing.
- What's typically involved: resealing flashing, re-nailing loose shingles, replacing 1–2 shingles, or resealing around penetrations.
- Time: a few hours on a single day.
- Materials: sealant, nails, a handful of shingles or flashing pieces.
- Cost range: $150–$600.
Moderate repair: description and cost
Moderate repairs address a larger damaged area or multiple small problem spots that keep leaking or compromising the roof's barrier.
- What's involved: replacing a larger section of shingles (roughly 2–5 squares), re-flashing around penetrations, minor decking repairs in localized spots, and updating underlayment where needed.
- Time: 1–2 days, depending on access and crew size.
- Materials: shingles, underlayment, flashing, fasteners.
- Cost range: $1,000–$3,500.
- Note: if decking damage is found but limited, costs stay in this range; extensive decking repair pushes into major repair territory.
Major repair: description and cost
Major repairs come into play when damage is widespread, there's compromised decking, or the warranty claim reveals significant defects requiring substantial work.
- What's involved: extensive decking replacement or repair, valley and large-penetration flashing fixes, multiple roof penetrations addressed, possible partial roof replacement, and permits or inspections if required.
- Time: several days to a week or more, depending on roof size and access.
- Materials: shingles, underlayment, decking, flashing, vent components.
- Cost range: $3,500–$12,000+.
- Note: very large or high-end roofs with premium materials can push costs higher, especially if contingencies or structural work are needed.
What factors affect cost
- Roof size: larger roofs require more materials and longer labor hours.
- Access: steep pitches, height, limited access, or obstructed work areas add complexity and equipment needs (lifts, scaffolding).
- Material type: asphalt shingles are usually the most budget-friendly; metal, tile, or slate raise material costs and installation time.
- Extent of damage: isolated issues are cheaper to fix than widespread deterioration or decking replacement.
- Local labor rates: regional cost differences can significantly impact total pricing.
How Long Can You Wait? Timelines for Filing a Claim Under a Failing Roof Warranty
Understanding the basic warranty window
- Most warranties require prompt notice after you become aware of a potential defect.
- Common windows: within 30 days, within 60 days, within 90 days, or within 1 year from discovery or installation date.
- Some warranties distinguish between workmanship coverage and material defect coverage; reporting rules may differ.
How to gauge your specific deadline
- Check your contract, warranty card, and service agreement.
- Look for: "Notice of claim," "timelines for filing," "exclusion of coverage for late reporting," "pre-existing conditions."
- If you can't find it, contact the manufacturer or contractor for a written deadline.
What to do now (practical, quick steps)
1. Photograph the issue from multiple angles and note dates.
2. Gather receipts, warranties, and prior work records.
3. Notify the contractor or warranty administrator per instructions in writing.
4. Schedule an inspection; some warranties require a licensed roof inspector.
What happens if you wait to address the problem in several timeframes
- Within 0-30 days of discovery
- Prompt reporting keeps coverage options broad; defects that are clearly manufacturing or workmanship-related are more likely to be honored.
- Documentation matters: save emails, take dated photos, and keep a log of conversations.
- 31-90 days
- Coverage can still apply, but late-notice clauses may come into play.
- Insurers or manufacturers may request additional evidence, a written description, or an on-site inspection within a defined window.
- Delays can complicate the contractor's ability to reproduce original installation conditions.
- 3-6 months
- Risks rise: extended exposure can lead to secondary damage (rot, mold, structural concerns) that may fall outside warranty scope.
- Some warranties require that the issue be unresolved by the initial investigation, or they may reclassify it as maintenance if delays are significant.
- Over 6-12 months
- Many warranties exclude or severely limit coverage for issues not reported promptly.
- You may bear inspection costs, and repairs may not be covered if the defect is judged to be long-standing or aggravated by neglect.
- The defect could be deemed outside the scope of a trigger event covered by the warranty, shifting the burden to you.
How This Problem Varies by Location and Climate
How This Problem Varies by Region & Climate within the United States
Your warranty terms don't exist in a vacuum. Local weather patterns, building practices, and even regional roofing materials shape how a failing roof warranty shows up and what a claim can cover. In practice, climate drives three core realities: the kinds of damage that occur, how quickly it happens, and whether the warranty language explicitly includes or excludes that kind of damage. Use this region-focused guide to spot the most common issues in your area and to read warranty terms with the right questions in mind.
Northeast & Great Lakes
- Climate drivers: frequent freeze-thaw cycles, heavy snow, ice dams, seasonal temperature swings, strong winter winds.
- Common failure modes: shingle granule loss, curling edges, flashing leaks around skylights and chimneys, ridge vent blockage from snow buildup.
- Warranty considerations: hail and wind damage may be subject to regional exclusions or higher deductible language; ice-dam related damage is sometimes framed as ventilation or insulation failure rather than manufacturing fault.
- Maintenance tips: ensure attic ventilation and insulation are up to par; keep gutters clear; remove heavy snow before it sits long; inspect flashing after snowmelt or thaw periods.
Southeast & Gulf Coast
- Climate drivers: high humidity, heavy rainfall, heat, tropical storms and hurricanes, coastal salt air.
- Common failure modes: accelerated asphalt aging from heat, moss/algae growth, deck rot in poorly vented roofs, corrosion on metal components near saltwater.
- Warranty considerations: moisture intrusion and wind-driven damage can be treated differently depending on the policy; salt spray may affect fasteners and metal flashings; some warranties exclude damage caused by ongoing moisture or improper maintenance.
- Maintenance tips: trim trees to reduce debris, power-wash and dry roof surfaces where appropriate, treat for algae growth, verify sealants and penetrations maintain watertight seals.
Midwest
- Climate drivers: wide temperature swings, summer heat, winter cold, hail in many seasons.
- Common failure modes: hail-caused denting or punctures, seam and shingle edge failures, fatigue of underlayment, moisture intrusion from compromised flashings.
- Warranty considerations: hail damage often triggers separate coverage from material warranties, but wind and workmanship limits vary by region; some policies require regular maintenance to remain in force.
- Maintenance tips: schedule post-storm roof checks, inspect for softened or cracked shingles, verify flashing around vents and chimneys, keep attic ventilation balanced.
Southwest
- Climate drivers: extreme heat, intense solar exposure, dust and wind, sporadic heavy rain.
- Common failure modes: asphalt aging and granule loss from UV exposure, fastener corrosion in coastal-adjacent areas, thermal movement causing ridge and hip joints to loosen.
- Warranty considerations: heat-related deterioration may be treated differently than wind or hail damage; warranties may require UV-rated materials or specific underlayment choices.
- Maintenance tips: routine cleaning to remove sand and debris, monitor for sunburned shingles, check sealants around penetrations, ensure proper attic ventilation to curb heat buildup.
West Coast & Pacific Northwest
- Climate drivers: high rainfall in many areas, heavy fog in coastal zones, damp conditions, earthquake exposure in parts, coastal salt in windy corridors.
- Common failure modes: moss and lichen growth, rot in damaged decks from prolonged moisture, flashing corrosion, wind-driven rain entry during storms.
- Warranty considerations: moisture and mold-related claims can hinge on ventilation and ventilation-related maintenance; coastal salt can affect metal components; local wind zones may have stricter coverage rules.
- Maintenance tips: aggressive gutter maintenance, moisture monitoring in eaves and soffits, timely replacement of any warped or rotted decking, check flashing after storms.
Alaska & Hawaii
- Alaska: extreme cold, permafrost interactions, and deep snow, with rapid thaw cycles in shoulder seasons.
- Hawaii: intense sun exposure and tropical storms; volcanic ash in some zones can abrade surfaces.
- Warranty considerations: many standard warranties have region-specific limitations; Alaska often involves unique frost-related considerations, while Hawaii may emphasize UV and salt exposure.
- Maintenance tips: for both, frequent inspections after severe weather events, and materials chosen for regional conditions (e.g., UV-resistant options in Hawaii).
1. Identify your region's primary climate stressors and compare them to your warranty's covered perils.
2. Read definitions of “loss,” “damage,” and exclusions with an eye for weather-driven failure versus workmanship failures.
3. Document weather events and resulting roof damage promptly with photos and notes before filing any claim.
4. Work with a local roofer who understands regional warranty practices and common regional pitfalls.