Ultimate Guide to Vent Pipe Leaks
Last updated: Feb 28, 2026
Introduction to Vent Pipe Leaks
Understanding the problem
Vent pipes are a normal part of your home's plumbing system, venting sewer gases and allowing air to flow so drains work properly. When the roof around a vent pipe leaks, water can chase the pipe through the flashing and into the attic or ceiling. Leaks may show up as ceiling stains, damp insulation, or dripping on a rainy day. Because the vent runs through the roof, even small gaps can become pathways for water if left unaddressed.
Is this urgent or common?
- Common, especially in older homes or after heavy storms, freeze–thaw cycles, or wind-driven rain.
- Not every leak is an emergency, but untreated leaks can lead to rot, mold, and higher repair costs over time.
- If you notice active dripping onto electrical fixtures, or widespread ceiling damage, treat it as more urgent and seek professional help promptly.
Where leaks come from (high-level)
- Damaged or degraded flashing around the vent boot where it meets the roof.
- Cracked, loose, or missing shingles around the vent opening.
- Deteriorated or improperly sealed vent pipe boot material.
- Ice damming or condensation issues in colder climates that push water toward the vent area.
How to spot leaks (symptoms)
- Water stains or damp spots around the ceiling near the vent line.
- Wet insulation or rafters in the attic directly above the vent.
- A musty smell or visible mold growth in the attic or upper living spaces.
- Drips that appear after rain or snow melt, especially near the vent pipe location.
High-level next steps
- Stay safe: avoid climbing on a wet roof; do not attempt to seal from inside unless you're confident in your method.
- Gather quick details: photos of the area, roof age, last repairs, and recent weather conditions.
- Get a professional assessment to pinpoint the source and plan the right repair approach, rather than guessing at causes.
What a typical inspection covers (overview)
- Check the vent pipe boot flashing for cracks, gaps, or lifting.
- Inspect the surrounding shingles for damage or improper sealing.
- Examine the flange and pitch of the roof around the vent to ensure proper water shedding.
- Look for signs of attic condensation, improper attic ventilation, or insulation issues that could contribute to moisture.
Quick homeowner checklist
- Note the leaking pattern: does it drip only during rain, or also in dry spells?
- Look in the attic for dark stains, soft spots, or wet insulation near the vent.
- Check for visible gaps or damage at the base of the vent on the roof.
- Keep moisture levels down inside the attic by improving ventilation and addressing any existing leaks.
When to call a professional (high-level guidance)
- If you see active dripping in the attic or ceiling, or if you're uncomfortable inspecting on a roof.
- If flashing shows tearing, lifting, or corrosion, or if shingles near the vent are damaged.
- If you've had multiple leaks or suspect ice damming, which often requires specialized repair methods.
Vent Pipe Leaks: Are They an Emergency?
Vent pipe leaks can range from a nuisance to a serious issue that invites attic damage and mold if left untreated. The urgency depends on whether water is actively entering your home and how quickly it could worsen. Use these practical guidelines to decide how to respond.
Quick signs this is an emergency
- Water is actively dripping into living spaces, a ceiling is sagging, or you can see water stains spreading across walls or ceilings.
- You observe daylight or a gap around the vent boot from the attic or roof line.
- Moisture is pooling in insulation, or you smell moldy air in the attic or upper rooms.
- There are electrical components involved (outlets, switches, or fixtures) that are getting damp or show signs of moisture.
- Protect the interior: Move furniture and valuables away from the leak path. Place buckets or towels to catch drips, and use a tarp or plastic sheeting to contain water where practical.
- Limit water exposure: If it's raining, avoid using the plumbing fixtures that connect to the vent system and reduce attic activity to minimize moisture spread.
- Safely inspect from a distance: If you can reach the leak safely from the attic without stepping on damaged decking, peek around the vent boot to identify obvious cracks, missing flashing, or gaps. Do not climb onto a wet roof.
- Apply a temporary seal (only if you can do so safely): From inside the attic, you can dab roofing cement or a silicone sealant around small gaps in the vent flashing as a temporary stop-gap. This is not a permanent fix and should be replaced by a professional as soon as possible.
- Plan for a pro visit: Temporary containment helps, but a roof leak around a vent typically requires resealing the vent boot, flashing, or replacing the vent pipe if cracked.
Triage: when to call a roofer vs monitor or wait
- Call a roofer immediately if
- Water is actively dripping into your home or there is ceiling bulging that could lead to a collapse.
- You see daylight through the roof around the vent, or the flashing is fully detached.
- Electrical components are involved or you notice persistent moisture near outlets or switches.
- Monitor if
- The leak is slow, confined to the attic, and there's no water intrusion into living spaces.
- The weather is clearing and you can watch the area over a few hours to confirm whether the leak subsides.
- You can safely keep an eye on the situation without letting moisture accumulate in insulation or drywall.
- Can wait if
- There is no active dripping, the attic remains dry, and you're able to schedule repairs in the next few days.
- The leak is isolated to a non-living area and there's no apparent spread to ceilings or walls. You still want to book a repair soon to prevent a future emergency.
What a roofer will focus on
- Locate the source: Confirm whether the leak comes from the vent boot, flashing, pipe nut, or cracked vent pipe itself.
- Replace or reseal: Refit and seal the vent boot with new flashing, or replace a damaged vent pipe if needed.
- Restore waterproofing: Ensure surrounding shingles and flashing are properly flashed to protect against future leaks.
- Inspect for damage: Check attic insulation and structural wood for water damage or mold, and address any compromised material.
Quick tips for future emergencies
- Keep the attic insulation around vent pipes dry and well-ventilated to slow moisture spread.
- Schedule routine roof inspections, especially after severe weather, to catch flashing or boot issues early.
- Maintain accessible ladders and safe temporary materials (tarp, plastic sheeting, a small bucket) for rapid response.
Common Causes of Leaks in Vent Pipes
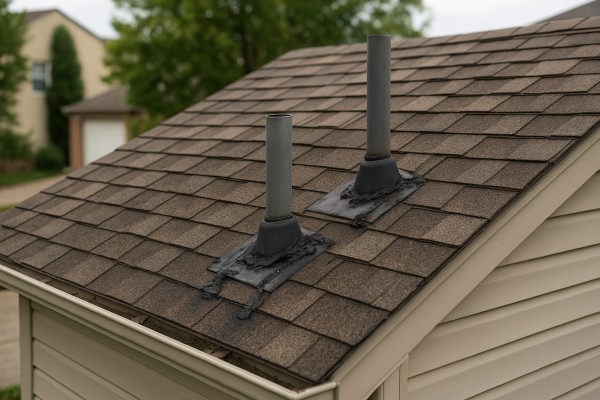
Worn or Damaged Roof Flashing
The flashing around a vent pipe is what seals the transition from roof to pipe. When flashing ages, lifts, or was poorly installed, water can seep in at the base and travel under shingles.
- Missing, loose, or damaged fasteners
- Gaps where flashing meets shingles or where it should overlap other flashing
- Rusted, bent, or torn metal that no longer lays flat against the roof
- Improperly formed flashing that leaves a gap around the pipe
Damaged or Deteriorated Vent Boot (Flange)
The rubber boot that seals the vent pipe to the roof can crack or dry out over time. Once the boot fails, water can run down the inside of the vent and into the attic.
- Cracks, splits, or dry-rot in the rubber
- UV exposure that hardens and cracks the boot
- Ice and snow can widen small cracks during winter
- Boot pulled away from the shingle line due to roof movement or improper trimming
Cracked or Deteriorated Vent Pipe Itself
The pipe material (PVC, ABS, or metal) can crack or joints can separate, especially with age or impact.
- Visible cracks around the pipe elbows or along the length
- Joint or coupling leaks where sections meet
- Condensation or water staining near joints that hints at a failed seal
Note: Condensation dripping inside the attic isn't always a leak from the roof; it can be a sign the vent is blocked or not venting properly. A leak on the ceiling is more often due to flashing or boot issues at the roof line.
Sealant or Cement Deterioration
Sealants and roofing cements used around the vent base can dry out, shrink, or crack, creating a path for water.
- Cracked or missing sealant along the base of the vent
- Old caulk that's discolored, peeling, or pulling away from the roof
- Inadequate or poorly applied sealing during installation
Ice Dams and Freeze-Thaw Damage
In cold climates, ice buildup around the vent opening can push flashing up or lift shingles, creating a weak spot for leaks.
- Ice buildup that presses on the vent boot or flashing
- Meltwater that flows under flashing when the ice melts
- Repeated freeze-thaw cycles that widen hairline cracks
Improper Installation or Aging Roof Assembly
A vent pipe installed with insufficient flashing, wrong sizing, or incompatible materials is a common leak source.
- Vent pipe too close to ridge or valley flashing, causing water to back up
- Step flashing not properly integrated with the vent
- Inadequate underlayment or missing shingle overlap around the vent
Animal Damage or Debris
Nesting, chewed boot edges, or debris around the vent cap can create channels for water to enter.
- Nests or leaves that trap moisture around the vent
- Damaged vent cap or screen allowing rain intrusion
- Chewed or gnawed boot edges by rodents
Aging and Material Degradation
All components wear out with time. Age-related deterioration often shows up first as small leaks that worsen after heavy rain or wind.
- Rubber boot aging past its service life
- Metal flashing that has corroded or separated from the roof
- Plastic or PVC vent pipe becoming brittle and cracking
Quick inspection checklist (follow with caution)
1) Look at the vent base from the attic after a rain; note any staining or dampness near the pipe flange.
2) Inspect the visible roof flashing around the vent from a safe vantage point; check for lifting, gaps, or corrosion.
3) Check the rubber boot for cracks, gaps, or softness.
4) Inspect the vent cap and pipe for cracks or damage and ensure the boot bands are secure.
5) Clear debris around the vent on the roof and inside the attic to confirm water isn't backing up due to a blockage.
How Roof Materials Affect Vent Pipe Leaks

- How leaks express: The vent boot sits through the shingles; sun-damaged or aged shingles can lift or crack around the pipe, letting water seep into the attic. Nails used to secure the vent collar can rust or back out, creating a path for moisture.
- Common failure modes: brittle or cracked rubber boot, improper flashing integration, shingle tabs cut too close to the pipe, and lifted shingles around the vent.
- What to check and do: Inspect the boot flange for cracks, look for lifted or curled shingles near the pipe, and verify fasteners aren't corroded. If you see gaps, reseal with a compatible flashing kit or replace the vent boot and nearby shingles. Ensure the nail line isn't directly in the water path and consider upgrading to a lead-free or stainless-steel vent collar if you have frequent leaks.

- How leaks express: Metal panels rely on precise flashing around penetrations. If the vent boot or flashing isn't properly sealed or degrades, water can follow panel seams into the attic.
- Common failure modes: improper flange alignment, damaged or missing sealant, corrosion around fasteners, and flashing gaps at the vent collar.
- What to check and do: Check the vent flashing for gaps or lifted edges; inspect nearby seams for corrosion or loose screws. Use continuous metal flashing around the vent and a compatible rubber or neoprene boot rated for metal roofs. Seal all fasteners with corrosion-resistant sealant and confirm weather-tight seating under any cap or collar.
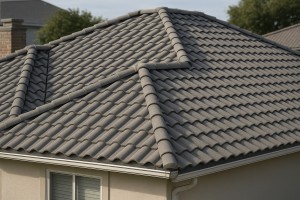
Tile roofs (clay or concrete)
- How leaks express: Tiles can crack or shift around the vent pipe, allowing water to bypass underlayment. Vent flashing must be tucked under tiles and properly sealed so water cannot run down the pipe into the deck.
- Common failure modes: cracked or broken tiles near the vent, inadequate under-tile flashing, and flashing that doesn't accommodate tile profiles.
- What to check and do: Look for cracked tiles directly around the vent and check underlayment for moisture signs. Install a vent flashing system designed for tile roofs, with under-tile membrane and properly seated tiles; replace damaged tiles, and use sealant compatible with tile and underlayment when needed.

- How leaks express: Similar to tile roofs, but heavier. Water can travel along the vent pipe path if flashing isn't integrated with the tile pattern.
- Common failure modes: tile breakage near the vent, poor tile-to-flashing fit, and insufficient mortar or sealant at the base.
- What to check and do: Inspect tiles around the vent for cracks or looseness; verify that flashing sits beneath the tile course and is sealed to the deck. Replace broken tiles, reseal the vent collar, and ensure the flashing is sized for the tile overlap to prevent water tracking.

- How leaks express: Wood expands, contracts, and rots when moisture gets in. If flashing isn't properly integrated with the vent, water can seep between shingles and into the attic.
- Common failure modes: deterioration of wooden shingles near the vent, warped or cupped shingles, and inadequate flashing coverage.
- What to check and do: Examine the shingles directly around the vent for splits or rot; ensure a compatible, flexible flashing is used that accommodates wood movement. Replace damaged shingles, seal around the vent with appropriate flashing, and consider copper or stainless options to resist rot.
Flat roofs (EPDM, TPO, Modified Bitumen)
- How leaks express: Low slope means water can overwhelm poorly sealed penetrations. Vent pipe penetrations require continuous, durable seals and proper collars.
- Common failure modes: seam failures near the pipe, aging sealant, and improper penetration detail.
- What to check and do: Inspect around the vent for cracks in the sealant and any seam separation. Use a vent pipe boot or collar compatible with flat roofing membranes, re-seal with the recommended product, and test with a dampness check above the flashing during rain.

- How leaks express: Slate requires precise penetrations to avoid cracking. Water can track along the vent collar if metal flashings aren't a tight fit with the slate profile.
- Common failure modes: cracked or chipped slate near the vent, corroded metal flashing, and improper fastener placement.
- What to check and do: Look for loose or broken slate; verify flashings are sized for slate overlaps. Replace damaged slates and install slate-appropriate flashing with careful trimming to prevent gaps.
- How leaks express: Heavy tiles demand robust underlayment and flashing; water can bypass weak points if tiles aren't properly bedded around the vent.
- Common failure modes: broken tiles around the vent, insufficient mortar bed, and flashing gaps.
- What to check and do: Inspect for cracked tiles near the vent and verify proper underlayment. Use the correct vent flashing method for concrete tiles, replace broken tiles, and ensure a solid seal at the base of the pipe.
The Risks of Ignoring Vent Pipe Leaks
Water Damage and Mold Growth
Water intrusion around a vent pipe travels and soaks into roofing felt, decking, insulation, and attic spaces. Over time this can lead to hidden rot and widespread mold growth that's not always visible from below. Expect attic stains, warped sheathing, and a musty odor as early warning signs.
- Damp insulation loses its effectiveness, driving up heating and cooling costs.
- Soft, rotten rafters or plywood can compromise the roof deck and shorten its life.
- Mold spores in the attic can migrate into living areas, triggering allergies or asthma flares.
Structural Risks
Even small leaks, if left unattended, can become big problems for the roof structure and the home above.
- Prolonged moisture weakens framing and fasteners, increasing the risk of sagging ceilings or sudden leaks.
- Continuous moisture around the vent boot or flashing can corrode metal components and lead to more extensive water intrusion.
- Delaminated roof decking or compromised sheathing can require costly repairs and early roof replacement.
Health and Indoor Air Quality Risks
Mold and damp conditions inside the attic don't stay there. They affect the entire home.
- Chronic exposure to damp, moldy air can irritate eyes, skin, and the respiratory system.
- In homes with weak ventilation, moisture fosters dust mites and other allergens.
- Musty odors are a sign moisture may be compromising air quality, even if you can't see mold.
Pests and Odor Risks
Leaks create convenient access points for critters and unwanted odors.
- Small animals, insects, and birds may nest around damp vent areas.
- Odors from sewer gases, if the venting path is compromised, can waft into the living spaces.
Fire, Electrical, and Gas Hazards
Moisture near electrical components and gas lines creates additional risk.
- Water intrusion around wiring or junction boxes can lead to corrosion, short circuits, or electrical hazards.
- If sewer gases are allowed to back up or escape into the attic, you can encounter hazardous odors and health risks.
- Moist environments around fasteners and metal vents can accelerate rust and wear, undermining safety margins.
Financial and Insurance Implications
Ignoring vent pipe leaks often costs more in the long run.
- Hidden damage can escalate from a small patch to a full roof replacement.
- Mold cleanup and remediation in the attic and living spaces adds substantial expense.
- Unaddressed leaks may affect insurance claim eligibility or premiums if water damage worsens.
Quick Assessment and Response Steps
1. Inspect signs from the attic or ceiling: stains, damp insulation, musty smell, or visible moisture around the vent boot.
2. Check the vent flashing and boot for cracks, gaps, or loose fasteners; look both where the pipe penetrates the roof and where the flashing sits on the shingles.
3. Note any roof shingle damage near the vent and document with photos for reference.
4. If moisture is present, temporarily shield the area from additional water intrusion with a tarp or bucket, but avoid climbing on the roof if you're not trained.
5. Schedule a professional inspection to evaluate flashing, boot integrity, and potential interior damage; request a mold and moisture assessment if dampness persists.
6. Plan for repairs that restore a true weather seal around the vent and address any compromised decking or insulation.
7. If mold is suspected or confirmed, enlist a qualified remediation specialist to ensure safe cleanup and proper drying.
How Vent Pipe Leaks Are Diagnosed
Diagnosing vent pipe leaks means tracing water intrusion back to the pipe boot, flashing, or pipe joints. Here's how we approach it in practical, homeowner-friendly terms, with safety and clarity in mind.
Signs you might have a vent pipe leak
- Water stains on ceilings or in the attic directly below the vent stack
- Damp or musty insulation around the vent area
- Drips or occasional moisture when it's raining or windy
- Peeling paint, brown spots, or mold around the vent penetration
- Loose or warped roof shingles near the vent pipe
- Condensation on the vent pipe in the attic
Common culprits to inspect
- Damaged, lifted, or missing vent flashing at the base of the pipe
- Cracks, gaps, or deterioration in roof sealant around the boot
- A cracked, bent, or aged vent boot (the rubber or plastic sleeve that surrounds the pipe)
- Loose fasteners or nails that have missed shingles or pulled away from the flashing
- Shingle wear or algae/lichen buildup that keeps the area wet longer
- Ice damming or wind-driven rain that can force water under the flashing
The diagnostic process (step-by-step)
1) Gather clues inside the attic
- Look for water stains, dark streaks, or damp insulation around the vent penetration
- Note if staining follows a pattern after rain or thaw cycles
2) Inspect the vent area from the roof (if it's safe)
- From a stable ladder, examine the vent boot and flashing at the base
- Check for signs of lifted metal, rust, or gaps where water could seep in
- Look at the shingles around the vent for cracks, damage, or movement
3) Check the boot and flashing closely
- Test the boot's integrity: push on the edge to feel for movement or softness
- Look for hairline cracks in the metal flashing and for any gaps between flashing and shingles
- Inspect the sealant bead; if it's dry, cracked, or missing, that's a red flag
4) Assess the interior seal around the pipe
- Inspect the area where the pipe penetrates the ceiling or roof deck
- Look for deteriorated sealant or signs of water wicking along the pipe
5) Look for other potential sources nearby
- Vents that share a roof line, skylights, or nearby valleys can leak water to the vent area
- Check for vent pipe connections that may tie into kitchen or bathroom exhaust lines
6) Consider a controlled water test (with safety in mind)
- If you're comfortable and the roof is safe, have a helper spray a light, steady stream around the vent area while you monitor the attic for leaks
- Start with low pressure and move the spray slowly to cover all sides of the pipe boot and flashing
- Stop if you see moisture appearing on the interior side to pinpoint the breach
7) Use additional tools if needed
- A moisture meter or infrared camera can help locate hidden dampness behind insulation or under sheathing
- A smoke pencil or theatrical fog can reveal air leaks that water tests might miss (use carefully and only if you're trained)
- Visually inspect the vent boot and flashing from ground level or using a sturdy ladder with someone spotting you
- Inspect the attic under the vent on a dry day, looking for fresh moisture trails after rain
- Gently press around the boot and flashing to detect any soft spots or movement
What these findings mean
- If the flashing is lifted or cracked, or the boot is deteriorated, the leak source is likely the vent penetration itself
- Small gaps in sealant can allow water to travel along the vent pipe and manifest as a stain far from the actual breach
- Worn shingles near the vent, combined with aging sealant, often points to the need for flashing replacement and resealing
When to bring in a pro
- If you're not comfortable working on a roof or near edges
- If water shows up in multiple roof areas or the attic after a rainstorm
- If the source isn't clear after a careful inspection and water test
Vent Pipe Leak Repair Options
Temporary fixes
- Protect interior and catch water: In the attic, place a bucket or towels where drips land and temporarily drape a tarp or plastic sheeting to guide water away from insulation and drywall.
- Quick base patch with roofing cement:
1) On a dry surface, clean the area around the vent flashing to remove dirt and loose material.
2) Apply a generous bead of asphalt roofing cement around the base of the vent flashing where it contacts the roof.
3) Cut a patch from compatible roofing membrane or a small piece of sheet metal; press it over the patched area and seal the edges with more cement. If you're patching with metal, secure with roofing nails and seal around the edges.
- Seal small cracks in the vent boot:
1) Clean and dry the cracked area on the boot.
2) Apply a bead of silicone or polyurethane roof sealant along the crack on both sides.
3) If you have patch material, place a patch over the crack and seal the edges.
- Temporary vent-cap option (not for long-term use): If the vent isn't needed for now, you can install a rated vent cap to block rain entry. Plan a proper flashing fix as soon as possible.
Minor repairs
- Re-seal loose flashing around the vent:
1) Lift nearby shingles as needed and remove loose sealant or debris.
2) Apply high-quality roofing sealant along the seam between the vent flashing and the roof.
3) Re-nail the flashing where loose and seal nail heads with additional sealant.
- Replace a cracked or aged vent boot:
1) Remove the old boot and clean the area.
2) Install a new pre-formed vent flashing boot, following the kit instructions.
3) Seal the joint where the boot meets the roof with sealant.
- Re-secure and reseal surrounding shingles:
1) Inspect shingles around the vent for cracks or looseness.
2) Re-nail and apply roofing cement to the edges to prevent water intrusion.
3) Fill any small gaps with sealant and reseal with flashing cement as needed.
- Verify weatherproofing after a rain event: Lightly spray with a hose to confirm the repair holds, focusing on the base of the vent and surrounding flashing.
Partial replacement
- When flashing or deck around the vent is severely damaged:
1) Remove a small patch of shingles around the vent to expose flashing and deck.
2) Remove damaged flashing and install new vent flashing or a replacement collar compatible with your roof.
3) Re-shingle the patched area and seal all joints with roofing cement.
- Check for edge leaks and reseal:
1) Ensure a continuous seal where flashing meets shingles.
2) Apply additional sealant along any vulnerable seams and test with water.
Full roof replacement
- Consider full roof replacement if leaks are widespread or the roof is nearing the end of its expected life:
1) Have a professional roof assessment to determine remaining life and plan.
2) Remove old roofing, install new underlayment, ice-and-water shield, and vent flashing.
3) Re-shingle with proper nailing patterns, ensuring all penetrations are flashed and sealed.
Typical Costs to Fix Vent Pipe Leaks
Minor repair
A minor leak is usually caused by a worn or cracked rubber vent boot, loose flashing, or deteriorating sealant around a single vent pipe. It often shows as a small drip after rain and can be fixed without major roof work.
- What it includes: resealing the boot, re-fastening flashing, or replacing a small section of boot.
- Steps:
1) Inspect the area around the vent to confirm the source.
2) Clean the flashing and vent area to remove debris and old sealant.
3) Apply a high-quality roofing sealant or replace a small boot if needed.
4) Re-test with rain or hose to verify the leak is gone.
- Estimated cost: typically $150–$350, depending on roof access and material.
Moderate repair
A moderate repair involves more substantial boot/flashing deterioration, a few shingles around the vent, or minor roof deck exposure. You may need to remove and reseal flashing and reinstall surrounding shingles.
- What it includes: replacing the vent boot or flashing collar, re-sealing, and restoring surrounding shingles.
- Steps:
1) Lift nearby shingles to access flashing; carefully remove damaged boot.
2) Install a new vent boot/flashing and seal properly.
3) Reinstall shingles with proper flashing integration and nail placement.
4) Check for leaks and perform a quick water test.
- Estimated cost: typically $300–$900, depending on material type and attic access.
Major repair
A major repair is needed when the vent pipe penetration or flashings are severely compromised, there is rotted decking around the vent, or there are multiple penetrations impacted. This may require more extensive roof work and might involve deck repair.
- What it includes: replacing vent stack parts, rebuilt flashing around multiple penetrations, possible decking repair, and re-shingling the area.
- Steps:
1) Assess extent of damage and create a repair plan that may cover decking and flashing.
2) Remove damaged flashing, replace vent stack if needed, and install a robust flashing assembly.
3) Replace any damaged decking and apply new underlayment as required.
4) Re-flash, re-shingle, and perform a comprehensive leak test.
- Estimated cost: typically $1,000–$3,000+, with higher costs if decking or multiple penetrations are involved or on steep roofs.
What factors affect cost
- Roof size: larger roofs or more vent penetrations require more materials and labor.
- Access: steep pitches, high ladders, or limited attic access increase time and safety requirements.
- Material type: PVC/ABS, metal, or lead vent pipes and flashing materials have different prices and installation complexities.
- Extent of damage: minor sealing vs. deck repair or vent stack replacement drives cost variance.
- Local labor rates: regional differences in wages and permit requirements can significantly shift final pricing.
How Long Can You Wait to Fix a Vent Pipe Leak?
First 24–48 Hours: Immediate risks and small actions
A vent pipe leak can rapidly escalate from a small drip to widespread moisture trouble. In the attic and nearby ceilings, damp insulation and drywall can begin to lose their effectiveness, and mold growth can start in as little as 24–48 hours if the area stays wet. You'll often see staining, a musty odor, or active dripping that makes the problem feel urgent.
- What happens if you wait:
- Water intrusion widens, soaking more insulation and framing.
- Drywall and ceiling materials may start to sag or bow.
- Mold spores begin to proliferate in moist conditions.
- What you can do now (quick, safety-minded steps):
1) Contain the drip: place a sturdy bucket under the leak and use plastic sheeting to channel water toward it when possible.
2) Protect insulation: move damp insulation away from the leak and cover exposed areas with plastic to limit further moisture absorption.
3) Avoid electrical hazards: keep the attic and any wet areas clear of exposed wiring and avoid touching damp electrical components.
4) Document the damage: take clear photos from inside the attic and, if safe, from the exterior roof line to show the leak's location for a pro.
1–2 Weeks: Ongoing damage and safety risks
If the leak isn't sealed, moisture continues to accumulate. Attic spaces that were dry can become damp, increasing the risk of hidden mold behind walls or above ceilings. The flashing around the vent pipe and the vent boot can deteriorate, allowing more water intrusion. Structural components like roof sheathing and joists may start to absorb moisture, reducing their strength over time.
- What happens if you wait:
- Mold growth becomes more established, especially in warm, humid areas.
- Drywall, plaster, and wood trim show water stains, soft spots, or warping.
- Insulation loses R-value and can become a breeding ground for odors or pests.
- Electrical and HVAC penetration areas near the leak can develop safety concerns.
- What you should do in this window:
1) Schedule a professional inspection of the vent flashing and vent pipe seal to stop the source.
2) Keep the interior spaces ventilated and dry as weather allows; use fans or dehumidifiers if you have access to the attic without creating more moisture.
3) Avoid DIY fixes that involve climbing on the roof in wet or windy conditions; rely on a pro for flashing and flashing repairs.
4) Photograph new damage to support insurance or contractor estimates.
1–3 Months: Structural and cost implications
The cumulative moisture now threatens structural integrity. Wood framing, roof decking, and attic plywood can soften or rot, leading to costly repairs. If visible mold spreads into living spaces or has been present long enough, remediation costs rise and investigative work is often required. Venting systems associated with furnaces or water heaters may experience backdraft or soot deposition if the vent isn't sealed properly.
- What happens if you wait:
- Wood rot and deck deterioration progress, potentially compromising roof structure.
- Mold becomes more pervasive, increasing remediation time and cost.
- Insurance claims become more complex, and some policies have caps for long-running leaks.
- The overall repair scope can expand from flashing and seal replacement to full roof or vent system replacement.
- What to do during this period:
1) Get formal damage assessments from a licensed roofer and a mold remediation specialist to understand scope.
2) Obtain written estimates for flashing repair, vent boot replacement, and any affected roof decks the contractor identifies.
3) Coordinate with your insurer if you have coverage for water damage; keep all receipts and inspection reports.
3+ Months: When it becomes a major project
At this stage, the leak has likely caused substantial damage beyond the vent area. You may be looking at a combination of vent pipe work, flashing replacement, possible roof deck repairs, and remediation of mold-affected spaces. Delays here can significantly increase both time and costs.
- What happens if you wait:
- Structural elements may require costly rehab or replacement.
- Mold can require extensive remediation and ongoing monitoring.
- Overall project length grows, and coordinating multiple trades becomes necessary.
- What to do if you're at this stage:
1) Prioritize securing interior spaces to prevent further water intrusion (tarps, plastic barriers, and controlled access).
2) Schedule a comprehensive roof/venting system replacement plan with a qualified roofer.
3) Start a documented project timeline and budget with contingencies for unexpected delays.
How Vent Pipe Leaks Vary by Location and Climate
Vent pipes on your roof interact with weather differently depending on where you live. The same leak you see in a humid coastal town might look or behave a bit differently in a dry high-desert city. Below is a practical map of how location and climate shape the problem, plus region-specific tips to help you plan the right fixes.
How This Problem Varies by Region & Climate within the United States
- Temperature swings and freeze-thaw cycles: In the Northeast and Midwest, repeated freezing and thawing can crack flashing, loosen sealants, and force water into seams around the vent boot.
- Coastal exposure and salt air: Along the Atlantic and Gulf coasts (and parts of the Pacific), salt spray accelerates corrosion of metal vent components and clamps, making metal flashings and caps more prone to leaks.
- Humidity and heavy rainfall: The Southeast and parts of the Pacific Northwest see high humidity and frequent rain, which stresses caulks and sealants and can encourage moss, algae, or mold around penetrations.
- Wind and storm impact: High-wind regions—coastal areas, the Great Plains, and hurricane-prone zones—put extra stress on vent pipes and flashing, increasing the chance of uplift or cap damage during storms.
- Snow and ice loads: Mountain and northern climates add snow buildup and ice damming pressure, pressing against the vent boot and potentially forcing water under shingles.
- Heat and sun exposure: Southwest and desert climates accelerate UV aging of plastics and sealants and cause more rapid expansion-contraction cycles, which can loosen joints over time.
Regional patterns you'll notice
- Northeast and Midwest
- Common issues: cracking sealants, loose flashing, ice dams near the vent.
- What to watch: seasonal freeze-thaw cycles and rapid warming afternoons.
- Southeast and Gulf Coast
- Common issues: corrosion of metal components, wind-driven leaks after storms.
- What to watch: heavy rain, humidity, and salt air near coastlines.
- Pacific Northwest and coastal West
- Common issues: moss or algae around the vent, damp flashing, slower-drying sealants.
- What to watch: persistent rainfall and coastal moisture.
- Southwest
- Common issues: UV aging of plastic parts, heat expansion around boots, cracked seals in extreme heat.
- What to watch: long sunny periods followed by occasional heavy storms.
- Alaska
- Common issues: persistent freezing, ice buildup around flashing.
- What to watch: severe cold cycles and expansion/contraction of materials.
- Hawaii
- Common issues: high humidity promoting mold near penetrations, frequent rain exposure.
- What to watch: tropical moisture and mild freeze risk, with emphasis on sealant life.
Practical regional maintenance steps
1. Do a seasonal inspection routine
- Inspect flashing, vent boot integrity, and cap seals at least twice a year.
- Look for cracked caulk, torn shingle underlayment, and any wobbly vent pipes.
2. Match materials to climate
- Cold regions: choose frost-resistant boot materials and corrosion-resistant fasteners.
- Coastal areas: prefer stainless or coated hardware to resist salt corrosion.
- High-UV regions: use UV-stable sealants and durable vent caps.
3. After major weather events
- In storms, hurricanes, or heavy snow, perform a quick post-storm check for lifted flashing or loose caulk.
4. Address moss, mold, or algae
- In damp climates, clean around the vent and re-seal if you notice staining or softening of sealants.
5. Schedule proactive fixes by season
- Schedule re-sealing and flashing replacement before winter in cold regions.
- Plan flashing and cap replacements after the rainy season in humid/coastal areas.
6. When in doubt, inspect the entire penetration
- If you see staining on drywall interior or damp spots on attic insulation near the vent, check the roofline thoroughly from the attic and from the outside.