Ultimate Guide to Bald Shingles
Last updated: Feb 28, 2026
What Bald Shingles Is
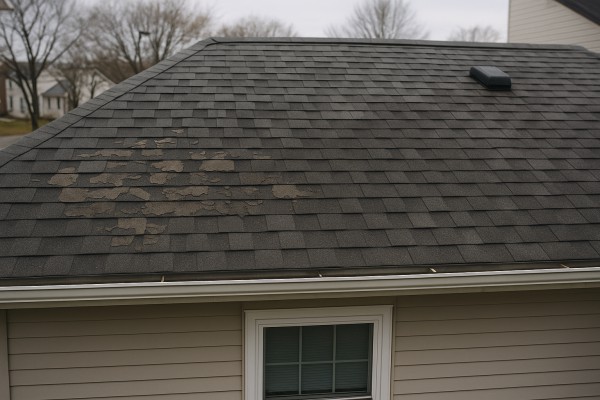
Bald shingles describe a common form of asphalt-roof wear where the protective granules have eroded or washed away from the shingle surface. When those granules disappear, the dark asphalt mat underneath is exposed. That exposed area can look smooth or shiny and is a sign the shingle isn't protecting your roof as well as it should. Bald shingles don't always mean an immediate roof collapse, but they do reduce a shingle's ability to shed water, resist UV light, and stand up to wind. If left unchecked, the underlying roof deck can become more susceptible to leaks and damage.
How Bald Shingles Develop
Balding happens gradually and for several common reasons:
- Age and sun exposure: Over time, UV rays break down asphalt and loosen granules.
- Weather and wind: Wind can peel away granules, and hail or heavy rain can knock them off.
- Installation and maintenance: Incorrect nailing, improper shingles overlap, or poor flashing can accelerate wear.
- Ventilation and moisture: Poor attic ventilation or trapped moisture can accelerate shingle deterioration.
- Local conditions: Coastal or high-sun climates tend to see faster granule loss.
What It Signals
Bald shingles are usually a warning, not an instantaneous disaster. They signal that a roof is aging or has taken enough wear to reduce its protective layer. The main concerns are:
- Increased risk of leaks, especially after storms or heavy rain
- Faster deck exposure, which can lead to rot if moisture reaches the plywood or sheathing
- Greater vulnerability to wind uplift and ice dam formation in colder climates
Is It Urgent or Common?
- Common: With aging roofs, some degree of granule loss and bald spots is normal. It becomes more noticeable after the roof is several decades old or after harsh winters.
- Urgent: It's more urgent if you notice active leaks, staining on ceilings, or large bald areas spreading across many shingles. In those cases, addressing the issue sooner helps protect the deck and interior.
Quick Ways to Assess From Ground Level
- Look for smooth, shiny patches on individual shingles, especially along ridges and eaves
- Check for increased granule buildup in gutters and downspouts
- Scan for curling edges or tabs that look thinner or more worn than surrounding shingles
- Use binoculars to confirm signs without climbing on the roof
How to Inspect Inside (Attic Check)
- Look for dark water stains or damp insulation around penetrations and along the rafters
- Check for signs of wetness after rain or snowmelt
- Note any musty odors, which can indicate hidden moisture
High-level Next Steps
1. Do a safe, high-level assessment: ground-based viewing, attic checks, and note any leaks or widespread bald areas.
2. Catalog the extent: small, isolated bald spots vs. large swaths of granule loss across several rows.
3. Decide on a path: patching or localized repairs may help short-term; extensive baldness or multiple leaks typically points to replacement being more cost-effective in the long run.
4. Plan a pro evaluation: arrange a professional roof inspection to confirm the condition, confirm risks, and discuss options such as repair, overlay, or full reroof.
This approach helps you understand bald shingles without jumping straight to expensive decisions, keeping your home protected while you weigh practical, long-term solutions.
Is Bald Shingles an Emergency? What It Means and How to Respond
What Bald Shingles Means
Bald shingles are a sign that a portion of the roof surface has lost its protective covering. Wind, hail, aging shingles, or poor installation can leave patches exposed. When shingles are missing or curling, water can reach the underlayment and decking. That doesn't always mean a collapse is imminent, but it does raise the risk of leaks, ice damming, and accelerated deck rot if rain or heavy snow arrives.
Is This an Emergency? Quick Triage
Not every case is a full-blown emergency, but some situations demand immediate attention to prevent interior damage. Use this triage to decide your next move.
- Call a roofer immediately if:
- There is active water intrusion or dripping inside ceilings or the attic.
- A large area of shingles is missing or exposed after a storm, especially on the roof's upper slopes.
- Daylight is visible in the attic or through the roof decking when you're up in the attic.
- You notice sagging sections, soft or damp decking, or signs of structural concern after rain.
- There are severe wind events forecasted that could expose more underlayment.
- Monitor if:
- You have a few bald spots but no leaks, staining, or dampness in the attic.
- The attic and ceilings show no moisture after recent weather.
- Weather is temporarily calm and you can schedule inspections soon without risking interior damage.
- Can wait if:
- The roof is otherwise solid with no active leaks and only minor, cosmetic bald patches.
- Your climate is dry and storms aren't expected in the near term.
- You're able to plan a repair window within the next few weeks without exposing the home to rain.
What to Do Right Now
Short, practical steps help minimize risk while you arrange professional help.
1) Check from the ground, not on the roof
- Use binoculars to spot missing or severely damaged shingles.
- Look for exposed underlayment or flashing gaps near vents, chimneys, and edges.
- Do not climb on a wet or slick roof; avoid walking on damaged decking.
2) Inspect the attic for moisture signs
- Look for dark stains, dampness, or unusual odors.
- Note any dripping or active leaks, even if they seem minor.
- Record dates and weather events that coincide with new signs.
3) Protect the interior
- Place buckets or containers under any active leaks.
- Move valuables away from leak paths to prevent water damage.
- If feasible, cover stained or insulated areas with plastic sheeting until repairs can begin.
4) Create a temporary exterior shield
- If safe to do so, use a heavy-duty tarp to cover exposed roof areas. Secure the edges with weights or boards; avoid driving nails through shingles if you can help it.
- Ensure the tarp extends beyond the damaged zone to shed rain off the roof rather than toward new spots.
5) Plan a professional assessment
- Schedule a roofing pro as soon as possible if you've labeled the situation as “Call immediately” or if you're unsure about the roof's condition.
- Have the roofer assess shingle integrity, underlayment, flashing, and decking; request a written repair or replacement estimate.
6) Safety reminders
- Do not attempt major repairs yourself unless you're trained and equipped for fall protection.
- Keep children and pets away from work zones and broken roof areas.
- If temperatures drop and moisture is present, anticipate ice-related hazards and postpone exterior work.
Quick Reference
- If you see active leaks or daylight in the attic, treat it as urgent and arrange immediate inspection.
- If you're unsure or the weather is unsettled, err on the side of caution and schedule a professional evaluation soon.
What Causes Bald Shingles?
Aging and Weathering
Asphalt shingles are built to weather the elements, but the protective granule layer wears down over time. Aging, combined with sun exposure, wind-driven grit, and repeated temperature swings, can cause granules to shed and leaves patches that look bald.
- Bare, smooth patches where granules have fallen away
- Visible dark asphalt showing through in exposed areas
- Increased fine grit in gutters and on the roof surface
UV Radiation and Sun Exposure
The sun's ultraviolet rays break down the protective coating and can loosen granules. Over many years, this results in a thinner granule layer and bald spots that are more pronounced on sun-facing slopes.
- Faded or dull color along sun-drenched sections
- Wider bald patches on southern or western roof faces
- Softer, smoother feel where granules are gone
Weather Events and Physical Damage
Storms, hail, and wind-driven impacts can physically displace granules. Weather events don't always remove all granules evenly, but they can create noticeable bald spots around impact points or along edges.
- Granules displaced at impact points (dimpling or pock marks)
- Edges or corners that look chipped or worn
- Patches of smooth, exposed shingle surface after a hail event
Improper Installation and Maintenance
Shingles that were installed with the wrong fasteners, spacing, or sealing can suffer accelerated granule loss. Wind uplift and improper sealing around vents, penetrations, or edges can loosen granules over time.
- Nails too close to edges or nailed too high
- Missing or insufficient sealant at laps and flashings
- Shingles that don't land flat, lifting slightly at edges
Walking on the roof to inspect, clean gutters, or remove debris can rub away granules. Repeated foot traffic concentrates wear in some areas, especially along valleys, ridges, or access points.
- Wear paths where people regularly walk
- Flattened, smooth patches from foot traffic
- Increased granule loss around fascia lines and eaves
Ventilation, Heat Build-Up, and Climate
Poor attic ventilation allows heat to build up in the attic and under the roof deck. Excess heat speeds aging of the asphalt and loosens granules, making bald patches appear sooner than expected.
- Warped or cupped shingles in hot attic zones
- Faster granule loss on roof sections that get the most sun
- Iris-like or sunken look where heat concentrates
Quality and Manufacturing Variations
Not all shingles are created equal. Some batches or brands have weaker granule adhesion or thinner protective coatings, so baldness can show up earlier in life or in clusters.
- Early onset bald patches on certain batches
- Uneven granule loss between neighboring shingles
- Noticeable differences in texture or color where granules are missing
How Roof Materials Affect Bald Shingles
Heat, sun, and expansion by material
Different roof materials absorb, store, and shed heat in distinct ways. That heat behavior directly influences how quickly bald patches – areas where granules have worn away or failed to adhere – appear and grow. Understanding these patterns helps homeowners anticipate risk and spot trouble early.
- Asphalt shingles: The most common type; their granules protect the asphalt coating from UV. Sun and heat cause granule loss over time, so bald patches tend to appear first on southern exposures or in areas with strong sun during peak hours.
- Metal roofing: Metal doesn't shed granules, so bald spots aren't about granule loss. Instead, heat can accelerate sealant, paint, and fastener wear, and thermal cycling can reveal exposed areas around edges or joints.
- Clay or concrete tile: Tiles absorb heat and can expand and contract with temperature swings. Repeated movement or cracked tiles can expose underlayment, creating bald-looking patches along ridges and valleys.
- Wood shingles/shakes: Wood is sensitive to UV and moisture; fading, cracking, and rot develop more quickly with sun exposure. Bald patches often start where shingles have curled or split, exposing the underlayer.
- Slate: Extremely durable, but gaps or edge wear can occur from long-term sun exposure or improper installation. Bald-like spots are less common, but micro-cracking and edge erosion can reveal lighter underlayers.
- Composite or fiberglass shingles: If they mimic asphalt, they lose granules similarly. Bald patches appear as granule loss accelerates under sun exposure and weathering.
Material-specific impacts on Bald Shingles
Understanding how each roof material interacts with bald shingles helps you tailor inspections and maintenance.
- Asphalt shingles:
- Expect granule shedding to create dark, bald areas on the surface.
- UV exposure accelerates granule loss, especially on south-facing slopes.
- Worn directives around flashing and vents can speed up exposure in those zones.
- Metal roofing:
- No granules, so bald looks come from worn coatings, sealants, or corrosion near fasteners.
- Expansion and contraction can cause hairline gaps that look like bald patches.
- Clay/concrete tile:
- Bald areas often align with cracked or broken tiles allowing edge exposure.
- Movement between tiles and underlayment exposure can imitate baldness along the roof's plane.
- Wood shingles/shakes:
- Bald patches track wood curling, splitting, or rot; UV and moisture drive wear.
- Moss and algae colonies on exposed areas can join with weathering to mimic bald spots.
- Slate:
- Bald patches are rarer but can happen from edge wear or micro-cracking exposing lighter layers.
- Proper fasteners and flashing are key to preventing accelerated edge wear.
- Composite/fiberglass shingles:
- Granule loss mirrors asphalt patterns; bald patches appear where resin binders degrade.
- Heat and weathering shorten the life of surface coatings, revealing bald areas sooner.
Quick evaluation steps by material (how to spot bald Shingles quickly)
1. Asphalt: Check gutters and downspouts for an uptick in granules; inspect sunlit slopes for bare patches.
2. Metal: Look for exposed sealant lines, corrosion near fasteners, or discolored spots where finish has worn.
3. Tile: Inspect for cracked or missing tiles; review exposed underlayment along ridges and eaves.
4. Wood: Scan for curling, splitting, or rot; note any moss growth on exposed surfaces.
5. Slate: Examine edge wear and micro-cracks; confirm flashing is intact and no water seepage is present.
6. Composite: Compare to neighboring sections; identify excessive granule loss or dulling of coated areas.
Maintenance notes that help preserve bald-shingle integrity
- Schedule regular inspections after severe weather to catch early signs of exposure.
- Pay attention to sun exposure patterns and prioritize viewing from the ground or a safe ladder position.
- Keep gutters clear so granules don't wash away with runoff on asphalt roofs.
- Address flashing, vents, and fasteners promptly to prevent exposed underlayers from accelerating baldness.
The Risks of Ignoring Bald Shingles
Rapid UV exposure and weathering
- Bald shingles lose their protective granule layer, leaving the underlying asphalt mat exposed.
- Without granules, shingles sun-damage and age faster, becoming brittle and prone to cracking.
- UV and temperature cycling can cause curling, splitting, and accelerated wear on adjacent shingles.
Water intrusion and hidden leaks
- Exposed substrate can allow rainwater to seep in at a faster rate, especially during heavy storms.
- Small gaps can develop into larger leaks over time, sometimes behind walls or under attic insulation.
- Moisture intrusion increases the chance of rot in the roof deck and potential mold growth in hidden spaces.
Structural damage and safety concerns
- Prolonged exposure weakens the roof system, potentially stressing rafters and the roof deck.
- Prolonged moisture can lead to wood rot, compromising structural integrity and long-term safety.
- Sagging or uneven sections may develop if significant rot or water damage occurs.
Mold, mildew, and indoor air quality
- Hidden moisture promotes mold growth in attic spaces and along ceiling lines.
- Mold spores can migrate into living areas, affecting indoor air quality and triggering allergy or asthma symptoms.
- Addressing mold later usually costs more than early intervention.
Energy inefficiency and comfort problems
- Bald shingles allow heat transfer to the attic, making cooling more difficult in summer.
- Higher attic temperatures can degrade insulation performance and raise cooling bills.
- Temperature swings can also impact indoor comfort, especially in attic-adjacent rooms.
Aesthetics, resale value, and insurance implications
- Visible bald spots detract from curb appeal and can signal neglect to potential buyers.
- Chronic roof issues may lower home resale value and complicate financing or appraisal.
- Some insurance policies require timely maintenance; ignoring bald shingles can raise premiums or affect coverage if leaks occur.
Why small problems become big problems
- Minor granule loss today can lead to accelerated wear tomorrow.
- A single wind-driven nuisance can lift loose shingles and expose more substrate.
- Delaying repairs often increases repair scope and cost later.
Practical signs you shouldn't ignore
- Noticeable granule loss in gutters or on the driveway.
- Dark stains or streaks on interior ceilings after rain.
- Visible curling, cracking, or missing shingles on the roof slope.
- Attic moisture or musty odors when the attic is ventilated.
Quick actions to mitigate risk (easy, safe steps)
1. Inspect from ground level for obvious bald spots, curled edges, or missing pieces.
2. Keep gutters clean to prevent water backup near vulnerable areas.
3. Document issues with photos to guide a pro assessment.
4. Schedule a professional roof inspection if you notice multiple bald shingles or leaks.
5. Do not climb on a damaged roof; if you must check, use extreme caution or hire a pro.
When to call a roofing professional
- If you see extensive granule loss, curling, or multiple bald shingles.
- If you notice leaks, attic dampness, or mold growth.
- If your roof is approaching the end of its expected life or you've had repeated repairs in a short period.
Steps in Diagnosing Bald Shingles
Step 1: Understand what bald shingles are
Bald shingles describe areas on the roof where granules have worn away, leaving flat, dark patches of asphalt exposed. It can look like a shiny or smooth patch where the shingle surface has thinned. It's different from a missing shingle, which leaves a visible gap. Recognize these signs:
- Smooth, dark patches with little to no granule grit
- Streaks or large patches across a single row or multiple rows
- Increased glare or a slick feel where you run your hand over the patch
Step 2: Do a safe exterior check from ground level
Start with a careful look from the ground. If you can safely reach with a ladder and proper fall protection, you may go up for a closer view; otherwise use binoculars or a high-quality zoom camera. Look for:
- Bald patches, sheer granule loss, or shiny asphalt
- Curling, cracking, or brittle edges around patched areas
- Areas near Valleys, flashing, or joints where wear concentrates
- Signs of hail impact, which often creates clustered bald spots
If the roof is steep or weather conditions are poor, skip up-close inspection and proceed to the attic or call a pro.
Step 3: Inspect the roof surface up close (if safe)
If you can access the roof safely, inspect with a ladder secured on level ground. Keep your movements deliberate and gentle to avoid further damage:
- Check each suspected bald area for underlying shingle wear, missing granules, or exposed felt
- Assess surrounding shingles for wear patterns; bald spots often appear in clusters
- Note any soft spots, blistering, or sagging indicating underlying deck issues
Step 4: Check attic and interior signs of moisture
Interior clues often reveal problems not obvious from outside. In the attic, look for:
- Light shining through roof boards, indicating compromised decking
- Stains, discoloration, or condensation on sheathing or rafters
- Dark, musty odors or visible mold near the ceiling or vents
- Signs of ongoing leaks after rain, such as wet insulation or dripping
Step 5: Consider roof age, exposure, and prior events
A thorough diagnosis weighs history as well as current condition:
- Age of the roof and last major replacement
- Past leaks or repairs in the same area
- Exposure risks: high sun, strong winds, or frequent hail in your area
- Nearby branches or shade that may accelerate granule loss
To confirm hidden damage, professionals may use:
- Infrared imaging to identify warm or damp areas not visible to the eye
- Moisture meters to measure deck or underlayment moisture
- Probe tests in suspect spots to assess shingle and backing integrity
These tools help determine if bald patches extend into the underlayment or decking
Step 7: Decide on repair vs. replacement based on findings
Diagnosis guides action. Consider:
- If bald patches are localized to a few shingles with good surrounding sealing, a targeted replacement or resealing may suffice
- Widespread granule loss and multiple bald patches across the roof often indicate aging shingles and underlayment wear, where replacement is more cost-effective in the long run
- Structural concerns (soft spots, sagging) require professional evaluation and likely replacement
Step 8: Document findings for records and future planning
A clear record helps with insurance, warranties, and contractor bids:
- Take date-stamped photos of each bald patch and surrounding shingles
- Note the approximate area affected (square feet or percent of roof)
- Record observed attic signs and any leaks or moisture readings
- Keep a simple map or sketch showing where issues are located
Step 9: When to bring in a professional
Call a licensed roofer if you notice:
- Large or rapidly growing bald areas
- Signs of structural decking damage or active leaks
- Inability to safely inspect or access the roof
- Uncertainty about proper repair or installation methods
Step 10: Prepare for the next phase
Once diagnosed, you'll be better equipped to discuss options with a pro:
- Clarify whether you're aiming patch repairs, shingle replacement, or full roof replacement
- Ask about warranty coverage for granule loss and shingle wear
- Plan for potential underlayment or flashing repairs to ensure a long-lasting fix
Repair Options for Bald Shingles: How to Restore a Damaged Roof
Temporary fixes
These fixes are meant to slow leaks and buy you time until a proper repair can be done. They are not long-term solutions and should be used with caution, especially on steep or wet roofs.
- Cover exposed areas with a tarp or weatherproof membrane. Secure the edges with roofing nails or weights, keeping it taut so wind won't lift it.
- Apply a liberal bead of asphalt roof cement to the edges of the bald patch and press a compatible patch (or a piece of matching shingle) over it. Smooth the edges to seal.
- Use temporary self-adhesive roof repair tape or mesh reinforced patches over the bald spot, then seal with a thin layer of roof cement on top.
- For small cracks or splits, use a bead of sealant or urethane roof sealant. Allow proper curing time before anticipated rain.
- If you have attic access, place a temporary drip diverter or bucket under the area to manage any drips until a repair can be made.
- Safety reminders: avoid working on a slick roof, use a sturdy ladder, wear a harness on steep slopes, and never work alone in risky conditions.
Minor repairs
If the bald area is localized to a few shingles or edges are curling, you can often address it without a full replacement.
- Re-nail loose shingles. Drive nails just above the tab line and into solid decking; countersink slightly and seal with roof cement under the nail heads to prevent leaks.
- Seal loose edges. Run a thin line of roofing cement under curled or lifted shingle edges, then press them flat and secure with an additional fastener if needed.
- Replace a single damaged shingle. Lift the surrounding shingles carefully, remove the damaged one, insert a matching replacement shingle, and nail it in place. Seal the edges with cement.
- Patch minor bald patches. Cut a small patch from a matching shingle, apply cement to the back and edges, position over the bald area, and press firmly. Seal the borders with cement to prevent water intrusion.
- Inspect surrounding area for clues. Often bald shingles are a symptom of age or underlying deck issues; address any signs of decking deterioration or flashing wear as part of the repair when necessary.
Partial replacement
Partial replacement is appropriate when a larger, contiguous area shows severe granule loss or baldness, but the rest of the roof is still solid.
- Identify the extent. Mark the damaged section across one or more bays and confirm the underlying deck condition.
- Remove affected shingles. Lift the shingles above the damaged row, gently pry out the old shingles, and clean the area.
- Check the deck. Look for soft spots or rot; replace damaged decking before installing new shingles.
- Install replacement shingles. Slide in matching shingles, aligning with the existing rows, and nail into the deck at standard locations. Keep tabs aligned with neighboring shingles for a clean look.
- Seal and blend. Apply roofing cement under the edges of the new shingles and along the seams to seal them. Clean up stray cement and ensure consistent appearance.
- Re-cement and re-nail adjacent courses as needed to ensure a tight, weatherproof surface.
Full roof replacement
Consider a full roof replacement when bald shingles are widespread, granule loss is heavy, or the roof is near or beyond the typical service life.
- When to consider replacement. Widespread baldness across multiple sections, recurring leaks, visible sagging, or age over 15–20 years are common indicators.
- Planning steps. Schedule an inspection to confirm deck condition, identify ventilation needs, and select shingle type and color. Budget for underlayment, flashing, and disposal.
- Removal and deck check. Safely remove all existing shingles. Inspect the entire deck for rot or damage; replace any compromised boards.
- Underlayment and ventilation. Install a high-quality underlayment, new drip edge, and ensure proper attic ventilation to extend roof life.
- Shingle installation. Start with a solid starter row, align shingles with adjacent courses, and nail per manufacturer guidelines. Ensure flashing around chimneys, walls, and vents is properly installed and sealed.
- Finishing touches. Install new vents, plumbing stacks, and flashings; seal all penetrations and inspect for potential leak points. Clean the site and perform a final walkthrough to confirm quality.
What Is the Typical Cost to Fix Bald Shingles?
Minor repair: Description and cost
- What it covers: Tightening loose shingles, re-nailing with corrosion-resistant nails, applying a fresh dab of roofing cement to secure edges, and sealing around small patches. Usually fixes shallow bald spots or lifted tabs without replacing large sections.
- Typical cost: Roughly $100–$250, depending on roof accessibility and local labor rates.
- How it's done: A pro inspects the area, re-nails or reseals as needed, cleans away debris, and tests for any immediate leaks. Materials are minimal: nails, sealant, and basic flashing if needed.
Moderate repair: Description and cost
- What it covers: Replacing a small cluster of shingles (about 5–15 tabs) or repairing a bald patch around flashing, vent collars, or other penetrations. May involve a bit more underlayment in the affected area.
- Typical cost: About $250–$750, depending on the number of shingles and any minor underlayment work.
- How it's done: Steps typically include removing damaged shingles, cutting and fitting new ones, securing with nails, sealing edges, and checking adjacent shingles for proper grip. If underlayment is damaged, a limited patch may be installed before resealing.
Major repair: Description and cost
- What it covers: Replacing a larger roof section (up to roughly 300 sq ft on a typical home) or addressing significant damage that includes underlayment and possibly framing/ decking repair. This is common when baldness is widespread or moisture has penetrated deeper.
- Typical cost: Roughly $1,000–$4,500, with larger or steeper roofs, or higher-end materials, pushing toward the higher end. In rarer cases, extensive decking repair can push costs higher.
- How it's done: A major repair involves a thorough inspection, removal of damaged shingles and underlayment, any necessary decking replacement, reinstallation of underlayment, and carefully matched shingle replacement. Flashing is reworked as needed, followed by a full leak test and a final inspection.
What factors affect cost
- Roof size
- The bigger the roof area with bald shingles, the more materials and labor are needed. Larger patches or sections mean longer project time and higher costs.
- Access
- Steep pitches, limited ground access, or hard-to-reach areas increase safety precautions and equipment needs, driving up labor costs.
- Material type
- Asphalt shingles are typically less costly to repair than premium architectural or specialty shingles. Color matching and brand compatibility can also affect price.
- Extent of damage
- Isolated bald spots are cheaper to fix than widespread baldness or damage that reveals or compromises underlayment or decking.
- Local labor rates
- Prices vary by region and market conditions. Urban areas or markets with higher living costs often have higher hourly or per-project rates.
Quick reference steps a homeowner can expect (when hiring a pro)
1. Diagnostic inspection of bald areas and any associated moisture or flashing issues.
2. Determination of repair level (minor, moderate, or major) based on damage scope.
3. Execution of appropriate fixes (re-nailing/sealing, or replacing shingles/underlayment).
4. Final leak test and close inspection to confirm a watertight seal.
How Long Can You Wait Before Treating Bald Shingles?
What bald shingles are and why they matter
Bald shingles are asphalt shingles that have lost most or all of their surface granules, exposing the darker asphalt and the mat underneath. The granules protect the shingle from UV damage and extend its life. When they're missing, the shingle is less able to shed water and resist weather, and wind can lift them more easily. If you see bald patches (often near the edges, hips, or valleys of the roof), it's a warning sign that the roof is aging and vulnerable.
- Potential risks: faster wear, more UV damage, higher likelihood of leaks around damaged areas.
- Quick checks: look for shiny, bare spots, rough felt, curled edges, or granules in gutters.
Immediate red flags (0–2 weeks)
What happens if you wait:
- A small leak becomes a larger leak with rain.
- Water can travel across the deck and damage insulation or ceiling.
- The exposed mat can wick moisture and start curling or degrading faster.
What to do now:
1) Do a quick attic inspection after rain or at least weekly when you suspect a leak; look for water staining or damp insulation.
2) Keep people off the roof; bald patches can be slippery and fragile.
3) If you see active dripping, place a temporary tarp above the leak and call a roofer for an emergency assessment.
4) Photograph the affected area for your records and insurance if needed.
5) Schedule a professional roof inspection as soon as you can.
Short-term risks (2–8 weeks)
What happens if you wait:
- The damage can expand: neighboring shingles lose granules and begin to fail.
- Underlayment and decking may start to deteriorate, increasing rot risk.
- Mold or mildew may form in damp insulation, affecting indoor air quality.
What to do now:
1) Get a formal inspection and estimate from a licensed roofer.
2) Decide whether you'll patch a small area or replace a section of shingles.
3) Check attic ventilation and insulation; adjust if moisture is present.
4) Keep gutters clear of granules to monitor the scope of wear on your roof.
Medium-term risks (2–6 months)
What happens if you wait:
- You'll lose more shingles, accelerating water intrusion.
- The cost to repair grows as more decking and underlayment become compromised.
- Your roof may approach end-of-life sooner than expected, especially if it's already near the end of its rated life.
What to do now:
1) Obtain multiple repair or replacement bids to compare options.
2) Consider partial replacement if only a section is bald; otherwise plan full roof replacement if many shingles are compromised.
3) Confirm warranty coverage and age of the roof so you understand what's eligible.
Long-term risks (6+ months)
What happens if you wait:
- Major leaks, sagging decking, and structural damage become real risks.
- Mold growth and attic air-quality problems can develop, leading to higher remediation costs.
- Insurance claims may be impacted if the issue worsens or if negligence is alleged.
What to do now:
1) Start planning a reroof if the roof is older or heavily damaged.
2) Ensure proper attic ventilation and drainage to protect any new shingles.
3) Schedule a comprehensive replacement with a trusted contractor.
How This Problem Varies by Location and Climate
- How This Problem Varies by Region & Climate within the United States
Across the United States, bald shingles show up for region-specific reasons. Temperature swings, sun exposure, moisture, wind, and snowfall all shape how fast granules wear away and how quickly shingles go bald. Tailoring your inspection and repair plan to climate can save money and extend roof life.
Northeast & Midwest
- Primary drivers: freezing winters, frequent freeze-thaw cycles, and seasonal snow. Ice dams and moisture intrusion are common culprits.
- What bald shingles look like here: granule loss along eaves and valleys, curling at edges after cold snaps, and smooth, sun-exposed patches in mid-winter sun.
- Practical steps you can take:
1) Inspect after winter and after major storms; look for exposed roofing mat where granules are gone.
2) Improve attic ventilation and insulation to minimize condensation and ice dam risk.
3) Keep gutters clear and consider ice dam prevention where your roof shows signs of backing up meltwater.
- Material considerations: look for shingles with good cold-weather performance and strong granule adhesion; warranty that covers wind and hail in cold climates.
Southeast & Gulf Coast
- Primary drivers: high humidity, frequent rain, heat, and coastal salt exposure near the water.
- What bald shingles look like here: dark streaks from algae and moss, rubbed or worn granules from UV and rain, and bald patches in shady, damp spots.
- Practical steps you can take:
1) Use algae- and moss-resistant shingles and ensure proper attic ventilation to reduce moisture.
2) Trim shade trees and keep roof surfaces relatively dry by improving drainage and gutters.
3) Schedule mid-season inspections to catch moss growth before it lifts shingles.
- Material considerations: choose shingles with algae resistance and good UV stability; coastal homes may benefit from corrosion-resistant flashings and vent components.
Southwest
- Primary drivers: intense sun, high heat, and windy, sandy conditions.
- What bald shingles look like here: pronounced granule loss on sun-exposed surfaces, chalky look of exposed fiberglass mat, and faster aging on slope faces that face the afternoon sun.
- Practical steps you can take:
1) Favor shingles with high UV resistance and robust granule adhesion; consider reflective or light-colored options.
2) Protect roof edge and flashing from wind-driven sand with proper sealing and maintenance.
3) Schedule regular inspections after windy dust events to catch early granule loss.
- Material considerations: premium UV-stabilized asphalt shingles and higher wind resistance ratings perform best in dry, sunny climates.
Pacific Northwest
- Primary drivers: heavy, frequent rain and persistent moisture; moss and algae thrive here.
- What bald shingles look like here: widespread moss or dark staining, especially on north-facing slopes and shaded areas; bald patches where moss has lifted granules.
- Practical steps you can take:
1) Prioritize a good underlayment and ensure attic ventilation to balance moisture.
2) Regular moss and debris removal; keep gutters clean and downspouts clear.
3) Consider algae- and moss-resistant shingles and periodic professional cleaning to preserve granule coverage.
- Material considerations: shingles with strong moisture resistance and algae resistance help delay bald spots in wet climates.
Alaska & Northern Regions
- Primary drivers: extreme cold, heavy snowfall, and freeze-thaw cycles.
- What bald shingles look like here: concentrated granule loss along eaves from ice buildup, cracking at low temperatures, and accelerated aging after long winters.
- Practical steps you can take:
1) Ensure proper insulation and vapor barriers in the attic to minimize condensation.
2) Remove substantial snow buildup and test for ice dams; reinforce installation with suitable underlayment and ice barriers in vulnerable areas.
3) Have a winter inspection plan and address any exposed mat early to prevent broader damage.
- Material considerations: look for shingles rated for cold climates with solid granule adhesion and robust warranty coverage for freezing conditions.
General guidance that cuts across regions:
- Signs to watch for anywhere: shiny or smooth patches, exposed fiberglass mat, curling edges, or random bald spots after storms.
- Quick checks you can do seasonally: walk the roof (with a safe setup or hire a pro), inspect flashings and valleys, and test attic ventilation and insulation.
- Step-by-step upkeep (short version):
1) Inspect twice per year (post-winter and post-summer) and after major weather events.
2) Clean gutters and ensure proper drainage to prevent water backing up under shingles.
3) Use region-appropriate shingles and maintenance methods to slow granule loss and extend life.