Ultimate Guide to Solar-Ready Roofing Services
Last updated: Feb 28, 2026
An Introduction to Solar-Ready Roofing Services
Solar-ready roofing is all about preparing your roof so a future solar installation goes up smoothly, safely, and with long-lasting performance. It's not just about adding panels later on—it's about designing the roof layout, choosing materials, and sealing every seam so energy production isn't interrupted by weather or wear.
What solar-ready means
- Structural compatibility: your roof framing and support are assessed to handle the weight and dynamic loads of solar equipment.
- Roof plane planning: optimal panel orientation, minimal shading, and clean paths for racking and wiring.
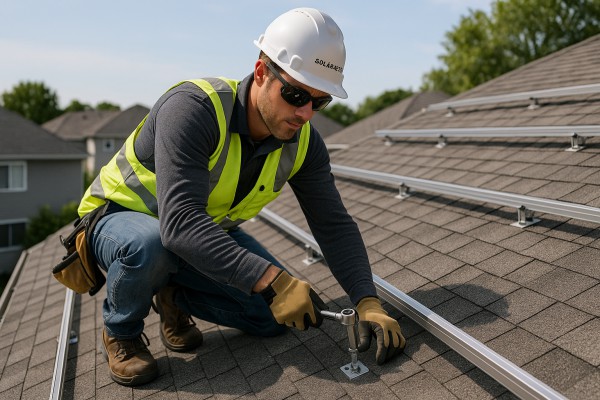
- Penetration management: flashing and sealants are chosen to keep water out where mounts, conduits, and inverters connect.
- Electrical readiness: wiring routes, conduit sizing, and panel-landing locations are mapped before any modules show up.
- Longevity focus: selections and details that protect the roof surface and extend both roof life and solar output.
Why homeowners care
- Faster installs: with a ready-to-install plan, crews don't waste time on rework or later structural changes.
- Predictable costs: upfront assessment helps you budget for both roof work and the solar system.
- Better warranties: a well-planned, properly sealed roof maintains its warranty and reduces risk of leaks.
- Improved performance: clean layouts and fewer penetrations mean fewer potential points of failure and higher efficiency.
Key elements of a solar-ready roof
- Clear install space: flat, unobstructed areas for mounting hardware.
- Consistent pitch and orientation: balanced angles to maximize sun exposure in your location.
- Durable mounting zones: reinforced sections that tolerate wind, snow, and thermal movement.
- Accessible wiring routes: clean, protected pathways from roof to attic or exterior mounting points.
- Integrated safety margins: design choices that keep access, maintenance, and future upgrades straightforward.
Our solar-readiness process (step-by-step)
1. Initial evaluation: we review roof age, material, existing wear, and visible shading from trees or vents.
2. Structural check: we confirm framing, rafter spacing, and load capacity for potential equipment.
3. Layout planning: we determine panel count, orientation, and mounting method to balance aesthetics and performance.
4. Weatherproofing and details: we select flashing, sealants, and membranes that protect against leaks around penetrations.
5. Documentation and permits: we prepare a clear plan and coordinate with utilities and local codes so future work stays on track.
Typical roof types and solar compatibility
- Shingle roofs: versatile and common; solar-ready details focus on secure mounting and leak protection.
- Metal roofs: strong and long-lasting; often excellent for rapid installs with clean flush mounts.
- Tile roofs: require careful mounting and sometimes alternative racking to preserve tile integrity.
- Flat or low-slope roofs: special attention to drain paths and robust waterproofing.
Quick homeowner checklist
- Note roof age and any prior leaks or repairs.
- Check for shading that changes with seasons.
- Confirm attic access and electrical panel location.
- Ask about warranty coverage for both roof and future solar components.
- Keep a record of roof dimensions and any peculiarities (chimneys, vents, skylights) that affect layout.
This approach helps you understand what “solar-ready” actually involves and why each step matters for long-term performance, safety, and value.
Solar-Ready Roofing Services: How They Prepare Your Roof for Solar
Comprehensive Definition
Solar-ready roofing services are a package of pre-installation tasks designed to make a roof physically and structurally suitable for solar PV systems. They go beyond a simple cosmetic upgrade and address the roof as a system: decking condition, underlayment quality, flashing, ventilation, and potential penetrations. The goal is to create a solid, weather-tight base that allows solar panels, racking, and electrical wiring to be installed smoothly, safely, and with minimal future repairs. A solar-ready approach considers roof age, prior leaks, and the local climate, ensuring the roof can support the added weight, handle wind loads, and accommodate optimal panel placement. While the electrical work is handled by a licensed solar or electrical contractor, the roofing work sets the stage for a durable, code-compliant installation.
When it's typically needed
- Your roof is new or has been recently replaced and you're planning to add solar within the next 1–2 years.
- The roof is approaching the end of its expected life (typically 15–25 years for shingles, longer for some tile or metal roofs) and needs upgrades to withstand solar hardware.
- There are signs of underlying issues (shingle damage, soft spots, leaks, or poor decking) that could compromise solar mounting or warranty.
- The roof has complex geometry (multiple angles, steep pitches, or irregular shapes) that requires careful layout to maximize sun exposure and minimize penetrations.
- You want to minimize future roof work after solar installation, reducing the risk of panel removal to re-deck or reseal.
Key Components of Solar-Ready Roofing
- Structural and decking assessment: checks for decay, rot, or fastener issues; ensures deck can support added loads.
- Material compatibility and upgrades: selects underlayment and flashing compatible with solar mounting systems and local weather.
- Roof penetrations and flashing: uses properly sealed flashing around penetrations (vents, pipes, skylights) to prevent leaks.
- Ventilation and attic airflow: confirms adequate soffit/ ridge ventilation to manage heat and moisture with solar installed.
- Weatherproofing improvements: tightening seals, upgrading sealants, and ensuring a continuous moisture barrier above and below the deck.
- Mounting and layout planning: coordinates with the solar installer on rack type, grounding points, and conduit paths to minimize roof cuts.
- Wiring channels and conduit routing: designs discreet, protected routes for DC and AC wiring that won't compromise the roof or void warranties.
- Roof material considerations: selects mounting methods and fasteners that suit shingles, metal, tile, or flat roofing without voiding warranties.
- Insurance and warranties coordination: aligns with manufacturer guidelines to preserve roof and system warranties.
How the process works (step-by-step)
1. Initial assessment: a roof professional evaluates condition, age, and solar-readiness; may include drone photos and moisture checks.
2. Identify needed repairs: replace damaged decking or shingles, upgrade underlayment, and fix any leaks found during inspection.
3. Improve ventilation: ensure attic airflow is adequate to handle heat with solar equipment installed.
4. Plan the layout: determine optimal panel placement, rack type, and conduit routes in coordination with the solar installer.
5. Prepare for permits: compile documentation and ensure design meets local codes and warranty requirements; schedule installation with the solar contractor.
Signs your roof is or isn't solar-ready
- Visible wear, curled or missing shingles, or soft spots that suggest decay.
- Older underlayment or flashing that may not seal well around penetrations.
- Complex roof geometry that would benefit from professional layout planning.
- Good structural condition but limited attic ventilation, which can affect efficiency.
- Willingness to align with your solar timeline to avoid unnecessary roof work after installation.
Maintenance tips to stay solar-ready
- Schedule a roof inspection before planning solar, especially if the roof is over 15 years old.
- Keep trees trimmed to reduce shading and debris around panels and flashings.
- Address leaks promptly to prevent compounded damage and interruptions to solar performance.
- Follow manufacturer and installer guidelines for warranty maintenance and inspections.
Signs You Need Solar-Ready Roofing Services
Signs this service is needed
- Your roof is approaching the end of its expected life: asphalt shingles typically 15–20 years, metal 30–50, tile often longer but more fragile.
- Visible damage: curling or cupping shingles, missing shingles, blistering, or significant granule loss in gutters.
- Leaks or water intrusion: stains on ceilings, damp attic insulation, or a musty attic smell.
- Structural concerns: sagging roof sections, soft decking, or daylight visible through the attic.
- Planning a solar install: you're considering a PV system in the next 6–12 months, or you're unsure the roof can support the panels without upgrades.
- Ventilation or flashing issues: poor attic ventilation or damaged flashing that could complicate mounting or void warranties.
Ways you can confirm yourself as a homeowner
- Check age and history: locate the installation date, warranty terms, and any prior roof repairs or work.
- Do a safe visual check from the ground: look for curled, cracked, or missing shingles; excessive granule buildup in gutters; warped or damaged flashing.
- Inspect the attic: look for water stains, damp insulation, mold, or unusual smells; ensure vents and baffles are in place.
- Note roof type and layout: identify material (asphalt, tile, metal), pitch, and where vents, chimneys, or skylights sit, since mounting methods vary.
- Assess sun and shade: consider orientation (south-facing is common) and any tree or neighbor shading that could affect solar performance.
- Check access and permits: verify HOA rules and whether permits are needed for a future solar installation.
When to get a professional assessment
- If you notice leaks, widespread shingle damage, or soft/sagging decking.
- If the roof is older or its exact age is unknown and you want a plan that won't compromise a solar install.
- If you're planning to add solar within 6–12 months, or you want a precise load and mounting plan.
- If you have a complex roof (multiple pitches, irregular shapes, steep angles) or significant shading that could affect performance.
- If you're not comfortable safely inspecting or climbing on the roof; a professional can perform a thorough roof and attic assessment and offer recommended next steps.
What Solar-Ready Roofing Services Include
Core inclusions
- Comprehensive roof assessment and condition report: we document roof age, material type, flashing, shingles or panels, and any damage, with clear recommendations for readiness.
- Structural evaluation and reinforcement as needed: we check framing, decking, and fasteners, and perform minor reinforcements so the roof can carry future solar equipment.
- Roof replacement or targeted repairs to establish a solid base: if current materials are nearing end of life or show critical flaws, we repair or replace only what's necessary to support solar readiness.
- Upgraded weatherproofing and ventilation: high-quality underlayment, proper flashing, sealants, and any ventilation improvements to prevent leaks once solar is added.
- Deck repairs or reinforcement for added solar load: we address damaged or undersized decking so mounting rails sit securely.
- Pre-planned, solar-ready penetrations: we pre-cut or sleeve openings for future conduit runs, with weatherproof seals and clean finishing to minimize future disruption.
- Conduit routing and cable management plan: deliberate paths from the attic to the exterior and a neat, access-friendly layout that future installers can follow.
- Electrical capacity check and panel compatibility: we review existing service capacity, perform load calculations, and flag any need for panel upgrades or service changes.
- Permitting, code compliance, and project documentation: we coordinate required permits and inspections, provide drawings and notes to simplify the solar install.
- Engineering support and stamped documentation when required: if local codes demand structural stamps, we generate the necessary calculations and paperwork.
- Materials compatibility and warranty alignment: we choose roof products that won't conflict with solar mounting and won't void existing warranties.
- Coordination with your solar installer: we document layout guidelines, access points, and site notes so the solar team can move quickly when you're ready.
How it unfolds (three practical steps)
1) Schedule and site review: a thorough roof and structure check, plus shading and weather considerations that could affect future solar placement.
2) Planning for solar readiness: we map penetrations, conduit routes, and flashing details, then prepare a detailed plan you can share with your solar contractor.
3) Execution and handoff: we complete the necessary roof work, seal and test penetrations, and provide a clean, documented handoff with all measurements and notes for the solar install.
What isn't typically included
- Actual solar equipment and hardware: no panels, mounting rails, racking, microinverters, string inverters, or trackers are installed as part of the roofing work.
- Solar electrical system installation: no DC/AC wiring, interconnection wiring, disconnects, inverters, combiner boxes, optimizers, or battery storage systems.
- Solar system design and commissioning: layout optimization, system sizing, electrical design work, and final system commissioning are handled by the solar installer.
- Major electrical upgrades unrelated to solar readiness: we don't upgrade service panels or perform heavy electrical work beyond what's required to support solar readiness.
- Non-standard or extensive structural changes beyond readiness scope: any major remodels or reinforcement beyond what's necessary for solar readiness are not included.
- Ongoing roof maintenance or non-solar-related repairs: routine cleaning, cosmetic fixes, or unrelated repairs aren't part of the solar-ready package.
- Solar permitting with fees (in some regions): while we handle the roofing permits and documentation, solar permit fees and utility interconnection approvals are usually managed by the solar contractor and may not be included in our price.
- Long-term warranties on the solar system: you'll obtain warranty details for the roof portion, but solar equipment warranties come from the solar equipment suppliers and installers.
Roofing Materials Commonly Used with Solar-Ready Roofing Services

- Asphalt shingles are the most common residential roofing material, and they're frequently paired with solar-ready installations. This material is lightweight and flexible, which helps with retrofits and more straightforward mounting, provided the roof is in good condition.
- How the service relates: a solar-ready retrofit for asphalt roofs focuses on preserving shingle integrity around penetrations, flashing, and edge details. We'll inspect for curling, cupping, or missing granules before any mounting happens.
- Material specifics: shingles age and condition matter. If the roof is near or past its expected life, you may need a roof replacement before solar. Nail lines and attic ventilation influence how much space is available for racking and wiring. Proper sealing around skylights and vent stacks is essential to prevent leaks.

- Metal roofs are a natural fit for solar because many systems can fasten directly to the panels without penetrating the roof deck as often as other materials. Standing seam, in particular, provides clean seam lines for rails and clamps.
- How the service relates: mounting hardware is designed to grip or clip onto metal without leaks, and some setups use through-fastened or hidden-fastener rails. We'll evaluate seam integrity, panel coatings, and any potential heat-related expansion gaps.
- Material specifics: metal roofs are lightweight and durable, but color fades and thermal expansion can affect mounting tolerances. We'll check for oxidation, corrosion resistance, and ensure proper grounding and bonding. The warranty on the roof and the solar system should align to avoid voiding coverage.
Concrete or Clay Tiles
- Concrete and clay tiles are heavier than asphalt and often require structural verification before solar work. They're common in warmer climates and can be aesthetically pleasing with solar.
- How the service relates: tiles are typically mounted using rail clamps on battens or on the roof deck. We'll assess tile condition, risk of cracking during installation, and the need for tile replacement around penetrations and flashings.
- Material specifics: tile fragility means careful handling and sometimes wider spacing of racking. Broken tiles are not uncommon during retrofits, so spare tiles and careful sequencing matter. A roof with tiles may need a partial reroof in concert with solar to ensure long-term integrity.

- Slate is extremely durable but very heavy, making solar integration more specialized. Slack in the structure or inadequate framing can complicate installs.
- How the service relates: slate roofs often require expert mounting solutions and sometimes reinforcement to handle added loads. Sideloads and carefully placed clamps are used to minimize breakage.
- Material specifics: slate warrants long life, but the installation process must protect against fractures and chipping. If the roof's age or slates show wear, a partial slate replacement or roof refresh may be recommended before solar.

- Synthetic or composite roofing (polymer-based shingles, faux shakes, or rubber composites) pairs well with solar due to its light weight and resilience.
- How the service relates: racking systems often install cleanly on synthetic surfaces, with fewer compatibility concerns around expansion and contraction.
- Material specifics: these materials typically tolerate mounting hardware well and can be easier to seal around penetrations. They often carry strong warranties that align nicely with solar warranties, and they resist cracking better than some natural materials.

- On low-slope or flat roofs, solar-ready installations use ballast or mechanical mounting with rubber or thermoplastic membranes.
- How the service relates: the racking strategy must respect membrane seams and edge details to prevent leaks. We'll verify deck condition, insulation, and the integrity of existing flashing.
- Material specifics: these membranes are durable but require careful attachment methods to avoid punctures or seam failures. Solar mounting may involve ballast blocks or specialized clamps designed for membranes, and any penetrations are sealed with compatible sealants to maintain watertight performance.
1) Inspect roof condition and age for each material type.
2) Confirm structural capacity to support solar equipment.
3) Choose mounting method that minimizes penetrations and preserves warranties.
4) Ensure proper flashing, sealing, and edge protection around penetrations.
5) Align roof and solar warranties to prevent coverage gaps.
Understanding the Cost of Solar-Ready Roofing Services
What solar-ready prep includes
Solar-ready roofing isn't just about installing panels later. It's a package of measures that sets up your roof to accept solar hardware safely and efficiently. Expect:
- Reinforced or properly prepared roof deck and underlayment to handle mounting hardware and potential panel weight.
- Clean, unobtrusive conduit paths and junction boxes planned into the roof line.
- Flashing and sealant detail that won't trap moisture around penetrations.
- Ventilation and attic access considerations tailored for solar installations.
- Coordination with the solar installer for panel layout, electrical run, and inverter placement.
- Permitting, inspections, and code compliance checks as part of the project.
Typical average costs
Costs vary widely based on roof size, material, condition, and local labor rates. Here are typical ranges you'll see when a contractor quotes solar-ready work.
- Baseline solar-ready prep (roof in good condition, no major roof replacement): $1,500–$4,000
- Partial roof reinforcement or modest upgrades to support solar mounting: $4,000–$9,000
- Full reroof paired with solar-ready prep (common for asphalt shingles): $8,000–$15,000
- Full reroof with premium materials or large, complex roofs: $15,000–$35,000+
- Electrical readiness (panel assessment/upgrade, wiring, conduit to the roof): $1,000–$6,000
- Permitting, inspection fees, and system integration coordination: $300–$1,500 (typical, varies by jurisdiction)
What influences cost (factors that may lower or raise the price)
Understanding the drivers helps you plan and compare apples to apples.
- Factors that can reduce costs
- Roof is in solid condition with no structural repairs needed.
- Simple roof geometry (rectangular, minimal hips/dips) lowers labor time.
- Existing attic space and easy conduit routing reduce complexity.
- Standard roofing material (asphalt shingles) and mid-range insulation/underlayment.
- One contractor handling both roofing and solar coordination, avoiding separate charges.
- Permits and inspections included in a bundled package or waived by some programs.
- Factors that can increase costs
- Roof deterioration, rot, or need for structural repair before solar prep.
- Complex roof designs (multiple valleys, dormers, steep slopes, or unusual pitch).
- Premium roofing materials (wood shake, tile, standing seam metal) add both material and labor costs.
- Limited access to the roof, tight spaces, or safety requirements that slow work.
- Large electrical upgrades (new main panel, feeder upgrades, disconnects) or long conduit runs.
- Local permitting hurdles, HOA rules, or additional code compliance steps.
- Scheduling delays or multiple trades needing coordination beyond the roofing contractor.
Cost-saving strategies
- Get a formal solar-ready assessment from the roofing contractor, not just a price quote.
- Bundle roofing replacement with solar readiness to unlock efficiency; avoid piecemeal work.
- Check if the contractor offers a bundled warranty covering roof and solar components.
- Plan the solar install timeline to align with roof work for fewer site visits.
- Obtain at least three detailed quotes that show scope of work, materials, permits, and sequencing.
How to budget (four practical steps)
1. Have a roof assessment done to confirm current condition and determine if reinforcement is needed.
2. Ask for a single, integrated quote that itemizes roofing work, solar-ready prep, electrical upgrades, permits, and inspections.
3. Compare not just price, but scope of work, warranty terms, and project timeline.
4. Build a contingency—set aside 10–15% of the estimated total for unexpected roofing or electrical needs.
How the Solar-Ready Roofing Process Works
Step 1: Initial Consultation and Home Evaluation
- We start with a friendly chat to hear your goals (lower bills, energy independence, environmental impact) and to learn about your home, roof age, shading, and orientation.
- We gather roof measurements, photo references, and basic electrical information. We also discuss budget, timelines, and any HOA or utility requirements so the plan fits your situation.
Step 2: Roof and System Assessment
- Our team inspects the roof structure, underlayment, decking condition, vents, and attic insulation to confirm the roof can support solar-ready upgrades.
- We identify any repairs or upgrades needed before or during solar work, such as resealing flashing, addressing moisture concerns, or reinforcing decking.
Step 3: Feasibility and Design
- We perform a shading and orientation analysis to determine the optimal panel count and layout for your energy goals.
- We design a Solar-Ready solution that includes conduit routing, mounting approach, and compatibility with existing roofing materials. We also outline inverter type options (string or microinverters) and discuss future storage readiness if you're interested.
Step 4: Permitting and Scheduling
- We handle or guide permits, utility interconnection paperwork, and any HOA approvals required for your project.
- A clear project calendar is provided, with milestones such as material lead times, weather windows, and installation windows so you know what to expect.
Step 5: Site Preparation and Safety
- We protect landscaping and walkways, set up containment as needed, and prepare a safety plan for workers.
- We confirm access, ladder anchor points if applicable, and any roof prep steps that keep your home safe and weather-tight during the process.
Step 6: Solar-Ready Roofing Installation
- If needed, we upgrade or adapt the roof to a true solar-ready condition, including secure conduit routes, compatible flashing, and weatherproof penetrations.
- All work follows manufacturer guidelines to preserve roof warranties and to ensure a clean, leak-free installation.
- Our coordination between roofing and electrical teams keeps the project on schedule and minimizes disruption to your daily routine.
Step 7: Electrical Work and Inverter Setup
- We install racking, route DC wiring through approved conduits, and mount the solar modules.
- We place the inverter(s), AC disconnect, and safety interlocks, then tie the system into the electrical panel and utility interconnection point, with careful labeling and documentation.
Step 8: System Commissioning and Inspections
- We perform thorough performance testing: voltage, current, insulation checks, and string balance to confirm everything operates as designed.
- We schedule or complete required inspections with local authorities and the utility, verify interconnection approval, and confirm metadata like system size and orientation.
Step 9: Handover and Maintenance Plan
- You receive a complete set of documents: equipment specs, warranties, as-built drawings, and a performance dashboard briefing.
- We review recommended maintenance practices, monitoring options, and how to interpret production data; we outline any warranty care steps and suggested annual checks.
Residential vs. Commercial Considerations for Solar-Ready Roofing
Residential Considerations
For homeowners, solar-ready roofing boils down to fit, aesthetics, and long-term value. The roof is your base, and the system should complement its shape and usage patterns without creating ongoing headaches.
- Roof geometry and plan
- Most homes benefit from straightforward, south-facing or slightly east/west orientations.
- Pitch and shading from trees or nearby structures can influence panel quantity and performance.
- Roof age, condition, and warranty
- A roof nearing the end of its life may need replacement before or during solar installation to avoid rework.
- Check warranty language on both the roof and the mounting hardware; some warranties require installers to use non-penetrating or low-penetration methods.
- Aesthetics and neighborhood rules
- HOA guidelines or local design guidelines can affect panel size, placement, and color.
- Visible arrays should blend with the shingles and overall home style to maintain curb appeal.
- Space and layout for optimal performance
- Ensure there is enough unobstructed roof area for the desired system size; consider shading from chimneys, vents, and skylights.
- If roof space is limited, microinverters or optimizers and a higher-efficiency panel mix might be better.
- Practical installation considerations
- Follow a homeowner-friendly sequence: assessment, design, permitting, installation, and final inspection.
- Plan for weather windows and a clean work area to minimize disruption.
- Permitting, interconnection, and warranties
- Local permitting timelines vary; your installer should handle most of the paperwork.
- Confirm the system's performance warranty, workmanship warranty, and what happens if panels need service.
- Step-by-step planning for a home install
1) Conduct a roof and energy-use assessment to size the system.
2) Design panel layout and mounting type that respects roof features and aesthetics.
3) Obtain permits and schedule electrical interconnection with the utility.
4) Prepare the roof, install the racking, panels, and inverters, and seal all penetrations.
5) Commission the system, provide documentation, and review maintenance needs.
Commercial Considerations
For small businesses, multi-family buildings, or office spaces, solar-ready roofing must scale with structure, safety, and long-term reliability. The approach often involves engineering coordination and code-driven planning.
- Structural and mounting decisions
- Large roofs may support higher array counts; decisions between ballasted (non-penetrating) and penetrating mounts depend on roof type and warranty.
- Consider roof load capacity, wind uplift, and whether ballast blocks must be integrated into drainage design.
- Roof access, safety, and maintenance
- Commercial projects require clear access routes for maintenance, with fall protection, guardrails, and fall-arrest systems as needed.
- Ensure safe walkways and trained personnel for ongoing inspections and cleaning without compromising roof integrity.
- Codes, standards, and interconnection
- NEC, fire-rated assemblies, and local building code requirements drive equipment choices and spacing.
- Utility interconnection can involve more complex metering and monitoring for building management systems.
- System sizing, performance, and monitoring
- Commercial layouts often optimize for peak daytime demand and overall building load, not just annual kWh.
- Centralized inverters or string inverters with robust monitoring help operations teams track performance and detect issues quickly.
- Financing, incentives, and lifecycle planning
- Greater scale may unlock different financing options, tax incentives, and potential utility rebates.
- Plan for long-term O&M: module cleaning, inverter replacement cycles, and performance reporting.
- Step-by-step planning for a commercial install
1) Do a site survey and a building-load analysis to determine feasible system size.
2) Engage structural and electrical engineering if needed; prepare a detailed design package.
3) Develop a safety plan with access routes, fall protection, and contractor coordination.
4) Navigate permitting and utility interconnection; align with building management schedules.
5) Install, commission, and hand over with an ongoing O&M plan and performance guarantees.
- Quick-read contrasts at a glance
- Scale and pace: residential projects are smaller and faster; commercial jobs are bigger and more coordinated.
- Mounting: residential often favors aesthetically integrated racks; commercial may use ballast or penetrations based on roof type.
- Compliance: both follow codes, but commercial projects typically involve more complex engineering and documentation.
- O&M expectations: homeowners want simple, warranty-backed service; businesses require ongoing monitoring, reporting, and scheduled maintenance.
How Solar-Ready Roofing Services Vary by Location
Regional Climate and Roof Design Considerations
- Different climates demand different roof prep. In hot, sunny regions you'll want ventilation, reflective underlayments, and properly spaced rafter bays to keep attic temps down. In cold or snowy areas, roof slope, snow guards, and insulation matter for performance and longevity.
- Wind-prone zones require robust edge protection and wind-rated mounting hardware to resist uplift. Hail-prone regions push for impact-resistant shingles and panel mounts designed to survive hail events.
- Ember and fire risk in dry areas influences material choices and clearance around arrays; fire-rated underlayment and ember-resistant vents can be worth it.
- Across all regions, ensure roof decking is sound and compatible with solar racking; a weak roof is the bottleneck, not just the solar system.
Local Regulations and Permitting
- Permitting timelines, required inspections, and code interpretations vary by city, county, and state. Some jurisdictions offer online portals; others rely on in-person plan checks that can slow the project.
- HOA rules differ widely: some HOAs restrict panel orientation, visible conduit, or even shade-generating equipment. Check covenants early to avoid surprises.
- Building codes may require specific underlayment, ventilation, or seismic strapping in certain areas. Your roofer should align solar installs with local code amendments and absorption requirements.
- Numbered steps to navigate regional rules:
1) Identify all permits and approvals needed (roof, electrical, structural).
2) Confirm contractor licensing and any region-specific solar electrician requirements.
3) Request HOA or local approvals upfront.
4) Schedule inspections in line with your utility interconnection timeline.
Utility Programs and Interconnection Rules
- Net metering, time-of-use rates, and interconnection processes vary by state and utility. Some regions have streamlined online interconnection portals; others require manual applications and longer review times.
- Incentives (state tax credits, rebates, or utility-backed programs) can differ year to year. Some programs stack with the federal ITC; others are limited or phased out.
- Interconnection agreements may specify equipment standards, data messaging, and insurance requirements. Your installer should map these rules to the solar-ready design before ordering materials.
Common Roof Types by Region
- Northeast and Mid-Atlantic: mixtures of asphalt shingles and metal; roofs often designed for snow shedding and ice dam prevention.
- Southeast: asphalt and tile roofs are common; higher humidity can influence sealants and fastener choices.
- Southwest: metal roofs and tile are prevalent due to heat; solar mounts must account for direct sun, dust, and corrosion resistance.
- West Coast: a blend of shingles, tile, and metal; earthquake considerations may affect attachment methods and ballast choices.
- Pacific Northwest: moisture and moss are considerations; roof vents and drainage play a bigger role in long-term performance.
- Florida and gulf states: high wind zones and salt spray call for wind-rated modules and corrosion-resistant hardware.
Contractor Availability and Quality Standards
- Urban areas offer many options but also fragmented workmanship; verify credentials, warranties, and safety records.
- Rural regions may have longer lead times or fewer installers; discuss access, scheduling, and support responsiveness upfront.
- Look for manufacturer-certified installers, proper licensing, insurance, and a clear warranty path for both roofing and mounting hardware.
How this service varies in different regions in the United States
- Northeast and Midwest: snowfall and ice dam concerns drive emphasis on roof integrity, insulation, and ice-melt strategy; permit queues can be longer in winter.
- Southeast: hurricane and high-wind design requirements shape mounting, sealants, and attachment methods; salt and humidity influence hardware longevity.
- Southwest: extreme sun and heat demand high-efficiency modules, heat-resistant components, and corrosion-proof mounting; planning around dust and wind is common.
- West Coast: wildfire and seismic zones push for ember-resistant materials and reinforced connections; interconnection timing can hinge on regional utility workload.
- Pacific Northwest: persistent moisture changes how roof decking, drainage, and moss control are addressed; cooling strategies still matter for panel performance.
- Alaska and Hawaii: remote logistics, unusual weather patterns, and distinct building codes require tuned supply chains and adaptable installation schedules.