Last updated: Apr 19, 2026
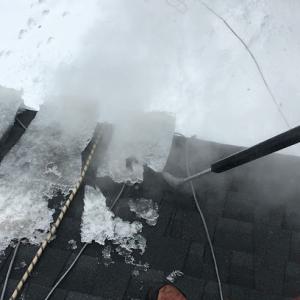
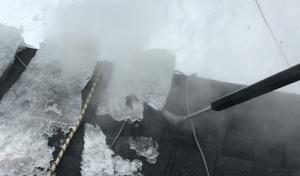
Duluth's position on the western tip of Lake Superior creates colder, longer-lasting snow cover and lake-influenced moisture that increase ice dam risk compared with inland Minnesota locations. That combination means snow near the peak of the roof can stay heavy well into late winter, and meltwater has nowhere to go but back up under shingles if the attic isn't fighting it. When days warm, nights freeze, and sun rests lower in the sky, those cycles carve a path for ice dams to form faster than in many other climates. The result is not just a nuisance; it's a driver of moisture that can push water inward and into ceilings if left unchecked.
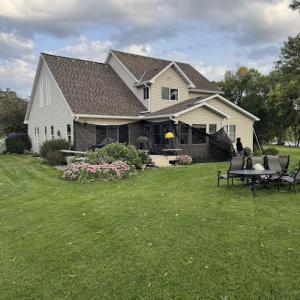
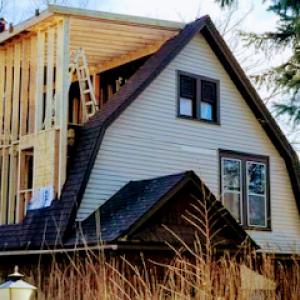
Homes built on steep hillside neighborhoods often shed snow unevenly, concentrating runoff and refreezing at eaves, valleys, and over entry roofs. That uneven shedding creates pockets of ice that back up under flashing and shingles, especially where valleys funnel water or where roof lines meet walls. If an eave edge is slightly damaged, or if a valley gets clogged with drift, the resulting dam can back up under roofing materials with enough pressure to deform seals around vents, pipes, and skylights. On hillside houses, the wind-borne cold air can freeze drips and meltwater in layers, magnifying the stress on the soffit, fascia, and rafter system.
Repeated freeze-thaw cycles during Duluth winters can open shingle seals, stress flashing, and turn minor defects into interior leaks during spring melt. Small gaps that form at shingle tabs or around venting can widen with every cycle, allowing warm attic air to infiltrate the roof deck and melt snow from above while refreezing at the eaves below. In homes with complex roof geometry-multiple pitches, large valleys, or over-entry roofs-the opportunity for misdirected meltwater grows. The timing matters: a late-season thaw followed by a sudden cool snap can trap water where it doesn't belong, creating hidden rot behind dormers or under ridge caps that aren't designed to shed heavy snow loads.
First, focus on snow management. Keep a clear path from the roof overhangs to the ground, or install safe snow guards and ice rails where ice tends to form at the eave and in valleys. Ensure attic insulation and ventilation are balanced so warm attic air doesn't overheat the roof deck during a thaw; a well-ventilated attic reduces the chance of warm roof areas that push meltwater toward the eaves. Inspect flashing around chimneys, skylights, vents, and joints after major storms, paying close attention to any gaps or loose sealant. On steeper roofs, consider preventive maintenance that includes securing loose shingles before the season, and address any visible signs of wear in valleys and ridges promptly. If you notice interior staining, damp spots along ceilings, or a sudden spike in ice buildup after a spring melt, treat it as an urgent leak risk and arrange an inspection without delay. In hillside homes, prioritize systems that channel water away from entry points and separate runoff from the foundation and entry stairs. When you plan repairs, opt for materials and flashing details that tolerate repeated freeze-thaw cycles and keep expansion joints clear of debris. This approach minimizes the chance that a minor defect becomes a costly, climber-forced repair when the next heavy snowfalls arrive.

Billings Roofing & Siding
(218) 940-8299 billingsroofingmn.com
5916 Sunny Ln, Duluth, Minnesota
5.0 from 184 reviews
Welcome to Billings Roofing & Siding, your premier provider of roofing and siding services in Duluth, MN, and the surrounding areas. With a dedication to excellence and customer satisfaction, Billings Roofing & Siding offers comprehensive solutions to meet all your residential and commercial exterior improvement needs. At Billings Roofing & Siding, we understand the importance of a reliable roof and durable siding when it comes to safeguarding your property and enhancing its aesthetic appeal. We are proud to prioritize professionalism, integrity, and customer satisfaction. Contact us today to schedule a consultation and experience the superior service! Let us elevate the beauty, value, and protection of your property.

Outlast Construction
(877) 278-9555 www.outlast-construction.com
2521 Miller Trunk Hwy Suite 1, Duluth, Minnesota
5.0 from 212 reviews
Outlast Construction provides roofing services in the MN, ND, WI and IN areas.
Peak Construction Roofing
(218) 728-8033 www.peakconstructionroofing.com
4120 Richard Ave Suite 400, Duluth, Minnesota
4.9 from 143 reviews
Since 2011, Peak Construction Roofing as been the trusted choice for roofing services, proudly serving as the only Owens Corning Platinum Contractor in the area. Our commitment to exceptional service and quality craftsmanship ensures your home is protected with the best roofing solutions available
Superior Roofing Company
(218) 248-6060 superior-roofing-company.com
6511 Lexington St, Duluth, Minnesota
5.0 from 58 reviews
Superior Roofing with 16 years dedicated to excellence in providing luxury level service to every customer. We Specialize In luxury Metal, Cedar, and slate for the best customers around With a team of seasoned professionals, cutting-edge technology, and expert customer satisfaction. SRC is a stand alone option for Specialty Roofing! Talk soon
Duluth Roofing Company
(218) 727-8868 www.duluthroofing.com
4502 E Superior St, Duluth, Minnesota
4.8 from 72 reviews
Since 2008, Duluth Roofing is the go-to roofing company for the greater Iron Range and Duluth, MN area. Whether it's tear-off and re-roofing, new construction, flat rubber roofing, or any other roofing needs, we've got you covered. As certified experts, we specialize in various roofing types, including asphalt shingles, cedar shake and shingle, slate and synthetic slate, and EPDM rubber. We offer enhanced manufacturers warranties and back our work with our own Workmanship Guarantee, ensuring peace of mind for our customers. In addition, we offer green roofing options and grass roofs for those seeking eco-friendly solutions. Let us prove how our licensed, bonded, certified, and insured professionals can provide your long-term roofing needs.

Empire Roofing
(218) 960-7308 www.empireroofingmn.com
1632 London Rd, Duluth, Minnesota
4.6 from 217 reviews
Empire Roofing is the leading Roofing Company in Duluth, MN & the surrounding areas. We proudly offer Roof Repair & Replacement in Duluth, MN! Get in touch with us if you need a Roofer. Since we first opened our doors in 1999, we have been dedicated to serving our customers with prompt, quality service, as we fully understand this is the best way to succeed as a local expert in the community. Contact us if you are looking for a "Roofing Contractor near me". We are constantly learning and staying active in the roofing community, as we believe that keeping our customers informed and sharing our knowledge is key! Book now for your free 20 point inspection & consultation!
Perrault Construction
(218) 723-8477 perraultconstruction.com
3009 W Superior St, Duluth, Minnesota
4.3 from 100 reviews
Perrault Construction specializes in roofing, decks, windows, and siding in Duluth, Minnesota. With over 50 years of experience, our dedicated Duluth Roofing and home improvement team ensures quality service and customer satisfaction. As Duluth's trusted home improvement contractor, located in Lincoln Park and serving Lakeside, Central Hillside, and beyond, we focus on delivering peace of mind for all your renovation projects. Contact us today to learn how we can enhance your home!
North Shore Roofing & Contracting
(218) 576-9427 northshoreroofingandcontracting.com
Duluth, Minnesota
5.0 from 8 reviews
I started North Shore Roofing and Contracting so I could pursue a career in the field I am most passionate about - construction with an emphasis on roofing systems. Whether you need an emergency tarp to cover a hole in your roof, are interested in a full re-roof, or have another building project to tackle, I am dedicated to preforming the highest quality work at a competitive price. I pride myself on turning your large complicated project into a hassle free experience.
Duluth Ice Dam Removal
(218) 349-2684 duluthicedam.com
Duluth, Minnesota
5.0 from 8 reviews
Duluth Ice Dam Removal provides ice dam removal services to Duluth, MN; Iron Range, North West Wisconsin, and the surrounding areas.

M.C. Roofing
(218) 348-8539 mcroofingduluth.com
Duluth, Minnesota
5.0 from 3 reviews
M.C. Roofing provides residential roofing, commercial roofing, shingles, gutters, snow removal, and ice removal services to Duluth, MN and surrounding areas.
Rhino Roofing
(218) 724-7663 rhinoroofer.com
Serving
4.8 from 115 reviews
Rhino Roofing, a leading roofing company and construction specialist, specializes in providing top-quality roofing and siding services to the Hermantown, MN, area. Whether you're in need of comprehensive roofing solutions, including metal and traditional materials, or looking to enhance your home with new siding, our team has the expertise and dedication to deliver exceptional results. With a focus on using the best materials and systems in the construction industry, Rhino Roofing ensures your home improvement project in Hermantown, MN, not only meets but surpasses your expectations. Choose Rhino Roofing, the roofing company that truly cares about its customers and the community it serves.
Vertex Roofing
(218) 503-5448 vertexroofing.com
Serving
4.5 from 16 reviews
We're Not Your Normal Roofing Company. At Vertex Roofing, we’re a proud family-owned and locally rooted business, our mission is to provide top-quality roofing services with unwavering integrity and dedication. We operate with humility, respecting every customer and every home we work on. Guided by our core values of doing the right thing and continuously seeking improvement, we are committed to delivering excellence without the pressure of door knocking or scheming tactics. Our focus on high standards and genuine character sets us apart, ensuring that every project reflects our dedication to quality and trustworthiness. We strive to be the roofing professional you can count on, built on a foundation of honesty, skill, and transparency.
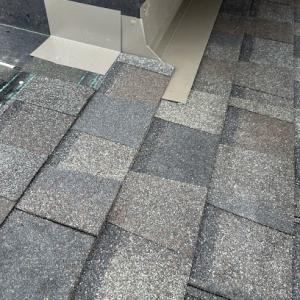
Duluth roofs can take a double hit from winter snow damage followed by summer hail and wind events, so damage assessments often need to distinguish old winter wear from new storm impacts. Snow load can bend a roof structure and create hidden damage under ice and packed layers, which means a knock from a hailstorm this summer can expose preexisting weaknesses. When you review a damage claim or plan repairs, start by mapping what was already compromised by last season's snow and what the most recent storm actually did to the shingles, flashing, and vents. If you see curled edges, micro-cracks, or loose granules, treat them as warning signs of accelerated wear rather than isolated surface flaws.
Lake exposure intensifies wind-driven rain on elevated and exposed parts of the city, especially where roofs face open slope or ridge conditions. That means ridge vents, rake edges, dormers, and skylights demand extra attention after a storm. In Duluth, the wind can drive rain straight under weakened shingles and behind flashing, feeding ice dam formation in winter and moisture intrusion in summer. If you notice shifting shingles, gaps around chimney flashing, or damp spots along the eave line, inspect quickly and comprehensively. Don't rely on superficial fixes-wind-driven rain can exploit small vulnerabilities and create costly interior damage over time.
Short northern repair seasons mean storm backlogs can push work into narrow installation windows before cold weather returns. Plan ahead by flagging urgent repairs that affect roof-to-wall joints, gutters, and attic ventilation. Delays trap moisture and can worsen ice dam risks once temperatures drop. When arranging a repair window, prioritize sealing penetrations, resealing flashing, and restoring proper ventilation to curb condensation and freeze-thaw stress. If a storm has just passed, your immediate focus should be on stopping water intrusion and stabilizing the roof structure, then scheduling a thorough assessment to differentiate what's newly damaged from what's already aged.
Walk the roof with caution after a storm with good daylight and, if possible, a ladder secured on solid ground. Look for lifted shingles, misaligned flashing around vents, and any pooling near valleys. Inside the attic, check for damp insulation, staining, or musty odors near the ridge and eaves. If you're unsure about the extent of damage, call in a local roofing professional who can distinguish winter wear from fresh storm impacts and prioritize repairs aligned with Duluth's demanding climate. Quick action now can prevent ice dam formation and wind-driven water from turning a minor setback into a major repair.
Find local contractors experienced in assessing and restoring roofs after hail, wind, and severe weather events.
Billings Roofing & Siding
(218) 940-8299 billingsroofingmn.com
5916 Sunny Ln, Duluth, Minnesota
5.0 from 184 reviews

Outlast Construction
(877) 278-9555 www.outlast-construction.com
2521 Miller Trunk Hwy Suite 1, Duluth, Minnesota
5.0 from 212 reviews

Peak Construction Roofing
(218) 728-8033 www.peakconstructionroofing.com
4120 Richard Ave Suite 400, Duluth, Minnesota
4.9 from 143 reviews
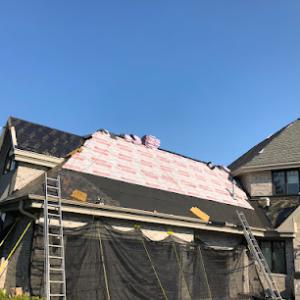
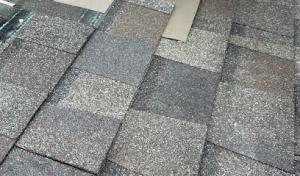
Asphalt shingles remain the dominant practical choice for Duluth, but seal-strip performance and brittleness matter more here because of cold-weather cycling and snow retention. In this climate, ice dam prevention starts at the shingle edge and underlayment, and every step of installation should be chosen with winter moisture control in mind. When selecting asphalt, look for products with enhanced seal strips and a weight appropriate for steep hillside homes where wind exposure and snow loading can be higher than average. Proper ventilation and a robust attic insulation strategy push the likelihood of ice dams down, even if the surface looks familiar.
For most homes, asphalt shingles offer a straightforward balance of curb appeal, service life, and repairability as winter communities contend with freezing and thawing cycles. In Duluth, cold-weather cycling amplifies brittleness in older seal strips, so choose shingles with proven wind uplift resistance and good adhesive performance in subzero temperatures. A careful installation matters: ensure adequate nailing zones on steep pitches, and verify that the underlayment provides a reliable barrier against meltwater that can refreeze at eaves. If a roof already carries heavy snow loads, confirm that the installation team accounts for snow retention at the eaves so meltwater can drain without backing up into the soffit or attic.
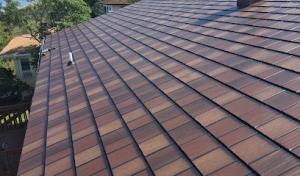
Metal roofing is especially relevant in a climate with heavy snow for its snow-shedding potential and long-winter durability. The surface sheds snow more reliably, which reduces ice dam risk at the roof line, but the system still needs thoughtful snow-management planning around entries, walkways, and lower roof sections. When selecting metal, pay attention to panel profiles and fastener choices that withstand repeated freeze-thaw cycles without losing seal. Consider enhanced edge details and integrated snow guards or barriers where expectations are for frequent, heavy snowfall. A precise, professional snow-management plan helps prevent snow from piling against doors, windows, or lower roof edges, which can create hazardous ice buildup.
Cedar, slate, concrete tile, and composite products face added scrutiny in this climate because weight, moisture retention, freeze-thaw movement, and specialized installation all matter more here. Cedar's organic materials absorb moisture, which can freeze and thaw repeatedly, stressing the fasteners and underlayment. Slate and concrete tile bring excellent durability, but the weight and the need for a structurally sound deck become more critical when snow loads are high. Composite products may offer improved moisture resistance, but still require careful fastening and appropriate underlayment to accommodate freeze-thaw cycles. In all these cases, ensure the roof structure can handle the load without compromising attic ventilation, and insist on installers with proven experience in cold-weather projects to avoid premature cracking or movement.
Duluth has a narrower roof replacement season than milder markets because cold temperatures arrive earlier and linger longer near Lake Superior. That same weather pattern affects window replacements as well. When you're replacing windows near the peak of winter, you'll want to plan for subfreezing work conditions, frost on traps and scaffolds, and limited daylight. Fall jobs carry extra scheduling pressure because temperature swings can affect installation conditions before winter weather shuts work down. It's common to see warm days followed by sudden cold snaps, which can complicate sealant curing and interior moisture management. Spring, meanwhile, is often when hidden winter damage appears, but thaw-season moisture can complicate tear-off timing and deck drying. Each transition period requires a tighter schedule and more careful moisture control.
Before tearing out the old panes or slides, inspect the roof edge and attic for signs of ice dams or lingering snow buildup that could complicate window work. Remove or shift snow away from the work area to reduce the risk of ice falling onto crews or newly installed flashing. Use weather boards and temporary barriers to keep wind-driven snow from seeping behind siding or trim where windows meet the wall. Inside, set up space heaters and dehumidification in a way that won't heat the glass excessively or drive rapid interior drying that can crack plaster or drywall. A dedicated plan for moisture management is essential when the outside temperature hovers around freezing, because the new sealants and flashing must cure without being stressed by alternating temperatures.
Look for units with low-emissivity coatings and coatings designed for cold climates to minimize condensation on interior surfaces. When you choose a replacement, consider how the window frame will interact with existing roof-to-wall flashings. If the opening touches an exterior roof plane near soffits, ask about integrating a drainage path or drip edge to direct any incidental moisture away from the interior framing. For steep hillside homes common in this region, ensure the window install plan accounts for snow drift patterns and wind exposure. Misalignment between the window head and the roof line can create thermal bridges or trapping areas for meltwater, which in turn heightens the risk of ice dam-related moisture intrusion.
During fall, schedule installation for days with longer daylight and milder predicted highs to avoid rapid curing near dusk. In spring, verify that the deck is completely dry before installing interior finishes; any residual moisture can slow sealant curing and invite later condensation. Crews should complete exterior flashing and roof edge integration first, then address the window ope ning. Use breathable roof underlayment and high-quality flashing tapes that remain flexible in cold temps. After installation, re-check the interior for any signs of condensation buildup and ensure that attic ventilation remains balanced to minimize warm, moist air reaching the cold window surfaces. This reduces the potential for future ice dam formation around newly replaced units.
Don't let upfront costs delay a critical repair - these contractors offer payment plans to fit your budget.
Duluth Roofing Company
(218) 727-8868 www.duluthroofing.com
4502 E Superior St, Duluth, Minnesota
4.8 from 72 reviews
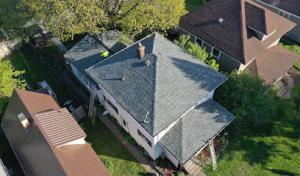
Ice dams, heavy snow loads, and the freeze-thaw cycle put extra stress on steep-hill homes. In this market, a replacement project isn't just about the material; it's about how the cold, wind, and ice complicate removal, insulation checks, and deck health. That means crews need to plan for longer staging, safer tear-off, and careful debris handling, all of which show up in the final bid. You'll notice winter damage surges and summer storm demand tighten contractor availability, affecting scheduling and pricing across the season.
Duluth's cold-climate labor window can raise pricing because crews have fewer ideal installation months to complete annual workloads. If your project stretches into shoulder seasons, expect tighter calendars and possibly higher daily rates to secure a crew. Scheduling with a firm start date and clear winter-weather contingency helps stabilize cost overruns. Communicate critical windows for ice dam mitigation and interior moisture checks early so a crew can allocate appropriate time without rush.
Steep-slope homes common in hillside neighborhoods demand extra safety gear, specialized fall protection, and more careful material handling. Racking and hoisting equipment must be set up on slopes, increasing labor hours and debris-control costs. Expect higher quotes if the roof line requires extensive temporary platforms or multiple lift passes for tear-off and installation. In these scenarios, crews may also need additional crew members for efficient staging, which nudges price upward compared to flatter, easier-to-access roofs.
Material selection remains a primary driver of overall cost. Asphalt shingles offer a lower entry point, while metal and slate deliver longer lifespans but higher upfront investment. Concrete tile and cedar shakes sit in between or above, depending on profile and installation complexity. The figures below reflect typical ranges per square (1 square = 100 square feet) for Duluth projects:
Begin with a cold-weather-ready plan: ensure attic insulation and ventilation are evaluated alongside roof replacement, so meltwater doesn't refreeze at the eaves. Build a contingency for potential weather-driven delays, especially when ice dam risk remains high through late winter into early spring. Ask for a detailed sequence from the contractor that shows tear-off, decking repair, underlayment, and final layer installation, including safety and debris removal steps. In this market, a clear, staged plan reduces surprises and helps keep the project on track when Duluth's demanding conditions press in.
Get a clear picture of your project costs upfront - no commitment required.

A full roof replacement in Duluth typically requires a building permit through the City of Duluth's Inspections/Permits office. The process is designed to align with the harsh winter conditions and hillside construction common to the area, where snow load and ice dam potential are top concerns. Before any shingle removal begins, you should file the permit application, provide project drawings or a scope of work, and confirm the anticipated start date with the city. The permit helps ensure that local code requirements for ventilation, drainage, and frost heave considerations are addressed from day one.
Duluth inspections are scheduled at key milestones during the project rather than handled informally at contractor discretion. Typical milestones include rough underlayment and flashing installation, mid-project health checks for attic ventilation and condensation control, and a final roof covering installation inspection. Plan ahead for these visits by coordinating with your contractor to set tentative windows, then confirm exact dates with the Inspections/Permits office. If weather creates delays, the city expects timely updates to keep the permit on track; a prolonged hold can require rescheduling and additional documentation.
A final inspection is required after completion in Duluth to verify the roof was installed properly before the permit process is closed out. The inspector will look for proper material transport and storage on site, correct underlayment installation for snow-prone seasons, and thorough sealing around eaves, valleys, and penetrations to reduce ice dam risk. Ensure access to the attic during the final check to confirm ventilation and insulation orientation meet code. Keep all receipts, product data sheets, and a concise summary of any deviations from the original plan ready for the inspector. Once the final approval is granted, the permit can be closed, leaving you with documented compliance for years of Duluth winters.
Minnesota's weather-driven claim environment affects Duluth homeowners directly because hail, wind, and heavy snow all create roof claim activity. On hillside homes with steep pitches, wind-driven debris and drifting snow routinely test flashing, seals, and gutter lines. Ice dams and freeze-thaw cycles push water under shingles, and carriers become conditioned to scrutinize whether damage is storm-related or simply wear from years of exposure. This reality means you should expect a more rigorous review process than you might anticipate for a routine annual roof check.
Carriers commonly want clear photo documentation, a contractor scope of work, and separation of pre-existing wear from recent storm damage on Duluth claims. Photos should cover the roof surface, edges, penetrations, and any interior staining or attic moisture that aligns with the claimed damage. A contractor scope of work helps frame what repairs or replacements are actually necessary, avoiding disputes over unrelated wear. In this market, a well-organized packet that clearly marks what is new versus what existed before can become the deciding factor in whether a claim progresses once the insurer reviews it.
Because Duluth roofs often show layered winter and summer damage, documentation timing matters when filing or supplementing a claim. Photos taken after the most recent freeze-thaw cycle, or after a notable storm, should be paired with a dated narrative describing how conditions changed since the prior inspection. If a claim is opened after a harsh season, keep a running log of weather events and any interim repairs. Insurers may request supplementary documentation, so having a precise timeline helps prevent gaps that could stall settlement or prompt unnecessary disputes.
Snow buildup and ice backup around skylights are a recurring concern in Duluth because roof penetrations interrupt drainage during long winters. The warm interior air that leaks near a skylight can melt a narrow channel through accumulating snow, creating hidden ice dams that push water inward. If you notice condensation, frost patterns, or a damp ceiling near a skylight after a storm, investigate the flashing and sealant around the curb. Look for gaps where the flashing meets the roofing material, and check the ridge cap above the skylight for wind-driven gaps. In practice, ensuring a tight seal and keeping the surrounding snow from piling up against the skylight edge reduces the risk of water migrating under shingles when ice seals back up.
Chimney flashing deserves extra attention on Duluth homes because freeze-thaw movement and prolonged snow contact can expose weak transitions. Each freeze-thaw cycle can widen micro-cracks in metal flashing or along the mortar joints, allowing water to creep beneath shingles even if the visible seam seems sound. Inspect flashing where it meets both the roof and the brick or stone of the chimney. Pay close attention to any staining, bulging, or loose mortar near the base, and remember that moisture can travel laterally under shingles before appearing as a ceiling stain far from the chimney itself. If flashing looks pitted or bent, or if the chimney cap shows rust and gaps, plan for targeted repairs before a thaw ends up with a larger leak.
Leak tracing in Duluth often requires checking whether water entered during ice dam backup rather than directly above the visible ceiling stain. Ice dam backup can push moisture laterally, so the area you see on the ceiling may be fed by a higher, colder section of the roof. Start by inspecting the attic for light leaks, insulation gaps, and condensation buildup near penetrations, then trace along the roof plane to identify ice dams during or after a storm. Don't overlook slow weeps that appear after warm periods when ice melts but refreezes at eaves. A careful, staged inspection helps avoid chasing phantom leaks and saves wall and ceiling areas from unseen damage.
Find contractors experienced in skylight installation, flashing, and leak repairs to bring natural light into your home.
Billings Roofing & Siding
(218) 940-8299 billingsroofingmn.com
5916 Sunny Ln, Duluth, Minnesota
5.0 from 184 reviews
Outlast Construction
(877) 278-9555 www.outlast-construction.com
2521 Miller Trunk Hwy Suite 1, Duluth, Minnesota
5.0 from 212 reviews
Duluth Roofing Company
(218) 727-8868 www.duluthroofing.com
4502 E Superior St, Duluth, Minnesota
4.8 from 72 reviews
Even in a steep-roof city like Duluth, low-slope sections over porches, additions, and garages are vulnerable because snow and meltwater linger longer there. Those flat or gently pitched planes can act like a sump during warming spells, letting standing water refreeze into stubborn ice. Inspect these zones after heavy snows and before spring thaws to spot pooled runoff and potential membrane wear. If you notice continuous wet spots or dark staining on the underside of attic eaves, focus your checks on these lower pockets.
Freeze-thaw ponding risk is more severe on low-slope roof areas where drainage slows during partial thaws and overnight refreezes. Water that sits at the edges or along transitions can freeze into ridges that push at flashing and joints. In Duluth's cycle of heavy snows and overnight cold snaps, every thaw followed by a freeze becomes a repeating stress test. Look for soft seams, blistering, or irregular ice dams forming along the eave line of these zones, and monitor the attic for sudden condensation indicators on calm, clear days.
Transitions between steep main roofs and lower attached sections are common leak points after heavy snow winters. Snow that slides off steeper planes can pile at the interface, raising meltwater pressure against improper seals. Pay special attention to step flashing, ridge-to-lower-seat junctures, and drainage scuppers at these transitions. Regularly re-bed and seal flashing where the main roof meets the low-slope addition, and verify that the low-slope membrane laps properly onto the higher plane.
After a storm, walk the perimeter with a flashlight to catch lifted shingles or torn sealants and any debris blocking gutters. Clear snow from overhangs carefully, avoiding as much direct impact as possible on softened ice. If a low-slope area shows persistent dampness or recurring ice buildup, arrange a professional inspection focusing on membrane integrity, flashing appeal, and drainage slope. In Duluth, small issues in these zones tend to escalate quickly with the next freeze-thaw cycle.
Find specialists in TPO, EPDM, and built-up flat roofing systems for residential and commercial properties.
Duluth Roofing Company
(218) 727-8868 www.duluthroofing.com
4502 E Superior St, Duluth, Minnesota
4.8 from 72 reviews
Because Duluth has strong demand for emergency repair and re-roofing, you should ask how quickly a contractor can stabilize leaks before the full replacement season opens. When a leak appears, prioritize a rapid temporary fix plan, clear expectations for weather delays, and the estimated window for permanent work. In this climate, freeze-thaw cycles and heavy snow events push a quick response from the first storm. Confirm who will be on site, and how interior spaces will be protected during a storm-driven repair. Also confirm what weather window they consider safe to work through and what contingencies if snow arrives mid-project.
Cleanup matters in the contractor market, especially on steep hillside homes and tight residential lots. Talk through how tear-off debris will be contained, where it will land, and how daily cleanups will be scheduled to avoid snow drift and yard debris accumulating near driveways. On sloped sites, discuss chute setups, tarps, and daily haul-away routines so winter melt does not undo progress. Agree on daily cleanup times and how snow removal will be coordinated during active work.
Long-established Duluth-area roofers may be especially valuable when coordinating permit closeout, weather delays, and post-winter callback work. In a busy market, veteran crews tend to communicate schedules clearly, respect winter-impacted timelines, and return for necessary follow-ups after the first major thaw. Seek references that confirm reliability under freeze-thaw stress and late-season storms. References should include recent projects with similar slope and wind conditions, plus notes on staying on schedule. Ask about their post-winter callback rate, and reliability guaranteed.