Last updated: Apr 19, 2026
Lake Superior's western edge shapes a unique roofing reality: lake-influenced cold, long snow seasons, and relentless freeze-thaw cycles. The result is a steady pressure on flashing, ventilation, and ice-dam resistance that can make even sturdy roofs fail when the weather shifts. A single strong melt or a rapid re-freeze can lock snow or meltwater behind imperfect seams, pushing leaks into attic spaces and into ceilings below. This is not theoretical risk here; it's a practical, repeatable pattern that reappears every winter and into the shoulder seasons. When you see wind-driven moisture piling against the eaves, you're watching the leading edge of a problem that demands early action.
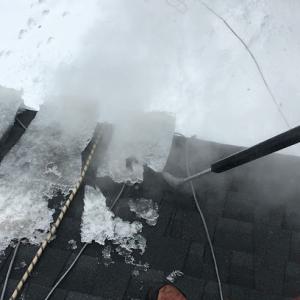
Ice dams form where warm attic air meets a cold roof deck, causing snow to melt and refreeze at the eaves. In this corner of the lake, that cycle happens more often and more aggressively, because prolonged snow cover and sharp temperature swings are the norm. Ice dams don't just look bad- they force melted water under shingles and into soffits, fascia, and interior ceilings. If left unchecked, they accelerate wood rot, gutter strain, and mold growth in attics and upper floors. The fastest path to reducing this risk is to ensure attic ventilation stays robust and continuous, so the roof deck remains cold along its entire span during winter, not just on paper. When you see icicles forming along the fascia or notice damp spots high on a wall, treat it as a warning sign and move urgently to address ventilation and airflow.
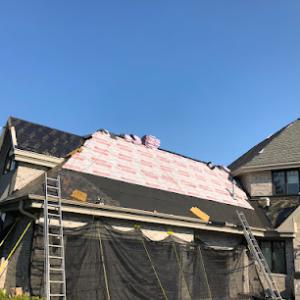
Superior's weather tests two roof systems at once: cooling lake winds and sun-scorched days in the shoulder seasons. The same components-ventilation and flashing-that resist wind-driven moisture are the parts most stressed by freeze-thaw cycles. Poor soffit intake, undersized attic vents, or gaps around flashing around chimneys and skylights create pressure points where ice dams can start. If flashing shows signs of lifting, or if attic hatches and soffits are not sealing properly, snow and ice will exploit those weaknesses. Immediate inspection of ridge vents, soffit balance, and step/counter flashing around roof protrusions becomes a safety-critical step as winter approaches. When these elements fail, the resulting leaks can creep a long way from the original damage zone before visible signs appear.
The roofing season in this region is compressed: full replacements most commonly occur from late spring through early fall, after winter safety risks fade and before the next cold blast. That timing matters because preventative work aimed at stopping ice dams and freeze-thaw damage often yields the best results when air and weather conditions are most favorable. Waiting until spring or next fall can mean letting small issues grow into big repairs, with higher risk of interior water intrusion during the next winter. If interior stains or musty attic odors appear after a heavy snowfall, treat it as a beacon of imminent failure and schedule targeted repairs without delay.
Start with a thorough attic inspection focused on insulation continuity and vent performance. Seal gaps around penetrations and ensure insulation is evenly distributed so warm air doesn't rise unchecked to the roof deck. Inspect flashing around chimneys, skylights, and vent pipes; reseal and reinforce as needed to prevent meltwater from finding its way under shingles. Clear snow from eaves after major storms to reduce dam formation, but avoid chiseling ice directly off the roof, which can damage shingles and flashing. If signs of ice buildup accumulate along the eaves, coordinate a professional assessment of the attic's ventilation balance and a flashing review before the next cold snap. Acting now protects against the most common Superior roof failures-before winter pressure compounds the cost and extent of repairs.
Spring and early summer bring a spike in hail and high winds that can disrupt scheduling and stretch the window for inspections. Frost cycles and rapid thawing intensify roof surface stress, especially on flashing, vents, and edge detailing. In this lake-crest region, you'll often see icicles forming along eaves late in the season followed by sudden thaw-funded moisture that freezes again at night. When a storm rolls through, gutters clog with shingle grit, and a few damaged shingles can become the first sign of a wind-driven issue. Expect inspections to swing from routine to urgent quickly, particularly after a weekend of windy showers.
Wisconsin claims in this market are commonly supported by photo documentation. After a hail or wind event, you'll want to photograph every visibly damaged area-shingles with bruising, granule loss in valleys, dented vents, and any lifted or displaced flashing. Document gutters and skylight seals as well, since storm damage often shows up there before it's obvious on the main roof plane. Adjusters closely evaluate the roof's age and pre-loss condition before approving storm-related work, so having a clear before-and-after set of photos helps establish that the damage is weather-driven and not merely wear and tear. If you've kept a seasonal maintenance log, pull it out; it can support a finding that pre-existing issues were not the primary cause of the current damage.
There is no statewide insurance pullback noted here, but claim volume can spike after hail events, which can lengthen inspection and repair timelines in the Superior area. Expect more time between the storm, the adjuster's first visit, and the start of work. Insurers may also send in additional specialists or schedule around lingering weather, snow leftovers, or county-wide demand. Plan for potential delays in preferred contractor availability, especially if the spring thaw stretches into early summer when many homeowners are chasing the same handful of reputable crews.
First, limit access to damaged roof areas to prevent secondary harm or injury. If you can safely reach the attic, check for signs of interior water intrusion-stains on ceilings or damp insulation-so you can report that quickly. Next, gather your photos while the damage is fresh; include dates from your camera or phone to establish a clear timeline. Contact your insurer promptly to initiate the claim and request guidance on preferred vendors or inspection scheduling. When the adjuster arrives, provide the pre-loss condition photos and any maintenance records you have, so they can differentiate new damage from existing wear.
Seek a contractor who understands the unique stresses of Lake Superior weather: ice dam resistance, reinforcing underlayment for freeze-thaw cycles, and wind-resistant flashing details. Ask for references from homeowners with similar roof types and exposure. If you have a storm-damaged area, coordinate with your insurer on the scope of repair to avoid surprises and ensure the work aligns with the expected extent of loss. Clear communication about timelines and weather windows helps keep the project moving, even when spring storms push schedules back.
Find local contractors experienced in assessing and restoring roofs after hail, wind, and severe weather events.
Twin Ports Built
(218) 866-7663 twinportsbuilt.com
3215 Tower Ave #101, Superior, Wisconsin
4.5 from 33 reviews

Twin Ports Built
(218) 866-7663 twinportsbuilt.com
3215 Tower Ave #101, Superior, Wisconsin
4.5 from 33 reviews
Looking for a new roof? Have storm damage and need help filing an insurance claim? You've come to the right place. We are the area's cleanest roofing crew, and offer the most competitive prices, warranties and materials. We offer free Insurance Claims Assistance, too! Whether you need an estimate for a new roof, a repair or a free roofing inspection - Give Twin Ports Built a call! We also offer financing on any sized project! Zero money down, two years same as cash!
Superior Roofing Company
(218) 248-6060 superior-roofing-company.com
Serving
5.0 from 58 reviews
Superior Roofing with 16 years dedicated to excellence in providing luxury level service to every customer. We Specialize In luxury Metal, Cedar, and slate for the best customers around With a team of seasoned professionals, cutting-edge technology, and expert customer satisfaction. SRC is a stand alone option for Specialty Roofing! Talk soon
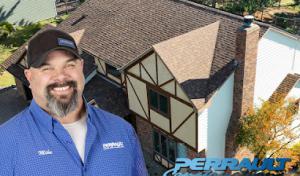
Perrault Construction
(218) 723-8477 perraultconstruction.com
Serving
4.3 from 100 reviews
Perrault Construction specializes in roofing, decks, windows, and siding in Duluth, Minnesota. With over 50 years of experience, our dedicated Duluth Roofing and home improvement team ensures quality service and customer satisfaction. As Duluth's trusted home improvement contractor, located in Lincoln Park and serving Lakeside, Central Hillside, and beyond, we focus on delivering peace of mind for all your renovation projects. Contact us today to learn how we can enhance your home!
Duluth Ice Dam Removal
(218) 349-2684 duluthicedam.com
Serving
5.0 from 8 reviews
Duluth Ice Dam Removal provides ice dam removal services to Duluth, MN; Iron Range, North West Wisconsin, and the surrounding areas.
North Shore Roofing & Contracting
(218) 576-9427 northshoreroofingandcontracting.com
Serving
5.0 from 8 reviews
I started North Shore Roofing and Contracting so I could pursue a career in the field I am most passionate about - construction with an emphasis on roofing systems. Whether you need an emergency tarp to cover a hole in your roof, are interested in a full re-roof, or have another building project to tackle, I am dedicated to preforming the highest quality work at a competitive price. I pride myself on turning your large complicated project into a hassle free experience.
Empire Roofing
(218) 960-7308 www.empireroofingmn.com
Serving
4.6 from 217 reviews
Empire Roofing is the leading Roofing Company in Duluth, MN & the surrounding areas. We proudly offer Roof Repair & Replacement in Duluth, MN! Get in touch with us if you need a Roofer. Since we first opened our doors in 1999, we have been dedicated to serving our customers with prompt, quality service, as we fully understand this is the best way to succeed as a local expert in the community. Contact us if you are looking for a "Roofing Contractor near me". We are constantly learning and staying active in the roofing community, as we believe that keeping our customers informed and sharing our knowledge is key! Book now for your free 20 point inspection & consultation!
Peak Construction Roofing
(218) 728-8033 www.peakconstructionroofing.com
Serving
4.9 from 143 reviews
Since 2011, Peak Construction Roofing as been the trusted choice for roofing services, proudly serving as the only Owens Corning Platinum Contractor in the area. Our commitment to exceptional service and quality craftsmanship ensures your home is protected with the best roofing solutions available

Outlast Construction
(877) 278-9555 www.outlast-construction.com
Serving
5.0 from 212 reviews
Outlast Construction provides roofing services in the MN, ND, WI and IN areas.
Rhino Roofing
(218) 724-7663 rhinoroofer.com
Serving
4.8 from 115 reviews
Rhino Roofing, a leading roofing company and construction specialist, specializes in providing top-quality roofing and siding services to the Hermantown, MN, area. Whether you're in need of comprehensive roofing solutions, including metal and traditional materials, or looking to enhance your home with new siding, our team has the expertise and dedication to deliver exceptional results. With a focus on using the best materials and systems in the construction industry, Rhino Roofing ensures your home improvement project in Hermantown, MN, not only meets but surpasses your expectations. Choose Rhino Roofing, the roofing company that truly cares about its customers and the community it serves.
Duluth Roofing Company
(218) 727-8868 www.duluthroofing.com
Serving
4.8 from 72 reviews
Since 2008, Duluth Roofing is the go-to roofing company for the greater Iron Range and Duluth, MN area. Whether it's tear-off and re-roofing, new construction, flat rubber roofing, or any other roofing needs, we've got you covered. As certified experts, we specialize in various roofing types, including asphalt shingles, cedar shake and shingle, slate and synthetic slate, and EPDM rubber. We offer enhanced manufacturers warranties and back our work with our own Workmanship Guarantee, ensuring peace of mind for our customers. In addition, we offer green roofing options and grass roofs for those seeking eco-friendly solutions. Let us prove how our licensed, bonded, certified, and insured professionals can provide your long-term roofing needs.

Breeze Construction
(218) 340-8720 www.breezeconstructioncompany.com
Serving
4.6 from 10 reviews
When it comes to Aluminum Siding, Shingle Roofing, Metal Roofing, and more, no one compares to Breeze Construction With years of combined experience, Breeze Construction has worked hard to build the trust of our clients in Duluth and surrounding areas. Visit our website to learn more or better yet, call us today!

Billings Roofing & Siding
(218) 940-8299 billingsroofingmn.com
Serving
5.0 from 184 reviews
Welcome to Billings Roofing & Siding, your premier provider of roofing and siding services in Duluth, MN, and the surrounding areas. With a dedication to excellence and customer satisfaction, Billings Roofing & Siding offers comprehensive solutions to meet all your residential and commercial exterior improvement needs. At Billings Roofing & Siding, we understand the importance of a reliable roof and durable siding when it comes to safeguarding your property and enhancing its aesthetic appeal. We are proud to prioritize professionalism, integrity, and customer satisfaction. Contact us today to schedule a consultation and experience the superior service! Let us elevate the beauty, value, and protection of your property.
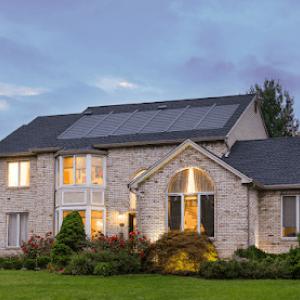
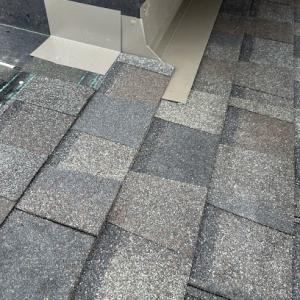
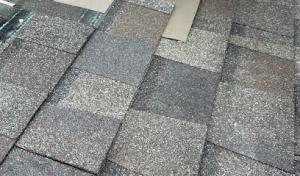
Asphalt shingles and metal roofing are the dominant practical choices for homes around the lake, with tile and slate existing as selective options but carrying higher risk due to winter loading and installation complexity. In this climate, the shingles or panels you choose should work in tandem with a robust flashing plan and an attic ventilation strategy. Metal roofs, while less common in the overall stock, stand out for their durability against wind-driven moisture and freeze-thaw cycles, especially when installed with appropriate underlayment and attic vents. The decision often comes down to how the material behaves under snow load, how quickly it sheds moisture, and how the surrounding roof structure handles heavier seasonal demands.
Heavy snow accumulation and repeated freeze-thaw cycling magnify the importance of flashing details and a well-designed underlayment system. In Superior, a high-quality underlayment that resists ice and wind-driven moisture provides a critical first line of defense where eaves and valleys are most exposed. Ventilation plays a pivotal role: adequate intake and exhaust provide an indoor environment that minimizes condensation and reduces ice-dam risk. When choosing asphalt shingles, prioritize those with good granule retention and a factory-applied seal that holds up under repeated freezes. For metal roofing, ensure the installation accounts for thermal movement and roof-to-wall transitions, as improper fastening or sealant choices can create vulnerable seams during rapid temperature swings.
Summer heat and humidity can influence asphalt shingle performance during installation windows, so planning work for cooler, dry days helps avoid premature damage. Metal roofing remains a notable specialty among local contractors, often favored for its longevity and performance in severe weather, but installation quality matters just as much as the product itself. In all cases, ensure the roof deck, underlayment, and flashing are matched to the chosen material, because the local stressors-lake wind, snow load, and freeze-thaw cycles-collectively tax the roof assembly more than the material alone would suggest. A careful panel or shingle layout that optimizes snow shedding while preserving venting paths pays dividends over decades.
Maintenance should focus on keeping flashings watertight, clearing snow from key drainage paths, and inspecting for ice dams after heavy snows begin to recede. Material choice informs some maintenance routines, but the bigger factor remains proper installation and ongoing ventilation. Regular attic checks help catch signs of moisture intrusion early, and targeted inspections after freeze-thaw periods reveal where flashing or underlayment might be failing. With Superior's weather regime, a proactive approach to maintenance reduces the risk of sudden failure during the deepest winter months and keeps your roof performing reliably through the seasons.
When you price a re-roof, you'll notice material costs dominate early decisions. In this market, typical pricing runs about $350 to $600 per square for asphalt shingles, $700 to $1100 for metal, $1500 to $2800 for clay tile, $900 to $1900 for concrete tile, $1800 to $3200 for slate, and $450 to $750 for fiber cement shingles. Those ranges reflect the local supply chain, transport from regional mills, and the demand you'll see after big lake storms. If your house uses odd roof shapes, turrets, or vented skylights, expect that to nudge you toward the higher end of the range because material handling and waste rise accordingly.
Costs in Superior can rise when short seasonal work windows, storm-driven demand spikes, and winter-related tear-off complications compress contractor availability. If a snow-heavy stretch overlaps with a late-fall start or an early-spring finish, crews may charge a premium for rapid mobilization or overtime. In practice, you'll see bids tighten as weather windows shrink, and delays can cascade into higher subcontractor costs. Plan for a weather-aware schedule and be prepared to shift materials or crews to avoid costly holdovers or re-shipment fees.
A full re-roof usually involves code-related checks around ventilation and flashing, and those corrections can affect the final project price. If existing ventilation is undersized or flashing components are degraded, expect extra material and labor to bring the roof up to current performance standards for ice dam resistance and wind uplift. You'll generally see higher totals when your project requires extensive detailing around eaves, rake edges, and penetrations to deter wind-driven moisture and freeze-thaw damage near Lake Superior. Consider upgrading underlayment and ice/water shield in vulnerable zones to reduce long-term risk, even if the upfront cost rises.
Don't let upfront costs delay a critical repair - these contractors offer payment plans to fit your budget.
Twin Ports Built
(218) 866-7663 twinportsbuilt.com
3215 Tower Ave #101, Superior, Wisconsin
4.5 from 33 reviews
A full re-roof project in Superior usually requires a building permit handled through the City of Superior building department. Before any tear-off begins, verify the need for a permit with the local office and secure a permit number. This initial step keeps you aligned with the city's expectations for weather-related stress factors-ice dams, heavy snow loads, and freeze-thaw cycles-that your roof must withstand.
The local process typically involves application, plan review, approval, installation, and then an inspection before final sign-off. When you apply, expect to provide a concise scope of work, roof type, underlayment strategy, and venting approach. Plan reviews in our climate place extra emphasis on effective ventilation, proper flashing around hips, valleys, chimneys, and parapets, plus details for accommodating ice-dam resistance. Have a clear sequence of roof replacement steps and a ventilation plan, since these elements are scrutinized to prevent short-term failures after winter cycles.
Approval often hinges on meeting current code requirements and detailing how flashing will integrate with existing structures, including venting and ice-dam prevention measures. If a contractor plans to install metal edges, kick-out flashing, or ice-and-water shield, these details should be specified in the submittal package. Coordinate with the install crew to ensure work aligns with the approved drawings and the city's expectations for material usage, fasteners, and attachment methods that stand up to Superior's wind-driven moisture.
During installation, the city may perform inspections at defined milestones. Inspections verify proper ventilation, flashing, and compliance with local code requirements rather than treating roofing as a no-review replacement. Expect an interim inspection to confirm underlayment, nail patterns, and flashing around vents and chimneys before covering with shingles or other roofing. If changes occur on-site, communicate promptly with the building department so adjustments can be reviewed before proceeding.
A successful final inspection yields sign-off from the building department, granting occupancy or project completion status. Retain the final inspection report and any permit amendments with your home records, as future maintenance or resale may reference the permit history and the observed standards for ventilation, flashing integrity, and ice-dam resistance.
In this Wisconsin market, homeowners strengthen roofing claims by documenting damage with clear photos taken as soon as conditions are safe. Capture wide shots to show context, and close-ups of warped flashing, damaged fascia, and missing shingles. Don't skip the attic view if there's interior signs of leaks or ice dam backflow, and note any fallen branches or debris that may have stressed the roof deck. Consistent timestamps on photos help your insurer see how quickly conditions changed after a storm. Keep a running log of dates and notable events, especially during long snow seasons when freeze-thaw cycles intensify wear on water barriers. In Superior-area conditions, emphasizing the contrast between new shingles and areas showing prior aging can strengthen the case that current damage is from the most recent event, not preexisting wear.
Adjusters commonly assess both storm damage and the existing roof's age and condition, which can affect whether repairs or full replacement are supported. Make sure to note prior repairs, granule loss, and any sagging or uneven sections that might influence the scope of work. Provide documentation from a reputable local contractor who can attest to the roof's overall health and how the recent damage fits into its expected life. Clear, organized evidence-photos, moisture readings, and a concise description of observed issues-helps prevent disputes over preexisting conditions and coverage limits.
Because hail-related claim activity can surge seasonally, prompt documentation and timely inspection requests matter more than waiting for peak contractor demand to pass. Schedule a prompt inspection after the storm, and submit photos and notes to your insurer without delay. Having a documented sequence of events, especially during the lake-facing exposure that amplifies wind-driven moisture, reduces the chance that crucial damage gets overlooked or misinterpreted. In Superior, fast action aligns with how adjusters weigh both current damage and the roof's remaining service life.
In the snow-heavy climate that surrounds the lake, skylights and chimneys become higher-risk leak points when snow and ice linger around flashing details. Freeze-thaw cycles can cause the flashing to flex and crack, allowing meltwater to work its way into roof joints that may look sealed from a distance. When a thick blanket of snow stalls meltwater near these openings, a small misalignment or gap can turn into a moisture trap that pushes water into the attic or ceiling after a warm day.
During re-roofing in Superior, a sharp focus on flashing around every penetration is essential. Local inspection emphasis on flashing makes these transition areas especially important. Cold snaps can reveal missed weeps or poorly seated shingle tabs quickly, and wind-driven moisture can force damp air right at the seams where skylights meet the roof. A thorough inspection of left-behind nailing blocks, step flashing, and the boot around chimneys is a practical defense against future leaks rather than a reactive fix after a thaw.
Rapid seasonal transitions in Superior can create moisture problems if openings are left exposed during active work. When crews pause for weather swings, snow and ice can settle and refreeze around flashing, stretching seals and opening gaps. If a skylight or chimney is temporarily uncased, even for a day, meltwater can creep into unsealed seams and freeze again, widening the damage. The best approach is to schedule work so flashing is securely sealed before the first heavy melt, and to verify that vent channels and kickout connections stay clear through the thaw.
Ask for a careful test for leaks around every penetration once the roof is dry and fully resurfaced. Inspectors should run water along the flashing edges with the roof cold to confirm seals hold under freeze-thaw stress. Confirm that ice and water shield coverage extends properly under any skylight curb and that counter-flashing is properly integrated with the vent flashing. A neighbor's eye can spot mismatches or gaps before they become costly repairs.
Find contractors experienced in skylight installation, flashing, and leak repairs to bring natural light into your home.

Superior's short prime roofing season means workmanship quality during a narrow installation window has outsized impact on long-term roof performance. When temperatures swing from below freezing to above freezing in rapid cycles, sealants, underlayment, and fasteners must be handled with precision to avoid premature ice-dam buildup and thaw-crack stress. If the crew is rushed, exposed edges, improper nailing patterns, or missed step flashing can leave vulnerable gaps that frost shifts promptly reveal.
Because local inspections focus on ventilation and flashing, warranty value in Superior is closely tied to whether those cold-climate details are installed correctly the first time. A warranty offered with a premium on performance often hinges on evidence of a complete, properly integrated ridge vent, soffit intake, and correctly over-flashed penetrations around vent pipes and chimneys. Ask for a detailed photoset or on-site checklist showing these components before and after the job, and ensure the contractor commits to a dry-in that protects underlayment during the handful of cold snaps that can occur early in the season.
Several contractors in this market advertise warranties, making post-installation coverage a meaningful comparison point for homeowners. Look for transferability, the duration of coverage on materials versus workmanship, and explicit exclusions related to freeze-thaw cycles and wind-driven moisture. A robust warranty should specify inspection timelines after installation and a clear process for addressing ice-dam related failures, including ice-shield performance and flashing repairs without the need for costly second mobilizations during a tight window.