Last updated: Apr 19, 2026
In this inland Piedmont corner of North Carolina, the rhythm of roof work is driven by heat, humidity, and rain more than coastal salt exposure or snow. Summers bring strong humidity and periodic downpours, while year-round rainfall creates continuous moisture challenges that can impact tear-off and dry-in times. The texture of the older neighborhoods mixed with newer homes means some roofs hold up differently under the same weather pattern, so a realistic plan accounts for age, deck condition, and underlayment exposure. Think of spring as a respite from peak heat and fall as a window that often offers clearer conditions before the next storm surge.
Spring and fall emerge as the most workable seasons locally. In spring, temperatures are mild enough to ease adhesive curing and shingle performance while rainfall is less relentless than midsummer, reducing the risk of fast-drying mistakes or wind-driven moisture during installation. Fall brings cooler days and typically drier spells that help crews complete tear-off and dry-in before winter moisture returns. The goal is to avoid prolonged exposure to hot, humid days that can soften underlayment and complicate sealant behavior, as well as the late-summer swing of tropical remnants that can disrupt consecutive days of work.
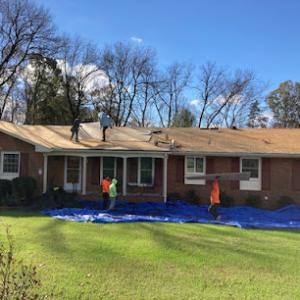
Late summer and early fall bring hurricane-season delays even this far inland. Wind-driven rain from tropical systems can extend tear-off, slow the dry-in process, or leave underlayment exposed longer than ideal. If a tropical system stirs up, crews may need to pause mid-project to secure tarps and prevent blow-off risk, then resume once conditions stabilize. That means a typical project timeline can shift suddenly, and a plan that assumes two or three good-weather days in a row needs a built-in contingency for an extra wet day or two.
When planning, map the roof around UV exposure and moisture load, noting which sections show older decking or faster wear. If spring looks promising, coordinate an early start so the crew can work through periods of moderate rainfall and finish before the peak of the rainy season. In fall, target a window after the hottest weeks but before cool, wet mornings become frequent. Have contingencies for late-season storms by keeping access paths clear, securing nearby landscaping, and ensuring materials can be staged in a sheltered spot. For homes with shallow ceilings or flat-lying parapets, aim to complete the dry-in before the first cold snap to avoid prolonged moisture exposure that can irritate plywood and felt.
Discuss an alternate plan with the contractor that prioritizes an accelerated tear-off in dry slots and a cautious dry-in during intermittent rain. Prepare the attic and interior for possible moisture exposure if the underlayment must stay uncovered longer than planned. Ensure gutters and downspouts are cleared ahead of any roof work to minimize water intrusion around the eaves. Finally, coordinate with the crew to align start times with favorable morning weather, so a late-afternoon shower doesn't force a rushed closeout. This neighborhood experiences a distinct blend of heat, rain, and late-summer storms; tailoring the project to that rhythm will protect the roof and the home without sacrificing quality.
In Reidsville's hot, humid summers, attic ventilation and moisture control are often as important as the roof covering itself because trapped heat and humidity accelerate shingle aging and can promote deck moisture issues. If soffit vents, ridge vents, or gable vents aren't functioning or sized correctly for the attic's footprint, you'll see accelerated granule loss, warped decking, and faster wear on the underlayment. The result isn't just a hotter attic; it can shorten the life of even a well-chosen shingles installation. Before deciding on replacement, check whether existing vents are clean, unblocked by insulation, and properly balanced for the attic's square footage. An oversized or undersized system leads to stagnant air and condensation that compromises fast-drying during any work stop.
Year-round rainfall in the Reidsville area increases the importance of fast dry-in practices during replacement and careful flashing work around penetrations and wall intersections. A wet-in during a rain spell can trap humidity under new underlayment, inviting hidden mold growth and wood rot that won't reveal itself until cycles of heat return. When scheduling a roof replacement, coordinate with dry windows and plan for moisture management around any roof penetrations-vents, chimneys, skylights, and HVAC boots. Ensure flashing around walls and transitions is reinforced so that moisture doesn't migrate into attic cavities or along the fascia. Thoughtful detailing around these areas pays off in lower risk of leaks as the roof ages through multiple storms.
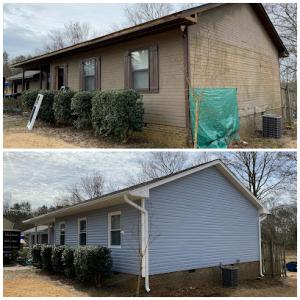
Mild winters mean roofs here often age from long-term moisture cycling and summer heat exposure rather than from repeated heavy snow loads or prolonged ice conditions. That pattern makes every season a test: high humidity in summer drives adhesive and sealant brittleness if products aren't chosen for prolonged heat exposure; winter nights can trap dampness if ventilation isn't pulling moisture away from the deck. Look for signs that the roof deck remains damp after rain, or that staining and dark spots appear on sheathing after dry spells. Addressing these early-before shingles deteriorate-helps prevent accelerated aging in a climate where dry cycles are the norm, not the exception.
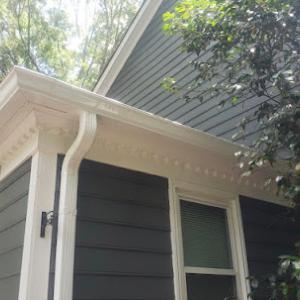
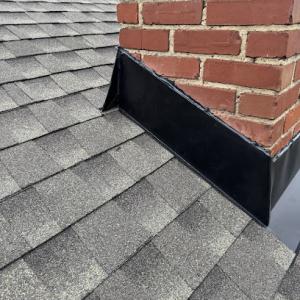
Around penetrations and wall intersections, flashing is the first line of defense against water intrusion. In this market, flashing must accommodate hot, humid air moving through cavities and frequent storm-driven gusts. If you notice loose or corroded metal, uplift on edges, or sections where sealant has peeled away, the risk of leaks climbs quickly during a heavy rain event. Proper flashing around chimneys, vents, and sidewall joints requires careful corner detailing, adequate sealant compatibility, and continuous clean lines to shed water away from fasteners and seams. A proactive approach here is not about a cosmetic fix; it's about maintaining a watertight envelope that endures the region's moisture-heavy cycles.
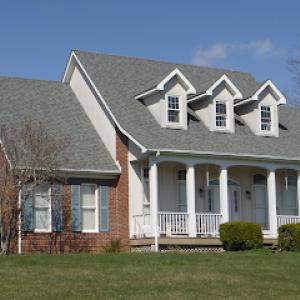
Asphalt shingles remain the practical default for most homes in this area because they match the common residential stock and are straightforward to replace after wind and rain events. In the humid Piedmont climate, shingles handle the year-round moisture without adding excessive weight or complexity to the existing structure. They are easier to install quickly after a storm and generally offer a reliable balance of performance, availability, and service life for typical Reidsville rooflines. When selecting asphalt, look for architectural or laminated options that provide better wind resistance and a thicker nailing area to withstand the spray from tropical-storm remnants and driving rain. A well-sealed edge and continuous valley protection are worth prioritizing on homes with frequent summer downpours.
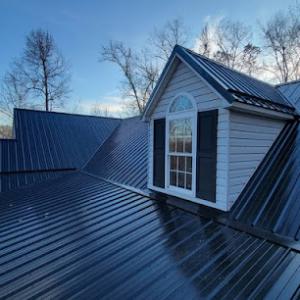
Metal roofing is especially relevant for homeowners who want aggressive rain shedding and durability during tropical-storm remnants. In this climate, metal can perform well under heavy rain, and its fast install can be a practical choice after wind or hail events. Details matter here: proper underlayment, a solid installer with experience in wind-driven rain, and careful fastening patterns to resist uplift are essential. Metal panels should be installed with sealed seams and integrated drip edges to reduce the risk of moisture intrusion during the late-summer thunderstorm season. If a home already has a lightweight structure or shallow roof pitches, confirm the deck's ability to support the added weight and consider a roofing profile that minimizes water entrapment in low-slope areas. Maintenance should include periodic inspection of fasteners and lookouts for corrosion, especially along coastal-adjacent flash points if the property sits near extended wind exposure.
Clay tile and concrete tile appear more selectively in this region and demand closer review of structural support, labor availability, and ongoing inspection attention. Clay tiles are heavy and can crack more easily under hail or flying debris from tropical-storm winds, while concrete tiles are heavier still and benefit from a reinforced roof deck. If considering these materials, verify that the existing framing can sustain the extra load and that the underside of the roof has adequate ventilation to prevent moisture buildup under tile overlays. Tilted, well-supported installations with proper underlayment can deliver long service life and a distinctive aesthetic, but these homes often require specialized crews who understand tile-to-wall transitions, ridge venting specifics, and gutters designed to handle debris from frequent storms. Budgeting for more frequent inspections is practical because tiny cracks or loosened fasteners can become bigger issues after a humid, wind-driven storm.
Wood shingles and shakes offer a traditional look but demand careful consideration in this climate. They are more vulnerable to moisture-related deterioration and require regular maintenance, especially in areas with persistent humidity and strong rain events. If choosing wood, select pressure-treated or decay-resistant varieties and ensure a ventilation strategy that promotes drying beneath the roof surface. Fire resistance should also be weighed, particularly in neighborhoods with older roofs transitioning to newer materials. In practice, wood tends to be found in older homes or in architectural revivals where the visual character is a priority, rather than as a first-choice replacement for high-traffic storm zones.
Slate delivers exceptional longevity and a refined appearance, but it comes with heightened structural demands. This material is best suited for homes with robust roof decks and access to skilled labor for stone-cut installation and precise fastening. In the Reidsville market, slate is typically chosen where the underlying structure is already reinforced and where a roofer with slate experience can ensure sound underlayment and long-term performance. Regular inspections for cracked tiles, flashing integrity, and ridge stability are important to preserve a slate roof's resilience during wet summer months and tropical-storm passages.
In this inland Piedmont spot, local pricing shifts with the calendar. The spring and fall sweet spots see the strongest demand as homeowners dodge the heat and wetter stretches of summer. Scheduling a replacement or major repair during these shoulder seasons tends to keep crews available and price pressure lower than the peak storms that arrive later. If you can plan ahead and lock in a fall project, you're more likely to encounter calmer lead times and better material availability, especially for mid-range shingles and metal options.
Storm-driven demand spikes can hit after tropical systems or severe spring weather move through Rockingham County and surrounding areas. When a storm passes, crews often race to meet a surge of jobs, which can push out lead times and nudge up prices, even for common roof types. In practice, this means a plan that anticipates potential weather windows helps avoid premium-rate rush jobs. If a storm is forecast, consider postponing non-critical work until the lull after the system.
Higher-end materials such as slate, clay tile, and certain metal systems cost more locally. The reason isn't just the material itself but the limited pool of specialized installation crews in smaller inland markets like this one. Asphalt shingles remain the most economical and most readily available option, with typical per-square costs ranging across the low to mid range of the spectrum. When choosing premium materials, expect not only higher upfront material costs but potentially longer bids and scheduling windows as qualified crews align on availability.
Planning early, aligning with the fall window, and factoring in storm-season volatility can help stabilize costs and timeline projections for your project.

Provision Roofing & Exteriors
(336) 347-0743 provisionroofingexteriors.com
129 Club House Rd, Reidsville, North Carolina
5.0 from 33 reviews
Quality affordable roofing and home renovations.
Competitive Edge Metal Roofing
(336) 504-2776 ncmetalroofs.com
135 Betty Lou Ln, Reidsville, North Carolina
4.8 from 82 reviews
Metal roofing installation at affordable pricing. Excellent warranties, quality and experience. We provide metal roofs at a fraction of the cost of our larger competitors, in fact we guarantee to beat our competitions prices.
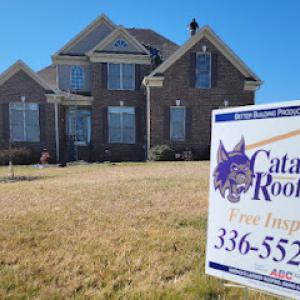
Catamount Roofing
(336) 552-9663 www.catamountroofing.com
Serving
5.0 from 86 reviews
Catamount Roofing was established to provide our customers with a new roof at the highest quality installation, a reasonable cost and most importantly stand behind our work. We specialize in hail and wind damaged roof replacement. We help you through the process from initial inspection, claim process, installation and post installation. Customer service is our priority. Let us earn your business!
Shock & Awe Construction
Serving
5.0 from 104 reviews
Shock And Awe Construction, led by Jackie and Holly Duncan, leverages 20 years of experience in residential and commercial roofing to provide Ridgeway, VA with quality craftsmanship at competitive rates.
Well Done Roofing
(336) 905-0476 www.welldoneroofingofnc.com
Serving
4.9 from 43 reviews
As a homeowner, you know how important it is to have a dependable roofing contractor you can trust for any installation and repair needs you may have. For those in the Piedmont Triad area, turn to Well Done Roofing in High Point, NC. Known for their professional, high-quality services, you can depend on their team to deliver superior results at affordable prices. Since 1999, this local roofing contractor has provided homeowners with reliable solutions. Count on them for your installation and repair needs, regardless of whether your home has a rubber roofing system, metal roofing, or asphalt shingles.
RUSO Installations
(336) 455-2735 sites.google.com
Serving
5.0 from 44 reviews
At RUSO Installations we pride ourselves on providing top-quality installation services for replacement windows, seamless gutters and roofing products in Greensboro, NC & surrounding areas. The team at RUSO Installations understands that having new windows, gutters or roof installed in your home can be a big investment and we’ll work tirelessly to make sure that our customers are completely satisfied with the end result. We understand that every home is unique, therefore we take the time to carefully measure and assess each project before starting work. This ensures that the installation process goes smoothly and that the end result is a seamless fit that looks and functions flawlessly.
RNT Roofing & Construction
(336) 901-8101 www.rntroofing.com
Serving
5.0 from 20 reviews
At RNT Roofing & Construction we specialize in Metal & Shingle Roofing, Gutters, Windows, Doors, Fences, Decks, Concrete & More. We are a Full Service, Licensed Contractor. Our company motto is "No job too big, or small. We do them all!" Give us a call anytime at.
North Carolina Roofing & Gutter Company
(336) 684-8470 www.northcarolinaguttersandroofingcompany.com
Serving
4.9 from 108 reviews
Discover excellence in roofing and gutter solutions with our family-owned business in central North Carolina. From seamless gutter installations to roof replacements and repairs, we're your trusted local experts. Led by John Davis, our dedicated team prioritizes quality work and personalized service. Experience the difference today – contact us for a free estimate on your next project, whether residential or commercial. BBB Accredited Business!
Maen Roofing
(336) 285-6200 www.maenroofing.com
Serving
4.9 from 152 reviews
We are a locally owned North Carolina company providing professional roofing installation, repair, and maintenance for both residential and commercial properties. Our team also specializes in gutters, siding, carpentry, and remodeling. With top-quality materials, competitive pricing, and exceptional service, we are dedicated to protecting and enhancing your property from the ground up.

All About Roofing
(336) 729-2586 www.allaboutroofing.net
Serving
4.7 from 234 reviews
Since 1984, All About Roofing has been providing quality roofing systems for Greensboro, NC, Burlington, NC, Eden, NC and surrounding areas. Our Greensboro, NC roofing contractors provide quality roofing products and first-class craftsmanship. All About Roofing is factory trained and certified to provide good advice about roofing & chimney products and procedures, to help educate you so you can choose what is best for your needs.
Carolina Elite Roofing
(336) 223-4476 carolinaeliteroofing.com
Serving
5.0 from 37 reviews
Roofing is our passion! Located in the heart of Greensboro, we specialize in roof replacements, installations, and repairs. For any roof project, you can have confidence and peace of mind when you choose your trusted partner in roofing, Carolina Elite Roofing!
AF Roofing Solutions
(336) 823-0437 afroofingsolutions.com
Serving
4.8 from 75 reviews
AF Roofing Solutions is a locally owned and operated roofing contractor that understands that a roof is the protector of everything below it! Choosing the right roofing contractor for your next project is a serious determination. You want a contractor with experience, a proven track record, and the integrity and skill to get the job done right, the first time. AF Roofing Solutions is just the roofing contractor you need!
A full residential re-roof in this area typically requires a permit rather than being treated as a no-paperwork maintenance item. Before any tear-off or installation begins, you'll want the contractor to check with the local building department to confirm the scope and required documents. In practice, the permit process helps ensure the new roof system ties properly to existing structures, flashings, and ventilation, which matters when the roof line crosses older sections with different underlayments or attic configurations. Expect the permit to be driven by the contractor's plan set, including material choices, roof slope notes, and any structural considerations that might affect framing or deck stability.
The local department generally issues the permit after the contractor submits project details, then schedules inspections at key milestones. An initial inspection typically happens during tear-off or early installation, to verify that underlayment, drip edge, and ventilation strategies meet code requirements and are compatible with the intended roof system. A final inspection follows completion to confirm that flashing, hips and ridges, and any premium components are installed correctly and that the roof aligns with local weather-resistant material standards. Plan around these visits so the site remains accessible, with the contractor ready to demonstrate compliance on any nonstandard assemblies or venting configurations that may trigger extra review.
Material-specific or wind-mitigation quirks may receive added attention on premium systems or nonstandard assemblies. In this inland Piedmont climate, tropical-storm wind rain is a realistic concern, so inspectors often focus on securing fastener patterns, wind-rated underlayment, and edge details on higher wind exposure zones. If a premium system is installed, expect documentation of fastener types, sealant choices, and any specialized flashing at transitions (like skylights, chimneys, or vent pipes). The emphasis is on durability against wind-driven rain and the integrity of moisture barriers, particularly around eaves, rakes, and roof-to-wall junctions.
Because Reidsville experiences humid rain and late-summer tropical-storm risk, the timing of a re-roof matters for both permitting and inspections. Start planning well ahead of the peak storm season to avoid weather-induced delays. The permit timeline can be influenced by which materials are chosen (as some assemblies require additional approvals) and by how quickly the contractor can schedule inspections around weather windows. Coordinating inspection dates with anticipated project milestones helps minimize exposure to wet conditions and ensures the system is fully assessed before the next storm season.
Keep a clear line of communication between you, the contractor, and the building department. Save all permit numbers, inspection dates, and any correspondence about exceptions or added requirements for nonstandard or premium assemblies. If a wind-rated roof is planned, gather product data, installation manuals, and any wind-resistance certificates to present at inspections. This organized approach reduces back-and-forth and supports smoother approval as the project progresses toward a compliant, resilient roof finish.
North Carolina's insurance environment has tightened enough that you should expect closer scrutiny of roof age, material type, and maintenance history when renewing coverage or filing storm claims. In a town where homes range from older neighborhoods to newer suburban roofs, insurers are looking for clear evidence that the roof has been cared for and that the chosen material aligns with expected performance in a humid Piedmont climate. The outcome can hinge on showing a consistent track record rather than a single repair receipt, so understand that your roof's age and condition will be weighed carefully when underwriting decisions are made.
Because this area is storm-exposed without being coastal, insurers may focus heavily on documentation of wind and rain damage from spring storms and tropical systems rather than obvious salt or surge-related loss. A roof that has weathered several humid seasons may have minor issues that are easy to overlook but are meaningful to a claims adjuster, such as lifted shingles, granule loss, or aging flashing. The emphasis is practical: can the claim tell a coherent story of recent events and the roof's ability to withstand the next round of storms? The clearer that story, the smoother the process.
Prompt photo documentation, dated repair records, and fast claim reporting are especially important locally as carriers in North Carolina have shown rate pressure and stricter underwriting in storm-prone portfolios. Have a current inventory of vulnerable spots, a simple timeline of repairs, and timestamped photos before and after any work. Keep repair receipts and contractor notes organized, and report damage promptly after a rain or wind event. A concise, well-documented file can ease comparisons when insurers review whether the roof age or material choice affects coverage decisions in the wake of a storm.
Reidsville's mix of older in-town housing and newer subdivisions means tear-offs can reveal very different deck conditions, with older homes more likely to need substrate repairs once layers are removed. When you lift shingles on an older roof, expect the underlying decking and rafters to tell a different story than a newer home. This isn't purely cosmetic-uneven board folio, soft spots, and knotty decking may emerge quickly once the surface comes off. Plan for a careful inspection of every section, not just the worst-looking spot.
Homes that have gone through many humid summers and repeated rain exposure in the area may show hidden sheathing deterioration even when leaks were not obvious from inside. A roof may appear sound from the attic reveals, yet lose strength at multiple edges or joints once exposed to air once the layers are removed. Expect some degree of delamination or warped boards behind the current layout, especially around hips and valleys where water tends to pool. Treat any suspect area as a potential problem rather than a minor flaw.
Premium replacements on older homes need extra attention to whether the existing structure can properly support heavier materials such as slate, clay tile, or concrete tile. The roof deck, support members, and anchorage must be assessed for the load change. In some cases, structural upgrades or reinforcement are necessary before a heavier roof goes on. If the attic floor shows more than typical deflection or beam sag, this is a signal to pause and confirm load-bearing capacity before selecting a premium finish.
When planning, coordinate a deck inspection with the full roof assessment, focusing on existing substrate condition and potential need for reinforcement. If gaps or soft spots are found, budget for deck repairs and reinforcement alongside the tear-off plan. For older homes, treat the substrate as the primary driver of material choice, not the cosmetic appeal of a new surface. In town, where many properties differ in age and construction, a thoughtful, site-specific plan reduces the risk of unforeseen deck-related failures after a replacement.