Last updated: Apr 19, 2026
Spring storms and hail shape the roof calendar here in the foothills along the James. When the season turns, you're watching for sudden downpours that can hammer shingles, loosen granules, and force emergency inspections. That weather pattern also stacks the schedule: crews get bogged down chasing storm-damaged drives and missed inspection windows, and replacement work slips further behind. If your roof shows signs of wear after a heavy spring, you're not just dealing with the damage-you're also facing a tight, storm-driven timetable that can push timelines into hot stretches or unexpected delays.
Lynchburg's spring delivery of heavy rain and hail carries a real risk of new leaks between the moment you notice damage and when a crew can secure materials and approvals. Hail can punch through shingles and dent metal panels, creating hidden damage that only shows up once a roof is opened for inspection. Property owners should plan for a faster-than-typical decision window after a hail event: a quick assessment, a candid talk with the contractor about tarping and temporary protection, and a target to lock in a replacement slot before the next storm front moves in. The pace of inspections tends to lag behind storms, so the risk isn't just the damage-it's a backlog that can push critical tasks into the next weather window.
Hot, humid summers in this area slow installation and make asphalt shingle handling a challenge during peak afternoon heat. You'll see crews stagger work hours to avoid the worst of the sun, but that can stretch a project longer than you expect. If you're planning a reroof during July or August, expect slower progress and tighter scheduling around daily heat peaks. You may also face more interruptions from heat-related safety checks and material handling constraints. The practical takeaway: coordinate with your contractor to establish a firm daily ramp-up and finish times, and consider scheduling critical steps, like tear-off and underlayment, for early morning windows when temperatures are friendlier.
Cold winters with freeze-thaw cycles complicate tear-off, underlayment drying, and deck condition assessment on reroof projects. Frozen or damp decking makes it harder to pull nails cleanly, assess substrate integrity, and achieve a solid dry-in. Frozen mornings can stall progress, while thaw cycles create moisture risk that pushes crews to pause and re-check. If a project runs into late fall or early winter, you'll want a clear plan for temporary weather protection, accelerated assessments of deck condition, and a ready path to resume once temperatures cooperate. The risk isn't just snow and ice; it's the way cold snaps compress scheduling into tight, unreliable windows.
You should monitor local storm forecasts closely in late winter and early spring, and contact a trusted roofer to map out a preferred window that avoids peak storm bands. Have a readiness checklist for hail damage, including prompt interior checks for leaks, clear access to the roof, and a plan to secure protective tarps if a storm is imminent. When summer arrives, confirm daily work-hour expectations and material handling strategies to stay on track. In winter, pre-arrange a rapid-start protocol: pre-season decking checks, moisture assessment, and a contingency plan to resume immediately after a thaw. Your goal is a firm, weather-aware timeline that minimizes exposure to backlogs and weather-induced setbacks.
On the steep terrain and hillside neighborhoods with views toward the James River, runoff pathing matters more than in flatter parts of the state. Water that travels down slope meets foundations, crawlspaces, and lower elevations with less room to shed away. Every intersection of roofline, gutter, and ground slope can become a focal point for erosion, pooling, or moisture intrusion if drainage isn't directing water safely away from the home.
Lynchburg's hillsides push water toward lower elevations quickly during storms. That means the roof's edge, fascia, and gutter discharge points consistently act as the first line of defense against foundation moisture. If gutters aren't sized and mounted to handle heavy rain events, water can spill over into vulnerable areas near planters, sidewalks, or crawlspace vents. Downspouts should be positioned to move water away from the base of the foundation and toward established drainage paths, not toward slope depressions where water can pool against the base of walls.
In homes with multiple roof levels or dormers, runoff can meet at complex valleys and intersections. Those assemblies become potential leak pathways if not properly flashed and sealed. The steeper the roof, the greater the urgency to maintain clean valleys and unblocked discharge routes. Debris buildup in screening and downspouts compounds risk after several wet days.
Regular rainfall makes flashing transitions and valley joints more consequential. Valleys are common sticking points where two roof planes join; they collect leaf litter and sediment from hillside landscapes. If valley flashings aren't continuous and robust, persistent wet periods can lead to slow seepage or sudden leaks at vulnerable joints. Downspouts should terminate in a way that directs flow toward drainage paths rather than toward walkways or staircases where water can splash onto siding or foundations.
Gutter discharge points deserve extra attention: ensure splash blocks or grading direct water away from footings and toward established drainage channels. Neighbors with mature landscaping may notice accelerated soil movement near the foundation if runoff isn't properly directed, especially after heavy spring rains.
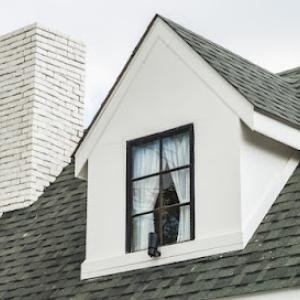
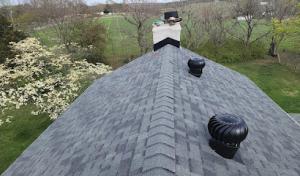
Older homes with established neighborhoods often feature intricate rooflines, chimneys, and dormers. These intersections are common leak-prone zones, especially during prolonged wet spells. Pay particular attention to flashing around chimneys, sidewall flashings where dormers meet the main roof, and step-flashings at transitions to masonry or siding. Regularly inspect for missing or damaged sealant, worn shingles at edges, and clogged vent areas that can trap moisture under roofing materials.
Seasonal inspections should target drainage performance first: verify that gutters are clear, downspouts extend away from the foundation, and discharge points are unobstructed. After storms, walk the roof edge to check for lifted shingles, loose flashings, or displaced valley materials. If a roof has multiple levels or prominent chimneys, consider a focused annual review of flashing integrity around those features and an evaluation of slope-driven runoff paths to catch issues before moisture encroaches.

Sentry Exteriors
(434) 239-6722 sentryexteriors.com
21835 Timberlake Rd, Lynchburg, Virginia
5.0 from 180 reviews
Helping Local Homeowners with Their Siding, Roofing, and More for Nearly 30 Years. We Provide Free Estimates and Financing for Qualified Customers. Contact Us to Learn More.
Cenvar Roofing - Lynchburg
(434) 231-6831 www.cenvarroofing.com
493 Crowell Ln, Lynchburg, Virginia
4.9 from 819 reviews
We are one of the most sought-after residential Lynchburg roofing contractors. Since we opened in 2012, we have served thousands of members of the Lynchburg, VA community. We prioritize customer satisfaction above everything and this is evident throughout each step of the process, from conception to completion. If you are in need of roofing services, schedule a free estimate appointment. We would be happy to serve you!
BTB Construction
22667 Timberlake Rd, Lynchburg, Virginia
4.9 from 147 reviews
BTB Construction is one of the best roofing companies in Lynchburg, VA and have been serving the local residents for 29 years. If you are looking for a local Lynchburg roofers for your residential and commercial roofing contractor repair and installation then look no further and contact BTB Construction for top-quality home improvement service to the Lynchburg, VA and the Surrounding Areas.
Earth Right Roofing
(434) 248-3697 earthrightroofing.com
52 Beechwood Dr, Lynchburg, Virginia
5.0 from 30 reviews
Residential roofing contractor
Miller Roofing
(434) 237-0341 www.millerroofinglynchburg.com
Lynchburg, Virginia
4.9 from 35 reviews
Protect your largest investment with our reliable roofing services. We are a locally owned and operated roofing company currently serving Lynchburg, VA and surrounding communities, also in Franklin County. If you want to make your roof last as long as possible, it is vital that you never put off a roof repair. Small issues with roofing become big issues in a hurry. No matter how major or minor the repair you need, we are here to help. We offer roofing contracting, roof installation, and roofing repair.

VHI Construction
(434) 363-8446 vhiconstruction.com
3000 Old Forest Rd # A, Lynchburg, Virginia
5.0 from 20 reviews
VHI Construction is your trusted local expert for roofing, siding, gutters, and home improvement services. We deliver high-quality craftsmanship, fast turnaround times, and outstanding customer service. Licensed and insured, we specialize in roof repairs, replacements, siding upgrades, and gutter installations for residential properties. Our team uses premium materials and follows the highest industry standards to protect and enhance your property. With transparent pricing, clear communication, and a commitment to excellence, VHI Construction is a leading name in reliable exterior construction. Contact us today for a free estimate!
McCarty Roofing
(434) 845-3219 mccartyroofing.net
3920 Campbell Ave, Lynchburg, Virginia
5.0 from 20 reviews
McCarty Roofing offers commercial and residential roofing services in the central Virginia area. We specialize in standing seam metal roofing, slate and cedar shake roofing, custom sheet metal work, and low-slope single-ply roofing. With over 50 years of combined experience we work with builders, property owners/managers, and homeowners to solve even the most challenging roof-related issues.
James R Jessie Roofing
(434) 316-2174 www.gottrust.org
244 Twin Oak Dr, Lynchburg, Virginia
4.8 from 25 reviews
James R. Jessie Roofing has been in business for over 26 years. Servicing Lynchburg, Virginia and surrounding areas. Free estimates and no deposit needed. Payment taken when job is completed. Financing Available!! Credit Cards Accepted.
All Phase Roofing & Construction
(434) 616-4992 allphaseroofingandconstruction.com
1525 12th St, Lynchburg, Virginia
4.6 from 51 reviews
All Phase Roofing and Construction is one of the top roofing contractors in Lynchburg, Virginia. We offer both residential and commercial roofing and construction services. We have been offering roofing and roof repair, windows, and general construction throughout Central Virginia since 2008. We are licensed and insured with a combined 47 years of experience and we are considered "honest roofers" by our clients. Integrity is important to us, which is why we offer free estimates and we always stand by our work.
Melvin T Morgan Roofing
(800) 249-0358 melvintmorgan.com
503 Old Plantation Dr, Lynchburg, Virginia
4.4 from 42 reviews
Melvin T. Morgan Roofing is a trusted roofing contractor in Lynchburg, VA, providing professional roofing services for residential and commercial properties. With years of hands-on experience, we specialize in roof replacement, roof repairs, new roof installation, and storm damage roofing services using high-quality materials and proven workmanship. We proudly serve homeowners and businesses throughout Lynchburg, Forest, Madison Heights, and surrounding Central Virginia areas. Whether you need emergency roof repair, leak detection, or a full roofing system replacement, our team is committed to dependable service, honest pricing, and long-lasting results. 📞 Contact Melvin T. Morgan Roofing today for reliable roofing services in Lynchburg,
Top Dog Pro Exteriors
(434) 535-1649 www.topdogproexteriors.com
114 Tradewynd Dr Suite 206, Lynchburg, Virginia
5.0 from 5 reviews
Top Dog Pro Exteriors is a locally owned exterior remodeling company based in Lynchburg, VA. We provide expert roofing services including roof replacement, architectural shingles, and metal roofing, as well as gutters, vinyl siding, soffits, fascia, decks, porches, and pergolas. Our team is known for quality craftsmanship, fair pricing, and dependable service. We proudly serve Lynchburg and surrounding areas of Central Virginia, including Bedford, Amherst, Nelson County, Appomattox, Chatham, and the Smith Mountain Lake area. Contact us today for a free consultation.
Forests Siding
(336) 564-5717 www.forestssidingllc.com
Lynchburg, Virginia
5.0 from 2 reviews
At Forests Siding, we are more than just a contractor – we are your partners in enhancing the integrity and beauty of your property. With over 15 years of industry experience, we have earned a reputation for delivering roofing, siding, and exterior solutions that stand the test of time. Our team of skilled professionals is driven by a passion for excellence and a commitment to exceeding your expectations. We believe in crafting solutions that not only protect your property but also elevate its aesthetics. From precise siding installations to intricate roofing repairs, every project we undertake reflects our dedication to quality, innovation, and unwavering customer satisfaction.
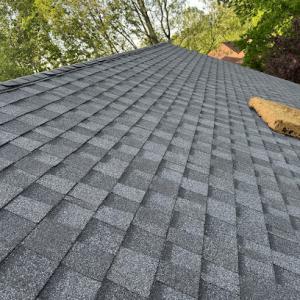
Asphalt shingles dominate the local roofing scene, and for good reason: they're familiar to many homeowners and come in a wide range of styles. Here in Lynchburg, the hot, humid summers and regular rainfall mean ventilation, algae resistance, and shingle heat exposure are especially important. Look for bundles and strata that emphasize proper attic ventilation, integrated or compatible underlayment, and higher algae-resistance ratings to keep roofs looking clean through the misty, damp months. When selecting asphalt, consider laminated or architectural shingles with reflective granules to help deflect heat, and confirm that the product has a durable warranty against algae growth common in humid seasons. Compatibility with existing soffit venting and ridge vents matters, since poor airflow can accelerate wear on shingles exposed to full sun and humidity.
Metal stands out in the local market for the way it sheds rain quickly and handles temperature swings between humid summers and cool winters. If a replacement or upgrade is on the horizon, metal can be a strong match for steep-slope homes with ample overhangs or architectural details that benefit from clean lines and long service life. In practice, you'll want to choose a metal profile with good wind resistance and a coating that holds up to the James River's seasonal moisture. Access to attic space for vapor management remains key, as with any roof, but metal's inherent durability under moisture and its fast shedding behavior align well with Lynchburg's wet months. For homes with historic character, there are metal options that mimic traditional textures while delivering modern performance; these can blend with existing materials on older neighborhoods without looking out of place.
Slate, clay tile, concrete tile, and wood products appear in the Lynchburg market, which matters because the city includes older and higher-character housing stock where heavier or specialty materials may already be present. Slate and concrete or clay tiles bring a sense of permanence and can tolerate freeze-thaw cycles if properly installed with appropriate underlayment and ventilation. Heavier materials require careful roof framing assessment and more robust supports, so a professional inspection is essential before planning a switch from lighter options. Wood shingles or shakes offer a distinctive look that fits many hillside neighborhoods, but they demand meticulous maintenance to resist moisture-induced swelling and mold in humid seasons. In any case, weight, compatibility with existing roof framing, and long-term moisture management should guide material choice, especially on older homes with unique roof lines or steep pitches.
Storm timing matters here: plan replacements during stable weather windows to minimize exposure to rapid temperature shifts and heavy downpours. Consider the roof's seasonality and potential for algae bloom when you schedule. A well-ventilated, moisture-aware system-whether asphalt with strong venting, metal with reliable seam and coating integrity, or a heavy tile option-helps protect the entire structure through Lynchburg's humid cycles and the accompanying freeze-thaw stress. For any heavier or specialty material, verify compatibility with the home's existing framing and surrounding landscape to maintain a balanced, durable roof well-suited to this hill country climate.
In this area, typical Lynchburg material pricing runs about $350-$650 per square for asphalt shingles, $600-$1100 for metal, $900-$1600 for clay tile, $800-$1400 for concrete tile, $600-$1000 for wood shingles or shakes, and $1200-$1900 for slate. Asphalt remains the most common option on the older hillsides and newer neighborhoods where storm activity doesn't push the project out of reach. If your roof is steep or has a complex footprint, expect the square-footage price to edge toward the higher end of the range due to extra time and materials like additional underlayment or drip edge.
Costs in Lynchburg can rise on steep-slope homes and older houses where tear-off reveals deck repairs, ventilation updates, or flashing work around chimneys and complex roof geometry. A full replacement on one of these structures may involve more labor, more waste disposal, and more precision flashing to protect the masonry below. To plan accurately, factor in square footage, the need for ventilation improvements, and potential chimney flashing work when you're evaluating bids. If the deck or rafter structure shows signs of wear, add a contingency for structural or insulation updates that commonly show up after a tear-off.
Storm-driven demand spikes after spring hail or autumn wind events can tighten scheduling in Lynchburg and affect labor availability for full reroofs. If a hailstorm rolls through, you may see a rush of urgent bids, expedited tear-offs, and offered emergency start times. In the months following a major storm, consider locking in a contractor with a clear timeline and a written sequence of work, so your project isn't left hanging during peak demand. If timing is flexible, you can often secure better material selections and labor terms in the late spring or late fall windows when crews aren't racing full-tilt to catch storm-driven delays.
Get a clear picture of your project costs upfront - no commitment required.
Sentry Exteriors
(434) 239-6722 sentryexteriors.com
21835 Timberlake Rd, Lynchburg, Virginia
5.0 from 180 reviews
Cenvar Roofing - Lynchburg
(434) 231-6831 www.cenvarroofing.com
493 Crowell Ln, Lynchburg, Virginia
4.9 from 819 reviews
VHI Construction
(434) 363-8446 vhiconstruction.com
3000 Old Forest Rd # A, Lynchburg, Virginia
5.0 from 20 reviews
When planning a full reroof, a permit is typically required through the City of Lynchburg Department of Community Development. Starting without a permit can lead to stop-work orders, penalties, and complications when you try to sell or insure the home later. Before a single shingle is removed, your contractor should confirm the permit path, and you should have a clear plan in hand to avoid delays that can stretch into the middle of storm season.
In this city, inspections are generally scheduled after installation and at final. This means the work should be completed to a point where inspectors can verify the roof deck, flashing, and membrane are properly installed, and that the finished roof meets code. Be prepared for the possibility of added review if the project involves structural changes or ventilation modifications. If a crew proposes to alter attic airflow, or to add or relocate vents, be aware that this can trigger a second round of scrutiny. Planning for those extra checks can prevent surprises that sidetrack your project and push the timetable further into bad weather.
Ventilation is a frequent source of follow-up questions in this area, where humid summers and winter freeze-thaw cycles stress roofs. If the scope includes ridge, soffit, or other attic ventilation alterations, confirm upfront with the permit office and your contractor whether these changes require additional inspection steps. In practice, that means you should have a clear, written plan for any changes to attic spaces, including ridge vent installations or soffit intake adjustments. Without this clarity, you risk a delay or a partial rejection during final review.
Begin by contacting the City of Lynchburg Department of Community Development early in the planning process to verify permit needs for your exact roof type and span. Have your contractor submit the permit application with a detailed scope of work, including any ventilation changes. Schedule the rough inspection once the roof deck is ready and the underlayment is in place, then plan for the final inspection after all work is completed. If any structural or ventilation modifications are contemplated, document notes, designs, and calculations so inspectors can review without backtracking. Finally, keep all permit numbers and inspector contact information accessible in the event questions arise during the project or at the time of final approval.
Virginia's homeowners insurance environment includes periodic wind and hail claims, and Lynchburg homeowners should expect roof losses to be reviewed closely during active storm periods. The combination of humid summers, sudden downpours, and spring hail means insurers scrutinize every inch of the roof, attic, and exterior walls when a claim is filed. Steep-slope roofs common on the city's older hillsides can reveal hidden damage after a storm, and that damage may not be obvious from ground level.
Insurers serving Lynchburg may require detailed photo documentation, roof condition reports, and on-site adjuster review when storm damage is reported. Gather clear before-and-after images from multiple angles, including close-ups of shingles, flashing, ridge lines, vents, and any granule loss. Create a simple, dated log of storm events and note any accompanying hail or wind reports from local sources. On-site adjusters will want to see the roof in its current state, not after hastily applied temporary fixes, so accurate records matter.
Because spring storms and hail are a known Lynchburg risk, homeowners should document damage promptly and preserve evidence before temporary repairs alter the roof's condition. If safe to do so, avoid large temporary patches that could mask true condition or mislead an adjuster. Do not remove damaged shingles unnecessarily; instead, photograph and note their location and extent. When scheduling any inspection or temporary repair, communicate clearly with the insurer to ensure the work won't inadvertently affect claim outcomes.
In quiet neighborhoods with mature trees and clay and shingle roofs, regular maintenance becomes part of a wise claim strategy. Keep a current inventory of roof materials, flashings, and vent configurations, and share that with your adjuster if a storm arrives. If a claim is filed, coordinate promptly with both the insurer and a trusted local contractor who understands the city's weather patterns and roof styles.
Connect with contractors who help homeowners navigate the claims process from damage assessment to final approval.

BTB Construction
22667 Timberlake Rd, Lynchburg, Virginia
4.9 from 147 reviews
Earth Right Roofing
(434) 248-3697 earthrightroofing.com
52 Beechwood Dr, Lynchburg, Virginia
5.0 from 30 reviews
VHI Construction
(434) 363-8446 vhiconstruction.com
3000 Old Forest Rd # A, Lynchburg, Virginia
5.0 from 20 reviews
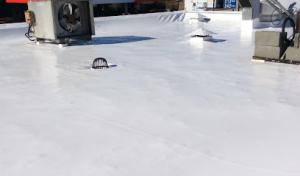
Even though steep-slope residential roofing dominates the area, the local contractor market shows enough flat-roof specialization to indicate recurring low-slope issues on additions, porches, and mixed-use structures. When a lower section ties into a steep main roof, the transition is a common failure point. Look for mismatched flashing, undersized drainage, and lingering ponding water after heavy rains. In Lynchburg's climate, those problems accelerate wear on membranes and edge details. When planning repairs, prioritize the transition zones first, and verify that the ridge line of the main roof and the parapet of the low-slope addition are vertically aligned with proper drain paths.
Lynchburg's regular rainfall makes skylight curbs, flashing edges, and low-slope transitions especially sensitive to installation quality. Skylight boots and curb flashings should sit flush to plywood and rise above any potential water flow path. In older neighborhoods with mixed rooftops, skylights are often perched near a seam where a low-slope section meets a steeper roof. Inspect for hairline cracks in the curb, deteriorated sealant, and rust on metal flashings. If a leak shows up near a skylight after a heavy rain, check the curb sealant first, then the drip edge and backer rod around the curb. Ensure flashing extends a sufficient distance onto the steeper roof to shed water properly.
Homes with later additions in older neighborhoods often combine original steep roofs with lower-slope sections that age differently and may need separate repair strategies. Dormer joists, flashing pans, and chimney-to-roof transitions often receive uneven sun and water exposure, leading to differential movement. Schedule inspections to verify that the deck membrane under the low-slope area remains intact and that the drip edge along both roof planes remains continuous. When elevations change abruptly, use step flashing that is independent of the main roof's flashing to reduce failure risk. Regular checks after heavy rainfall help catch issues before leaks travel into attic space.
Find specialists in TPO, EPDM, and built-up flat roofing systems for residential and commercial properties.
McCarty Roofing
(434) 845-3219 mccartyroofing.net
3920 Campbell Ave, Lynchburg, Virginia
5.0 from 20 reviews

All Phase Roofing & Construction
(434) 616-4992 allphaseroofingandconstruction.com
1525 12th St, Lynchburg, Virginia
4.6 from 51 reviews
In Lynchburg, storms arrive with little warning and the market rewards crews who can mobilize fast. That speed helps reduce ongoing exposure to weather, but it also raises risk if the scope isn't clearly defined. When you talk to bidders, push for a written scope that includes tear-off, underlayment, shingle or panel installation, ventilation, and a line-by-line cleanup plan. Clarify who coordinates any discarded deck or fascia work and who handles follow-up touchups after the job.
Contractors here frequently work on occupied homes rather than pristine new builds, so ask how often the crew routinely handles reroofs on lived-in properties. You want a team that understands working around shrubs, landscaping, and daily family activity. A reliable crew will map minor disruptions, locate safe entry points, and keep the house functioning during replacement windows without turning your home into a construction zone.
Cleanup is a prominent local hiring priority because many Lynchburg neighborhoods sit on sloped streets or narrow driveways. Debris control isn't just about leaving a neat yard; it reduces risk for neighbors and protects landscaping. Look for specifics: tarps or magnetic sweeps at day's end, containment of debris near driveways, and a plan for protecting the lawn and garden beds. Confirm how waste gets hauled off and where scrap material is stored during the project.
Ask for recent project photos and client references, focusing on comparable homes and weather-related challenges. Request a clear schedule with start and end dates, daily site cleanliness expectations, and how weather delays are handled. A trustworthy crew will provide a written contract, designate a single point of contact, and perform a site walk to confirm all exposed areas and potential access points before work begins.